1
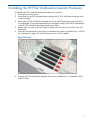
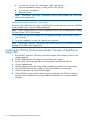
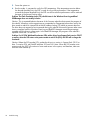
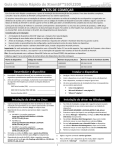
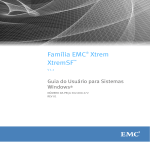
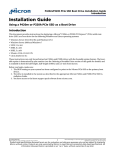
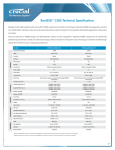
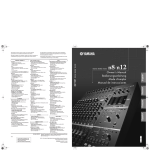
HP PCIe Workload Accelerator HHHL SSD
Installation Guide
HP PCIe Workload Accelerator Half-Height,
Half-Length NAND Flash SSD
Abstract
his document describes how to install an HP PCIe Workload Accelerator half-height, half-length (HHHL) PCIe NAND Flash SSD
into a host system
HP Part Number: 727351-001
Published: February 2013
Edition: 1
© Copyright 1999, 2013 Hewlett Packard Inc.
Confidential computer software. Valid license from HP required for possession, use or copying. Consistent with FAR 12.211 and 12.212, Commercial
Computer Software, Computer Software Documentation, and Technical Data for Commercial Items are licensed to the U.S. Government under
vendor's standard commercial license.
The information contained herein is subject to change without notice. The only warranties for HP products and services are set forth in the express
warranty statements accompanying such products and services. Nothing herein should be construed as constituting an additional warranty. HP shall
not be liable for technical or editorial errors or omissions contained herein.
Contents
1 Introduction...............................................................................................4
HP PCIe Workload Accelerator Overview....................................................................................4
System Recommendations.....................................................................................................6
Hardware Recommendations.................................................................................................6
Supported Operating Systems and Software............................................................................6
Software Requirements.........................................................................................................7
2 Components Provided by HP........................................................................8
Hardware................................................................................................................................8
Software..................................................................................................................................8
3 Installing the HP PCIe Workload Accelerator Hardware...................................9
4 Installing the HP PCIe Workload Accelerator Software...................................11
Prerequisites...........................................................................................................................11
Installing the HP PCIe Workload Accelerator Support Pack......................................................11
Installing the HP PCIe Workload Accelerator Support Pack on a Windows System......................11
Updating the Device Driver (New or Existing Installation)....................................................12
Installing the HP PCIe Workload Accelerator Support Pack on a Linux System............................12
Installing the HP PCIe Workload Accelerator Driver for RHEL 5.5, 5.6, 5.7, and 5.8..............12
Installing the HP PCIe Workload Accelerator Driver for RHEL 6.1 and 6.2.............................13
Installing the HP PCIe Workload Accelerator Driver for SLES 11...........................................13
Installing the HPWAM Software on a Linux System........................................................14
Updating the HP PCIe Workload Accelerator Firmware Unified Binary Image (UBI).........................14
5
6
7
8
Verifying the Installation............................................................................15
Troubleshooting........................................................................................16
LED Codes..............................................................................................19
References...............................................................................................20
Contents
3
1 Introduction
This document describes how to install an HP PCIe Workload Accelerator half-height, half-length
(HHHL) PCIe NAND Flash SSD into a host system and complete the required steps to get the drive
into a functional state. Additional documentation is referenced as needed.
This document provides:
•
An overview of the HP PCIe Workload Accelerator HHHL form factor SSD
•
A description of the software and hardware provided by HP
•
System recommendations
•
Device installation
•
Support pack installation
•
Installation verification steps
•
Troubleshooting steps
•
A description of LED codes
HP PCIe Workload Accelerator Overview
The HP PCIe Workload Accelerator solid state drive (SSD) is a PCI Express® (PCIe) Gen
2-compatible drive that conforms to the PCIe Card Electromechanical (CEM) specification version
2.0, section 6.1 (low profile add-in card size). This is also called the half-height, half-length (HHHL)
form factor. The HP PCIe Workload Accelerator HHHL drive is available in two capacities: 350GB
and 700GB. Both options have the same HHHL form factor and support a x8 link width and PCIe
Gen 2-compatible motherboard slot.
The HP PCIe Workload Accelerator HHHL card is shown in the following figures:
4
Introduction
Figure 1 HP PCIe Workload Accelerator HHHL card (Component side)
Figure 2 HP PCIe Workload Accelerator HHHL card (Solder Side)
HP PCIe Workload Accelerator Overview
5
A total of 64 NAND placements are on the drive. The 350GB drive has four NAND die per
package and the 700GB drive has eight NAND die per package. NAND are placed on both the
component and solder sides of the drive along with the component and solder sides of two daughter
boards as shown in Figure 1 (page 5) and Figure 2 (page 5).
Figure 1 (page 5) shows the drive’s LEDs. The state of these LEDs, such as color and blinking
pattern, convey important information about the drive’s status and behavior. For a description of
the LED codes, see “LED Codes” (page 19).
System Recommendations
To help achieve optimal performance for the HP PCIe Workload Accelerator, review the system
recommendations listed below. Italics indicate a hardware requirement.
Hardware Recommendations
The following table lists system hardware platform recommendations for using the HP PCIe Workload
Accelerator, except where specifically noted.
Table 1
Category
Description
Requirements
System
Type, BIOS
• Enterprise server class systems with
Intel® Tylersburg, Sandy Bridge, or
later class chipset motherboards are
recommended.
• “Performance” optimized legacy or
UEFI BIOS.
• “Performance” optimized legacy or
UEFI BIOS.
Processor
CPU type, cores, and cache size
• 64-bit processors are required.
• Single, dual, or higher number of
processors can be used.
• Intel® Xeon™ (Nehalem-EP) or better
processor with four or more
cores/processor.
• 12MB local cache is recommended.
• Processors with clock speeds greater
than 3GHz are recommended for
best performance.
Memory
System RAM
A minimum of 6GB DRAM is
recommended.
Chipset
Type
An Intel 5520 or later generation
chipset is recommended.
Slots
Type, speed, and link width
• A PCIe, Gen 2 speed, x8 link width
slot is required
• A PCIe Gen 1 slot can be used, but
drive performance will be impacted.
Power requirements
Slot power consumption and external • Slots must be at least 25W
supply
compatible PCIe.
• No external power connection is
required for the P320h drive.
Supported Operating Systems and Software
6
•
Microsoft Windows® Server 2008 R2 SP1 (x86-64)
•
Microsoft Windows Server 2008 R2 SP1 Hyper-V (x86-64)
Introduction
•
Microsoft Windows Server 2012 (x86-64) SP128
•
Microsoft Windows Server 2012 Hyper-V (x64)
•
Microsoft Windows 7 (x64)
•
Microsoft Windows 8 (x64)
•
Red Hat® Enterprise Linux (RHEL) version 5.5, 5.6, 5.7, 5.8 (SP 128), 6.1, or 6.2 (x86-64)
•
SUSE™ Linux Enterprise (SLES) version 11 SP1 or SP2 (x86-64)
Software Requirements
•
The HP PCIe Workload Accelerator drive is compatible with both Windows and Linux
64-bit-compatible operating systems only.
•
If your 64-bit operating system is not on our list, it may be possible to install and use the HP
PCIe Workload Accelerator software, but HP does not guarantee compatibility.
•
Java™ Runtime Environment (JRE) version 1.6 or later (64-bit version). Before using the
RealSSD™ Manager (RSSDM) GUI, you must download and install JRE from www.java.com.
HP PCIe Workload Accelerator Overview
7
2 Components Provided by HP
Hardware
HP provides the number of HP PCIe Workload Accelerator drives of the appropriate capacity that
have been ordered or specified by the customer.
NOTE: The HP PCIe Workload Accelerator drive is not usable until the HP PCIe Workload
Accelerator support pack is downloaded from micron.com and installed on the host system. For
specific OEMs, the support pack is provided either separately on micron.com or directly from HP.
Software
HP provides a support pack for the HP PCIe Workload Accelerator drive, which contains:
•
HP-specific HP PCIe Workload Accelerator driver (required) for Windows and Linux operating
systems
•
Linux driver source code and makefile for non-supported Linux operating systems
•
Drive firmware update as a unified binary image (UBI) file (required)
•
HP PCIe Workload Accelerator Manager (HPWAM) drive management tool for Windows
and Linux (recommended)
•
HP PCIe Workload Accelerator SSD installation guide (this guide)
•
HPWAM user guide
Visit hp.com to access and download the HP PCIe Workload Accelerator support pack.
8
Components Provided by HP
3 Installing the HP PCIe Workload Accelerator Hardware
To install the HP PCIe Workload Accelerator hardware in a system:
1. Power down the host system.
2. Ensure that you are ESD grounded before touching the HP PCIe Workload Accelerator drive
or the host system.
3. Remove the HP PCIe Workload Accelerator drive from the ESD packaging and verify that it
is not damaged. If you suspect that the board is damaged, contact your local HP representative
or the HP PCIe Workload Accelerator Applications Team.
4. Remove the lid or case on the host system to expose the PCIe slots into which the drive will
be inserted.
5. Check the documentation for the system or motherboard to locate an available Gen 2 x8 PCIe
slot (“Introduction” (page 15)) and verify that your slot is 25W capable.
Figure 3 PCIe slots
6.
Insert the HP PCIe Workload Accelerator drive into an available Gen 2 compatible x8 link
width PCIe slot.
9
Figure 4 Inserting the HP PCIe Workload Accelerator Drive into an Available PCIe Slot
Figure 5 PCIe Workload Accelerator Drive Installed
7.
Power up the host system. If possible, ensure that the LEDs are visible when the cover is
replaced.
8. When the system powers back on, check the LED state on the HP PCIe Workload Accelerator.
The LED closest to the PCIe connector on the bottom of the card should be solid green, which
indicates that the drive is ready to be used. If it is not, refer to Figure 1 (page 5) for a
description of the LED codes.
9. Replace the lid or case on the host system.
10. Verify that the host system successfully boots into the operating system. If it does not, see
“Troubleshooting” (page 16).
10
Installing the HP PCIe Workload Accelerator Hardware
4 Installing the HP PCIe Workload Accelerator Software
Prerequisites
Review the following requirements before installing the HP PCIe Workload Accelerator support
pack software:
•
The HP PCIe Workload Accelerator hardware must first be installed before installing the support
pack software in the host system.
•
The system (both the operating system and all processors) must be 64-bit compatible.
•
If using the HPWAM GUI, the 64-bit version of JRE version 1.6 or later must be installed on
the system prior to use.
•
For new installs, the HP driver must be installed before the HP PCIe Workload Accelerator
hardware can be used and recognized by the system.
HPWAM performs firmware updates, secure erases, and other operations on a drive-by-drive basis.
This means that the specific drive to be updated must first be selected either in the server tree view
in the HPWAM GUI or by drive number in the HPWAM command line interface (CLI) before
operations on that drive can be performed.
Detailed instructions for using the HPWAM tool to perform operations on the drive are documented
in the HPWAM user guide. Please note that HPWAM has both GUI and CLI options available for
both the Windows and Linux operating systems. The HPWAM user guide is installed and available
in the directory where the HPWAM software is installed.
Installing the HP PCIe Workload Accelerator Support Pack
This section describes how to install the HP PCIe Workload Accelerator support pack software in
both Windows and Linux operating systems. Links to detailed instructions are provided where
available.
To install the HP PCIe Workload Accelerator support pack
1. Before installing the HP PCIe Workload Accelerator support pack software, the HP PCIe
Workload Accelerator hardware must be installed.
2. Install the HP PCIe Workload Accelerator support pack, which includes the HPWAM software.
See“Installing the HP PCIe Workload Accelerator Support Pack on a Windows System”
(page 11) or “Installing the HP PCIe Workload Accelerator Support Pack on a Linux System”
(page 12).
3. Update the HP PCIe Workload Accelerator unified binary image (UBI). See “Updating the HP
PCIe Workload Accelerator Firmware Unified Binary Image (UBI)” (page 14).
4. Reboot the system.
5. Verify that the installation was successful. See “Verifying the Installation” (page 15).
Installing the HP PCIe Workload Accelerator Support Pack on a Windows System
1.
2.
3.
4.
5.
Install the HP PCIe Workload Accelerator drive.
Shut down your PC.
Boot into Windows.
Update the device driver on your system. For a new or existing installation, see the following
procedure.
Install the latest HPWAM software:
Prerequisites
11
a.
b.
c.
Before installing HPWAM, install JRE 1.6 or later (64-bit version). For JRE
installationinstructions and downloads, go to www.java.com
If you have already installed HPWAM, the latest version can be installed over an existing
installation.
Run the installer located at: \Workload Accelerator Manager\Windows\Workload
Accelerator Manager-x86_64–Setup.exe
Updating the Device Driver (New or Existing Installation)
1.
2.
3.
4.
5.
6.
In the Windows Driver folder of the support pack, double-click the MicronP320hDriveX64 MSI
installer file. The Micron RealSSD PCIe Device Drivers <Driver-Version> Setup dialog box
displays. <Driver-Version> is the driver release version available in the current support pack.
Select the I accept the terms of the License Agreement check box and click the Install button
to continue. If you do not agree with the licensing terms, cancel the installation by clicking the
Cancel button. When cancelling, the Are you sure you want to cancel Micron RealSSD PCIe
Device Drivers <Driver_Version> installation? message displays. Click the Yes button and then
the Finish button to cancel installation.
If you accepted the license agreement, the Install dialog box displays a progress bar.
After the installation process completes, the Window Security dialog box displays the message
Would you like to install this device software? Click the Install button. Optionally, select the
Always trust software from "Micron Technology" check box.
Click theFinish button when the setup wizard indicates that the driver installation has completed.
The drive is installed and ready for use on your system. It may be necessary to open the
Windows Device Manager and click the Scan for Hardware Changes button to see the drive
and its driver.
Installing the HP PCIe Workload Accelerator Support Pack on a Linux System
This section describes how to install the HP PCIe Workload Accelerator software on a Linux system.
Start by shutting down your PC, then boot into Linux.
NOTE: Refer to the Readme document in the Linux Driver folder in the support pack for additional
notes on version-specific release behavior.
Installing the HP PCIe Workload Accelerator Driver for RHEL 5.5, 5.6, 5.7, and 5.8
For RHEL versions 5.5, 5.6, 5.7 and 5.8, the package name of our RHEL driver is
mtip32xx-<version>.x86_64_rhel5ux.
1. If a device driver was previously installed and your system has the HP driver version 1.2.30
or earlier, you must first uninstall the existing driver:
a. As a root user, run rpm -e <driver_name> where <driver-name> is mtip32xx (or mtip2xx
for version 1.2.30 or earlier).
b. As a root user, run depmod.
c. Reboot the system
12
2.
For a new installation:
a. As a root user, run rpm -ivh <rpm-name> where <rpm-name> is
mtip32xx-<version>.x86_64_rhel5ux.rpm.
b. Run depmod.
c. Reboot the system.
3.
To upgrade your driver to a newer version:
Installing the HP PCIe Workload Accelerator Software
a.
b.
c.
As a root user, run rpm -Uvh <rpm-name> where <rpm-name> is
mtip32xx-<version>.x86_64_rhel5ux.rpm.
As a root user, run depmod.
Reboot the system.
NOTE: In both steps, <rpm-name> is replaced by the Linux driver located in the /Linux Driver
folder of the support pack.
Installing the HP PCIe Workload Accelerator Driver for RHEL 6.1 and 6.2
For RHEL versions 6.1 and 6.2, the package name of our RHEL driver is
kmod-mtip32xx-<version>.el6.x86_64_rhel6ux.rpm.
1. If a device driver was previously installed and your system has the HP driver version 1.2.30
or earlier, you must first uninstall the existing driver:
a. As a root user, run rpm -e <driver_name> where <driver-name> is mtip32xx (or mtip2xx
for version 1.2.30 or earlier).
b. As a root user, run depmod.
c. Reboot the system.
2.
For a new installation:
a. As a root user, run rpm -ivh <rpm-name> where <rpm-name> is
kmod-mtip32xx-<version>.el6.x86_64_rhel6ux.rpm.
b. As a root user, run depmod
c. Reboot the system
3.
To upgrade your driver to a newer version:
a. As a root user, run rpm -Uvh <rpm-name> where <rpm-name> is
kmod-mtip32xx-<version>.el6.x86_64_rhel6ux.rpm.
b. As a root user, run depmod.
c. Reboot the system.
NOTE: In both steps, <rpm-name> is replaced by the Linux driver located in the /Linux Driver
folder of the support pack.
Installing the HP PCIe Workload Accelerator Driver for SLES 11
For SLES, the package name of our SLES driver is
mtip32xx-kmp-default-<version>.<kernal_version>.x86_64.rpm.
1.
If a device driver was previously installed and your system has the HP driver version 1.2.30
or earlier, you must first uninstall the existing driver:
a. As a root user, run rpm -e <driver_name> where <driver-name> is mtip32xx (or mtip2xx
for version 1.2.30 or earlier).
b. As a root user, run depmod.
c. Reboot the system.
2.
For a new installation:
a. As a root user, run rpm -ivh <rpm-name> where <rpm-name> is
mtip32xx-kmp-default-<version>.<kernel_version>.x86_64.rpm.
b. As a root user, run depmod.
c. Reboot the system.
3.
To upgrade your driver to a newer version:
Prerequisites
13
a.
b.
c.
As a root user, run rpm -Uvh <rpm-name> where <rpm-name> is
mtip32xx-kmp-default-<version>.<kernel_version>.x86_64.rpm.
As a root user, run depmod.
Reboot the system.
NOTE: In both steps, <rpm-name> is replaced by the Linux driver located in the /Linux Driver
folder of the support pack.
Installing the HPWAM Software on a Linux System
Once you have installed the Linux driver, install HPWAM using the following instructions. HPWAM
will be installed under /opt/HP/WkldAccelManager.
NOTE: Note: HPWAM versions 1.58.00.00 and earlier must first be uninstalled before installing
HPWAM versions 1.59.00.00 and later.
1.
2.
If HPWAM was previously installed (you are upgrading software): As a root user, run rpm
-Uvh <rpm-file>.
For a new installation, run rpm -ivh <rpm-file> as a root user.
NOTE: In both steps, <rpm-file> is replaced by the HPWAM located in the /Workload Accelerator
Manager/Linux folder of the support pack.
Updating the HP PCIe Workload Accelerator Firmware Unified Binary
Image (UBI)
1.
2.
3.
4.
5.
6.
7.
8.
14
Run HPWAM, select the P320h drive, and click the Attach Device button (if device is not
already attached).
Click the Update button and select the Unified Image menu option.
Browse to the \Unified Image folder in the support pack and select the UBI file.
Click the Update button.
HPWAM displays the Unified image update completed successfully for Drive message.
Close HPWAM and restart your system. A full system shutdown is not required.
After the system starts up, launch HPWAM again.
Check HPWAM to ensure that the firmware version displayed in the SSD Info window is
accurate (see the HPWAM user guide for additional information on using the HPWAM
software).
Installing the HP PCIe Workload Accelerator Software
5 Verifying the Installation
To verify that the installation was successful:
1. In the operating system, verify that the drive appears as a recognized device and that the
driver has been loaded. Refer to the sections in“Installing the HP PCIe Workload Accelerator
Software” (page 11) for a description of the specific steps used to verify this.
2. Verify that the drive is online and ready to be used.
a. In Windows:
1) Open the Disk Management tool (refer to the documentation for your specific version
of Windows). The newly installed drive should display.
2) A dialog box may appear that prompts you to initialize the master boot record (MBR)
for the drive. Select OK and continue. The drive should appear as “Online” with
“Basic” as the format status. If the option to initialize the MBR does not appear,
right-click the drive number in the Disk Management tool and select Initialize Drive
from the pop-up menu. Once this operation completes, the drive should appear as
Online with Basic as the format status.
b.
In Linux:
1) After the system boots to the desktop, open a terminal window.
2) Run modinfo mtip32xx. The version and module information displays if the driver is
installed. Otherwise, follow the installation steps in “Installing the HP PCIe Workload
Accelerator Support Pack on a Linux System” (page 12).
3) Run fdisk – l | grep rssd*. The HP PCIe Workload Accelerator should appear as
/dev/rssd<x> device. <x> is the drive letter, which is typically “a” for one drive.
The letter increments for each additional drive in the system.
3.
Run HPWAM (either the GUI or CLI) and check the status of the drive.
a. If using the GUI, verify that HPWAM loads and that the drive information is shown in the
SSD Info section.
b. If using the CLI, run rssdm –L and rssdm –L –d and verify that the drive information firmware
and status indicate that the drive is present and functional.
4.
The drive is installed and is ready for testing.
15
6 Troubleshooting
Review the following troubleshooting steps if problems are encountered when following the
installation instructions in this document.
Problem: The drive is not appearing online or times out in the Windows Disk Manager with an I/O
error.
Solution: Confirm the HP PCIe Workload Accelerator drive and driver have been successfully
installed. Check whether the LED status on the adapter board is blinking with an alternating flashing
pattern. If this flashing pattern occurs, wait until the LED stops blinking (this can take several minutes),
reboot the system, and try again. Review the Windows System Event or Linux message logs for HP
PCIe Workload Accelerator drive messages related to this event.
Solution: Check the LED codes.
Problem: Install errors are occurring after an attempt was made to install the driver from the
appropriate rpm file.
Solution: Verify the version of RHEL or SLES you are using. The driver supports either RHEL 5.5
and later or SLES 11 and later. Run uname –a to check the kernel version. It should be 2.6.25 or
later to install the driver. If your operating system or kernel version is earlier, upgrade to the latest
HP-supported Linux operating system release and re-install the driver.
Problem: The HPWAM GUI does not display correctly or does not load at all.
Solution: The HPWAM GUI requires that 64-bit Oracle only JRE version 1.6 update 10 or later be
installed on the system before it can be used. Ensure that multiple versions of Java are not running
on the system and that the system path is pointing to an Oracle Java version 1.6 update 10 or
later. The HPWAM CLI does not require Java. All HPWAM functions are available through the CLI
if Java is not pre-installed on the host system.
Problem: A secure erase must be performed on the drive, but HPWAM is prompting for a password.
What is the password?
Solution: The password for performing a secure erase on the drive is ffff (lower case).
Problem: The firmware was successfully updated on the HP PCIe Workload Accelerator drive, but
HPWAM still shows the previous version.
Solution: Restart (warm boot) the system and run HPWAM again. The updated firmware version
should display.
Problem: Performance tests run on the HP PCIe Workload Accelerator are lower than the values
specified in the data sheet.
Solution: Follow these steps to optimize the performance of the HP PCIe Workload Accelerator:
1. Verify you are following HP's recommended SSD testing flow when running performance tests
on the HP PCIe Workload Accelerator.
2. Verify the Power Limiting setting on the HP PCIe Workload Accelerator is disabled. In the
command line, run: rssdm -L -d Power limiting throttles host I/O traffic to keep drive power
under the 25W PCIe CEM slot limit. The side effect of this behavior is reduced performance.
3. Make sure the system running the performance tests meets the hardware requirements.
4. Follow the recommendations documented in Micron's How System Settings Impact PCIe SSD
Performance white paper.
5. Update the P320h driver and firmware to the version available in the latest support pack on
micron.com.
6. Check the HP PCIe Workload Accelerator temperature to verify that thermal limiting is not
affecting performance:
16
Troubleshooting
a.
b.
c.
Run rssdm -S.
Check SMART attribute 194 (enclosure temperature) and compare value to the temp
throttle threshold in C.
If the enclosure temperature is greater than or equal to the threshold temperature,
performance decreases.
Problem: How can the Power Limiting setting be enabled on the HP PCIe Workload Accelerator?
Solution: If your system is running a support pack release later than B126.01, the power limiting
setting is disabled by default.
To enable the power limiting setting, use the RSSDM command line interface (CLI):
1. In the command line, type the following command where <Drive_id> is the ID number of the
HP PCIe Workload Accelerator, which can be found by running rssdm -L. rssdm –M –p 1
–n<Drive_id>
2. Power-cycle the system.
3. Verify the setting change by running the following command: rssdm –L –d
Problem: When disabling an ATA channel using Windows Device Manager in Windows Server
2008, the Microsoft Management Console (MMC) stops responding, the computer will not shut
down, and a "Stop 0x0000009F" message appears after 10 minutes.
Solution: This is an issue specific to Microsoft Windows and is not related to the HP PCIe Workload
Accelerator driver. The issue has been corrected for Windows Server 2008 as a hot fix; check the
Microsoft web site for details.
Problem: The Percentage Lifetime Used or Write Protect Progress SMART parameter report shows
100% for the HP PCIe Workload Accelerator.
Solution: These reports both indicate the HP PCIe Workload Accelerator is in the write protect
state. In this state, no additional data can be written to the drive (the drive is in a read-only mode).
All data on the drive is preserved and can be read or backed up. Back up the data on the drive.
After the data is backed up, it is highly recommended to replace the drive and refrain from using
it.
Problem: What are the behavior characteristics of a HP PCIe Workload Accelerator SSD that becomes
too hot? Can the drive still be used? What steps can be taken to reduce the SSD's temperature?
Solution: Two mechanisms control temperature and prevent damage to the drive: thermal limiting
and thermal shutdown. Thermal limiting is a dynamic mechanism that monitors temperature in the
background while host I/O traffic is being processed on the drive. If the SSD temperature exceeds
a preset limit, host traffic will be progressively reduced until the temperature goes below the
threshold point. Once below this threshold point, host traffic will be unthrottled and full performance
restored. If the temperature continues to increase above the threshold point, host IOPS will continue
to be throttled until the drive is in the thermal shutdown state. In this state, the drive will be disabled
from all I/O traffic but will continue to be recognized by the system.
To verify the state:
•
In Linux: run the rssdm –L command or check the Linux message logs (the drive will be reported
to be in the thermal shutdown state).
•
In Windows: check the Event/Error log and verify a thermal shutdown event occurred.
To recover from a thermal shutdown state:
1. Shut down the system.
2. Remove the HP PCIe Workload Accelerator from the system and allow it to cool.
3. If the HP PCIe Workload Accelerator is running firmware older than version 1.45, upgrade
the firmware to the latest available support pack release.
4. Check the SSD placement in the system motherboard and make sure there is sufficient airflow
around the SSD, as specified in the data sheet. If possible, place the SSD in a PCIe slot that
provides unobstructed airflow.
17
5.
6.
Power the system on.
Run the rssdm –L command to verify the SSD temperature. If the temperature remains below
the thermal threshold limit, the SSD is ready for use at full performance. If the temperature
exceeds the thermal threshold limit, the SSD can still be used but performance will be reduced
because of the thermal limiting effect.
Problem: The Flash Translation Layer (FTL) rebuild status in the Windows Event Log and Real
SSDManager does not steadily increase.
Solution: This is expected behavior because of the firmware algorithm that reports the progress of
this rebuild. Whenever a drive experiences a nonstandard or unexpected power-down event, the
drive needs to rebuild its internal LBA-to-NAND address lookup (FTL) tables to prevent data loss.
The drive does not respond to host commands during this rebuild. Because this process takes some
time to complete, both the Windows Event Log and RealSSD Manager record the percentage
complete until the drive is online again. In the RealSSD Manager, the progress of the rebuild is
reported in both the CLI and GUI.
Problem: For HP PCIe Workload Accelerator SSDs with a driver from Support Pack version 128.07
or earlier, when the SSD enters write protect mode at end of life (EOL), the SSD will no longer be
functional.
Solution: Before the SSD reaches EOL, update the driver to a version in Support Pack 131.02 or
later. To monitor EOL, poll SMART attributes 202 and 242. Note: When the SSD reaches write
protect mode, the SSD will continue to have read access in the system, and therefore, data can
continue to be backed up.
18
Troubleshooting
7 LED Codes
Table 2 LED Codes
HHHL
Green LED
Amber LED
Red LED
Description
Off
Off
Off
Indicates that power is off.
Green/amber flashing alternately (200ms)
Off
Indicates that power is on and the drive is busy
with an internal operation. Wait until the
operation completes. The drive state should
change to a solid green LED state.
On
Off
Off
Indicates that either an ATA command is being
processed or power is on, firmware is
initialized, and there is no host activity. The
drive is operational in either state.
Flashing (30ms)
Off
Off
Indicates that PCIe/NAND host activity is in
process. The drive is busy, but operational.
Flash error code
Flash error code
Flash error code
Indicates an error code. Error codes are three
digits long and are displayed by blinking the
first digit, then the second, then the third with
pauses in between and a long pause before
repeating. The drive is not operational.
Firmware fatal error codes:
• 112: Failure during DRAM initialization
• 113: Not enough DRAM to run in the
configured mode
• 313: DRAM UECC error
• 441: Error during chip initialization
• 411: Incorrect drive parameters in the
firmware image
Off
Flashing (30ms)
Off
Indicates that the drive is backing up internal
data to NAND. The drive is busy, but
operational.
Off
On
Off
Indicates that the drive is in the safe or
“parked” mode. Internal data has been written
to NAND and the drive is safe to power down.
Off
Off
On
Indicates that the drive requires a secure erase
or has encountered a critical error. The drive
is not operational.
19
8 References
20
•
HP PCIe Workload Accelerator Manager User Guide
•
PCIe Express CEM Specification Version 2.0
•
Java Runtime Environment version 1.6 x64 and later
References
*727351-001*
Printed in the US