1
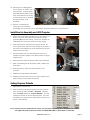
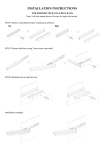
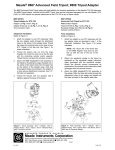
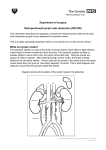
Kit Instruction
Subject: DL.2 Projector Replacement
Product Line: DL.2
Date: 08/08/06
DL.2 fixtures manufactured before August 1, 2006 utilized a Christie LX50 model
projector. This document provides instructions for upgrading these fixtures with the
Christie Digital LX55 projector.
Warnings: Disconnect power before servicing.
Equipment surfaces may reach temperatures up to 130° C (266° F). Allow
the fixture to cool before handling.
Access The Projector
1.
Lock fixture in horizontal
position.
2.
Disengage the two latches on
A
the bezel and remove the back
B
cover.
3.
Remove both top and bottom
head bezels by turning each
bezel’s two ¼ turn fasteners
(A).
4.
Remove front bezel by
loosening four fasteners (B),
take care to notice and remove
C
the IR cable (C) from the IR
illuminator.
5.
D
Disconnect power, video, and
control cables (D) from the
projector.
6.
Disconnect zoom and focus
cables (E) from head card.
7.
E
Unscrew projector from the
projector mounting plate by
F
removing four screws (F).
8.
Remove one spacer (G) under
the plate. Be careful to not lose
the spacer.
9.
With the four mounting screws
removed, carefully remove the
H
projector (H) from the housing.
Pay close attention to the zoom
and focus wires while removing
the projector.
G
60600265 Version 1.0
page 1
10. Disconnect the cables (I) for
J
the iris motor, iris sensor, and
camera power (leaving ribbon
cable attached to camera). Take
those wires with the one for the
IR removed in step 4, and feed
I
through grommet on IR
assembly.
11. Remove iris assembly by
removing the six mounting
screws (J). Two on the top, two on the bottom, and two located on the camera mount.
Install New Iris Assembly and LX55 Projector
1.
Install new iris assembly provided in your kit. Feeding iris
motor, iris sensor, and camera power cables through
grommet (K) and reconnecting. Secure iris assembly by
reattaching the six screws removed on step 10 (L).
2.
K
Take new projector and slide into projector mount. Be
sure to guide zoom and focus wires though to the front of
the fixture, and ultimately up to the head card by the side
closest to the iris motor.
3.
Screw projector back into mounting plate. Be sure to
install the projector spacer to the same location using the
longest screw.
4.
Reconnect zoom and focus motors wires to the head card.
5.
After reconnecting the IR illuminator cable, reattach the
front bezel.
6.
L
Reconnect power, video and control cables to the
projector.
7.
Reattach top and bottom head bezels.
8.
Reattach rear bezel. Be sure to line up the gasket to the
lamp housing, not the cable connections.
Setting Projector Defaults
1.
2.
Apply power to the fixture.
After the fixture has finished homing, use the onscreen
menu system to select the Set > Projector tabs and
press the Reset button for Project Defaults. This will
reconfigure the fixture for the LX55 Projector. For more
information on using the DL.2 onboard menu system, see
the DL.2 User Manual.
If you experience any complications or have any questions regarding these installations, contact
the High End Systems Service Hotline at 1.800.890.8989 to speak with a technician.
60600265 Version 1.0
page 2