1
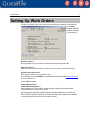
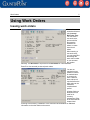
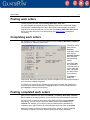
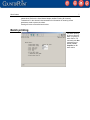
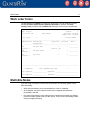
Work Orders
This document describes using work orders in
CounterPoint. A work order is a document that
controls the assembly of components to create
finished goods inventory.
10/18/2005
Work Orders
2
Table of Contents
Overview ..................................................................................................... 3
Setting Up Work Orders ............................................................................ 4
Using Work Orders .................................................................................... 5
Issuing work orders ................................................................................................................. 5
Posting work orders ................................................................................................................ 6
Completing work orders .......................................................................................................... 6
Posting completed work orders............................................................................................... 6
Batch printing .......................................................................................................................... 7
Work order forms .................................................................................................................... 8
Multi-Site Notes....................................................................................................................... 8
Work Orders
3
Overview
CounterPoint’s Kits Option allows you to process work orders for inventory. A work order
is a document that controls the assembly of components to create finished goods
inventory.
Work orders are similar to kit transactions – both are used to assemble finished goods. A
kit transaction is a one-step transaction that updates on-hand quantities and inventory
costs immediately upon posting. A work order is a two-step transaction for assembling
finished goods – work orders are first “issued” then “completed”. Work orders allow you to
automatically assign sequential work order numbers so you can track specific jobs. The
first step in creating a work order is to issue the work order. The second step is to
complete the work order. These functions are on different menu selections, allowing you
to control user access to each step.
When setting up work orders, you can control whether or not the quantity available
should be affected for the kit parent and/or component items. For example, you may
choose to update component quantity committed (which makes those components
unavailable elsewhere in CounterPoint) but not to update parent quantity committed
(which makes the parent unavailable until the work order is completed). Serial numbers
and lot numbers are not committed until the work order is completed.
You can either print work order forms as soon as the work order is issued, or you can
print them later using batch printing. You can use CounterPoint’s default work order form
(WKORD) or define your own.
Work Orders
4
Setting Up Work Orders
In order to use work orders, you must have the Kits Option registered in CounterPoint.
Select Setup /
Inventory / Control to
enable work orders
in CounterPoint.
Use work orders ?
Specify whether or not you want to use work orders by selecting Yes or No.
Next work order #
Enter the next work order number you want to use. An entry is required in this field.
Default work order form ID
Enter the work order form ID you want to use.
A pre-defined form named WKORD is included with CounterPoint (see Work order forms
for more information).
Leave <blank> for None.
Commit W/O parents ?
Commit W/O components ?
Specify whether or not you want to update quantity committed for parents and/or
components when a work order is issued.
Specifying Yes for the parent makes the finished good available as soon as the work
order is issued. Specifying Yes for the components makes the components unavailable
for other purposes as soon as the work order is issued.
Work Orders
5
Using Work Orders
Issuing work orders
Work orders are
entered and issued
using Inventory /
Work orders / Issue.
You can enter a
new work order,
print an edit list,
then post the
entered work
orders to create
issued work
orders.
When entering a
new work order,
you can press F2 to
auto-assign the
work order number
or you can enter
the number
manually. The Work order # is equivalent to the Document-# for a kit transaction.
Press F1 to view entered (un-issued) work orders.
You are not
required to enter
serial/lot numbers
for tracked items
on a new work
order. However,
these values are
required before the
work order can be
marked as
completed and
posted.
All other fields are
identical to those
used for kit
inventory
transactions. Refer
to the User Manual
chapter titled
“Entering a Kit Inventory Transaction” in the electronic documentation for additional
information on the other fields on the screen.
Work Orders
6
Posting work orders
To issue a new work order, select Inventory / Work orders / Issue / Post.
You may optionally print an edit list prior to posting. Refer to the User Manual chapter
“Printing a Kit Transaction Edit List” and in the electronic documentation for detailed
instructions on printing an edit list. You may also use Inventory / Work orders / Batch print to
print a work order form prior to (or after) posting (see Batch printing for additional
information).
Completing work orders
For issued work orders, use the menu selections under Inventory / Work orders / Complete to
edit, complete, or cancel the work orders.
Press F2 to mark a
work order as
Completed.
Press F3 to mark a
work order as
Cancelled. Cancelled
work orders are
removed during
posting.
Press F4 to Undo
the completed or
cancelled status of
a work order and
mark it as Issued
(the work order's
original status).
Press Enter to
modify the
components. When the component entry screen is displayed, you can press the F2 key to
go to the next modifiable component.
To return to the first screen (for example, to complete a work order after modifying its
components), press the Up arrow key or Page Up to return to the first component, then
press Page Up to return to the first screen.
Posting completed work orders
After you have marked a work order as Completed, use Inventory / Work orders / Complete /
Post to update the on-hand quantities of your inventory and create historical information.
You can choose to post only those work orders that have been marked Completed.
Alternatively, you can choose to post work orders that have been Issued but not
Completed. For example, you could post “all work orders that were scheduled for
completion today” without having to individually mark each work order as Completed.
When work orders are posted, the Work Order Activity Journal is created. Historical
information is created in a manner similar to posting kit inventory (assemble)
Work Orders
7
transactions. Refer to the User Manual chapter entitled “Posting Kit Inventory
Transactions” in the electronic documentation for information on entering screen
parameters used to post work orders.
Posting will remove cancelled work orders.
Batch printing
Use batch printing
to print or reprint a
batch (or group) of
work orders. You
can batch print New
(entered but not
issued), Issued,
Completed, or All
work orders.
Work Orders
8
Work order forms
The pre-defined form, WKORD, is provided for work orders. You can install the form by
running File Utilities / Special / System / Update pre-defined data. If required, use Setup /
Inventory / Forms to make a copy of WKORD and customize it to meet your requirements.
Date: 05/11/02
Time: 21:58:26
W O R K
Kit item No: 100
Qty req'd:
O R D E R
Work order No.
Page No.
Bike Package
20008
1
Issue date: 05/11/02
Complete date: 05/14/02
1
Location: MAIN
-------------------------------------------------------------------------------Component-item Description-1
Qty-per-kit
Qty-req'd
Notes
Description-2
-------------------------------------------------------------------------------101
Location: 1
All sport bike
102
Location: 1
All sport helmet
103
Location: 1
Seat Cover
1
Serial #: 600
1
_____________
1
1
_____________
1
1
_____________
-------------------------------------------------------------------------------3 components
Total component qty req'd:
3
Date completed: ___________________
Signature: ________________________________
Date inspected: ___________________
Signature: ________________________________
Multi-Site Notes
If you are using work orders in a Multi-Site environment, the following applies to work
order processing:
y
Work order transactions are not transmitted from a Hub to a Satellite.
y
At the Satellite, only work orders that have been completed and posted are
transmitted to the Hub.
y
Like other kit transactions, work orders that are completed and posted at a Satellite
must be manually posted at the Hub after import. They are not automatically posted
during overnight processing.