1
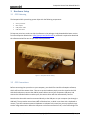
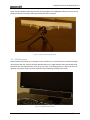
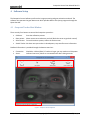
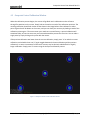
GAZEPOINT CONTROL USER MANUAL Revision 2.0 Gazepoint Control User Manual Rev 2.0 Contents 1 Introduction .......................................................................................................................................... 2 2 Technical Specification and Requirements ........................................................................................... 2 2.1 3 4 5 6 GP3 Desktop Eye-Tracker .............................................................................................................. 2 Hardware Setup .................................................................................................................................... 3 3.1 GP3 Unboxing................................................................................................................................ 3 3.2 GP3 Connections ........................................................................................................................... 3 3.3 GP3 Placement .............................................................................................................................. 4 Software Setup...................................................................................................................................... 5 4.1 Gazepoint Tracker Main Window ................................................................................................. 5 4.2 Gazepoint Control Calibration Window ........................................................................................ 6 Demo Programs and Source Code ........................................................................................................ 7 5.1 GPClient Class................................................................................................................................ 7 5.2 C++ apiclient.................................................................................................................................. 7 5.3 C++ Template/Template_nomfc ................................................................................................... 8 5.4 C++ FruitNinja ............................................................................................................................... 8 5.5 Matlab ........................................................................................................................................... 8 5.6 Other Languages? ......................................................................................................................... 8 Troubleshooting Tips ............................................................................................................................ 9 6.1 Camera Driver ............................................................................................................................... 9 6.2 Why isn’t my GP3 Working? ....................................................................................................... 10 Revised January 19, 2014 Copyright (c) 2014 1|Page Gazepoint Control User Manual Rev 2.0 1 Introduction The Gazepoint Control system is a high-performance eye-tracker software platform that provides gaze data at an extremely affordable price. The hardware and software setup are also extremely straightforward and easy to do. 2 Technical Specification and Requirements 2.1 GP3 Desktop Eye-Tracker Accuracy 0.5 – 1 degree of visual angle 60Hz update rate 5 and 9 point calibration Easy to use and open standard API 25cm x 11cm (horizontal x vertical) movement ±15 cm range of depth movement Powered by USB Processor: Memory: OS: Modern processor i5 to i7 recommended. 2 GB Window XP/Vista/7/8, 32/64 bit Revised January 19, 2014 Copyright (c) 2014 2|Page Gazepoint Control User Manual Rev 2.0 3 Hardware Setup 3.1 GP3 Unboxing The Gazepoint GP3 eye-tracking system ships with the following components: GP3 eye-tracker Mini-tripod USB power cable USB data cable To keep our price low, we do not ship the software in the package, simply download the latest version from the Gazepoint website here: http://gazept.com/downloads/. A password is required to download the software and will be sent to you at the time of purchase. Figure 1 - Gazepoint GP3 Un-tubing 3.2 GP3 Connections Before connecting the eye tracker to your computer, you should first install the Gazepoint software, which will install the camera driver. Then to set up the hardware simply screw the tripod to the GP3 with the thumbscrew, connect the USB DC power cable to one of your computers USB ports, and connect the USB data cable to another port, the camera driver will then automatically connect. Note that the data cable must be connected directly to the USB port on your computer (not through a USB hub). The eye-tracker uses almost 100% of the data bus, so while it can share with a keyboard or mouse, if you also connect an external hardware or webcam to the same bus you may impact the eyetracker image transmission. Often the USB ports on the front and back of a PC, or the left and right of a Revised January 19, 2014 Copyright (c) 2014 3|Page Gazepoint Control User Manual Rev 2.0 laptop use two separate USB hubs internally in the computer. The USB power cable can connect to any powered USB port, including a USB hub provided the hub is powered. Figure 2 - Gazepoint GP3 Hardware Setup 3.3 GP3 Placement Position GP3 directly below your computer screen. Avoid use in a room with direct or indirect sunlight on the face of the user. Position the GP3 approximately arm’s length distance away and centered and pointed at your face (ideal distance is 65 cm to your eyes). If you wear glasses, it is best to tilt the unit upwards at a greater angle to prevent reflections from appearing off the glasses lenses. Figure 3 - Gazepoint GP3 Placement Revised January 19, 2014 Copyright (c) 2014 4|Page Gazepoint Control User Manual Rev 2.0 4 Software Setup The Gazepoint Control software performs the image processing and gaze estimation methods. The software also operates the gaze-data server which provides data to third-party programs through the Open Gaze API. 4.1 Gazepoint Tracker Main Window There are only four buttons to control the Gazepoint eye-tracker: Calibrate: Gaze pointer: Select Screen: Switch Tracker: Start the calibration process Move mouse cursor wherever you look (block the sensor to get back control) For multi-monitor systems, selects the active screen We have new eye-trackers in development, stay tuned for more information. Feedback information is provided through the bottom status bar: Frame time: Server: Should be ~16.6ms (60Hz). If number is larger you may need more CPU power Indicates how many clients are connected and if data is being transmit Figure 4 - Gazepoint Control Software Revised January 19, 2014 Copyright (c) 2014 5|Page Gazepoint Control User Manual Rev 2.0 4.2 Gazepoint Control Calibration Window When the calibration process begins, the screen will go blank and a calibration marker will move through five positions on the screen. Simply look at the marker at each of the calibration positions. The resulting calibration should look similar to that shown in the image below. After calibration a white point-of-gaze dot will be drawn on the screen, and you can check your accuracy by looking at each of the calibration points again. If for some reason your results are not satisfactory, a second calibration will sometimes help, as first-time users may not have understood the process the first time. You can redo a single point by simply clicking on the point with the mouse. If the previous calibration was better than the current calibration, simply press ‘U’ to undo the current calibration and reload the last one (‘U’ again toggles between the latest calibration and the previous calibration). In some circumstances a little more accuracy may be desired, traded off with a slightly longer calibration. Simply press ‘9’ to start using the nine-point calibration process. Figure 5 - Gazepoint Control 5-Point Calibration Results Revised January 19, 2014 Copyright (c) 2014 6|Page Gazepoint Control User Manual Rev 2.0 5 Demo Programs and Source Code A number of example demo programs and source code are provided to get you started quickly using the Open Gaze API. These files can be found in the Gazepoint software installation folder. For 32bit OS: C:\Program Files\Gazepoint\Gazepoint\demo\ For 64 bit OS: C:\Program Files (x86)\Gazepoint\Gazepoint\demo\ If you wish to compile these programs, it is best to copy the demo folder to another location such as the desktop or c:\temp\, as your operating system will prevent you from creating compile files in the “Program Files” folder. 5.1 GPClient Class The GPClient class in the \Demo\Include\ folder is an MFC based class which simplifies all tasks needed to use the API. This class is used for all Gazepoint software projects which communication using the API. 5.2 C++ apiclient The apiclient uses the GPClient Class and enumerates the API commands so you can send them one at a time. This program is great for watching what commands look like as you send them back and forth with the server. Revised January 19, 2014 Copyright (c) 2014 7|Page Gazepoint Control User Manual Rev 2.0 5.3 C++ Template/Template_nomfc The template and template_nomfc projects are very simple projects which connect to the server, start sending data, and print the result to the screen. These are great starting points for developing your own C++ applications. 5.4 C++ FruitNinja A larger project which uses the API to collect gaze data, and then manipulate the cursor to create different blades for use in the Fruit Ninja video game, available in the Windows 8 App Store. 5.5 Matlab Sample source code showing the API use in a Matlab programming language. 5.6 Other Languages? Since the API is only a TCP/IP port, any language can communicate with the server. Please contact us if you would like to see some sample code for a language not listed here. Revised January 19, 2014 Copyright (c) 2014 8|Page Gazepoint Control User Manual Rev 2.0 6 Troubleshooting Tips 6.1 Camera Driver If the eye-tracker is plugged in before the software is installed, sometimes the camera can get labelled as an ‘Unknown Device’ in the Windows Device Manager. If you think this is the case, though the device manager and look for the unknown device, right-click and select update driver, then point to the folder (Win7 or Win8): For 32bit: C:\Program Files\Gazepoint\Gazepoint\driver\Win8 For 64bit: C:\Program Files (x86)\Gazepoint\Gazepoint\driver64\Win8 When the camera driver is installed successfully, it should be listed as a Point Grey Research device as shown in the figure below. Revised January 19, 2014 Copyright (c) 2014 9|Page Gazepoint Control User Manual Rev 2.0 6.2 Why isn’t my GP3 Working? Dim red lights not visible behind the black plastic on the front of the eye-tracker: Check that power is supplied via the second USB cable; ensure that Gazepoint Control is running; kill any extra Gazepoint Control processes. The camera window has a strange split image: This is a known bug that occurs infrequently with the Firefly camera on the first start up of the PC or installation of a new version. Simply restart the Gazepoint Control software to solve this issue. The camera shows my eyes properly but the GP3 doesn’t lock onto my eyes: A number of artefacts can throw off the GP3’s eye-tracking algorithm: - - Sunlight has a lot of infrared content that can easily wash out the infrared LED sources; try to work in environments with halogen or fluorescent lighting. Dark environments work well too. Hard contact lenses can shift after a blink which can cause difficulty in tracking Soft contact lenses that are too dirty can reduce the specular reflections used to track eye movement. Use only clean contact lenses. Glasses that are dirty or scratched can cause difficulty in tracking, as well as some shiny metal frames. Glasses work best when the angle from the GP3 unit to the face is relatively steep (i.e. move your head higher and closer to the monitor and tilt the unit up). Some makeup, such as glitter, can lead to spurious reflections. Avoid such makeup. The calibration isn’t working: Ensure that you complete the calibration without blinking. Also, make sure that you stay focused on the dot position. Some people anticipate where the dot will move and this throws off the calibration. Revised January 19, 2014 Copyright (c) 2014 10 | P a g e