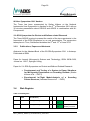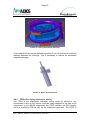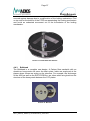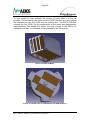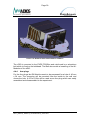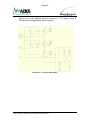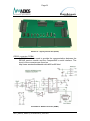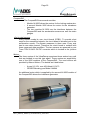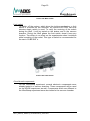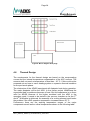
1
SED Student Experiment Documentation Document ID: RX11_ADIOS_SEDv5.3_07October2013_Final.docx Mission: REXUS 11 Team Name: Experiment Title: ADvanced Isolation On Sounding-rockets Team Student Team Leader: Name Stefan Krämer University FH Aachen Team Members: Lysan Pfützenreuter FH Aachen Brigitte Müller FH Aachen Dominique Daab FH Aachen Joana Hessel FH Aachen Fabian Baader FH Aachen Tobias Wagner FH Aachen Georg Gdalewitsch FH Aachen Andreas Gierse FH Aachen Johannes Stahl FH Aachen Version: Issue Date: Document Type: Valid from: 5.3 07 October 2013 Final Report Submission date: 07 October 2013 Issued by: Stefan Krämer Approved by: Mark Fittock RX11_ADIOS_SEDv5.3_07October2013_Final.docx -2- Change Record Version Date Changed chapters Remarks 0 1.8 1.11 2 3 2011-01-11 2011-01-26 Blank Book 2010 PDR Post PDR Version CDR IPR 4 2011-11-21 New Version All All All Chapter 3.2.4, 4.2.1.1, 4.4.4, 5.2, 6; Appendix A, B, C; SGRP 3.2, 3.3, 6.3, 6.5, APPENDIX B, APPENDIX C, 4.4 2012-04-12 4.8 5 2013-10-07 Results 2011-05-26 2011-09-01 RX11_ADIOS_SEDv5.3_07October2013_Final.docx Pre-Campaign Final report -3- CONTENTS ABSTRACT ............................................................................................................. 6 1 INTRODUCTION ............................................................................................ 8 1.1 Scientific / Technical Background........................................................... 8 1.2 Experiment Objectives ........................................................................... 8 1.3 Experiment Overview ............................................................................. 9 1.4 Team Details ........................................................................................ 10 1.4.1 Contact Point ........................................................................... 10 1.4.2 Team Members ....................................................................... 11 1.4.3 Team structure ........................................................................ 13 2 EXPERIMENT REQUIREMENTS................................................................. 15 2.1 Functional Requirements ..................................................................... 15 2.2 Performance requirements ................................................................... 16 2.2.1 Acceleration Sensors ............................................................... 16 2.2.2 Strain gauges (EXP2) .............................................................. 16 2.2.3 Isolation ................................................................................... 16 2.2.4 Electronics ............................................................................... 16 2.2.5 Imbalance generator ................................................................ 16 2.3 Design Requirements ........................................................................... 17 2.3.1 Structure .................................................................................. 17 2.3.2 Electronics, Sensors, Programming ........................................ 17 2.4 Operational Requirements ................................................................... 18 3 PROJECT PLANNING .................................................................................. 19 3.1 Work Breakdown Structure (WBS) ....................................................... 19 3.2 Resources ............................................................................................ 19 3.2.1 Manpower ................................................................................ 19 3.2.2 Workload ................................................................................. 20 3.2.3 Budget ..................................................................................... 21 3.2.4 External Support ...................................................................... 22 3.3 Outreach Approach .............................................................................. 25 3.3.1 Public presentations ................................................................ 25 3.3.2 Publications, Papers and Abstracts ......................................... 26 Development and Testing of a System to Damp Vibrations for Micrigravity Experiments on Sounding Rockets (Stefan Krämer et al. – EXP1) ................................................................................................... 26 3.4 Risk Register ........................................................................................ 26 3.5 Time Schedule ..................................................................................... 28 4 EXPERIMENT DESCRIPTION ..................................................................... 29 4.1 Experiment Setup ................................................................................. 29 4.1.1 EXP1: Verification of the damped System / FFED ................... 29 RX11_ADIOS_SEDv5.3_07October2013_Final.docx -4- 4.2 4.2.1.1 4.2.1.2 4.3 4.4 4.5 4.6 4.7 4.8 4.9 4.1.2 EXP2: Determining of static loads ........................................... 30 Experiment Interfaces .......................................................................... 31 4.2.1 Mechanical .............................................................................. 31 Cable feed through and D-Sub mountings ........................................... 31 Module / Module ................................................................................... 32 4.2.2 Electrical .................................................................................. 33 Experiment Components ...................................................................... 33 Mechanical Design ............................................................................... 34 4.4.1 Locking Mechanism ................................................................. 35 4.4.2 FFED (Free flying experiment device) ..................................... 36 4.4.3 Bulkhead.................................................................................. 37 4.4.4 Arm plugs ................................................................................ 39 4.4.5 Position of acceleration Sensors ............................................. 41 4.4.6 Mass reduction ........................................................................ 41 4.4.7 Structural Analysis ................................................................... 45 4.4.8 Drawing Number System ......................................................... 47 Electronics Design................................................................................ 48 4.5.1 Block diagram of the ADIOS experiment ................................. 48 4.5.2 EXP1 ....................................................................................... 49 4.5.3 EXP2 ....................................................................................... 58 4.5.4 Arm plugs ................................................................................ 62 Thermal Design .................................................................................... 64 Power System ...................................................................................... 65 Software Design ................................................................................... 66 Ground Support Equipment .................................................................. 69 4.9.1 Telemetry Software ................................................................. 69 5 EXPERIMENT VERIFICATION AND TESTING ........................................... 71 5.1 Verification Matrix ................................................................................. 71 5.2 Test Plan .............................................................................................. 73 5.2.1 Shaker Test ............................................................................. 73 5.2.2 Vacuum Test ........................................................................... 74 5.2.3 Thermal / Environmental Test.................................................. 75 5.2.4 Functional Sensor Test ............................................................ 75 5.2.5 Functional Electronic Test ....................................................... 76 5.2.6 Functional Test – Assembled Mode ........................................ 76 5.3 Test Results ......................................................................................... 77 6 LAUNCH CAMPAIGN PREPARATION ........................................................ 78 6.1 Input for the Campaign / Flight Requirement Plans .............................. 78 6.1.1 Dimensions and mass ............................................................. 78 6.1.2 Safety risks .............................................................................. 78 6.1.3 Electrical interfaces ................................................................. 78 RX11_ADIOS_SEDv5.3_07October2013_Final.docx -5- 6.2 6.3 6.4 6.5 6.6 6.7 7 6.1.4 Strain gauges .......................................................................... 78 Electrical interfaces applicable to REXUS ............................................ 79 Campaign Preparation ......................................................................... 80 6.3.1 List of tools .............................................................................. 80 6.3.2 List of spare parts .................................................................... 80 6.3.3 List of campaign attending team members .............................. 80 Launch Site Requirements ................................................................... 81 Preparation and Test Activities at Esrange .......................................... 82 6.5.1 Assembly of spring setup......................................................... 82 6.5.2 cRIO preparation ..................................................................... 82 6.5.3 Arm plugs ................................................................................ 82 Timeline for countdown and flight ......................................................... 83 Post Flight Activities ............................................................................. 83 DATA ANALYSIS PLAN ............................................................................... 85 7.1 Data Analysis Plan ............................................................................... 85 7.2 Launch Campaign ................................................................................ 86 7.3 Results ................................................................................................. 86 7.3.1 Experiment 1 ........................................................................... 86 7.3.2 Experiment 2 ........................................................................... 88 8 ABBREVIATIONS AND REFERENCES ....................................................... 91 8.1 Abbreviations ....................................................................................... 91 8.2 References ........................................................................................... 93 8.3 List of tables and pictures ..................................................................... 95 Appendix A – Experiment Reviews ....................................................................... 99 Appendix B – Outreach and Media Coverage ..................................................... 105 ............................................................................................................................ 110 Appendix C - papers and publications ........................................................... 120 Appendix D – Results EXP 1............................................................................... 130 Appendix E – Results exp 2 ................................................................................ 138 Appendix F – Strain gauge requirement proposal ............................................... 144 Appendix G – Additional Technical Information................................................... 153 RX11_ADIOS_SEDv5.3_07October2013_Final.docx Page 6 ABSTRACT ADIOS (ADvanced Isolation On Sounding-rockets) is a development project for a cost-effective µ-gravity platform on sounding rockets. The previous project VibraDamp has been successfully tested on REXUS 7. This abstract will discuss the advancement in flight readiness of the platform by a design update. Due to movements and vibrations induced by other experiments on a sounding rocket, the quality of the µ-gravity is extensively reduced. To decouple an experiment with stringent requirements on the µ-gravity, a group of students of the FH Aachen University of Applied Sciences invented a platform as free flying experiment container. This platform is theoretically able to decrease the influences of the residual forces onto the contained experiment down to five percent. The technical design of the VibraDamp project, working on the eddy current principle, achieved a damping of up to 85% for peaks and 65% on average. The major goal of ADIOS is to increase the average damping and hence, to increase the quality of the µ-gravity by design improvements of the platform. During the reduced gravity flight phase, the experiment container is uncoupled and free flying. The container is damped by small neodymium magnets. The first eigenfrequency of the container is given by the adjustment of small beam springs. During launch and landing, the container is securely locked to avoid damage onto the experiment. The secondary goal is to decrease the mass of the platform by using carbon fibre reinforced materials. A lower mass of the platform yields in a longer reduced gravity phase due to a higher altitude of the ballistic flight. Additionally, the mass of the contained experiment could be extended. The big advantage of the ADIOS platform is the easy adaption to a broad range of different types of experiments with demanding requirements to the quality of µ-gravity. The damping system can be easily adjusted to the Picture 1: Overview - ADIOS Experiment Platform RX11_ADIOS_SEDv5.3_07October2013_Final.docx Page 7 size and mass of the contained experiment by the layout of magnets and springs. A single small box of electronics will run the locking mechanism independently from the experiment. In the actual status, the ADIOS platform will be tested on the REXUS 11 flight in March 2012 in Kiruna / North Sweden. Acceleration sensors mounted on the free flying experiment container and on the rocket structure will measure the residual acceleration onto the elements of the platform. Calculations with Fourier transformations can determine the difference of accelerations between the container and the rocket structure. To measure the acceleration onto the container, a highly accurate measurement system has to be established. Usually, the noise of the sensors is higher than the measured signal. Therefore a complicated compensation of the signal and processing of the data is compulsory to obtain evaluable data. The applicability of the principle is already proven by the VibraDamp project on REXUS 7. If the improvements of the ADIOS platform design accomplish the goal of 85-90% damping in average, the platform can be offered to scientific experiments to use cost-effective sounding rockets without a rate control system. RX11_ADIOS_SEDv5.3_07October2013_Final.docx Page 8 1 INTRODUCTION 1.1 Scientific / Technical Background In designing a rocket one is faced with the challenge of developing a lightweight structure on the one hand which is able to withstand the high mechanical loads during launch and landing on the other hand. Observing both requirements is hardly achievable without a good knowledge of all acting forces and resulting loads onto the structure during the flight of the rocket. For that, tension shall be measured during launch and landing because those are the critical phases with high mechanical loads. During the reduced gravity phase, there is no tension measurement necessary because the acting forces are very small. But they might be too high for experiments which rely upon a high microgravity quality. For those, a passively damped experiment container will be designed which shall isolate the experiment against external forces using the eddy current principle for damping. Because this experiment container shall be a Free Flying Experiment Device (FFED), it has to be fixed to the outer structure during launch and landing to prevent any movement of the FFED and therefore, any disturbances or even damages caused by the FFED. This will be done using a locking mechanism. 1.2 Experiment Objectives The ADIOS Experiment is divided in two different experimental parts with different goals. The primary part (EXP1) is the further development of the VibraDamp Project, launched on RX7 in March 2010. The goal is to measure the performance of the developed passive isolation by the comparison of the accelerations on the damped system and the rocket structure. The secondary part (EXP2) is the practical verification of a numerical analysis of the loads and forces acting onto the rocket structure during the whole flight time. Due to the loads, tensions shall be measured at different interesting points on the structure like motor separation level, nose cone and centre of mass. RX11_ADIOS_SEDv5.3_07October2013_Final.docx Page 9 1.3 Experiment Overview The ADIOS experiment is divided in two parts (EXP 1 and EXP 2). EXP 1 contains following hardware: FFED including magnets and springs Locking mechanism including three servo motors, clamping rings, and limit switches Two tri axial acceleration sensors EXP 2 contains following hardware: 12 strain gauges and amplifiers (8 one-axial, and 4 two-axial strain gauges) 6 temperature sensors for temperature compensation of the measured strain Both experimental parts will fit into a 300 mm REXUS module. The data acquisition (DAQ), the control of the locking mechanism, and the communication with ground are going to be handled by a real-time controller. RX11_ADIOS_SEDv5.3_07October2013_Final.docx Page 10 1.4 Team Details 1.4.1 Contact Point The Team ADIOS can be contacted: [email protected] [email protected] Phone: +49 (0)176 61261739 Picture 2: ADIOS-Logo FH Aachen Fachbereich 6 / Luft- und Raumfahrttechnik Studierendenprojekt ADIOS Hohenstaufenallee 6 – Room O2105 52064 Aachen NRW / Germany Picture 3: URL Link to ADIOS Website Name E-Mail Phone Stefan Krämer [email protected] +49 176 / 61261739 Brigitte S. Müller [email protected] Dominique-Jonas Daab [email protected] Lysan Pfützenreuter [email protected] Vladimir Klassen [email protected] Joana Hessel [email protected] Fabian Baader [email protected] Tobias Wagner Tobias.Wagner @alumni.fh-aachen.de Georg Gdalewitsch [email protected] Johannes Stahl [email protected] Andreas Gierse [email protected] Table 1: Contact details of the Team members RX11_ADIOS_SEDv5.3_07October2013_Final.docx Page 11 1.4.2 Team Members Stefan Krämer (B.-Eng) Project management, Structure, Science 1st Semester – Astronautical Engineering (M.-Sci) FH-Aachen - Luft- und Raumfahrttechnik Apprenticeship: Precision Mechanic - Technician Brigitte S. Müller Outreach / PR, Management Assistance 12th semester – Astronautical Engineering (B.–Eng) FH-Aachen - Luft- und Raumfahrttechnik Apprenticeship: Precision Mechanic - Technician Dominique-Jonas ( Nick ) Daab Electronics 12th semester – Astronautical Engineering (B.–Eng) FH-Aachen - Luft- und Raumfahrttechnik Apprenticeship: Mechatronics - Technician Lysan Pfützenreuter (M. -Eng) Science, Programming, Data Acquisitioning Graduated – Astronautical Engineering FH-Aachen - Luft- und Raumfahrttechnik Joana Hessel (B.-Eng) Structure 1st semester – Astronautical Engineering (M.-Sci) FH-Aachen - Luft- und Raumfahrttechnik RX11_ADIOS_SEDv5.3_07October2013_Final.docx Page 12 Fabian Baader (B.-Eng) Programming / Experiments Controle 1st semester – Astronautical Engineering (M.-Sci) FH-Aachen - Luft- und Raumfahrttechnik Tobias Wagner (B.-Eng) Structure, Electronics 1th semester – Astronautical Engineering (M.-Sci) FH-Aachen - Luft- und Raumfahrttechnik Georg Gdalewitsch (B.-Eng) Data Acquisitioning, Data Analysis S/W 3rd semester – Astronautical Engineering (M.-Sci) FH-Aachen - Luft- und Raumfahrttechnik Dipl.- Ing Andreas Gierse Science, Electronic Development Graduated FH-Aachen - Luft- und Raumfahrttechnik Picture 4: Team ADIOS RX11_ADIOS_SEDv5.3_07October2013_Final.docx Page 13 1.4.3 Team structure At the moment the Team consists of ten team members studying at the FH Aachen. Participants of the former project VibraDamp are supporting the team with knowledge and the experience regarding the REXUS-Project. Figure 1: Team structure The management is the major link between the Team ADIOS and the EUROLAUNCH Consortium, the DLR RY and the DLR Space Agency on the one hand side and the team members on the other hand side. Acquiring sponsors and handling the financial budget and manpower is another aspect of the management. The structure will be improved by using light weight carbon fibre composites. Due to this change in the construction new calculations and FE-Method simulations have to be made to proof the reliability of the experiment. The responsible team members will do the CAD-Modelling and the structural analysis. In a close relationship to the structure the science branch is developing the simulations on which the experiments will base. Important is a good knowledge of structural analysis and design. The major part of this workload will be within the framework of at least one master thesis. The major part of work in the field of programming will cover the development of the S/W for the cRIO with LabVIEW to control the experiment functions as well as the DAQ. Electronics will be a complex and comprehensive part of the experiment. The power supply and the sensor control needs to be developed and build. RX11_ADIOS_SEDv5.3_07October2013_Final.docx Page 14 The outreach program and the link for public relations is covered by Brigitte Müller. Due to the parallel work for two other student projects she is in touch with the department of P/R of the FH Aachen and to local media. The administration of the ADIOS website will also be done by Brigitte Müller. The ADIOS-Logo has been created by Sabina Zits, a Communication Design student of the department of Design of the FH Aachen. RX11_ADIOS_SEDv5.3_07October2013_Final.docx Page 15 2 EXPERIMENT REQUIREMENTS 2.1 Functional Requirements The essential requirements to the experiment to achieve reliable data are: EXP1: Verification of damped System / FFED F.1: The experiment shall measure the accelerations on the damped FFED during reduced gravity phase using a tri-axial acceleration sensor. F.2: The experiment shall measure the accelerations on the undamped structure during reduced gravity phase using a triaxial acceleration sensor. F.3: The damping system shall isolate the FFED from influences due to the rocket F.4: The locking mechanism shall prohibit any movements of the FFED during launch and landing F.5: For verification the FFED shall be excited by a defined imbalance in a broad bandwidth of frequencies. EXP2: Determination of static loads F.6: The mechanical loads onto the structure due to launch and landing shall be determined by a separate tri-axial acceleration sensor. F.7: The mechanical loads onto the rocket structure shall be determined by strain gauges mounted in three levels of the module structures during the whole flight. Infrastructure F.8: All acquired data shall be stored on a reliable data storage device. F.9: The acquired data shall be sent particularly via telemetry. F.10: The control and DAQ shall work autonomously. RX11_ADIOS_SEDv5.3_07October2013_Final.docx Page 16 2.2 Performance requirements 2.2.1 Acceleration Sensors EXP1: Verification of damped System / FFED P.1: The two tri-axial sensors need to measure accelerations with an accuracy up to 10-6 g P.2: The measuring range should be ±2 g P.3: The ACC-Sensor shall be resistant against static loads of launch: 20 g EXP2: Determination of static loads P.4: 2.2.2 2.2.3 Strain gauges (EXP2) P.5: Each strain gauge shall measure the strain with a sample rate of 4000 Hz and should measure with a sample rate of 16000Hz P.6: The strain gauges shall have a resolution of 100µε P.7: The strain gauges shall be calibrated for usage onto aluminium Isolation P.8: 2.2.4 The Isolation setup by magnets and springs shall reach an isolation of min 90 % on the FFED. Electronics P.9: 2.2.5 The acceleration data shall be acquired with a sample rate of 200 Hz The Power consumption shall be in average beneath 1 A Imbalance generator P.10: The imbalance generator shall give a defined vibration to the FFED RX11_ADIOS_SEDv5.3_07October2013_Final.docx Page 17 2.3 Design Requirements 2.3.1 Structure 2.3.2 D.1: The internal bulkhead should stay as stiff as possible by reduced weight. D.2: The Isolation shall work passively. D.3: The locking mechanism shall prohibit any movements of the FFED during launch and landing D.4: There shall be easy access to electronic boards for maintenance and calibration D.5: Electronic access via Ethernet connector at assembled status. D.6: The Experiment shall fit into a REXUS 300mm Module D.7: To economise weight the locking mechanism shall be build from carbon fibre composites Electronics, Sensors, Programming D.8: The strain gauges should be mounted on the inside of the outer structure. D.9: EXP1 and EXP2 shall work independent from each other. If one fails the other one shall not be affected seriously. D.10: The electronics shall be as simple as possible D.11: The electronic setup should be as light weight as possible D.12: The Electronics shall cope with ±28 V D.13: Power consumption needs to stay beneath 3 A peak D.14: The data volume on the cRIO shall not exceed 0,7 GB for all data D.15: The strain shall be measured at three cross-sectional areas, where one is located near the motor adapter, one is located in the Adios-experiment and a third cross-section near the nosecone adapter. D.16: The sensors shall be temperature compensated D.17: The ACC-Sensors shall be Shock resistant up to 20 g D.18: The four strain gauges of one cross-section shall be attached to the structure as shown in Figure 2. RX11_ADIOS_SEDv5.3_07October2013_Final.docx Page 18 Figure 2: Application of the strain gauges onto the structure Additional Requirements to the performance of the strain gauges: 1. The strain gauges shall be calibrated for aluminium 2. The strain gauges shall have a minimal sensitivity of 100 µε 3. The sample rate for the strain shall be the same as for the temperature 4. The data volume on the cRIO shall not exceed 0.7 GB measured for all data. 5. Each strain gauge shall measure the strain with a sample rate of 4000 Hz and should measure with a sample rate of 16000Hz 2.4 Operational Requirements O.1: The temperature of the structure shall not under-run - 20°C. O.2: The Esrange recovery crew should disarm the experiment with a transport plug. RX11_ADIOS_SEDv5.3_07October2013_Final.docx Page 19 3 PROJECT PLANNING 3.1 Work Breakdown Structure (WBS) The following work breakdown structure shows the preliminary work packages for the single subsystems. Regarding the readability, the subsystems are showed in particular in Appendix D. Figure 3: Work breakdown structure of ADIOS, status: 07 October 2013 A frequent update of the status icons shows the progress of the single processes. The caption shows the meaning of the status icons. It is also attached in Appendix D. E.g. red flags show critical processes and green ticks the already finished work packages. 3.2 Resources 3.2.1 Manpower The actual team size has been enlarged up to ten members. RX11_ADIOS_SEDv5.3_07October2013_Final.docx Page 20 The team members do their work on the project voluntarily. High motivation and the goal: the launch campaign in sight, is forcing the team to spend an uncountable amount of time to the project. The fields of specialisation of the single members represent their skills and major interests. Andreas Gierse (Member of the further project VibraDamp) is heavily supporting the team in the field of electronics. Dipl.-Ing. Rudolf Vetter, Team manager of VibraDamp is consulting the ADIOS management and gives advice in the field of structure dynamics. Mr. Dipl.-Ing. Engelbert Plescher is the reliable and important link to the university. He provides the team with his experience and expert knowledge in the field of technical aspects as well as project management. Mr. Plescher himself has participated the MAPHEUS 01 – Program of the DLR providing the RAMS experiment. He also was responsible for several parabolic flight experiments. 3.2.2 Workload The following table shows the possible workload which can be done in a week by each team member. Team member Field of work Estimated workload [h/week] Stefan Krämer Management, Structure 15+ Brigitte Müller Outreach, Website, Management assistance 10+ Dominique Daab Electronics 10+ Lysan Pfützenreuter Science, Programming 25h from 1th June 2011 Joana Hessel Structural design 8 Fabian Baader Programming cRIO 8+ Tobias Wagner Electronics, Structural design 8 Georg Gdalewitsch Programming Data analysis 10 TOTAL Table 2: Possible workload of each team member RX11_ADIOS_SEDv5.3_07October2013_Final.docx 107 Page 21 3.2.3 Budget Following an estimation of the budget needed for the successful realization of the ADIOS experiments. Subsystem Element Structure External (RX Module) Internal Sensors Buy Carbon fibre composite parts Phase On Stock (RX 7 / VibraDamp) D 2000 € Provided by ADCO D Locking Mechanism 800 € C Magnet holders 200 € D Acceleration 6x Kistler (2x out of order) 2x ASC (tri axial) 2g Strain gauges On Stock (RX 7 / VibraDamp) 3500 € (DLR) C (ordered) 691 € Sponsored by HBM C DAQ / Storage c Rio c Rio Modules 1300 € C Electronics Boards 2000 € C-D asap Amplifiers / Filters 1500 € C-D asap Isolation Magnets / Springs 50 € D Tests Hardware 1000 € D Office supplies Outreach / PR / Print paper / Posters / Stickers Project costs Table 3: Budget list of parts RX11_ADIOS_SEDv5.3_07October2013_Final.docx NI (RX 7) 500 € 14.550 € A-E Page 22 3.2.4 External Support The TEAM ADIOS is deeply grateful for the support, given by the following companies. A realisation of the ADIOS project would not be possible without their sponsoring. Thank you all! FH Aachen The application for the FH Aachen internal commission for education and studies was successful and the team ADIOS will be supported with an amount of 5000 € for the year 2011. Additionally the FH-Aachen will partially finance the participation fees and travel cost for the ELRGA-Symposium (European Low Gravity Research Association) in Antwerp/Belgium in September 2011 for three students. FH Aachen – Lehrwerkstatt Special thanks goes to the Lehrwerkstatt for the fast and uncomplicated cooperation by building structural parts for the ADIOS experiment. ADCO (Advanced Composites) The directors of ADCO assured ADIOS to provide the carbon fibre composite parts for the experiment under the condition of practical support by the team. For the sponsor it is important that the team gains experience with the material. TRACO Electronic TRACO supports the team ADIOS with two free POWER TRACO´s amounting to 90€ for the power supply unit. KNIPEX Pliers The Knipex Company is providing a Four-Mandrel Crimping Plier for turned D-Sub connector pins as a permanent loan. The plier is amounting about 1000€ and can be also used for further and parallel space related student projects. Additionally the Knipex Company has conducted a crimping course to the Team ADIOS. RX11_ADIOS_SEDv5.3_07October2013_Final.docx Page 23 Picture 5: Four-Mandrel Crimping Plier HBM Hottinger Baldwin Messtechnik: The HBM sales office in Düsseldorf-Erkrath has sponsored the whole delivery of strain gauges amounting 691€ in total. The delivery included strain gauges, glue, temperature sensors and covering silicone. ERNI Electronics The ERNI Company confirmed the sponsoring of D-Sub – connectors for the ADIOS experiment. The sponsored amount connectors is about 70 conectors including all needed accessories. The delivery is amounting about 200 €. FCT Electronics The FCT Company has sponsored the Team ADIOS by providing D-Sub connectors and pins as well tools for the assembly. HARWIN Harwin has provided the connectors for the acceleration sensors amounting 200 €. The crimping plier will be loan for the time of assembly. NI – NATIONAL INSTRUMENTS The NI Acadmic Relations Office has sponsored the Team with the required NI-Modules: 2x NI 9205 and 1x NI 9505 including accessories. The delivery is amounting 2147 € Böllhoff The Böllhoff Group Germany has Sponsored the required HELICOILS for fhe structural parts including the needed tools for RX11_ADIOS_SEDv5.3_07October2013_Final.docx Page 24 processing the threads. The delivery is amounting about 300 €. BCE Special Ceramics BCE will supply the Team ADIOS with three ACC-Interfaces for the wall mounting of the acceleration sensors. Erich Frank – Schrauben Metall- und Normteile e.K. Schrauben Frank has delivered the whole amount of more than 700 screws, nuts and bolds. E&K Leiterplatten, Heinsberg The Company E&K Leiterplatten GmbH provides the Flight Hardware- PCB´s for the ADIOS-Experiment. RX11_ADIOS_SEDv5.3_07October2013_Final.docx Page 25 3.3 Outreach Approach The outreach plan is an important part of the project. There are several ways of represent the project in the public and media. FH Aachen: There was already an interview by the department of PR of the FH Aachen and it was published at the 10th of January on the FH Aachen webpage (Appendix B). The own homepage is online on the webpage of the FH Aachen Faculty of Aeronautical and Astronautical Engineering and on update status. http://www.fb6.fh- aachen.de/lur/studienprojekte/rexus-adios/ Posters and Handouts (Flyer) in updated versions are in process. 3.3.1 Public presentations Research and Development at the FH Aachen The Team has presented the ADIOS-Project at the Research and Development Symposium of the Faculty of Aeronautical and Astronautical Engineering. The schedule is attached in the Appendix [B]. ELGRA-Symposium: A delegation of three members of the Team ADIOS is going to participate in the Symposium of the European Low Gravity Research Association (ELGRA) in September 2011 in Antwerp / Belgium. The Team has represented the project during an oral presentation at the student sessions and with a poster at the poster sessions. The poster is attached in APPENDIX B. The participation fees and travel costs will be partially financed by the FHAachen and by the ESA education office. The Team is applying for the Student Session at the biennial ELGRA Symposium in Rome / Italy in September 2013 Space Utilisation Lecture - SUT / Prof. Dachwald (FH Aachen), Prof. Willnecker (FH Aachen / DLR), Stephan Ulamec (DLR) In the framework of the SUT lecture, a presentation about REXUSRequirements and the ADIOS Experiment has been held by Stefan Krämer on the 14th of November 2011. RX11_ADIOS_SEDv5.3_07October2013_Final.docx Page 26 NI-User Symposium 2011 Aachen The Team has been represented by Stefan Krämer at the National Instruments User Symposium in Aachen on the 2 nd of December 2011 with an 30 minutes presentation about REXUS and ADIOS in combination with NIComponents. 21st ESA Symposium for Rocket and Balloon related Research The Team ADIOS is going to present the results of the two experiments in the framework of the ESA Symposium by an oral presentation. The symposium takes place in Thun, Switzerland between the 9th and 13th of June 2013. 3.3.2 Publications, Papers and Abstracts Abstracts for the Abstract-Book of the ELGRA-Symposium 2011 in Antwerp. Publicated at ISBN Paper for Journal: Microgravity Science and Technology, ISSN: 0938-0108, Journal no. 12217, Springer Verlag Paper for 21st ESA Symposium on Rocket and Balloon Related Research 3.4 Development and Testing of a System to Damp Vibrations for Micrigravity Experiments on Sounding Rockets (Stefan Krämer et al. – EXP1) Experimental In-Flight Modal-Analysis of a Sounding Rocket Structure (Andreas Gierse et al. – EXP2) Risk Register Table 3: Risk Register ID Affected Parts Risk (& consequence if not obvious) P S PxS Action TC10 Interfaces Damage during test B 2 Very low Spare parts TC20 Motors Damage during test A 1 Very low Spare parts already on stock RX11_ADIOS_SEDv5.3_07October2013_Final.docx Page 27 SF10 Motors Damage during flight A 3 Very low Experiment shut down TC30 cRIO Damage during test A 3 Very low Spare part already on stock MS10 cRIO / Programme failure during flight B 2 Very low Loss of data Software MS20 cRIO Damage during ascent B 3 Low Total loss of all data VE10 cRIO Damage during µg-phase A 4 Very low Reliable structure cage (Loss of locking control) MS30 cRIO Damage during descent A 2 Very low Reduced EXP2 Performance MS40 Sensors Damage during launch D 3 Medium Loss of data EXP1 MS50 Sensors EXP1 Damage during ascent A 2 EXP2 Very low Loss of data EXP2 TC40 Electronics Damage during test C 2 Low Spare parts MS60 Electronics Damage during flight A 2 Very low Loss of data TC50 Imbalance Damage during test A 1 Very low Spare parts Damage during flight A 2 Very low Reduced EXP1 performance Generator MS70 Imbalance Generator RX11_ADIOS_SEDv5.3_07October2013_Final.docx Page 28 3.5 Time Schedule Figure 4: preliminary time schedule RX11_ADIOS_SEDv5.3_07October2013_Final.docx Page 29 4 EXPERIMENT DESCRIPTION 4.1 Experiment Setup The experiment ADIOS is divided into two sub experiments. Those experiments will work independently and will not influence each other in case of malfunction of one experiment. The only malfunction which would affect both experiments would be a failure of the cRIO. 4.1.1 EXP1: Verification of the damped System / FFED The experiment consists of a FFED, locked between two disks during the launch and impact phase. The FFED is the damped container which easily can be customized for an experiment with a higher requirement on reduced gravity or micro gravity in an excited system like a rocket or a space station. Parts of the container need to be built from a metal to enable the eddy current principle in reaction with the magnets, mounted on the locking mechanism. In the weight of the FFED is not improved to have a similar mass like a real experiment. To achieve the goal of minimized influences due to the outer structure onto the FFED the knowledge of the effective residual acceleration inside the FFED is essential. This verifies the working principle and improves the TRL of this type of a passive damping system. RX11_ADIOS_SEDv5.3_07October2013_Final.docx Page 30 FFED with ACC sensor cRIO Locking Mechanism Bulkhead with power supply ACC-Sensor Arm-Plug Connector Picture 6: Overview of the Experiment The residual accelerations onto the FFED are very small. Depending on the sensor setup the noise could be higher than the measured data. To avoid this loss in accuracy the FFED will be excited by an imbalance generator. This generator, probably known from the alarm of mobile phones, gives a defined acceleration in variable frequencies which can be determined and compared. The excitement will act for about 20-30 s and will be hardly measured at the outer structure, neither it would affect other experiments. First estimations showed that a maximum acceleration of 800 µg would suffice to excite the 2kg FFED. This equates an imbalance of with a rotating disk of r ≈ 22 mm. An accurate calculation can be done after the exact knowledge of masses. 4.1.2 EXP2: Determining of static loads The mechanical loads acting on the structure during the flight will be measured by strain gauges in critical points. These points need to be determined by structural analysis by building a FE-Model and simulating the acting forces. Presumably several measuring points need to be set in several levels allotted on the inside of the module structures, even at other experiment modules. Due to the setup the strain gauges will be temperature compensated. It need to be confirmed if it is necessary to amplify the signal before transmitting it to the DAQ in the ADIOS Module. RX11_ADIOS_SEDv5.3_07October2013_Final.docx Page 31 4.2 Experiment Interfaces 4.2.1 Mechanical 4.2.1.1 Cable feed through and D-Sub mountings The cable mountings will be placed at 180° and a mounting for the D-Sub connectors will be provided in this position. The D-Sub mounting provides space for five connectors (D-Dub 15 Pin). The cable harness is fixed by cable guides (Picture 8: Cable guide) which are glued to the RX-Module wall. Picture 7: Cable Feed Through at 180° Picture 8: Cable guide RX11_ADIOS_SEDv5.3_07October2013_Final.docx Page 32 4.2.1.2 Module / Module The structural connection is given and unchanged by the supplier of the RX300mm Module. The ADIOS Module will provide the required space for cablings in the connection section between ADIOS and the service module. RX11_ADIOS_SEDv5.3_07October2013_Final.docx Page 33 4.2.2 Electrical The interface between the RX service module and the ADIOS experiment is a D-SUB 15 female connector. It will be plugged to a junction box, which distributes the electrical power to several components and includes the power supply for the CompactRIO itself. Signals EXP1: 70s on / 320s off: 80s on / (320s) off: start of data acquisition (±2g sensors are switched on) start of experiment (unlock locking mechanism) Relocking must be finished at least 10sec. before parachute opens. EXP2: 10 seconds before ignition: 1 seconds after impact: start of experiment end of experiment Power The ADIOS experiment is completely supplied by the REXUS service module. An application of batteries is not necessary. Up- and downlink An uplink to the ADIOS experiment is not needed. The amount of collected data will be too much to transmit it in total to ground. There is no possibility to filter the data in real time to send a preselected data package to ground. The ADIOS experiment data will be stored in total on the build in storage of the cRIO. Status information of the sensors, motors and power supply will be sent and processed in real time on ground to have the actual status of the functions of the experiment during the flight time. 4.3 Experiment Components The following table shows a rough estimation of the weights and size. In particular the single parts with more accurate information according the weight are shown in APPENDIX D RX11_ADIOS_SEDv5.3_07October2013_Final.docx Page 34 Experiment mass (in kg): Experiment dimensions (in m): Experiment footprint area (in m2): Experiment volume (in m3): Experiment expected COG (centre of gravity) position: ca.14 kg 0,3120 0,0995 0,0310 t.b.d. asap Table 4: Experiment summary table 4.4 Mechanical Design The mechanical design is based on the design of the VibraDamp experiment. Some aluminium parts will be replaced by CFC-components to reduce mass. During PDR the team agreed to use a 300mm RX-Standard module to save approximately 0.9 kg on the structure additionally. The chosen material for the carbon fibre reinforced parts will be a MD55 carbon fibre laminate with an anodized and vented aluminium honeycomb. This material is space environment tested and certificated and will be processed in a qualified workshop. Part Laminate Sandwich Bulkhead MD 55 – 8 layer 1” AL honeycomb (Locking mechanism MD 55 – 8 layer 1/3” AL honeycomb) Table 5: Carbon fibre materials All mountings and threads in the laminate will be reinforced by AL-Inlets with HeliCoils to avoid deformations of the honeycomb. The sponsoring company ADCO is going to support the planning by consulting the structure responsible team members. The principle of the locking mechanism as well as the mounting on the outer structure will not be changed because it is tested and worked properly on RX7. RX11_ADIOS_SEDv5.3_07October2013_Final.docx Page 35 The electronic boxes attached on the FFED are going to be removed and the electronic boards will fit into the FFED. Therefore, the inner volume has been enlarged by changing the position of the walls. 4.4.1 Locking Mechanism The LM works on the principle of form fitting. Two rings on the upper and lower side of the FFED are holding it during launch and landing. The lower Ring is attached directly to the module walls. During the reduced gravity phase, three geared electric stepped motors are driving the upper ring to enlarge the space in between the LM and the FFED is free flying. Bevelled circles on the upper and lower ring are fitting exactly to the bevels on the FFED. This assures the perfect position during locking. Positioning sticks are mounted on the FFED and are fed through the LM – rings. If the LM has a malfunction during locking after the reduced gravity phase, these positioners avoiding damage to the module and electronics as well as DAQ during landing. Due to this the FFED is not able to move further than a few mm away from the x-axis of the rocket. RX11_ADIOS_SEDv5.3_07October2013_Final.docx Page 36 Picture 9: Locking mechanism and FFED A limit switch will assure the optimised position of the LM and hence a defined distance between the LM-rings. This is necessary to assure the calculated magnetic damping. Picture 10: Motor and attachment 4.4.2 FFED (Free flying experiment device) The FFED is the experiment container, which could be offered to µgexperiments. Later on the volume could be easily adapted to the size of an experiment. In the ADIOS experiment the FFED contains the ACC-Sensor and the amplifying PCB as well as the imbalance generator. The FFED is RX11_ADIOS_SEDv5.3_07October2013_Final.docx Page 37 secured against damage due to a malfunction of the locking mechanism. Pins on top and on the bottom of the FFED are penetrating the locking mechanism and avoid an undesired movement out of the boundaries of the locking mechanism. Picture 11: FFED with ACC-Sensor 4.4.3 Bulkhead The Bulkhead is a complete new design. A Carbon fibre sandwich with an aluminium honeycomb will serve the basic plate. Inlets are employed at the places where forces are acting on the structure. For example, the anchorage of the cRIO as well as the EXP2 PCB Box, are tubes which are glued into the structure of the honeycomb between the CFC plates. Picture 12: M5 Inlet RX11_ADIOS_SEDv5.3_07October2013_Final.docx Page 38 To save weight by high stiffness, the amount of used inlets is as low as possible. The screws for the cRIO and the EXP2 PCB-Box are also holding the interfaces for the ACC-PCB and the junction box. The EXP2 PCB-Box contains the four PCB´s for the amplification of the strain and temeperature measurements. The design will assure the easy access to the PCB´s for calibration and test. It is mounted to the bulkhead by six M5 screws. Picture 13: EXP2 PCB-Box Picture 14: Bottom view of the Bulkhead with PCB-Dummies RX11_ADIOS_SEDv5.3_07October2013_Final.docx Page 39 Picture 15: Bulkhead with cRIO and EXP2 PCB-Box The cRIO is mounted to the EXP2 PCB-Box and reinforced by a aluminium belt which is fixed on the bulkhead. The Belt also avoids a loosening of the NIModules of the cRIO. 4.4.4 Arm plugs For the Arm plugs the RX-Module needs to be processed for a hole of 40 mm x 24 mm. The connector will be mounted from the inside to the wall and closes the hole. A 9 Pin D-Sub will be used as an Arm plug which can easily assembled and disassembled to the experiment. RX11_ADIOS_SEDv5.3_07October2013_Final.docx Page 40 Picture 16: Arm plug interface Picture 17: Arm plug interface front view RX11_ADIOS_SEDv5.3_07October2013_Final.docx Page 41 Picture 18: Arm Plug interface with cover 4.4.5 Position of acceleration Sensors A late change has occurred in changing the position of the verifying acceleration sensor on the bulkhead. Therefore a new position is fixed on the inside of the outer rocket structure. The reasons for the change are the improved comparability of the measured data. There are now no parts with unknown structural behaviour in the way of the vibrations. A structural analysis of the single carbon fibre bulkhead is complicated and would not assure a detailed knowledge of the isolating behaviour of the bulkhead itself. To keep the sensor in an acceptable temperature range it is necessary to use insulating material for the interface between RX-Module and acceleration sensor. Therefore we need to use ceramic material with a heat transmission factor of 2 W/m^2 like Z700.This interface will be supplied by BCE Special Ceramics. 4.4.6 Mass reduction Forced by the review board during the PDR the mass of the experiment has to be reduced down to 13 kg. The goal will be reached by using light weight CFC including an aluminium honeycomb for the bulkhead. For the LM there are two possible options of mass reduction. The first option is the milling of cut outs into the existing VibraDamp parts. The second option is the redesign by using CFC .In the table in APPENDIX D the single parts are shown with the actual weight and the estimation for the new parts. RX11_ADIOS_SEDv5.3_07October2013_Final.docx Page 42 The VibraDamp 400mm RX Module will be replaced by a 300 mm RX Module. Due to this change it is possible to save up to 0.95 kg. The FFED will be designed smaller and hence lighter. The casing material will be changed from 2 mm to 1mm AL sheet metal. A cut out, also used as access hatch, will save weight as well. The redesign of the brackets saves up to 50% in weight. Regarding the financial budget it is compulsory to work with highest cost effectiveness. It is needed to evaluate the price and workload to build the Picture 19: Old and new design of the LM aluminium rings carbon fibre composites in comparison with the processed VibraDamp parts. RX11_ADIOS_SEDv5.3_07October2013_Final.docx Page 43 Picture 20: Alternative CFC LM design Picture 21: Mounting of locking mechanism RX11_ADIOS_SEDv5.3_07October2013_Final.docx Page 44 Figure 5: Structural levels The bulkhead and the locking mechanism are mounted on the structure. The mountings therefore are shown in the following picture. RX11_ADIOS_SEDv5.3_07October2013_Final.docx Page 45 4.4.7 Structural Analysis In the following pictures the results of the modal analysis of the critical parts and assemblies are shown. The excitation is simulated by a random vibration with 20 Hz - 20.000 Hz. The pictures show the deformation. The material is aluminium. Picture 22: deformations of the FFED Picture 23: Deformations of the LM bottom plate RX11_ADIOS_SEDv5.3_07October2013_Final.docx Page 46 Picture 24: Deformations of the LM top plate Picture 25: Deformations of the Motor mounting Picture 26: Deformations of the Brackets RX11_ADIOS_SEDv5.3_07October2013_Final.docx Page 47 The results show that there will not be any critical deformations of the structural parts. 4.4.8 Drawing Number System To keep an overview over the CAD parts and drawings a numbering system was invented. The CAD parts and assemblies will be archived in folders of levels of the structure. The single parts will have version numbers to easily identify status of progress and changes. Because of the evaluation of weight the materials of the different parts are named in the system. RX11_ADIOS_SEDv5.3_07October2013_Final.docx Page 48 4.5 Electronics Design The ADIOS experiment consists of two different experiments. The first experiment (EXP1) verifies the quality of the damping system. EXP 2 will measure the loads and forces which affect the structure of the rocket during the whole flight. 4.5.1 Block diagram of the ADIOS experiment Figure 6: Block diagram ADIOS experiment RX11_ADIOS_SEDv5.3_07October2013_Final.docx Page 49 Figure 7: Overall schematic ADIOS experiment electronics 4.5.2 EXP1 The accelerations are measured by a tri-axial acceleration sensor on the FFED and by an identical sensor on the structure. The measured data are stored in a CompactRIO module. To drive the locking mechanism three motors are required. An additional motor will be mounted on the FFED to drive a defined imbalance. The motors are driven by the CompactRIO module NI 9505. Electrical Components: Junction box The interface between the REXUS service module and the ADIOS experiment is a D-SUB 15 female connector. It will be plugged on a junction box which distributes the several electrical components. The Junction box consists of PCB1 and an RS232. PCB1 is implemented with three Traco power DC-DC converters. Each experiment is supplied by a Traco TEN 20-2423 DC-DC converter with a demand of 20W. It provides a voltage of ±15V at a current of 667mA. The DC-DC converters are enabled by signals of the REXUS service module (SODS/SOE). That is realised by a FET, which distributes the converter with an input voltage of 28V after switching. The third DC-DC converter is used for power supply of the CompactRIO module. The Traco TEN 30-2413 DC-DC converter has a demand of 30W and provides an output voltage of 15V at a current of 2A. That DC-DC converter is directly linked to the input voltage of 28V of the REXUS service module which implies that the CompactRio module is booting before liftoff. On PCB1 an optocoupler is used to convert the liftoff- RX11_ADIOS_SEDv5.3_07October2013_Final.docx Page 50 signal (LO) of the REXUS service module to a TTL-signal which is linked to the CompactRIO´s serial interface. Schematic 1: Junction Box (PCB1) RX11_ADIOS_SEDv5.3_07October2013_Final.docx Page 51 Picture 27 : layout junction box (PCB1) RS232 converter (PCB4) A RS232 module is used to provide the communication between the REXUS service module and the CompactRIO´s serial interface. The circuit of the converter was found on http://www.amateurfunkbasteln.de/rs485/rs485.html. Schematic 2: RS232 converter (PCB4) RX11_ADIOS_SEDv5.3_07October2013_Final.docx Page 52 CompactRIO The CompactRIO has several modules: - Module NI 9505 drives the motors for the locking mechanism. A second Module 9505 drives the motor for the imbalance generator. The two modules NI 9206 are the interfaces between the CompactRIO and the acceleration sensors as well the strain gauges. ±2g tri-axial sensors Every sensor needs its own circuit board (PCB2). To provide short ways for the unamplified signals, the circuit board is situated next to the acceleration sensor. The sensor measures in three axes. Every axis has its own data channel. Therefore the circuit board is realised with three measured data amplifiers. The two sensors are powered by one Traco TEN 20-2423 DC-DC converter which is located in the junction box. Motors The three motors of the VibraDamp experiment have worked very well that we decided to use this type again. These motors are supplied by one of the 9505 modules of the CompactRIO. The used motors are provided by Maxon Motors. The details are listed below. - A-max 26 (12V, max 4W) Model 110173 GP26B Planetary gear Model 144044 An additional motor which is supplied by the second NI 9505 module of the CompactRIO drives the imbalance generator. RX11_ADIOS_SEDv5.3_07October2013_Final.docx Page 53 Picture 28: Motor FFED Limit switch To switch off the motors, which drive the locking mechanism, a limit switch is mounted on the structure. An Omron D2F-01D3 ultra sub miniature basic switch is used. To verify the surviving of the switch during the liftoff, it will be tested on the shaker and in the vacuum chamber. During the liftoff phase the limit switch doesn’t have any function. Thus there is no effect on the experiments when it switches while launching of the rocket. This type of switch is recommended for the use in CUBE-SAT´s. Picture 29: Limit Switch Circuit board components: For the VibraDamp experiment, several electronic components were already tested in a vacuum chamber. Those components will be used on the ADIOS experiment as well. Components which are different to the VibraDamp experiment were also tested in the vacuum chamber. RX11_ADIOS_SEDv5.3_07October2013_Final.docx Page 54 Picture 30: Circuit board components during VibraDamp thermal / vacuum test Circuit boards / Printed circuit boards (PCB): The circuits are drawn in TARGET 3001. That program allows also a derivation of the electrical circuit to the layout of the PCB. The PCBs will be produced and drilled Otto Junker GmbH in SimmerathLammersdorf. The assembly and the soldering of the PCBs will be at FH-Aachen. Circuit boards will have a 35µm copper layer. Connectors: To link the several electronic components D-Sub 9 Pin, 15 Pin, and 25 Pin connectors are used. Turned pins which are crimped with the Knipex Four-Mandrel Crimping Pliers will provide a secure connection. To realise the connection from the acceleration sensors to the belonging PCB Harwin Datamate connectors (Vertical PC Tail Reverse Fix) are used. The connectors are screwed directly on the PCB. The Pin configuration of the connectors is specified at special documents. Each connector has its own document which shows the gender, the location and the function of the pins. RX11_ADIOS_SEDv5.3_07October2013_Final.docx Page 55 Table 6: connector pin configuration Cabling: At FH-Aachen we have a LI-F12YC11Yö 3x2x0,25mm² cable with a length of several hundred meters. That cable will be split into the single strands which have 6 different colours. The aperture of 0,25mm² equates to the AWG 24 (American Wire Gauge). The cable coating is heat resistant which was tested in the climate camber. Picture 31: cable DC-DC converter Each experiment is supplied by a Traco TEN 20-2423 DC-DC converter with a demand of 20W. It provides a voltage of ±15V at a current of 667mA. A Traco TEN 30-2413 DC-DC converter which has a demand of 30W, provides an output voltage of 15V at a current of 2A. That DC-DC converter supplies the CompactRio module. RX11_ADIOS_SEDv5.3_07October2013_Final.docx Page 56 Picture 32 : Traco Power DC-DC converter Optocoupler On PCB1 an optocoupler is used to convert the liftoff-signal (LO) of the REXUS service module to a TTL-signal which is linked to the CompactRIOs serial interface Test-box / Fuse-box The Test-box is used to safeguard the service module of the REXUS rocket. For the first initiation, it is switched between the service module and the ADIOS experiment. The 15 pin D-sub connector 28V wires (pin 1 and pin 9) are conducted to a fast 2,5A fuse. The fuse is mounted on PCB4 which is located in the Test-box / Fuse-box. The housing of the Test-box / Fuse-box has an input- and an output-15 Pin D-sub connector. Sensors On the ADIOS experiment two tri-axial ±2g sensors (ASC 5511LN) will be used. For every sensor three single amplifiers will be mounted on one circuit board (PCB2). The two sensors are powered one Traco power DC-DC converters. RX11_ADIOS_SEDv5.3_07October2013_Final.docx Page 57 Picture 33 : ASC ±2g acceleration sensor Schematic of EXP1 (PCB2): The circuit was build and tested on a breadboard. It also will be tested on a pendulum when the test sensor arrives. The principle depends on a simple one stage amplification. To realize a gain factor of about 1000, an analog Device OP177 will be used. The OP177 is offering a cut off frequency of nearly 100Hz at a closed loop gain of 70dB at 20°C. Schematic 3: acceleration amplification (PCB2) RX11_ADIOS_SEDv5.3_07October2013_Final.docx Page 58 4.5.3 EXP2 Electrical components: CompactRIO A second module NI-9205 is used for the DAQ of the strain measurement. Strain gauges and temperature sensors There will be 8 one-axial strain gauges attached to two cross-section areas of the REXUS rocket as outlined in Figure 2. They are measuring the strain in flight direction. There will be 4 two-axial strain gauges located inside the ADIOS-experiment. First rough estimations show that there will be a maximum deformation of 0.6 mm near the motor adapter. Because the orientation of the rocket is not predictable there have to be at least two measurements of the strain at one cross-section which are displaced by 90 ° to each other. Because one measurement cannot be used to differentiate between bending and longitudinal excitations a second pair of strain gauges has to be used which are symmetrically with respect to the first two strain gauges attached to the structure. To follow the oscillating deformations a second and third measurement cross-section are required. One will be inside of the ADIOSexperiment and one should be near to the nosecone adapter. Each strain gauge demands an amplifier. The data of the strain gauges has to be temperature compensated. Due to the high temperature gradient during launch and landing it is not applicable to use strain gauges in a full-bridge configuration. Hence, the temperature compensation has to be outsourced as post-flight activity. For that the temperature of the structure has to be measured during flight. There will be 2 temperature sensors at each cross section. The sizes of the train gauges are very small and the required space for the wall application will not exceed 20mm x 20mm for each measuring point. The cables will be assembled to one cable harness which leaves the module. HBM, manufacturer and sponsor of the strain gauges, provided us a package of 10 x 120 Ω linear strain gauges for testing the application and function of the amplification. These strain gauges will be tested at the VibraDamp REXUS 7 Module. The actual size of the strain gauges is shown in the following pictures. RX11_ADIOS_SEDv5.3_07October2013_Final.docx Page 59 Picture 34: linear strain gauge (350 Ω) Picture 35: T-rosettes strain gauges (350 Ω) RX11_ADIOS_SEDv5.3_07October2013_Final.docx Page 60 Picture 36: Temperature sensor (350 Ω) Picture 37: linear strain gauge for testing (120 Ω) RX11_ADIOS_SEDv5.3_07October2013_Final.docx Page 61 Picture 38: strain relief for cabling A detailed introduction to the assembly is explicitly shown in APPENDIX C in the document RX11_ADIOS_SGRP_v1.6.pdf [14] Schematic of EXP2 (PCB3): Four circuit boards are used (PCB3) for EXP2. Every circuit board has four strain gauges amplifiers and two amplifiers for the temperature sensors. The strain gauges and the temperature sensor are operated with a constant current of an (JRC) Dual High Current Operational Amplifier NJM4556AD. The flowing current is compared to a common sensor signal very high (4mA – 20mA) and has a very constant value. Thus the measuring cable is highly resistant against irradiation. That technology is immune to the inductance of the measuring cable which allows cable length up to 100m, too. The housing of the NJM4556AD shelters two operational amplifiers. The first operational amplifier provides the constant current which flows through the sensor. The second operational amplifier is an analogue summer and is able to amplify the output signal. The first operational amplifiers output voltage changes if the resistance of the sensor varies. Now the offset voltage is compensated with the analogue summer. The residual voltage is amplified and the output value is stored in the CompactRio module. To ensure exact measurement the circuit has to be calibrated in Kiruna. RX11_ADIOS_SEDv5.3_07October2013_Final.docx Page 62 Schematic 4 : circuit EXP2 (PCB3) Picture 39 : layout EXP2 (PCB3) 4.5.4 Arm plugs To ensure a soundly active experimental procedure during flight it is necessary to pass some passive test runs on ground before. It is therefore of crucial importance that the ADIOS experimental module can be placed safely into an armed und disarmed mode. This determination will be implemented by using three different types of arming and disarming plugs: RX11_ADIOS_SEDv5.3_07October2013_Final.docx Page 63 1. The flight plug has to be assembled before flight and closes the power connection to the service module. All dynamic systems are set to active. The defined experimental procedure can be actually performed. 2. The test plug is used for ground testing in horizontal condition. All dynamic systems are set to inactive. In this way the free flight experimental device FFED will be still fixed by the closed locking mechanism and take no damage during the bench test in the final assembled status under gravity. The defined experimental procedure will be performed in virtual simulation. 3. The transport plug will be used for the transport to Kiruna as well as after landing to open all power lines to the cRIO and to avoid an accidental reboot, which results in a deletion of memory and loss of all data. The technical implementation is carried out by a manual plug-in mechanism with D-Sub ports. As the rocket during the test phase is fully integrated, the mechanism must be accessible from the outside, i.e. it connects the experimental module located in the rocket with the outer shell of the rocket. The unit consists of a machined metal housing to which a total of three D-Sub connectors (2 x 9-pin, 1 x 15-pin) to be arranged opposite each other. The front-positioned D-Sub connector is the interface to the outside. The metal hou sing is attached with screws to the outer shell of the rocket. RX11_ADIOS_SEDv5.3_07October2013_Final.docx Page 64 Figure 8: Block diagram Arm plugs 4.6 Thermal Design The requirements for the thermal design are based on the compensating curves and the internal temperature compensation of the ACC sensors. The sensors shall not reach a temperature of less than - 20 °C. If this could not be screened out we have to use a heating system or a passive thermal insulation for the pre launch phase. The electronics of the ADIOS experiment will dissipate heat during operation. The major dissipater will be the cRIO. In the former project VibraDamp the experiment had no problems because of heat. But this experience is no more valid for ADIOS because of the higher workload onto the cRIO in the operation mode. It needs to be tested in the vacuum chamber as far the 3 rd and 4th NI-Module is delivered. An assembly of a cooling element could solve the problem if the cRIO operation temperature increases above 50 °C. Furthermore there are the working temperature ranges of the major components as well as the critical temperatures shown in the following table. RX11_ADIOS_SEDv5.3_07October2013_Final.docx Page 65 Component Operating range Critical temperature cRIO -40 °C to 70 °C High temp. due to Needs to be operation tested possibly critical. Strain gauges Up to 200 °C Higher than 250°C Temp. Sensors -50 °C to +180 °C Strain gauges glue -200 °C to +280 °C ACC Sensor -20 °C to +85 °C Temp. below -20 °C Status Ambient temp. during Flight phase not critical – no contact to hot outer structure / Table 7: Thermal operating ranges of electrical and structural components 4.7 Power System All single terms are approximated with a safety factor of minimum 30%. The average of the power consumption is approximately 23W. The total power consumption is 3,2Wh (130mAh). RX11_ADIOS_SEDv5.3_07October2013_Final.docx Page 66 Table 8 : Power consumption ADIOS experiment 4.8 Software Design The software is responsible for DAQ and controlling the locking and unlocking procedures. All tasks will be programmed using LabVIEW 2010. The software design used for ADIOS will be an adjusted version of the running programme used for the VibraDamp-experiment. For the software on ADIOS we thought about using a modified version of VibraDamp’s software, but after some tests we struggled with significant RX11_ADIOS_SEDv5.3_07October2013_Final.docx Page 67 performance problems. So we were forced to do a bigger modification and had to reprogram the software partially to handle all tasks with the limited power of the cRio’s 40 MHz processor. One big point to decrease the load of the central processor was to outsource as much processes as possible to the FPGA. The programme will be executed in the following way: 1. Booting cRIO 9014, initializing modules and connected hardware 2. Initialize Serial Port for data transfer 3. Start signal monitoring (LO, SOE) 4. Prepare DAQ (Create and open files and folders) 5. Waiting for LO signal 6. Parallel execution of: a. Strain Measurement, start sending strain to ground station b. Unlocking the FFED and starting acceleration DAQ (signal triggered when SOE “on”), sending acceleration instead of strain c. Time-triggered imbalance generator running 3 frequencies d. Locking the FFED and stopping acceleration DAQ (signal triggered when SOE switches to “off”), sending strain again 7. Shutdown routine after landing, before power off During the whole process the cRIO will send status information and measured data to ground via serial port. Because of the low bandwidth it is not possible to send the complete data and because of the very limited processor power it is not possible to build packages. This would be a risk for running the software (storing all the data in flight) safely and was not an option. As a result the transmitted data is not useable for any statement according our measurement results, but during flight it indicates our software is working well. The status information is transmitted properly so the ground station can reproduce the given LO and SOE signals as well as the information of “power on” and “end of program / shut down”. The internal data stream of the cRIO is shown in the following diagram. The cRIO is interacting with the FPGA Chassis linked to the A/D Modules (NI9205) and the motor control units (NI9505). RX11_ADIOS_SEDv5.3_07October2013_Final.docx Page 68 Figure 9: Data interactions The routine is following shown as a block diagram. The LO signal is required for starting the Strain+Temp measurement and calibrating the internal clock. Acceleration DAQ starts with SOE ON after unlocking the FFED. When the Test Plug is installed the software will simply skip the “unlock/lock” action, so nothing will get stuck in the final tests in horizontal orientation after assembly. For a simulation time of 1000 s, the data volume is approximately 0.66 GB (16000 Hz strain measurement, 800 Hz acceleration measurement). The data volume for the planned experimental setup for 1000 s measurement of strain and temperature and approximately 160s measurement of acceleration will be as follows: 16 strain gauges 0.4768 GB 6 temperature sensors 0.1788 GB 6 acceleration sensors 0.0003 GB RX11_ADIOS_SEDv5.3_07October2013_Final.docx Page 69 Sum : 0.6559 GB Since the data volume of the cRIO memory is about 2 GB, it is necessary to replace files during flight. It is not necessary to have manual access to the cRIO the files will be replaced by software. 4.9 Ground Support Equipment 4.9.1 Telemetry Software To receive, display and safe the data, which is sent during the flight, a telemetry receiving program has been written. Directly after the lift off strains and temperatures are measured. Because of lack of downstream capacity the transmitted data is only a part of the measured data set. Two strains and two temperatures are sent each with a sample rate of 500Hz. The sample rate fulfills the Nyquist Criterion. The values have a size of 16Bit. Thus 32kBit/s is broadcasted. The ground station receives the data and transmits it via serial port in an ASCII format to the user’s laptop. During the weightless phase acceleration data is transmitted instead of strains and temperatures. Acceleration data of six sensors is sent each with a sample rate of 300Hz. With 16Bit per value it makes 28.8kBit/s. The sample rates are higher than the Nyquist frequency. After the weightless phase the strain and temperature data is sent in the same way as at the beginning. The strains, temperatures and accelerations are displayed on graphs in real time. The figures are transmitted in a defined order to allocate them to the right graph. Also status information is sent and displayed to know what the cRIO is doing at that time. All the received data is saved in a log text file. RX11_ADIOS_SEDv5.3_07October2013_Final.docx Page 70 Picture 40: Telemetry Software screenshot RX11_ADIOS_SEDv5.3_07October2013_Final.docx Page 71 5 EXPERIMENT VERIFICATION AND TESTING 5.1 Verification Matrix ID Requirement text Verification Status F.1 EXP1 - The experiment shall measure the accelerations on the damped FFED during reduced gravity phase using a tri-axial acceleration sensor ATR Test plan 1;4 F.2 EXP1 - The experiment shall measure the accelerations on the undamped structure during reduced gravity phase using a tri-axial acceleration sensor ATR Test plan 1;4 F.3 EXP1 - The damping system shall isolate the FFED from influences due to the rocket R F.4 EXP1 - The locking mechanism shall prohibit any movements of the FFED during launch and landing TA Test plan 1 F.5 EXP1 - For verification the FFED shall be excited by a defined imbalance in a broad bandwidth of frequencies ATR Test plan 1;5 F.6 EXP2 - The mechanical loads onto the structure due to launch and landing shall be determined by a separate tri-axial acceleration sensor T No more needed F.7 EXP2 - The mechanical loads onto the rocket structure shall be determined by strain gauges mounted in three levels of the module structures during the whole flight RT Test plan 1;5 F.8 Infrastructure - All acquired data shall be stored on a reliable data storage device RT Test finished F.9 Infrastructure - The acquired data shall be sent particularly via telemetry RT F.10 Infrastructure - The control and DAQ shall work autonomously RT RX11_ADIOS_SEDv5.3_07October2013_Final.docx Page 72 P.1 EXP1 - The two tri-axial sensors need to measure accelerations with an accuracy up to 10^-6 g IT P.2 EXP1 - P.2: The measuring range should be ±2 g IT P.4 The ACC-Sensor shall be resistant against static loads of launch: 20 g TR P.5 Strain gauges - measure the strain with a sample rate of 4000 Hz TR P.6 The Isolation setup by magnets and springs shall reach an isolation of min 90 % on the FFED R Test Plan 5 P.7 The Power consumption shall be in average beneath 1 A TR Test 4;5 P.8 The imbalance generator shall give a defined T vibration to the FFED D.1 The internal bulkhead should stay as stiff as possible by reduced weight. R D.2 The Isolation shall work passively. R D.3 The locking mechanism shall prohibit any movements of the FFED during launch and landing TR D.4 There shall be easy access to electronic boards for maintenance and calibration RI reviewed D.5 Electronic access via Ethernet connector at assembled status R No more Umbilical access needed D.6 The Experiment shall fit into a REXUS 300mm Module RT CAD-Modelling D.7 To economise weight the locking mechanism shall be build from carbon fibre composites R Design change D.9 The strain gauges should be mounted on the R Several RX11_ADIOS_SEDv5.3_07October2013_Final.docx Datasheed reviewed Plan Verified by calculation Page 73 inside of the outer structure application tests completed D.10 The Strain gauge setup shall be temperature compensated RT Test Plan 5 D.11 EXP1 and EXP2 shall work independent from each other. If one fails the other one shall not be affected seriously RT reviewed D.12 The Electronics shall be as simple as possible R reviewed D.13 The electronic setup should be as light weight as possible R reviewed D.14 The Electronics shall cope with ±28 V RTA Breadboard tests finished D.15 Power consumption needs to stay beneath 3 A peak RT Test Plan 5 D.16 The sensors shall be temperature compensated RT Test Plan 3 D.17 The ACC-Sensors shall be Shock resistant up to 20 g R O.1 The temperature of the structure shall not under-run - 20°C O.2 The Esrange recovery crew should disarm the experiment with a transport plug Table 9: Verification table 5.2 Test Plan 5.2.1 Shaker Test Test number 1 Test type Shaker test RX11_ADIOS_SEDv5.3_07October2013_Final.docx Passive thermal insulation Page 74 Test facility Laboratory for light weight structures / FH Aachen Tested item 1. RX Module including Bulkhead with Electronics 2. RX Module including Locking Mechanism with FFED Test level 5 – 2000Hz; random; Sinus; 6 g; 12 g Test campaign duration 2 day (incl. preparation shaker) Table 10: Shaker Test To avoid damage to the ACC-Sensors the first run of the qualification shaker test will be done without the flight hardware sensors. It is important to proof that the Eigen-frequencies will not have impact on the highly accurate ACCSensors. The principle of the locking mechanism is already tested and flight proofed. Nevertheless it is necessary to test the locking mechanism as far it is constructed. The shaker test will verify the clamping behaviour during launch phase. 5.2.2 Vacuum Test Test number 2 Test type Vacuum test Test facility Laboratory for space technology / FH Aachen Tested item 1. Structural parts: CFC Bulkhead 2. Electronic boards (Strain gauge Acceleration amplification, Power supply) 3. cRio 4. Motors 5. COTS RS-232 to RS-422 Test level/procedure Qualification and duration 3×10⁻⁵ bar 15 min Test campaign duration 24 h Table 11: Vacuum Test RX11_ADIOS_SEDv5.3_07October2013_Final.docx amplification, Page 75 The Vacuum test covers two different responsibilities. The first one is the vacuum compatibility of the single parts soldered on the electronic boards. The second one is to proof the function under the changing circumstances from ambient pressure down to vacuum. 5.2.3 Thermal / Environmental Test Test number 3 Test type Thermal test Test facility Laboratory for space technology / FH Aachen Tested item 1. Electronic boards (Strain gauge Acceleration amplification, Power supply) amplification, 2. cRio 3. Motors 4. COTS RS-232 to RS-422 Test level Qualification -30°C up to 60°C Test campaign duration 24 h Table 12: Thermal / Environmental Test Regarding the very small expected signals it is very important to know the behaviour of the amplification boards as well the power supply under changing environmental conditions. 5.2.4 Functional Sensor Test Test number 4 Test type Functional test – Acceleration Sensors Test facility Laboratory for fluid dynamics / FH-Aachen Tested item Test of ACC sensors on a pendulum for calibrating Filters and Amplifiers Test level 1g–2g Test campaign duration 5h RX11_ADIOS_SEDv5.3_07October2013_Final.docx Page 76 Table 13: Functional Sensor Test To test the function of the ACC-Sensors, they will be mounted to a pendulum. The acceleration can be measured in the single axis. The sensors will be calibrated by the manufacturer. For the calibration and test of the strain gauges, the first test items have been placed on the VibraDamp RX7 Module. The application has already been tested under different conditions. There are to different types of testing. 1. Static test: The RX-Module with the applicated strain gauges will be mounted to a rack and bended by a load. 2. Dynamic test: The RX-Module will be put on the shaker including the strain gauges and an additional mass. 5.2.5 Functional Electronic Test Test number 5 Test type Functional test – Electronics Test facility Laboratory for space technology / FH Aachen Tested item Electronic circuits, Bread boards and prototypes, Test level Test campaign duration 5 days Table 14: Functional Electronic Test The functional tests have been done parallel to the development of the circuits. Every change in the design has been followed by a test of the circuit on the bread board and later on the prototype. Every single PCB will be tested completely. 5.2.6 Functional Test – Assembled Mode Test number 6 Test type Functional test – Assembled Mode Test facility Laboratory for space technology / FH Aachen and later at ESRANGE Tested item Function of Electronics and Mechanics in combination Test level RX11_ADIOS_SEDv5.3_07October2013_Final.docx Page 77 Test campaign duration 5 days and again 1 day at ESRANGE Table 15: Functional Test - Assembled Mode In the final assembled mode, the whole experiment will be tested before the payload integration and the bench test. 5.3 Test Results The test results will be divided again into the results of the two experiments. The Protocols of the conducted test are stored in a folder on the BSCWServer. A list of the conducted tests and a protocol example is shown in APPENDIX C. EXP1: The ACC-Data will be processed by a data processing s/w which calculates the total damping of the FFED in relation to the frequency. The comparison of the data of the two ACC-sensors is the basic of the calculations. EXP2: The data determined by the strain gauges will be processed again in a special data processing s/w. Here the ACC-data of the service module and the strains will be put into relation and finally compared with the ANSYS structural analysis. RX11_ADIOS_SEDv5.3_07October2013_Final.docx Page 78 6 LAUNCH CAMPAIGN PREPARATION 6.1 Input for the Campaign / Flight Requirement Plans 6.1.1 Dimensions and mass Experiment mass: kg Estimation regarding carbon fibre parts: ca.13 kg Experiment dimensions: m 0,3120 Experiment footprint area: Experiment volume: m 2 0,0995 m 3 0,0310 Experiment expected COG (centre of gravity) position: t.b.d. asap Table 16: Experiment mass and volume 6.1.2 Safety risks There are no safety risks known for the moment. The experiment will not require liquids, explosive batteries, pyrotechnical devices or poisonous or hazardous parts. The moving parts are not accessible when the experiment is fully assembled. 6.1.3 Electrical interfaces The ADIOS Experiment will not have any special requirements belonging to the launch site. An Ethernet cable connection to our computer an our own S/M-Simulator for testing are the only necessary electrical I/F before P/L assembly. The I/F to the service module for assembly, hot test and flight as well as experimental time are shown in the following in 6.2. 6.1.4 Strain gauges RX11_ADIOS_SEDv5.3_07October2013_Final.docx Page 79 The Strain gauges shall be mounted in three different levels of the rocket. Therefore the chosen RX-Modules shall have four 20 x 20 mm spaces left on the inner side of the structure. The anodization has to be removed at these areas to provide clean surface and an optimized adhesion of the glue. There is no space for the mounting of the amplifiers necessary. The amplification and data acquisition will take place at the ADIOS Module (EXP2 PCB-Box). Further information about the assembly are given in the document RX11-12_ADIOS_SGRP_v1.x.pdf 6.2 Electrical interfaces applicable to REXUS REXUS Electrical Interfaces Service module interface required? Yes Number of service module interfaces: 1 TV channel required? no Up-/Downlink (RS-422) required? Yes Data rate - downlink: 38.4. Kbit/s Data rate – uplink 0 Kbit/s Power system: Service module power required? Yes Peak power consumption: 30W Average power consumption: 23W Total power consumption after lift-off (until T+600s) 3,2 Wh Power ON 600s before lift-off Power OFF 600s after lift-off Battery recharging through service module: No Experiment signals: Signals from service module required? Yes LO: Yes SOE: Yes, at 70s after YoYoDespin SODS: no RX11_ADIOS_SEDv5.3_07October2013_Final.docx Page 80 Table 17: Electrical interfaces applicable to REXUS 6.3 Campaign Preparation For the campaign preparation following topics have to be taken in account. The heavy toolboxes and boxes of spare parts should be delivered to DLR MoRaBa for the Bench Test in January to ship these items in the DLR container to Kiruna. 6.3.1 List of tools 6.3.2 List of spare parts 6.3.3 List of campaign attending team members For the campaign it is necessary, that every subsystem is covered by a responsible person. In the case of problems and failures, the responsible should be able to find solutions for it. Management 1. Stefan Krämer Electronics 1. Dominique Daab 2. Andreas Gierse Structure 1. Joana Hessel 2. Tobias Wagner Software 1. Fabian Baader Outreach 1. Brigitte Müller RX11_ADIOS_SEDv5.3_07October2013_Final.docx Page 81 6.4 Launch Site Requirements The Experiment temperature shall not fall below –20°C because of the calibration of the acc-sensors. RX11_ADIOS_SEDv5.3_07October2013_Final.docx Page 82 6.5 Preparation and Test Activities at Esrange 6.5.1 Assembly of spring setup The springs of the passive isolation of EXP1 will be assembled to the module on the launch side to avoid damage due to the transport. To assemble the springs, minor parts of the structure and the locking mechanism need to be disassembled. Numbered parts and locations in the structure will prevent accidental interchange while the assembly. The Springs are prepared for assembly. One screw will mount the spring to the wall of the RX-Module. The second end of the spring has to be glued to the FFED. 6.5.2 cRIO preparation The cRIO will not be updated unless a failure occurs during testing. An Ethernet-cable is sufficient for connecting the cRIO with the ground support computer. At least two computers will be on the same S/W status to connect to the cRIO to assure connectivity. 6.5.3 Arm plugs The ADIOS Experiment will use three different types of armed and disarmed plugs. The Flight Plug has to be assembled before flight and closes the power connection to the service module. The Test Plug is used for ground testing to avoid the opening if the locking mechanism during the bench tests in the final assembled status. RX11_ADIOS_SEDv5.3_07October2013_Final.docx Page 83 6.6 Timeline for countdown and flight Time (Second) Event -600 S POWER ON Service Module – booting of cRIO 0 LO-Signal – EXP2 measurement starts LO +63 S Yo-Yo Release +70 S Start EXP1: DAQ; Drive LM (unlock) SOE on +250s Drive Imbalance Generator via internal Timeline +320 S Drive LM (lock); Stop EXP1 DAQ; Start EXP2 DAQ – SOE off +500 S Stop of EXP2: DAQ +530 S Shutdown cRIO +600 S POWER OFF Service Module (or 1 minute after landing) Table 18: Timeline for countdown and flight Regarding the RX11 Timeline, the ADIOS Experiment is quiet flexible to handle. The LM needs to unlock after YoYo-Despin and to lock before reentry. The use of the Imbalance Generator can be pushed to the end of the -phase to avoid disturbances to other experiments. A time slot of 45s to 60s for the excitation would be appreciated. 6.7 Post Flight Activities The Recovery Crew shall remove the Flight Plug before recovery to the Esrange base. The change is not compulsory, if the S/M will not be switched on again before the cRIO has been switched to hardware save mode. The FFED needs to be disassembled to access the cRIO before reboot and data backup to avoid a accidently deletion of the memory (hardware safe mode). Data backup via Computer access to cRIO. RX11_ADIOS_SEDv5.3_07October2013_Final.docx Page 84 Data analysis (e.g. temperature compensation of strain etc.) RX11_ADIOS_SEDv5.3_07October2013_Final.docx Page 85 7 DATA ANALYSIS PLAN 7.1 Data Analysis Plan Due to the two experiments the data for each experiment must be processed in particular. Therefore following boundary conditions need to be considered: The sampling rate of EXP1 ACC sensors is 800Hz o DAQ starts and ends with SOE The sampling rate of EXP2 Strain Gauges is 12000Hz o DAQ starts with LO until t+1000s The official Timeline for flight is included. Table 19: RXS 11 Timeline RX11_ADIOS_SEDv5.3_07October2013_Final.docx Page 86 7.2 Launch Campaign For the ADIOS Team the Launch Campaign was very successful. For the Launch five students were able to attend the campaign sponsored by DLR and FH Aachen. The preparations have been fulfilled without any problems. The Experiment has survived the half year waiting period without any influences. The team assumed changes in the calibration of the measuring equipment but these concerns have not come true. The Experiment was ready for launch again in time and conducted all pre-flight test successfully. First analysis of the data after the RXS 11 flight showed that the conditions of reduced gravity have been very poor although the damping mechanism of EXP 1 obviously has worked. All measurement points of EXP 2 have delivered data until the end of the flight. ADIOS has worked perfectly! 7.3 Results A detailed presentation and discussion of the results of the experiments 1 and 2 can be found in Chapter 8.3Appendix D and 8.3Appendix E in the framework of the submitted papers for the 21st ESA Symposium on Rocket and Balloon related Research. 7.3.1 Experiment 1 The acceleration data shows clearly the strong disturbance induced by the wobbling effect of the payload after motor separation. The graphs in Figure 10 indicate the acceleration in flight axis of the vehicle in order to the time after driving the LM of the ADIOS Experiment 1. The red line represents the X-Axis of the undamped wall. It is directly influenced by the vibrations of the outer structure. The green line belongs to the ACC sensor carried by the FFED. A band filter washed out the deep frequent perturbation by the movement of the vehicle and shows clearly the difference between the undamped (bright blue) and the damped (deep blue) system. The strong signal at the end of the timeline is erected by the run of the imbalance simulator. RX11_ADIOS_SEDv5.3_07October2013_Final.docx Page 87 Figure 11: Filtered and unfiltered Signal of the X-Axis ACC RX11_ADIOS_SEDv5.3_07October2013_Final.docx Page 88 Figure 12: Fourier Transformation of the filtered Signal 7.3.2 Experiment 2 The following data was determined by a numerical simulation to compare it with the measured flight data. After mode superposition: Extrema for deformations caused by longitudinal vibrations: Maximum at L = 3.5 m (inside of service module) Minimum at L = 4.8 m (nosecone) Two other extrema inside of rocket motor Extrema for deformations caused by bending vibrations Maximum at L = 3.2 m (recovery module) Minimum at L= 4.4 m (Romulus) RX11_ADIOS_SEDv5.3_07October2013_Final.docx Page 89 Max. Deformation [-] Longitudinal Bending 1,0 0,8 0,6 0,4 0,2 0,0 -0,2 -0,4 -0,6 0 0,75 1,50 2,25 2,99 3,72 4,44 5,18 Length [m] Figure 13: Mode superposition for REXUS 11 - Maximum deformations over length of the rocket Based on the data given in the REXUS/BEXUS technical overview and the SEDs of the single student teams, first estimations about the structural behaviour of the REXUS rocket during the whole flight were made using ANSYS 13 Mechanical APDL. Since, the rocket is losing weight during flight because of burning propellant and following motor separation several phases of flight has to be considered to specify where, how, and how many strain gauges has to be applied to the rocket structure. Figure 1 shows the estimated resulting strain shortly after Lift-Off. Figure 2 shows the estimated resulting strain during the landing phase. As shown in those figure, the location of maximum strain (coloured in red) is moving from bottom of the recovery module to upper part of the nosecone during flight. 1 2 3 5 6 Figure 14: Estimated resulting strain in flight direction during launch phase RX11_ADIOS_SEDv5.3_07October2013_Final.docx Page 90 1 2 3 4 5 6 1. 2. 3. 4. 5. 6. Recovery Module Service Module ADIOS GGES CaRu Romulus Figure 15: Estimated resulting strain in flight-direction during landing phase RX11_ADIOS_SEDv5.3_07October2013_Final.docx Page 91 8 ABBREVIATIONS AND REFERENCES 8.1 Abbreviations This section contains a list of all abbreviations used in the document. Add abbreviations to the list below, as appropriate. In version 5 of the SED (final version), delete unused abbreviations. ADIOS AIT asap A/D BO BR CAD CDR CFC COG cRIO CRP DAQ DLR EAT EAR ECTS EIT EPM ESA Esrange ESTEC ESW EXP1 EXP2 FAR FFED FH Aachen FST FRP ADvanced Isolation On Sounding-rockets Assembly, Integration and Test as soon as possible Analogue / Digital transformation Bonn, DLR, German Space Agency Bremen, DLR Institute of Space Systems Computer Aided Design Critical Design Review Carbon Fibre Composites Centre of gravity compactRio (NI) Campaign Requirement Plan Data Acquisition System Deutsches Zentrum für Luft- und Raumfahrt Experiment Acceptance Test Experiment Acceptance Review European Credit Transfer System Electrical Interface Test Esrange Project Manager European Space Agency Esrange Space Center European Space Research and Technology Centre, ESA (NL) Experiment Selection Workshop Experiment part 1 (Isolation of FFED) Experiment part 2 (measuring mechanical loads) Flight Acceptance Review Free-Flying Experiment Device Aachen University of Applied Sciences Flight Simulation Test Flight Requirement Plan RX11_ADIOS_SEDv5.3_07October2013_Final.docx Page 92 FRR GSE HK H/W ICD I/F IPR LO LT LOS Mbps MFH MORABA NI OP PCB PDR PST SED SNSB SODS SOE SSC STW S/W T TBC TBD TRL WBS Flight Readiness Review Ground Support Equipment House Keeping Hardware Interface Control Document Interface Interim Progress Review Lift Off Local Time Line of sight Mega Bits per second Mission Flight Handbook Mobile Raketen Basis (DLR, EuroLaunch) National Instruments Oberpfaffenhofen, DLR Center Printed Circuit Board (electronic card) Preliminary Design Review Payload System Test Student Experiment Documentation Swedish National Space Board Start Of Data Storage Start Of Experiment Swedish Space Corporation (EuroLaunch) Student Training Week Software Time before and after launch noted with + or To be confirmed To be determined Technology Readiness Level Work Breakdown Structure RX11_ADIOS_SEDv5.3_07October2013_Final.docx Page 93 8.2 References [1] EuroLaunch: REXUS User Manual (2010). [2] European Cooperation for Space Standardization ECSS: Space Project Management, Project Planning and Implementation, ECSSM-ST-10C Rev.1, 6 March 2009. [3] SSC Esrange: Esrange Safety Manual, EU A00-E538 , 20 March 2006. [4] European Cooperation for Space Standardization ECSS: Space Engineering, Technical Requirements Specification, ECSS-E-ST10-06C, 6 March 2009. [5] European Cooperation for Space Standardization ECSS, Space Project Management, Risk Management, ECSS-M-ST-80C, 31 July 2008. [6] European Cooperation for Space Standardization ECSS: Space Engineering, Verification, ECSS-E-ST-10-02C, 6 March 2009. [7] Project Management Institute, Practice Standard for Work Breakdown Structures – second Edition, Project Management Institute, Pennsylvania, USA, 2006. [8] Team VibraDamp, UAS Aachen: Student Documentation (SED), VD-05-F, 12.02.2009. [9] FH-Aachen News Page; Bedbur, Ruth: Zu den Sternen, http://www.fhaachen.de/newsarchiveinzel.html?&tx_ttnews[pS]=1293836400&tx_ttn ews[pL]=2678399&tx_ttnews[arc]=1&tx_ttnews[pointer]=2&tx_ttnews[tt _news]=2916&tx_ttnews[backPid]=231&cHash=5f2e7b5e37 (accessed 23th March 2011), [10] Diploma Thesis, UAS Aachen – Aerospace Department: Entwicklungen einer Prüfstruktur mit einem Schwingungsisolationssystem, mit magnetsicher Dämpfung und Test beim Parabelflug einer REXUS Rakete, Rudolf Vetter, 2010. [11] Diploma Thesis, UAS Aachen – Aerospace Department: Entwicklungen einer berührungslosen Dämpfung zur Verminderung von Resonanzüberhöhungen eines Systems zur Schwingungsisolation eines Schmelzofens in der Raumfahrt (ADVANCED TITUS), Manuela Franke, Nov. 2001. RX11_ADIOS_SEDv5.3_07October2013_Final.docx Experiment Page 94 [12] Bachelor Thesis, UAS Aachen – Aerospace Department: Autonome Experimentsteuerung mittels LabVIEW für ein Raketenexperiment, Lysan Pfützenreuter, 2010 [13] RX_PDR_minutes v1_ADIOS_03Mar11.doc , [14] ADIOS Strain Gauge Requirement Proposal, Stefan Krämer, Lysan Pfützenreuter, FH Aachen, 2011, RX11_ADIOS_SGRP_v1.6.pdf, [15] RX_CDR_minutes_ADIOS DLR/ESA/SSC-Review Experiment Critical Design Review , Mark Fittock, 2011 RX11_ADIOS_SEDv5.3_07October2013_Final.docx Board - Page 95 8.3 List of tables and pictures Table 1: Contact details of the Team members ............................................. 10 Table 2: Possible workload of each team member ........................................ 20 Table 3: Budget list of parts ........................................................................... 21 Table 4: Experiment summary table .............................................................. 34 Table 5: Carbon fibre materials ...................................................................... 34 Table 6: connector pin configuration .............................................................. 55 Table 7: Thermal operating ranges of electrical and structural components .. 65 Table 8 : Power consumption ADIOS experiment .......................................... 66 Table 9: Verification table .............................................................................. 73 Table 10: Shaker Test.................................................................................... 74 Table 11: Vacuum Test .................................................................................. 74 Table 12: Thermal / Environmental Test ........................................................ 75 Table 13: Functional Sensor Test .................................................................. 76 Table 14: Functional Electronic Test .............................................................. 76 Table 15: Functional Test - Assembled Mode ................................................ 77 Table 16: Experiment mass and volume ........................................................ 78 Table 17: Electrical interfaces applicable to REXUS...................................... 80 Table 18: Timeline for countdown and flight .................................................. 83 Table 19: Mass reduction list ....................................................................... 154 Figure 1: Team structure ................................................................................ 13 Figure 2: Application of the strain gauges onto the structure ......................... 18 Figure 3: Work breakdown structure of ADIOS, status: 23 November 2011 .. 19 Figure 4: preliminary time schedule ............................................................... 28 Figure 5: Structural levels .............................................................................. 44 Figure 6: Block diagram ADIOS experiment .................................................. 48 Figure 7: Overall schematic ADIOS experiment electronics .......................... 49 Figure 8: Block diagram Arm plugs ................................................................ 64 Figure 9: Data interactions ............................................................................. 68 Figure 10: Functional flow of ADIOS S/W . Fehler! Textmarke nicht definiert. RX11_ADIOS_SEDv5.3_07October2013_Final.docx Page 96 Figure 11: Mode superposition for REXUS 11 - Maximum deformations over length of the rocket ........................................................................................ 89 Figure 12: Estimated resulting strain in flight direction during launch phase .. 89 Figure 13: Estimated resulting strain in flight-direction during landing phase 90 Figure 14: Estimated resulting strain in flight direction during launch phase 144 Picture 1: Overview - ADIOS Experiment Platform .......................................... 6 Picture 2: ADIOS-Logo .................................................................................. 10 Picture 3: URL Link to ADIOS Website .......................................................... 10 Picture 4: Team ADIOS ................................................................................. 12 Picture 5: Four-Mandrel Crimping Plier .......................................................... 23 Picture 6: Overview of the Experiment ........................................................... 30 Picture 7: Cable Feed Through at 180°.......................................................... 31 Picture 8: Cable guide.................................................................................... 31 Picture 9: Locking mechanism and FFED ...................................................... 36 Picture 10: Motor and attachment .................................................................. 36 Picture 11: FFED with ACC-Sensor ............................................................... 37 Picture 12: M5 Inlet ........................................................................................ 37 Picture 13: EXP2 PCB-Box ............................................................................ 38 Picture 14: Bottom view of the Bulkhead with PCB-Dummies ....................... 38 Picture 15: Bulkhead with cRIO and EXP2 PCB-Box..................................... 39 Picture 16: Arm plug interface ........................................................................ 40 Picture 17: Arm plug interface front view ....................................................... 40 Picture 18: Arm Plug interface with cover ...................................................... 41 Picture 19: Old and new design of the LM aluminium rings ........................... 42 Picture 20: Alternative CFC LM design .......................................................... 43 Picture 21: Mounting of locking mechanism ................................................... 43 Picture 22: deformations of the FFED ............................................................ 45 Picture 23: Deformations of the LM bottom plate ........................................... 45 Picture 24: Deformations of the LM top plate ................................................. 46 Picture 25: Deformations of the Motor mounting ............................................ 46 Picture 26: Deformations of the Brackets ....................................................... 46 Picture 27 : layout junction box (PCB1) ......................................................... 51 RX11_ADIOS_SEDv5.3_07October2013_Final.docx Page 97 Picture 28: Motor FFED ................................................................................. 53 Picture 29: Limit Switch .................................................................................. 53 Picture 30: Circuit board components during VibraDamp thermal / vacuum test ................................................................................................................. 54 Picture 31: cable ............................................................................................ 55 Picture 32 : Traco Power DC-DC converter ................................................... 56 Picture 33 : ASC ±2g acceleration sensor ..................................................... 57 Picture 34: linear strain gauge (350 Ω) .......................................................... 59 Picture 35: T-rosettes strain gauges (350 Ω) ................................................. 59 Picture 36: Temperature sensor (350 Ω) ....................................................... 60 Picture 37: linear strain gauge for testing (120 Ω).......................................... 60 Picture 38: strain relief for cabling .................................................................. 61 Picture 39 : layout EXP2 (PCB3) ................................................................... 62 Picture 40: Telemetry Software screenshot ................................................... 70 Picture 41: First and second recruitment poster .......................................... 106 Picture 42: Presentation / F&E/ Research & Development Conference / FH Aachen - Fachbereich Luft- und Raumfahrttechnik ...................................... 108 Picture 43: Presentation/ F&E/ Research & Development Conference/ FH Aachen – No Vibrations – Good Vibrations, S. Krämer................................ 108 Source 1: PDR Minutes by the Review Board ............................................. 101 Source 2: CDR Minutes by Review Board ................................................... 104 Source 3: Press release 10th January 2011 [9] ............................................ 105 Source 4: ADIOS Homepage at the FH Aachen website ............................. 107 Source 5: PeopleMover 2011 ...................................................................... 109 Source 6: Dimensionen 2011 ....................................................................... 110 Source 7: ELGRA Symposium Poster Session ............................................ 113 Source 8: Press-Release by Bedbur, Ruth / FH Aachen Press Office 02.11.2011 ................................................................................................... 114 Source 9: Press-Release by Bedbur, Ruth / FH Aachen Press Office 08.03.2012 ................................................................................................... 115 Source 10: Note / ASTRIUM Intranet by Peter Kern (ASTRIUM Friedrichshafen) and Tobias Wagner (ADIOS Team) 19.03.2012 ............... 116 RX11_ADIOS_SEDv5.3_07October2013_Final.docx Page 98 Source 11: Press-Release by Bedbur, Ruth / FH Aachen Press Office 23.03.2012 ................................................................................................... 117 Source 12: Outreach list: ............................................................................. 119 Schematic 1: Junction Box (PCB1) ................................................................ 50 Schematic 2: RS232 converter (PCB4) .......................................................... 51 Schematic 3: acceleration amplification (PCB2) ............................................ 57 Schematic 4 : circuit EXP2 (PCB3) ................................................................ 62 RX11_ADIOS_SEDv5.3_07October2013_Final.docx Page 99 APPENDIX A – EXPERIMENT REVIEWS PDR – Minutes [13] Flight: REXUS-11 Payload Manager: Mark Fittock Experiment: ADIOS Location: DLR Oberpfaffenhofen, Germany Date: 9/02/2011 1. Review Board members Mark Fittock [MoM] (DLR RY), Markus Pinzer (DLR MORABA), Macus Hoerschgen (DLR MORABA), John Richardson (DLR RY), Martin Siegl [MoM] (DLR RY), Helen Page (ESA ESTEC), Andreas Stamminger [Chairman] (DLR MORABA), Olle Persson (SSC), Mark Uitendaal (SSC), Koen DeBeule (ESA ESTEC) 2. Experiment Team members Stephan Kraemer, Lysan Pfuetzenreuter, Brigitte Mueller, Dominique-Jonas Daab 3. General Comments Presentation o easy and understandable, but requires prior knowledge from Vibradamp; o a lot of detail still missing, also from version 1.8; o communicate your work to us; SED a little bit light regarding EXP2; o diagrams and graphics adequate; o there is a flow chart for the software, but it is outdated; whole document is in English, but flowchart is in German, please correct that. SED o o slides are good; don’t say “this is my part of the presentation”; big improvement over SED in terms of content; resubmission will be required 4. Panel Comments and Recommendations RX11_ADIOS_SEDv5.3_07October2013_Final.docx Page 100 Requirements and constraints o expand on requirements, number them, full sentences, expand on operational requirements; o there are many misclassifications; Mechanics o difficult to judge, there is not much description; o show the components in the pictures; Single components should also be depicted. Also a picture of the complete payload has to go into the SED. o detail how many boxes there will be in the E-box and what are you going to place where. Describe position and size of strain gauges; o hard to understand where the measurements shall be taken. Suggest position for the strain gauges, how big are they, what are the electrical interfaces; o what do you expect to see on the strain gauges? - Simulations required. o what is the movement of the box? – 2 cm in radial direction. o feed through other experiment cables next to your module: implement it already now; o bring your mass down: not just say, but act; set a level for mass and make sure it will be below this level. Provide a mass budget. o lots of good points where weight could be reduced: holes in plates, for example; o proposal of EXP2 sensor locations must be given to your project manager together with the SED resubmission o consider possibility of using a 300 mm module Electronics and data management o main part is compact rio: overview diagram for power and data handling missing; o more detail in block diagrams required; o Power distribution to different experiments not clear o operational amplifier: frequency to be adapted to reasonable value; o use optocouplers to avoid noise on the signal lines; o power consumption much higher than Vibradamp, please check. What will the peak consumption be? o nomenclature: describe what compact rio modules are, what their names are; “module of modules” is hard to understand; o expected data rate needs to be defined; team would like to sample with 40khz per sensor; requires on-board storage solution; o clarify timeline with regard to measuring the landing; put it in the timeline; Thermal o EXP2: temperature compensation for the sensor – how will this be conducted? Thermal needs to be considered better for that, thermal range for each component. o maybe use wheatstone bridge to compensate the sensor? Software o o o o o o o o running program from Vibradamp will be adjusted. when do measurements start, for how long? why are measurements starting again after stop of the experiments? clarify the timeline wrt to software, call the signals SOE / SODS (don’t give them any other names) what has worked on the previous, may not run on this one; perform tests. can you fall back from C if you do not get on with Labview? use the signal lines from the service module wisely; make sure you are able to clear the memory by command; RX11_ADIOS_SEDv5.3_07October2013_Final.docx Page 101 o team requests an Ethernet umbilical -> use an access hatch instead Verification and testing o locking mechanism has to be tested; o verify that the structure is strong enough once the mass has been reduced o verification matrix missing in SED; o perform a thermal test; Safety and risk analysis o mission risk: how much mass is uncontained if the locking mechanism fails? o if locking mechanism opens before launch, the balance of the rocket can be ruined o Risk MS40: D is a bit high; manufacturer cannot guarantee that they will survive takeoff; Launch and operations o no problems; Organisation, project planning & outreach o a lot to discuss about project planning and organization; o project management must be discussed with your project manager and a proper solution must be found Others o o o o o movie team at Esrange: possible, but needs to be pre-organized funding for acceleration sensors one board per sensor ok? project management is a concern again; CDR will be a critical step for the project 5. Final remarks Summary of main actions for the experiment team o Design must be developed further (or better described) before a full pass is given o Resubmission of SED at the end of March including preliminary CDR content o proposal of EXP2 sensor locations must be given to your project manager together with the SED resubmission o locking mechanism has to be tested; o project management must be discussed with your project manager and a proper solution must be found PDR Result: conditional pass Pass is given upon the condition that an SED is resubmitted including all PDR information required, taking into account the PDR comments and developing a proper project plan Next SED version due 30 March 2011 Source 1: PDR Minutes by the Review Board RX11_ADIOS_SEDv5.3_07October2013_Final.docx Page 102 REXUS / BEXUS Experiment Critical Design Review Flight: REXUS-11 Payload Manager: Mark Fittock Experiment: ADIOS Location: DLR Oberpfaffenhofen, Germany Date: 10.06.2011 1. Review Board members Adam Lambert (ESA), Paul Stevens (ESA), Marcus Hoerschgen (DLR), Markus Pinzer (DLR), Frank Hassenpflug (DLR), Frank Scheurpflug (DLR), Andreas Stamminger [Chair] (DLR), Tobias Ruhe (DLR), Mark Uitendaal (SSC), Nils Hoeger (DLR), Mark Fittock [MoM] (DLR) 2. Experiment Team members Dominique Daab, Vladimir Klassen, Stefan Kraemer 3. General Comments SED: o Filename and mission should refer to RX 11, Change Record should be updated o When referring to EuroLaunch: this is only DLR and SSC o DLR Space Agency has changed name to DLR Space Administration o Need to include overall schematic in the appendices, just include all schematics o Need to be very careful in the documentation that you can clarify which details are for which experiment Presentation: o Generally good, clarify the difference between the two experiments, larger size of text o Amount of data downlink was there but not clear in the SED 4. Panel Comments and Recommendations Requirements and constraints o Missing compliance to the vehicle o Operations requirements need to be reviewed Mechanics o EXP1: looks fine now, clearly depicted in general, well described for the changes o EXP2: not as good, strain gauges mentioned but clear positioning is not there, need to describe clearly the connections and cabling o Need a better definition and to clearly identify the integration possibility o Can’t see from this document how the assembly looks and the connections o Should have some simulations of what you expect to measure, identify what the team is focussing on o Describe complete vehicle and complete payload and where you would place them o Need to look at the different options, is it possible just from the ADIOS module, are there minimum requirements o It is very important for the payload integration that we have a clear indication of how this would occur, number of connectors, where the cables are routed o Should have done some basic analysis for determination of location of strain gauges o Team wants to use only a single cable for the strain gauges o Need to ask other teams whether you can pass your line through their modules o Couldn’t find scientific justification for a second cross-section of measurements, looks like it could be done from one, justification needs to be given o This experiment would also be very valuable if done with one cross-section RX11_ADIOS_SEDv5.3_07October2013_Final.docx Page 103 o Require a significant report on justification of other cross-sections and a proposal solution o Is bulkhead electrically conductive? Experiment needs to have a good ground, can have a simple thin (0.2/0.3 mm) aluminium plate o Cable feed-through must be at 180o o Have to consider how to secure the cables, especially in the case with late cables o Arm plug should be an arm plug, use a hatch to cover the plug, leave this at 240 if possible o Good structural analysis o Need to make significant assumptions to cover simulations before sci P/L week Electronics and data management o If you turn arm plug 90o this will make it much easier for the mounting of connectors o For the interfaces, there is no overall schematic so it is not possible to see all the connections, this is not so good as can’t help the team by checking the design o Have to change the power supply as they can’t operate directly off our signals, use an optocoupler o Need to introduce some filtering o Resubmission of electronics schematics for review o How can you be sure that the strain gauges are temperature compensated? Are measuring next to the strain gauge Need to calibrate the sensors with regard to temperature o Investigate shielding of the cable o Is it really sampled at 500 MHz? Is most likely a mistake o For telemetry: are the baudrates the required telemetry baudrate? No, is regarding the sensors o Can use a COTS RS-232 to RS-422 converter but need to test it carefully o Have requested multiple signals from RXSM, change this as the signals come from the CRio Thermal o Component approach is fine o Need to be careful of temperature sensitivity of sensors o Can use the temperature data of REXUS-8 that is found on the teamsite Software o Is it possible to send commands to the CRio? Not planned o Data storage is a problem, need to be careful with the arm plug and the data Verification and testing o Verification matrix is ok but not all are done o Need to expand on the testing, consider components, calibration, vibration etc. o The calibration of the strain gauges, is it being done on the module itself? Must use a test with similar setup and loads o Must submit a new test plan for CDR to Delivery o Push you thermal tests Safety and risk analysis o Risk register is not updated and is limited, review the risk register and expand o Need to know that FFU does not move inside the payload o Add analysis of this situation to the ADIOS SED and clarify that it is safe for launch and re-entry RX11_ADIOS_SEDv5.3_07October2013_Final.docx Page 104 Launch and operations o Need to clarify your mass estimate o Need to work on the arm plug solution with your payload manager o o o o Organisation, project planning & outreach Found a good solution for the organization for EXP 1, EXP 2 needs lots of work Good progress on the budget Access to the teamsite is very useful Outreach approach is great Others o Need to have a helicoil and hole to add shielding, is it possible to do this in the other sections? Yes, but needs to have a very good proposal for EXP 2 o Is there a curing oven available for the assembly of the strain gauges? Can find one for this in Bremen 5. Final remarks A clear proposal for experiment 2 must be submitted so that the inclusion of the sensors in other modules is possible (6th of July 2011) The sensors for experiment 2 can be included in other experiment modules but shall not be included in MORABA system modules or the nosecone All comments in bold must be acted upon for an SED resubmission SED to be resubmitted on 18th of July 2011 including experiment 2 proposal CDR conditional pass (SED resubmission) Source 2: CDR Minutes by Review Board RX11_ADIOS_SEDv5.3_07October2013_Final.docx Page 105 APPENDIX B – OUTREACH AND MEDIA COVERAGE th Source 3: Press release 10 January 2011 [9] RX11_ADIOS_SEDv5.3_07October2013_Final.docx Page 106 Picture 41: First and second recruitment poster RX11_ADIOS_SEDv5.3_07October2013_Final.docx Page 107 Source 4: ADIOS Homepage at the FH Aachen website Link: http://www.fb6.fh-aachen.de/lur/studienprojekte/rexus-adios/ RX11_ADIOS_SEDv5.3_07October2013_Final.docx Page 108 Picture 42: Presentation / F&E/ Research & Development Conference / FH Aachen - Fachbereich Luft- und Raumfahrttechnik Picture 43: Presentation/ F&E/ Research & Development Conference/ FH Aachen – No Vibrations – Good Vibrations, S. Krämer RX11_ADIOS_SEDv5.3_07October2013_Final.docx Page 109 Source 5: PeopleMover 2011 RX11_ADIOS_SEDv5.3_07October2013_Final.docx Page 110 Source 6: Dimensionen 2011 RX11_ADIOS_SEDv5.3_07October2013_Final.docx Page 111 RX11_ADIOS_SEDv5.3_07October2013_Final.docx Page 112 RX11_ADIOS_SEDv5.3_07October2013_Final.docx Page 113 Source 7: ELGRA Symposium Poster Session RX11_ADIOS_SEDv5.3_07October2013_Final.docx Page 114 Source 8: Press-Release by Bedbur, Ruth / FH Aachen Press Office 02.11.2011 RX11_ADIOS_SEDv5.3_07October2013_Final.docx Page 115 Source 9: Press-Release by Bedbur, Ruth / FH Aachen Press Office 08.03.2012 http://www.fh-aachen.de/topnavi/presse/pressepressemitteilungen/pmdetails/?no_cache=1&tx_ttnews%5Btt_news%5D=325&cHash=f5a98b19b24ed8997ec9184e a02f8247 RX11_ADIOS_SEDv5.3_07October2013_Final.docx Page 116 Source 10: Note / ASTRIUM Intranet by Peter Kern (ASTRIUM Friedrichshafen) and Tobias Wagner (ADIOS Team) 19.03.2012 RX11_ADIOS_SEDv5.3_07October2013_Final.docx Page 117 Source 11: Press-Release by Bedbur, Ruth / FH Aachen Press Office 23.03.2012 http://www.fh-aachen.de/topnavi/presse/presseaktuelles/aktuellesdetails/?tx_ttnews%5Btt_news%5D=354&cHash=9201c875b5a47fd1a278713 7e0ec3364 RX11_ADIOS_SEDv5.3_07October2013_Final.docx Page 118 RX11_ADIOS_SEDv5.3_07October2013_Final.docx Page 119 Source 12: Outreach list: RX11_ADIOS_SEDv5.3_07October2013_Final.docx Page 120 APPENDIX C - PAPERS AND PUBLICATIONS ADvanced Isolation On Sounding rockets (ADIOS) No Vibrations – Good Vibrations A. Gierse, S. Krämer, Dipl.-Ing. (FH) R. Vetter FH Aachen University of Applied Science Department of Aerospace Engineering Hohenstauffenallee 6, 52064 Aachen, Deutschland 1. Introduction Nowadays nearly all kind of experiments can be operated on a great variety of microgravity providing systems like rockets, drop-towers, parabolic flights, satellites as well as space stations. Duration and quality of the μg-environment depends on the chosen platform. On board of the ISS and other piloted missions, many experiments are affected by perturbations due to vibrations, caused by astronauts, running aggregates and other experiments. Same problems may occur on every mechanical system which deals with non disturbance tolerant experiments. Using the term „micro-gravity“ presumes small amplitudes of acceleration in all axis. To decrease these residual forces, acting onto the experiment, a reliable decoupling mechanism is necessary. RX11_ADIOS_SEDv5.3_07October2013_Final.docx Page 121 The DLR (German Aerospace Centre) and the FH Aachen University of Applied Science developed a mechanical decoupling system for the TITUS II experiment for usage on the ISS (International Space Station). The system worked with three-dimensional springs and eddy current dampers. Today’s goal is to improve this decoupling mechanism and make it capable for other μg-platforms. In the VibraDamp Student Experiment, launched with REXUS 7 (Rocket Experiments for University Students), a decoupling mechanism for sounding rockets, based on eddy current dampers including a highly reliable locking-device, has been tested successfully. The ADIOS (ADvanced Isolation On Sounding-rockets) Student Experiment will be launched on REXUS 11 in March 2012 and will verify an improved, partly active damping mechanism and locking device. Basing on the results of ADIOS, a standardised decoupling-System for sounding Rockets can be developed. The accumulated stock of knowledge can also be used to develop decoupling mechanisms for other μg-Platforms. 2. Mechanical decoupling A mechanical decoupling system, which is the same as a flexible machine bearing, naturally consists of springs and dampers. Both, springs and dampers, can be engineered in various designs for different applications. Here the decoupled experiment, which can be an experiment of any kind, itself is considered to be a single mass without own eigenfrequencies. The eigenfrequencies of a real experiment set-up are usually of much higher frequency than the eigenfrequencies of the decoupling mechanism what makes it possible to separate these two cases. The decoupling mechanism restrains the energy from the outer structure to affect the experiment. If the experiment itself includes sources of RX11_ADIOS_SEDv5.3_07October2013_Final.docx Page 122 mechanical vibrations these sources or the most sensitive parts of the experiment have to be decoupled separately. Figure 16: Single mass system incl. spring and damper Figure 1 shows a one dimensional decoupling mechanism (one degree of freedom „x“) consisting of a one dimensional spring, a one dimensional damper and the experiment as a single mass. The movements of the outer structure (“s”) are the excitation of the spring and the damper. Figure 17: Estimated damping behaviour RX11_ADIOS_SEDv5.3_07October2013_Final.docx Page 123 Figure 2 compares the dynamic mechanical behaviour of this system using viscous dampers (green) and active eddy current dampers (blue). A System with one degree of freedom has one eigenfrequency. This eigenfrequency is characterized by a high magnification factor. At frequencies higher than the eigenfrequency the amplitude of the Experiment decreases and finally is much smaller than the excitation amplitude. This phenomenon is called decoupling. Obviously the active eddy current damper allows an increased damping close to the eigenfrequency. This results in a smaller magnification factor. Even more important is the result, that at higher frequencies a very good decoupling is achieved. 2.1 Decoupling all axis To improve the existing μg-environment, all axes have to be mechanically decoupled. Therefore three-dimensional springs and dampers are necessary. The dimensioning eigenfrequency should be as low as possible to achieve a decoupling even at low frequencies. RX11_ADIOS_SEDv5.3_07October2013_Final.docx Page 124 Figure 18: Schematic of Eddy current damping system [1] Figure 3 (obtained from[1]) shows the patented decoupling mechanism of the TITUS II experiment. The three-dimensional springs are realised as bending and torsional beams while magnets are damping the experiment using the eddy current effect. Working with eddy current dampers the damping depends on the oscillations amplitude, frequency and the distance between the magnets and the corresponding aluminium board. A full description provides [2]. 3. VibraDamp 3.1 Experiment Setup Figure 19: VibraDamp Setup Figure 4 shows the experiment [3],[4]. mechanical design of the VibraDamp Located at the top of the module are the decoupling-System and the free flying experiment. Below, the measuring and data acquisition system as well as the power supply, were placed. Three geared motors, controlled by a National Computer, actuated the decoupling-System. RX11_ADIOS_SEDv5.3_07October2013_Final.docx Instruments Page 125 Six Kistler acceleration sensors measured the residual accelerations at the rockets structure and the inside of the free flying experiment. 3.2 Experiment Results FFT: x-direction 1,8E-5 damped undamped 1,6E-5 1,4E-5 1,2E-5 1E-5 8E-6 6E-6 4E-6 2E-6 0 0 5 10 15 20 25 30 35 40 45 50 55 frequency in Hz 60 65 70 75 80 85 90 95 100 Figure 20: Fast Fourier Transformation of VibraDamp Data – x-axis up to 100 Hz Figure 5 shows the achieved reduction of acceleration amplitudes for frequencies up to 100 Hz. Frequencies below 1Hz are reproduced faultily because of a used high-pass filter. This filter was necessary, because sounding rockets, without a rate control system, revolve and overturn slowly during the μg-phase. 4. Adios The Team ADIOS has been assembled to develop an improved layout of the successful VibraDamp-concept. The new system allows increasing or decreasing of the damping rate by active positioning of the damping magnets while the system is decoupled. The optimal position of the damping magnets is calculated as a function of the actual acceleration amplitude. This active regulation of the damping rate leads to the following approximated mechanical behaviour as function of different experiment masses. RX11_ADIOS_SEDv5.3_07October2013_Final.docx Page 126 Figure 21: Decoupling as function of experimental mass RX11_ADIOS_SEDv5.3_07October2013_Final.docx Page 127 Figure 22: ADIOS Setup Figure 7 shows the improved mechanical design of the ADIOS experiment. 5. Conclusion The results of the VibraDamp experiment show, that the μgconditions have been improved significantly. The ADIOS experiment will show the potential of an actively controlled damping. A future project will be the additional detection and damping of high frequency (> 10Hz) vibrations produced inside the decoupled experiment using the decoupling eddy current dampers. RX11_ADIOS_SEDv5.3_07October2013_Final.docx Page 128 Cheap passive decoupling mechanism and more advanced active decoupling mechanism can both play a decisive role in future μgresearch. The FH Aachen would be pleased if research groups which are working on experiment using μg-Conditions make contact with us. References: Patent [1] Patent DE 10227968 B4. Lagerungssystem in einem Raumfahrzeug (application: 06/22/2002, published:03/02/2006). Applicant: German Space Center Cologne. Inventors: Nähle, R., Dipl.-Ing., Troisdorf, DE; Wahle, M., Prof.Dr.-Ing., Geilenkirchen, DE; Röstel, R., Dr.rer.nat., Berlin, DE. Literature [2] Franke, M. (2001). Diploma Thesis „Entwicklung einer berührungslosen Dämpfung zur Verminderung von Resonanzüberhöhungen eines Systems zur Schwingungsisolation eines Schmelzofens in der Raumfahrt (ADVANCED TITUS)“ Aachen University of Applied Science and German Aerospace Center Cologne [3] Vetter, R. (2010). Diploma Thesis „Entwicklung einer Prüfstruktur mit einem Schwingungsisolationssystem, mit magnetischer Dämpfung und Test beim Para- belflug einer Rexus Rakete“. Aachen University of Applied Science [4] Rudolf Vetter, Andreas Gierse, Michael Lauruschkat. (2009). Student Experiment Documentation for VibraDamp on Rexus 7. [5] Stefan Krämer, Andreas Gierse, Dominique Daab, Joana Hessel, Fabian Baader. (2011). Student Experiment Documentation for Adios on Rexus 11. RX11_ADIOS_SEDv5.3_07October2013_Final.docx Page 129 [6] Lysan Pfützenreuter, Michael Lauruschkat, Andreas Gierse, Rudolf Vetter. (2010).VIBRA-DAMP. RX11_ADIOS_SEDv5.3_07October2013_Final.docx Page 130 APPENDIX D – RESULTS EXP 1 Paper on Experiment 1 – 21st ESA Symposium on Rocket and Balloon Related Research RX11_ADIOS_SEDv5.3_07October2013_Final.docx Page 131 RX11_ADIOS_SEDv5.3_07October2013_Final.docx Page 132 RX11_ADIOS_SEDv5.3_07October2013_Final.docx Page 133 RX11_ADIOS_SEDv5.3_07October2013_Final.docx Page 134 RX11_ADIOS_SEDv5.3_07October2013_Final.docx Page 135 RX11_ADIOS_SEDv5.3_07October2013_Final.docx Page 136 RX11_ADIOS_SEDv5.3_07October2013_Final.docx Page 137 RX11_ADIOS_SEDv5.3_07October2013_Final.docx Page 138 APPENDIX E – RESULTS EXP 2 Paper on Experiment 2 – 21st ESA Symposium on Rocket and Balloon Related Research RX11_ADIOS_SEDv5.3_07October2013_Final.docx Page 139 RX11_ADIOS_SEDv5.3_07October2013_Final.docx Page 140 RX11_ADIOS_SEDv5.3_07October2013_Final.docx Page 141 RX11_ADIOS_SEDv5.3_07October2013_Final.docx Page 142 RX11_ADIOS_SEDv5.3_07October2013_Final.docx Page 143 RX11_ADIOS_SEDv5.3_07October2013_Final.docx Page 144 APPENDIX F – STRAIN GAUGE REQUIREMENT PROPOSAL 1. SGRP – Strain gauge requirement proposal (document name: RX11_ADIOS_SGRP_v1.6.docx) ADIOS Strain Gauge Requirement Proposal Based on the data given in the REXUS/BEXUS technical overview and the SEDs of the single student teams, first estimations about the structural behaviour of the REXUS rocket during the whole flight were made using ANSYS 13 Mechanical APDL. Since, the rocket is losing weight during flight because of burning propellant and following motor separation several phases of flight has to be considered to specify where, how, and how many strain gauges has to be applied to the rocket structure. Figure 1 shows the estimated resulting strain shortly after Lift-Off. Figure 2 shows the estimated resulting strain during the landing phase. As shown in those figure, the location of maximum strain (coloured in red) is moving from bottom of the recovery module to upper part of the nosecone during flight. 1 2 3 5 6 Figure 23: Estimated resulting strain in flight direction during launch phase 1 2 3 4 5 6 7. 8. 9. 10. Recovery Module Service Module ADIOS GGES 11. CaRu 12. Romulus Figure 2: Estimated resulting strain in flight-direction during landing phase RX11_ADIOS_SEDv5.3_07October2013_Final.docx Page 145 To consider moving maxima, strain gauges have to be applied on several stages of the rocket. Best stages to cover all flight phases are: 1. Recovery module and service module during launch 2. ADIOS and CaRu during landing phase (NC is neglected) For that, the largest strain at each stage is expected to be in the middle between two “perturbations” of structure. Perturbations are connections between the modules, mountings, and bore holes in the structure. Hence, first stage is located ≈ 92 mm from bottom inside the ADIOS module. The second stage shall be located at ≈120 mm from bottom inside the CaRu module. It would have been good to have a third stage located at ≈200 mm from bottom of the recovery module. Next, the number of strain gauges in each cross-section has to be termed. For that, the different kind of structural loads have to be considered. During flight, there are longitudinal and bending vibrations. Physically, a longitudinal vibration on a symmetric structure causes equal strain (magnitude and algebraic sign) on opposite sides of the structure. A bending vibration leads to strain with equal magnitude but different algebraic sign. To decide which kind of vibration is acting on the rocket and to measure its magnitude, two strain gauges has to be applied to the structure positioned on opposite sides of the rocket structure (that means displaced by 180°). As Figures 1 and 2 show, the strain maxima in a stage will be displaced by 180° followed by strain minima displaced by 90° to the maxima. Previous to flight, it is not possible to say where those maxima and minima are located. To consider the different behaviour in different positions in one stage, there shall be four strain gages applied equally distributed and displaced by 90° onto the structure. In addition to the location of each measurement stage, the position of the strain gauges in comparison to the zero degree mark has to be termed. This will be based on the assembly of the ADIOS module. Since, mountings and bore holes in the structure falsifies strain measurement the strain gauges shall not be positioned at 0°, 120°, and 240°. There are the mountings of the bulkhead, the free flying experiment device (FFED), and the motors. Since, the strain gauges are displaced by 90°, the positions of 40°, 80°, 160°, 200°, 280°, and 320° are no possible application position, too. To have the lowest possible perturbations, the strain gauges shall be positioned at 20°, 110°, 200°, and 290°. Figure 3 shows the positioning of the strain gauges in one stage schematically. Since, strain measurement is always depending on the temperature of structure, either the strain gauges has to be temperature compensated or the temperature has to be measured during flight, to compensate the strain data afterwards. It is not possible to compensate the strain gauges itself with the planned ICP measurement setup. Hence, the temperature at each stage has to be measured. For that, temperature sensors are applied to the structure next to the strain gauges as shown in Figure 3. Since, the rocket is always RX11_ADIOS_SEDv5.3_07October2013_Final.docx Page 146 rotating a circumferential temperature gradient is not expected. Hence, one temperature sensor for each stage would be enough. To have redundancy, there shall be two of them at each stage. Using four strain gages and two temperature sensors at each stage, six harnessed cables are going from the CaRu module to the ADIOS module. They shall be guided through the modules together with the other cables coming from the service module at the cable feed-through at 180°. 20° Temperature sensors Figure 3: Strain gauge positioning in one stage Due to the planned measurement setup, the strain gauges will provide only very small voltages. The disturbances and the noise caused by cut cables can be much higher than those signals. Therefore, the cables shall not be cut and equipped with connectors. To get an idea, how much space one strain gauge and one temperature sensor will need, Figure 4 shows an example of the application of both sensors onto the structure of the VibraDamp module (400 mm height). Figure 5 shows an enlarged picture of the application. RX11_ADIOS_SEDv5.3_07October2013_Final.docx Page 147 Strain gauge Strain relief Picture 1: Example of strain gage application Picture 2: Enlarged picture of the applicated sensors RX11_ADIOS_SEDv5.3_07October2013_Final.docx Page 148 For the EXP2 of the ADIOS experiment, following requirements are defined: 1. The strain shall be measured at 3 cross sections, each with 4 strain gauges. 2. The first measurement cross section should be near the motor separation adapter (recovery module, at 200 mm). 3. The second measurement stage shall be inside the CaRu module located 120 mm from bottom of this module. 4. The third measurement cross section shall be inside the ADIOS module (92 mm from bottom). 5. The strain gauges at sections 1 and 2 shall be one-axial, to measure the strain in flight direction. 6. The strain gauges in the 3rd section shall be T-Rosettes to measure the strain in flight and lateral direction. 7. Each cross section shall be equipped with 2 temperature sensors. 8. The strain gauges and temperature sensors shall be positioned in one cross section as shown in Figure 3. 9. The required space inside the external modules shall not exceed 20mm x 20mm. 10. The cable harness shall not being cut at the separation planes of the rocket. 11. The cable feed-through shall be at 180°. Additional Requirements to the performance of the strain gauges: 6. The strain gauges shall be calibrated for aluminium 7. The strain gauges shall have a minimal sensitivity of 100 µε 8. The sample rate for the strain shall be the same as for the temperature 9. The data volume on the cRIO shall not exceed 0.7 GB measured for all data. 10. Each strain gauge shall measure the strain with a sample rate of 4000 Hz and should measure with a sample rate of 16000Hz Strain gauge design The sizes of the train gauges are very small and the required space for the wall application will not exceed 20mm x 20mm for each measuring point. The cables will be assembled to one cable harness which leaves the module. RX11_ADIOS_SEDv5.3_07October2013_Final.docx Page 149 HBM, manufacturer and sponsor of the strain gauges, provided us a package of 10 x 120 Ω linear strain gauges for testing the application and function of the amplification. These strain gauges will be tested at the VibraDamp RX 7 Module. The actual size of the strain gauges is shown in the following pictures. Picture 3: Linear strain gauge (350 Ω) Picture 4: T-rosettes strain gauges (350 Ω) RX11_ADIOS_SEDv5.3_07October2013_Final.docx Page 150 Picture 5: Temperature sensor (350 Ω) Picture 6: Linear strain gauge for testing (120 Ω) RX11_ADIOS_SEDv5.3_07October2013_Final.docx Page 151 Picture 7: strain relief for cabling Procedure of application 1. Cleaning of the module surface. 2. Removing anodization in the area around the placement with 80 with abrasive paper. Keep it dry and clean. Use clean gloves! 3. Use provided clean paper tissues for cleaning the surface VERY accurately with chemically pure acetone (very important!!! – do not use technically clean acetone). 4. Do not touch the clean surface again!!! 5. Using transparent adhesive tape to pick up the strain gauge and place on the structure 6. Lifting up the adhesive tape until the matt-finished backside of the strain gauge is visible 7. Apply special glue (read instructions of manufacturer!) on the strain gauge 8. Press the strain gauge on the structure for several minutes (see instructions of manufacturer) 9. Use rubber between tool and strain gauge! Fixate the rubber with adhesive tape. 10. Use tool to build up pressure onto the positioned measuring point. 11. Heat the structure from the outside of the module at least in the area around the strain gauges to a temperature up to 80°C. RX11_ADIOS_SEDv5.3_07October2013_Final.docx Page 152 12. Wait for at least 5 hours – then remove the tool carefully. 13. Remove adhesive tape 14. Same procedure for strain reliefs 15. Soldering of small cables between strain reliefs and strain gauge 16. Soldering of cable harness to strain relief 17. Cover the whole deanodized area including strain gauges and cable connection with covering agent. 18. Merge the cables of all strain gauges of the cross section at the wall to one cable harness to leave the module at 180°. 19. Connecting the cables to amplifier in ADIOS module The instructions of the manufacturer HBM can be found on the BSCW Server -> 300 Sensors & DAQ -> Sensorik RX11_ADIOS_SEDv5.3_07October2013_Final.docx Page 153 APPENDIX G – INFORMATION ADDITIONAL RX11_ADIOS_SEDv5.3_07October2013_Final.docx TECHNICAL Page 154 Substructure of WBS, RX11_ADIOS_SEDv5.3_07October2013_Final.docx Page 155 RX11_ADIOS_SEDv5.3_07October2013_Final.docx Page 156 RX11_ADIOS_SEDv5.3_07October2013_Final.docx Page 157 RX11_ADIOS_SEDv5.3_07October2013_Final.docx Page 158 RX11_ADIOS_SEDv5.3_07October2013_Final.docx Page 159 Mass reduction list Table 20: Mass reduction list RX11_ADIOS_SEDv5.3_07October2013_Final.docx