1
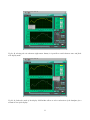
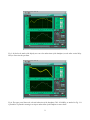
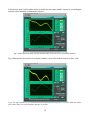
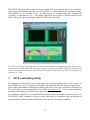
CSO-FFTS User Manual Bernd Klein Max-Planck-Institut für Radioastronomie, Bonn Issue 1.0 Document: CSO-MPI-MAN-02 Keywords: FFTS, CSO, spectrometer 1 Change Record REVISION DATE AUTHOR 1.0 2007-12-01 B. Klein SECTIONS/PAGES AFFECTED REMARKS new issue Table of Contents 1 Purpose....................................................................................................................................................3 2 Reference Documents.............................................................................................................................3 3 Definitions...............................................................................................................................................3 4 FFTS startup............................................................................................................................................4 5 Start of the graphical on-line display (“LabView Monitor”)..................................................................6 6 The graphical on-line display (“LabView Monitor”)..............................................................................7 7 FFTS overheating safety.......................................................................................................................11 8 FFTS shutdown.....................................................................................................................................12 9 Trouble shooting...................................................................................................................................12 2 1 Purpose The purpose of this document is to provide the user with all necessary (background-) information to operate the CSO-FFT spectrometer (FFTS) within the CSO environment in the observing mode. This document does not address the possibilities to use the FFTS outside the CSO control software, e.g. for low-level debugging. Also this document does not cover the technical aspects and specifications of the CSO-FFTS. For this the interested reader is referred to the CSO-FFTS Design Description (RD-01). For questions, which go beyond this document or for any kind of problems please contact B. Klein from the Max-PlanckInstitut für Radioastronomie (e-mail: [email protected]). 2 RD-01 RD-02 RD-03 RD-04 RD-05 3 Reference Documents CSO-Fast Fourier Transform Spectrometer, Design Description, CSO-MPI-DSD-02 APEX SCPI socket command syntax and backend data stream, APEX-MPI-IFD-0005 B. Klein, S.D. Philipp, I. Krämer et al., 2006, A&A, 454, L29 B. Klein, S.D. Philipp, R. Güsten et al., 2006, SPIE Vol. 6275, pp. 627511 D. Muders, H. Hafok, F. Wyrowski et al., 2006, A&A, 454, L25 Definitions In the course this document we will use the following abbreviations: IF FFTS ADC FPGA MPIfR CSO Heterodyne IF system, delivered from MPIfR Fast Fourier Transform Spectrometer, user manual Analog-to-Digital Converter Field Programmable Gate Array Max-Planck-Institut für Radioastronomie 3 4 FFTS startup To startup the FFTS after a power shut-down: 1) Switch on the Acqiris FFTS unit (power switch on the front of the FFTS crate). 2) After a few seconds delay the Linux-PC (FFTS-PC) can be switched on (power switch on the front of the FFTS-PC). 3) During the booting of the Linux system, the Acqiris AC240 digitizer / analyzer boards, which are connected via a PCI bus extension, will be detected and displayed in the boot messages. The boot phase of the FFTS-PC is finished when the KDE desktop appears. The boot phase of the FFTS-PC is finished when the KDE desktop appears. 4) Start the VNC viewer from a terminal window: > vncviewer -shared :2 ! starts the vncviewer with a connection to the virtual desktop :2 or double click to the VNC icon located on the KDE desktop: N.B.: The VNC viewer can be launched on every PC (Linux and Windows) in the network. 5) The FFTS control software is started by the FFTS setup script “startWOLA” from the home directory. > ./startWOLA This setup script initializes and loads the FPGA on the IRIG-B/Blank-Sync board (RD-01) and launches the FFTS control software. During this boot sequence (which takes typically ~15 seconds) the following text is displayed in the active terminal window: ++ | *** FFTSpectrometer: FFTS *** | | | | FPGACORE: max. 2 GSPS / WOLAFFT / 8192 channel | | | | VERSION: 8.19 RELEASE/BUILD: Nov 29 2007 | | | | MaxPlanckInstitut fuer Radioastronomie, Digital Group | ++ TELESCOPE: CSO BACKEND: FFTS1 AC240 BOARDS: 1 AC240 INPUT: 1 FPGA Core: WOLA / 8K channel Port SCPI (UDP): 16200 Port FitsWr(TCP): 25144 Simulate: NO Control: UDP SCPI 4 REMARK: Found KOLTER Baseaddress at 0x8400 REMARK: Found IRIGB timer card with FPGA Core version 1.03 REMARK: Create FitsWriter Server thread .. REMARK: FitsWriterServer() started! REMARK: Wait for Client at port 25144 REMARK: Lock memory (no paging). REMARK: Set highest process priority and FIFO scheduling. AcqrsD1_multiInstrAutoDefine(): OK REMARK: Detected AC240 boards: 1 Init AC240 board number 0 AcqrsD1_InitWithOptions(): OK AcqrsD1_getInstrumentData(): OK Acqiris Name: AC240 Serial Number: 48 Bus Number: 5 Slot Number: 15 AcqrsD1_getMemory(): OK Max. Number of Samples: 10000 Max. Number of Segments: 1 REMARK: Clear XILINX ... finished. REMARK: Loading FPGA image ... finished. AcqrsD1_configLogicDevice(): OK AcqrsD1_configMode(): OK AcqrsD1_configHorizontal(): OK CH1: AcqrsD1_configVertical(): OK CH2: AcqrsD1_configVertical(): OK REMARK: Calibrate ADCs for interleave mode .. AcqrsD1_calibrate(): OK REMARK: Switch XILINX on REMARK: Number of FPGA accumulations: 4000 AcqrsD1_acquire(): OK REMARK: Create control thread (UDP SCPI).. REMARK: SCPIctrlThread() started! REMARK: Now the FFTS is ready for observing. Good luck! After the boot-sequence is finished, the active terminal window will display the SCPI communication (RD-05) between the telescope control system and the CSO-FFTS, e.g.: ... UDPSCPI(recv): CSO:FFTS1:BAND1:IFAtten? UDPSCPI(send): CSO:FFTS1:BAND1:IFAtten 10 20070621T20:50:36.657+0000 UDPSCPI(recv): CSO:FFTS1:integrationTime? UDPSCPI(send): CSO:FFTS1:INTEGRATIONTIME 983 20070621T20:50:36.775+0000 UDPSCPI(recv): CSO:FFTS1:BAND1:minIFLevel? UDPSCPI(send): CSO:FFTS1:BAND1:MINIFLEVEL 14.00 20070621T20:50:36.849+0000 UDPSCPI(recv): CSO:FFTS1:BAND1:bandWidth? UDPSCPI(send): CSO:FFTS1:BAND1:BANDWIDTH 1000.000 20070621T20:50:37.261+0000 TCP: Send 32840 Bytes, Dump 3, Phase 1 UDPSCPI(recv): CSO:FFTS1:BAND1:numSpecChan? UDPSCPI(send): CSO:FFTS1:BAND1:NUMSPECCHAN 8192 20070621T20:50:37.716+0000 ... As soon as this is displayed, the FFTS is in full operation mode and ready to use for observations. For thermalization of components in the FFTS (particularly the ADC), which can cause baseline instabilities, we recommend to wait another 5 – 10 minutes before starting regular observations! 5 5 Start of the graphical on-line display (“LabView Monitor”) Independent of the FFTS control program, there is an online display (LabViewMon) available for the FFTS, which is implemented as a LabView application. The LabViewMon provides additional information about the status (bandpass, level, blank/sync time, FPGA temperature, etc.) of the FFTS to the user, which is not available within the SCPI commands. The LabViewMon can be started by double clicking the corresponding icon on the VNC desktop of the FFTS-PC: WOLA-LabView 6 6 The graphical on-line display (“LabView Monitor”) After double clicking on the startup icon, within a few seconds the LabView monitor window will appear (Fig 1). Start the application by pressing the LabView start button: Fig.1: Display of LabViewMon: In the upper panel the bandpass of the FFTS is shown in a logarithmic level yscale and a linear frequency (x-)scale (DC to 1 GHz). In the lower panel, the bandpass is plotted on a linear scale for both axis. In the right column the operational parameters (blank/sync time, FPGA temperatures, etc.) and the settings for the FFTS are listed. Note: The CSO-FFTS version provides only one bandpass (1 x 1 GHz), therefore only one FPGA temperature is displayed! After start-up, the LabViewMon displays the graphs in auto-scale mode, which means that the level and frequency scale are automatic adjusted to display the complete bandpass. These plotting ranges may be changed by clicking with the right mouse-button to the corresponding scale and un-selecting “auto-scale” as shown in Fig. 2. In fixed-scale mode it is possible to zoom into subsections of the bandpass by selecting the corresponding range with the mouse, e.g. to inspect the data in more detail (Fig. 3). 7 Fig 2a: By selecting the axis sub-menu (right mouse button) it is possible to switch between auto- and fixedscale display mode. Fig 2b: In fixed-scale mode of the display LabViewMon allows to select subsections of the bandpass for a zoomed-in view of the display. 8 Fig 3: In fixed-scale mode of the display one can select subsections of the bandpass (see the white vertical helplines) to zoom into the spectrum. Fig 4: The upper panel shows the selected subsection of the bandpass (588 – 826 MHz), as marked in Fig. 3. It is possible to repeat this zooming-in to inspect subsections of the bandpass in more detail. 9 In fixed-scale mode, LabViewMon allows to modify the axis range (smaller x-span) by overwriting the min/max values manually as illustrated in Figure 5. Fig 5: In the fixed-scale mode, the min and max values of the axis can be overwritten manually. Fig. 6 illustrates the increased level resolution (smaller y-span) after manual zoom-in on the y-scale. Fig 6: The upper panel shows a subsection of the bandpass after zooming-in on the y-scale. With this smaller span a more detail view of the bandpass structure is possible. 10 The IF/FFTS system provides an auto-level loop function. This loop is applied before every calibration scan to adjust and optimize the input level for the FFTS. To control/monitor this automatic leveling, LabViewMon can be switched to the “Leveling”-display by mouse-clicking the selection bar “Leveling”, as illustrated in Fig. 7. The optimal input-level for the FFTS is reached when the 8-bit ADC is driven by a mean-value signal around 75% full-scale of the ADC. Fig 7: The Level-Display: The upper panels are only used for sophisticated debugging purposes. Therefore they are not described in this manual. The lower panel shows the leveling for the FFTS (yellow). The chart in the left corner at the bottom line shows that the FFTS level is around 75% ADC full-scale, which corresponds to an input level of ~ -3 dB. 7 FFTS overheating safety The temperatures of the FPGA is given in the upper line of the right column of the “spectra-section” of LabViewMon (e.g. Fig. 1). To prevent overheating of the system an idle mode has been implemented: Since higher temperatures are limiting the lifetime of the FPGA, the chip is switched to idle mode (no FFT processing) in case the temperature of the FPGA rises above 65°C! As soon as the temperature decreases below that level the FFTS can be operated again. To safe lifetime of the FPGA, it is automatically switched-off after 60 minutes of non-activity (no new CSO:FFTS1:START command). As soon as a new observation is commanded, they are switched-on again automatically. But note that the FFTS then needs another ∼10 minutes to stabilize! 11 8 FFTS shutdown The shutdown procedure for the FFTS is similar to the start-up, but in reverse order. 1) First, the FFTS control program is stopped by typing “Ctrl + C” in the active terminal window where this program is running. A signal handler will take care that all processes and threads of the FFTS software will terminate properly. The final message of the exit handler will inform the user about the correct termination of the software. 2) The LabViewMon can be stopped by clicking the “exit” button. To exit the LabView program choose “File” in the menu bar and “exit”. 3) The VNC viewer is stopped by pressing “F8” and selecting “exit”. 4) Now, the Linux operating system can be shutdown. 5) And finally, the PC can be switched-off and then the Acqiris FFTS unit. 9 Trouble shooting In case of problems, the best way to get the FFTS back into operation is to shutdown and then a re-start of the whole FFTS system, as described in section 4. Since the FFTS was tested and demonstrated to be very stable and reliable, please check whether the problem was caused by another instrument before you re-start the system. In any case, please inform Bernd Klein ([email protected]) about every problem that occurred and re-start performed. 12