1
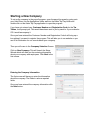
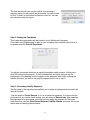
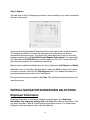
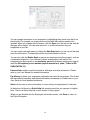
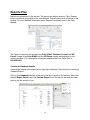
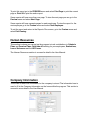
Installation Instructions
The V17.5 series of our payroll program is designed to be used on Macintosh
computers running OS 10.4 or higher operating systems. It will not work properly on
systems below 10.4.
To install the program, open the update. Click drag and drop the Aatrix Top Pay/
Ultimate/Paycheck folder into the Applications folder on the download -- It is a shortcut
to your Applications folder on your computer. If you are prompted that the item already
exists, select Replace.
To open the program once you have it installed, open your hard drive and go into your
Applications folder. Go into the Aatrix Top Pay/Ultimate/Paycheck folder and double
click on the Aatrix Top Pay/Ultimate/Paycheck program application to open the
program. If you normally open the program from a shortcut on your dock you will have
to remove the link to the old version and create a link to the new version.
Aatrix V17.5 Quick Start Guide
Welcome to Aatrix V17.5 and the V17.5 Start Up Guide. This guide gives you short,
simple instructions and tips for quickly getting started with V17.5. It is handy as a quick
reference guide but is not meant to replace the full User Guide, which covers the payroll
program in detail. This guide is for Top Pay, Ultimate, and Paycheck version 17.5ʼs.
Before Starting New Company
If you plan to use the program with Quickbooks®, you will need be sure that you have
the accounts necessary for payroll and then export the chart of accounts.
Accounts Needed in Quickbooks for Payroll
In Quickbooks®, you will need accounts set up as a Type Other Current Liability to
track the amounts of the taxes and deductions for payroll and accounts set up as a Type
Expense that tracks the companyʼs expense for payroll. Please consult with your
accountant for guidance on setting up the accounts in Quickbooks®.
Exporting the Chart of Accounts from Quickbooks®
Once you have the accounts needed in Quickbooks® set up you will need to export
your Chart of Accounts from your Quickbooks® program to the desktop.
The Export command in Quickbooks® is located under the File menu. Select List to IIF
files, select your Chart of Accounts, save as COA ( short for Chart of Accounts ) and
select the destination as the desktop. For assistance in exporting your Chart of
Accounts you can contact your accountant or Quickbooks® Technical Support.
1
Starting a New Company
To set up the company in the payroll program, open the payroll program by going onto
your Hard Drive, into the Applications folder and into the Aatrix Top Pay folder and
double click on the Aatrix Top Pay application to open the program.
If you have not entered your Customer Number and Registration Code for the Tax
Tables, it will prompt you. This would have been sent to you by email or if you ordered a
CD it would accompany it.
Once you have entered the Customer Number and Registration Code it will bring up a
box asking if you want to register the program. This will take you to our website so you
can fill in information for our records about your company.
Then you will come to the Company Selection Screen.
Click on New Company. This will launch the Setup
Wizard which will walk you thru entering information
about your company and employees. Click Next in the
first screen.
Entering the Company Information
The first screen will have you enter the information
about the company. The fields in red are required
fields.
Once you have entered the company information click
the Next button.
2
!
!
!
!
!
Income Items
Regular Pay, Overtime Pay, Double Overtime Pay,
Commission Pay and Bonus Pay are already created for
you. In this section select any income items listed that would
apply for your company.
Click Next to continue with the company setup
!
!
!
!
!
Deduction Items
In this example the company is being set up for California.
The program automatically creates and assigns the Federal
Income Tax, Social Security, Medicare, California State
Tax and the California State Disability Insurance ( SDI ).
There is also a choice for a Pension and Health Insurance
Deductions that you can select. Once selected, from the
drop down menu, select the calculation method ( Amount $,
or Percent of Gross ) and then enter the rate or amount.
Click Next to go on to the next section.
Employer Paid
These are the items that the company pays. The SUI is your
State Unemployment. The rate that is listed is the rate for a
new company in your state. Verify your Company
Unemployment Contribution Rate and enter it in percentage
form. If you do not know your rate contact the State
Unemployment Agency or your accountant for assistance.
If the company pays a portion of the Pension or Health Insurance, you can assign them here, select the calculation
method ( Amount $ or Percent of Gross ) then enter the rate
or amount. Click Next to continue with setup.
3
Employees
This is where you will enter your information for your
employees. Click the New button and enter the
information. It would be a good idea to double check when
entering the Number of Claims and Filing Status for the
Taxes.
Once you have the information entered for the employee,
click Save and the employee will be added to the list on
the left side. Repeat these steps to create your employees.
Once you have the employees created, click Next to
continue the setup.
Link for Net Pay
If you exported your Quickbooks® Chart of Accounts, this
is where we will import them into the payroll program. If
you do not use Quickbooks®, or will not be using payroll
in connection with an accounting program simply click
Next.
On the screen, click the Import button. Navigate to the
desktop. Highlight the COA.IIF file and click Open.
From the drop down menu in the Link window, select the
Checking Account to be used for the payroll checks and
click Next.
Click Finish and the payroll program will open to the Payroll Navigator screen to the
company that you just set up.
The Payroll Navigator
The main screen of the payroll program is the Payroll Navigator screen. There are
several selections that will be covered in this section.
4
Linking to Quickbooks®
The Quickbooks Links will open the Send / Post Payroll window. If you do not see
anything below Designate Account Links, then click on the arrow to the right to
expand the bottom part of the window.
If you have not already, you can click the Import Chart of Accounts button and import
your Chart of Accounts. You will have to first however, export the Chart of Accounts List
from your Quickbooks® program and save to the desktop. If you need assistance
please contact your Quickbooks® consultant or contact Quickbooks®.
The following are the links for the payroll variables that are required.
Variable!
!
!
Entry Type! !
Account
NET PAY"
"
"
CREDIT"
"
CHECKING ACCOUNT
GROSS PAY "
"
DEBIT""
"
WAGE EXPENSE ACCOUNT
ALL DEDUCTIONS ""
CREDIT"
"
PAYROLL LIABILITY ACCOUNT"
ALL EMPLOYER PAID"
CREDIT"
"
PAYROLL LIABILITY ACCOUNT
ALL EMPLOYER PAID"
DEBIT""
"
PAYROLL TAX EXPENSE ACCOUNT
Again, these are the required links for payroll to post properly.
NOTE 1 --- The Liability Accounts needed should be set up as a Type Other Current
Liability Account in your Quickbooks® program.
5
NOTE 2 --- Also notice that there are TWO required links for the items that the
company pays. One is a Credit to the Liability Account to show the amount that is
owed, the other link is a Debit to the Tax Expense Account to show the expense since
the company will pay these items.
NOTE 3 -- The Gross Pay ( Not assigned or all ) link that you will create will track all
items that make up Gross Pay into the account designated. If that is Ok with you you,
after creating the Gross Pay ( Not assigned or all ) link, you can skip down the
variable link to the Federal Income Tax.
If you wish to track the Regular Pay separate from Vacation Pay for example, you would
create the links for those variables into their respective Expense Accounts.
Creating the links is a four step process:
Step 1 - Select the variable from the Payroll Variable List ( for example Federal
Income Tax )
Step 2 - Select the Account to track the item in from the Chart of Accounts ( Using the
Federal Income Tax as an example select the Payroll Liability Account for the Federal
Withholding )
Step 3 - Select the Entry Type ( again for the Federal Income Tax it would be a Credit )
Step 4 - Click the Link button and it will add the link to the Existing Links.
The Reports button will pull up the Export Format report that will show each Item,
whether is a Credit or Debit and the account it is linked to. At the bottom will be a list of
Missing Items for the deductions and employer paid items. Also there is a hint as to
what links are needed.
When you have finished, click Done to return to the Payroll Navigator.
PAY EMPLOYEES
This is where you go to start the process of paying your employees. The first thing that
will pop up is a box asking you to enter the Pay Period Ending Date so it can check for
any holidays during the pay period. This will walk you thru the basics of processing a
payroll. For detailed instructions on processing payroll please to refer to the User
Manual.
6
Once you have entered the Pay Period Ending Date, click Continue.
Step 1 Processing the Paychecks
The first step of the process is where you will select the employees to be paid and make
any changes necessary.
When you select an employee from the list the program will automatically check the box
to Print Check for this employee. If the employee is set up for Direct Deposit it will
automatically mark DD. See the User Manual for guidance on setting up Direct Deposit.
The Record Only when selected will not print a check, but will record the check into the
employeeʼs Pay History records within the program. This is useful when entering prior
paychecks, or if a printed check is not needed.
The check information will also automatically enter with default information based on
what is entered into the program for this person. Make any changes necessary, for
example if this is an hourly employee, enter the hours and then Tab out of the field and
the paycheck recalculates the gross, the deductions and net pay.
If you make any changes to the default information on the paycheck, when you highlight
the next person it will ask you to Save Changes to Paycheck.
7
Donʼt Save will revert the paycheck to the default values when processed, Save will
save the check to be processed with the changes for this payroll only.
Repeat the steps for all employees to be paid for the current payroll.
There is an Undo All button below the listing of employees that will undo all the
employees marked.
There is also an Exit Payroll Process in the bottom of each step of the payroll process.
It will allow you to exit the payroll process and save where you are at in the process as
all steps of the process have to be gone thru to complete the process and have it reset
for the next payroll run.
There is a Quick Help question mark that will bring up a quick help information window
that will give you a handy quick reference guide to assist you. There is a Quick Help link
in each step.
The Reports button will pull up some reports that you can choose from that will give you
information about the payroll to be processed for you to review and catch any mistakes
before the payroll is processed.
The Time Card Summary is used in conjunction with the Time Card Sheets within the
payroll program. Please Refer to the User Manual for detailed information.
The Skip Step is used to skip any step not necessary at the time payroll is being
processed. This allows you to bypass that step to go on to the next step so you can
complete the remaining steps of the current payroll. There is a Skip Step in all of the
steps of the process.
When all employees have been selected and you are ready to proceed, click on the
Print/Record Selected Paychecks.
Enter the Starting Check Number, Date on Check, and Pay Period Ending Date and
click OK.
8
The next window will give you the option of processing a
summary report for the payroll just processed. You can choose
to Print it, view it on the screen or save as a text file. You can
also choose to skip the report.
Step 2, Posting the Paychecks
This is where the paychecks will be posted to your Quickbooks® program.
First, make sure Quickbooks® is open to your company, then verify the date that is to
be posted and click Post All Paychecks.
You will get a message that there is payroll information ready to import. At that point
click OK and import the payroll. Go into Quickbooks® and verify that you see the
paychecks in the checking account register on the paycheck date. After verifying the
checks did import, go back to the payroll program and it is on to step 3.
Step 3, Processing Liability Payments
The third step of the payroll process allows you to select any payments that need to be
done at this time.
You can select to Print & Record, or if it is an electronic payment, or is done over the
phone and do not need a check printed, you can select to Record only. After selecting
the payments to be processed, verify the period to apply the payment to. Once you
have done that, click the Print Record Selected Liability Checks and enter the correct
check date and starting check number.
9
If you do not need to make any payments at this time, click the Skip Step button to
bypass this step and continue.
To process the liability payments, click on the Print/Record
Selected Liability Checks. Enter the Starting Check Number
and the Check Date and then click the Record button.
Step 4, Posting Liability Payments
Any Liability Payments that were processed in the previous step can be posted to
Quickbooks® in this step.
Verify that your Quickbooks® program is open to your company, then verify the date of
the payments to be posted then click Post All Checks and the payments will be posted.
Once the payments have been posted, verify that the checks appear in your checking
account register. Then go back to payroll and it is on to the next step.
10
Step 5, Reports
The final step of the Pay Employees process is the processing of any reports needed at
the end of the payroll.
There are several Standardized Reports built into the program that can be processed.
The Federal and State Forms that are required by the government can also be
processed at this step as well. To process the Federal and State Forms to file would
require enrollment in our Print & Mail Payroll Reports Subscription. You can contact
our Sales Staff at 800-426-0854 for more information and to enroll. You can also efile
the forms and payments for an additional nominal fee.
Reports can be added and deleted from the list by clicking the Add Report and Delete.
Select the forms to be filed by checking the box under the Print column for the reports
you wish to process, then click the Print Reports button. For detailed information on
processing reports please refer to the User Manual.
Once you have the reports needed, click Done. This will finish the payroll process and
reset the process.
PAYROLL NAVIGATOR SCREEN MAIN SELECTIONS
Employee Information
Employee Information is where you manage your employees. Your Employee
Information, Pay frequency and pay rate, and Taxes Information is stored here. This
is a quick overview of what is in the Employee Information screen. For details about
Employee Information please refer to the User Manual.
11
"
You can change information on an employee by highlighting their name from the list on
the left side. For example, an employee has moved and their address needs to be
updated. When you change the information, click the Save from the top tool bar and the
changes will be saved. You can enter as much, or as little information on your
employees as you like.
You can create new employees by clicking the New Empl button on the top tool bar and
enter the information. The employee will be saved and added to the list.
You can also click the Delete Empl to remove any employee from the program, such as
a terminated employee. If you choose to delete an employee it will remove the
employee from the program so be absolutely sure before deleting employees. Keep in
mind the IRS requires you to maintain payroll records for 4 years ( Refer to IRS
PUBLICATION 15 )
Personal Info contains contact information, birthdays and other information. Please
refer to your User Manual for detailed information.
Pay History is where your employees paychecks are stored in the program. This is also
the the area that payments and reports calculations are based on. Please refer to your
User Guide for more detailed information.
Notes can be used to store information or notes about your employees for reference.
In the bottom left there is a Quick Help link question mark that you can use for helpful
hints. There is a Quick Help link in each screen of the program.
When you are finished with the Employee Information screen, click Done to return to
the Payroll Navigator.
12
Payroll Items
Income Items, Deductions, and Employer Paid Items are managed here. This is a
quick overview of Payroll Items. For more details about the Payroll Items screen please
refer to the User Manual
You can create new items and assign items to your employees as needed, or edit
existing items.
If you have an existing item that would apply to All Employees, select the Employee
List Settings at the top of the employee listing on the left side and place a check in the
first column of the item. This will assign it to all employees on the list.
The New Employee Settings is used to automatically assign items to any new
employees that are created.
You can Personalize an item to calculate a specific value for each employee, such as
contributions to Pensions, or Insurance Deductions where the amount for each
employee would be different.
Highlight the employee and double click on the item. Enter the Value for this employee
and click OK. It will place a P in the title of the item with the employee highlighted.
That means it has been personalized for this person.
New Items are created by clicking the New across from the appropriate type of item to
create. Enter the Title, Type and Calculation Method. If you are using Quickbooks®
crete the link to the appropriate account and click OK to create the item.
NOTE -- The Taxes listed under the Type menu and the Tax Calculation selection
under the Calculation Method should ONLY be used in conjunction with Taxes.
When you have finished in Payroll Items, click Done to return to the Payroll Navigator.
13
Manage Liabilities
This is where you can set up Liability Payment information and create payments to be
made. This is a brief overview of what is in the window. For more detailed information
on Manage Liabilities please refer to your User Manual.
To calculate a payment to be made, down the left side, box 1 - select the payment to be
made, 2 - select the employee list to use, 3 - select the period to apply the payment to
and 4 - calculate the amount due. The payment amount pulls in to the right with the
breakdown of what the payment includes and amounts for each item below.
NOTE -- When moving about the screen after calculating a payment, be sure to
use your Mouse or the Tab key on your keyboard.
You can select to Print Check, or to just Record Check if you do not need a printed
check. The check will process and record into the program. You can also choose to efile
Payment as well. efiling the payment requires a subscription to the Print & Mail Payroll
Reports and enrollment in our efiling system. Please contact our Sales Staff at
800-426-0854 for details and enrollment.
View Register is like a checking account register in any accounting program. The
register in the payroll program stores the checks so they can be exported to your
Quickbooks® program.
You can maintain the checking account within payroll, write checks for bills, make
withdrawals, deposits and reconcile it as well. If you post the payroll to Quickbooks®
into your checking account you do not need to worry about reconciling the checking
account in the payroll program.
The other selections across the top tool bar are covered in depth in the User Manual.
14
Reports Plus
Reports are processed in this section. The reports are broken down by Type. Reports
Plus is covered in more detail in the User Manual. This will give you an overview of this
window. For more detailed information about Reports Plus please refer to the User
Manual.
!
!
!
The Types of reports in the program are Print & Mail, Standard, Custom and HR
Forms. Usage of the Print & Mail and the HR Forms require subscriptions for the
forms to process. For subscription information please contact our Sales Staff at
800-426-0854.
Creation of Standard Reports
Creating the reports is the same for any type report selected. This will go thru creating a
Standard Report.
Click on the Standard selection at the top of the list of reports in the window. Select the
desired Report Period, and click Preview Report From the top tool bar and the report
pulls up on the screen for you.
15
To print this report go to the PREVIEW menu and select Print Page to print the current
page or Print All to print the entire report.
Some reports will have more than one page. To view the next page you can go to the
Preview menu and select Next Page.
Some reports will have separate pages for each employee. To view the report for the
next employee go to the Preview menu and select Next Employee.
To exit the report and return to the Reports Plus screen, go to the Preview menu and
select Exit Viewing.
Human Resources
This section is where you can set up the program to track contributions to Cafeteria
Plans and Pension Plans, Paid time off tracking for your employees, Evaluations,
Loans / Advances and the HR Forms.
The Human Resources section is covered in detail in the User Manual.
Company Information
This screen is where the information for the company is stored. The information here is
used to fill in the Company Information on the forms within the program. This section is
covered in more detail in the User Manual
16
Updating your payroll program
A vital part of any in house payroll is making sure that you keep up to date with any
changes to the taxes for payroll. Making sure that your payroll program is up to date
click on the Check for Updates button located in the lower left corner on the Payroll
Navigator screen.
This will verify that your payroll program and the Tax Tables are current. Internet
connection is required. When you check for updates, if an update is available it will tell
you, or if you are up to date, it will tell you that no installation of updates is needed. This
ensures that your program is current.
We do recommend checking for updates at least once a quarter, however, you can
check as often as you like.
You can also get updates by CD for a nominal fee. Contact our Sales Staff at
800-426-0854.
Additional Help
Our Technical Support Staff is available to help you at 701-746-6017 Monday thru
Friday 8AM to 5PM Central Standard Time. You can also contact our support Staff by
email at [email protected]
We also offer Web Seminars that are conducted one on one over the internet. The
seminars cover the operation of the program. You can ask questions, or cover a specific
area that you want more information on. The seminar allows you to visually see how the
program works. For enrollment contact our Technical Support Staff.
17