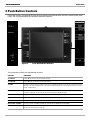
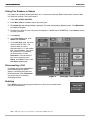
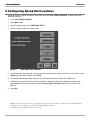
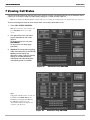
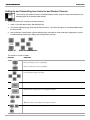
1
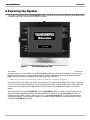
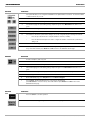
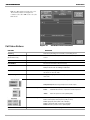
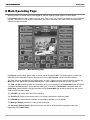
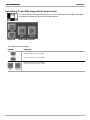
2
EDUCATOR
User Manual
Codec Software Version B4
Control Software Version V4
D50102-06
This document is not to be reproduced in whole
or in part without the permission in writing from:
TANDBERG
TANDBERG
Educator2
Trademarks and copyright
COPYRIGHT © 2000, TANDBERG
1860 Michael Faraday Drive, Suite 250
Reston, Virginia 20190
Tel: 703-709-4281, Fax: 703-709-4231
All rights reserved. This document contains information that is proprietary to TANDBERG. No part of this publication
may be reproduced, stored in a retrieval system, or transmitted, in any form, or by any means, electronic, mechanical,
photocopying, or otherwise, without the prior written permission of TANDBERG.
Nationally and internationally recognized trademarks and trade names are property of their respective holders and are
hereby acknowledged.
Disclaimer
The information in this document is furnished for informational purposes only, is subject to change without prior notice,
and should not be construed as a commitment by TANDBERG.
The information in this document is believed to be accurate and reliable, however TANDBERG assumes no
responsibility or liability for any errors or inaccuracies that may appear in this document, nor for any infringements of
patents or other rights of third parties resulting from its use. No license is granted under any patents or patent rights of
TANDBERG.
The Applications Development Department of TANDBERG, wrote this document. We are committed to maintaining a
high level of quality in all our documentation. Towards this effort, we welcome your comments and suggestions
regarding the content and structure of this document. Please fax or mail your comments and suggestions to the
attention of:
Applications Development Department
1860 Michael Faraday Drive, Suite 250
Reston, Virginia 20190
Tel: 703-709-4281, Fax: 703-709-4231
Technical Support
For technical support, contact one of the following service centers:
2
USA
Canada
Europe & Asia Pacific
TANDBERG
1860 Michael Faraday Drive
Suite 250
Reston, Virginia 20190
Tel: 703 709 4281
Toll free: 800 889 7440
Fax: 703 709 4231
Video: 703 437 6991
Email: [email protected]
TANDBERG
6505 Trans-Canada Hwy.
Suite 610
Montreal, Quebec
H4T 1S3
Tel: 514 748 5224
Toll free: 800 729 6990
Fax: 514 748 5760
Video: 514 744 5514
TANDBERG
Philip Pedersens vei 22
1366 Lysaker, Norway
Tel: +47 67 125 125
Fax: +47 67 125 234
Video: +47 67 117 777
User Manual - D50102-06
Mailing Address:
TANDBERG ASA
P.O. Box 92
1325 Lysaker, Norway
TANDBERG
Educator2
Table of Contents
1 Introduction ............................................................................................................. 5
Manual Content .............................................................................................................................. 5
Conventions .................................................................................................................................... 5
2 Powering the System .............................................................................................. 6
3 Push Button Controls .............................................................................................. 7
4 Touch Panel Controls .............................................................................................. 8
5 Making Calls ............................................................................................................ 9
Speed Dialing ................................................................................................................................. 9
Manual Dialing .................................................................................................................................9
Call Quality Setup ......................................................................................................................... 10
Dialing Two Numbers or Names ................................................................................................... 12
Disconnecting a Call ..................................................................................................................... 12
Redialing ....................................................................................................................................... 12
Initiate Streaming .......................................................................................................................... 13
Telephone Add-on Function .......................................................................................................... 13
Making a Call Using the External Network Configuration ............................................................. 13
6 Configuring Speed Dial Locations .........................................................................14
7 Viewing Call Status .................................................................................................15
Call Status Buttons ....................................................................................................................... 16
Making an MCU Call ..................................................................................................................... 17
Accepting a Call when Auto-Answer is Disabled .......................................................................... 17
8 Main Operating Page ............................................................................................ 18
Live Source Buttons ......................................................................................................................
Setting Up and Transmitting from Instructor and Student Cameras .............................................
Transmitting from a Document Camera ........................................................................................
Transmitting from a VCR or DVD..................................................................................................
Recording the Conference ............................................................................................................
Using Separate Playback and Record VCRs ...............................................................................
Transmitting PC Scan Converter Images .....................................................................................
Transmitting 35 mm Slide Images ................................................................................................
Setting Camera Presets and Auto-tracking ...................................................................................
Setting and Saving Camera Presets .............................................................................................
Using Auto-tracking .......................................................................................................................
Sending Still Images .....................................................................................................................
Using Display Selection ................................................................................................................
19
20
21
22
23
23
24
25
26
26
27
28
28
9 Far End Camera Control ........................................................................................29
User Manual - D50102-06
3
TANDBERG
Educator2
10 Multi-Point Control (MCU) ..................................................................................... 30
Using an External MCU ................................................................................................................ 30
Using the Built-in Codec MCU ...................................................................................................... 31
11 Full Screen View .................................................................................................... 32
12 Instructor Mode Description................................................................................. 33
13 Duo Video .............................................................................................................. 34
Appendix A.
Touch-n-Talk Microphone .......................................................................................... 35
Appendix B
TANDBERG Tracker.................................................................................................... 35
List of Figures
Figure 1
Figure 2
Figure 3
Figure 4
Figure 5a
Figure 5b
Figure 6
Figure 7
Figure 8
Figure 9a
Figure 9b
Figure 10
Figure 11
Figure 12
Figure 13
Figure 14
Figure 15
Figure 16
Figure 17
Figure 18
Figure 19
Figure 20
Figure 21a
Figure 21b
Figure 22
Figure 23a
Figure 23b
Figure 24
4
Educator2 Panel .............................................................................................................. 5
Touch Panel Opening Page ............................................................................................ 6
Push Button Bezel Controls ............................................................................................ 7
Touch Panel Areas ...........................................................................................................8
Speed Dial Page ..............................................................................................................9
Call Setup Page .............................................................................................................. 9
Call Quality Setup Page ............................................................................................... 10
Setting Up a Two Number Call ..................................................................................... 12
Speed Dial Preset Buttons ........................................................................................... 14
Call Status Page BRI/ISDN .......................................................................................... 15
Call Status Page PRI/ISDN .......................................................................................... 15
Call Status External Network ........................................................................................ 16
MCU Speed Dial Page ................................................................................................. 17
Incoming Call Notice ..................................................................................................... 17
Main Operating Page .................................................................................................... 18
Camera Control Buttons ............................................................................................... 20
Document Camera Controls for Elmo and Sony Models .............................................. 21
VCR Buttons and DVD Buttons .................................................................................... 22
PC Scan Converter Controls ........................................................................................ 24
35 mm Slide Controls ................................................................................................... 25
Auto Tracking Page ...................................................................................................... 27
Far End Camera Control Page ..................................................................................... 29
External MCU Control Page ......................................................................................... 30
Built-In MCU Control Page ........................................................................................... 30
Full Screen Buttons ...................................................................................................... 32
Instructor Mode Active .................................................................................................. 33
Instructor Mode with Icon ............................................................................................. 33
Duo Video Control Page ............................................................................................... 34
User Manual - D50102-06
TANDBERG
Educator2
1 Introduction
2
Welcome to the TANDBERG Educator .
2
Educator is a fully featured distance learning system. The heart of this system is a color touch panel incorporating
2
single screen operation and a video window that displays current local and remote site transmission. Educator allows
control of multiple devices, such as room cameras, VCR’s, DVD players, document cameras.
Figure 1
Educator2 Panel
Manual Content
2
This manual is designed to assist you in the basic operation of the TANDBERG Educator . It assumes that all
equipment has been set up prior to operation and that users have a fundamental knowledge of the system. (For initial
set up and configuration instructions, see Installation & Configuration Manual.)
2
This manual is arranged in the order in which an Educator user will need the information. Screen captures included
on these pages depict a system that is configured with all possible sources. Where necessary, small locator icons
show where the controls being discussed typically appear on the screen. For example, Area #1 is represented as:
Conventions
Push button controls are fitted into the cover plate surrounding the touch-sensitive area of the control screen (touch
panel). Push button controls are DEPICTED LIKE THIS.
Touch panel buttons are depicted like this.
Note: Text in this format pertains to the topic being discussed in regular text and is set aside to emphasize a particular point.
User Manual - D50102-06
5
TANDBERG
Educator2
2 Powering the System
2
The system is powered by pressing SYSTEM ON located in the upper left corner of the Educator panel. When power
is applied to the system, the touch panel appears as follows:
Figure 2
Touch Panel Opening Page
The ‘Please Wait’ message appears while the system is loading the control software. When the system is ready, the
message changes to ‘Touch to Start’. Press Touch to Start to display the Main Operating page. If the system has
been password protected, a password window appears. Enter the password using the panel’s keypad and press
Enter. Once the password is accepted, the Main Operating page is displayed.
Note: Some of the buttons located in the bezel will not work when the opening page is displayed.
The touch panel layout changes according to which resources are installed and enabled on your system. The pages
in this manual show a typical example of a fully configured system where all possible video inputs to the system are
installed. If one or several of these video sources are not installed, or not enabled, their selection icons will not
appear.
To turn the system OFF, press SYSTEM OFF. Pressing SYSTEM OFF while in a video call will prompt the user to
confirm this action, before disconnecting and turning off. While the system is off and Auto Answer is active, an
incoming call will turn the system on and accept the call. If the Do Not Disturb option is active (see Installation &
Configuration Manual), a message box will appear on the opening page indicating this and incoming calls will be
ignored until SYSTEM ON is pressed.
6
User Manual - D50102-06
TANDBERG
Educator2
3 Push Button Controls
Push button controls are fitted into the cover plate surrounding the touch-sensitive area of the control screen (touch
panel), and are used to operate the secondary conference functions:
Figure 3
Push Button Bezel Controls
The push button controls have the following functions:
BUTTONS
FUNCTIONS
SYSTEM ON
Powers ON the system. See Powering the System.
SYSTEM OFF
Powers OFF the system. See Powering the System.
VOLUME
Increases or decreases the incoming volume level of all speakers within the room using the arrow buttons. A popup meter in the lower left-hand corner of the main touch panel indicates the current level and varies as you press
the up or down buttons.
MUTE
Disables sound from all microphones within the room. While the Mute is active a flashing ‘Audio Mute’ text
message is displayed over the video window. De-activate by pressing MUTE again.
SYSTEM SET UP
Configures the system. See “System Configuration” in The Installation & Configuration Manual.
CALL STATUS CONTROL
Initiates, disconnects or verifies calls. See Making Calls, and Viewing Call Status.
FAR END CONTROL
Accesses far end camera control. See Far End Camera Control.
MULTI-POINT CONTROL
Accesses controls used within a multi-point environment. See Multi-Point Control (MCU).
HOME
Returns the touch panel to the default, or standard state. HOME cancels all active system and secondary controls
but does not disconnect the current call.
User Manual - D50102-06
7
TANDBERG
Educator2
4 Touch Panel Controls
The touch panel’s features and controls that are displayed are dependent on how the system is configured and what
options have been selected. Some touch panel controls only appear when they are needed. So the general
appearance of the touch panel can vary. However, similar controls always appear in the same areas:
1
5
2
6
3
7
4
Figure 4
Touch Panel Areas
The areas are defined as follows:
BUTTONS
8
FUNCTIONS
1
Displays the currently available Live Sources for video transmission.
Up to five Live Sources are displayed at a time but more are available as described in Area # 2. See Setting and
Transmitting Live Sources.
2
The arrow keys scroll through Live Sources when there is more than five sources available.
3
Contains Send Still button to send a still image and a Display Selection button to toggle from Local Transmission,
Remote Site, and Still Display. (Currently selected display is noted in the Message Window in upper center of panel).
See Sending Still Images.
4
Contains the controls associated with the selected Live Source. See Setting and Transmitting Live Sources.
5
Contains presets associated with the selected Live Source, MCU, or speed dialing controls.
Up to five presets or speed dials can be displayed at a time but more are available as described in Area # 6. See
Making Calls and Setting and Saving Camera Presets.
6
The arrow keys scroll through Live Source presets when there are more than five preset positions available.
7
Contains the utility controls for Area # 5. See Setting and Saving Camera Presets. Also see the dialing instructions.
User Manual - D50102-06
TANDBERG
Educator2
5 Making Calls
There are two methods that you can use to make a call: speed dialing and manual
dialing. Both dialing options are accessed by pressing CALL STATUS CONTROL.
Speed Dialing
To call a previously set speed dial number:
1. Press CALL STATUS CONTROL. A set of previously defined
speed dial locations appears in magenta.
If the system is setup with an Access Code, the user must
enter his or her access code in order to gain access to the
Dialing controls.
2. Press the speed dial button with the name of the desired site. If more than five speed
dial sites are defined, use the More buttons below the Speed Dial buttons to scroll
through the available speed dial sites.
To add or edit a speed dial preset, see Configuring Speed Dial Locations.
Manual Dialing
To manually dial a number:
1. Press CALL STATUS CONTROL.
If the system is setup with an Access Code, the user must enter his or her
access code in order to gain access to the Dialing controls.
Figure 5a
Speed Dial Page
2. Press Make a Call at the bottom right of the touch panel.
3. The Call Set Up page (see figure below) is displayed. The active dialing setting is
depicted in green. The default setting is
Manual Dial. Enter the number or name
of the desired site using the touch
keypad (i.e. 7035551234 or
TANDBERG). Press Delete to correct
any keying mistakes.
Note: The Alpha Dial button will only
appear when the system has been registered
with the H323 Gatekeeper.
4. (Optional) Press Quality to change the
call bandwidth from the default or make a
restricted call. (See Call Quality Setup).
Note: If the requested number of channels
cannot be established, the system will
establish a connection on as many channels
as possible.
5. Press Connect ISDN-H320 to initiate a
call on the H320 Network or press
Connect IP-H323 to initiate a call on the
Figure 5b
H323 Network. System will indicate that it
is connecting. To disregard call, press Disconnect. If connection is busy, wait a
while and then press REDIAL.
Press EXIT to return to the Main Control page.
Note: * This page shows a system that is configured for both ISDN-H320 and IP-H323 Dialing.
Call Setup Page*
User Manual - D50102-06
9
TANDBERG
Educator2
Call Quality Setup
The Call Quality Setup Page allows you to setup the bandwidth requirements for optimal video and audio
transmission. To configure the different call types, select the Quality button on the Manual Dial Page.
Figure 6
BUTTONS
Call Quality Setup Page*
FUNCTIONS
A restricted call is a call to a 56 kbit network. By default the system will dial an
unrestricted call (a call to a 64 kbit network). To make a restricted call:
10
1.
Press CALL STATUS CONTROL.
2.
Press Make a Call at the bottom right of the touch panel.
3.
The Call Set Up page the active dialing setting is depicted in green. Press Manual Dial if this button is not
green.
4.
Enter the number using the touch pad (Ex.: 7035551234). Press Delete to correct keying mistakes.
5.
Press Quality.
6.
On the Call Quality page, press 56K. Press the Return to Keypad.
7.
Press Connect. System will indicate that it is connecting. To disregard call, press Disconnect. If connection is
busy, wait a while and then press Redial. Press Exit to return to the Call Status Control page.
User Manual - D50102-06
TANDBERG
BUTTONS
Educator2
FUNCTIONS
The system will allow you to configure the bandwidth for an optimal number of channels. To select the number
of desired channels for your call:
1.
Press CALL STATUS CONTROL.
2.
Press Make a Call at the bottom right of the touch panel.
3.
The Call Set Up page the active dialing setting is depicted in green. Press Manual Dial if this button is not
green.
4.
Enter the number using the touch pad (Ex.: 7035551234). Press Delete to correct keying mistakes.
5.
Press Quality.
6.
The number of channel the system will use during a call can be configured using the following two methods:
•
Press the Up or Down Arrows to setup the number of channels (1 to Max.).
•
Press the desired channel preset in order to configure the number of channels the system will use
during a call.
BUTTONS
7.
Press the Return to Keypad.
8.
Press Connect. System will indicate that it is connecting. To disregard call, press Disconnect. If connection is
busy, wait a while and then press Redial. Press Exit to return to the Call Status Control page.
FUNCTIONS
To make a telephone (audio only) call:
BUTTONS
1.
Press CALL STATUS CONTROL.
2.
Press Make a Call at the bottom right of the touch panel.
3.
The Call Set Up page the active dialing setting is depicted in green. Press Manual Dial if this button is not
green.
4.
Enter the number using the touch pad (Ex.: 7035551234). Press Delete to correct keying mistakes.
5.
Press Quality.
6.
On the Call Quality page, press Telephone. Press the Return to Keypad.
7.
Press Connect. System will indicate that it is connecting. To disregard call,
press Disconnect. If connection is busy, wait a while and then press Redial. Press Exit to return to the
Call Status Control page.
FUNCTIONS
Press the Cancel to cancel the operation.
Press the Return to Keypad to go back to the Manual Dial Setup page.
User Manual - D50102-06
11
TANDBERG
Educator2
Dialing Two Numbers or Names
For systems not capable of receiving bonding calls, it is necessary to dial both ISDN numbers when making a video
call using H221 protocol. To dial two numbers:
1. Press CALL STATUS CONTROL.
2. Press Make a Call at the bottom right of the touch panel.
3. The Call Set Up page (see figure below) is displayed. The active dialing setting is depicted in green. Press Manual Dial
if this button is not green.
4. Enter the first number or name using the touch keypad (i.e. 7035551234 or TANDBERG). Press Delete to correct
any keying mistakes.
5. Press Quality.
6. On the Call Quality page, press
2xH221 then Connect.
7. On the Call Setup page, key in the
second number or name. The
second number or name is
displayed after the ** in the number
field. Press Connect. The system
will indicate that it is connecting.
To disregard the call, press
Disconnect. If the connection is
busy, wait a while then press
Redial. Press Exit to return to the
Call Status Control page.
Disconnecting a Call
Immediately after pressing Connect on
the Call Setup page, the system
displays a connecting message and a
Disconnect button. Press Disconnect if
you see that the call is not being
established correctly.
Figure 7
Setting Up a Two Number Call*
Redialing
Press Redial on the Call Setup page to redial the last entry that was either dialed
manually or speed-dialed.
Note: * This page shows a system that is configured for ISDN calls only.
12
User Manual - D50102-06
TANDBERG
Educator2
Initiate Streaming
To broadcast the audio/video signals over an IP network, press the Stream Button. A
“Streaming” message will be displayed on the monitor to indicate that the system is
streaming both video and audio signals. The button will illuminate when the system
is streaming and the STREAM indicator will flash.
To stop broadcasting the audio/video signals over an IP network, press the Stream Button. The “Streaming” message
will disappear from the monitor to indicate that the system has stopped streaming both the video and the audio signals.
The button will return to normal and the STREAM indicator will not flash.
Note: While the system is streaming, a Multi-Site or Duo Video call will not be made. Streaming server or multicast address
is configured within the Terminal Setup page.
BUTTONS
FUNCTIONS
Streams the image from whichever site is speaking, either local or remote.
Streams the image from the local site.
Streams the image from the remote site.
To start or stop streaming.
Telephone Add-on Function
Connecting a Telephone Call (North America only)
To connect a telephone call to the videoconference, press the Telephone Add-on
button. Use the telephone handset to establish the call into the conference. The
button will illuminate when the telephone party is connected and the TEL-ADD
indicator will flash. Press the button a second time to disconnect the telephone party.
Making a Call Using the External Network Configuration
To make a call using the External Network configuration:
Note: This method is specific to a particular network and configuration.
1. Press CALL STATUS CONTROL.
2. Press Connect. System will indicate that it is connecting. To disregard call, press Disconnect.
User Manual - D50102-06
13
TANDBERG
Educator2
6 Configuring Speed Dial Locations
Speed dial locations appear on the touch panel when you press CALL STATUS CONTROL. To define and assign
speed dial numbers:
1. Press CALL STATUS CONTROL.
2. Press Make a Call.
3. On the Call Setup page, press SPEED DIAL SETUP.
4. Press a magenta speed dial location button.
Figure 8
Speed Dial Preset Buttons
5. On the Speed Dial Location page, use the touch pad to type the name of the location (up to 11 characters). Press
Delete to overwrite existing letters. Press Enter.
6. On the Speed Dial Number page, use the touch pad to type the location’s number (Ex: 7035551212).
7. (Optional) To change the call quality from what default is depicted in yellow on the Speed Dial Number page,
press Quality. Press the quality option and press Enter or Return to Keypad. Repeat until all locations are
defined.
8. Press Exit.
Notes: Any time you define Site 5 (lower speed dial location), five more possible speed dial locations are made available.
Direction arrows also appear at the bottom of the Speed Dial list as shown.
A maximum of 95 speed dial locations can be stored.
14
User Manual - D50102-06
TANDBERG
Educator2
7 Viewing Call Status
Use the Call Status feature to view the status of the channels currently connected within the call, to disconnect from a
current call, or to alter the video and audio quality settings of a current or future video call.
Note: If you change the TX Call Quality settings, make sure you change the settings back to the defaults after the conference.
To view and change the status of the channels which are currently connected to a call:
1. Press CALL STATUS CONTROL.
Note: If not currently connected in a call,
press Call Status in the lower right
corner.
2. The appearance of the Call Status
page is dependent on the current
network.
To disconnect from the call, press
DISCONNECT.
To return to the Call Setup page,
press Exit.
3. (Optional) To change the transmitting
video and audio quality: press TX Call
Quality. Current settings are
displayed in green. Press the desired
settings in the Video Resolution,
Video Mode and Audio Mode fields
(see following table). Press Exit.
Figure 9a
Call Status Page BRI/ISDN
Notes:
Call Quality and Resolution controls can
be disabled in SYSTEM SET UP. See
Installation & Configuration Manual.
For PRI Network interfaces, the
‘Network Line Status’ box displays the
condition of the Network.
Figure 9b
Call Status Page PRI/ISDN
User Manual - D50102-06
15
TANDBERG
Educator2
Note: For External Network interfaces, the
‘Network Line Status’ box displays the
condition of the other NET on the rear of the
6000 Codec.
Figure 10
Call Status Buttons
BUTTONS
Call Status External Network
FUNCTIONS
Streaming
Start and stop streaming. For more details, see Streaming Section.
Telephone Add-on
(North America only)
Adds or disconnects the telephone. For more details, see Telephone Add-on
section.
LOG OFF SYSTEM
Logs off the system to prevent any unauthorized use.
DISCONNECT
Disconnects unit from the call (if connected).
Connect MCU CALL
When present an MCU call can be made using the Codecs built-in
Multipoint Control Unit. See Making an MCU Call.
Connect DUO VIDEO CALL
When present, selecting this will establish a Duo Video Connection to
the remote site. See Duo Video.
TX Call Quality
Changes the outgoing video and audio quality and resolutions of current and
future calls.
Video Resolution
Motion:
Optimized for smooth motion images for all video inputs.
Sharpness: Optimized for image sharpness for all video inputs.
Video Quality
Audio Quality
EXIT
16
User Manual - D50102-06
H.261:
H.263:
Normal video compression and decompression.
bandwidth efficient video compression and decompression.
AUTO:
Allows the system to set the optimal quality.
G.728: Compressed normal quality audio leaving more bandwidth for video.
G.711: Normal quality audio (telephone quality, 3.1 kHz).
G.722: High quality audio (7kHz at 48 or 56 kbps).
G.722.1: High quality audio (7 kHz at 24 or 32 kbps).
AUTO: Allows the system to set the optimal quality.
Returns to the Main Operation page.
TANDBERG
Educator2
Making an MCU Call
If the system has the network channels available, the ability to Make an MCU Call will be displayed.
There are two methods that you can use to make an MCU call: SPEED DIAL SETUP and MANUAL DIAL. Press the
Connect MCU CALL button to access both dialing options.
1. Press Connect MCU CALL. A set of previously defined speed dials will be displayed along with a MANUAL DIAL
selection button.
2. Press the speed dial location
required or select the MANUAL
DIAL button. If MANUAL DIAL is
selected follow the same steps
explained in Manual Dialing.
Figure 11
MCU Speed Dial Page
Accepting a Call when
Auto-Answer is Disabled
Auto-Answer mode is set in SYSTEM SET UP. (See
Installation & Configuration Manual for instructions).
When Auto-Answer mode is enabled, the system
automatically communicates with any incoming
videoconferencing call. If the Auto-Answer mode is OFF
and there is an incoming call, a red pop-up window
appears (see following). Press Accept to allow the call.
Press Ignore/Disconnect to prevent the call’s
connection.
Figure 12
Incoming Call Notice
User Manual - D50102-06
17
TANDBERG
Educator2
8 Main Operating Page
After the system has loaded and you have logged on, the Main Operating page appears as shown below.
Live Sources selection buttons appear on the left of the Touch Panel. The currently transmitted source is highlighted
in green. The default is set in the initial configuration. The area in the center is the video window and shows what
currently is being transmitted.
Figure 13
Main Operating Page
Live Source control buttons appear under and to the right of the video window. The control buttons available are
dependent on the selected live source. Some sources, such as PC Presenter, do not have control buttons.
The Touch Panel can present up to five source buttons at a time. If there are five or more live sources available, the
More buttons will appear below the Live Sources panel. Press the More arrows to view the other sources.
The Time and Date windows provide such information during system operation.The Custom Mute button will appear
and replace the Date window if any microphone audio inputs are enabled. Custom Mute is enabled through the
Audio Setup (see Installation & Configuration Manual).The Custom Mute light flashes to indicate that one or more
audio sources have been muted.
The VCR REC light flashes when the VCR is recording.
The Tel-ADD light flashes to indicate that there is a third party connected via audio only mode.
The STREAM light flashes when the session is transmitted or recorded via an IP address.
The Message Window provides the current system information.
The Temporary Disable Control. When activated, the user will be able to disable the operation of the mats
temporarily from the Main Page.
18
User Manual - D50102-06
TANDBERG
Educator2
Live Source Buttons
Press a Live Source button to transmit its image. Users can change the live source being transmitted at
any time during the videoconference. The selected image changes from gray to bright green. The
available Live Sources buttons are depended on what sources have been configured for your system.
(Two live sources can be transmitted on a Duo Video system. See Duo Video)
BUTTONS
FUNCTIONS
Student Camera
Sends a view from the Student Camera to the remote site.
Up to 40 presets are available with this camera. See Setting Up and Transmitting from Instructor and Student
Cameras
Instructor Camera*
Sends a view from the Instructor Camera to the remote site.
Up to 10 presets are available with this camera. See Setting Up and Transmitting from Instructor and Student
Cameras.
Document Camera
Sends a view from the Document Camera. See Transmitting from a Document Camera.
PC Presenter
Sends a view from the PC VGA Input or from a VNC IP Address.
VCR*
Sends the image from the VCR video (press the VCR play button).
See Transmitting from a VCR or DVD.
DVD*
Sends the image from DVD.
See Transmitting from a VCR or DVD.
Auxiliary #1*
Sends the image from the source that is connected to the Auxiliary #1 input. Eg. Scan converter, 35mm slide.
Auxiliary #2
Sends the image from the source that is connected to the Auxiliary #2 input. Eg. Whiteboard.
More
Presents more live sources if more than five sources are available.
Send Still
Transmits a still image of the selected live source. See Sending Still Images.
Displayed Selection
Toggles from local transmission, remote site and most recent still image (if a still image has been sent) and presents
the image in the video window. See Using Display Selection.
* The basic version of the Educator2 system includes the Student Camera, with all the other sources being available
as options. If these options are not installed, their selection icons will not appear on the control panel.
User Manual - D50102-06
19
TANDBERG
Educator2
Setting Up and Transmitting from Instructor and Student Cameras
The Instructor and Student Cameras can be positioned manually using the camera control buttons (see
following figure) or the preset position buttons.
To set and transmit from Instructor or Student Cameras:
1. make a call to the desired sites. (See Making Calls).
2. On the Main Operating page, select the desired live source. The source will appear in the video window and on
the local monitor.
3. Use the Camera Control buttons (see the following figure and table) to make the focusing adjustments, or press
the desired preset position (see Setting and Saving Camera Presets).
Figure 14
Camera Control Buttons
The controls are used as follows:
BUTTONS
FUNCTIONS
Zooms in (enlarges the view of a participant).
Zooms out (reduces the view of a participant).
Left and right arrow buttons pan (move horizontally) the camera. Upper or lower arrow buttons tilt (move vertically)
the camera and change the view angle.
Allows user access to adjust the brightness and clarity of the image that is rendered from the camera.
Enables the auto-tracking function. See Using Auto-Tracking.
Use to adjust the clarity of the image that is rendered from the camera.
Note: This feature is only available for the Instructor Camera.
Use to adjust the brightness of the image that is rendered from the camera.
20
User Manual - D50102-06
TANDBERG
Educator2
Transmitting from a Document Camera
2
The standard (optional) document camera for the Educator system is the TANDBERG Documentor (DC2000).
The Sony VID-P series with RS232 Control, ELMO EV series with RS232 control and Wolfvision VZ series
can also be configured. The selected camera is controlled using the options that appear in the pop-up control
window (see following figure).
To set and transmit a Document Camera image:
1. Make a call to the desired sites. (See Making Calls ).
2. On the Main Operating page, select Document Camera. The image from the document camera will appear in the
video window and on the local monitor.
3. Use the Document Camera Control buttons (see following figure and table) to make the adjustments.
Figure 15
Document Camera Controls for Elmo and Sony Models
The controls are used as follows:
BUTTONS
FUNCTIONS
Zooms in (enlarges the view of a document)
Zooms out (reduces the view of a document).
Up arrow button focuses the subject. If the focus diminishes, use the down arrow button. Press the down arrow
button to focus the subject. If the focus diminishes, use the up arrow button.
AUTOFOCUS
Enables the automatic focusing of a camera equipped with this feature.
MORE / BACK
Presents the Document Camera Image Controls.
BACK presents the Document Camera Lens Controls.
LAMP UPPER
Turns ON the UPPER lamp.
LAMP LOWER
Turns ON the LOWER lamp.
LAMP OFF
Turns both the upper and lower lamps OFF.
COLOR
Obtains a color signal from the Document Camera.
B/W
Obtains a black and white signal from the Document Camera.
POSI
Obtains a normal video image.
NEGI
Obtains an inverted (negative) video image.
IRIS
Available for the Wolfvision Series and TANDBERG Documentor cameras only. Adjust the brightness of the image
that is rendered from the camera.
User Manual - D50102-06
21
TANDBERG
Educator2
Transmitting from a VCR or DVD
2
The standard VHS VCR option for the Educator system is a Sony domestic SLV model (North
America). Alternate VCRs and DVD players are available. (See The Installation & Configuration
Manual for more information). The selected player(s) is controlled using the options that appear in
the pop-up control window. For instructions on transmitting on a system with separate playback and
record VCR’s, see Using Separate Playback and Record VCR’s.
To transmit VCR or DVD images:
1. Make a call to the desired sites. (See Making Calls ).
2. On the Main Operating page, select VCR or DVD.
3. Use the VCR/DVD buttons (see following figure and table) to select the player’s functions. Press the Play button
and the image from the player will appear in the video window and on the local monitor.
Note: A “No Tape” indicator illuminates in RED if there is no tape in the VCR.
Figure 16
VCR Buttons and DVD Buttons
The controls are used as follows:
BUTTONS
FUNCTIONS
REWIND the VCR or DVD player
PLAY the VCR or DVD player.
This also transmits the VCR image and allows the audio to be heard.
FAST-FORWARD the VCR or DVD player.
PAUSE the VCR or DVD player.
STOP the VCR or DVD player.
“Note-NOT AVAILABLE FOR DVD”
RECORD the locally transmitted video using the VCR.
The VCR record indicator flashes during a session recording.
22
User Manual - D50102-06
TANDBERG
Educator2
Recording the Conference
You can use your installed VCR to either record the videoconference or play an existing tape. A two VCR installation
provides the ability to play a videocassette while at the same time continuously recording a selected source (see Using
Separate Playback and Record VCRs).
To record the conference using a single VCR:
1. On the Main Operating page, select VCR from the Live
Sources panel.
2. Select the VCR Record Source . Outgoing records the
transmission that is sent to the remote site. Incoming
records the transmission from the remote site.
3. Use the VCR buttons (see previous figure and table) to select the player’s functions. Press the Record button. The
VCR REC indicator (above the Message Window) will flash while VCR is recording.
4. Press another live source button to continue videoconference.
5. To stop the recording, press the VCR source button and press the Stop button.
Using Separate Playback and Record VCRs
A system with a two VCR installation enables you to play a videocassette while simultaneously
recording a selected source. In this setup, each VCR is dedicated to perform one function only.
When you select VCR as the current live source, two buttons are displayed to allow you the choice of
controlling the playback VCR or the recording VCR.
To operate the VCRs in a two VCR installation:
1. On the Main Operating page, select VCR from the Live Sources panel.
2. Select the VCR Control option(s): Playback VCR displays controls required for playback operation (i.e. no
RECORD button). Record VCR displays the controls for recording (i.e. no PLAY button).
3. For Record VCR: Select the VCR Record Source . Outgoing records the transmission that is sent to the remote
site. Incoming records the transmission from the remote site. Press the Record button. The VCR REC indicator
(above the Message Window) will flash while VCR is recording.
For Playback VCR: Use the VCR buttons to select the player’s functions.
4. Press another live source button to continue videoconference.
5. To stop the recording, press the VCR Source button. Press Record VCR. Press the Stop button.
User Manual - D50102-06
23
TANDBERG
Educator2
Transmitting PC Scan Converter Images (North America only)
2
The standard PC scan converter option for the Educator system is the Focus model TView Gold. If
this option is installed, the following pop-up control window appears when the device is selected as
the current live source.
Figure 17
PC Scan Converter Controls
The controls are used as follows:
BUTTONS
FUNCTIONS
Enlarges the image on the television by 100%.
Reduces the image to fit on the television screen.
Lists three sub-menus that control the scan converter’s configuration.
1. Press TV Setup to access settings for the television output.
2. Press Computer Setup to access settings for the computer video input.
3. Press Picture Setup to access settings for the television image.
Right and left arrow buttons pan the image on the screen horizontally.
Up and down arrow buttons pan the image on the screen vertically.
24
User Manual - D50102-06
TANDBERG
Educator2
Transmitting 35 mm Slide Images (North America only)
2
The standard 35mm slide option for the Educator system is the Elmo model TRV-35H. If this option
is installed, on selection this pop-up control window appears:
Figure 18
35 mm Slide Controls
The controls are used as follows:
BUTTONS
FUNCTIONS
Zooms in (enlarges the view of a slide).
Zooms out (reduces the view of a slide).
Back arrow returns to the previous slide.
Forward arrow advances to the next slide.
User Manual - D50102-06
25
TANDBERG
Setting Camera Presets and Auto-tracking
When the system is turned ON, the previously set camera positions (presets) are
immediately available. If optional pressure mats are installed (up to five in total), the
first five presets for the Instructor Camera will correspond to each pressure mat
location.
If there are five or more presets defined, More arrow buttons appear. Use these buttons to reach
more locations to store camera presets. The Instructor Camera can have up to 10 presets while
the Student Camera can have up to 40 presets.
To reach more presets for the Student Camera, change the name of the last new preset (Preset
10), and another set of five presets is made available. This can be repeated until the maximum
number of presets is reached.
Note: Additional preset locations are available only when the last preset has been used and named. The
last preset is the one at the bottom of the preset area.
Setting and Saving Camera Presets
To create and store a camera preset:
1. Select a controllable camera from the Live Sources panel.
2. Adjust the camera using the Camera Control buttons. (See Setting Up and
Transmitting from Instructor and Student Cameras).
3. Press Save Preset.
4. Press a Preset button for assignment (from 1 to 5).
5. Test the new preset by moving the camera to another orientation using any camera control button.
This changes the camera orientation and the Preset button selected in step 4 becomes gray.
6. Press the Preset button selected in step 4. If the preset is properly stored, the button becomes
green and the associated camera moves to the previously assigned position.
If the camera fails to move to the assigned position, repeat steps 1 to 5 or call technical
support (see page 2).
7. Name the preset by pressing Change Name. The button blinks.
8. Select the Preset button whose name you want to change. A keypad appears.
9. Type the new name of the preset using the touch panel keys. Press Cancel if you do not want
to change the name. Press Delete to erase the last letter entered in the name. Press Enter.
26
User Manual - D50102-06
Educator2
TANDBERG
Educator2
Using Auto-tracking
The Auto-tracking feature allows the picture of a subject to stay
in the middle of the screen no matter where the subject moves.
The camera automatically follows the subject. Auto-tracking is
not typically used if optional pressure mats are installed. If
Auto-tracking is used with pressure mats, mat positions
override auto-tracking positions.
To use Auto-tracking:
1. Press Instructor Camera.
2. Press Track on the Camera Control panel.
3. Press On/Off to enter into Auto-tracking (AT) mode. A
white-bordered frame appears in a predefined size
(shown as a black frame in the example). The frame
might not be well placed on the subject.
Figure 19
Auto Tracking
Page
4. Press the arrow buttons to perform the pan and/or tilt
operations such that the subject is placed into the frame.
Make sure to place the subject such that the frame is
uniform in color and brightness. Recognition might not
work if you zoom out the camera to cover too much
background.
5. Press OK Lock-on to activate the AT function. The camera
will now track the subject. Press Auto-Zoom to present the
subject in the same size ratio as when locked on.
6. Press Exit to disable Auto-tracking.
The red tracking lock light on the front of the camera
lights up if the lock is lost. The lock can be re-enabled
by having the subject move back into the center of the
picture or by turning the AT function OFF and repeating
steps 1 to 4. When the light goes off, the lock is
restored.
tracking
lock
light
(red)
User Manual - D50102-06
27
TANDBERG
Educator2
Sending Still Images
Press Send Still to transmit a still image from the selected Live Source.
Note: The ability for the system to send still images is configured in the system setup. (See installation and configuration manual)
The Message Window indicates that the system is transmitting a still image. It takes approximately five seconds to
transmit.
The video source that is currently being transmitted as a live or motion image is automatically stored in the system
and sent as a still image to the remote site. The still image is displayed on the local display monitor until another still
image is sent or the monitor’s displayed source is changed. The video source reverts to live motion after the still has
been transmitted.
Use the Display Selection button to toggle to the Display Still option. When Display Still is selected, the most
recently sent or received still image is displayed on the control panel video window and on the local display monitor
(right hand student monitor).
If a “Still” is received from another site, this will replace any existing image stored in the system and will be
automatically displayed.
Using Display Selection
Press Display Selection to toggle to and display in the video window:
28
•
Local Transmission - (Default) what is being locally transmitted
•
Remote Site – what is being transmitted by the remote site
•
Display Still – (Available only if a still image has been sent or received). The currently stored still image.
User Manual - D50102-06
TANDBERG
Educator2
9 Far End Camera Control
Use the Far End Camera Control feature to control the cameras at the remote site (provided they are
controllable). Press FAR END CONTROL. The Far End Camera Control buttons appear on the touch
panel:
Note: The ‘More’ control buttons only appear when there are more than five available selections for the Live
Sources or Remote Presets.
Figure 20
Far End Camera Control Page
The controls are used as follows:
BUTTONS
FUNCTIONS
Remote Live Sources
Selects a remote source. Up to 15 of the available sources at the remote site will appear. The source name replaces
the text shown in the button.
Remote Presets
Displays a preset camera source at the remote site. Up to 15 of the available remote camera presets will appear.
Zooms in (enlarges the view of a participant).
Zooms out (reduces the view of a participant).
Left or right arrow buttons pan (move horizontally) the camera. Upper or lower arrow buttons tilt (move vertically) the
camera and change the view angle.
User Manual - D50102-06
29
TANDBERG
Educator2
10 Multi-Point Control (MCU)
Use the Multi-Point Control function to control a conference with multiple sites connected, from any of
the participating sites. Press MULTI-POINT CONTROL, and the MCU control buttons appear on the
touch panel:
Figure
21a
External
MCU
Control
Page
Figure 21b
Built-In MCU
Control Page
Using an External MCU
When using an External MCU the following controls are available for use:
Buttons
Functions
Request / Release Floor
Requests floor during the conference. If nobody has chair control, and you wish all other sites to view only you,
press Request Floor. The button will activate and read Release Floor. To release the floor, press Release Floor.
30
View Site
Views a site, then selects the site from the available conference sites. The image from that site is then displayed.
Cancel View
Cancel View switches the display back to the current MCU transmission.
Take Chair / Release Chair
Allows a site to act as a chairman or have chair control for the conference. When pressed (if nobody has chair
control), the button will activate when chair control is granted and will read Release Chair. Press Release Chair to
release chair control.
Transmit Site
Broadcasts a specific site to all participants. Select the site from the currently available conference sites. This
function requires that you already have chair control.
Voice Switched
Enables voice-switched transmission as opposed to manual (chair) control. This function requires that you already
have chair control.
Drop Site
Press to eliminate a site from the videoconference, then select the site from the currently available conference sites.
This function requires that you already have chair control.
End Meeting
Ends the videoconference. This function requires that you already have chair control.
More
Allows access to other connected sites. These buttons are only present if more than 9 sites are connected.
MCU x SITE x Name
These buttons show the other connected sites. Pressing a site button will request to view that site in the same
manner as the View Site button. The local location is indicated by the additional text ‘Your Site’ under the MCU x
SITE x information.
User Manual - D50102-06
TANDBERG
Educator2
Using the Built-in Codec MCU
When using the built-in codec MCU, the following toggle buttons will appear on the MCU controls section of the touch
panel. (See Figure 21b for an illustration.)
BUTTONS
FUNCTIONS
Request Floor
Requests floor during the conference. If nobody has chair control, and you wish all other sites to view only you, press
Request Floor. This will activate and read Release Floor. To release the floor, press Release Floor.
Voice Switched
Pressing this button configures the system to display the image of the person currently speaking. The image will be
broadcasted to all other conference participants and will remain broadcasting until another participant starts to speak
where the system automatically switches to the active speaker.
Continuous Presence
Press this button devides the motion monitor into three or four screens of equal size, each displaying the video
image of different participant. Pressing this button again will remove the screens from the motion monitor and the
system will return to Voice Switched mode.
Transmit Site
When a system is the host of a MultiSite conference, it has the ability to select the site that is seen by the participants .
Select the site from the currently available conference sites.
To cancel this function press the “Transmit Site” button again.
User Manual - D50102-06
31
TANDBERG
Educator2
11 Full Screen View
Touch the video window on the touch panel to switch to “Full Screen View”. In this
view, the entire screen area is used to display the video image. Use this feature to
help make fine camera adjustments.
To use Full screen view:
1. Touch the video window on the Main Operating screen. The touch panel changes to Full
Screen View.
2. Touch the screen while in Full Screen View and the Full Screen buttons appear in the
lower left corner (see following figure and table).
3. Press Preview and the source control buttons appear. Select a source.
4. The source appears on the screen with any relevant controls overlaid on the image. These
controls appear in the same touch panel areas and operate as described in the previous
sections. The previewed source appears on the video window only. To transmit the
previewed source, press Send.
Note: The Send button only appears when a source is being previewed, and not when viewing the
current transmission.
Figure 22
Full Screen Buttons
The controls are used as follows:
BUTTONS
FUNCTIONS
Transmits the previewed image. A message will appear to indicate a change in transmission.c
Selects a source to preview (this has no effect on the current transmission).
Note that the Preview button becomes a Clear Screen button.
Press Clear Screen to display the same image but remove the controls (if any for the selected source) and preset
boxes from the screen for an uncluttered view of the image.
Press to toggle from Local Transmission, Remote Site and Display Still to display full screen images of those options.
Quits the full screen view and return to the main page.
32
User Manual - D50102-06
TANDBERG
Educator2
12 Instructor Mode Description
Instructor Mode
When the system is configured for Instructor Mode, the live source is transmitted with an inserted image from the
instructor camera. This allows the remote site to see the presentation and the instructor simultaneously.
While the mode is active, the
instructor camera is displayed
as PIP in the touch panel video
window, see Figure 23a.
Pressing the PIP will remove
the inserted image of the
instructor camera to be
replaced by an instructor icon,
see Figure 23b.
Figure 23a
Instructor Mode Active
Figure 23b
Instructor Mode with Icon
Selecting the icon will re-insert
the image from the instructor
camera to the live source.
When Instructor Mode is active, Streaming is not possible and activating Duo Video or making an MCU Call
will de-activate Instructor Mode.
User Manual - D50102-06
33
TANDBERG
Educator2
13 Duo Video
With Duo Video two video images can be sent simultaneously from two separate video sources (i.e. Instructor
Camera and a PC presentation) allowing for two incoming and outgoing pictures at each site. Users can select both
their primary (Main) and secondary (Duo) video sources.
To set and transmit in the Duo Video mode:
1. Press Call Status Control.
2. On the Call Status page, press Duo Video.
Note: Connect Duo Video call will only be displayed if the network resources are available and the current call is connected
to another TANDBERG Codec.
3. Pop-up window appears in which you select the source that will appear as the secondary source (in the local display).
Note:
When Instructor Mode is active, selecting Duo Video will cancel Instructor Mode.
4. Press Exit, to return to the main menu page.
5. Back on the Main Operating page, switching between Main Source and Duo Source allows you to select and
control what sources are transmitted and displayed.
Figure 24
Duo Video Control Page
To disconnect from Duo Source mode:
1. Press Call Status Control.
2. Press Disconnect. This drops the Duo Video source. Press Disconnect again to end the conference.
34
User Manual - D50102-06
TANDBERG
Educator2
Appendix A.
Touch-n-Talk Microphone
(North America only)
The touch-n-talk microphone is designed to sit on a level surface, about 12 inches in
front of the user.
Pressing and holding the rectangular touch-n-talk button on the base of the
microphone activates the microphone.
While the microphone is active, the remote site will hear the user, and the student
camera automatically focuses in on the user.
After the touch-n-talk button is released, the microphone is deactivated, and the
student camera returns to a wide-angle shot.
Note: On some of the touch-n-talk microphones, an on/off switch is built onto the
base of the microphone. When the unit is switched on, the microphone is active, and
the user is allowed complete operation of the microphone hands free. When the unit
is switched off the microphone is deactivated.
Appendix B.
Tandberg Tracker
The Tracker is a hand held Infrared transmitter that allows users to request
the student camera to focus on their location.
Each Tracker has a specific Student Camera preset allocated to it and
hence, the Tracker must be used from the location the camera preset will
focus on.
The Tracker has two buttons, one for requesting
to view the individual (single person) the other
viewing a group or the wide-angle room view
(three people).
The Tracker must be pointed towards the
student camera for correct operation.
User Manual - D50102-06
35