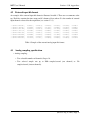
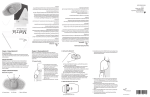
1
Motion Capture System User Manual Model MC 40180 Metria Innovation, Inc. Moiré Phase Tracking™ Technology Motion Capture System User Manual Model MC 40180 August 6, 2013 Copyright (c) 2012, Metria Innovation, Inc All rights reserved Moiré Phase Tracking and MPT are trademarks of Metria Innovation, Inc. Contents 1 Introduction 1.1 Basics of operation . . . . . . . . . . . . . . . . . . . . . . . . . . . . . . . . . . 1.2 Acquisitions . . . . . . . . . . . . . . . . . . . . . . . . . . . . . . . . . . . . . . 1.3 Program MoCapUI . . . . . . . . . . . . . . . . . . . . . . . . . . . . . . . . . . 1 2 3 3 2 Quick start guide 2.1 Equipment setup . . . . . . . . . . . . . . . . . . . . . . . . . . . . . . . . . . . 2.2 Software startup . . . . . . . . . . . . . . . . . . . . . . . . . . . . . . . . . . . 4 4 4 3 Detailed Users Manual 3.1 Equipment setup . . . . . . . . . . . . . . . . . . . . . . . . . 3.1.1 Setup Camera-Lighting Unit and attach cables . . . . . 3.1.2 Attach cables to the robust computer . . . . . . . . . . . 3.1.3 Example use of the external analog input: a force plate . 3.2 MoCapUI the user interface to the Metria motion capture system 3.2.1 Anatomy of a motion capture acquisition . . . . . . . . 3.3 Planning panel . . . . . . . . . . . . . . . . . . . . . . . . . . 3.3.1 New Plan . . . . . . . . . . . . . . . . . . . . . . . . . 3.3.2 Load Plan . . . . . . . . . . . . . . . . . . . . . . . . . 3.3.3 Save Plan and Save As Plan . . . . . . . . . . . . . . . 3.3.4 Reorder Plan . . . . . . . . . . . . . . . . . . . . . . . 3.3.5 Acquisition triggering . . . . . . . . . . . . . . . . . . 3.3.5.1 Pre-trigger store . . . . . . . . . . . . . . . . 3.4 Acquisition panel . . . . . . . . . . . . . . . . . . . . . . . . . 3.4.1 Basic configuration of the acquisition panel . . . . . . . 3.4.2 Five controls at the bottom of the acquisition panel . . . 3.4.3 Firing acquisitions . . . . . . . . . . . . . . . . . . . . 3.4.4 The live-view window . . . . . . . . . . . . . . . . . . 3.5 Status panel . . . . . . . . . . . . . . . . . . . . . . . . . . . . 3.6 Config panel . . . . . . . . . . . . . . . . . . . . . . . . . . . . 3.6.1 Path generation for storing data files . . . . . . . . . . 4 . . . . . . . . . . . . . . . . . . . . . . . . . . . . . . . . . . . . . . . . . . . . . . . . . . . . . . . . . . . . . . . . . . . . . . . . . . . . . . . . . . . . . . . . . . . . . . . . . . . . . . . . . . . . . . . . . . . . . . . . . . . . . . . . . . . . . . . . . . . . . . . . . . . . . . . . . . . . . . . . . . . . . . . . . . . . . . . . . . . . . . . . . . . . . . . . . . . . . . . . . . . . . . . . . . 5 5 5 8 10 12 13 14 14 15 15 15 16 17 19 19 21 22 25 27 27 27 Appendix 30 4.1 Homogeneous transform file format . . . . . . . . . . . . . . . . . . . . . . . . . 30 4.2 External input file format . . . . . . . . . . . . . . . . . . . . . . . . . . . . . . . 32 4.3 Analog sampling specification . . . . . . . . . . . . . . . . . . . . . . . . . . . . 32 (Revised: Aug 12, 2012) Page i List of Figures 1 2 3 4 5 6 7 8 9 10 11 12 13 14 15 16 17 18 19 20 21 22 23 24 25 26 27 28 29 Images of a 65mm MPT marker and Camera-Lighting Unit (CLU). . . . . . . . Images of an MPT Robust Computer and user laptop running MoCapUI. . . . . . Basic elements of the Metria Motion Capture System. . . . . . . . . . . . . . . Mounting the camera-lighting unit to a suitable tripod. . . . . . . . . . . . . . . Back of camera-lighting unit with three cable connections. . . . . . . . . . . . . Attaching the CLU power cable. . . . . . . . . . . . . . . . . . . . . . . . . . . Camera lighting unit with all cables attached. . . . . . . . . . . . . . . . . . . . Making the power connection to the robust computer. . . . . . . . . . . . . . . . Connecting the first camera-link cable to the robust computer. . . . . . . . . . . Connecting the second camera-link cable to the robust computer. . . . . . . . . . The external analog input signals are connected by a 50 pin ribbon cable. . . . . Bertec corp. 4060-NC force plate, with cable. . . . . . . . . . . . . . . . . . . . Bertec corp. AM6 six-channel amplifier. . . . . . . . . . . . . . . . . . . . . . . BNC cables connect the force plate amplifier to the motion capture system external analog inputs through a Measurement Computing Corp. BNC-16SE BNC connector box. . . . . . . . . . . . . . . . . . . . . . . . . . . . . . . . . . . . A Measurement Computing Corp C100HD50-65 ribbon cable connects to connection P3 on the back of the BNC-16SE connector box. . . . . . . . . . . . Appearance of MoCapUI upon launch. . . . . . . . . . . . . . . . . . . . . . . . Acquisition settings dialog. . . . . . . . . . . . . . . . . . . . . . . . . . . . . . An acquisition plan with three configured acquisitions. . . . . . . . . . . . . . . To reorder acquisitions, modify the numeral assigned to the acquisition. . . . . . After the “Reorder Acquisitions” button is selected, the acquisitions will appear in the new order. . . . . . . . . . . . . . . . . . . . . . . . . . . . . . . . . . . . Acquisition trigger type selection dialog. . . . . . . . . . . . . . . . . . . . . . . Triggering options under the ExtInput selection. . . . . . . . . . . . . . . . . . . Acquisition panel when first opened. . . . . . . . . . . . . . . . . . . . . . . . . Folder selection dialog to set the results directory. . . . . . . . . . . . . . . . . . Entering the subject name. . . . . . . . . . . . . . . . . . . . . . . . . . . . . . Acquisitions ready to fire once the camera is started. . . . . . . . . . . . . . . . Motion capture system ready to fire acquisitions. . . . . . . . . . . . . . . . . . “Acq One” “Fire” button has been selected once. The blue circular arrows icon indicates that the acquisition images have been captured and are being processed. “Acq One” “Fire” button has been selected once. The green check icon indicates that the acquisition images have been successfully processed. . . . . . . . . . . . 1 . 1 . 2 . 5 . 6 . 6 . 7 . 8 . 8 . 9 . 9 . 10 . 10 . 11 . . . . . 11 12 14 15 16 . . . . . . . . 16 17 18 19 20 20 21 22 . 22 . 23 (Revised: Aug 12, 2012) Page ii 30 31 32 33 34 35 36 37 Selecting “Fire” a second time launches a second acquisition, identical to the first except with a trial number of 2 (the value before incrementing), rather than 1. The second icon location shows the status. . . . . . . . . . . . . . . . . . . . . . . . Red ’X’ indicates that the current trial repetition number corresponds to data already on disk. . . . . . . . . . . . . . . . . . . . . . . . . . . . . . . . . . . . A red “X” indicates that selecting “Fire” will overwrite data. If “Fire” is selected, a dialog box gives the user one last chance to preserve existing data. . . . . . . . Example live view window. . . . . . . . . . . . . . . . . . . . . . . . . . . . . When Continuous Processing is started, detected MPT markers can be illuminated in the live view window by selecting the “Circles” control. . . . . . . . . . . . . When Continuous Processing is started, detected MPT markers can be illuminated in the live view window by selecting the “Circles” control. . . . . . . . . . . . . Config panel, a configuration that includes four fields in each data file name. . . . Config panel, a configuration that includes five fields in each data file name. . . . . 23 . 24 . 25 . 25 . 26 . 27 . 29 . 29 List of Tables 1 2 3 4 Attributes of a motion capture acquisition (an acquisition, for short). Example parameter settings for pre-trigger store. . . . . . . . . . . Sample of the homogeneous transform file format. . . . . . . . . . . Sample of the external analog input file format. . . . . . . . . . . . . . . . . . . . . . . . . . . . . . . . . . . . . . . . . . . . 13 18 31 32 (Revised: Aug 12, 2012) Page iii MPT Users’ Manual 1 Section 1.0.0, Introduction Introduction Moiré Phase Tracking™ , or MPT, is a single-camera 3D motion tracking technology that operates with a passive cooperative marker. An MPT motion tracking system comprises 1. One or more moiré phase tracking markers (figure 1) 2. A camera-lighting unit, or CLU (also in figure 1 3. A robust computer computer (figure 2), and 4. A user laptop computer (also in figure 2, user-provided). Figure 1: Images of a 65mm MPT marker and Camera-Lighting Unit (CLU). Figure 2: Images of an MPT Robust Computer and user laptop running MoCapUI. (Revised: Aug 12, 2012) Page 1 MPT Users’ Manual Section 1.1.0, Introduction The MC 40180 motion capture system is described in this manual. The MC 40180 captures images at high speed, processes the images for marker measurements, and records captured motion data for user analysis. Some characteristics of the MPT motion capture system are: • Through unique use of moiré patterns, full 3D motion capture with a single camera • Translation and rotation of each marker is recorded from each image – With moiré patterns, rotations are detected with an accuracy of +/- 0.05o RMS. • Automatic identification of up to 256 markers in each image • Synchronized capture of up to 16 channels of analog data. • Data output in ASCII and c3D file formats. 1.1 Basics of operation The basic elements of the Metria Motion Capture System are seen in figure 3, going from the motion of the MPT marker on the left to recorded data files on the right. motion field of view MPT Markers wifi cables CLU results storage Robust Computer User Laptop Measurement Data Files (ASCII or .c3d) on user laptop Figure 3: Basic elements of the Metria Motion Capture System. The basic elements are: • MPT markers MPT markers present in the field of view are tracked by the system. • Camera-lighting unit The camera-lighting unit (CLU) illuminates and captures images of the measurement volume. The images are passed continuously over camera power and data cables to the robust computer. • Robust computer The Robust Computer (RC) is purpose built to capture images of MPT markers and produce motion data. The RC receives commands from the user laptop to configure motion capture acquisitions, fire (execute) the acquisition and transfer the results to the user laptop. (Revised: Aug 12, 2012) Page 2 MPT Users’ Manual Section 1.3.0, Introduction The RC has two states: on and off. When on, the RC motion capture software runs, and is ready to receive commands from the user laptop. The RC provides a WiFi access point, and will accept a WiFi connection from the user laptop computer. • User laptop computer Program MoCapUI runs on the user-provided laptop computer and provides the user interface to the Metria motion capture system. Through MoCapUI, the user can access and use all features of the motion capture system. MoCapUI is introduced in section 1.3 and described fully in section 3.2. • Measurement data files When acquisitions are run, motion data is acquired and saved in measurement data files. Both ASCII data files and .c3d files are available. 1.2 Acquisitions Operation of the Metria MC 40180 motion capture system is built around the concept of a motion capture acquisition. Motion capture acquisitions are pre-planned, with values set for characteristics such as number of images in the acquisition and trigger type. Acquisitions are fired (executed) through program MoCapUI, and produce data files in a specified file location on the user-laptop disk. 1.3 Program MoCapUI Program MoCapUI is a java program that runs on the user laptop (or other) computer. (Revised: Aug 12, 2012) Page 3 MPT Users’ Manual 2 Section 2.2.0, Quick Start Guide Quick start guide 2.1 Equipment setup A summary list of equipment setup steps is given here. Complete detail with illustrations is provided in section 3.1. 1. Connect the power cable to the robust computer 2. Setup the camera-lighting unit (CLU) on a tripod or other fixed mount (tripod not provided). 3. Connect camera link and power cables between the CLU and the robust computer. 4. Turn on the robust computer. 5. Configure MPT markers in the CLU field of view, to track motion. 6. Boot the user laptop. 2.2 Software startup On the user laptop, connect to the Metria Innovation access point 1. Launch program MoCapUI 2. On the Planning panel, load an acquisition plan, or create a new acquisition plan 3. Fire acquisitions (Revised: Aug 12, 2012) Page 4 MPT Users’ Manual 3 3.1 Section 3.1.1, Detailed Users Manual Detailed Users Manual Equipment setup Step by step details of equipment setup are presented in this section. 3.1.1 Setup Camera-Lighting Unit and attach cables The camera-lighting unit should be mounted to a solid tripod or other fixed mount, as seen in figure 4. Figure 4: Mounting the camera-lighting unit to a suitable tripod. As seen in figure 5, three cables are attached to the camera lighting unit. They are 1) the power cable, 2) the first camera-link cable (camera-link Base), and 3) the second camera-link cable (camera-link Full). (Revised: Aug 12, 2012) Page 5 MPT Users’ Manual Section 3.1.1, Detailed Users Manual Figure 5: Back of camera-lighting unit with three cable connections. Figure 6 illustrates attaching the camera-lighting unit power cable. Figure 6: Attaching the CLU power cable. Attach the two camera-link cables. Between the camera-lighting unit and the robust computer, camera-link base should be connected to base, and full to full. The camera-link thumb-screw fasteners should be snugly finger tight (do not over-tighten with a screw driver). (Revised: Aug 12, 2012) Page 6 MPT Users’ Manual Section 3.1.1, Detailed Users Manual Figure 7: Camera lighting unit with all cables attached. (Revised: Aug 12, 2012) Page 7 MPT Users’ Manual 3.1.2 Section 3.1.2, Detailed Users Manual Attach cables to the robust computer Four cables are attached to the robust computer. They are 1) the power cable for the CLU, 2) the first camera-link cable (camera-link Base), 3) the second camera-link cable (camera-link Full), and 4) the external input connection. The CLU power connection to the robust computer is seen in figure 8. Figure 8: Making the power connection to the robust computer. Connecting the two camera-link cables to the robust computer is illustrated in figures 9 and 10. The camera-link cable fasteners should be tightened snugly finger tight. Figure 9: Connecting the first camera-link cable to the robust computer. (Revised: Aug 12, 2012) Page 8 MPT Users’ Manual Section 3.1.2, Detailed Users Manual Figure 10: Connecting the second camera-link cable to the robust computer. Connection of the external analog input signals is seen in figure 11. Fasteners should be snugly finger tight. Figure 11: The external analog input signals are connected by a 50 pin ribbon cable. (Revised: Aug 12, 2012) Page 9 MPT Users’ Manual 3.1.3 Section 3.1.3, Detailed Users Manual Example use of the external analog input: a force plate In figures 12 and 13, connection of the Metria motion capture system to a Bertec 4060-NC force plate is illustrated. As seen in figure 13, the force-plate amplifier connects onto standard BNC connections. Figure 12: Bertec corp. 4060-NC force plate, with cable. Figure 13: Bertec corp. AM6 six-channel amplifier. In figures 14 and 15, connection of the force plate signals through a BNC connector box and 50-conductor ribbon cable is seen. (Revised: Aug 12, 2012) Page 10 MPT Users’ Manual Section 3.2.0, Detailed Users Manual Figure 14: BNC cables connect the force plate amplifier to the motion capture system external analog inputs through a Measurement Computing Corp. BNC-16SE BNC connector box. Figure 15: A Measurement Computing Corp C100HD50-65 ribbon cable connects to connection P3 on the back of the BNC-16SE connector box. The ribbon cable connects to the robust computer external analog input, as seen in figure 11. (Revised: Aug 12, 2012) Page 11 MPT Users’ Manual 3.2 Section 3.2.1, Detailed Users Manual MoCapUI the user interface to the Metria motion capture system The user interacts with the Metria motion capture system through the program MoCapUI, which runs on a user-supplied computer. Implemented in java, MoCapUI is platform independent, so many types of user-supplied computer can be used, such as a Microsoft Windows laptop computer. The first panel of MoCapUI is seen in figure 16. Across the top are seen four tabs: • Planning • Acquisition • Status • Config These four tabs take the user to four panels, each of which permits control or monitoring of an aspect of motion capture. Figure 16: Appearance of MoCapUI upon launch. Before describing the four panels, details of a motion-capture acquisition are presented in section 3.2.1. (Revised: Aug 12, 2012) Page 12 MPT Users’ Manual 3.2.1 Section 3.3.0, Detailed Users Manual Anatomy of a motion capture acquisition An acquisition is the basic element of data in the Metria motion capture system. Acquisitions are organized into acquisition plans that are edited in the Planning panel. Acquisitions are fired (executed) from the Acquisition panel. The attributes of each acquisition are listed in table 1. These are set through the settings dialog on the Acquisition panel. Status is controlled during execution of the Acquisition from the Acquisition panel. Each time an acquisition is fired, motion is captured and data files are produced and stored on the UI computer. The file naming convention under which captured motion data are stored is controlled from the Config panel, described in section 3.6. As described in section 3.4, acquisitions can be fired (executed) any number of times from the Acquisition panel. The acquisition trial number is incremented each time, and used to produce unique results file names (see also section 3.6. Acquisition attributes Significance Value range Short Name Short string name of the acquisition (Appears in data file name) Walk01 Description Longer string description of the acquisition (optional) any string Number of Images Number of images in the acquisition (determines the duration of the acquisition) 1 .. 1000 Number of Images Pre-trigger Used with pre-trigger store (described further in section 3.3.5.1) 0 Number of Targets Anticipated number of MPT tracking markers in the images of the acquisition (Can accelerate processing, or set to 0 if unknown) 0 .. 256 Number of Images Max Gap Parameter that controls searching for markers in images. 1 .. 10 Priority Priority of the acquisition for processing high / low Number of Analog Channels Number of external analog input channels to record in the ExternalInput.csv file 0 .. 16 Trigger Type Type of triggering to initiate the acquisition User / Timer / External Input Table 1: Attributes of a motion capture acquisition (an acquisition, for short). (Revised: Aug 12, 2012) Page 13 MPT Users’ Manual 3.3 Section 3.3.1, Detailed Users Manual Planning panel In the motion capture system, an acquisition is the most basic element of motion capture. Data are recorded by firing acquisitions. As described in section 3.2.1, acquisitions are organized into acquisition plans. Program MoCapUI interacts with one acquisition plan at a time, • In the Planning panel, acquisition plans are loaded, edited and saved. • In the Acquisition panel, acquisitions from the currently loaded acquisition plan are executed. As seen in figure 16, acquisition plans can be loaded, saved (under their current name) and saved as (a new name). To get started working with an acquisition plan, select either “Load Plan” or “New Plan.” 3.3.1 New Plan • Set the “Plan Name” (Session Name) to the desired plan name. The plan name can appear as part of the path generated to store data files. White space is allowed but may not be desired (see section 3.6.1). • Select “Add Acquisition” to add the first acquisition to the plan. Selecting “Add Acquisition” will open the acquisition settings dialog, seen in figure 17. Starting with the acquisition short name, the settings of the acquisition can be made. Figure 17: Acquisition settings dialog. The acquisition short name should be set to a name that is unique to this acquisition plan. It may be used to generate the captured motion data file names (see section 3.6.1). (Revised: Aug 12, 2012) Page 14 MPT Users’ Manual Section 3.3.5, Detailed Users Manual • Additional acquisitions can be added to the plan by repeatedly selecting “Add Acquisition” • The plan can be saved by selecting “Save As Plan” A plan with three configured acquisitions is seen in figure 18. Figure 18: An acquisition plan with three configured acquisitions. 3.3.2 Load Plan If acquisition plans have been previously made and saved, one can be loaded by selecting “Load Plan.” For example, once the plan of figure 18 has been saved, it can later be loaded, bringing the Planning panel back to the state seen in figure 18. 3.3.3 Save Plan and Save As Plan “Save Plan” causes a currently loaded acquisition plan to be saved, using the file name and path from which it was loaded. Alternatively “Save As Plan” opens a file name dialog, for the user to set the file name of the saved plan. 3.3.4 Reorder Plan The acquisitions in a plan can be reordered, as illustrated in figures 19 and 20. To reorder acquisitions, modify the numeral assigned to the acquisition. After the “Reorder Acquisitions” button is selected, the acquisitions will appear in the new order. (Revised: Aug 12, 2012) Page 15 MPT Users’ Manual Section 3.3.5, Detailed Users Manual Figure 19: To reorder acquisitions, modify the numeral assigned to the acquisition. Figure 20: After the “Reorder Acquisitions” button is selected, the acquisitions will appear in the new order. 3.3.5 Acquisition triggering To capture motion data, an acquisition is triggered. As seen in figure 17, the last entries in the acquisition settings dialog are “Trigger Type” and trigger options. Selecting the “Trigger Type” box brings up the trigger type dialog seen in figure 21. One of the trigger types The trigger types are: • User (Revised: Aug 12, 2012) Page 16 MPT Users’ Manual Section 3.3.5, Detailed Users Manual Figure 21: Acquisition trigger type selection dialog. The user triggers the acquisition by selecting “Fire” in the Acquisition panel. • Timer A timer starts when the user selects “Fire” in the Acquisition panel. The acquisition is triggered when the timer times out. • ExtInput (external analog input) The external input trigger source permits acquisitions to be triggered from external devices, such as a light beam, pressure sensor or force plate. When “ExtInput” is selected, the options dialog includes the values seen in figure 22. These options allow a trigger to be setup based on an external analog input signals, connected as shown in figure 14. The channel can be set to one of 0 ... 16. The threshold is set in volts, and the trigger edge can be set to “Rising” or “Falling”. 3.3.5.1 Pre-trigger store Pre-trigger store in the Metria motion capture system functions as does the pre-store function that is common in oscilloscopes. Pre-trigger store makes possible motion capture of events prior to the triggering event. As seen in figure 17 and table 1, “Number of Images Pre Trigger” is a parameter of each acquisition. When this value is set greater than zero, the trigger is not armed until the pre-trigger store buffer is full. Once the buffer is full, images are continuously replaced, so that at the instant of the trigger, the images corresponding to the “number of images pre-trigger” immediately prior to the trigger event are available for analysis. (Revised: Aug 12, 2012) Page 17 MPT Users’ Manual Section 3.3.5, Detailed Users Manual Figure 22: Triggering options under the ExtInput selection. When the acquisition is triggered, motion captured from the pre-stored images will be included in the results. For example, with the settings seen in table 2, when the user selects “fire,” for the first two seconds the pre-store buffer will be filling, and trigger will not be armed. Then the trigger will be armed, and will fire based on the trigger type. When the trigger fires (possibly after some delay), the 200 images recorded immediately prior to the triggering event and the 300 images following the triggering event will be analyzed and motion capture data will be recorded. frame rate 100 number of images 500 number of images pre-trigger 200 fps Table 2: Example parameter settings for pre-trigger store. (Revised: Aug 12, 2012) Page 18 MPT Users’ Manual 3.4 Section 3.4.1, Detailed Users Manual Acquisition panel 3.4.1 Basic configuration of the acquisition panel When the acquisition panel is first opened, it appears as seen in figure 23. Before acquisitions can be fired, these values must be set: • Results directory • Subject name No motion capture acquisition can be fired until the results directory and subject name are set. Figure 23: Acquisition panel when first opened. To set the results directory, select the folder icon to the right of the results directory field. This opens the folder selection dialog seen in figure 24. (Revised: Aug 12, 2012) Page 19 MPT Users’ Manual Section 3.4.1, Detailed Users Manual a) Setting the results directory b) Results directory is set Figure 24: Folder selection dialog to set the results directory. Next, the subject identifier (name, or de-identified string, such as Subject01) is entered in the Subject field, as seen in figure 25. Figure 25: Entering the subject name. With the Acquisition panel as seen in figure 26, acquisitions will be ready to fire once the camera is started. (Revised: Aug 12, 2012) Page 20 MPT Users’ Manual Section 3.4.3, Detailed Users Manual Figure 26: Acquisitions ready to fire once the camera is started. 3.4.2 Five controls at the bottom of the acquisition panel Next attention is given to the five controls at the bottom of the Acquisition panel, for example, seen at the bottom of figure 26. These are: 1. A check box to activate auto increment for the acquisition repetition number. 2. Reconnect, This control will re-initialize and reconnect the WiFi link between the robust computer and the user interface computer (see figure 3). 3. Start/Stop Live View When the camera is started, this control opens a live view window, which shows the current image seen by the camera. When live view is stopped, the control shows start, and vice versa. 4. Start/Stop camera This control is used to start and stop the camera. In figure 26, the acquisition fire buttons and the start live view button are grayed out because the camera is stopped. Selecting this control will start the camera, and change the configuration of controls to that seen in figure 27. 5. Start/Stop CP “CP” stands for Continuous Processing, which is continuous processing of camera images to detect and measure MPT motion tracking markers. When Start CP is selected, the system will illuminate detected markers in the live view window, and optionally report basic data, as described in section 3.4.4 . When Stop CP is selected, live view updates the image faster. (Revised: Aug 12, 2012) Page 21 MPT Users’ Manual 3.4.3 Section 3.4.3, Detailed Users Manual Firing acquisitions When “Start Camera” is selected, the acquisitions are ready to be fired, as seen in figure 27. Firing acquisitions will produce captured motion files on the user computer. Figure 27: Motion capture system ready to fire acquisitions. In figure 28, the “Fire” button of acquisition “Acq One” has been selected once. The repetition counter is incremented to 2, indicating that the trial number will be 2 the next time the “Fire” button is selected, and the first icon has been filled in, indicating the status of the acquisition. Figure 28: “Acq One” “Fire” button has been selected once. The blue circular arrows icon indicates that the acquisition images have been captured and are being processed. (Revised: Aug 12, 2012) Page 22 MPT Users’ Manual Section 3.4.3, Detailed Users Manual In figure 29, the status icon indicates that the acquisition has been successfully processed. Selecting the fire button a second time, as seen in figure 30, launches a new acquisition. Figure 29: “Acq One” “Fire” button has been selected once. The green check icon indicates that the acquisition images have been successfully processed. Figure 30: Selecting “Fire” a second time launches a second acquisition, identical to the first except with a trial number of 2 (the value before incrementing), rather than 1. The second icon location shows the status. The motion capture system supports repeated trials in a flexible way. Some characteristics of the acquisition repetition number (trial number) are: (Revised: Aug 12, 2012) Page 23 MPT Users’ Manual Section 3.4.3, Detailed Users Manual • In normal operation, the ’Rep’ value indicates the next acquisition repetition number that will be assigned to an acquisition when it is fired. • The acquisition repetition number can be incremented or decremented with the adjacent control. • A green check next to the acquisition repetition number indicates that firing the acquisition will not overwrite data. • If there is a bad trial, data can be overwritten by decrementing the acquisition repetition number. • If the acquisition repetition number corresponds to existing data, a red “X” will show, as seen in figure 31. If “Fire” is selected, a dialog box gives the user one last chance to preserve existing data, as seen in figure 32. Figure 31: Red ’X’ indicates that the current trial repetition number corresponds to data already on disk. (Revised: Aug 12, 2012) Page 24 MPT Users’ Manual Section 3.4.4, Detailed Users Manual Figure 32: A red “X” indicates that selecting “Fire” will overwrite data. If “Fire” is selected, a dialog box gives the user one last chance to preserve existing data. 3.4.4 The live-view window Selecting “Start Live View” in the Acquisition panel opens the live view window, as seen in figure 33. Figure 33: Example live view window. The live view window has four controls at the bottom. (Revised: Aug 12, 2012) Page 25 MPT Users’ Manual Section 3.4.4, Detailed Users Manual 1. Equalizer The equalizer display, seen on the left in figure 33. It graphically shows that values on channels 0-5 of the external analog input, and can be used to visually verify that a force plate or other sensor is operating. 2. Circles When Continuous Processing is running (see section 3.4.2), detected MPT markers can be illuminated in the live view window by selecting the “Circles” control, as seen in figure 34. 3. Target Info When Continuous Processing is running (see section 3.4.2), information on detected MPT markers can be written into the live-view window, as seen in figure 35. The marker information includes: • The MPT marker ID number • The brightness of the central (Starburst) landmark • A value indicating the quality of focus of the marker. 4. Verbose If “Verbose” is activated, additional information is written into the live-view window. Figure 34: When Continuous Processing is started, detected MPT markers can be illuminated in the live view window by selecting the “Circles” control. (Revised: Aug 12, 2012) Page 26 MPT Users’ Manual Section 3.6.1, Detailed Users Manual Figure 35: When Continuous Processing is started, detected MPT markers can be illuminated in the live view window by selecting the “Circles” control. 3.5 Status panel The status panel indicates engineering data. 3.6 Config panel 3.6.1 Path generation for storing data files When motion data is captured, it is written to disk using automatically generated file names. The Metria motion capture system provides a flexible means to configure generation of the data file names. The ASCII format data files are: • A file of captured data (see section 4.1) • An external analog input data file (see section 4.2) These files are stored with a path and file name that can include up to 6 fields: 1. Subject Name 2. Acquisition Plan Name 3. Plan Repetition Number 4. Acquisition Short Name 5. Acquisition Repetition Number 6. A file extension (Revised: Aug 12, 2012) Page 27 MPT Users’ Manual Section 3.6.1, Detailed Users Manual Control of these options is set by the radio buttons seen in figures 36 and 37. The first five fields may be used in one of three possible ways, selected by the corresponding radio button on the Config panel: • Start Name If this radio button is selected, the corresponding element starts a new name in the path to the data. For example, the configuration of figure 36 starts a name with the Subject Name and with the Acquisition Short Name. When a name is started, it will be the first field in one of two types of name: 1. Data file name If the field is the last for which “Start Name” is selected, it will be the start of the results data file name. 2. Subdirectory name If the field precedes the last for which “Start Name” is selected, it will be the start of a subdirectory name in the path to the results data file. • Use in File name If “Use in File name” is selected, the field will be post-pended to the preceding field as part of the generation of the path and results file name. • Don’t Use If “Don’t Use” is selected, the field will not be used. For example, in figure 36 two fields are selected for “Start Name” and one field is selected for “Use in File name”. In this case, the Acquisition Short Name starts the results data file name (it is the last field for which “Start Name” is selected), and a subdirectory is created for each Subject Name. Additionally, the Acquisition Repetition Number is post-pended to the Acquisition Short Name, and the file extension is post-pended. An example path, generated by this selection, is seen in the “Example Path” box. A second example is seen in figure 37, where the Subject Name and Acquisition Plan Name each start names. In this case, the data file name is started with the Acquisition Plan Name and includes the Acquisition Short Name and Acquisition Repetition Number and file extension. A subdirectory is created for each Subject Name, and an example is seen in the “Example Path” box. (Revised: Aug 12, 2012) Page 28 MPT Users’ Manual Section 3.6.1, Detailed Users Manual Figure 36: Config panel, a configuration that includes four fields in each data file name. Figure 37: Config panel, a configuration that includes five fields in each data file name. (Revised: Aug 12, 2012) Page 29 MPT Users’ Manual 4 Section 4.1.0, Appendices Appendix 4.1 Homogeneous transform file format The homogeneous transform file format is illustrated in table 3. The initial eight lines are comments, providing information about the acquisition. Each subsequent line corresponds to one captured image and contains: 1. An initial string 2. The frame time (time in seconds in the current epoch of the robust computer system clock) 3. Nt repetitions of 14 fields, where Nt is the number of MPT markers identified in the acquired images. The fields are (a) The MPT marker ID number (b) The status of measurement for this MPT marker in this image, 1 = valid data, 0 = no valid data (c) Twelve elements of the homogeneous transform matrix, expressing the pose of the MPT marker in the coordinate frame of the motion tracking camera For example, for the first row of data in table 3, the homogeneous transform is given as: −0.840866 0.392027 0.373174 0.007651 0.530461 0.733847 0.424358 0.038187 c tT = −0.107493 0.554782 −0.825022 1.552948 0 0 0 1 The last row, h (1) i 0 0 0 1 , is omitted from the homogeneous transforms file. (Revised: Aug 12, 2012) Page 30 Table 3: Sample of the homogeneous transform file format. Image0001_PostTigger_00083742.737133028.bmp, 00083742.737133028, 010, 1, -000.840881, 0000.392001, 0000.373168, 0000.007650, 0000.530447, 0000.733804, 0000.424450, 0000.038188, -000.107447, 0000.554858, -000.824977, 0001.552996, % Measurements processed on Fri Jul 13 15:55:21 2012 % Image Directory: /Metria/Acquisitions/Acquisition_00002124 % Camera Data: Model: ProsilicaGC1290-01, Lens: Schneider28mm, Calibration Date: 09-Apr-2011 % Processing Configuration: TargetIDNumbers (1): 0002; jTargetDeterminationMethod: 2, nMaxImageSearchGap: 10, nImages: 10 % nFullSearches: 4, nRuleAttemps: 6, nTargetsFoundOnRules: 6, nTargetsMeasured: 0002 % % ImageName, FrameTime, TargetID, Status, HT(1, 1), HT(1, 2), HT(1, 3), HT(1, 4), % Image0000_PreTrigger_00083742.697129420.bmp, 00083742.697129420, 010, 1, -000.840866, 0000.392027, 0000.373174, 0000.007651, HT(2, 1), HT(2, 2), HT(2, 3), HT(2, 4), HT(3, 1), HT(3, 2), HT(3, 3), HT(3, 4) 0000.530461, 0000.733847, 0000.424358, 0000.038187, -000.107493, 0000.554782, -000.825022, 0001.552948, MPT Users’ Manual Section 4.1.0, Appendices (Revised: Aug 12, 2012) Page 31 MPT Users’ Manual 4.2 Section 4.3.0, Appendices External input file format An example of the external input file format is illustrated in table 4. There are no comments at the top. Each line contains the time stamp and N columns of data, where N is the number of external input channels selected for the acquisition (see section 3.2.1). 00083742.697129420, 00083742.701129780, 00083742.705130141, 00083742.709130502, 00083742.713130863, 00083742.717131224, 00083742.721131585, 00083742.725131946, 2.388800, 2.358892, 2.328679, 2.293889, 2.263676, 2.228885, 2.198672, 2.168765, 2.418708, 2.383917, 2.353704, 2.318914, 2.288701, 2.258793, 2.223697, 2.193790, 2.443732, 2.408637, 2.378729, 2.348821, 2.313725, 2.283818, 2.248722, 2.218814, 2.468757, 2.438849, 2.403754, 2.373846, 2.338750, 2.308843, 2.278935, 2.243839, 2.493782, 2.463874, 2.428779, 2.398871, 2.368658, 2.333867, 2.303655, 2.268864, 2.518807 2.488899 2.458686 2.423896 2.393683 2.358892 2.328679 2.298772 Table 4: Sample of the external analog input file format. 4.3 Analog sampling specification • Analog sampling: – User selectable number of channels, 0 up to 16. – User selected sample rate up to 200k samples/second (one channel) or 12k samples/second (sixteen channels). (Revised: Aug 12, 2012) Page 32