1
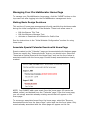
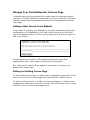
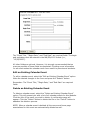
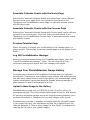
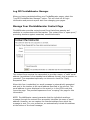
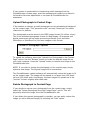
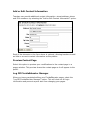
FloridaEducator Management Manual FloridaEducator offers full-featured Websites for Pre-K–12 teachers. These easy-to-build, easy-to-maintain sites require no programming skills. Teachers simply fill out Web forms and "point and click" to create professional-quality Websites for their classrooms. This manual provides step-by-step instructions for constructing and maintaining a dynamic classroom Website. Once a teacher has secured a FloridaEducator account, the simple instructions in this document offer everything needed to build a classroom Website without mastering any special software or programming language. Overview of FloridaEducator Management FloridaEducator is a flexible environment that allows teachers to select from a range of features for their classroom Websites. Teachers are free to choose as few or as many of the available resources as they desire and change this basic configuration anytime they wish. Best of all, teachers can use FloridaEducator to create static Websites (sites that change infrequently and thus require minimal maintenance) or truly dynamic Websites (sites that are updated regularly with new and fresh information). Flexibility lies at the core of this tool. The core features included in all FloridaEducator classroom Websites are: Home Page – a greeting from the instructor to all visitors and featured calendar events Courses Page – a course introduction with links to related Websites, associated calendar events, and associated download documents Dynamic Calendar – a calendar of school and classroom events, announcements, and assignments with weekly, monthly, and “all event” navigation Image Gallery – a collection of photographs (scanned images or digital photos) uploaded by the instructor Download Documents – a collection of documents (syllabi, handouts, assignments, permission forms, etc.) for download by students and parents Contact Page – an email form to correspond with the teacher (with an optional photograph of the teacher) Application for a FloridaEducator Account The FloridaEducator tools are provided to teachers in school districts that contract with Beacon Learning Systems for online training. All FloridaEducator account holders must agree to use these resources according to the terms of the FloridaEducator User License Agreement. Furthermore, account holders are restricted by any policies their school districts or schools create to govern school and classroom Websites. The account holder is responsible to seek out and follow these guidelines. Additionally, account holders must review and agree to the FloridaEducator file upload policies each time they upload an image or document to the FloridaEducator site. Initial Website Configuration To manage your FloridaEducator Website, navigate to www.floridaeducator.com and enter your user name and password in the “Manage Your Website” box at the lower right of the FloridaEducator home page. Your user name and password for FloridaEducator is the same as your BeaconEducator account. The first time you login into the FloridaEducator management tools, you will be asked to make several basic design decisions for your classroom Website. Configuring Title Banner and Welcome Message Use this form to create the banner text that will appear on top of all of your FloridaEducator pages and the welcome message that will appear on your home page. The banner text should be descriptive of your site. Normally, teachers will use their names as part of this title—for example, “Joan Smith’s Fifth Grade Class” or “Mr. Smith’s Math Classes.” This title may take a more general form—such as, “Jefferson Middle School Band.” This title text is limited to 100 characters. The welcome message is most often used to provide a greeting to visitors and to introduce the site’s purpose. This message is also a perfect occasion to describe any special initiatives or events planned for the class during the current school year. The best messages are no longer than 2 or 3 short paragraphs in length. A double-space should be left between paragraphs for better Web page appearance. While this message has no character limitation, all Web text should be brief and “to the point.” Use the preview page option to proofread the banner text and welcome message. Configuring Grade Level Select the most appropriate grade level for your classroom Website. This selection will determine the banner graphics that will appear at the top of your FloridaEducator pages. The images are age-appropriate for the grades selected. Configuring Multiple Courses This option allows you to choose whether your Website will feature a single course (or class)—normally for elementary grades—or multiple courses— normally for middle and high schools. Check the box if you want multiple courses. Leave it blank if you want a single course configuration. NOTE: This is the only feature of the initial configuration that CANNOT be edited later, so choose your course configuration carefully. Configure Course Activation FloridaEducator Websites can be activated (viewable by the public) or deactivated (viewable only by the Website manager). Teachers will sometimes deactivate their Websites while they are building them (or making major changes to them). Once the site construction is complete, the teacher will activate the course for public viewing. NOTE: FloridaEducator Websites can be activated or deactivated at anytime by the account holder. Reviewing the FloridaEducator User Agreement Each account holder must review and agree to the FloridaEducator User Agreement to finalize the initial configuration of their Website. Click the link to view the User Agreement in a popup window. Close the window and click the check box to agree to the terms of use. NOTE: If an account holder violates any of the terms of the User Agreement, FloridaEducator reserves the right to remove the Website and revoke the user’s account. Managing Your FloridaEducator Home Page To manage your FloridaEducator home page, click the “HOME” button on the top menu bar after logging into the FloridaEducator management tools. Making Basic Design Decisions This section of home page management directly parallels the decisions made during the initial configuration of the Website. These tools allow users to Edit the Banner Title Text Edit the Welcome Message Text Activate or Deactivate the Website for Public View See the instructions in the “Initial Website Configuration” section for using these tools. Associate Special Calendar Events with Home Page Events created on the “Calendar” page can be associated with thehome page. These are usually the “featured events” that no one should miss. Select the “Associate a Special Event with the Home Page” and use the form below to associate events with the home page. Events already associated are clearly marked. NOTE: You CANNOT add a new event from the home page. All events are added, edited, and deleted from the “Calendar” page. From the home page, you can simply associate already existing events that will appear on the home page. To remove an associated event from the home page, select the “Remove Associated Events from the Home Page” option and use the form below. Only events already associated with the home page will appear on this list. NOTE: Removing an event association on the home page does NOT delete the event from the calendar. To delete an event entirely, use the tools on the “Calendar” page. Build Direct Links to FloridaEducator Pages You may wish to link directly to your FloridaEducator page from your school’s Website. The address for this link is provided on the home page management page. A link that will display a list of all FloridaEducator Websites associated with your school is also provided. NOTE: The ID numbers in the picture are samples. Your ID numbers will be different. Preview Home Page Select this option to preview your modifications to the home page in a popup window. This preview shows the home page as it will appear to the public. Log Off FloridaEducator Manager When you have completed editing your FloridaEducator pages, select the “Log Off FloridaEducator Manager” option. This will clear out all login information and prevent anyone else from changing your pages. Manage Your FloridaEducator Courses Page FloridaEducator can be configured for a single class for elementary school teachers or multiple classes for middle and high school instructors. Selected calendar events and downloadable documents can be associated with each class page. Adding a New Course to the Website If you chose to configure your Website for multiple classes during the initial configuration of FloridaEducator, the “Add a New Course to the Web Site” option will appear at the top of the courses page menu. Select this option to add a new course. Course names are limited to 100 characters and should follow title capitalization rules—every major word should be capitalized. This “add course” option will not appear if you chose to configure your Website as a single class. Editing an Existing Course Page To add a welcome message in a single class configuration, simply fill out the form at the top of the courses page menu and click the “Submit” button. To edit an existing course or to add a welcome message in a multiple class configuration, select the course title from the “Edit an Existing Course on the Web Site” section of the courses page menu. Fill out the form and click the “Submit” button. Remember: Course names are limited to 100 characters. Deleting an Existing Course Page If you chose to configure your Website for multiple classes during the initial configuration of FloridaEducator, you can delete any course you have added by selecting the course name from the “Delete an Existing Course from the Web Site” section of the courses page menu. A confirmation page will appear asking you to commit to the deletion. Click either the “Delete” button to proceed or the “Cancel” button to stop the deletion process. NOTE: If you delete a course, you will automatically delete all Web links added to the course. Additionally, all event and download document associations with the course will be deleted. But the events and download documents themselves will NOT be deleted. To delete events and documents entirely, visit the calendar and download documents pages respectively. Adding Web Links to a Course Page To add a Web link to a course, select the “Add a New Web Link to this Course” menu option. Complete the form above. The link title is limited to 100 characters. Make sure that the link URL begins with the “http://” prefix. Add a description that will help students and parents know what to expect and look for at the remote Website. Test the Web link by clicking the “Test Web Link” button before submitting. If the link is correct, the remote site should appear in a popup window. Once you have confirmed the accuracy of the link URL, close the popup window and press the “Submit” button. Web links can be edited with the “Edit an Existing Web Link for this Course” menu option or deleted with the “Remove an Existing Web Link from this Course” menu option. Associating Calendar Events with a Course Page Events created on the “Calendar” page can be associated with a course page. Select the “Associate a Special Event with this Course” and use the form below to associate events with this course page. Events already associated are clearly marked. NOTE: You CANNOT add a new event from a course page. All events are added, edited, and deleted from the “Calendar” page. From the course page, you can simply associate already existing events that will appear on a course page. To remove an associated event from a course page, select the “Remove Associated Events from this Course” option. Only events already associated with this course page will appear on this list. NOTE: Removing an event association on a course page does NOT delete the event from the calendar. To delete an event entirely, use the tools on the “Calendar” page. Associating Download Documents with a Course Page Documents uploaded on the “Download Documents” page can be associated with a course page. Select the “Associate a Download Document with this Course” and use the form below to associate documents with this course page. Documents already associated are clearly marked. NOTE: You CANNOT upload a new document from a course page. All documents are added, edited, and deleted from the “Download Documents” page. From the course page, you can simply associate already existing documents that will appear on a course page. To remove an associated document from a course page, select the “Remove Associated Download Document from this Course” option. Only events already associated with this course page will appear on this list. NOTE: Removing a document association on a course page does NOT delete the document from the Website. To delete a document entirely, use the tools on the “Download Document” page. Preview Courses Page Select this option to preview your modifications to the courses page in a popup window. This preview shows the courses page as it will appear to the public. Log Off FloridaEducator Manager When you have completed editing your FloridaEducator pages, select the “Log Off FloridaEducator Manager” option. This will clear out all login information and prevent anyone else from changing your pages. Manage Your FloridaEducator Calendar Page FloridaEducator's feature-rich calendar allows teachers to construct year-long schedules of events with as little or as much detail describing each event as desired. Website visitors can easily move through the calendar in weekly, monthly, or "all event" views. Add a New Calendar Event To add a new calendar event, select the “Add a New Calendar Event” option. Complete the form below: The “Event Title,” “Begin Date,” and “End Date” are required fields. The begin and end dates must be entered in the MM/DD/YYYY format (i.e., “12/25/2005”). All other fields are optional. However, it is strongly recommended that as many as possible of these fields be completed. Providing more information for an event makes the calendar much more useful to parents and students. Edit an Existing Calendar Event To edit a calendar event, select the “Edit an Existing Calendar Event” option. Make the desired changes in the form and press the “Submit” button. Remember: The “Event Title,” “Begin Date,” and “End Date” are required fields. Delete an Existing Calendar Event To delete a calendar event, select the “Delete an Existing Calendar Event” option. This will present you with a list of all calendar events for this Website. Click the title of the event you wish to delete. A confirmation page will appear. Click the “Delete” button to delete the file or the “Cancel” button to abandon the deletion process. NOTE: When a calendar event is deleted all the course and home page associations for this event are automatically deleted as well. Associate Calendar Events with the Home Page Selecting the “Associate Calendar Events with Home Page” option redirects the user to the home page. From here, follow the instructions in the “Managing Your FloridaEducator Home Page” to associate calendar events with the home page. Associate Calendar Events with the Courses Page Selecting the “Associate Calendar Events with Course Pages” option redirects the user to the courses page. From here, follow the instructions in the “Managing Your FloridaEducator Courses Page” to associate calendar events with specific courses. Preview Calendar Page Select this option to preview your modifications to the calendar page in a popup window. This preview shows the calendar page as it will appear to the public. Log Off FloridaEducator Manager When you have completed editing your FloridaEducator pages, select the “Log Off FloridaEducator Manager” option. This will clear out all login information and prevent anyone else from changing your pages. Manage Your FloridaEducator Image Gallery FloridaEducator sets aside a full megabyte of storage space for uploaded photographs. Teachers can scan images or take pictures with digital cameras and then easily upload them to their image gallery. Our breakthrough upload system automatically resizes and sharpens uploads, allowing teachers to store between 20 and 50 photographs at a time. Upload a New Image to the Gallery FloridaEducator accepts only the JPEG file format (16 million colors) for photograph uploads. This is the standard photograph format for Web display. All scanners and digital cameras as well as image processing software (such as Adobe PhotoShop or PaintShop Pro) can save images in this format. FloridaEducator provides 1 megabyte of storage space for uploaded images. If you exceed this limit, you must delete an older file to upload a new one. (See the Appendix A: “How to Keep Image File Size Small” for strategies for reducing the file size of your upload images.) To upload a photograph, select the “Upload a New Image to the Gallery” option. Press the “Browse” button to locate the file for upload on your local computer. Add a caption to assist students and parents to understand the image’s purpose. Review the FloridaEducator image upload policy and check the upload agreement box. Finally, press the “Upload” button to transfer the document. NOTE: There are several limitations to image file uploads. Only the specified JPEG file formats will be accepted. You cannot exceed the 1 megabyte upload limit. Caption text cannot exceed 255 characters. NOTE: You must agree with the terms of the FloridaEducator upload policy and all policies regarding posting Web images from your school or district. Failure to follow any of these terms will result in the removal of questionable images and, in some cases, the termination of the user’s account. Edit the Caption of an Image in the Gallery To edit the caption of an image, select the “Edit the Caption of an Image in the Gallery” option. Make the desired changes in the form and press the “Submit” button. Remember: The caption is limited to 255 characters. Delete an Image from the Gallery To delete an image, select the “Delete an Image from the Gallery” option. This will present you with a preview list of all images uploaded to this Website along with the image captions. Click the “Delete” button by the image you wish to delete. A confirmation page will appear. Click the “Delete” button to delete the file or the “Cancel” button to abandon the deletion process. Preview Image Gallery Select this option to preview your modifications to the image gallery in a popup window. This preview shows the image gallery as it will appear to the public. Log Off FloridaEducator Manager When you have completed editing your FloridaEducator pages, select the “Log Off FloridaEducator Manager” option. This will clear out all login information and prevent anyone else from changing your pages. Manage Your FloridaEducator Download Documents With FloridaEducator, teachers can upload syllabi, handouts, special announcements, newsletters, permission forms, and any other type document for student and parent use. This tool provides students with convenient access to missed information and assignments. Upload a New Download Document FloridaEducator accepts 6 file types of download documents: the Microsoft Office tools—Word, Excel, PowerPoint, and Access—as well as Adobe Acrobat (PDF) and plain text files. Only the following file extensions will be accepted by the upload tool: doc, xls, ppt, mdb, pdf, and txt. FloridaEducator provides 1 megabyte of storage space for download documents. If you exceed this limit, you must delete an older file to upload a new one. (See the Appendix B: “How to Keep Document File Size Small” for strategies for reducing the file size of your download documents.) To upload a document, select the “Upload a New Download Document” option. Enter a title for the document. Press the “Browse” button to locate the file for upload on your local computer. Add a description to assist students and parents to understand the document’s contents. Review the FloridaEducator file upload policy and check the upload agreement box. Finally, press the “Upload” button to transfer the document. NOTE: There are several limitations to file uploads. Only the specified file formats will be accepted. You cannot exceed the 1 megabyte upload limit. Title text cannot exceed 150 characters. While there is no character limit on the description text, it should be brief and “to the point.” NOTE: You must agree with the terms of the FloridaEducator upload policy and all policies regarding posting Web documents from your school or district. Failure to follow any of these terms will result in the removal of questionable documents and, in some cases, the termination of the user’s account. Edit a Document’s Title and Description To edit the title or description of a download document, select the “Edit a Download Document's Title and Description” option. Make the desired changes in the form and press the “Submit” button. Remember: The title is limited to 150 characters. While there is no character limit on the description, keep the description brief and “to the point.” Delete a Download Document To delete a download document, select the “Delete a Download Document” option. This will present you with a list of all download documents for this Website. Click the title of the document you wish to delete. A confirmation page will appear. Click the “Delete” button to delete the file or the “Cancel” button to abandon the deletion process. NOTE: When a download document is deleted all the course associations for this document are automatically deleted as well. Associate a Download Document with a Course Page Selecting the “Associate Download Documents with Course Pages” option redirects the user to the courses page. From here, follow the instructions in the “Managing Your FloridaEducator Courses Page” to associate download documents with specific courses. Preview Download Documents Page Select this option to preview your modifications to the download documents page in a popup window. This preview shows the download documents page as it will appear to the public. Log Off FloridaEducator Manager When you have completed editing your FloridaEducator pages, select the “Log Off FloridaEducator Manager” option. This will clear out all login information and prevent anyone else from changing your pages. Manage Your FloridaEducator Contact Page FloridaEducator provides a simple email form that allows parents and students to communicate with the teacher. This contact form is "spam proof," protecting teachers against unwanted, unsolicited emails. The contact form requires the respondent to provide a name, a “valid” email address (an address in the standard email address format), and a question or comment. The respondent optionally can choose to check the “Reply Requested” box. When this form is submitted, an email message is automatically generated and sent to the teacher at the email address specified in his account. This email address is never displayed on the screen or in the HTML code that forms the page. This prevents spammers from “scraping” the page for this information. NOTE: FloridaEducator cannot guarantee that the individual sending a message through the contact form accurately identifies his name or email address. However, we can capture the Internet address from which the message is sent. For your protection, we automatically include this address at the bottom of the email message. If you receive a questionable or threatening email message from the FloridaEducator contact page, print the message and contact your district’s Information Services department or our team at FloridaEducator for assistance. Upload Photograph to Contact Page If the teacher so desires, a small photograph can be uploaded and displayed on the contact page. This “personal touch” can help “humanize” the online classroom for parents. The photograph must be saved in the JPEG image format (16 million colors). This is the standard photograph format for Web display. All scanners and digital cameras as well as image processing software (such as Adobe PhotoShop or PaintShop Pro) can save images in this format. To upload the software, select the “Upload Your Photograph to the Contact Page” option. Use the “Browse” button to locate the desired image file on your local computer. Press the “Upload” button to transfer the image to the FloridaEducator site. NOTE: If you wish to change the photograph on the contact page, simply upload a new image. The original image will be overwritten. The FloridaEducator upload software will automatically resize the image to fit on the contact page. The image will be resized to no larger than 155 pixels tall and 135 pixels wide. Accordingly, the best images for upload are in the “portrait” format—slightly taller than wide. Delete Photograph to Contact Page If you decide to remove your photograph from the contact page, simply select the “Delete Photograph from the Contact Page” option. This will physically delete the image from the FloridaEducator site. If you delete the contact photograph by mistake, you can easily restore the image (or add a different image) by choosing the “Add” option. Add or Edit Contact Information Teachers can provide additional contact information—street address, phone and FAX numbers—by selecting the “Add or Edit Contact Information” option. Each of the elements in the form above is optional, allowing teachers to add as little or as much contact information as they desire. Preview Contact Page Select this option to preview your modifications to the contact page in a popup window. This preview shows the contact page as it will appear to the public. Log Off FloridaEducator Manager When you have completed editing your FloridaEducator pages, select the “Log Off FloridaEducator Manager” option. This will clear out all login information and prevent anyone else from changing your pages. Appendix A How to Keep Image File Size Small FloridaEducator allows users to upload images only in the JPEG (*.jpg) file format. The JPEG format is the Web standard for displaying photographquality images. The 16-million color palette of this format allows FloridaEducator programming to resize and sharpen uploaded images. If you wish to upload an image from a different file format, you must first convert the image to the JPEG format using one of the standard image manipulation programs such as Adobe PhotoShop or PaintShop Pro. FloridaEducator limits the number of document uploads to a total of 1 megabyte of disk storage space. Because of this limitation, it is imperative to keep upload files as small as possible. The remainder of this document will offer practical guidelines for reducing file size for upload documents. Cropping and Resizing Images With the appearance of inexpensive scanners and mega-pixel digital cameras, more and more of us are creating digital images. The problem with these images for FloridaEducator uploads is their physical size—both their dimensions (width and height) and their file size (the amount of disk space required to store them). These images files need to be cropped and resized before they are used in FloridaEducator uploads. These step-by-step instructions using two of the most popular graphics software packages will assist you in manipulating your image files. Adobe PhotoShop • • • Understanding File Formats Improving Image Quality Through Cropping Resizing the Image to the Desired Size PaintShop Pro • • • Changing File Formats Improving Image Quality Through Cropping Resizing the Image to the Desired Size Appendix B How to Keep Document File Size Small FloridaEducator allows users to upload documents in six file formats: Microsoft Word (*.doc) Microsoft Excel (*.xls) Microsoft PowerPoint (*.ppt) Microsoft Access (*.mdb) Adobe Acrobat (*.pdf) Plain Text Files (*.txt) FloridaEducator limits the number of document uploads to a total of 1 megabyte of disk storage space. Because of this limitation, it is imperative to keep upload files as small as possible. The remainder of this document will offer practical guidelines for reducing file size for upload documents. Microsoft Word There are two strategies for reducing the size of Word files: 1. One major problem in large Word documents is large inserted images. Word allows users to import (or past from the clipboard) very large images and then “resize”—stretch or shrink their borders inside Word. The problem is that Word only resizes the images display, not its file size. If you import a very large image—say 10 inches by 10 inches—into Word and then shrinking it down to 2 inches by 2 inches, only the appearance of the image has changed; its file size remains the same, resulting in very large Word file sizes. To combat this problem, crop, resize, and sharpen images in an image manipulation program (such as Adobe PhotoShop or PaintShop Pro) before importing them into Word. Starting with smaller image files will guarantee smaller Word documents. 2. A second problem with Word documents—as well as other Microsoft Office files—lies in the “Undo” feature of the program. Word allows users to change their minds after making edits and “undo” the changes to the prior state. To accomplish this Word embeds a “history” of all the user’s actions in the file. The more formatting you do, the more changes you make, the larger this history becomes. One possible strategy for removing this history information is to select and copy the entire existing document’s contents to the clipboard, open a new blank document, and paste the content here. The new file is often considerably smaller than the original. The downside to this strategy is that you can loose font and paragraph formatting when pasting to a blank document. Microsoft Excel The only way to reduce the file size of Microsoft Excel files is to remove unneeded information. Spreadsheets often contain many years of information (along with corresponding charts and reports). Make a copy of the Excel spreadsheet and eliminate all information not directly pertinent to your purposes and save the file again. This will create a smaller file for download. Microsoft PowerPoint There are three strategies for reducing the size of PowerPoint presentations: 1. Remove all multimedia elements from the presentation. Sound and movie files are extremely large. 2. Reduce or eliminate the slide and bullet transitions and custom animations. These “whiz bang” features are cool, but the seldom really add to the message of your presentation. 3. Crop, resize, and sharpen images in an image manipulation program (such as Adobe PhotoShop or PaintShop Pro) before importing them into PowerPoint. See the discussion of inserted images in the “Microsoft Word” section above. Microsoft Access There are two strategies for reducing the size of Access databases: 1. Physically remove any unnecessary, “outdated” data (fields, tables, views, and reports) that are not important to the download file. 2. Use the “Compact Database” tool inside Access to reduce file size. Select the “Tools” menu, the “Database Utilities” option, and finally the “Compact and Repair Database” option. Adobe Acrobat There are four strategies for reducing the size of Acrobat files: 1. Do not embed fonts when creating the Acrobat file. If your original document uses standard fonts (“Arial,” “Times New Roman,” “Courier,” etc.), there is no need to embed fonts. 2. Remove all multimedia elements from the file. Sound and movie files are extremely large. 3. Lower the image reproduction quality in the program’s settings. You will probably find that an 85% JPEG image is almost identical with a 100% JPEG image, but is considerably smaller. 4. Always optimize your Acrobat file size by saving the file using the “SAVE AS” option, even if you save the file with the same name. This allows Acrobat to evaluate and remove unneeded, unused components of your file. Text Files There is no need to reduce file size in plain text files. These files—with their minimal formatting and lack of graphics and multimedia—are very small by their nature.