1
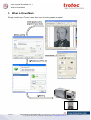
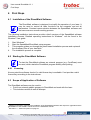
User manual DirectMark V1.1 TROTEC VERTRIEBS UND PRODUKTIONS GmbH Linzer Straße 156 A – 4600 Wels AUSTRIA Tel.: ++43/7242/239-0 Fax: ++43/7242/239-7380 E-mail: [email protected] www.troteclaser.com TROTEC accepts no liability for any direct or indirect damage arising from the application or use of the products, circuits or software described herein. The operating instructions must be read carefully and observed before the equipment is commissioned. TROTEC reserves the right to amend any product described herein without prior notice. This document and all diagrams remain the intellectual property of Trotec Produktions- u. Vertriebs GmbH. The entire document has been provided to the user for personal use only. This document may not be reproduced or passed to a third party without our written approval. Any infringement will be prosecuted under criminal law. 17/08/2011 Trotec Produktions- und Vertriebs GmbH_Linzer Strasse 156, A-4600 Wels, Austria, Technical Support tel_+43 (0)7242 239-7000, fax_+43 (0)7242 239-7380, mailto: [email protected] 2 / 16 User manual DirectMark V1.1 Contents 1 Contents 1 Contents ........................................................................................................................... 3 2 General ............................................................................................................................. 4 2.1 Using this Manual ........................................................................................................................................ 4 2.2 Computer Requirements............................................................................................................................. 5 2.3 Compatibility ................................................................................................................................................ 5 2.4 Intended Use of the Laser System............................................................................................................. 5 3 What is DirectMark .......................................................................................................... 6 4 First Steps ........................................................................................................................ 7 4.1 Installation of the DirectMark Software..................................................................................................... 7 4.2 Starting the DirectMark Software............................................................................................................... 7 4.2.1 Licensing................................................................................................................................................. 7 4.3 Scope of Application of Software .............................................................................................................. 7 5 Creation of content to mark............................................................................................ 8 5.1 Preparations in graphic program............................................................................................................... 8 5.2 DirectMark Print Properties ...................................................................................................................... 10 5.2.1 Job Properties....................................................................................................................................... 10 5.2.2 Printer-Properties ................................................................................................................................. 11 5.2.3 Material Parameter Manager................................................................................................................ 12 6 Marking with DirectMark ............................................................................................... 13 6.1 Positioning of print jobs ........................................................................................................................... 13 6.2 Marking on work pieces............................................................................................................................ 14 6.3 Edit print job list ........................................................................................................................................ 14 7 DirectMark Options........................................................................................................ 15 7.1 Single options ............................................................................................................................................ 15 7.2 Job archive................................................................................................................................................. 15 7.3 Job history ................................................................................................................................................. 16 7.4 Advanced options...................................................................................................................................... 16 17/08/2011 Trotec Produktions- und Vertriebs GmbH_Linzer Strasse 156, A-4600 Wels, Austria, Technical Support tel_+43 (0)7242 239-7000, fax_+43 (0)7242 239-7380, mailto: [email protected] 3 / 16 User manual DirectMark V1.1 General 2 General 2.1 Using this Manual Attention: This user manual must be read and observed before commissioning and operating the software and the corresponding laser system. Failing to observe individual points listed in this user manual may result in personal injury and/or material damage to property. This software may only be used to operate systems containing devices and spare parts included in the scope of supply or the replacement or wear and tear parts list. Ancillary devices must be calibrated to meet the safety and operational requirements of the base machine (please contact your dealer or the manufacturer with any queries). The following symbols are used within this user manual to aid understanding: Failing to observe this part of the user manual could pose a particular risk for operating or maintenance personnel. Caution: this component is energized. These parts contain electrical safety instructions which must be carefully observed, particularly when undertaking maintenance or service work. Caution: these parts indicate that extreme care should be taken regarding the potential risks posed by the laser beam. Instructions or information regarding individual equipment components or the software intended to simplify or aid use. 17/08/2011 Trotec Produktions- und Vertriebs GmbH_Linzer Strasse 156, A-4600 Wels, Austria, Technical Support tel_+43 (0)7242 239-7000, fax_+43 (0)7242 239-7380, mailto: [email protected] 4 / 16 User manual DirectMark V1.1 General 2.2 Computer Requirements The following recommendations are the required minimum a more powerful computer will produce and display the graphics much more quickly. This will not affect the overall marking time as the laser system contains an independent computer unit. • • • • • • • • • Windows® 7 32 Bit Windows® XP 32-bit (with Service Pack 2 or above) or 256 MB RAM, 200 MB hard disk Pentium® 1 GHz processor or AMD Athlon™ XP Monitor resolution at least 1024 x 768 pixels 24-bit color graphics card CD-drive Serial port (Com port) (alternatively a USB-to-COM converter is available) Mouse Please check the requirements in the relevant documentation of the laser system employed 2.3 Compatibility Software with the same version number (first two digits) must be used in order for various Trotec software components to work together smoothly. The last digit of the version number is irrelevant (X.X.X). Example: SpeedMark 2.5.x will only function with TLC2 module 2.5.x. 2.4 Intended Use of the Laser System SpeedMark software is used in all TROTEC Galvo laser systems. The marking process may only be conducted using fault-free machines (please also refer to the user manual for the TROTEC laser system you have purchased). Any other application of the equipment is considered contrary to intended use. The manufacturer accepts no liability for any personal injury and/or material damage arising as a result of this. The equipment may only be operated, serviced and commissioned by individuals familiar with the intended use and potential risks of the machine! Failing to observe the operating, service and maintenance regulations provided by the manufacturer in this user manual exempts the manufacture from any liability in the event of a fault. 17/08/2011 Trotec Produktions- und Vertriebs GmbH_Linzer Strasse 156, A-4600 Wels, Austria, Technical Support tel_+43 (0)7242 239-7000, fax_+43 (0)7242 239-7380, mailto: [email protected] 5 / 16 User manual DirectMark V1.1 What is DirectMark 3 What is DirectMark Simply control your Trotec Laser from your favorite graphic program. 17/08/2011 Trotec Produktions- und Vertriebs GmbH_Linzer Strasse 156, A-4600 Wels, Austria, Technical Support tel_+43 (0)7242 239-7000, fax_+43 (0)7242 239-7380, mailto: [email protected] 6 / 16 User manual DirectMark V1.1 First Steps 4 First Steps 4.1 Installation of the DirectMark Software The DirectMark software is designed to simplify the operation of your laser. It may be used to control all laser functions via the computer and set all parameters. Constant communication between the SpeedMark software and the laser ensure a smooth working process. The following installation instructions provide a brief overview of the SpeedMark software installation process. Detailed operating instructions for Windows can be found in the Windows user guide. 1. 2. 3. 4. Start Windows. Start the SpeedMark/DirectMark setup program. This program guides you through the menu-based installation process and copies all the necessary files to your hard disk.1 The installation process is complete. 4.2 Starting the DirectMark Software To start the DirectMark software an external program (e.g. CorelDraw) must be used, which starts the DirectMark program directly after printing. 4.2.1 Licensing At every start the software checks if a valid license key is available. If not provide a valid license key according to the instructions2. 4.3 Scope of Application of Software The DirectMark software may be used to: • Print from external graphic program to DirectMark and mark with the laser • This includes vectors as well as bitmaps 1 Additional information regarding the installation of the SpeedMark software with respect to upgrades and the deinstallation of the software can be found in the installation manual. 2 See also 7.4 Advanced options on page 16 17/08/2011 Trotec Produktions- und Vertriebs GmbH_Linzer Strasse 156, A-4600 Wels, Austria, Technical Support tel_+43 (0)7242 239-7000, fax_+43 (0)7242 239-7380, mailto: [email protected] 7 / 16 User manual DirectMark V1.1 Creation of content to mark 5 Creation of content to mark The following examples and explanations use the graphic program CorelDraw®. But the instructions can be performed with other graphic programs as well. 5.1 Preparations in graphic program 1. To avoid distortions and cut of graphics, the page size within the graphics program be equal to the size of the marking field. A smaller page size is no problem. 2. Insert the graphic to mark as usual. 3. Print your graphic with the normal printing function. Some programs (e.g. Word) have a quick print function. But with the first use of DirectMark you should use the normal print function to setup necessary printer properties. 17/08/2011 Trotec Produktions- und Vertriebs GmbH_Linzer Strasse 156, A-4600 Wels, Austria, Technical Support tel_+43 (0)7242 239-7000, fax_+43 (0)7242 239-7380, mailto: [email protected] 8 / 16 User manual DirectMark V1.1 Creation of content to mark On systems with more than one printer attached, please choose the correct one – SpeedMark DirectMark Printer Driver v3.x.x. Within the printing dialog of your graphic program you can setup the printer properties for the printing process. The option “copies” is not supported by DirectMark. This setting must be configured within DirectMark printer properties. 17/08/2011 Trotec Produktions- und Vertriebs GmbH_Linzer Strasse 156, A-4600 Wels, Austria, Technical Support tel_+43 (0)7242 239-7000, fax_+43 (0)7242 239-7380, mailto: [email protected] 9 / 16 User manual DirectMark V1.1 Creation of content to mark 5.2 DirectMark Print Properties The DirectMark printer properties – as shown above – can be started via the button properties with in the printing dialog of your graphic program. 5.2.1 Job Properties In the section material you can setup the used material for the work piece. The button with the pen allows editing of the material parameters3. With the execution mode you can choose between photo and logo. In photo mode the marking will be performed row by row. In this case the execution is slower. Black and white graphics can be marked with logo mode. The graphic will be vectorized which speeds up the marking significantly. The section graphic is used to change the resolution (in DPI), the dithering (only photo mode), the quantity and the pixel correction. With the option rotary it is possible to process rotary jobs. Only the diameter of the work piece must be specified. 3 See also 5.2.3 Material Parameter on page 12 17/08/2011 Trotec Produktions- und Vertriebs GmbH_Linzer Strasse 156, A-4600 Wels, Austria, Technical Support tel_+43 (0)7242 239-7000, fax_+43 (0)7242 239-7380, mailto: [email protected] 10 / 16 User manual DirectMark V1.1 Creation of content to mark 5.2.2 Printer-Properties In the section print mode you can choose if Quick-Print mode or Quick-Positioning mode should be used. In Quick-Print mode DirectMark instantly starts the marking process when the graphic program has finished the creation of the print job4. In Quick-Positioning mode the DirectMark print job list will be opened after the creation of the print job. In this case a positioning of the work piece can be done. The marking process will then be started manually. The size values height and width are used to define the size of the printing area. These size values must be equal or smaller to size of the real marking field. With the update button the current size of the marking field can be requested. The material parameter can be edited by pressing the Material Parameter button. The option “Exhaust – Start automatically” will start a connected exhaust before the beginning of the marking process. In the section bitmap rendering you can determine how the detection of bitmaps in relation to the material parameter shall be done. 4 The marking process will only be started automatically when there are no pending failures of the system. 17/08/2011 Trotec Produktions- und Vertriebs GmbH_Linzer Strasse 156, A-4600 Wels, Austria, Technical Support tel_+43 (0)7242 239-7000, fax_+43 (0)7242 239-7380, mailto: [email protected] 11 / 16 User manual DirectMark V1.1 Creation of content to mark 5.2.3 Material Parameter Manager The material parameter manager allows the creation and editing of materials for the marking process. In the parameter table are 16 marking colors per material defined. Every color defines it own parameter settings. Single colors can be activated or deactivated. The print mode defines the kind of executions for the particular color. • Bitmap: This parameter will be used for bitmaps. • Vectors: When a graphic contains vectors (width must be set to hairline) to according color will be applied. • Positioning: When vectors are found which have this color, then these vectors won’t be marked. Instead they can be used for positioning. 17/08/2011 Trotec Produktions- und Vertriebs GmbH_Linzer Strasse 156, A-4600 Wels, Austria, Technical Support tel_+43 (0)7242 239-7000, fax_+43 (0)7242 239-7380, mailto: [email protected] 12 / 16 User manual DirectMark V1.1 Marking with DirectMark 6 Marking with DirectMark After creation of the print job by the graphic program, the data will be sent to DirectMark and is ready for marking with the laser system. DirectMark automatically detects if a new print job is available and opens the DirectMark window. 6.1 Positioning of print jobs With the button Border marking it is possible to perform positioning of the print job or the work piece. It is also possible to determine if the whole bitmap should be border marked or only the positioning graphics5. With the arrow buttons it is possible to move the print job. The button in the middle resets changes already made. Move changes are applied by ending Border marking. 5 See also 5.2.3 Material Parameter Manager on page 12 17/08/2011 Trotec Produktions- und Vertriebs GmbH_Linzer Strasse 156, A-4600 Wels, Austria, Technical Support tel_+43 (0)7242 239-7000, fax_+43 (0)7242 239-7380, mailto: [email protected] 13 / 16 User manual DirectMark V1.1 Marking with DirectMark 6.2 Marking on work pieces With the Start button the marking of the print job with the laser system will be started. The button Stop cancels an already running marking process. In this case the print job won’t be deleted. On marking end the print job will be deleted and is not available any more. At the end of the marking the marking time will be shown in the bottom left of the window. 6.3 Edit print job list Moreover it is possible to edit the list of pending print jobs with a right mouse button click. Print jobs can be deleted or the count of copies can be changed. Single jobs can also be copied or move to the archive6. 6 See also 7.2 Job archive on page 15. 17/08/2011 Trotec Produktions- und Vertriebs GmbH_Linzer Strasse 156, A-4600 Wels, Austria, Technical Support tel_+43 (0)7242 239-7000, fax_+43 (0)7242 239-7380, mailto: [email protected] 14 / 16 User manual DirectMark V1.1 DirectMark Options 7 DirectMark Options 7.1 Single options The option “Automatic border marking” starts the border marking automatically when a print job is available. The option “Manually start QuickPrint jobs” deactivates the print mode setting of the printer properties7. The option “Start exhaust with print job” starts a connected exhaust before the beginning of the marking process. The option “Use MarkStart signal” waits with the marking process until a MarkStart signal is detected. 7.2 Job archive From the job archive it is possible to take over archived jobs8 back to the print job list. Archived jobs can be simple moved or copied. All available actions can be accessed by right clicking an archive file in the list. 7 8 See also 5.2.2 Printer-Properties on page 11 See also 6.3 Edit print job list on page 14 17/08/2011 Trotec Produktions- und Vertriebs GmbH_Linzer Strasse 156, A-4600 Wels, Austria, Technical Support tel_+43 (0)7242 239-7000, fax_+43 (0)7242 239-7380, mailto: [email protected] 15 / 16 User manual DirectMark V1.1 DirectMark Options 7.3 Job history In the job history is shown which print jobs have been executed. Inclusively duration, time stamp and execution status. 7.4 Advanced options With the advanced options it is possible to configure the laser system9, change the language or perform the software registration. 9 After a laser system configuration DirectMark should be restarted. 17/08/2011 Trotec Produktions- und Vertriebs GmbH_Linzer Strasse 156, A-4600 Wels, Austria, Technical Support tel_+43 (0)7242 239-7000, fax_+43 (0)7242 239-7380, mailto: [email protected] 16 / 16