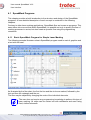
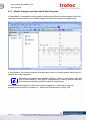
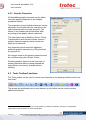
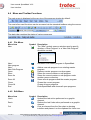
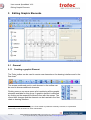
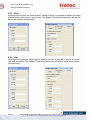
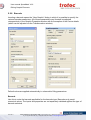
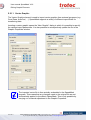
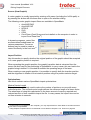
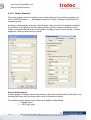
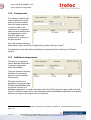
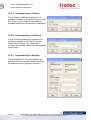
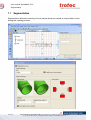
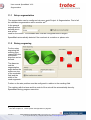
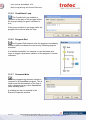
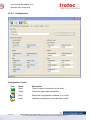
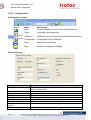
1
User manual SpeedMark V3.0 TROTEC VERTRIEBS UND PRODUKTIONS GmbH Linzer Straße 156 A – 4600 Wels AUSTRIA Tel.: ++43/7242/239-0 Fax: ++43/7242/239-7380 E-mail: [email protected] www.troteclaser.com TROTEC accepts no liability for any direct or indirect damage arising from the application or use of the products, circuits or software described herein. The operating instructions must be read carefully and observed before the equipment is commissioned. TROTEC reserves the right to amend any product described herein without prior notice. This document and all diagrams remain the intellectual property of Trotec Produktions- u. Vertriebs GmbH. The entire document has been provided to the user for personal use only. This document may not be reproduced or passed to a third party without our written approval. Any infringement will be prosecuted under criminal law. 13/01/2011 Trotec Produktions- und Vertriebs GmbH_Linzer Strasse 156, A-4600 Wels, Austria, Technical Support tel_+43 (0)7242 239-7000, fax_+43 (0)7242 239-7380, mailto: [email protected] 2 / 150 User manual SpeedMark V3.0 Contents 1 Contents 1 Contents ........................................................................................................................... 3 2 General ............................................................................................................................. 8 2.1 Using this Manual ........................................................................................................................................ 8 2.2 Computer Requirements............................................................................................................................. 9 2.3 Compatibility ................................................................................................................................................ 9 2.4 Intended Use of the Laser System............................................................................................................. 9 3 First Steps ...................................................................................................................... 10 3.1 Installation of the SpeedMark Software .................................................................................................. 10 3.2 Starting the SpeedMark Software ............................................................................................................ 10 3.3 Licensing .................................................................................................................................................... 10 3.4 Scope of Application of Software ............................................................................................................ 11 4 User Interface................................................................................................................. 12 4.1 SpeedMark Programs................................................................................................................................ 13 4.1.1 Basic SpeedMark Program for Simple Laser Marking ......................................................................... 13 4.1.2 Dynamic SpeedMark Program ............................................................................................................. 14 4.1.3 Master Program and Associated Sub-Programs.................................................................................. 15 4.2 User Interface Windows............................................................................................................................ 16 4.2.1 Flow Diagram with Flow Chart.............................................................................................................. 16 4.2.2 Drawing Interface ................................................................................................................................. 16 4.2.3 Graphic Properties................................................................................................................................ 17 4.3 Tools Toolbar Functions........................................................................................................................... 17 4.3.1 Select and Zoom Tools......................................................................................................................... 18 4.3.2 Graphic Elements ................................................................................................................................. 18 4.3.3 Control Elements .................................................................................................................................. 19 4.3.4 Programming Elements ........................................................................................................................ 20 4.4 Menu and Toolbar Functions ................................................................................................................... 21 4.4.1 File Menu .............................................................................................................................................. 21 4.4.2 Edit Menu.............................................................................................................................................. 21 4.4.3 View Menu ............................................................................................................................................ 22 4.4.4 Project Menu......................................................................................................................................... 24 4.4.5 Start Menu ............................................................................................................................................ 24 4.4.6 Tools Menu ........................................................................................................................................... 24 4.4.7 Windows Menu ..................................................................................................................................... 25 4.4.8 Help Menu ............................................................................................................................................ 25 4.5 Context Menu Functions........................................................................................................................... 25 5 Editing Graphic Elements ............................................................................................. 26 5.1 General ....................................................................................................................................................... 26 5.1.1 Creating a graphic Element .................................................................................................................. 26 5.1.2 Selecting Elements ............................................................................................................................... 28 5.1.3 Changing the View in the Drawing Interface ........................................................................................ 28 5.1.4 Editing Graphic Elements with the Mouse............................................................................................ 28 5.1.5 Graphic Properties................................................................................................................................ 30 13/01/2011 Trotec Produktions- und Vertriebs GmbH_Linzer Strasse 156, A-4600 Wels, Austria, Technical Support tel_+43 (0)7242 239-7000, fax_+43 (0)7242 239-7380, mailto: [email protected] 3 / 150 User manual SpeedMark V3.0 Contents 5.1.6 Free Transformation ............................................................................................................................. 31 5.2 Creating and Editing Graphic Elements.................................................................................................. 33 5.2.1 Point...................................................................................................................................................... 34 5.2.2 Line ....................................................................................................................................................... 34 5.2.3 Ellipse/Circle ......................................................................................................................................... 35 5.2.4 Arc ........................................................................................................................................................ 36 5.2.5 Rectangle.............................................................................................................................................. 37 5.2.6 Text....................................................................................................................................................... 38 5.2.7 Outline Text .......................................................................................................................................... 40 5.2.8 Barcode ................................................................................................................................................ 43 5.2.9 Data Matrix ........................................................................................................................................... 45 5.2.10 UID Data Matrix .................................................................................................................................. 47 5.2.11 Vector Graphic.................................................................................................................................... 48 5.2.12 Raster Graphics.................................................................................................................................. 51 5.2.13 PDF..................................................................................................................................................... 53 5.2.14 Import.................................................................................................................................................. 54 5.3 Editing Basic Graphic Properties ............................................................................................................ 55 5.3.1 Basic Graphic Properties...................................................................................................................... 55 5.3.2 General ................................................................................................................................................. 56 5.3.3 Filling .................................................................................................................................................... 57 5.3.4 Transformation...................................................................................................................................... 58 5.3.5 Marking ................................................................................................................................................. 59 5.3.6 Source .................................................................................................................................................. 59 6 Marking with the Laser.................................................................................................. 60 6.1 Creating a Test Program........................................................................................................................... 60 6.2 Quick mark ................................................................................................................................................. 61 6.2.1 Focusing Laser ..................................................................................................................................... 61 6.2.2 Set-Up Workpiece ................................................................................................................................ 62 6.2.3 Quick mark............................................................................................................................................ 62 6.2.4 Power.................................................................................................................................................... 63 6.2.5 Options ................................................................................................................................................. 63 6.2.6 Marking Information .............................................................................................................................. 63 6.3 Normal Program Execution ...................................................................................................................... 64 6.3.1 Set-Up Workpiece ................................................................................................................................ 64 6.3.2 Start Program Execution and Marking ................................................................................................. 64 6.3.3 End Program......................................................................................................................................... 64 7 Material Parameter Manager......................................................................................... 65 7.1 Manage Material Parameters .................................................................................................................... 66 7.2 Define Material Parameters ...................................................................................................................... 67 7.2.1 Active, Name ........................................................................................................................................ 68 7.2.2 Marking mode ....................................................................................................................................... 68 7.2.3 Laser system parameters ..................................................................................................................... 68 7.2.4 Quality - Delay Parameters .................................................................................................................. 69 7.2.5 Advanced.............................................................................................................................................. 71 7.3 Exporting Material Parameters................................................................................................................. 72 7.4 Applying Material Parameters to Graphic Elements.............................................................................. 72 7.4.1 Setting Material Parameters using Graphic Properties ........................................................................ 72 7.4.2 Setting Material Parameters using the Toolbar .................................................................................... 72 8 Desktops and User Rights Control .............................................................................. 73 8.1 Adjusting the SpeedMark User Interface Layout ................................................................................... 73 8.1.1 Open and Close windows..................................................................................................................... 73 13/01/2011 Trotec Produktions- und Vertriebs GmbH_Linzer Strasse 156, A-4600 Wels, Austria, Technical Support tel_+43 (0)7242 239-7000, fax_+43 (0)7242 239-7380, mailto: [email protected] 4 / 150 User manual SpeedMark V3.0 Contents 8.1.2 Docking and Moving Windows ............................................................................................................. 74 8.2 Managing Customised User Interfaces Using the Desktops ................................................................ 74 8.2.1 Creating and Selecting Desktops Using the Toolbar............................................................................ 74 8.2.2 Creating and Managing Desktops Using the Desktop Manager .......................................................... 75 8.3 SpeedMark Windows................................................................................................................................. 76 8.3.1 Project Management ............................................................................................................................ 76 8.3.2 Marking Parameters ............................................................................................................................. 76 8.3.3 Graphic Properties................................................................................................................................ 76 8.3.4 Flow Diagram........................................................................................................................................ 76 8.3.5 Free Transformation ............................................................................................................................. 77 8.3.6 Border marking ..................................................................................................................................... 77 8.3.7 Controlling Variables ............................................................................................................................ 77 8.3.8 Error Messages .................................................................................................................................... 77 8.3.9 Execute Program .................................................................................................................................. 77 8.3.10 Internal RunScreen............................................................................................................................. 78 8.3.11 Program Messages ............................................................................................................................ 78 8.3.12 Program Log ...................................................................................................................................... 78 8.4 User Groups ............................................................................................................................................... 79 8.5 Access Rights ............................................................................................................................................ 80 8.6 Users........................................................................................................................................................... 80 8.7 Basic User Rights Settings....................................................................................................................... 81 9 Configuring SpeedMark ................................................................................................ 82 9.1 SpeedMark Settings .................................................................................................................................. 82 9.1.1 General ................................................................................................................................................. 82 9.1.2 Language.............................................................................................................................................. 82 9.1.3 Marking ................................................................................................................................................. 82 9.1.4 Units...................................................................................................................................................... 83 9.1.5 Theme................................................................................................................................................... 83 9.1.6 Undo ..................................................................................................................................................... 83 9.2 Components and Extensions ................................................................................................................... 83 10 Laser System Configuration....................................................................................... 84 10.1 System configuration .............................................................................................................................. 85 10.2 Components............................................................................................................................................. 86 10.3 Additional components........................................................................................................................... 86 10.3.1 Component type: IO-Input .................................................................................................................. 87 10.3.2 Component type: IO-Output ............................................................................................................... 87 10.3.3 Component type: Exhaust .................................................................................................................. 87 11 Segmentation............................................................................................................... 88 11.1 Setup segmentation ................................................................................................................................ 89 11.2 Rotary engraving ..................................................................................................................................... 89 12 Pre- and Post Processing ........................................................................................... 90 12.1.1 Options of the start element ............................................................................................................... 90 13 Basic Programming and Control Elements............................................................... 91 13.1 General ..................................................................................................................................................... 92 13.2 Variables................................................................................................................................................... 92 13/01/2011 Trotec Produktions- und Vertriebs GmbH_Linzer Strasse 156, A-4600 Wels, Austria, Technical Support tel_+43 (0)7242 239-7000, fax_+43 (0)7242 239-7380, mailto: [email protected] 5 / 150 User manual SpeedMark V3.0 Contents 13.2.1 Creating Variables .............................................................................................................................. 93 13.2.2 Editing Variables................................................................................................................................. 93 13.2.3 Deleting Variables .............................................................................................................................. 93 13.3 Basic Programming Elements................................................................................................................ 94 13.3.1 Basic Element Properties ................................................................................................................... 94 13.3.2 Creating Conditions ............................................................................................................................ 95 13.3.3 Branch ................................................................................................................................................ 96 13.3.4 Incremental Loop ................................................................................................................................ 96 13.3.5 Conditional Loop................................................................................................................................. 97 13.3.6 Program End....................................................................................................................................... 97 13.3.7 Comment/Note.................................................................................................................................... 97 13.4 Debug Programs...................................................................................................................................... 98 13.4.1 Breakpoints......................................................................................................................................... 98 13.4.2 Incremental Program Execution ......................................................................................................... 99 13.4.3 Actual Variable Values ....................................................................................................................... 99 13.4.4 Displaying Error Messages................................................................................................................. 99 13.5 Serial Text and Dynamic Graphic Element Content........................................................................... 100 13.5.1 Time Stamp ...................................................................................................................................... 100 13.5.2 Serial Text......................................................................................................................................... 101 13.5.3 Expressions ...................................................................................................................................... 102 13.5.4 Dynamic Loading of Vector Graphics ............................................................................................... 102 13.6 Control Elements ................................................................................................................................... 103 13.6.1 Wait For Signal ................................................................................................................................. 103 13.6.2 Set I/O Output................................................................................................................................... 104 13.6.3 Delay................................................................................................................................................. 104 13.6.4 Input Window .................................................................................................................................... 105 13.7 Dynamic Positioning ............................................................................................................................. 106 13.7.1 Position ............................................................................................................................................. 107 13.7.2 Size................................................................................................................................................... 107 13.7.3 Rotation ............................................................................................................................................ 107 14 Advanced Programming ........................................................................................... 108 14.1 Advanced Programming Elements ...................................................................................................... 109 14.1.1 Calculation/Allocation ....................................................................................................................... 109 14.1.2 Jump Label ....................................................................................................................................... 109 14.1.3 Jump to Jump Label ......................................................................................................................... 110 14.1.4 Jump to Sub-Routine........................................................................................................................ 110 14.1.5 Jump Back out of Sub-Routine......................................................................................................... 110 14.1.6 Sub-Program .................................................................................................................................... 111 14.1.7 External Program.............................................................................................................................. 111 14.2 Scripting ................................................................................................................................................. 112 14.3 Master Programs and Sub-Programs .................................................................................................. 113 14.3.1 Adding or Inserting Sub-Programs ................................................................................................... 113 14.3.2 Specifying Transfer Parameters ....................................................................................................... 113 14.3.3 Opening a Sub-program ................................................................................................................... 114 15 Modules and Components........................................................................................ 115 15.1 Component list....................................................................................................................................... 116 15.2 Components Window ............................................................................................................................ 116 15.3 TLC2 Laser Controller........................................................................................................................... 117 15.3.1 Functional Range of Module............................................................................................................. 117 15.3.2 Configuration .................................................................................................................................... 118 15.3.3 SpeedMark Windows........................................................................................................................ 123 13/01/2011 Trotec Produktions- und Vertriebs GmbH_Linzer Strasse 156, A-4600 Wels, Austria, Technical Support tel_+43 (0)7242 239-7000, fax_+43 (0)7242 239-7380, mailto: [email protected] 6 / 150 User manual SpeedMark V3.0 Contents 15.4 EasyControl Laser System ................................................................................................................... 124 15.4.1 Functional Range of Module............................................................................................................. 124 15.4.2 Configuration .................................................................................................................................... 124 15.4.3 SpeedMark Windows........................................................................................................................ 130 15.5 Servida Axis Control ............................................................................................................................. 131 15.5.1 Functional Range of Module............................................................................................................. 131 15.5.2 Configuration .................................................................................................................................... 132 15.5.3 SpeedMark Windows........................................................................................................................ 134 15.6 Relop I/O ................................................................................................................................................. 135 15.6.1 Functional Range of Module............................................................................................................. 135 15.6.2 Configuration .................................................................................................................................... 135 15.6.3 SpeedMark Windows........................................................................................................................ 136 15.7 EasyControl I/O...................................................................................................................................... 137 15.7.1 Functional Range of Module............................................................................................................. 137 15.7.2 Configuration .................................................................................................................................... 137 15.7.3 SpeedMark Windows........................................................................................................................ 138 15.8 RunScreen.............................................................................................................................................. 139 15.8.1 Functional Range of Module............................................................................................................. 139 15.8.2 Configuration .................................................................................................................................... 140 15.8.3 SpeedMark Windows........................................................................................................................ 141 15.9 Profibus .................................................................................................................................................. 142 15.9.1 Functional Range of Module............................................................................................................. 142 15.9.2 Configuration .................................................................................................................................... 142 15.9.3 SpeedMark Windows........................................................................................................................ 143 15.10 COM Port .............................................................................................................................................. 144 15.10.1 Functional Range of Module........................................................................................................... 144 15.10.2 Configuration .................................................................................................................................. 144 15.10.3 SpeedMark Windows...................................................................................................................... 145 16 Extensions ................................................................................................................. 146 16.1 Configuration of Extensions ................................................................................................................ 147 16.2 Extensions Window............................................................................................................................... 147 16.3 Program Selection Extension............................................................................................................... 148 16.3.1 Functional Range of Extension......................................................................................................... 148 16.3.2 Configuration .................................................................................................................................... 148 16.3.3 SpeedMark Windows........................................................................................................................ 149 17 Appendix: Utilities ..................................................................................................... 150 17.1 SpeedMarkerDiagnostics...................................................................................................................... 150 13/01/2011 Trotec Produktions- und Vertriebs GmbH_Linzer Strasse 156, A-4600 Wels, Austria, Technical Support tel_+43 (0)7242 239-7000, fax_+43 (0)7242 239-7380, mailto: [email protected] 7 / 150 User manual SpeedMark V3.0 General 2 General 2.1 Using this Manual Attention: This user manual must be read and observed before commissioning and operating the software and the corresponding laser system. Failing to observe individual points listed in this user manual may result in personal injury and/or material damage to property. This software may only be used to operate systems containing devices and spare parts included in the scope of supply or the replacement or wear and tear parts list. Ancillary devices must be calibrated to meet the safety and operational requirements of the base machine (please contact your dealer or the manufacturer with any queries). The following symbols are used within this user manual to aid understanding: Failing to observe this part of the user manual could pose a particular risk for operating or maintenance personnel. Caution: this component is energised. These parts contain electrical safety instructions which must be carefully observed, particularly when undertaking maintenance or service work. Caution: these parts indicate that extreme care should be taken regarding the potential risks posed by the laser beam. Instructions or information regarding individual equipment components or the software intended to simplify or aid use. 13/01/2011 Trotec Produktions- und Vertriebs GmbH_Linzer Strasse 156, A-4600 Wels, Austria, Technical Support tel_+43 (0)7242 239-7000, fax_+43 (0)7242 239-7380, mailto: [email protected] 8 / 150 User manual SpeedMark V3.0 General 2.2 Computer Requirements The following recommendations are the required minimum a more powerful computer will produce and display the graphics much more quickly. This will not affect the overall marking time as the laser system contains an independent computer unit. • • • • • • • • Windows 7 32-bit Windows® XP 32-bit (with Service Pack 2 or above) 256 MB RAM, 200 MB hard disk Pentium® 1 GHz processor or AMD Athlon™ XP Monitor resolution at least 1024 x 768 pixels 24-bit colour graphics card CD-drive Mouse Please check the requirements in the relevant documentation of the laser system employed 2.3 Compatibility Software with the same version number (first two digits) must be used in order for various Trotec software components to work together smoothly. The last digit of the version number is irrelevant (X.X.X). Example: SpeedMark 3.0.x will only function with TLC2 module 3.0.x. 2.4 Intended Use of the Laser System SpeedMark software is used in all TROTEC Galvo laser systems. The marking process may only be conducted using fault-free machines (please also refer to the user manual for the TROTEC laser system you have purchased). Any other application of the equipment is considered contrary to intended use. The manufacturer accepts no liability for any personal injury and/or material damage arising as a result of this. The equipment may only be operated, serviced and commissioned by individuals familiar with the intended use and potential risks of the machine! Failing to observe the operating, service and maintenance regulations provided by the manufacturer in this user manual exempts the manufacture from any liability in the event of a fault. 13/01/2011 Trotec Produktions- und Vertriebs GmbH_Linzer Strasse 156, A-4600 Wels, Austria, Technical Support tel_+43 (0)7242 239-7000, fax_+43 (0)7242 239-7380, mailto: [email protected] 9 / 150 User manual SpeedMark V3.0 First Steps 3 First Steps 3.1 Installation of the SpeedMark Software The SpeedMark software is designed to simplify the operation of your laser. It may be used to control all laser functions via the computer and set all parameters. Constant communication between the SpeedMark software and the laser ensure a smooth working process. The following installation instructions provide a brief overview of the SpeedMark software installation process. Detailed operating instructions for Windows can be found in the Windows user guide. 1. 2. 3. 4. Start Windows. Start the SpeedMark setup program. This program guides you through the menu-based installation process and copies all the necessary files to your hard disk.1 The installation process is complete. 3.2 Starting the SpeedMark Software To start the SpeedMark software, the set-up program adds an icon to the Windows Desktop and the Start menu. SpeedMark may be started using either of these. 3.3 Licensing Trotec SpeedMark will be delivered with a license key for the usage of this application. If you have not received the appropriate keys please contact the dealer of your laser system. The license codes can be registered after starting SpeedMark via menu point Help Software registration. 1 Additional information regarding the installation of the SpeedMark software with respect to upgrades and the deinstallation of the software can be found in the installation manual. 13/01/2011 Trotec Produktions- und Vertriebs GmbH_Linzer Strasse 156, A-4600 Wels, Austria, Technical Support tel_+43 (0)7242 239-7000, fax_+43 (0)7242 239-7380, mailto: [email protected] 10 / 150 User manual SpeedMark V3.0 First Steps 3.4 Scope of Application of Software The SpeedMark software may be used to: • Control the supplied laser system • Mark vector and bitmap images • Create your own graphics • Create dynamic user programs • Implement user programs • Control external hardware 13/01/2011 Trotec Produktions- und Vertriebs GmbH_Linzer Strasse 156, A-4600 Wels, Austria, Technical Support tel_+43 (0)7242 239-7000, fax_+43 (0)7242 239-7380, mailto: [email protected] 11 / 150 User manual SpeedMark V3.0 User Interface 4 User Interface This chapter of the user manual explains the design and structure of the SpeedMark user interface in detail. It includes all the functions controlled using the menus and toolbars. The user interface pictured above represents a standard view2 of the SpeedMark software. It basically consists of the following areas: • • • • Main menu Toolbars Window for drawing and importing graphics Window for editing the drawing and programming elements 2 An explanation of the adjustment of various SpeedMark views can be found in Chapter 8 Desktops and User Rights Control on Page 73 13/01/2011 Trotec Produktions- und Vertriebs GmbH_Linzer Strasse 156, A-4600 Wels, Austria, Technical Support tel_+43 (0)7242 239-7000, fax_+43 (0)7242 239-7380, mailto: [email protected] 12 / 150 User manual SpeedMark V3.0 User Interface 4.1 SpeedMark Programs This chapter provides a brief introduction to the structure and design of the SpeedMark programs. A more detailed description of each concept is contained in the following chapters. Contrary to other laser marking applications, SpeedMark files are known as programs. This name takes into account that within SpeedMark it is possible not only to specify the flow of marking processes in series, but also create a dynamic flow using the programming constructs. 4.1.1 Basic SpeedMark Program for Simple Laser Marking The following example illustrates a basic SpeedMark program used to mark 4 graphics and a text with the laser. As illustrated by the flow chart, the first the line and the circle are marked, followed by the text and then the rectangle and the arc. The flow may be adjusted by changing the order of the individual elements. The user does not require any programming knowledge to perform this type of laser marking. All steps can be carried out with confidence and ease using fixed, defined elements. 13/01/2011 Trotec Produktions- und Vertriebs GmbH_Linzer Strasse 156, A-4600 Wels, Austria, Technical Support tel_+43 (0)7242 239-7000, fax_+43 (0)7242 239-7380, mailto: [email protected] 13 / 150 User manual SpeedMark V3.0 User Interface 4.1.2 Dynamic SpeedMark Program The following example illustrates a dynamic SpeedMark program which uses settings to mark 4 lines and a text. As illustrated by the flow chart, just one line is marked to start with. Then SpeedMark checks whether the text should be marked or not. Based on this decision, the text or the line is marked next. Then another line is marked. In the next grinding element, the line is then marked four times. Rudimentary programming knowledge offers a distinct advantage with this type of laser marking. However, programming knowledge is not a requirement for the basic operation of the SpeedMark flow control. More detailed descriptions of the use of dynamic programs can be found in Chapters 13 Basic Programming and Control Elements on page 91 and 14 Advanced Programming on page 108. 13/01/2011 Trotec Produktions- und Vertriebs GmbH_Linzer Strasse 156, A-4600 Wels, Austria, Technical Support tel_+43 (0)7242 239-7000, fax_+43 (0)7242 239-7380, mailto: [email protected] 14 / 150 User manual SpeedMark V3.0 User Interface 4.1.3 Master Program and Associated Sub-Programs In SpeedMark it is possible to store graphic markings and flows in sub-programs which not only help maintain clarity in the master program but also allow dynamic programming. In this instance, the master program illustrated above has two sub-programs which may be used by the master program. Advanced programming knowledge definitely offers an advantage with this type of laser marking. This type of programming is mainly used in industrial environments employing repetitive tasks of long duration. More detailed descriptions of the use of master programs in combination with subprograms can be found in Chapter 14 Advanced Programming on Page 108. 13/01/2011 Trotec Produktions- und Vertriebs GmbH_Linzer Strasse 156, A-4600 Wels, Austria, Technical Support tel_+43 (0)7242 239-7000, fax_+43 (0)7242 239-7380, mailto: [email protected] 15 / 150 User manual SpeedMark V3.0 User Interface 4.2 User Interface Windows 4.2.1 Flow Diagram with Flow Chart The flow diagram illustrates the current flow chart of a SpeedMark program. Each program contains a start and at least one end node. It is possible to add as many graphic, control or programming elements in between as required. This type of illustration provides a quick and simple overview of the way and order in which programs are processed and marked. Programming elements can be used to introduce a dynamic flow to programs. 4.2.2 Drawing Interface The SpeedMark drawing interface stores all the graphic elements to be marked by the laser. Graphics can be positioned easily using the grids and rulers. The outer rectangular border indicates the actual working area and field size of the laser system. This border is determined by the calibration. Any graphics located outside this boarder cannot be marked by the laser. All the graphic elements stored in the drawing interface can be edited using the mouse. A more detailed description of how to edit elements can be found in Chapter 5 Editing Graphic Elements on page 26. 13/01/2011 Trotec Produktions- und Vertriebs GmbH_Linzer Strasse 156, A-4600 Wels, Austria, Technical Support tel_+43 (0)7242 239-7000, fax_+43 (0)7242 239-7380, mailto: [email protected] 16 / 150 User manual SpeedMark V3.0 User Interface 4.2.3 Graphic Properties All SpeedMark graphic elements can be edited using the graphic properties in the Graphic properties window. The properties of each individual element can be adjusted in the Graphic tab (the example on the right contains those of a linear element). The entries in the Graphic tab will therefore differ according to the graphic element selected. The other tabs such as Marking, Source, Filling, Transformation and General contain common graphic element properties which remain the same for all elements. Any properties which cannot be applied to particular graphic elements (e.g. filling for lines) are greyed out. All changes made to the graphic properties must be confirmed using the “Accept” button. Selecting another element in the flow chart or drawing interface without having pressed the Apply button cancels any changes without warning. 4.3 Tools Toolbar Functions The Tools toolbar can be used to create new elements on the drawing interface and in the flow chart.3 The arrows are positioned next to each element in the toolbar can be used to access additional elements. 3 In the SpeedMark default settings, the Tools toolbar is positioned vertically. However, it is presented horizontally in this document for ease of illustration. 13/01/2011 Trotec Produktions- und Vertriebs GmbH_Linzer Strasse 156, A-4600 Wels, Austria, Technical Support tel_+43 (0)7242 239-7000, fax_+43 (0)7242 239-7380, mailto: [email protected] 17 / 150 User manual SpeedMark V3.0 User Interface 4.3.1 Select and Zoom Tools The Select tool is used to carry out various actions for changing the drawing interface view. Tool Name Select Hand Zoom Description Selects one or more elements Drags and drops the drawing interface into a new position Zooms in to an area selected with this tool Next View Switches to the next zoom view. If there is no further zoom view, this will not function Switches back to the previous zoom view Previous View Magnify Demagnify Window Size Magnifies the zoom on the drawing interface. This is referenced according to the centre of the drawing interface Demagnifies the zoom on the drawing interface. This is referenced according to the centre of the drawing interface Zooms in to the drawing interface in order to display the entire editing field 4.3.2 Graphic Elements Graphic elements can be used to create a variety of graphical elements on the drawing interface. These elements can be generated in both the drawing interface as well as the flow chart.4 Element Name Point Description Creates a single point on the drawing interface Line Creates a line on the drawing interface Ellipse/Circle Creates a circle or an ellipse on the drawing interface Curve Creates a curve on the drawing interface Rectangle Creates a rectangle on the drawing interface Text Creates a text element on the drawing interface Outline Text Creates an outline text element on the drawing interface Barcode Creates a barcode on the drawing interface Data Matrix Creates a data matrix on the drawing interface UID Data Matrix Vector Graphic Creates a UID data matrix on the drawing interface Creates a vector graphic element imported from an existing file into the drawing interface 4 More information on the editing and application of graphic elements can be found in Chapter 5 Editing Graphic Elements on page 26. 13/01/2011 Trotec Produktions- und Vertriebs GmbH_Linzer Strasse 156, A-4600 Wels, Austria, Technical Support tel_+43 (0)7242 239-7000, fax_+43 (0)7242 239-7380, mailto: [email protected] 18 / 150 User manual SpeedMark V3.0 User Interface Raster Graphic PDF Import Creates a raster graphic element imported from an existing file Creates a raster graphic element imported from an existing PDF file Creates a raster graphic element imported from an existing import file. An import file may be one of several formats 4.3.3 Control Elements SpeedMark programs use the control elements to react to external events such as I/O values, user inputs, etc. These elements can only be created in the flow chart.5 Element Name Wait For Signal Set I/O Output Description Waits for a configured signal from an I/O input or the user to press a button. Sets an I/O output for a configured I/O card Delay Delays program execution for a set period Input Window Allows the user to enter configurable input values via the keyboard or barcode scanner 5 More information on the editing and application of control elements can be found in Chapter 13 Basic Programming and Control Elements on page 91 13/01/2011 Trotec Produktions- und Vertriebs GmbH_Linzer Strasse 156, A-4600 Wels, Austria, Technical Support tel_+43 (0)7242 239-7000, fax_+43 (0)7242 239-7380, mailto: [email protected] 19 / 150 User manual SpeedMark V3.0 User Interface 4.3.4 Programming Elements Programming elements give SpeedMark programs a dynamic component. These elements can only be created in the flow chart.6 Element Name Calculation/Allocation Program End Comment/Note Branch Description Enables the creation of program structures in the SpeedMark script language for the calculation and allocation of variables Marks the end of a program. It may be used several times within a program Adds a comment to a program Jump Label Creates branches for adding alternative program flow Creates loops with preset start and end values and increments Creates loops which end according to a specified condition Defines a jump label within a program Jump to Jump Label Jumps to a jump label Jump to Sub-Routine Carries out a sub-routine Jump Back out of SubRoutine Sub-Program Returns out of the sub-routine Opens a sub-program External Program Opens an external program Incremental Loop Conditional Loop 6 More information on the editing and application of programming elements can be found in Chapter 14 Advanced Programming on page 108 13/01/2011 Trotec Produktions- und Vertriebs GmbH_Linzer Strasse 156, A-4600 Wels, Austria, Technical Support tel_+43 (0)7242 239-7000, fax_+43 (0)7242 239-7380, mailto: [email protected] 20 / 150 User manual SpeedMark V3.0 User Interface 4.4 Menu and Toolbar Functions The main menu is displayed at the very top of the program window by default. The most often used functions can be accessed via the standard toolbars using the mouse. The status bar contains the status of various programs. 4.4.1 File Menu Menu item New Symbol Description The “New” symbol opens a window used to specify whether a “New Program” or a “New Sub-Program” should be created. New/ New program New/ New Sub-Program Open Save Save As Creates a new master program in SpeedMark. Adds a new sub-program to an existing master program. Opens a master program or sub-program Saves the current master or sub-program Saves the current master or sub-program under another name or directory Saves all sub-programs and the master program Closes the current program Closes all open programs Ends SpeedMark and closes all open programs Save All Close Close All End 4.4.2 Edit Menu Menu item Undo Redo Cut 13/01/2011 Symbol Description Undoes the last action performed on a graphic element. Redoes the last Undo action performed on a graphic element. Cuts an element from the flow chart or drawing interface and places it on the clipboard for future use. Trotec Produktions- und Vertriebs GmbH_Linzer Strasse 156, A-4600 Wels, Austria, Technical Support tel_+43 (0)7242 239-7000, fax_+43 (0)7242 239-7380, mailto: [email protected] 21 / 150 User manual SpeedMark V3.0 User Interface Copy Paste Delete Select All Select All Graphics Free Transformation Align/Left Align/Centre Align/Right Align/Top Align/Centre Align/Bottom Properties Copies an element from the flow chart or drawing interface and placed it on the clipboard. Pastes and element from the clipboard into the flow chart. Deletes an element from the flow chart or drawing interface. Selects all elements in the flow chart and the drawing interface. Selects all graphic elements in the flow chart and the drawing interface. Opens the Free Transformation window for the advanced editing of graphic elements (please also refer to Chapter 5 on page 26) Aligns all selected graphic elements to the left-hand most element. Aligns all selected graphic elements to the central vertical axis. The centre being the vertical centre of all selected elements. Aligns all selected graphic elements to the right-hand most element. Aligns all selected graphic elements to the upper most element. Aligns all selected graphic elements to the central horizontal axis. The centre being the horizontal centre of all selected elements. Aligns all selected graphic elements to the bottom most element. Opens the properties dialog of a selected element. A graphic element properties dialog is usually located at on the right-hand side of SpeedMark (please also refer to Chapter4.2.3 on page 17) 4.4.3 View Menu Menu item Project Management Marking Parameters Graphic Properties Flow chart Free Transformation Mark Borders Debug Window Toolbars 13/01/2011 Description Displays the Project Management window containing the programs currently open. Displays the marking parameters dialog Displays the graphic properties for a selected graphic element Displays the flow chart for the current selected program Displays the Free Transformation dialog for editing one or more selected graphic elements. Displays the Mark Borders dialog The Debug Window menu item consists of several windows for controlling dynamic programs: • Variable Monitoring • Error Messages The Toolbars menu item contains all tool bars available within Trotec Produktions- und Vertriebs GmbH_Linzer Strasse 156, A-4600 Wels, Austria, Technical Support tel_+43 (0)7242 239-7000, fax_+43 (0)7242 239-7380, mailto: [email protected] 22 / 150 User manual SpeedMark V3.0 User Interface Operator Window Program Extensions Preview Mode SpeedMark: • Standard • Tools • Execute • Debug • Select Marking Parameters • Project • Undo/Redo • Desktops The Operator Window menu item contains all windows used during on-going operation: • Execute Program • Program Log • Program Messages These operator windows are supported by the windows of individual components, modules and program extensions. Displays a list of all windows of all installed program extensions (please also refer to Chapter 16 Extensions on Page146) Used to switch SpeedMark into preview mode and back. Further information on each of the individual windows can be found in Chapter 4.2 User Interface Window on page 16. 13/01/2011 Trotec Produktions- und Vertriebs GmbH_Linzer Strasse 156, A-4600 Wels, Austria, Technical Support tel_+43 (0)7242 239-7000, fax_+43 (0)7242 239-7380, mailto: [email protected] 23 / 150 User manual SpeedMark V3.0 User Interface 4.4.4 Project Menu Menu item Segmentation Symbol Description Performs segmentation on the current graphic elements for usage with a movement axis. In SpeedMark it is possible to set variables as place holders for use within dynamic programs (more detailed information can be found under 13.2 Variables on page 92) When dynamic programs are used, this menu item is able to determine whether the syntax of all dynamic components has been defined correctly (Further information can be found in Chapter 14 Advanced Programming on page 108) Variables List Syntax Check 4.4.5 Start Menu Menu item Quick mark Mark Borders Execute Debug Individual Instruction Total Routine Continue program Stop Program Pause Program Switch Breakpoint Remove All Breakpoints Symbol Description Opens the Quick mark dialog for performing a one-off laser marking (please also refer to 6.2 Quick mark on page 61) Draws a rectangular border round all graphic elements with the laser pointer. Executes the master program and all associated subprograms Starts the program in debug mode. Interrupts the program flow at specified breakpoints. Executes an individual program instruction Executes a block of programs Continues the program until the next breakpoint without interruption. Stops the program Pauses the program. The program can be continued using “Continue Program”. Sets or removes a breakpoint in a program instruction. Removes all breakpoints. 4.4.6 Tools Menu Menu item Switch User User Rights and Desktops Program Extensions 13/01/2011 Description Switches the current user using a login if the user rights control is activated Allows the configuration of user rights control (please also refer to 8 Desktops and User Rights Control on page 73) Opens the Program Extensions dialog for configuring the installed extensions (please also refer to 16 Extensions on page 146) Trotec Produktions- und Vertriebs GmbH_Linzer Strasse 156, A-4600 Wels, Austria, Technical Support tel_+43 (0)7242 239-7000, fax_+43 (0)7242 239-7380, mailto: [email protected] 24 / 150 User manual SpeedMark V3.0 User Interface Laser system configuration Opens the Components dialog to configure the installed modules and their associated components (please also refer to 15.1 Error! Reference source not found. on page 115) Displays a list of components and their available windows depending on the modules installed. This list depends on the configuration of SpeedMark All configured axis can be resetted or controlled All configuration files will be backed up in a file and can be restored from this file Opens the SpeedMark configuration dialog (please also refer to 9.1 SpeedMark Settings on page 82) TLC2 Axis control Backup/Restore configuration Settings 4.4.7 Windows Menu Menu item Arrange Horizontally Arrange Vertically Cascade Minimize All Window List Symbol Description Arranges the windows next to one another horizontally Arranges the windows under one another vertically Overlaps the windows on top of one another Minimises all windows Displays a list of all open windows (master program with all open sub-programs) 4.4.8 Help Menu Menu item Software registration About SpeedMark Symbol Description Registering of the SpeedMark software Displays the start dialog containing the version of SpeedMark in use. 4.5 Context Menu Functions The SpeedMark context menu can be opened by clicking the right mouse button. This applies to elements selected in both the flow chart and the drawing interface. The individual functions are either activated or deactivated depending on the element selected. 13/01/2011 Trotec Produktions- und Vertriebs GmbH_Linzer Strasse 156, A-4600 Wels, Austria, Technical Support tel_+43 (0)7242 239-7000, fax_+43 (0)7242 239-7380, mailto: [email protected] 25 / 150 User manual SpeedMark V3.0 Editing Graphic Elements 5 Editing Graphic Elements 5.1 General 5.1.1 Creating a graphic Element The Tools toolbar can be used to create new elements on the drawing interface and in the flow chart.7 The arrows positioned next to each element in the toolbar can be used to access additional elements. Clicking once on an arrow opens a list containing all the graphic elements available for this group. A graphic element is selected by clicking on the respective element once with the mouse. The cursor then changes and the element can be inserted in the flow chart or drawing interface. 7 In the SpeedMark default settings, the Tools toolbar is positioned vertically. However, it is presented horizontally in this document for ease of illustration. 13/01/2011 Trotec Produktions- und Vertriebs GmbH_Linzer Strasse 156, A-4600 Wels, Austria, Technical Support tel_+43 (0)7242 239-7000, fax_+43 (0)7242 239-7380, mailto: [email protected] 26 / 150 User manual SpeedMark V3.0 Editing Graphic Elements Double-clicking on a graphic element enables an element to be inserted several times on the drawing interface. Click once with the mouse and it immediately reverts back to the Select tool once the element has been inserted in the drawing interface. However, if you do not want to insert the selected element, simply reselect the Select tool. Creating an Element in the Flow Chart To create a graphic element in the flow chart click on the graphic element to be created and move the mouse cursor to the place in the chart where the element should be inserted. The currently selected insertion position will be marked by a green rectangle. Areas containing an invalid insertion position are indicated by a mouse cursor in the form shown here. Handstop.cur Once the insertion position has been confirmed by a single click, a settings dialog opens for the respective graphic element in which the basic graphic properties may be adjusted before the element is actually inserted.8 Creating a graphic Element on the Drawing Interface To create a graphic element on the drawing interface click on the graphic element to be created and move the mouse cursor to the place where the element should be inserted. Once the insertion position has been confirmed, a single click opens the settings dialog for the respective graphic element in which the basic graphic properties may be adjusted before the element is actually inserted. An additional insertion method (click-drag-drop) is available for the following graphic elements: Example line: Click on the start position of the line with the mouse on the drawing interface but do not release the mouse button and continue to move the mouse cursor to the end position of the line. Then release the mouse button. 8 The layout and content of the Settings dialog for each of the graphic elements are described in Chapter 5.2 Creating and Editing Graphic Elements on page 33. 13/01/2011 Trotec Produktions- und Vertriebs GmbH_Linzer Strasse 156, A-4600 Wels, Austria, Technical Support tel_+43 (0)7242 239-7000, fax_+43 (0)7242 239-7380, mailto: [email protected] 27 / 150 User manual SpeedMark V3.0 Editing Graphic Elements 5.1.2 Selecting Elements The Select tool interface. can be used to select elements in both the flow chart and the drawing The Select tool provides several options for selecting elements in the flow chart and the drawing interface: • Make a single selection by clicking on an element in the flow chart or drawing interface. • Make a multiple selection by dragging a selection rectangle over the drawing interface. • Make a multiple selection by selecting the individual graphic elements on the drawing interface while holding down the Shift key. • Make a multiple selection by selecting the individual graphic elements on the flow chart while holding down the Shift key. 5.1.3 Changing the View in the Drawing Interface In order to better edit the graphic elements, the drawing interface can be adjusted to suit the editing requirements using the Zoom and Drag functions. The tools and toolbars described below can be used for this purpose. Hand Zoom Drags and drops the drawing interface into a new position Zooms in to an area selected with this tool Next View Switches to the next zoom view. If there is no further zoom view, this will not function Switches back to the previous zoom view Previous View Magnify Demagnify Window Size Magnifies the zoom on the drawing interface. This is referenced according to the centre of the drawing interface Demagnifies the zoom on the drawing interface. This is referenced according to the centre of the drawing interface Zooms in to the drawing interface in order to display the entire editing field 5.1.4 Editing Graphic Elements with the Mouse The position and size of graphic elements can be adjusted directly using the mouse. This is done using the Select tool. Graphic elements must be selected before adjustments can be made. 13/01/2011 Trotec Produktions- und Vertriebs GmbH_Linzer Strasse 156, A-4600 Wels, Austria, Technical Support tel_+43 (0)7242 239-7000, fax_+43 (0)7242 239-7380, mailto: [email protected] 28 / 150 User manual SpeedMark V3.0 Editing Graphic Elements The illustration to the right shows a selected text element with the selection markers. Selecting an element automatically superimposes nine selection points (squares and a central circle) which are used in conjunction with the mouse cursor to adjust the element. Dragging Graphic Elements Graphic elements may be dragged by using the mouse cursor in conjunction with the element’s central selection point. The mouse cursor then changes its form to the mouse drag cursor. The graphic element can be moved to a new position by clicking and holding down the mouse button while dragging the mouse. Releasing the mouse button confirms the new position. Adjusting the Size of Graphic Elements It is possible to adjust the size of graphic elements by using the mouse cursor in conjunction with one of the outer selection points. The mouse cursor then changes accordingly to one of the following forms: The size of the graphic element can be adjusted by clicking and holding down the mouse button while dragging the mouse. Releasing the mouse button confirms the new size. 13/01/2011 Trotec Produktions- und Vertriebs GmbH_Linzer Strasse 156, A-4600 Wels, Austria, Technical Support tel_+43 (0)7242 239-7000, fax_+43 (0)7242 239-7380, mailto: [email protected] 29 / 150 User manual SpeedMark V3.0 Editing Graphic Elements 5.1.5 Graphic Properties In addition to using the mouse cursor to edit the graphic elements, it is also possible to adjusting the properties in the Graphic Properties window. This window can be used to specify and adjust additional graphic element properties. However, any adjustments made to these properties are restricted to the individually selected graphic elements. The entered values are only applied by pressing the Apply button. Selecting another graphic element discards the current adjustments without warning. SpeedMark checks the plausibility of all changes made to the input values before they are applied. If an error is found, it will be displayed as in the illustration on the right. It is not possible, however, to alter the parameters of several selected graphic elements using the Graphic Properties. This is only possible using the “Free Transformation” function described in the subsequent chapter. 13/01/2011 Trotec Produktions- und Vertriebs GmbH_Linzer Strasse 156, A-4600 Wels, Austria, Technical Support tel_+43 (0)7242 239-7000, fax_+43 (0)7242 239-7380, mailto: [email protected] 30 / 150 User manual SpeedMark V3.0 Editing Graphic Elements 5.1.6 Free Transformation If not already open, the “Free Transformation” function can be opened using the View Free Transformation9 menu item or the context menu.10 The “Free Transformation” function also supports the editing of multiple selections of graphic elements. It groups the elements together and applies all operations as if to one individual element. If the “Free Transformation” function is used on a regular basis, the dialog may be docked11 on one side similar to a toolbar, therefore remaining permanently activated. The transformation functions are essentially divided into three different groups: • • • Adjust position and size Rotation Tilt and reflection Adjust Position and Size In order to adjust the position, the X and Y values simply need adjusting in the Position section. Pressing the “Apply” button then applies these adjustments to the graphic elements. The Target position selector may also be used to specify whether an X or Y position input relates to a corner or centre. The size of the graphic elements can be adjusted in the Size section by adjusting the height and width values. Pressing the “Apply” button then applies these adjustments to the graphic elements. The Proportional checkbox is used to specify whether the entered values should be automatically recalculated according to the aspect ratio. The Fixed Point position selector may also be used to specify whether the size should be adjusted from a corner or the centre. 9 Please also refer to Chapter 4.4.3 View Menu on page 22 Please also refer to Chapter 4.5 Context Menu Functions on page 25 11 Further information on the docking of windows can be found in Chapter 8 Desktops and User Rights Control on page 73 10 13/01/2011 Trotec Produktions- und Vertriebs GmbH_Linzer Strasse 156, A-4600 Wels, Austria, Technical Support tel_+43 (0)7242 239-7000, fax_+43 (0)7242 239-7380, mailto: [email protected] 31 / 150 User manual SpeedMark V3.0 Editing Graphic Elements Rotation In order to adjust the rotation a Rotation Point must first be specified. This is either achieved by selecting a rotation point using the Rotation Point position selector or by specifying a value in the X and Y input fields. The rotation point itself may then be selected independently from the selected element. The angle of rotation is also specified. This is either possible by selecting an angel in the Angle Selector or by specifying a value in the Angle input field. It is also possible to enter negative angles. Pressing the “Apply” button then applies these adjustments to the graphic elements. Bend and Mirroring Adjusting the bend simply requires the adjustment of the values in the Horizontal bend and Vertical bend input fields in the bending angle section. Pressing the “Apply” button applies these adjustments to the graphic elements. Graphic elements can be mirrored directly using the “Horizontal Mirroring” and “Vertical mirroring” buttons. 13/01/2011 Trotec Produktions- und Vertriebs GmbH_Linzer Strasse 156, A-4600 Wels, Austria, Technical Support tel_+43 (0)7242 239-7000, fax_+43 (0)7242 239-7380, mailto: [email protected] 32 / 150 User manual SpeedMark V3.0 Editing Graphic Elements 5.2 Creating and Editing Graphic Elements The following graphic elements are available in SpeedMark: Graphic element Name Point Line Ellipse/Circle Curve Rectangle Text Outline Text Barcode Data Matrix UID Data Matrix Vector Graphic Raster Graphic PDF Import The following chapters contain descriptions of how to insert the graphic elements in the flow chart as this option contains the most settings.12 Graphic elements such as point, line, ellipse and rectangle may all be created directly on the drawing interface. Complex graphics can be imported easily into SpeedMark using the Vector Graphics and Raster Graphic Elements. This chapter specifically describes the special properties of the individual graphic elements, while the basic properties such as Filling, Transformation, Marking and Source are described in the following Chapter5.3 Editing Basic Graphic Properties on page 55. 12 The graphic elements described can be selected using the Tools toolbar. A brief description of how to insert elements is contained in the previous chapter 5.1.1 Creating a graphic Elementon page 26. 13/01/2011 Trotec Produktions- und Vertriebs GmbH_Linzer Strasse 156, A-4600 Wels, Austria, Technical Support tel_+43 (0)7242 239-7000, fax_+43 (0)7242 239-7380, mailto: [email protected] 33 / 150 User manual SpeedMark V3.0 Editing Graphic Elements 5.2.1 Point Inserting a point opens the “New Graphic” dialog in which it is possible to specify the exact position of the point (X and Y input fields). The Graphic Properties window may be used to adjust this position retrospectively. 5.2.2 Line Inserting a line opens the “New Graphic” dialog in which it is possible to specify the exact start and end points. The Graphic Properties window may be used to adjust these values retrospectively. 13/01/2011 Trotec Produktions- und Vertriebs GmbH_Linzer Strasse 156, A-4600 Wels, Austria, Technical Support tel_+43 (0)7242 239-7000, fax_+43 (0)7242 239-7380, mailto: [email protected] 34 / 150 User manual SpeedMark V3.0 Editing Graphic Elements 5.2.3 Ellipse/Circle Inserting an ellipse/circle opens the “New Graphic” dialog in which it is possible to specify the centre, the diameter and the starting angle. The Graphic Properties window may be used to retrospectively adjust the starting angle only. The other properties may be adjusted via the Transformation window. The starting angle of the ellipse/circle element is used to specify the point from which the laser should begin marking the element. This can be essential in time-critical applications in order to optimise flow. The default setting of 0° i s usually sufficient.13 13 In this instance, 0° usually represents the furthes t right-hand point on the graphic element. 13/01/2011 Trotec Produktions- und Vertriebs GmbH_Linzer Strasse 156, A-4600 Wels, Austria, Technical Support tel_+43 (0)7242 239-7000, fax_+43 (0)7242 239-7380, mailto: [email protected] 35 / 150 User manual SpeedMark V3.0 Editing Graphic Elements 5.2.4 Arc Inserting an arc opens the “New Graphic” dialog in which it is possible to specify the centre, diameter, starting/end angle and the arc closure. The Graphic Properties window may be used to retrospectively adjust the starting/end angle and the arc closure only. The other properties may be adjusted via the Transformation window. The starting angle of the arc element is used merely to specify the point from which the arc begins and the end angle is used to specify the point where the arc ends (please refer to the illustration to the right with a starting angle of 0° and an end angle of 90° ). Activating the “Arc closed” checkbox specifies whether the arc is closed and therefore displayed as a segment. In this form a vector filling may also be applied to the arc.14 14 When the arc closure is deactivated, so are all the filling settings. 13/01/2011 Trotec Produktions- und Vertriebs GmbH_Linzer Strasse 156, A-4600 Wels, Austria, Technical Support tel_+43 (0)7242 239-7000, fax_+43 (0)7242 239-7380, mailto: [email protected] 36 / 150 User manual SpeedMark V3.0 Editing Graphic Elements 5.2.5 Rectangle Inserting a rectangle opens the “New Graphic” dialog in which it is possible to specify the centre and the size. The Graphic Properties window does not contain any specific properties although these may be adjusted via the Transformation window. 13/01/2011 Trotec Produktions- und Vertriebs GmbH_Linzer Strasse 156, A-4600 Wels, Austria, Technical Support tel_+43 (0)7242 239-7000, fax_+43 (0)7242 239-7380, mailto: [email protected] 37 / 150 User manual SpeedMark V3.0 Editing Graphic Elements 5.2.6 Text Inserting text opens the “New Graphic” dialog in which it is possible to specify the various text parameters. All of these parameters may likewise be adjusted retrospectively in the Graphic Properties window with the exception of the Centre details (which can be adjusted via the Transformation window). Font The text element font is a so-called single line font which produces the symbols using lines.15 The following fonts are available in SpeedMark: • ISOCT • RomanS • SOKOL 15 Due to the use of single line fonts, text elements may not contain any filling. 13/01/2011 Trotec Produktions- und Vertriebs GmbH_Linzer Strasse 156, A-4600 Wels, Austria, Technical Support tel_+43 (0)7242 239-7000, fax_+43 (0)7242 239-7380, mailto: [email protected] 38 / 150 User manual SpeedMark V3.0 Editing Graphic Elements Text The text to be displayed can be entered in the Text input field. It is also possible to enter multiple lines of text. Size This is used to specify the font size, and the line and character spacing. When specifying the font size it is also possible to specify the units used for the sizing parameters. The currently configured size units (in standard mm) and the font size units in points (1 pt equals 1/72 inch) are available for selection. The selected units are used for the both the line and character spacing parameters. Text Style A text element may be displayed in various direction styles incorporating various display format properties. Normal The text is displayed using the specified font, text and size parameters. These parameter also determine the behaviour of the element in relation to the overall size of the element and any transformations (i.e. when the size is adjusted, the size of the font adjusts itself automatically as the element itself has become larger otherwise the text will be distorted according to the scaling). Text box In this instance, a text box is placed around the element when it is first created (or this style applied). From this point on, this text box represents the definitive border of the element. This border is also used to calculate the alignment16 (left, right, centred). For example, any lines which do not fit into the text box are compressed so that they may displayed within the overall size. Any lines which do not fit into the text box are cut off. This type of text style is mainly used for markings on a workpiece of a specific size. Ring marking The ring marking style is used to display the text in the form of a virtual ring marking defined by the Radius parameter. Only the first line of multiple lines of text is displayed. 16 Please refer to the button top right in the Text Style section. 13/01/2011 Trotec Produktions- und Vertriebs GmbH_Linzer Strasse 156, A-4600 Wels, Austria, Technical Support tel_+43 (0)7242 239-7000, fax_+43 (0)7242 239-7380, mailto: [email protected] 39 / 150 User manual SpeedMark V3.0 Editing Graphic Elements 5.2.7 Outline Text Inserting text opens the “New Graphic” dialog in which it is possible to specify the various text parameters. All of these parameters may likewise be adjusted retrospectively in the Graphic Properties window with the exception of the Centre details (which can be adjusted via the Transformation window). Font Outline Text elements may use any of the fonts available in your Windows® operating system. Text The text to be displayed can be entered in the Text input field. It is also possible to enter multiple lines of text. 13/01/2011 Trotec Produktions- und Vertriebs GmbH_Linzer Strasse 156, A-4600 Wels, Austria, Technical Support tel_+43 (0)7242 239-7000, fax_+43 (0)7242 239-7380, mailto: [email protected] 40 / 150 User manual SpeedMark V3.0 Editing Graphic Elements Size This is used to specify the font size, and the line and character spacing. When specifying the font size it is also possible to specify the units used for the sizing parameters. The currently configured size units (in standard mm) and the font size units in points (1 pt equals 1/72 inch) are available for selection. The selected units are used for the both the line and character spacing parameters. Font effects Outline Text elements may use bold and italic font effects. However, in this instance, bold only means that the respective font parameter for this effect is applied. In order to actually make an Outline Text element bolder, this text must be shaded. Symbol table With the button right of the font effects it is possible to open the symbol table dialog to insert special characters into the text field. The amount and kind of available symbols depend on the chosen font. Text Style A text element may be displayed in various direction styles incorporating various display format properties. Normal The text is displayed using the specified font, text and size parameters. These parameter also determine the behaviour of the element in relation to the overall size of the element and any transformations (i.e. when the size is adjusted, the size of the font adjusts itself automatically as the element itself has become larger otherwise the text will be distorted according to the scaling). 13/01/2011 Trotec Produktions- und Vertriebs GmbH_Linzer Strasse 156, A-4600 Wels, Austria, Technical Support tel_+43 (0)7242 239-7000, fax_+43 (0)7242 239-7380, mailto: [email protected] 41 / 150 User manual SpeedMark V3.0 Editing Graphic Elements Text box In this instance, a text box is placed around the element when it is first created (or this style applied). From this point on, this text box represents the definitive border of the element. This border is also used to calculate the alignment17 (left, right, centred). For example, any lines which do not fit into the text box are compressed so that they may displayed within the overall size. Any lines which do not fit into the text box are cut off. This type of text style is mainly used for markings on a workpiece of a specific size. Ring marking The ring marking style is used to display the text in the form of a virtual ring marking defined by the Radius parameter. Only the first line of multiple lines of text is displayed. 17 Please refer to the button top right in the Text Style section. 13/01/2011 Trotec Produktions- und Vertriebs GmbH_Linzer Strasse 156, A-4600 Wels, Austria, Technical Support tel_+43 (0)7242 239-7000, fax_+43 (0)7242 239-7380, mailto: [email protected] 42 / 150 User manual SpeedMark V3.0 Editing Graphic Elements 5.2.8 Barcode Inserting a barcode opens the “New Graphic” dialog in which it is possible to specify the various barcode parameters. All of these parameters may likewise be adjusted retrospectively in the Graphic Properties window with the exception of the Centre details (which can be adjusted via the Transformation window). Default values are applied automatically to a barcode’s filling parameters. Barcode Use this to enter the barcode applicable for the barcode type. Barcodes only permit numerical values. The inputs and properties are not separately validated against the type of barcode selected. 13/01/2011 Trotec Produktions- und Vertriebs GmbH_Linzer Strasse 156, A-4600 Wels, Austria, Technical Support tel_+43 (0)7242 239-7000, fax_+43 (0)7242 239-7380, mailto: [email protected] 43 / 150 User manual SpeedMark V3.0 Editing Graphic Elements Type Use this to select the type of barcode. The following barcodes are available in SpeedMark: • Code 2 of 5 interleaved • Code 2 of 5 industrial • Code 2 of 5 matrix • Code 39 • Code 39 Extended • Code 128A • Code 128B • Code 128C • Code 93 • Code 93 Extended • Code MSI • Code Postnet • Code Codabar • Code EAN8 • Code EAN13 • Code UPC A • Code UPC E0 • Code UPC E1 • Code UPC Supp 2 • Code UPC Supp 5 • Code EAN128A • Code EAN128B • Code EAN128C Settings The Checksum checkbox is used to indicate whether a checksum should be created or not. The Invert checkbox is used to indicate whether a barcode should be displayed inverted or not. Advanced Settings Use this to adjust the size of the barcode and the width of the bars. The quite zone input field is only activated for inverted barcodes whereby it adds a black border to make the barcode more legible for the barcode scanner. 13/01/2011 Trotec Produktions- und Vertriebs GmbH_Linzer Strasse 156, A-4600 Wels, Austria, Technical Support tel_+43 (0)7242 239-7000, fax_+43 (0)7242 239-7380, mailto: [email protected] 44 / 150 User manual SpeedMark V3.0 Editing Graphic Elements 5.2.9 Data Matrix Inserting a data matrix opens the “New Graphic” dialog in which it is possible to specify the various data matrix parameters. All of these parameters may likewise be adjusted retrospectively in the Graphic Properties window with the exception of the Centre details (which can be adjusted via the Transformation window). Default values are applied automatically to a data matrix’s filling parameters. Code Use this to enter the data matrix code applicable to the type of coding selected. Data matrices only permit alpha-numeric values. The inputs and properties are not validated separately against the selected data matrix coding. Settings These settings are used to specify the size and appearance of a data matrix code. 13/01/2011 Trotec Produktions- und Vertriebs GmbH_Linzer Strasse 156, A-4600 Wels, Austria, Technical Support tel_+43 (0)7242 239-7000, fax_+43 (0)7242 239-7380, mailto: [email protected] 45 / 150 User manual SpeedMark V3.0 Editing Graphic Elements Coding Use this to specify the exact data matrix coding. The following coding is available in SpeedMark: • ASCII • C40 • TEXT • BINARY • NONE • AUTO Format Use “Format” to define the data matrix cells. The following formats are available: • AUTO (for automatic recognition) • 10x10 • 8x18 • 12x12 • 16x48 • … • 144x144 Data matrix height Use this to define the overall height of the data matrix. If the data matrix is not square (e.g. 16x48) the width is calculated by SpeedMark. Inverted Use this to invert the data matrix. 13/01/2011 Trotec Produktions- und Vertriebs GmbH_Linzer Strasse 156, A-4600 Wels, Austria, Technical Support tel_+43 (0)7242 239-7000, fax_+43 (0)7242 239-7380, mailto: [email protected] 46 / 150 User manual SpeedMark V3.0 Editing Graphic Elements 5.2.10 UID Data Matrix Though the UID data matrix is a special customer development you can get further information from Trotec support. 13/01/2011 Trotec Produktions- und Vertriebs GmbH_Linzer Strasse 156, A-4600 Wels, Austria, Technical Support tel_+43 (0)7242 239-7000, fax_+43 (0)7242 239-7380, mailto: [email protected] 47 / 150 User manual SpeedMark V3.0 Editing Graphic Elements 5.2.11 Vector Graphic The Vector Graphic element is used to import vector graphics from external programs (e.g. Corel Draw, AutoCad, …). SpeedMark supports a variety of different import filters for transferring data. Inserting a vector graphic opens the “New Graphic” dialog in which it is possible to specify the various import parameters. It is also possible to retrospectively update the file in the Graphic Properties window. The imported vector file is then actually embedded in the SpeedMark program. This means that any changes made to the original file are not automatically applied to the data in SpeedMark. This is only possible by carrying out a manual adjustment in the Graphic Properties. 13/01/2011 Trotec Produktions- und Vertriebs GmbH_Linzer Strasse 156, A-4600 Wels, Austria, Technical Support tel_+43 (0)7242 239-7000, fax_+43 (0)7242 239-7380, mailto: [email protected] 48 / 150 User manual SpeedMark V3.0 Editing Graphic Elements Source (New Graphic) A vector graphic is usually imported by entering a file name (including the full file path) or by pressing the button with the three dots to open a file selection dialog. The following vector graphic import filters are available in SpeedMark: • AutoCAD DWG • AutoCAD DXF • HPGL/2 • SVG • CGM • Corel Draw (Corel Draw must be installed on the computer in order to import Corel Draw files18) In dynamic programs, vector files are sometimes loaded based on various parameters. The arrow buttons may be used to create a vector file directly in the front end.19 Import Position Use this section to specify whether the original position of the graphic should be accepted or if a new graphic position is required. When accepting the graphic position, the graphic’s position data is extracted from the source file and used for the positioning in SpeedMark. In many cases, this can lead to the graphic being invisible if it is located far outside the operating range of the laser. When creating a new graphic position, it is possible to specify both the insertion position and the alignment in relation to the insertion position using the position selector target. Optimisations Use this to activate various SpeedMark import optimisations: Minimal Vector Length This optimisation is mainly used to reduce the number of points on a curve with many individual points. The minimal vector length defines the minimum length of a linear vector. The advantage of using this optimisation is the lower amount of memory required and reduced amount of time needed to import the file. In many cases, the import time can be cut from minutes to seconds. 18 If Corel Draw is not installed on the computer, you may export files from Corel Draw as .dxf files and then import them into SpeedMark. 19 Using Graphic Properties Source is described in more detail in Chapter 5.3.6 Source on page 59 13/01/2011 Trotec Produktions- und Vertriebs GmbH_Linzer Strasse 156, A-4600 Wels, Austria, Technical Support tel_+43 (0)7242 239-7000, fax_+43 (0)7242 239-7380, mailto: [email protected] 49 / 150 User manual SpeedMark V3.0 Editing Graphic Elements Optimise Graphic If this is selected, SpeedMark optimises the graphic for laser processing: • • • Deletes zero vectors (unnecessary delay times) Links lines to vector strokes if there are no intervals between the existing individual vectors (reduces unnecessary delay times) Implements vector sequencing (flow optimisation) Plotter Steps This setting is relevant to the import of HPLG files. It is used to specify the plotter steps required for importing (default value is 1016). Source (Graphic Properties) To update a vector file, press the green Update button. This reloads the selected vector file according to the given import settings. All previously performed transformations remain unchanged. To replace a vector file, press the green arrow button. Use the file selection dialog to select a new file. This reimports the new file according to the given import settings. All previously performed transformations remain unchanged. 13/01/2011 Trotec Produktions- und Vertriebs GmbH_Linzer Strasse 156, A-4600 Wels, Austria, Technical Support tel_+43 (0)7242 239-7000, fax_+43 (0)7242 239-7380, mailto: [email protected] 50 / 150 User manual SpeedMark V3.0 Editing Graphic Elements 5.2.12 Raster Graphics The raster graphic element is used to import raster graphics from external programs (e.g. Paint, Adobe Photoshop, …). SpeedMark supports a variety of different import filters for transferring data. Inserting a raster graphic opens the “New Graphic” dialog in which it is possible to specify the file name of the graphic and the import position (centre). Graphic Properties can be used to retrospectively adjust the raster graphic settings in terms of pixel density, contrast, brightness, dithering and execution mode. Source (New Graphic) A raster graphic is usually imported by entering a file name (including the full file path) or by pressing the button with the three dots to open a file selection dialog. The following raster graphic import filters are available in SpeedMark: • Bitmap (bmp) • JPEG (jpg, jpeg) 13/01/2011 Trotec Produktions- und Vertriebs GmbH_Linzer Strasse 156, A-4600 Wels, Austria, Technical Support tel_+43 (0)7242 239-7000, fax_+43 (0)7242 239-7380, mailto: [email protected] 51 / 150 User manual SpeedMark V3.0 Editing Graphic Elements Settings (Graphic Properties) Use this to adjust the main raster graphic settings in order to optimise them for laser marking. Dot Density Use this to specify the pixel density in “dots per inch”. Contrast and Brightness Use this to align the contrast and brightness of the imported raster graphic to those of the laser marking. Dithering This is used to describe the process of simulating colours using a reduced colour palette (e.g. converting a colour picture to a black/white graphic). The following dithering algorithms are available in SpeedMark: • Next colour • Floyd Steinberg • Stucki • Sierra • Jarvin, Judice & Ninke • Stevenson & Arche • Burkes Execution mode The execution mode determines if a graphic will be marked row by row or vectorized. The following options are available: • Photo (greyscale) Graphic will be marked row by row (recommended for photos) • Logo (Black/White) Graphic will be vectorized and the found regions will be quickly marked with vectors (recommended for logos) Inverted This specifies whether a raster graphic should be inverted or not. 13/01/2011 Trotec Produktions- und Vertriebs GmbH_Linzer Strasse 156, A-4600 Wels, Austria, Technical Support tel_+43 (0)7242 239-7000, fax_+43 (0)7242 239-7380, mailto: [email protected] 52 / 150 User manual SpeedMark V3.0 Editing Graphic Elements 5.2.13 PDF The PDF graphic element supports the import of PDF files used for raster graphic elements. A PDF file can be selected for importing using a file selection dialog. Use the Import Graphic Wizard to set the necessary import settings such as Import DPI, Page and Import Position (Centre). The imported PDF element is then available in SpeedMark as a raster graphic. All raster graphic settings can be found in the previous Chapter 5.2.12 Raster Graphics on page 51. 13/01/2011 Trotec Produktions- und Vertriebs GmbH_Linzer Strasse 156, A-4600 Wels, Austria, Technical Support tel_+43 (0)7242 239-7000, fax_+43 (0)7242 239-7380, mailto: [email protected] 53 / 150 User manual SpeedMark V3.0 Editing Graphic Elements 5.2.14 Import Import Graphic Element supports the import of PDF and EPS files used for raster graphic elements. A file selection dialog is used to select the file for importing and the appropriate data filter. Use the Import Graphic Wizard to set the necessary import settings such as Import DPI, Page and Import Position (Centre). The imported graphic element is then available in SpeedMark as a raster graphic. All raster graphic settings can be found in the Chapter 5.2.12 Raster Graphics on page 51. 13/01/2011 Trotec Produktions- und Vertriebs GmbH_Linzer Strasse 156, A-4600 Wels, Austria, Technical Support tel_+43 (0)7242 239-7000, fax_+43 (0)7242 239-7380, mailto: [email protected] 54 / 150 User manual SpeedMark V3.0 Editing Graphic Elements 5.3 Editing Basic Graphic Properties The Graphic Properties window not only offers the possibility of editing special graphic element properties, it also provides the option of adjusting the basic parameters of all elements. As not all properties are available for each graphic element, these are greyed out or deactivated as necessary. 5.3.1 Basic Graphic Properties The Graphic tab contains the basic graphic properties of each graphic located above the specific graphic properties of the selected graphic element. It is also possible to set the Line Width that will appear on the screen for each element (default value is 0.01 mm). This setting only applies to the display screen graphic. The laser has its own diameter depending on the focus selected and material used. This setting merely serves to display a specified editing diameter on the screen. The Smoothing Factor is used to determine how fine or coarse a curve should be in terms of individual vector strokes. The adjacent example shows a circle with a smoothing factor of 10 sub-divisions per curve (four curves per circle). The adjacent example shows a circle with a smoothing factor of 2 sub-divisions per curve. Under normal circumstances, a smoothing factor of 10 is sufficient for achieving an optimal marking. 13/01/2011 Trotec Produktions- und Vertriebs GmbH_Linzer Strasse 156, A-4600 Wels, Austria, Technical Support tel_+43 (0)7242 239-7000, fax_+43 (0)7242 239-7380, mailto: [email protected] 55 / 150 User manual SpeedMark V3.0 Editing Graphic Elements 5.3.2 General The Graphic Properties General tab contains all the basic setting of each of the individual graphic elements. The Description section can be used to amend the standard title and the title is displayed in bold in the flow chart directly next to the element symbol. It is also possible to add a comment. This is likewise displayed on the flow chart below the title. The Behaviour section determines the process flow of the graphic element. Breakpoint is used to specify whether the flow should be interrupted during debug mode20 or not. Show Graphic is used to specify whether an element is displayed on the drawing interface or not (please note, however, that this does not affect the laser marking). Element active, on the other hand, displays the element on the drawing interface although it will not be marked by the laser unless it is actively set. The Contour and Filling sections21 provide basic information regarding the graphic element in terms of the number of points, number of jumps and overall vector length. 20 Further information on the debugging of programs can be found in Chapter 13.4 Debug Programs on page 98 21 This section is only displayed for graphic elements containing filling. 13/01/2011 Trotec Produktions- und Vertriebs GmbH_Linzer Strasse 156, A-4600 Wels, Austria, Technical Support tel_+43 (0)7242 239-7000, fax_+43 (0)7242 239-7380, mailto: [email protected] 56 / 150 User manual SpeedMark V3.0 Editing Graphic Elements 5.3.3 Filling The Graphic Properties Filling tab contains all the parameters required to define the filling of a graphic element.22 Filling Style is used to determine the basic type of filling. There are four filling styles available: None Parallel lines Bi-directional Crossed lines Filling is deactivated Filling lines are marked from left to right Filling lines are marked from left to right and right to left The filling resembles a definable grid The Filling Parameters section is used to define the actual characteristics of the selected filling style in greater detail. Line spacing Angle Cross Angle Closed Polygon With Contour Optimize Filling Filling Angle Relative to Object Rotation Actual Object Rotation Intervals between the filling lines Angle of the filling lines Angle of the crossed lines for the hatched filling style This option refers to the graphics with open polygons e.g. if a “C” in a text should be shaded, this option forms a virtual closure between the start and end points of the “C” so it may be shaded. Draws the contour of the underlying element The filling lines are subjected to vector sequencing and flow optimisation23 The filling angle is calculated according to the sum of the actual object rotation and the filling angle Displays the actual object rotation. The filling lines may be shortened by the value entered in the Contour distance section.24 The Clean section may be used to process the graphic again with the laser and other marking parameters in order to remove any abrasion. Use this to specify the marking parameter set and the cleaning frame (outward extension of the contour). 22 This tab is only available for shadable graphic elements. In many instances, this means that the parallel filling of the optimisation process creates a bi-directional filling. This is a result of flow optimisation. 24 However, this function refers to the reduction of individual filling lines and not the outline itself. 23 13/01/2011 Trotec Produktions- und Vertriebs GmbH_Linzer Strasse 156, A-4600 Wels, Austria, Technical Support tel_+43 (0)7242 239-7000, fax_+43 (0)7242 239-7380, mailto: [email protected] 57 / 150 User manual SpeedMark V3.0 Editing Graphic Elements 5.3.4 Transformation The Graphic Properties Transformation tab contains all the parameters required to transform a graphic element. The anchor point of the graphic defines the fixed point around which the transformation should occur. This point is marked in purple in the selection marker25. The position may be adjusted by entering the appropriate values in the X and Y input fields. The size may be adjusted by editing the values in the Height and Width input fields. Activating the Proportional option retains the aspect ratio of the graphic element. The Object Rotation may be adjusted by entering an appropriate angle. Negative angles may also be entered. Dynamic Transformation is used in conjunction with dynamic programs26 and is explained in greater detail in the following chapters. 25 See also 5.1.4 Editing Graphic Elements with the Mouse on page 28 A detailed explanation on usage of dynamic Transformation can be found in chapter 13.7 Dynamic Positioning on page 106. 26 13/01/2011 Trotec Produktions- und Vertriebs GmbH_Linzer Strasse 156, A-4600 Wels, Austria, Technical Support tel_+43 (0)7242 239-7000, fax_+43 (0)7242 239-7380, mailto: [email protected] 58 / 150 User manual SpeedMark V3.0 Editing Graphic Elements 5.3.5 Marking The Graphic Properties Marking tab is used to edit the necessary material parameters. A detailed explanation of the marking parameters can be found in Chapter 7 Material Parameter Manager on page 65. The section intensity adjustment is used to adjust laser settings like power and frequency without overwriting the material parameter settings. The parameter settings section shows the current parameters used for this graphic element. Changing the material parameter itself can be done with the button in section material parameter. 5.3.6 Source The Source settings are used to link dynamic data to graphic elements. For example, it is possible to set series text functions. 13/01/2011 Trotec Produktions- und Vertriebs GmbH_Linzer Strasse 156, A-4600 Wels, Austria, Technical Support tel_+43 (0)7242 239-7000, fax_+43 (0)7242 239-7380, mailto: [email protected] 59 / 150 User manual SpeedMark V3.0 Marking with the Laser 6 Marking with the Laser 6.1 Creating a Test Program All of the following procedures are based on the simple program containing the Trotec text pictured above. The following steps must be carried out to create this program: 1. 2. 3. 4. 5. 6. 7. 27 Open a new program using the File New New Program menu. Select the Outline Text symbol and insert the text in the machining area. Enter a text and suitable font size. Position the text centrally with in the operating range of the laser27 Save the program using the File Save As menu The new program is now ready for processing the workpiece. Prepare a suitable workpiece for marking. Represented by the rectangle surrounding the Trotec text. 13/01/2011 Trotec Produktions- und Vertriebs GmbH_Linzer Strasse 156, A-4600 Wels, Austria, Technical Support tel_+43 (0)7242 239-7000, fax_+43 (0)7242 239-7380, mailto: [email protected] 60 / 150 User manual SpeedMark V3.0 Marking with the Laser 6.2 Quick mark This function is used to execute programs simply and quickly in SpeedMark. Its main purpose is the simple set-up of the work piece and retrieval of the relevant marking parameters. It is initiated using either the menu (Start Quick mark) or the F8 function key. The Quick mark function is only used to perform the marking of graphic elements. This mode is not used to mark program and control elements. 6.2.1 Focusing Laser The focus laser28 enables the simple positioning of the workpiece based on the distance between the workpiece and the laser head. The z-direction position of the workpiece is adjusted to that the two laser points coincide on the workpiece. When this occurs, the workpiece is positioned in the focus of the laser. 28 The laser system used to perform this function must have a focus laser installed. 13/01/2011 Trotec Produktions- und Vertriebs GmbH_Linzer Strasse 156, A-4600 Wels, Austria, Technical Support tel_+43 (0)7242 239-7000, fax_+43 (0)7242 239-7380, mailto: [email protected] 61 / 150 User manual SpeedMark V3.0 Marking with the Laser 6.2.2 Set-Up Workpiece The “Border Marking” and “Border mark positioning graphics” functions are used to set up the work piece in the machining area. The “Border Mark” function enables the XY setup of the work piece. The pilot laser is used to draw the smallest possible rectangle for all created graphics. With the function “Border mark positioning graphics” only such elements with the material parameter property “Positioning” will be drawn with a rectangle by the pilot laser29. While the pilot laser is drawing the rectangle, it is in principle safe to reposition and set up the work piece. However, you must continue to observe all laser safety guidelines. The pilot laser may be deactivated once the work piece has been set up by pressing the button again. 6.2.3 Quick mark Use the Start Marking button to start the laser marking the workpiece. Use the Stop marking button to interrupt the current marking process at any time. The “Repeat” option causes SpeedMark to repeat the marking until the Stop Marking button is pressed. You are able to specify the pauses between the individual repetitions. 29 Further information on material parameter property “Positioning” can be found in chapter 7 Material Parameter Manager in sub chapter Marking mode on page 68. 13/01/2011 Trotec Produktions- und Vertriebs GmbH_Linzer Strasse 156, A-4600 Wels, Austria, Technical Support tel_+43 (0)7242 239-7000, fax_+43 (0)7242 239-7380, mailto: [email protected] 62 / 150 User manual SpeedMark V3.0 Marking with the Laser 6.2.4 Power The currently defined material parameter settings can here slightly be adjusted (power and marking speed). The button “Apply to project” will take over these adjustments to the single graphic elements30. 6.2.5 Options The option “Only selected graphics” will only mark currently selected graphics in the drawing interface. The option “Mark inactive graphics” allows the marking of inactive graphics. The “Trigger on MarkStart signal” option causes SpeedMark to begin marking only once the MarkStart signal is issued. 6.2.6 Marking Information Once the marking is complete, all relevant information such as the number of marked objects, number of cycles, marked vectors, cycle time and marking time are displayed. The cycle time indicates the total marking time including the calculation of the vectors and transfer of the data to the laser system. The marking time indicates the time the laser required to complete the actual marking. 30 See also 5.3.5 Marking on page 59 13/01/2011 Trotec Produktions- und Vertriebs GmbH_Linzer Strasse 156, A-4600 Wels, Austria, Technical Support tel_+43 (0)7242 239-7000, fax_+43 (0)7242 239-7380, mailto: [email protected] 63 / 150 User manual SpeedMark V3.0 Marking with the Laser 6.3 Normal Program Execution This function is used to execute an entire SpeedMark program including the program and control elements. 6.3.1 Set-Up Workpiece Use this mode to set up the workpiece using the Border marking function (Menu: Start Border marking or F7). To deactivate this function, press the stop button. 6.3.2 Start Program Execution and Marking The actual program execution is started either using the menu (Start Execute) or the F12 function key. 6.3.3 End Program When the program execution starts, the “Execute Program” window opens. The program execution can be stopped at any time by pressing the Stop Marking button. When the program is complete, the execution is automatically interrupted. The window can be closed by clicking on the close button top right. 13/01/2011 Trotec Produktions- und Vertriebs GmbH_Linzer Strasse 156, A-4600 Wels, Austria, Technical Support tel_+43 (0)7242 239-7000, fax_+43 (0)7242 239-7380, mailto: [email protected] 64 / 150 User manual SpeedMark V3.0 Material Parameter Manager 7 Material Parameter Manager Material parameters can be used to adjust how the laser marks the workpiece. This chapter describes how the material parameters are defined and how they can then be applied to individual graphic elements. 13/01/2011 Trotec Produktions- und Vertriebs GmbH_Linzer Strasse 156, A-4600 Wels, Austria, Technical Support tel_+43 (0)7242 239-7000, fax_+43 (0)7242 239-7380, mailto: [email protected] 65 / 150 User manual SpeedMark V3.0 Material Parameter Manager 7.1 Manage Material Parameters All used material parameters can be managed by the material parameter manager. If not already visible, this dialog can be opened using the View Material database menu or the buttons marked with rectangles in the picture on the previous page. All materials and the groups are presented in a tree structure for a better overview. Materials and the according groups can be added, edited or deleted with a context menu (right mouse button). The material “Standard” can not be deleted. 13/01/2011 Trotec Produktions- und Vertriebs GmbH_Linzer Strasse 156, A-4600 Wels, Austria, Technical Support tel_+43 (0)7242 239-7000, fax_+43 (0)7242 239-7380, mailto: [email protected] 66 / 150 User manual SpeedMark V3.0 Material Parameter Manager 7.2 Define Material Parameters A material parameter set always consists of 16 parameters with a name and an allocated colour. This colour is also the colour used to represent the graphic elements in the drawing interface. The material parameters may be defined according to the following settings: • • • • • Active, Name Specifies Name and state Marking mode Defines special executions modes Laser system parameters Specifies the laser output, marking speed and frequency Quality This is used to specify any laser marking delay values. Advanced Specifies advanced settings e.g. repetitions 13/01/2011 Trotec Produktions- und Vertriebs GmbH_Linzer Strasse 156, A-4600 Wels, Austria, Technical Support tel_+43 (0)7242 239-7000, fax_+43 (0)7242 239-7380, mailto: [email protected] 67 / 150 User manual SpeedMark V3.0 Material Parameter Manager 7.2.1 Active, Name Defines if a material parameter is active or not. Inactive material parameters can not be chosen for graphic elements. The name of a material parameter can be chosen individually. 7.2.2 Marking mode The marking mode defines special execution settings for this material parameter. The following options are available: • • Marking The graphic element will be marked with the specified laser system parameters Positioning The graphic element will NOT be marked with the laser. It will only be used for positioning of the work piece31. 7.2.3 Laser system parameters Laser output can be defined in per cent for the purposes of laser processing. The minimum value is 0 per cent and the maximum value 100 per cent. Depending on the laser system used, it may be that certain types of laser only produce an actual laser output above a certain threshold value (e.g. 20%). Please refer to the relevant values in the user manual specific to your laser system. The Marking Speed parameter affect the behaviour of the scanner head used by your laser system. The Marking Speed specifies how fast the scanner head moves during a laser marking process. In addition to the output, it is also possible to specify the frequency of the laser pulses. The minimum and maximum values are therefore limited by the type of laser system used.32 31 32 See also 6.2.2 Set-Up Workpiece on page 62. Values normally range between 20 kHz and 80 kHz. 13/01/2011 Trotec Produktions- und Vertriebs GmbH_Linzer Strasse 156, A-4600 Wels, Austria, Technical Support tel_+43 (0)7242 239-7000, fax_+43 (0)7242 239-7380, mailto: [email protected] 68 / 150 User manual SpeedMark V3.0 Material Parameter Manager 7.2.4 Quality - Delay Parameters33 With the parameter quality it is easily possible to configure the delay parameters of the laser system. A value of 100 means a high quality with moderate delay values. A value to 0 increases the execution speed of a graphic element but can cause quality reduction on certain materials. Additionally to the quality parameter it is possible to setup the delay values manually by activating the checkbox “Setup delays manually”. As a laser system essentially consists of two components - the laser and the scanner head - the dynamic behaviour of the scanner head must be synchronised appropriately.34 The following laser and scanner delays are available: • Positioning speed • Marking delay • Positioning delay • Polygon delay • Laser On delay • Laser Off delay Positioning speed The Positioning Speed specifies how fast the scanner head moves between two markings. 33 Some of these descriptions have been extracted from the documentation regarding your TLC2 card. Additional information regarding the delay parameters can be found in the documentation belonging to your TLC2 card or the control card you are using. 34 This time difference between the laser and the scanner head arises from the fact that the mirrors must first be sped up at the beginning of a movement thus causing a time delay. 13/01/2011 Trotec Produktions- und Vertriebs GmbH_Linzer Strasse 156, A-4600 Wels, Austria, Technical Support tel_+43 (0)7242 239-7000, fax_+43 (0)7242 239-7380, mailto: [email protected] 69 / 150 User manual SpeedMark V3.0 Material Parameter Manager Laser Delays The laser delays determine when the laser is switched on or off before or after a marking (e.g. vector stroke). The laser delays do not affect the overall marking time unless negative values are selected. Laser On Delay The laser on delay specifies how long the laser must wait before being switched on, although the scanner head has already started the marking process. The laser on delay may be used for the following purposes: • In order to prevent a burning effect at the start of a marking process as the scanner head still has to bring the mirrors up to the preset marking speed. A suitably high positive value should be selected35 • Some materials take a certain amount of time to react to the laser beam. It may therefore be worthwhile pre-heating the start point of the vector before marking begins. This can be achieved by selecting a negative value.36 Laser Off Delay The acceleration phase at the beginning of a scanner head movement creates a difference between the respective target and actual positions of the mirrors. As the laser should not then be switched off again when the target position is reached, but when the actual position is reached, it is possible to enter a laser off delay. Scanner delays Scanner delays determine the behaviour of the scanner head in relation to the movement of the mirrors. Positioning Delay At the beginning of a jump between two vectors, the mirrors must first be sped up to reach the preset positioning speed creating a time delay (also known as a drag delay) which must be compensated for. In addition to the drag delay, another delay occurs at the end of the jump as the mirrors must be brought to a complete halt. Their slow reaction time causes a certain amount of oscillation around the target point (settling time). A suitably high positioning delay must be selected to account for the drag delay and settling time. 35 36 However, if too high a value is selected, the first part of the vector will not be marked. Using negative values for the laser on delay extends the overall marking time. 13/01/2011 Trotec Produktions- und Vertriebs GmbH_Linzer Strasse 156, A-4600 Wels, Austria, Technical Support tel_+43 (0)7242 239-7000, fax_+43 (0)7242 239-7380, mailto: [email protected] 70 / 150 User manual SpeedMark V3.0 Material Parameter Manager Marking Delay Although the marking speed is normally lower than the jump speed, a drag delay will occur during marking. In order to ensure that the mirrors have arrived at their target position before the marking process begins, a suitable value may be selected for the marking delay. Polygon Delay It is not always necessary to completely stop the movement of the mirrors between two consecutive vectors (e.g. the corners of a rectangle). At this point, instead of a marking delay, a polygon delay is automatically inserted as the drag delay and settling time are less. Delay Value Guidelines37 When setting the delay values, ensure that the following guidelines are observed in order to avoid problems:38 1. The laser off delay must be longer than the laser on delay. Otherwise, laser control errors may occur. LOffD > LOnD 2. The marking delay must be greater than the difference between the laser off delay and the laser on delay. MarkD > LOffD – LOnD 7.2.5 Advanced In the advanced pop up properties like iteration can be configured. The other values like colour are for information purposes. 37 These guidelines apply primarily to the use of a TLC2 control card. Please refer to the relevant guidelines in the documentation of any other control card you may be using. 38 More detailed information on these guidelines can be found in the relevant documentation for your TLC2 card. 13/01/2011 Trotec Produktions- und Vertriebs GmbH_Linzer Strasse 156, A-4600 Wels, Austria, Technical Support tel_+43 (0)7242 239-7000, fax_+43 (0)7242 239-7380, mailto: [email protected] 71 / 150 User manual SpeedMark V3.0 Material Parameter Manager 7.3 Exporting Material Parameters With the export option it is possible to write the whole material database into a csv file39. 7.4 Applying Material Parameters to Graphic Elements Graphic element material parameters can be set in Graphic Properties and via the “Material Parameters” toolbar. 7.4.1 Setting Material Parameters using Graphic Properties The Marking tab in Graphic Properties can be used to directly apply the material parameters to the graphic element using the material parameter combo boxes. 7.4.2 Setting Material Parameters using the Toolbar By using the “Parameter” combo box it is possible to directly set the material parameters of all selected graphic elements. The selected parameter is also automatically allocated to any newly inserted graphic elements. The material parameter manager is easily opened using the marker symbol on the righthand side. 39 These files can be opened with a text editor or Microsoft Excel and similar programs. 13/01/2011 Trotec Produktions- und Vertriebs GmbH_Linzer Strasse 156, A-4600 Wels, Austria, Technical Support tel_+43 (0)7242 239-7000, fax_+43 (0)7242 239-7380, mailto: [email protected] 72 / 150 User manual SpeedMark V3.0 Desktops and User Rights Control 8 Desktops and User Rights Control In SpeedMark it is possible to adjust the user interface to your personal requirements by moving, opening and closing individual windows (docking). Using the SpeedMark desktop it is possible to save the thus configured user interfaces and open them later for use in other applications. 8.1 Adjusting the SpeedMark User Interface Layout 8.1.1 Open and Close windows SpeedMark windows can be opened and closed using the View menu. Open windows are indicated by the tick on the left-hand side of the menu item. It is also possible to close a window directly on the user interface by clicking on the X next to the window title. 13/01/2011 Trotec Produktions- und Vertriebs GmbH_Linzer Strasse 156, A-4600 Wels, Austria, Technical Support tel_+43 (0)7242 239-7000, fax_+43 (0)7242 239-7380, mailto: [email protected] 73 / 150 User manual SpeedMark V3.0 Desktops and User Rights Control 8.1.2 Docking and Moving Windows All open windows can be moved by clicking with the mouse directly on the window title in the user interface. These windows can be moved freely around the user interface and docked on the sidebars. The “Flow Diagram” window is the only window which cannot be moved as it is linked directly to the drawing interface. However, it is still possible to open and close this window. 8.2 Managing Customised User Interfaces Using the Desktops The Desktop Manager can be used to save user interface layouts for use in other applications (as described in the previous chapter). 8.2.1 Creating and Selecting Desktops Using the Toolbar The Desktop toolbar can be used to select the standard desktop and previously saved desktops (e.g. operator), and to save current desktops. This menu consists of three parts: • Standard desktop • List of previously created desktops • Save desktop “Save Desktop” can be used to save the current user interface as a desktop. The adjacent dialog may be used to assign a name and description to the created desktop. The desktop is created by pressing the OK button. Every newly created desktop is then added to the desktop list and is available for selection. 13/01/2011 Trotec Produktions- und Vertriebs GmbH_Linzer Strasse 156, A-4600 Wels, Austria, Technical Support tel_+43 (0)7242 239-7000, fax_+43 (0)7242 239-7380, mailto: [email protected] 74 / 150 User manual SpeedMark V3.0 Desktops and User Rights Control 8.2.2 Creating and Managing Desktops Using the Desktop Manager Via the menu: Tools User managements and desktops… it is possible to open the Desktop Management dialog. This dialog displays all the desktops currently available. The Add button is used to add the current user interface as a new desktop. If you want to create a user interface without the Desktop toolbar, you can do this using the Add button. It is not possible to do this using the Desktop toolbar. The Delete button can be used to delete existing desktops. 13/01/2011 Trotec Produktions- und Vertriebs GmbH_Linzer Strasse 156, A-4600 Wels, Austria, Technical Support tel_+43 (0)7242 239-7000, fax_+43 (0)7242 239-7380, mailto: [email protected] 75 / 150 User manual SpeedMark V3.0 Desktops and User Rights Control 8.3 SpeedMark Windows All SpeedMark windows can be opened and closed using the menu items on the View main menu. 8.3.1 Project Management The Project Management window lists the master program and assigned sub-programs. The second column displays the file paths. 8.3.2 Marking Parameters The Marking Parameters management window displays all the defined marking parameter sets and also allows marking parameters to be added, edited and deleted. 8.3.3 Graphic Properties The Graphic Properties window displays all the data relating to a selected graphic element. It may also be used to adjust all the relevant properties. 8.3.4 Flow Diagram The Flow Diagram window displays the entire program flow. It is also possible to adjust the structure of the flow by inserting elements. 13/01/2011 Trotec Produktions- und Vertriebs GmbH_Linzer Strasse 156, A-4600 Wels, Austria, Technical Support tel_+43 (0)7242 239-7000, fax_+43 (0)7242 239-7380, mailto: [email protected] 76 / 150 User manual SpeedMark V3.0 Desktops and User Rights Control 8.3.5 Free Transformation The Free Transformation window is used to edit the position, size, gradient, reflection and rotation of one or more graphic elements. 8.3.6 Border marking The Mark Borders window is used to specify exactly how the mark borders function should be executed. It is possible to select the speed of the pilot laser and specify whether only the selected graphics should be marked. 8.3.7 Controlling Variables The Variable Monitoring window displays the values of all the defined variables during the debugging process. 8.3.8 Error Messages Error messages caused by the program are displayed in this window. 8.3.9 Execute Program The Execute Program window executes the current SpeedMark program. 13/01/2011 Trotec Produktions- und Vertriebs GmbH_Linzer Strasse 156, A-4600 Wels, Austria, Technical Support tel_+43 (0)7242 239-7000, fax_+43 (0)7242 239-7380, mailto: [email protected] 77 / 150 User manual SpeedMark V3.0 Desktops and User Rights Control 8.3.10 Internal RunScreen The Internal RunScreen window is used to interrupt the current program. It displays the overall flow time when the program is complete. 8.3.11 Program Messages The “AddProgramMessage” program command can be used to issue program messages in this window. 8.3.12 Program Log The “AddProgramLogText” program command can be used to issue log entries in this window. The entries are displayed in different formats depending on the log level. 13/01/2011 Trotec Produktions- und Vertriebs GmbH_Linzer Strasse 156, A-4600 Wels, Austria, Technical Support tel_+43 (0)7242 239-7000, fax_+43 (0)7242 239-7380, mailto: [email protected] 78 / 150 User manual SpeedMark V3.0 Desktops and User Rights Control 8.4 User Groups Via the menu: Tools User Rights and Desktops it is possible to open the User Rights Management dialog. The user rights control is based on the user groups. The user groups Administrator, Developer, User and Operator are provided as standard. The Add button can be used to add new user groups. The Edit button can be used edit existing user groups. The Delete button can be used to delete existing user groups. However, this is only possible if the user group does not have any users allocated to it. It is also not possible to delete the Administrator user group. It is possible to specify the following user group properties: • • • User group name User group description Desktop The Desktop option is used to assign existing desktops to the user group. If one of the users of this user group now registers with SpeedMark, it automatically switches to this set desktop. 13/01/2011 Trotec Produktions- und Vertriebs GmbH_Linzer Strasse 156, A-4600 Wels, Austria, Technical Support tel_+43 (0)7242 239-7000, fax_+43 (0)7242 239-7380, mailto: [email protected] 79 / 150 User manual SpeedMark V3.0 Desktops and User Rights Control 8.5 Access Rights The Access Rights tab is used to define the rights of individual user groups in detail. It can be used to specify whether menu items should be activated or deactivated and also whether menu items should be visible or invisible. 8.6 Users SpeedMark users may be created and edited in the Users tab. The Add button can be used to add new users. The Edit button can be used edit existing users. The Delete button can be used to delete existing users. However, this is not possible for the final user of the Administrator user group. 13/01/2011 Trotec Produktions- und Vertriebs GmbH_Linzer Strasse 156, A-4600 Wels, Austria, Technical Support tel_+43 (0)7242 239-7000, fax_+43 (0)7242 239-7380, mailto: [email protected] 80 / 150 User manual SpeedMark V3.0 Desktops and User Rights Control The following properties may be specified for a user: • • • • • User name Full name of user Password Assigned user groups User status (active/inactive) 8.7 Basic User Rights Settings The basic user rights settings are used to define user control behaviour in more detail. The Standard User Login option is used to specify a user registered automatically when SpeedMark starts. The Password Required for Login option specifies whether a user must enter a password when registering or not. 13/01/2011 Trotec Produktions- und Vertriebs GmbH_Linzer Strasse 156, A-4600 Wels, Austria, Technical Support tel_+43 (0)7242 239-7000, fax_+43 (0)7242 239-7380, mailto: [email protected] 81 / 150 User manual SpeedMark V3.0 Configuring SpeedMark 9 Configuring SpeedMark 9.1 SpeedMark Settings The basic SpeedMark settings can be opened via the Tools Settings menu. This dialog can be used to set and adjust all basic SpeedMark settings. 9.1.1 General The General section is used to specify whether a SpeedMark program should be loaded and executed automatically when SpeedMark starts up. The program name and path may be entered directly into the editing field or inserted from a file selection dialog using the “Open file” button (on the right-hand side of the editing field). 9.1.2 Language SpeedMark supports two languages as standard: English and German. To switch languages, the relevant language should be selected and then the “Standard” button pressed to set it as the new default language. As SpeedMark does not allow the language to be switched during operation, SpeedMark must be rebooted for the change to take effect. 9.1.3 Marking Use the Marking option to specify whether SpeedMark programs should be executed in production mode or development mode. Development mode checks the program flow more thoroughly during the set up and development of SpeedMark programs, but takes longer to execute. 13/01/2011 Trotec Produktions- und Vertriebs GmbH_Linzer Strasse 156, A-4600 Wels, Austria, Technical Support tel_+43 (0)7242 239-7000, fax_+43 (0)7242 239-7380, mailto: [email protected] 82 / 150 User manual SpeedMark V3.0 Configuring SpeedMark Production mode optimises all graphic elements and transfers them to the laser system control card, allowing the SpeedMark program to be executed more quickly. 9.1.4 Units The Units section is used to specify whether the SpeedMark interface should display millimetres or inches. As SpeedMark always saves and processes all measurements in millimetres it is easy to perform a conversion during operation. 9.1.5 Theme In order to be able to adapt better to customer requirements, SpeedMark supports a range of different themes. The following themes are available for selection: • • • • • Standard Office 2003 – Standard Office 2003 – Blue Office 2003 – Silver Office 2003 – Black 9.1.6 Undo The Undo option is used to specify how many undo steps should be saved in SpeedMark when editing graphic elements. However, this history is deleted entirely when SpeedMark is closed and is not available after a reboot. 9.2 Components and Extensions Available components settings can be found in Chapters Error! Reference source not found.Error! Reference source not found. on page Error! Bookmark not defined. and 16 Extensions on page 146. 13/01/2011 Trotec Produktions- und Vertriebs GmbH_Linzer Strasse 156, A-4600 Wels, Austria, Technical Support tel_+43 (0)7242 239-7000, fax_+43 (0)7242 239-7380, mailto: [email protected] 83 / 150 User manual SpeedMark V3.0 Laser System Configuration 10 Laser System Configuration The dialog for configuring the laser system can be opened with short cut F3 or via the menu Tools Laser system configuration. 13/01/2011 Trotec Produktions- und Vertriebs GmbH_Linzer Strasse 156, A-4600 Wels, Austria, Technical Support tel_+43 (0)7242 239-7000, fax_+43 (0)7242 239-7380, mailto: [email protected] 84 / 150 User manual SpeedMark V3.0 Laser System Configuration 10.1 System configuration On the tab system configuration all available components (like TLC2 Laser controller) can be registered. These registered components can be used for special tasks like MarkStart monitoring, controlling the exhaust and so on. The following component types are available: • • • • • • • • • • • LaserController: Controls the laser RunScreen: Dialog control during program execution MarkStart-Input: External signal to start marking MarkBusy-Output: Sets the marking busy signal AutomaticMode-Input: Controls the automatic program execution40 X-Axis: Axis for planar segmentation Y-Axis: Axis for planar segmentation Z-Axis: Axis for distance to work piece A-Axis: Axis for rotary B-Axis: Axis for rotary Exhaust: Controlling the exhaust from SpeedMark To register component, they must be defined. This will be described in the following sections of this document. 40 See also 12.1.1 Options of the start element on page 90. 13/01/2011 Trotec Produktions- und Vertriebs GmbH_Linzer Strasse 156, A-4600 Wels, Austria, Technical Support tel_+43 (0)7242 239-7000, fax_+43 (0)7242 239-7380, mailto: [email protected] 85 / 150 User manual SpeedMark V3.0 Laser System Configuration 10.2 Components This dialog is used to add new components, modify existing ones and delete those no longer required. In order to add a new component, a component name must be entered and the appropriate module selected. Add a new component by clicking on the plus symbol. Once the components have been added, they can be fully configured by double-clicking on them41. Components can be deleted by selecting the components then clicking on the Delete symbol. 10.3 Additional components This kind of components can be defined additionally to normal components within SpeedMark. They are special in that way that they use functional parts of normal hardware components. With this structure it is possible to connect a single IO-Input like MarkStart with a physical IO-Input of a hardware component. In most cases that will be the TLC2-card, but it also could be the IOInput of a Relop-IO-card. Due to this abstraction within SpeedMark a MarkStart is available and the real origin of the signal can be configured. 41 A detailed description for configuring of modules can be found in chapter 15 Modules and Components on page 115. 13/01/2011 Trotec Produktions- und Vertriebs GmbH_Linzer Strasse 156, A-4600 Wels, Austria, Technical Support tel_+43 (0)7242 239-7000, fax_+43 (0)7242 239-7380, mailto: [email protected] 86 / 150 User manual SpeedMark V3.0 Laser System Configuration 10.3.1 Component type: IO-Input For an IO-Input additional component it is possible to choose an IO-Input from the combo box IO-Input. The combo box provides all available inputs from all hardware components. 10.3.2 Component type: IO-Output For an IO-Output additional component it is possible to choose an IO-Output from the combo box IO-Output. The combo box provides all available outputs from all hardware components. 10.3.3 Component type: Exhaust The configuration of an exhaust allows the definition of the necessary signals as well as the behaviour during program execution. 13/01/2011 Trotec Produktions- und Vertriebs GmbH_Linzer Strasse 156, A-4600 Wels, Austria, Technical Support tel_+43 (0)7242 239-7000, fax_+43 (0)7242 239-7380, mailto: [email protected] 87 / 150 User manual SpeedMark V3.0 Segmentation 11 Segmentation Segmentation allows the marking of work pieces which are moved or rotated with an axis during the marking process. 13/01/2011 Trotec Produktions- und Vertriebs GmbH_Linzer Strasse 156, A-4600 Wels, Austria, Technical Support tel_+43 (0)7242 239-7000, fax_+43 (0)7242 239-7380, mailto: [email protected] 88 / 150 User manual SpeedMark V3.0 Segmentation 11.1 Setup segmentation The segmentation can be configured via menu point Project Segmentation. First of all the checkbox segmentation active must be set42. In the general settings will be defined which axis will be used for the motion. The available axis must be configured before usage43. SpeedMark automatically detects if the used axis is a rotation or planar axis. 11.2 Rotary engraving For the rotary engraving the marking type respectively the movement direction can be defined. The diameter und the segmentation angle define the maximum size of the markable field and the width of the used segments. Further on the axis position must be configured in relation to the marking field. The marking with the laser and the control of the axis will be automatically done by SpeedMark during program execution. 42 43 See page before. See also chapter 10 Laser System Configuration on page 84. 13/01/2011 Trotec Produktions- und Vertriebs GmbH_Linzer Strasse 156, A-4600 Wels, Austria, Technical Support tel_+43 (0)7242 239-7000, fax_+43 (0)7242 239-7380, mailto: [email protected] 89 / 150 User manual SpeedMark V3.0 Pre- and Post Processing 12 Pre- and Post Processing With Pre- and Post Processing it is possible to set up the behaviour of programs at the start and end phase. 12.1.1 Options of the start element The automatic program loop repeats the program as long as it is not cancelled. The option Start exchaust at program start send according commands to the exhaust. Correct exhaust configuration is necessary. The MarkBusy signal can be automatically set with the following option. The option automatic program start at start signal waits with program execution until a MarkStart signal comes. In combination with automatic program loop it is very easy to work off a staple of work pieces. 13/01/2011 Trotec Produktions- und Vertriebs GmbH_Linzer Strasse 156, A-4600 Wels, Austria, Technical Support tel_+43 (0)7242 239-7000, fax_+43 (0)7242 239-7380, mailto: [email protected] 90 / 150 User manual SpeedMark V3.0 Basic Programming and Control Elements 13 Basic Programming and Control Elements SpeedMark not only allows the basic marking of graphics using a laser, it also affects the flow of a program. Basic programming methods can extend SpeedMark programs using a dynamic component with very little effort.44 Rudimentary programming knowledge offers a distinct advantage with this type of laser marking. However, programming knowledge is not a requirement for the basic operation of the SpeedMark flow control. 44 Additional programing methods can be found in Chapter14 Advanced Programming on page 108. 13/01/2011 Trotec Produktions- und Vertriebs GmbH_Linzer Strasse 156, A-4600 Wels, Austria, Technical Support tel_+43 (0)7242 239-7000, fax_+43 (0)7242 239-7380, mailto: [email protected] 91 / 150 User manual SpeedMark V3.0 Basic Programming and Control Elements 13.1 General The Tools toolbar can be used to create new control and programming elements in the flow chart.45 Such elements can be created simply by clicking on the respective symbol. Then move the mouse to the flow diagram and insert the element by clicking the mouse on the desired position. The arrows positioned next to each element in the toolbar are used to access additional elements. All available control and programming elements are located on the toolbar beginning with the traffic light symbol (Wait for Signal). An arrow is located next to each symbol and clicking once on an arrow opens a list containing all the graphic elements available for this group. 13.2 Variables Variables are used in SpeedMark to transfer information from one control or programming element to the next. All defined variables are available throughout the program. That means that you may, for example, calculate an X position, save it in a variable and then transfer it to a graphic element for dynamic positioning. The “List of Variables” dialog pictured above may be opened directly using the (Project of Variables) menu. This dialog contains options for creating, editing and deleting variables. 45 In the SpeedMark default settings, the Tools toolbar is positioned vertically. However, it is presented horizontally in this document for ease of illustration. 13/01/2011 Trotec Produktions- und Vertriebs GmbH_Linzer Strasse 156, A-4600 Wels, Austria, Technical Support tel_+43 (0)7242 239-7000, fax_+43 (0)7242 239-7380, mailto: [email protected] 92 / 150 User manual SpeedMark V3.0 Basic Programming and Control Elements 13.2.1 Creating Variables To create variables, enter a unique name for the variable in the Variable Name field.46 Then select a suitable variable type from the adjacent list. SpeedMark supports the following types of variable:47 Type Description Integer 4-byte integer (-231 … 231-1) Text String consisting of ASCII/ANSI symbols Floating-point number 8-byte real number (5.0*10-324 … 1.7*10308) Integermatrix Matrix consisting of integer values Text matrix Matrix consisting of text Floating-point matrix Matrix consisting of floating decimal values Clicking on the green plus symbol adds a new variable to the list which is then available for other applications. 13.2.2 Editing Variables In order to edit variables, select the variable in the list by double-clicking with the mouse. All property values for the variables are then transferred to the Variable Name, Variable type and Dimension fields. The type and dimension of the selected variable may now be edited (it is not possible to edit the variable name). The changes are then accepted by clicking on the “Apply” button. In order to change the variable name, select the variable you want to edit. Then click with the right mouse button on the selection and select “Edit Variable Name” from the context menu. 13.2.3 Deleting Variables Variables can be deleted simply by selecting the variable to be deleted from the list, then clicking on the red X symbol. 46 47 A variable name may only be allocated once within a SpeedMark program. The use of matrix variables is described in more detail in document “SpeedMark Scripting Reference”. 13/01/2011 Trotec Produktions- und Vertriebs GmbH_Linzer Strasse 156, A-4600 Wels, Austria, Technical Support tel_+43 (0)7242 239-7000, fax_+43 (0)7242 239-7380, mailto: [email protected] 93 / 150 User manual SpeedMark V3.0 Basic Programming and Control Elements 13.3 Basic Programming Elements48 The programming elements give SpeedMark programs a dynamic component. You can open the properties dialog for each of the elements with a double click. 13.3.1 Basic Element Properties The Basic Element Properties tab is used to specify whether the element should have a breakpoint,49 whether the element is active and which title and comment should be displayed. 48 This chapter describes only the basic programming elements. All advanced programming elements are described in detail in Chapter 14 Advanced Programming on page 108. 13/01/2011 Trotec Produktions- und Vertriebs GmbH_Linzer Strasse 156, A-4600 Wels, Austria, Technical Support tel_+43 (0)7242 239-7000, fax_+43 (0)7242 239-7380, mailto: [email protected] 94 / 150 User manual SpeedMark V3.0 Basic Programming and Control Elements 13.3.2 Creating Conditions Conditions are used in branches and certain loops to specify the exact program. The design of such conditions is described in this chapter and applied in the subsequent chapters. Conditions can be used to check variables against fixed values or other variables using relational operators. A condition must always be entered using the following format: [Variable/Value] [Relational Operator] [Variable/Value] e.g. Variable > 3 Relational Operator = > < >= <= Function The condition is true if the values to the left and the right of the operator are equal. The condition is true if the value on the left is greater than that on the right. The condition is true if the value on the left is less than that on the right. The condition is true if the value on the left is greater than or equal to that on the right. The condition is true if the value on the left is less than or equal to that on the right. It is also possible to combine individual conditions using Boolean operators and parentheses. [Condition1] [Boolean-Operator] [Condition2] e.g. (Variable > 3) And (Variable < 4) Boolean Operator Not And Or Xor 49 Function Negates the result of the condition to which Not is applied. e.g. Not (2 > 3) gives a true result Combines the results of two conditions, whereby both conditions must be true for the total result to be true. e.g. (2 > 1) And (5 > 2) gives a true result Combines the results of two conditions, whereby one condition must be true for the total result to be true. e.g. (2 > 1) Or (2 > 5) gives a true result Combines the results of two conditions, whereby one condition must be unequal to the other for the total result to be true. e.g. (2 > 1) xor (2 > 5) Further information on breakpoints can be found in Chapter 13.4 Debug Programs on page 98 13/01/2011 Trotec Produktions- und Vertriebs GmbH_Linzer Strasse 156, A-4600 Wels, Austria, Technical Support tel_+43 (0)7242 239-7000, fax_+43 (0)7242 239-7380, mailto: [email protected] 95 / 150 User manual SpeedMark V3.0 Basic Programming and Control Elements 13.3.3 Branch The Branch elements may be used to easily implement alternative program flows. The If-Then-Else field can be used to specify the path the program should take. If the condition is fulfilled, SpeedMark carries out the Then branch. If the condition is not fulfilled, SpeedMark carries out the Else branch. 13.3.4 Incremental Loop The Incremental Loop enables a repetition of the part of the program within the loop with definable parameters. In order to set the incremental loop, a loop variable must be specified (by making a selection in the Loop Variable combo box) A start value, an end value and the increments of the loop must then be entered. The start value, end value and increments may also be variables. 13/01/2011 Trotec Produktions- und Vertriebs GmbH_Linzer Strasse 156, A-4600 Wels, Austria, Technical Support tel_+43 (0)7242 239-7000, fax_+43 (0)7242 239-7380, mailto: [email protected] 96 / 150 User manual SpeedMark V3.0 Basic Programming and Control Elements 13.3.5 Conditional Loop The Conditional Loop enables a repetition of the part of the program within the loop providing the given condition is true. If the given condition is no longer valid, the program will continue after the loop. 13.3.6 Program End The Program End element ends the program immediately at that position and does not execute any following program elements. It is therefore possible, for example, to use branches and loops to trigger a premature abortion of the program in certain instances. 13.3.7 Comment/Note This programming element creates a comment in a SpeedMark program. This is used to provide information on the flow of such a program for any other SpeedMark users working with it. A suitable text can be entered in the Element Properties window. 13/01/2011 Trotec Produktions- und Vertriebs GmbH_Linzer Strasse 156, A-4600 Wels, Austria, Technical Support tel_+43 (0)7242 239-7000, fax_+43 (0)7242 239-7380, mailto: [email protected] 97 / 150 User manual SpeedMark V3.0 Basic Programming and Control Elements 13.4 Debug Programs In order to support the development of SpeedMark programs, SpeedMark provides several program debugging functions: • • • • Incremental program execution Breakpoints Window for displaying current variable values Window for displaying any error messages Symbols before Debug Mode is activated Symbols while Debug Mode is activated 13.4.1 Breakpoints SpeedMark stops the current program execution when it reaches breakpoints and the program developer is able to evaluate the current progress, view variable values and investigate any errors. Before you can add a breakpoint to a program, you must select an element in the flow diagram. Then select the Switch Breakpoint function from the main menu (Start), the context menu or the toolbar.50 Sets or removes a breakpoint in a program instruction. Removes all breakpoints. All elements containing a breakpoint are displayed in the flow diagram with a simple red breakpoint symbol. 50 Re-executing the function deletes the breakpoint again. 13/01/2011 Trotec Produktions- und Vertriebs GmbH_Linzer Strasse 156, A-4600 Wels, Austria, Technical Support tel_+43 (0)7242 239-7000, fax_+43 (0)7242 239-7380, mailto: [email protected] 98 / 150 User manual SpeedMark V3.0 Basic Programming and Control Elements 13.4.2 Incremental Program Execution The Debugging function is used to activate the SpeedMark Debug Mode. The program execution runs to the first breakpoint or until any Program End is found. SpeedMark stops the program execution at the first breakpoint it finds as per the instructions of the breakpoint. The Single Program Instruction function executes the current element in the flow diagram, jumps to the next element without executing it and waits for the next user input. Execute Program Block executes sub-program requests. Continue Program causes SpeedMark to continue with the program without interruption until the next breakpoint. Stops the program and ends the execution. Pauses the program. The program can be continued using “Continue Program”. 13.4.3 Actual Variable Values While SpeedMark is in Debug Mode, it is possible to request all current variable values. The associated window can be opened using Menu View Debug Windows Variable Monitoring. 13.4.4 Displaying Error Messages It is possible to display error messages in SpeedMark during and after the execution of a program. The associated window can be opened using Menu View Debug Windows Error Messages. 13/01/2011 Trotec Produktions- und Vertriebs GmbH_Linzer Strasse 156, A-4600 Wels, Austria, Technical Support tel_+43 (0)7242 239-7000, fax_+43 (0)7242 239-7380, mailto: [email protected] 99 / 150 User manual SpeedMark V3.0 Basic Programming and Control Elements 13.5 Serial Text and Dynamic Graphic Element Content The Serial Text and Dynamic Element Content functions may be used to extend the content of a specific graphic element using a variable component. This allows the creation of SpeedMark programs capable of reacting to external circumstances during operation. A graphic element must be selected in order to select dynamic graphic element content. Then the Source tab can be used to select the relevant content type.51 The following types of content are available for selection depending on the graphic element selected: • • • • Time stamp Serial text Expressions File expressions 13.5.1 Time Stamp Time Stamp may be selected for the content source of text elements. The current text is then replaced by today’s date. It is also possible to specify the presentation format by using the Format combo box. 51 The types of content available for selection depend on the graphic element selected. e.g. graphic elements such as rectangles or lines do not possess any content types. 13/01/2011 Trotec Produktions- und Vertriebs GmbH_Linzer Strasse 156, A-4600 Wels, Austria, Technical Support tel_+43 (0)7242 239-7000, fax_+43 (0)7242 239-7380, mailto: [email protected] 100 / 150 User manual SpeedMark V3.0 Basic Programming and Control Elements 13.5.2 Serial Text Serial Text may be selected for the content source of text elements. The current text is then replaced by the current serial number.52 Before applying the Serial Text function, it is necessary to specify the parameters such as start value, increments and end value. It is also possible to specify that the end value is infinite. The presentation format a serial number can be selected in the Format section of the Serial Text settings. The appearance of the formatting is displayed in the “Results” field for preview purposes. It is also possible to request help with formatting using the button containing a question mark. Optional Actions allow actions to be carried out on specific events: On End Value • Reset to start value • Ask User • End program On Program Start • Reset current value to start value • Keep current value • Ask for start value On Saving Program • Reset current value to start value • Save current value 52 SpeedMark currently only supports whole decimal numbers as serial text. 13/01/2011 Trotec Produktions- und Vertriebs GmbH_Linzer Strasse 156, A-4600 Wels, Austria, Technical Support tel_+43 (0)7242 239-7000, fax_+43 (0)7242 239-7380, mailto: [email protected] 101 / 150 User manual SpeedMark V3.0 Basic Programming and Control Elements 13.5.3 Expressions The Expressions source content makes it possible to replace the content of a graphic element with the content of a variable or a calculated value.53 To aid operation, a Variable Wizard is available in order to quickly request a list of all available variables. 13.5.4 Dynamic Loading of Vector Graphics The File Print Out source content is available for vector graphic type graphic elements and allows the dynamic import of various vector graphics while a SpeedMark program is running. A valid file name must be added to the File Print Out field in the form of a variable of a calculated string. As with Print Out, a Variable Wizard is also available. It is also possible to specify whether an import should only be carried out if changes are made to the file. That means that SpeedMark checks whether the current imported graphic has changed its format in any way before a new import is carried out. Under certain circumstances, this can significantly affect the execution speed of the created program. 53 Information on defining and creating calculated values and functions can be found in Chapter 14 Advanced Programming on page 108 13/01/2011 Trotec Produktions- und Vertriebs GmbH_Linzer Strasse 156, A-4600 Wels, Austria, Technical Support tel_+43 (0)7242 239-7000, fax_+43 (0)7242 239-7380, mailto: [email protected] 102 / 150 User manual SpeedMark V3.0 Basic Programming and Control Elements 13.6 Control Elements Control elements may be used by SpeedMark programs while in progress to communicate with either the user or a connected system in order to exchange data and react to events. Each of the properties dialogs can be opened by doubleclicking the mouse. 13.6.1 Wait For Signal Waits for a configured signal from an I/O input or the user presses a button. If it is only necessary to wait for the user to press a button, the Keyboard option must be selected in the Hardware combo box. It is also possible to configure a suitable output message in the Message field. Otherwise all cards with systemconfigured I/O inputs can be selected in the Hardware combo box. When selecting multiple inputs, both signal settings must be met before SpeedMark executes the program. The signal inputs may be checked for: • HIGH • LOW • Side HIGH/LOW • Side LOW/HIGH 13/01/2011 Trotec Produktions- und Vertriebs GmbH_Linzer Strasse 156, A-4600 Wels, Austria, Technical Support tel_+43 (0)7242 239-7000, fax_+43 (0)7242 239-7380, mailto: [email protected] 103 / 150 User manual SpeedMark V3.0 Basic Programming and Control Elements 13.6.2 Set I/O Output This control element sets an I/O output of a system-configured I/O card. It is possible to set one or more outputs. If the dot under Value is set to green, the output is set to HIGH. If the dot under Value is set to grey, the output is set to LOW. The output values are set by simply clicking on the dot. 13.6.3 Delay The Delay control element delays program execution for a set period. This value may be specified in the Time field. This control element is usually used when external systems (e.g. axes) require specific time spans before proceeding with the actual marking. 13/01/2011 Trotec Produktions- und Vertriebs GmbH_Linzer Strasse 156, A-4600 Wels, Austria, Technical Support tel_+43 (0)7242 239-7000, fax_+43 (0)7242 239-7380, mailto: [email protected] 104 / 150 User manual SpeedMark V3.0 Basic Programming and Control Elements 13.6.4 Input Window The Input Window control element allows the user to enter configurable input values via the keyboard or barcode scanner, for example. A target input variable must be defined before the input window can be used. It is also possible to specify the window title and a description of the input field. In order to be able to check the entries in the front end, it is possible to create an input mask. The button containing a question mark may be used to request detailed information about input masks. It is also possible to perform test inputs to validate the input mask. The program execution is then interrupted during the program execution and an input dialog opens in which it is possible to perform the user input. The result of the input is then saved in the target variables for future use. 13/01/2011 Trotec Produktions- und Vertriebs GmbH_Linzer Strasse 156, A-4600 Wels, Austria, Technical Support tel_+43 (0)7242 239-7000, fax_+43 (0)7242 239-7380, mailto: [email protected] 105 / 150 User manual SpeedMark V3.0 Basic Programming and Control Elements 13.7 Dynamic Positioning Dynamic positioning uses variables to dynamically adjust the: • • • Position Size Rotation of graphic elements while a SpeedMark program is running. The dynamic transformation of each graphic element is specified in the Transformation tab in Graphic Properties.54 If no variables have been entered in the respective combo boxes, these values will not be changed. The last section, Transformation Changes, is used to specify whether SpeedMark should retain the applied changes or reset them once the program has finished. 54 Information on editing the transformation of graphics can be found in 5.3.4 Transformation on page 58 13/01/2011 Trotec Produktions- und Vertriebs GmbH_Linzer Strasse 156, A-4600 Wels, Austria, Technical Support tel_+43 (0)7242 239-7000, fax_+43 (0)7242 239-7380, mailto: [email protected] 106 / 150 User manual SpeedMark V3.0 Basic Programming and Control Elements 13.7.1 Position A combo box in Dynamic Positioning (the upper section of the dialog) is used to set the X and Y variables. It is possible to specify whether these variable values should be given a specific target as their position or whether they refer to a relative shift in the current position. The Target Anchor Point is used to specify which of the graphic element’s anchor points should be used as the reference for the positioning. 13.7.2 Size The size of the graphic element may also be dynamically adjusted by selecting variables from the combo boxes. 13.7.3 Rotation To execute a dynamic rotation it is possible to select a variable from the “Angle” combo box. It is also possible to specify whether a graphic element should be rotated around an anchor point or a fixed point (also variable). 13/01/2011 Trotec Produktions- und Vertriebs GmbH_Linzer Strasse 156, A-4600 Wels, Austria, Technical Support tel_+43 (0)7242 239-7000, fax_+43 (0)7242 239-7380, mailto: [email protected] 107 / 150 User manual SpeedMark V3.0 Advanced Programming 14 Advanced Programming It is possible to fully automate SpeedMark programs using the advanced programming elements. Advanced programming knowledge definitely offers an advantage with this type of laser marking. This type of programming is mainly used in industrial environments employing repetitive tasks of long duration. 13/01/2011 Trotec Produktions- und Vertriebs GmbH_Linzer Strasse 156, A-4600 Wels, Austria, Technical Support tel_+43 (0)7242 239-7000, fax_+43 (0)7242 239-7380, mailto: [email protected] 108 / 150 User manual SpeedMark V3.0 Advanced Programming 14.1 Advanced Programming Elements 14.1.1 Calculation/Allocation The Calculation/Allocation element is used to create flow scripts in the SpeedMark script language. This makes it possible to modify variables and access external files and components such as the laser or I/O cards. A detailed specification of the SpeedMark script language and further explanations regarding the application of this element can be found in Chapter 14.2 Scripting on page 112. 14.1.2 Jump Label A jump label may be used to specify a position within a SpeedMark program to which it is possible to make a direct jump. These are sometimes required when it is necessary to jump back to the beginning from various positions within large scripts. 13/01/2011 Trotec Produktions- und Vertriebs GmbH_Linzer Strasse 156, A-4600 Wels, Austria, Technical Support tel_+43 (0)7242 239-7000, fax_+43 (0)7242 239-7380, mailto: [email protected] 109 / 150 User manual SpeedMark V3.0 Advanced Programming 14.1.3 Jump to Jump Label It is possible to use the Jump to Jump Label element in conjunction with the Jump Label programming element introduced in the previous chapter to jump directly to the jump label. This element may be inserted at any point in the flow diagram. The Jump Target combo box is used to select the target Jump Label. 14.1.4 Jump to Sub-Routine This is used to jump to a sub-routine in the flow diagram. This is marked with a jump label. In contrast to Jump to Jump Label, this saves the current position. It is therefore possible to return to this initial position using the following element (Jump Back out of Sub-Routine) on completion and continue with processing. 14.1.5 Jump Back out of SubRoutine Is used to jump back out of the subroutine. 13/01/2011 Trotec Produktions- und Vertriebs GmbH_Linzer Strasse 156, A-4600 Wels, Austria, Technical Support tel_+43 (0)7242 239-7000, fax_+43 (0)7242 239-7380, mailto: [email protected] 110 / 150 User manual SpeedMark V3.0 Advanced Programming 14.1.6 Sub-Program The Sub-Program programming element is used to request a sub-program. Once the sub-program is complete, the next instruction in the program is carried out. The Parameter field can then be used to transmit information to the sub-program.55 It is also possible to dynamically request sub-programs. To do this, select the File option and enter in the field a variable containing the path to the appropriate subprogram. 14.1.7 External Program The External Program programming element is used by SpeedMark to request an external program. It is also used to give the application command line parameters. The option exists to specify whether the SpeedMark program should wait until the external program has stopped or not. 55 Further information about requesting sub-programs can be found in Chapter 14.3 Master Programs and Sub-Programs on page 113 13/01/2011 Trotec Produktions- und Vertriebs GmbH_Linzer Strasse 156, A-4600 Wels, Austria, Technical Support tel_+43 (0)7242 239-7000, fax_+43 (0)7242 239-7380, mailto: [email protected] 111 / 150 User manual SpeedMark V3.0 Advanced Programming 14.2 Scripting SpeedMark scripts may be used to fully automate program execution. A full description of the syntax and all functions is contained in the document entitled “SpeedMark Scripting Reference”. 13/01/2011 Trotec Produktions- und Vertriebs GmbH_Linzer Strasse 156, A-4600 Wels, Austria, Technical Support tel_+43 (0)7242 239-7000, fax_+43 (0)7242 239-7380, mailto: [email protected] 112 / 150 User manual SpeedMark V3.0 Advanced Programming 14.3 Master Programs and Sub-Programs Sub-programs are used to improve the structure of SpeedMark programs and reuse individual program sections in other SpeedMark programs. 14.3.1 Adding or Inserting Sub-Programs A new sub-program can be added using Menu File New New Sub-Program. This always assigns a sub-program to a master program. As sub-programs are saved as independent files, it is possible to assign them to other master programs as well. By right-clicking on the master program in the Project Management window it is possible to link existing sub-programs to the master program via the menu item “Add Existing SubProgram”. 14.3.2 Specifying Transfer Parameters To dynamise sub-program requests it is possible to transfer parameters from the master program. A list of parameters consisting of local sub-program variables is therefore defined in the sub-program start element. When the sub-program starts, the variables are populated with the values from the master program. 13/01/2011 Trotec Produktions- und Vertriebs GmbH_Linzer Strasse 156, A-4600 Wels, Austria, Technical Support tel_+43 (0)7242 239-7000, fax_+43 (0)7242 239-7380, mailto: [email protected] 113 / 150 User manual SpeedMark V3.0 Advanced Programming It is also possible to transmit values from the sub-program back to the master program. The identifier “Ref” is then prefixed to the name of the variable in the parameter list. Example of a parameter list: VarZahl, Ref VarText In the example above, the VarText value is transmitted back to the master program on completion of the sub-program. 14.3.3 Opening a Sub-program Sub-programs can be opened by the master program and other sub-programs using the Sub-Program programming element.56 All parameters to be transferred are specified in the parameter list, separated by a comma. This makes it possible to enter both variable and fixed values. In the case of reference parameters, a variable must be entered when the sub-program is requested. 56 Please also refer to 14.1.6 Sub-Program on page 111 13/01/2011 Trotec Produktions- und Vertriebs GmbH_Linzer Strasse 156, A-4600 Wels, Austria, Technical Support tel_+43 (0)7242 239-7000, fax_+43 (0)7242 239-7380, mailto: [email protected] 114 / 150 User manual SpeedMark V3.0 Modules and Components 15 Modules and Components In SpeedMark, modules are used in combination with components to form an extension basically representing additional hardware components. The function - e.g. connection of a TLC2 card or Servida motor - is implemented by the module. Such modules are configured by the system when it boots. In contrast, components are used to connect SpeedMark and the installed modules. These components may then be configured accordingly in subsequent steps. 13/01/2011 Trotec Produktions- und Vertriebs GmbH_Linzer Strasse 156, A-4600 Wels, Austria, Technical Support tel_+43 (0)7242 239-7000, fax_+43 (0)7242 239-7380, mailto: [email protected] 115 / 150 User manual SpeedMark V3.0 Modules and Components 15.1 Component list The configuration of modules and components is carried out using the Tools Laser system configuration. This dialog is used to add new components, modify existing ones and delete those no longer required. In order to add a new component, a component name must be entered and the appropriate module selected. Add a new component by clicking on the plus symbol. Once the components have been added, they can be fully configured by doubleclicking on them. Modules such as the laser controller only allow the definition of an individual component. For other modules such as I/O cards or motor controllers, the number of components depends on the number of in-built hardware components. Components can be deleted by selecting the components then clicking on the Delete symbol. 15.2 Components Window Various modules and components use additional windows in SpeedMark. These can be opened and closed using Menu View [ComponentName] [Windowlist]. 13/01/2011 Trotec Produktions- und Vertriebs GmbH_Linzer Strasse 156, A-4600 Wels, Austria, Technical Support tel_+43 (0)7242 239-7000, fax_+43 (0)7242 239-7380, mailto: [email protected] 116 / 150 User manual SpeedMark V3.0 Modules and Components 15.3 TLC2 Laser Controller The TLC2 module and associated components control the Trotec laser system laser and scanner. The module is integrated in SpeedMark and connects SpeedMark to the laser and scanner system, thus enabling the laser marking or engraving of the graphics created in SpeedMark on a wide range of workpieces. 15.3.1 Functional Range of Module The TLC2 module therefore fulfils the following functions: • Laser control • Scanner head control • Configuration of the field correction file • Configuration of the operating range • Transformation of the operating range • Control of the card I/Os • Output of the laser system’s current status • Manual control of the scanner head mirrors 13/01/2011 Trotec Produktions- und Vertriebs GmbH_Linzer Strasse 156, A-4600 Wels, Austria, Technical Support tel_+43 (0)7242 239-7000, fax_+43 (0)7242 239-7380, mailto: [email protected] 117 / 150 User manual SpeedMark V3.0 Modules and Components 15.3.2 Configuration Configuration Control Tool 13/01/2011 Name Open Description Tries to create a connection to the laser Close Closes the open laser connection Save Saves the configuration contained in a .ini file. Load Load the configuration in the specified .ini file. Trotec Produktions- und Vertriebs GmbH_Linzer Strasse 156, A-4600 Wels, Austria, Technical Support tel_+43 (0)7242 239-7000, fax_+43 (0)7242 239-7380, mailto: [email protected] 118 / 150 User manual SpeedMark V3.0 Modules and Components Laser Type (Laser Configuration) This specifies the type of laser used in the laser system. Different types of lasers also allow the specification of additional settings. In this case, the Advanced Settings button is activated automatically. Current Laser Settings (Laser Configuration) The current laser settings display the actual values used in relation to the marking parameter settings. Settings On Opening (Laser Configuration) The Settings On Opening define the marking parameter values to be used when the card is initialised. Further information about marking parameter settings can be found in Chapter Error! Reference source not found.Error! Reference source not found. on page Error! Bookmark not defined.. 13/01/2011 Trotec Produktions- und Vertriebs GmbH_Linzer Strasse 156, A-4600 Wels, Austria, Technical Support tel_+43 (0)7242 239-7000, fax_+43 (0)7242 239-7380, mailto: [email protected] 119 / 150 User manual SpeedMark V3.0 Modules and Components Field distorsion (Marking Field) In the case of the TLC2 card, field distorsion is defined using a correction file specified using the Correction File input field. The program file is used to specify particular TLC2 card properties. This file is delivered with SpeedMark and the TLC2 card. Field Borders (Marking Field) The laser system field borders are essentially defined by the optics used. The Field Borders Wizard is used to calculate these borders incrementally. In order not to damage the scanner head with the mirrors, the operating range should always be slightly smaller than the maximum field borders. The Pilot Laser Wizard is used to adjust the pilot laser so that the offset of the laser pointer position is compensated for by the actual laser beam used. This offset is determined by the difference in wave lengths of the pilot laser and the processing laser. Field Transformation (Marking Field) The field transformation of the marking field enables the transformation of the actual marking field compared to the marking field shown in SpeedMark. 13/01/2011 Trotec Produktions- und Vertriebs GmbH_Linzer Strasse 156, A-4600 Wels, Austria, Technical Support tel_+43 (0)7242 239-7000, fax_+43 (0)7242 239-7380, mailto: [email protected] 120 / 150 User manual SpeedMark V3.0 Modules and Components I/O’s I/O Inputs The I/O inputs display the current status of all 16 of the card’s available I/O inputs. It is possible to change the name of the inputs by double-clicking on the name. The new names are then also available in elements such as the Wait For Signal element. I/O Outputs The I/O outputs of all 16 of the card’s I/O outputs can be set using this dialog. An I/O output is set by clicking on the dot in the Value column (green = HIGH, grey = LOW). It is possible to change the name of the outputs by double-clicking on the name. The new names are then also available in elements such as the Set Signal element. Scanner Head Manual Control (Control) This dialog is used to manually move the mirrors for test and maintenance purposes. 13/01/2011 Trotec Produktions- und Vertriebs GmbH_Linzer Strasse 156, A-4600 Wels, Austria, Technical Support tel_+43 (0)7242 239-7000, fax_+43 (0)7242 239-7380, mailto: [email protected] 121 / 150 User manual SpeedMark V3.0 Modules and Components FPGA The tab-sheet FPGA shows a detailed overview of the current state of the laser system. All signals which are processed by the TLC2FPGA are presented in a signal overview. Version (Info) The Version information mask supplies all the information relating to the version of the card used. 13/01/2011 Trotec Produktions- und Vertriebs GmbH_Linzer Strasse 156, A-4600 Wels, Austria, Technical Support tel_+43 (0)7242 239-7000, fax_+43 (0)7242 239-7380, mailto: [email protected] 122 / 150 User manual SpeedMark V3.0 Modules and Components 15.3.3 SpeedMark Windows Laser Status The current status of the laser is displayed in SpeedMark using the Laser Status window. Scanner Control This window is used to manually move the mirrors for test and maintenance purposes. 13/01/2011 Trotec Produktions- und Vertriebs GmbH_Linzer Strasse 156, A-4600 Wels, Austria, Technical Support tel_+43 (0)7242 239-7000, fax_+43 (0)7242 239-7380, mailto: [email protected] 123 / 150 User manual SpeedMark V3.0 Modules and Components 15.4 EasyControl Laser System The EasyControl module and associated components support the control of the laser and scanner components in the Trotec laser system via the EasyControl controller card. The module is integrated in SpeedMark and connects SpeedMark to the laser and scanner system, thus enabling the laser marking or engraving of the graphics created in SpeedMark on a wide range of workpieces. 15.4.1 Functional Range of Module The EasyControl module fulfils the following functions: • Laser control • Scanner head control • Configuration of the field correction • Configuration of the lens type • Control of the EasyControl card I/Os • Output of the laser system’s current status • Manual control of the scanner head mirrors 15.4.2 Configuration 13/01/2011 Trotec Produktions- und Vertriebs GmbH_Linzer Strasse 156, A-4600 Wels, Austria, Technical Support tel_+43 (0)7242 239-7000, fax_+43 (0)7242 239-7380, mailto: [email protected] 124 / 150 User manual SpeedMark V3.0 Modules and Components Configuration Control Tool Name Open Description Tries to create a connection to the laser Close Closes an open connection Card COM The address used to communicate with the laser controller in the PC The COM port determines which COM interface in the PC should be used to exchange laser data. Configuration of the COM port Save Saves all configurations Load Loads all configuration settings COM Port Field Correction Field correction is used to straighten out the lines at the edge of the marking field which have curved outwards and therefore to refine a rectangle. The Select Focal Length and Field field is used to select the lenses chosen previously. Mark Field Borders: marks a particular field necessary for later measurements. 13/01/2011 Trotec Produktions- und Vertriebs GmbH_Linzer Strasse 156, A-4600 Wels, Austria, Technical Support tel_+43 (0)7242 239-7000, fax_+43 (0)7242 239-7380, mailto: [email protected] 125 / 150 User manual SpeedMark V3.0 Modules and Components A field marked in this way must then be measured. The outline below represents the previously marked field. X Positive X Negative Upper Upper X Negative Centre <-----------------X Negative Lower X Positive Centre ------------------> X Positive Lower The same principle is applied to X measurements and Y measurements. All the calculated values are entered in the fields in the correction form. Once all the values have been determined, the correction co-efficient is calculated. Now calculate the distance co-efficients. Mark Diagonals is used to mark a grid to check the parallel intervals. 13/01/2011 Trotec Produktions- und Vertriebs GmbH_Linzer Strasse 156, A-4600 Wels, Austria, Technical Support tel_+43 (0)7242 239-7000, fax_+43 (0)7242 239-7380, mailto: [email protected] 126 / 150 User manual SpeedMark V3.0 Modules and Components Laser Configuration Laser Configuration is used to view and modify laser errors or the current laser settings. Setting Output Pulse Frequency LaserOn Delay LaserOn Delay Faulty Power Supply Laser Error Reset All Errors Min. Output Max. Output 13/01/2011 Description The set output of a laser in %, may be modified manually.. The set pulse frequency of a laser in kHz, may be modified manually The time delay in ms until the laser is switched on, may be modified manually. The time delay in ms until the laser is switched off, may be modified manually. Fault currently affecting the power supply. Error currently affecting the laser. Resets all errors, errors are not always reset automatically. The minimal laser output. The maximum laser output. Trotec Produktions- und Vertriebs GmbH_Linzer Strasse 156, A-4600 Wels, Austria, Technical Support tel_+43 (0)7242 239-7000, fax_+43 (0)7242 239-7380, mailto: [email protected] 127 / 150 User manual SpeedMark V3.0 Modules and Components Min. Pulse Frequency Max. Pulse Frequency Laser Power Supply Internal Laser Output External Laser Output The minimal pulse frequency of the laser. The maximum pulse frequency of the laser. Voltage of laser power supply. Output of laser output. Output of laser focus. Scanner Configuration Scanner Configuration is used to view and modify the scanner settings. Setting Positioning Speed Marking Speed Polygon Delay Positioning Delay Marking Delay Polygon Angle Move Manually 13/01/2011 Description The speed at which the mirrors move when the laser is switched off. The speed at which the mirrors move when the laser is switched on. Please refer to the chapter on marking parameters Please refer to the chapter on marking parameters Please refer to the chapter on marking parameters Please refer to the chapter on marking parameters Move Manually is used to move the X and Y mirrors individually. Trotec Produktions- und Vertriebs GmbH_Linzer Strasse 156, A-4600 Wels, Austria, Technical Support tel_+43 (0)7242 239-7000, fax_+43 (0)7242 239-7380, mailto: [email protected] 128 / 150 User manual SpeedMark V3.0 Modules and Components Status I/O’s The I/O status signals are internal signals sent between the control electronics and mechanics which indicate the current switching status. Control Port Input: • Input 1: SHFC: Shutter Close Signal • Input 2: SHFO Shutter Open Signal • Input 3: MarkStart: start signal for the laser process • Input 4: LasOnPan: Laser On signal on panel Control Port Output: • Output 1: Pilot Laser On: switches on the pilot laser • Output 2: SHCPC: postpones the output signal for the shutter closure from the PC • Output 3: LasOn: switches the Laser On signal on panel Ports Status: • Internally available ports used to monitor the status signals of the electronics. 13/01/2011 Trotec Produktions- und Vertriebs GmbH_Linzer Strasse 156, A-4600 Wels, Austria, Technical Support tel_+43 (0)7242 239-7000, fax_+43 (0)7242 239-7380, mailto: [email protected] 129 / 150 User manual SpeedMark V3.0 Modules and Components Service57 The SpeedMark service area should only be used and modified by Trotectrained individuals or employees. 15.4.3 SpeedMark Windows The EasyControl module does not use any windows in SpeedMark. 57 A separate document on EasyControl Service Settings may be provided on request. 13/01/2011 Trotec Produktions- und Vertriebs GmbH_Linzer Strasse 156, A-4600 Wels, Austria, Technical Support tel_+43 (0)7242 239-7000, fax_+43 (0)7242 239-7380, mailto: [email protected] 130 / 150 User manual SpeedMark V3.0 Modules and Components 15.5 Servida Axis Control The Servida58 module and associated components support the control of Servida motors used to control axial and curved engravings. The motors can be controlled manually and by using the scripting functions. 15.5.1 Functional Range of Module The Servida module fulfils the following functions: • Initialisation of the motors • Control of the motors using scripting functions • Manual control of the motors 58 All rights to the name Servida and the associated drive systems are retained by the Servida Corporation. Further information about Servida drives can be found in the relevant documentation. 13/01/2011 Trotec Produktions- und Vertriebs GmbH_Linzer Strasse 156, A-4600 Wels, Austria, Technical Support tel_+43 (0)7242 239-7000, fax_+43 (0)7242 239-7380, mailto: [email protected] 131 / 150 User manual SpeedMark V3.0 Modules and Components 15.5.2 Configuration Configuration Control Tool Name Open Description Tries to establish a connection to a Servida motor Close Closes an open connection COM Port COM port used to communicate with the Servida motor Configuration Configuration of the COM port Save Saves all configurations Load Loads all configuration settings General Settings Setting Axis Type Encoder Resolution Slope Gear Factor Max. Position Error PWM Limit Max. Temperature Deactivate Hardware Limits Info 13/01/2011 Description Specification of axis type. The available options are planar axis or rotation axis. Number of motor steps per revolution or per mm (planar) Slope of the thread in mm per rotation Transfer factor of gears Maximum position error (drag error) in motor steps Power limit Maximum motor temperature for cut off Activates/deactivates limit switch signals Additional motor information Trotec Produktions- und Vertriebs GmbH_Linzer Strasse 156, A-4600 Wels, Austria, Technical Support tel_+43 (0)7242 239-7000, fax_+43 (0)7242 239-7380, mailto: [email protected] 132 / 150 User manual SpeedMark V3.0 Modules and Components Control Setting Speed (Movement) Acceleration (Movement) P I D Limits Activated Min. Position Max. Position Offset Invert Positions Zero Point 13/01/2011 Description Maximum motor speed in mm per second or rotations per second Acceleration of the motor Proportionality factor Integral factor Differential factor Activates the software limits (position borders) of the motor. The smallest position which can be reached in ° or mm (planar) The greatest position which can be reached in ° or mm (planar) The zero point offset of the positions in ° or mm (planar) Inverts the motor positions Sets the current motor position to the zero point (modifies the offset value) Trotec Produktions- und Vertriebs GmbH_Linzer Strasse 156, A-4600 Wels, Austria, Technical Support tel_+43 (0)7242 239-7000, fax_+43 (0)7242 239-7380, mailto: [email protected] 133 / 150 User manual SpeedMark V3.0 Modules and Components Speed (Referencing) Acceleration (Referencing) Direction Maximum motor speed in mm per second or rotations per second during referencing Acceleration of the motor during referencing Direction of the reference movement (positive or negative limit switch) Starts referencing Interval in motor steps after a successful referencing between the limit switch and the first index marker found Motor status signals Resets the motor status signals The target of the next movement in ° or mm (planar) Current motor position in ° or mm (planar) Starts the movement to target position Stops the current movement Fast movement in a negative direction Slow movement in a negative direction Fast movement in a positive direction Slow movement in a positive direction Current input and output status Referencing Index Interval Status Reset Target position Position Start Stop << < > >> Inputs/Outputs 15.5.3 SpeedMark Windows Manual Axis Control This window is used to manually adjust the motor position in SpeedMark. 13/01/2011 Trotec Produktions- und Vertriebs GmbH_Linzer Strasse 156, A-4600 Wels, Austria, Technical Support tel_+43 (0)7242 239-7000, fax_+43 (0)7242 239-7380, mailto: [email protected] 134 / 150 User manual SpeedMark V3.0 Modules and Components 15.6 Relop I/O The Relop I/O module and associated components support the control of a Relop I/O card by SpeedMark. 15.6.1 Functional Range of Module The Relop I/O module fulfils the following functions: • Initialisation of a Relop I/O card • Provision of functions for accessing the I/O ports 15.6.2 Configuration 13/01/2011 Trotec Produktions- und Vertriebs GmbH_Linzer Strasse 156, A-4600 Wels, Austria, Technical Support tel_+43 (0)7242 239-7000, fax_+43 (0)7242 239-7380, mailto: [email protected] 135 / 150 User manual SpeedMark V3.0 Modules and Components Configuration Control Tool Settings Setting Output Port Output Port Index Output Port Name Invert Output Port Input Port Input Port Index Input Port Name Invert Input Port Initialisation Value Deinitialisation Value Auto Test Delay Name Open Description Tries to establish a connection to the I/O card Close Closes an open connection Card Save Card Index is used to specify which card to communicate with Saves all configurations Load Loads all configuration settings Description Displays the switching status of all 16 outputs. The individual outputs can be switched manually by clicking on the grey or green dots. Displays the index number of each output. Displays the name of each output. This name can be modified. Select an output, move the mouse over the name field, then click once with the left mouse button. The name is now highlighted in blue and can be edited. Negates individual or all outputs. Displays the switching status of all 16 inputs. Displays the index number of each input. Displays the name of each input. This name can be modified. Select an input, move the mouse over the name field, then click once with the left mouse button. The name is now highlighted in blue and can be edited. Negates individual or all outputs. Defines the switching status of the outputs when the card is opened. Defines the switching status of the outputs when the card is closed. Carries out a test on the card in which all outputs and inputs are switched in turn. The delay is used to set the time between the switching operations. 15.6.3 SpeedMark Windows The Relop I/O module does not use any windows in SpeedMark. 13/01/2011 Trotec Produktions- und Vertriebs GmbH_Linzer Strasse 156, A-4600 Wels, Austria, Technical Support tel_+43 (0)7242 239-7000, fax_+43 (0)7242 239-7380, mailto: [email protected] 136 / 150 User manual SpeedMark V3.0 Modules and Components 15.7 EasyControl I/O The EasyControl I/O module and associated components support the control of the I/O ports of the EasyControl I/O card. 15.7.1 Functional Range of Module The EasyControl I/O module fulfils the following functions: • Card control • Provision of functions for accessing the I/O ports 15.7.2 Configuration 13/01/2011 Trotec Produktions- und Vertriebs GmbH_Linzer Strasse 156, A-4600 Wels, Austria, Technical Support tel_+43 (0)7242 239-7000, fax_+43 (0)7242 239-7380, mailto: [email protected] 137 / 150 User manual SpeedMark V3.0 Modules and Components Configuration Control Tool Settings Setting Output Port Output Port Index Output Port Name Output Port Inversion Input Port Input Port Index Input Port Name Input Port Inversion Initialisation Value Deinitialisation Value Error Output 1-8 Error Output 9-16 Auto Test Delay Name Open Description Tries to establish a connection to the I/O card Close Closes an open connection Card COM port address Save Saves all configurations Load Loads all configuration settings Description Displays the switching status of all 16 outputs. The individual outputs can be switched manually by clicking on the grey or green dots. Displays the index number of each output. Displays the name of each output. This name can be modified. Select an output, move the mouse over the name field, then click once with the left mouse button. The name is now highlighted in blue and can be edited. Negates individual or all outputs. Displays the switching status of all 16 inputs. Displays the index number of each input. Displays the name of each input. This name can be modified. Select an input, move the mouse over the name field, then click once with the left mouse button. The name is now highlighted in blue and can be edited. Negates individual or all outputs. Defines the switching status of the outputs when the card is opened. Defines the switching status of the outputs when the card is closed. Displays any errors affecting outputs 1-8. Displays any errors affecting outputs 9-16. Carries out a test on the card in which all outputs and inputs are switched in turn. The delay is used to set the time between the switching operations. 15.7.3 SpeedMark Windows The EasyControl I/O module does not use any windows in SpeedMark. 13/01/2011 Trotec Produktions- und Vertriebs GmbH_Linzer Strasse 156, A-4600 Wels, Austria, Technical Support tel_+43 (0)7242 239-7000, fax_+43 (0)7242 239-7380, mailto: [email protected] 138 / 150 User manual SpeedMark V3.0 Modules and Components 15.8 RunScreen The RunScreen module and associated components generate a configurable dialog while a SpeedMark program is being processed. 15.8.1 Functional Range of Module The RunScreen module therefore fulfils the following functions: • Displays a dialog while a SpeedMark program is being processed • Configures the dialog • Provision of functions for adjusting the dialog while the program is being processed 13/01/2011 Trotec Produktions- und Vertriebs GmbH_Linzer Strasse 156, A-4600 Wels, Austria, Technical Support tel_+43 (0)7242 239-7000, fax_+43 (0)7242 239-7380, mailto: [email protected] 139 / 150 User manual SpeedMark V3.0 Modules and Components 15.8.2 Configuration Configuration Control Tool General Setting Input Field Visible Button Visible Active Tab Log Tab Visible Image tab visible Image 13/01/2011 Name Save Description Saves all configurations Load Loads all configuration settings Description Sets which input field should be visible Sets which button should be visible Selects the active tab Specifies that the Log tab should be visible Specifies that the Image tab should be visible Selects the image displayed in the Image tab. Trotec Produktions- und Vertriebs GmbH_Linzer Strasse 156, A-4600 Wels, Austria, Technical Support tel_+43 (0)7242 239-7000, fax_+43 (0)7242 239-7380, mailto: [email protected] 140 / 150 User manual SpeedMark V3.0 Modules and Components Passwords The Passwords tab is used to specify whether a password is required for the RunScreen service menu. When a program is interrupted, the service menu opens and active password protection ensures that the program may only be closed by entering the valid password. The adjacent illustration shows the RunScreen service menu. It can be used to select from various options to continue processing when a program is interrupted (ESC key). 15.8.3 SpeedMark Windows The RunScreen module does not support any windows in SpeedMark. 13/01/2011 Trotec Produktions- und Vertriebs GmbH_Linzer Strasse 156, A-4600 Wels, Austria, Technical Support tel_+43 (0)7242 239-7000, fax_+43 (0)7242 239-7380, mailto: [email protected] 141 / 150 User manual SpeedMark V3.0 Modules and Components 15.9 Profibus The Profibus module and associated components support the control of a Profibus card. 15.9.1 Functional Range of Module The Profibus I/O module fulfils the following functions: • • Control of a slave Profibus card Communication with a master Profibus 15.9.2 Configuration 13/01/2011 Trotec Produktions- und Vertriebs GmbH_Linzer Strasse 156, A-4600 Wels, Austria, Technical Support tel_+43 (0)7242 239-7000, fax_+43 (0)7242 239-7380, mailto: [email protected] 142 / 150 User manual SpeedMark V3.0 Modules and Components Configuration Control Tool Name Open Close Card Description Tries to created a connection to the Profibus Closes an open connection Save Address used by the PC to communicate with the Profibus. Saves all configurations Load Loads all configuration settings Settings Setting Input Size Output Size Number of ConfigData ConfigData Description Used to specify the number of bytes received Used to specify the number of bytes sent Number of data modules Configuration of data module 15.9.3 SpeedMark Windows The Profibus module does not use any windows SpeedMark. 13/01/2011 Trotec Produktions- und Vertriebs GmbH_Linzer Strasse 156, A-4600 Wels, Austria, Technical Support tel_+43 (0)7242 239-7000, fax_+43 (0)7242 239-7380, mailto: [email protected] 143 / 150 User manual SpeedMark V3.0 Modules and Components 15.10 COM Port The COM port module and associated components support the control of the COM ports available on the PC system. 15.10.1 Functional Range of Module The COM port module fulfils the following functions: • • Initialisation of the selected COM ports Provision of functions for accessing the COM ports 15.10.2 Configuration 13/01/2011 Trotec Produktions- und Vertriebs GmbH_Linzer Strasse 156, A-4600 Wels, Austria, Technical Support tel_+43 (0)7242 239-7000, fax_+43 (0)7242 239-7380, mailto: [email protected] 144 / 150 User manual SpeedMark V3.0 Modules and Components Configuration Control Tool Name Open Close Port Description Tries to establish a connection to the COM interface Closes an open connection Save The COM port determines which COM interface to use in the PC Saves all configurations Load Loads all configuration settings Settings Setting Baud Rate Parity Data Bits Stop Bits RTS Control DTR Control Description Sets the transmission rate Determines whether an even or uneven number of bits should be transmitted Determines the number of bits transmitted Determines the number of stop bits transmitted Interface handshake Interface handshake 15.10.3 SpeedMark Windows The COM port module does not use any windows in SpeedMark. 13/01/2011 Trotec Produktions- und Vertriebs GmbH_Linzer Strasse 156, A-4600 Wels, Austria, Technical Support tel_+43 (0)7242 239-7000, fax_+43 (0)7242 239-7380, mailto: [email protected] 145 / 150 User manual SpeedMark V3.0 Extensions 16 Extensions Extensions are used to provide additional functions within SpeedMark. In contrast to modules, extensions directly increase the functional range of SpeedMark. It is therefore also possible use the extension function of modules. 13/01/2011 Trotec Produktions- und Vertriebs GmbH_Linzer Strasse 156, A-4600 Wels, Austria, Technical Support tel_+43 (0)7242 239-7000, fax_+43 (0)7242 239-7380, mailto: [email protected] 146 / 150 User manual SpeedMark V3.0 Extensions 16.1 Configuration of Extensions The configuration of extensions is carried out using the Tools Program Extensions menu. 16.2 Extensions Window Various extensions use additional windows in SpeedMark. These can be opened and closed using Menu View Program Extensions [Extension] [Windowlist]. 13/01/2011 Trotec Produktions- und Vertriebs GmbH_Linzer Strasse 156, A-4600 Wels, Austria, Technical Support tel_+43 (0)7242 239-7000, fax_+43 (0)7242 239-7380, mailto: [email protected] 147 / 150 User manual SpeedMark V3.0 Extensions 16.3 Program Selection Extension The program selection extension is used to make a simple selection of SpeedMark programs from a configurable directory list. 16.3.1 Functional Range of Extension The Program Selection extension fulfils the following functions: • • Selects and loads programs from a list Configures the directories used to generate the program lists 16.3.2 Configuration 13/01/2011 Trotec Produktions- und Vertriebs GmbH_Linzer Strasse 156, A-4600 Wels, Austria, Technical Support tel_+43 (0)7242 239-7000, fax_+43 (0)7242 239-7380, mailto: [email protected] 148 / 150 User manual SpeedMark V3.0 Extensions Directory Selection Directory Selection displays a list of all configured directories which can be used to search for SpeedMark programs. The Directory Selection input field is used to specify directories which are added to the list using the “Add” button. Configuration File The Configuration File input field is used to enter the directory and name of the configuration file used. 16.3.3 SpeedMark Windows The Program Selection window displays a list of all the SpeedMark programs found which may then be loaded into SpeedMark using the Load Program button. 13/01/2011 Trotec Produktions- und Vertriebs GmbH_Linzer Strasse 156, A-4600 Wels, Austria, Technical Support tel_+43 (0)7242 239-7000, fax_+43 (0)7242 239-7380, mailto: [email protected] 149 / 150 User manual SpeedMark V3.0 Appendix: Utilities 17 Appendix: Utilities SpeedMark Utilities are a collection of utility programs which support the user outside of the actual SpeedMark software in the work with the Trotec laser system. These programs can be found under the SpeedMark installation directory in the folder Utilites. 17.1 SpeedMarkerDiagnostics With SpeedMarkerDiagnostics a diagnosis of the laser system can be done step by step. The diagnosis will be started with the button “Start Diagnosis”. Follow the instructions on the screen to get a correct result. During the usage or start of SpeedMarkerDiagnostics it is not allowed to run SpeedMark, because there would be no access to the relevant hardware components. 13/01/2011 Trotec Produktions- und Vertriebs GmbH_Linzer Strasse 156, A-4600 Wels, Austria, Technical Support tel_+43 (0)7242 239-7000, fax_+43 (0)7242 239-7380, mailto: [email protected] 150 / 150