1
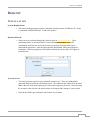
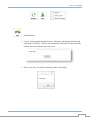
Onsite User Manual
User Manual
About this Guide: This guide is intended to aide in the
installation and basic operation of the Onsite Desktop/Mobile
App and Relay.
1
Onsite User Manual
TABLE OF CONTENTS
DESKTOP ................................................................................................................................ 3
INSTALLATION ......................................................................................................................... 3
System Requirements ........................................................................................................... 3
Download/Install .................................................................................................................. 3
Account Access .................................................................................................................... 3
Updating ............................................................................................................................... 4
OVERVIEW ............................................................................................................................... 5
GETTING STARTED ................................................................................................................... 6
OPERATION ............................................................................................................................. 8
CHAT ....................................................................................................................................... 8
INBOX ...................................................................................................................................... 9
CONNECTIONS........................................................................................................................ 10
DATA ..................................................................................................................................... 13
SITES ..................................................................................................................................... 17
TOOLBOX ............................................................................................................................... 20
SETTINGS ............................................................................................................................... 21
SUPPORT ................................................................................................................................ 21
RELAY ................................................................................................................................... 22
OVERVIEW ............................................................................................................................. 22
HOW TO USE........................................................................................................................... 22
SPECIFICATIONS ..................................................................................................................... 22
ANDROID/MOBILE ............................................................................................................ 23
INSTALLATION ....................................................................................................................... 23
System Requirements ......................................................................................................... 23
Download/Install ................................................................................................................ 23
Account Access .................................................................................................................. 24
Updating ............................................................................................................................. 25
OVERVIEW ............................................................................................................................. 26
GETTING STARTED ................................................................................................................. 27
OPERATION ............................................................................................................................ 29
DATA ..................................................................................................................................... 30
CONNECTIONS........................................................................................................................ 35
SITES ..................................................................................................................................... 39
INBOX .................................................................................................................................... 41
TOOLBOX ............................................................................................................................... 44
SETTINGS ............................................................................................................................... 45
SUPPORT ................................................................................................................................ 46
2
Onsite User Manual
DESKTOP
I NSTALLATION
System Requirements
•
The Onsite Desktop program requires a minimum operation system of Windows XP. Onsite
is compatible with both Windows 32 and 64 bit systems.
Download/Install
•
Onsite can to be purchased through the Onsite website at www.onsiteag.com . Upon
purchasing Onsite, an automated email is sent confirming the purchase. Once the
confirmation email has been received, the user may navigate to the specified page to
download the application. After the application has downloaded, follow the prompts for
installation. After the program has successfully installed; the login window will appear as
pictured below:
Account Access
•
The Onsite program requires Login credentials in order to use. These are automatically
generated and provided in the confirmation email. The credentials provided will be the email
address that was used when signing up for Onsite and a temporary password. After accessing
the account for the first time, the password may be changed in the Settings of your account.
•
Enter the provided Login credentials and click the Log In button.
3
Onsite User Manual
Updating
•
Onsite automatically checks for updates every time it is launched. If there is an available
update; screen prompts will walk the user through the update and then launch Onsite.
-
-
4
Onsite User Manual
O VERVIEW
•
Onsite is a cloud-based, mobile and desktop app that assists with file management
and communications to and from the field by socially connecting people and
equipment. Onsite is not intended to replace your current precision ag software
systems, it is intended to complement and improve the efficiency of these solutions.
•
The Onsite program directly connects into many of the most well respected precision
ag software, equipment telematics, and agronomic resource systems in our industry
today.
•
The Onsite desktop program was designed to be the command center of all Onsite
activity. The desktop program allows you to manage or use your files, your site
locations, your contacts and equipment, your tools and your account settings.
5
Onsite User Manual
G ETTING S TARTED
•
The Onsite Homepage is the main menu screen that displays after log in. The available pages
and tools of Onsite can be accessed through the Homepage. To navigate to the desired
location, mouse over and click one of the icons.
Desktop Homepage
•
The icons or “buttons’ open a specific page or tool for use.
Data – View and share stored
files.
Toolbox – Use the available
set of free tools.
Connections – Set up and view
contacts and equipment lists.
Settings – Setup user settings
and privacy settings.
Sites – View, manage and
share sites.
Support – Connect with the
support staff, send feedback
and access the FAQ.
6
Onsite User Manual
•
The Action Bar is located at the top of the Onsite Desktop Program, providing the user with
desired actions.
•
The Chat and Inbox buttons will always be present in the Action Bar regardless of what page
the user is currently in.
Numerous other buttons appear in the Action Bar as other pages are accessed; the function of
these buttons will be explained throughout this document.
The user may access the Homepage from any area within the Onsite program by clicking the
Onsite Command text in the upper left of the program window.
•
•
7
Onsite User Manual
O PERATION
C HAT
Open Chat
•
•
Analogous to text messaging or IM.
Chat is available to everyone in your Connections list.
•
A colored in
symbol in front of a User name signifies that the specified person is
logged into Onsite and is availble for Chat.
•
A grayed out
symbol signifies that the User is offline and messages that are sent
will not be delivered.
Sort Users in the Chat window by either alphabetical or reverse alphabetical order by
clicking on the User bar.
Right click on a User name and select to Send a file or view User Info.
•
•
8
Onsite User Manual
I NBOX
Opens Inbox
•
•
•
•
The Inbox within Onsite is where all notifications such as; Connection Requests,
Data files and Sites are sent by other users so that they can be viewed and imported if
desired.
When a new message is received by another user, the Inbox button will flash from
green to orange repeatedly to notify the user of an unread message.
Within the Inbox bar there is a From, Type, Message, Name and Date, you may click
on the appropriate bar title to enable sorting.
You may right click and use the menu or use one of the buttons located in the Action
Bar at the top of the program to Accept, Import or View a Request, Data file or Site.
Refreshes window
•
The Refresh button will refresh the current page and import any new information
since the page was last visited.
9
Onsite User Manual
C ONNECTIONS
The Connections page is where the user will view and manage people and equipment
contacts. The user will be able to connect and efficiently communicate with others in the
industry. These Connections may be employees, co-workers, customers or suppliers. Keep
track of contacts and equipment within Onsite through a mobile device, equipment, or Onsite
Relay through integrated GPS.
Add Contact
•
Connect with other Onsite users by clicking on the Add Contact button and typing in
the users email address.
•
Sending a Connection Request to another Onsite user will be directed to the users
Inbox and allow them to Accept or not.
Sending a Connection Request to a non-user of Onsite will result in an invitation
email being sent to the email address entered.
Use the available functions in the Action Bar or use the right-click context menu to
Refresh, Add, or Remove Contacts.
•
•
10
Onsite User Manual
Add Equipment
•
Connect with equipment through Onsite by clicking the Add Equipment button and
entering the Access Key. Once the correct number of characters are entered into the
window; the Import button will become active.
•
If the Access Key is invalid; the following window will display.
11
Onsite User Manual
•
Once connected to the Equipment, the user will be able to view the Asset;
•
The user will also be able to perform available functions through the Action Bar or
right-click context menu.
12
Onsite User Manual
D ATA
Labeled display of Data Page
13
Onsite User Manual
•
•
•
Onsite displays selected files and folders in the Preview Window so the user can view
basic information including Type, Last Modified date and Size.
Select multiple files by holding shift and clicking the files, or, by using the arrow
keys on the keyboard.
When multiple files are selected, the user will see the files preview in a carousel. Use
the arrow buttons located on the right side of the program or the mouse scroll wheel
to move the files and left and right in a carousel effect.
The Data page is where the user will save and access files.
Data page Action Bar
The Import function will allow the user to browse and select files from the
computer or a drive connected to the computer.
Create New Folders so that you can arrange and organize your Data files in a
desired fashion. Use the click-and-drag function to move files and folders to the
desired location.
14
Onsite User Manual
Open files and folders using the Preview Window when the file/folder is
selected.
Use the Delete function to get rid of any unwanted files and folders within the
Onsite program. Select the desired file/folder and click the Delete button in the
Action Bar. A confirmation window will then popup and the user may click
either Yes to continue with deletion or No to cancel the Delete request and return
to the file/folder grid.
The Files and Folders stored in Onsite can be renamed. Use the available
function in the Action Bar to rename the desired file/folder; click the Rename
button, enter the desired characters and press Enter when done to save the
renamed file
The Send function allows the user to Send Data files to other Connected Users,
Equipment and Software. To do so simply select the file to be sent by clicking
on it, this will highlight the file/folder in orange. Click the Send Button in the
Action Bar, check the box next to the desired recipient of the file and click Send.
15
Onsite User Manual
The Hitch function integrates Onsite’s cloud from the Desktop to the Mobile.
Hitching a file to a mobile device ensures that the latest version of that file is
available on the mobile device. If a file is changed while the device is out of a
service area and not connected to a wifi network, it will be automatically updated
the next time the device is connected to the internet.
To Hitch a file; select a file from
the file/folders grid and click the
Hitch button located in the
Action Bar.
When a file is unhitched it is
removed from the mobile
device, but a copy is maintained
in the cloud. When a user
imports a file from their Inbox it
is automatically hitched.
The file is Hitched whenever
you see the image to left under
the Hitched column.
The file is Unhitched when there
is no image under the Hitched
column.
16
Onsite User Manual
S ITES
The Sites page is where the user can view land as geo-referenced
boundaries, create Fences and keep track of Contacts and
Equipment. These geo-referenced boundaries are Sites.
•
Colored dots next to a Connection indicate when the Contact or Equipment
was last located; Green signifies that the location is up to date within 10
minutes. Yellow indicates the location is stale between 10 minutes and 24
hours. Red lets the user know the location is older than 24 hours or has never
been set/detected.
17
Onsite User Manual
Sites Action Bar:
Import shape files or KML files of your Sites.
Activate -Fences around Sites.
Clicking on the Fences button will bring up a Connections/Equipment menu that
will allow you to select the desired Contacts to Fence.
Setting a Fence to a specified Contact will result in the creation of an Alert.
Alerts for specified Connections will announce the presence of your Contacts or
Equipment that cross the Site Fence.
By clicking the Alerts button you will be able to see the past Alerts that have
been triggered; the Site, User, Time and Path will display.
Delete will remove the selected site from the Sites grid.
18
Onsite User Manual
View Connections that have entered into the Site.
Explain more please
Users may Request the Location of Connection. This will send a message to the
specified User requesting that they update their location.
19
Onsite User Manual
T OOLBOX
The Toolbox page provides easy access to popular tools.
These are designed to be quick and easy tools at your fingertips.
Insect Resistance Management refuge calculator.
Convert units such as distances, areas, weights and temperatures.
Chemical information such as product labels and Material Safety Data Sheets.
20
Onsite User Manual
S ETTINGS
The Settings page is where the user can fill out the User Profile
including name, address and company information. The user may
make this as detailed or private as they like.
Preferences to display different Area Units and the Remember Me
box can be accessed from Settings.
Changing of the Login password is also done within this page..
S UPPORT
Support is powered by Get Satisfaction and is the link to ask
questions, review Frequently Asked Questions, share ideas, report
problems and communicate with other Users and Onsite employees.
21
Onsite User Manual
RELAY
Relay
O VERVIEW
•
•
•
The Onsite Relay is a device that is used to transfer data wirelessly to and from a
connected data storage device.
Directly connect a compact flash card or USB flash drive to the Relay.
With the Onsite Relay and a Smartphone, easily transfer VRT, AB lines, as-applied
and yield files directly into and out of any brand of farm equipment.
H OW TO USE
•
•
•
•
The O in Onsite is the power On/Off switch of the device.
Once powered on, the Power light should blink red to let the user know the Relay is
turned on.
The Activity light should also blink to let the user know that the Relay is able to
communicate. This Activity light will blink green.
Insert a compact flash card, USB flash drive or both to transfer data to and from a
Smartphone or tablet.
S PECIFICATIONS
•
•
•
•
•
Micro USB port used for charging; when charging the Power light will stay solid red,
when fully charged the light will turn off.
Charging from 0% battery typically takes 3-4 hours.
20+hours of battery life.
Data storage ports: Compact flash card and USB.
Bluetooth with data compression to aid in faster data transfer speeds.
22
Onsite User Manual
ANDROID/MOBILE
I NSTALLATION
System Requirements
•
The Onsite Remote application requires a minimum operating version of Android 2.2
or newer.
Download/Install
•
Onsite can to be purchased through the Onsite website at www.onsiteag.com . The
Onsite mobile app can be downloaded by accessing Google Play on any mobile
device; simply search for Onsite and choose to download. After the application has
downloaded, follow the prompts for installation. After the program has successfully
installed; the Onsite app should appear in the list of phone applications.
23
Onsite User Manual
Account Access
•
The Onsite Remote app requires Login credentials in order to use. These are
automatically generated and provided in the confirmation email. The credentials
provided will be the email address that was used when signing up for Onsite and a
temporary password. After accessing the account for the first time, the password may
be changed in the Settings of your account from the Desktop only. The Remember
me box may be checked to act as an auto login.
•
Selecting the I forgot my password button will send an email to the user with a link
so the user can confirm to have the password reset.
24
Onsite User Manual
•
Enter the provided Login credentials and click the Log In button.
•
The Onsite Remote will automatically check for updates each time the app is
accessed. If there is an available update; the user will get a message upon startup
notifying them of an update. The user can accept to update the Mobile app and will
be directed to the app market for download. If the user rejects the update; they will
be notified each time the app is accessed until the update has been performed.
Updating
25
Onsite User Manual
O VERVIEW
•
Onsite is a cloud-based, mobile and desktop app that assists with file management and
communications to and from the field by socially connecting people and equipment. Onsite is
not intended to replace your current precision ag software systems, it is intended to
complement and improve the efficiency of these solutions.
•
The Onsite program directly connects into many of the most well respected precision ag
software, equipment telematics, and agronomic resource systems in our industry today.
•
The Onsite Remote is the Android/Mobile version of the Onsite program that retains most of
Desktop functionality but adds the versatility of taking it anywhere a Smartphone or tablet
can go. The Remote also adds some features that will explained throughout this document.
26
Onsite User Manual
G ETTING S TARTED
•
The Onsite Remote Homepage is the main menu screen that displays after login. The
available functions will take the user to the desired page. Touch one of the page icons to
navigate to the desired location. The user will need to return to the homepage to access
another page.
Remote Homepage
•
Logging out of Onsite Remote can be done from any page within the app; simply
click the mobile devices menu button and select Logout. This takes the user back to
the login screen.
27
Onsite User Manual
Data – View, send and Hitch
files.
Connections – Chat and
View Contacts.
Sites – View and send Sites to
other users.
Inbox – View and Import
files and Sites that were
shared.
Toolbox – Use the available
set of free tools.
Settings – Change Location
and Disk Usage settings.
Support – Connect with the
support staff, send feedback
and access the FAQ.
28
Onsite User Manual
O PERATION
•
•
•
•
Once selecting a page; the user will be able to utilize different functions depending on
whether they use a normal touch (touch on the screen and release right away) or a long press
(touch the screen and hold the finger on it).
Tapping the phones back button will take the user to the previous screen/page.
Accessing the phones menu button will bring up different menus depending on what screen
the user is currently in.
Offline Mode is automatically set whenever the user does not have internet access. Offline
mode only gives the user access to Data and Settings. In order to successfully Login when no
internet access is available; the user must have already logged in with the Remember Me box
checked with internet access, at an earlier time.
•
In order to communicate with the Onsite Relay the mobile device must be paired with
the users Relay. Recommended steps to pair should may be followed as below;
1. Turn on Bluetooth within mobile device. If this action is not known, please refer
to the devices manual.
2. Turn on Onsite Relay.
3. Scan for Bluetooth devices on mobile.
4. When Relay is found, click to pair; enter code 0000.
5. Launch Onsite, Login and navigate to the Data page to view the Relay.
29
Onsite User Manual
D ATA
Opens Data
Data Page View
•
•
From the Data page, the user will be able to view files loaded onto their mobile
device and view the Relay if connected to an Onsite Relay device. (Steps on how to
pair to a Relay can be found in Operation.)
A long press on one of the items will bring up a window to enable adding a New
Folder or Delete Contents as seen below.
30
Onsite User Manual
•
A normal touch will direct the user into the desired area to view the contents.
My Files view
Onsite Relay view
31
Onsite User Manual
•
A long press on a folder gives the user the options to create a New Folder, Delete
Contents, Rename, Delete or Copy as seen below:
•
•
A normal touch on a folder navigates the user into the desired folder.
A long press on a file selects the file and gives the user the options to View, Send,
Rename, Delete, Copy, Hitch/Unhitch or Unzip a zipped file.
32
Onsite User Manual
•
Choosing to view a file will open the selected file so the user will be able to view the
contents if the mobile device is sufficiently equipped.
•
Choosing the send action will bring up the option to send the file(s) to a Connection,
My Files, Onsite Relay, Email or Software.
•
Sending a file to a Connection will pull up the list of the users contacts and allow
them to choose who they want to send the file to.
Sending a file to My Files will allow the user to make a copy of the file and move it
to the desired folder on the mobile device.
Sending a file to the Onsite Relay will give the user the option to send the file to an
available memory device that is connected to the Relay. This will be either a
Compact Flash or USB drive.
Sending a file to Email will give the user the ability to send the selected file through
email using their mobile devices email application.
Sending a file to Software will give the user the ability to send data to a software
connection.
Choosing the Rename function will allow the user to rename a file or folder.
•
•
•
•
•
33
Onsite User Manual
•
Choosing the Copy function will allow the user to make a copy of the selected file(s)
or folder and paste them into the desired area.
•
Choosing the Hitch function will download or “Hitch” the file or files to the mobile
device so that the user can access the data when there is no available wifi or cellular
network. Conversely, the user can Unhitch the file after it has been Hitched to free
up space on the device.
Unhitched
Hitching file to Mobile
Hitched
•
Choosing to Unzip a file will extract data from already zipped files.
•
A normal touch on a file will select the file; a green check to the right of the file
indicates that the file(s) are selected. Multiple files can be selected and one action
can be performed with the selected files. After the desired files have been selected,
the user can long press on a file or one of the multiple selected files and choose from
Send, Delete or Copy.
34
Onsite User Manual
C ONNECTIONS
Opens Connections
•
•
•
•
The Connections page is where the user will be able to Add Contacts and chat with
connected contacts.
Accessing the mobile devices menu button will allow the user to Refresh, Add
Contact or Logout.
In order to add a Contact, the user will have to enter an email address and send the
connection request. If the desired contact is an Onsite subscriber, the connection
request will be sent to the user’s inbox. If the email address is not associated with
Onsite, an email will be sent inviting the individual to join Onsite.
Onsite users within their contact list, view the users profile, view the user on the map
or remove the contact.
35
Onsite User Manual
•
Choosing View On Map will allow the User to view their Contact’s location via their
GPS signal; if the Contacts Broadcasting Location is selected under the settings
menu.
•
•
Chat within Onsite is analogous to text messaging or IM.
Chat is available to everyone in your Connections list.
•
A colored in
symbol in front of a User name signifies that the specified person is
logged into Onsite and is availble for Chat.
•
A grayed out
symbol signifies that the User is offline and messages that are sent
will not be delivered.
36
Onsite User Manual
•
Incoming Chat messages will alert the user through their mobile devices notification
bar so that the user may quickly navigate to the Chat area and respond.
37
Onsite User Manual
•
•
•
•
•
•
The user will be alerted of the number of new messages by an orange counter to the
right of a contacts user name;
The user can choose to search for contacts by clicking within the Filter Contacts area
and typing in the Contacts user name.
38
Onsite User Manual
S ITES
Opens Sites
•
The Sites page displays the Users Sites they have imported.
39
Onsite User Manual
•
On the mobile device the user can long press on an imported site to either View On
Map or Send Site to User
•
Choosing View On Map will allow the user to complete the action by selecting the
preferred mapping application. (google maps is recommended on android devices)
Once the Site has loaded; the user may choose to get directions to the Site.
Choosing Send Site to User will allow the User to send the selected Site to the
desired Contact.
•
40
Onsite User Manual
I NBOX
Opens Inbox
•
•
The Inbox is where Data and Sites notifications are sent
The User will be alerted of all incoming notifications through the mobile devices
notification bar as seen here:
•
The notification symbol will remain in the notification bar until the user views the
notification(s).
•
Indicator symbols will display next to the file within the inbox so that the user can
easily differentiate a Data file from a Site file.
Data Indicator
Sites Indicator
•
The user may select to View or Import incoming Data.
41
Onsite User Manual
•
The user may select to View, Import or Send incoming Sites.
•
New notifications within the Inbox will be highlighted in Orange:
42
Onsite User Manual
•
•
The user may Sort the Inbox according to who the files were sent From, the Date they
were sent or the Notification Type.
Once a file has been imported, it will automatically be removed from the users Inbox.
The user can also choose to remove files manually by clicking the X to the right of
the file name or selecting the Remove All function accessed through the devices
menu button.
43
Onsite User Manual
T OOLBOX
Opens Toolbox
•
The Toolbox page provides easy access to popular tools. These are designed to be
quick and easy tools at your fingertips
Insect Resistance Management refuge calculator.
Convert units such as distances, areas, weights and temperatures.
Chemical information such as product labels and Material Safety Data Sheets.
44
Onsite User Manual
S ETTINGS
Opens Settings
•
Settings on the mobile device give the user the ability to change their Location
Settings, Disk Usage Settings, Network Settings and view the End User License
Agreement (EULA).
•
The user may enable or disable location broadcasting. With broadcasting location
enabled; the user may choose how often to perform location broadcasts. This can be
as short as 30 seconds or as long as 30 minutes.
The user can change how much space should be allocated for storage as well as
define the file size limitation for mobile sync and Relay transfer.
Network settings may be changed by the user to implement WiFi only downloads and
uploads.
•
•
45
Onsite User Manual
S UPPORT
Opens Support
•
Support is powered by Get Satisfaction and is the link to ask questions, review
Frequently Asked Questions, share ideas, report problems and communicate with
other Users and Onsite employees.
46