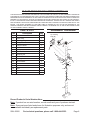
1
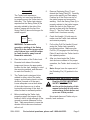
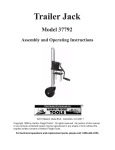
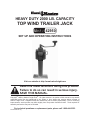
Heavy Duty 2000 lb. capacity
top wind trailer jack
42950
Set up and Operating Instructions
Visit our website at: http://www.harborfreight.com
Read this material before using this product.
Failure to do so can result in serious injury.
Save this manual.
Copyright© 1998 by Harbor Freight Tools®. All rights reserved. No portion of this manual or any artwork
contained herein may be reproduced in any shape or form without the express written consent of
Harbor Freight Tools. Diagrams within this manual may not be drawn proportionally. Due to continuing
improvements, actual product may differ slightly from the product described herein. Tools required for
assembly and service may not be included.
For technical questions or replacement parts, please call 1-800-444-3353.
Revised Manual 10g
NOTICE is used to
address practices
not related to personal injury.
Save This Manual
Keep this manual for the safety
warnings and precautions, assembly,
operating, inspection, maintenance and
cleaning procedures. Write the product’s
serial number in the back of the manual
near the assembly diagram (or month
and year of purchase if product has no
number). Keep this manual and the
receipt in a safe and dry place for future
reference.
CAUTION, without
the safety alert
symbol, is used to address
practices not related to
personal injury.
General Tool Safety Warnings
WARNING Read all safety
warnings and instructions.
Failure to follow the warnings and
instructions may result in serious
injury.
Save all warnings and
instructions for future reference.
The term ″tool″ in the warnings
refers to your Trailer Jack.
Important SAFETY
Information
In this manual, on the labeling,
and all other information
provided with this product:
This is the safety alert
symbol. It is used to alert
you to potential personal
injury hazards. Obey all
safety messages that
follow this symbol to avoid
possible injury or death.
DANGER indicates
a hazardous
situation which, if not
avoided, will result in death or
serious injury.
WARNING
indicates a
hazardous situation which, if
not avoided, could result in
death or serious injury.
1.
Work area safety
Keep work area clean and well
lit. Cluttered or dark areas invite
accidents.
2.
Personal safety
a.Stay alert, watch what you are
doing and use common sense
when operating a tool. Do not use
a tool while you are tired or under
the influence of drugs, alcohol
or medication. A moment of
inattention while operating tools may
result in serious personal injury.
b.Use personal protective
equipment. Always wear eye
protection. Safety equipment such
as non-skid safety shoes or a hard
hat used for appropriate conditions
will reduce personal injuries.
CAUTION, used
with the safety
alert symbol, indicates a
c. Do not overreach. Keep proper
hazardous situation which, if
footing and balance at all times.
not avoided, could result in
This enables better control of the
minor or moderate injury.
tool in unexpected situations.
SKU 42950
For technical questions, please call 1-800-444-3353.
Page 2
d.Dress properly. Do not wear
loose clothing or jewelry. Keep
your hair, clothing and gloves
away from moving parts. Loose
clothes, jewelry or long hair can be
caught in moving parts.
3.
1.
Be aware that the user/installer of
this product is solely responsible
for the way the Trailer Jack is
installed, operated and maintained,
and is responsible for any and all
consequences that occur, whether
or not anticipated in these warning
statements.
2.
Do not exceed 2000 Lb. capacity.
3.
Never attempt to adjust, modify or
take apart the Swing Plate, Pull Pin,
or Pull Pin Handle while the Trailer
Jack is supporting any weight.
4.
Lock Trailer Jack in vertical position
before applying load.
5.
Use on flat, level, hard surface
capable of supporting the combined
weight of the trailer and the jack.
6.
Before each use, verify that the Pull
Pin is properly engaged in a hole of
the Swing Plate (8).
7.
Wear ANSI-approved safety goggles
during use.
8.
Prevent trailer wheels from moving by
using wheel chocks while extending
or retracting.
9.
Before towing, fully raise Trailer Jack
and secure properly in it’s horizontal
position (foot to the rear).
Tool use and care
a.Do not force the tool. Do not
exceed 2,000 lb. capacity of this
tool. The correct tool will do the job
better and safer at the rate for which
it was designed.
b.Store idle tools out of the reach of
children and do not allow persons
unfamiliar with the tool or these
instructions to operate it. Tools are
dangerous in the hands of untrained
users.
c. Maintain tools. Check for
misalignment or binding of
moving parts, breakage of parts
and any other condition that may
affect the tool’s operation. If
damaged, have the tool repaired
before use. Many accidents are
caused by poorly maintained tools.
d.Use the tool and accessories
in accordance with these
instructions, taking into account
the working conditions and the
work to be performed. Use of the
tool for operations different from
those intended could result in a
hazardous situation.
4.
Specific Safety Warnings
Service
a.Have your tool serviced by a
qualified repair person using only
identical replacement parts. This
will ensure that the safety of the tool
is maintained.
SKU 42950
10. Always keep feet, arms, and legs
out from under jack and tongue
when applying and releasing load, or
moving trailer.
11. Inspect before use. Do not use if
parts are loose or damaged.
For technical questions, please call 1-800-444-3353.
Page 3
12. Use in accordance with the
Department of Transportation (DOT)
regulations. Information about DOT
regulations can be found at www.dot.
gov/regulations.html
13. Read manual before installation and/
or use.
14. Maintain labels and nameplates on
the tool. These carry important safety
information. If unreadable or missing,
contact Harbor Freight Tools for a
replacement.
15. This product is not a toy. Children
should be kept at a safe distance,
and never allowed to operate the
Trailer Jack.
16. Follow all state regulations for safety
and towing when using Trailer Jack,
including using safety chains securely
attached to the towing vehicle when
the trailer is hooked to the vehicle.
17. Not for aircraft purposes.
18. Trailer Jack must always be in the up
position (horizontal to ground) when
towing the trailer.
19. The warnings, precautions,
and instructions discussed in
this instruction manual cannot
cover all possible conditions and
situations that may occur. It must
be understood by the operator that
common sense and caution are
factors which cannot be built into this
product, but must be supplied by the
operator.
Save these
instructions.
SKU 42950
Specifications
Weight Capacity
2,000 lb.
Maximum Height
23-5/8” (Extended)
Minimum Height
14” (Retracted)
Lift Distance ±
9-5/8”
Net Weight
9.9 Lbs.
Trailer Jack must be welded to side of
straight trailer tongue. Once welded to the
trailer, the Trailer Jack is an effective aid to
hitching, unhitching, leveling and moving
the trailer. The Trailer Jack can be used
on farm duty trailers as well as recreational
boat trailers.
The Trailer Jack is designed for permanent
attachment to the trailer tongue, and can
be available for use wherever the trailer
goes.
Unpacking
When unpacking, make sure item
is intact and undamaged. If parts are
missing or broken, call Harbor Freight
Tools at 1-800-444-3353.
set up instructions
Read the entire Important
Safety Information
section at the beginning of this
manual including all text under
subheadings therein before set
up or use of this product.
Note: For additional information regarding
the parts listed in the following pages,
refer to the Assembly Diagram near
the end of this manual.
For technical questions, please call 1-800-444-3353.
Page 4
5.
Remove Retaining Ring (7) and
detach the Swing Plate (8). Carefully
remove the paint from Plate edges.
Position lip of the Plate over top of
the trailer tongue and commence
welding. Once the Swing Plate (8) is
properly welded to the trailer tongue,
attach the Jack to the Plate and
secure in place with the Retaining
Ring (7). Test the Trailer Jack to
make sure it functions correctly.
6.
Crank the Handle (1) both ways to
make sure the Trailer Jack extends
and retracts properly.
WARNING: To insure safe
operation, welding of the Swing
Plate (8) to the trailer tongue must
only be done by a certified welder
in a safe location, away from all
flammable materials.
7.
Pull out the Pull Pin Handle (9) and
swing the Trailer Jack upward to
horizontal position. Make sure the
Pull Pin (10) engages into the Swing
Plate (8) and locks the Trailer Jack in
this upward position.
1.
Plan the location of the Trailer Jack.
8.
2.
Examine both sides of the trailer
tongue and choose the appropriate
location for the Jack, keeping in mind
the mounting method, and the need
to crank the Handle (1).
After you have tested the Trailer
Jack and are confident of it’s proper
operation, the Trailer Jack is ready for
use.
9.
Note: Always have the open end of
the Rotarting Pin (13) pointed to the
jack.
Assembly
The Trailer Jack requires no
assembly, but care must be taken
to properly mount the Trailer Jack to
the trailer. The Trailer Jack design
requires that the Swing Plate (8) be
securely welded to the side of the
trailer’s tongue with the lip of the
Swing Plate (8) above the tongue for
added support.
Trailer
Tongue
3.
4.
Swing
Plate (8)
The Trailer Jack is designed to be
welded to either side of the trailer
tongue, and will swing back in either
direction (forward or to the rear).
Leave adequate room at both sides
of the trailer frame so as to allow
horizontal positioning of the Jack, in
either forward or rearward position.
Before installing the Trailer Jack,
properly support the tongue of the
trailer so that it is high enough off the
ground to provide clearance for the
Jack. Take precautions to insure the
wheels of the trailer are chock and
will not roll.
SKU 42950
Operating Instructions
Read the entire Important
Safety Information
section at the beginning of this
manual including all text under
subheadings therein before set
up or use of this product.
Mount and dismount Trailer only on
smooth, level surfaces.
For technical questions, please call 1-800-444-3353.
Page 5
Mounting The Trailer To The Towing
Vehicle.
Removing The Trailer From The Towing
Vehicle
1.
Before mounting, chock the trailer
wheels to prevent the trailer from
rolling.
2.
Crank the Handle (1) counterclockwise
to extend the leg to the desired
height.
3.
Maneuver the vehicle so that the
trailer’s hitch is directly over the
towing vehicle’s hitch ball.
Take the necessary precautions against
uncontrolled trailer movement (use wheel
chocks), before loosening the trailer
hitching mechanism. Turn the Handle (1)
counterclockwise to raise the tongue of the
trailer from the hitch ball. Keep hands and
feet clear of the hitch, tongue and the area
underneath the tongue.
4.
Rotate the Handle clockwise to
retract the Trailer Jack, and lower the
tongue hitch onto the hitch ball.
5.
Tighten the hitch retainer mechanism.
6.
Continue turning the Handle (1) until
the leg is fully retracted.
7.
Pull out the Pull Pin (10) and rotate
the Trailer Jack to it’s horizontal
position. Make sure that it locks into
the Swing Plate.
8.
9.
The Handle (1) should also be swung
over and positioned to rest on top of
the trailer tongue.
Before towing, always swing the
Trailer Jack to it’s horizontal position
(foot facing rearward). Always keep
feet and hands clear of the hitch, the
tongue and the area underneath.
10. Caution: Before driving the vehicle
and trailer to your destination, always
use safety chains to secure the trailer
to the towing vehicle.
SKU 42950
Leveling and Moving
1.
In the unhitched mode, the trailer
can be leveled front to back by
turning the Handle either clockwise or
counterclockwise.
2.
If the trailer is to be stored in this
mode, it is advised that the trailer
wheels be properly chocked.
Towing
While the trailer is being towed, the Trailer
Jack must be pivoted into the horizontal
position with the foot facing rearward.
Maintenance And
Servicing
Procedures not specifically
explained in this manual
must be performed only by a
qualified technician.
To prevent
serious injury
from tool failure:
Do not use damaged
equipment. If abnormal noise
or vibration occurs, have the
problem corrected before
further use.
For technical questions, please call 1-800-444-3353.
Page 6
Cleaning, Maintenance, and
Lubrication
1.
BEFORE EACH USE, inspect the
general condition of the tool. Check
for loose hardware, misalignment or
binding of moving parts, cracked or
broken parts, and any other condition
that may affect its safe operation.
2.
No lubrication is necessary until
the product is dismantled for
maintenance.
3.
After Use, wipe external surfaces
of the tool with clean cloth, then dry.
4.
Occasionally pull out the Pull Pin
(10) and place a drop of lubricating
oil over it’s shank.
SKU 42950
For technical questions, please call 1-800-444-3353.
Page 7
PLEASE READ THE FOLLOWING CAREFULLY
The manufacturer and/or distributor has provided the parts list and assembly diagram in
this manual as a reference tool only. Neither the manufacturer or distributor makes any
representation or warranty of any kind to the buyer that he or she is qualified to make any
repairs to the product, or that he or she is qualified to replace any parts of the product.
In fact, the manufacturer and/or distributor expressly states that all repairs and parts
replacements should be undertaken by certified and licensed technicians, and not by the
buyer. The buyer assumes all risk and liability arising out of his or her repairs to the
original product or replacement parts thereto, or arising out of his or her installation
of replacement parts thereto.
ASSEMBLY DIAGRAM
Parts List
Part
Description
Qty
1
Handle
1
6
Outer Tube
1
7
Retaining Ring
1
8
Swing Plate
1
9
Pull Pin Handle
1
10
Pull Pin
1
11
Spring
1
12
Washer #2
1
13
Retaining Pin
1
14
Flat Washer
1
15
Bearing
1
16
Thick Washer
1
17
Nut
1
18
Spindle
1
19
Foot
1
20
Screw
1
21
Nut
1
Lip of Swing
Plate (8)
1
21
20
6
8
9
10
11
12
13
14
15
7
16
17
18
19
Record Product’s Serial Number Here:
Note: If product has no serial number, record month and year of purchase instead.
Note: Some parts are listed and shown for illustration purposes only, and are not
available individually as replacement parts.
SKU 42950
For technical questions, please call 1-800-444-3353.
Page 8