1
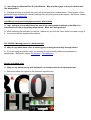
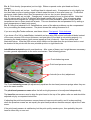
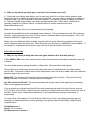
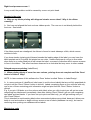
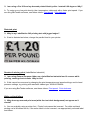
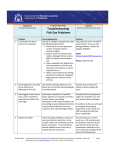
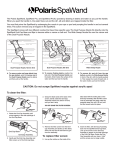
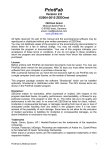
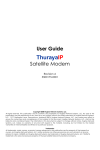
Print Quality & Completeness
Please note, there is much commonality between the different models of LabelStation and therefore
it is advisable to read the comments on other models if you cannot find a diagnosis relating to your
own.
All labels are blank
Q. My printer goes through the motions of printing and I can even hear the print head
buzzing, but nothing is printed. What can I do?
A. Check that the ribbon is loaded correctly (waxy side down). Videos: Pro 200 & Pro 300.
Industrial models.
All labels are blank
Q. My printer goes through the motions of printing but not everything (sometimes nothing) is
printed. What causes this?
A. On the label template, check that no boundary box (which appears around a label object when it
is selected) overhangs the label. A small amount of overhang is permissible, but if the object which
does not print contains characters from a printer font try changing to a Windows font.
Every other label is blank
Q. Alternate labels are blank. How can I correct this?
A. Make sure the label height (depth) you have entered in the template of your label corresponds to
the physical height of the label. Likewise, make sure that the vertical gap has been measured
correctly. Where there is any doubt, enter a slightly lower figure.
BarTender videos: Page setup. Gap setting.
It is helpful to know that the gap sensor only begins looking for the gap when the gap is expected —
based on the label dimensions you have entered in the template. If the label height specified in the
template is slightly greater than the actual height of the label then the sensor will be late looking for
the gap and possibly miss every other label.
Occasional label is blank
Q. My printer is producing occasional blank labels when I print die-cuts. How can I prevent
this?
A. Check the following:
1. Calibration of the printer's gap sensor. The gap sensor is an optical device. When you change
label stock, recalibration can be necessary because backing paper varies slightly in optical density
from one roll to the next.
2. Try reducing the gap size setting in the software by 1mm. BarTender video: Gap setting
3. Check that the labels are not physically damaged or flawed. Check that none are missing from
the roll and, if one is missing, check that it is not stuck inside the printer somewhere?
If the blanks are random there could be a marginal setting causing the trouble. In other words, if the
label height you have entered in the template is exactly equal to the physical height of the label, plus
the vertical gap relating to it, the printer might only see the passing of some labels. When designing
a template, if you are unable to make precision measurements, it is usually best to round numbers
downwards. For example, if the gap seems very slightly under 3mm then entering 2mm in the
template would be fine.
4. Maybe your label stock is of the black line type but the template is set to gap, or vice versa.
BarTender videos: Gap setting. Black line setting.
Trailing labels are blank
Q. The printer produces one correct label followed by blanks then stops with a red error light.
How can I correct this?
A. Set the label template to ‘Gap’ or ‘Black Mark’ as appropriate. BarTender videos: Gap setting.
Black line setting.
Missing text or image (LabelDirect only)
Q. Blank labels are produced. Drawing objects are printed but not the text. How can I
remedy this?
A. This is an early LabelDirect problem. If your version of LabelDirect produces a print preview
window before printing, click the Restart button when this window appears. Also switch the printer off
for a few seconds. Ideally, upgrade to the latest version of LabelDirect.
Q. Not all the objects on my label are printing even though they appear on screen. What’s
happening?
A. LabelDirect users only. If any label object is located entirely or partly outside the boundary of the
label then LabelDirect produces this message: ‘Warning: One or more of the label elements extend
outside the label.’ This may result in a failure to print.
LabelDirect and BarTender users: Even an empty text box left forgotten in a corner of the screen
during development of the label can cause the label to come out blank. Worse still, if you have set
LabelDirect to suppress the related warning you can be left with no clue to what’s wrong.
Useful tip: Select any object on the label then use the Tab key on your keyboard to rotate through all
the other objects. You might be surprised by what you find!
Character cut-off
Q. Why is the right-hand side of a character in a text box cut off?
A. LabelDirect users only. If the incomplete character is italicised, the character has probably
overlapped the boundary box. Insert a space after the incomplete character.
If you have recently adjusted the value in X-axis offset to overcome an alignment problem then you
might need to exaggerate the width of the label in Page Setup. E.g. if the label is 50mm wide then
set the label width in the template to 55mm. BarTender videos: Page setup.
Banner/long label problems (Pro 200/Pro 300)
Q. Why does my very long label (banner) only print partially or cause errors?
A. The maximum length of a banner is as follows:
Pro 200: nominally 2000 mm. (exact value depends on labelling software in use)
Pro 300: nominally 1000 mm. (exact value depends on labelling software in use)
If you are using LabelDirect, note that the Design window shows a dotted line at the limit of the label
height.
See the LabelStation Specification/Comparison sheet.
Printer stalls almost immediately
Q. Why does my printer lay down the first row of pixels then stall and go to error condition?
A. The print-head connector might be loose. The printer shuts down if head currents are spurious.
Contact Advanced Labelling for assistance.
Network 'ping' test failure
Q. Why does the presence of a logo or picture file prevent printing to a networked printer?
Why does the ping test run to timeout?
A. If you are using an early version of LabelDirect and your operating system is 64-bit, fix this
problem by ignoring the Image drivers and using a 64 bit driver.
Unwanted black line
Q. Why is a vertical black line printed through all my labels?
A. This is caused by either a faulty print head or faulty PCB. Return the printer for repair.
Unwanted gap
Q. I am using an Industrial/Pro XL LabelStation. Why are there gaps in the print which look
like dead pixels?
A. Industrial and Pro XL printers can print with what appear to be dead pixels. If the location of the
pixels shifts with different print density settings then try printing at a slower speed. BarTender videos:
Print speed. Print darkness.
LabelDirect ready-made template produces blank labels
Q. I am trying to print a label based on one of the ready-made templates under Metric in
LabelDirect but I am only getting blank labels. What am I doing wrong?
A. When selecting the template you require, make sure you click the 'New' button to create a copy of
it. You cannot edit the templates themselves.
Pro 200/300: Missing pixels in a horizontal line
Q. Why do my labels have a line of missing print running horizontally through them?
A. If you are using an electric cutter, try reducing the print density (darkness/temperature)
substantially. BarTender videos: Print speed. Print darkness.
Patchy and faded print
Q. Why are my labels patchy with faded print or random streaks of unprinted area?
A. See photo below for a guide to the common imperfections.
Pic. A Print density (temperature) set too high. Ribbon expands under print head and forms
creases.
Pic. B Print density set too low. Insufficient heat to deposit resin. If temperature is only slightly too
low then fade occurs on leading edges of black areas because of slow pixel warm-up. If individual
pixels are visible (fabric effect) then temperature is far too low (or print speed to high)
Pic. C Print density set too high. ‘Orange peel’ or wave patterns occur on black areas. Note that
only the narrow part of the H is affected (print head travelled left-to-right). This is because when
fewer pixels are energised the voltage to the head rises (less demand on power overall) and the
temperature rises in those pixels still at work. This can sometimes be compensated for by setting a
lower temperature or faster print speed.
Pic. D Using the Industrial or XL LabelStations, some of the above problems can be compensated
for by increasing the head pressure. The photo shows this setting increased to 3.
If you are using BarTender software, see these videos: Print speed. Print darkness.
If you have a Pro 240 or LabelStation Industrial and are using 300 micron horticultural labels instead
of the more common 200 micron thickness, and one side of your label is not printing properly, try
increasing the head pressure (both screws equally at first) to about 4. See user manual and
illustration below. Note that 300 micron stickin labels can be wider than the print-head and so must
be inserted in the printer with the non-printable portion on right-hand side.
LabelStation Industrial special considerations. After years of heavy use it might become necessary
to make general adjustments to the entire mechanism. See following picture.
Z-axis balancing screw
Print-head pressure screws
Azimuth (burn line) adjustment
The Z-axis balancing screw (tilt adjustment) equalises the two head pressure springs when they are
set to the same number.
The print-head pressure screws allow the left and right pressure to be adjusted independently.
The burn line screws are used to align the print-head to the top of the platen roller arc and should be
adjusted only by a competent technician.
If adjusting the print-head pressure screws does not improve print quality, and it is observed that
when the pressure screws are set equally the print-head pressure remains unequal, adjust the Z-axis
screw.
If the print-head pressure is satisfactory but the print quality remains poor, then probably the printhead is either dirty or worn out.
Q. Why are my labels generally poor now that I have started a new roll?
A. Check that your labels (and ribbon) are not past their shelf life or of poor quality generic origin.
Also check that your ribbon and label stock are compatible. You may need to change your ribbon to
a different type, e.g. from Industrial to General Purpose. Wax ribbon (General Purpose) is suitable
for Thermal Transfer paper labels, wire wrap and heat-shrink tube. Resin ribbon (Industrial) is
generally suitable for synthetic labels. Industrial ribbon is scratch resistant and more
chemical/weather proof.
Make sure your label roll is not contaminated during handling.
Consider the possibility that the print-head needs cleaning. This should be done with IPA (Isopropyl
Alcohol). Apply sparingly with a soft, lint free cloth or untreated (balm free) tissue paper. Don’t use
abrasive materials or aggressive techniques.
Maybe you have fitted the ribbon wrongly, possibly with the waxy side facing upwards at the point
where it passes under the print-head. Also check that you are using a LabelStation mains adaptor. If
the adaptor is underpowered the printer may continue to work but produce faint print.
Print faint on one side
Q. Why are my labels printing with one side good and the other faint and patchy?
A. Pro 200/Pro 300: One of the catches which locks down the print head/ribbon assembly (main lid)
is broken.
The print-head pressure spring is broken or dislocated. Remove ribbon and inspect.
There might be a contaminant stuck to the white roller that is located beneath the rubber platen
(drive) roller. Remnants of label stuck to this white plastic roller can tilt the rubber roller and offset the
pressure against the print head.
Model 342: The catch which locks down the print-head assembly is broken. The print-head leaf
spring is broken or dislocated. Remove ribbon and inspect.
Pro 240, Industrial & ProXL: The print-head pressure springs might need adjusting or equalising.
Refer to the appropriate manual.
If you are printing on labels less than100 mm wide (less than the width of the print-head), such as
140 x 25 @ 3 across Stick-in labels, the print-head can tilt slightly and cause faint print on one side of
the label. In this case, independent adjustment of the head pressure springs is necessary to
compensate.
In a case study of the above 140 x 25 Stick-ins (300 micron thick), the following settings proved
necessary to obtain satisfactory results printing on the glossy side of these labels using General
Purpose ribbon:
Temp/Darkness: 0
Speed: 101.6 mm/sec
Left head pressure screw: 4
Right head pressure screw: 2
In any model, the problem could be caused by a worn out print-head.
Streaks in the print
Q. Why are my labels printing with diagonal streaks across them? Why is the ribbon
creasing?
A. You have not aligned the front and rear ribbon spools. The rear one is not directly behind the
front one. See below:
If the ribbon spools are misaligned, the ribbon is forced to travel sideways a little, which causes
wrinkles to form.
If you have streaks (missing print) biased towards the leading edge of the label, you may have the
label template set to Cut while the printer has no cutter. Newer machines do not go to error state
when there is no cutter fitted but do still retract the label, a reversal of direction which causes creases
to form in the ribbon. This effect has been observed in an Industrial but may occur in other models.
Delayed response printing (LabelDirect)
Q. When printing labels of more than one column, printing does not complete until the ‘Done’
button is clicked. Why?
NOTE: In later versions of this software the ‘Done’ button is called ‘Return to Label Design’.
A. In some versions of LabelDirect, label rows (in multi column labels) that are not fully populated do
not print until the ‘Done’/’Return’ button is clicked. Labels comprising three or four columns with only
one or two of them containing print information might not print until the ‘Done’/’Return’ button is
clicked.
E.g. If you print 10 labels on a four-column wide label, when you click to print you will get two rows
comprising four labels each immediately, then after clicking ‘Done’/’Return’ get one row comprising
two labels and two blanks. If you have set up to print one label only, you will get nothing until you
click ‘Done’/’Return’.
This is intended to avoid wasting labels when successive batches are printed, because it allows one
batch to end and another to begin mid way across a row of labels (database use only), but can be
confusing when printing non database driven labels.
Blotchy bar code
Q. I am using a Pro 300 and my barcode printed blotchy after I rotated it 90 degrees. Why?
A. Try using a very low print density (aka: temperature, darkness) with a faster print speed. If you
are using BarTender software, see these videos: Print speed. Print darkness.
Distorted print
Q. Why is my LabelStation 342 printing text with jagged edges?
A. If text is distorted as below, change the parallel lead to your printer.
Streaks of missing print (LabelStation Industrial)
Q. I am using General Purpose ribbon on a LabelStation Industrial and it creases while
printing, causing short streaks. Why is this?
A. If this cannot be overcome by changing the print temperature and speed settings, and/or head
pressure settings, try printing with wax/resin ribbon type: 92-BLK-PR443A.
If you are using BarTender software, see these videos: Print speed. Print darkness.
White on black failure
Q. Why does my reversed print area (white font on black background) not appear as it
should?
A. You are probably using a printer font. Printer fonts cannot be inversed. For white-on-black
printing use a Windows font or, if the entire label is to be inversed, use appropriately coloured label
and ribbon.