1
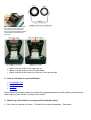
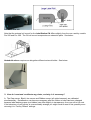
How To Do It: Hardware
The Printer
Q. How do I tell which printer driver to use?
A. See below to match a driver to your LabelStation printer.
Model
Driver
CN
TTP-245C
Pro 200
TTP-245 Plus, TTP-247 or TT027-50 (Plug & Play determines which)
Pro 300
TTP-343 Plus, TTP-345, or TT027-70 (Plug & Play determines which)
Pro 240
ME240
Industrial USB (203 dpi)
TTP-246M Plus (may be Ethernet upgraded but remains on 246 driver)
Industrial USB (300 dpi)
TTP-344M Plus
Industrial Network (203 dpi)
TTP-2410M or T-0612 (Ethernet as standard)
Industrial Network (300 dpi)
TTP-346M or T-0613
Pro XL Network (300 dpi)
TTP-384M
NOTE ABOUT LABELLING SOFTWARE
Many of these drivers are technically identical but, when used with BarTender, licensing rules restrict
the use of all but the appropriately named one.
If you are printing from an early version of LabelDirect (inc. v.3) over a network connection we
recommend using a Nice driver.
Q. What’s the basic set up procedure to use my Pro 200/Pro 300 ?
A. For a simple guide click here. This video shows how to print on continuous vinyl label.
Q. How do I fit a ribbon in my LabelStation?
•
•
•
•
LabelStation CN
Pro 200/Pro 300
Pro 240
Industrial
Pro 200/Pro 300: See below for further illustrations
Note: The loose end of the unused
(new) ribbon comes off the top of
the rear spool in the direction of
the rear of the printer before passing
underneath the print-head to the
front spool.
•
•
•
Make sure the ribbon is the right way up.
Make sure the ribbon covers the print head.
Make sure the ribbon feeds from the top of the rear spindle.
Q. How do I fit labels in my LabelStation?
•
•
•
•
LabelStation CN
Pro 200/Pro 300
Pro 240
Industrial
When adjusting the label guides we would advise applying pressure to both guides simultaneously
rather than just one of them (contrary to the video!)
Q. What if my roll of labels is too large to fit inside the printer?
A. You need an external roll mount. This has to be ordered separately. See below:
Pro 200 & Pro 300
Note that the external roll mount for the LabelStation CN differs slightly from the one used by models
Pro 200 and Pro 300. The CN roll mount incorporates an extension plate. See below:
Heatshrink sleeve requires an altogether different external holder. See below:
Q. How do I reset and recalibrate my printer, and why is it necessary?
A. The Gap sensor, Black Line sensor and Ribbon sensor (all optical sensors) are calibrated
simultaneously. Recalibration can become necessary after the ribbon or label has been changed
because label backing paper (and ribbon) can differ slightly in transparency from one roll to the next.
If the behaviour of your printer is unaccountably strange you might need to reset it first, possibly even
returning it to ‘Factory Default’ settings.
Please note that many calibration and reset operations can be done more simply via your PC using
the Diagnostic Tool if your printer is connected USB. The Diag Tool is found in later versions of the
CD that came with your printer (Utilities folder), also in later version of LabelDirect (click 'Help' >
'Diagnostic Tool'). In even later versions of LabelDirect you will also find that calibration can be done
directly by clicking 'Printer Settings' > 'Change' > 'Calibrate Sensor'.
To learn how to recalibrate your printer independently of a computer, click below as appropriate:
•
•
•
•
•
LabelStation CN (see User Manual)
Pro 200/Pro 300
Pro 240 (see User Manual)
Industrial (see User Manual)
LabelStation 342 can only be recalibrated manually, as follows:
342 Recalibration
1. Switch the printer off and fit blank labels (unprinted) of the type you want to use.
2. Press the Pause button and, while keeping it pressed, switch the printer back on.
3. Release the button when the labels advance. Calibration is complete when two green LEDs
are illuminated. If the printer begins to print dump information afterwards, switch it off (you
don’t need this).
Ribbon sensor recalibration is unnecessary.
342 initialise/reset
Resetting the printer becomes necessary when the firmware has been corrupted.
1. Switch the printer off.
2. Press both buttons (Pause & Feed) and, keeping them pressed, switch the printer on.
3. Release the buttons any time after all three LEDs have flashed in sequence, which they do
very briefly.
4. Now recalibrate the gap sensor.
NOTE: Steps 1 to 3 restore the printer to its default settings and (342 only) clear the memory of all
downloaded labels.
Q. Pro 200/Pro 300 printer: How can I test it independently of the computer?
A. Click here to see a video showing how to initiate a self-test operation.
Q. LabelStation 342: How can I test it independently of the computer?
A. To self-test the printer, do the following:
1. Install in the printer the widest label you have.
2. Switch the printer off then, while pressing the Feed button, switch it back on.
3. Release the Feed button when the printer feeds out labels.
The printer should do the following:
•
•
•
•
Calibrate label pitch.
Print a check pattern so that you may look for missing pixels and observe general print quality.
Print internal settings and values (see below).
Enter 'dump' mode and print code which mostly is of little interest to the non specialised user.
The internal settings printed are as follows:
•
•
•
•
•
•
•
•
•
•
•
•
•
•
Model & firmware version.
Mileage.
Flash times.
Check sum.
Serial port setting.
Code page setting.
Country code setting.
Print speed setting.
Print density setting.
Label size setting.
Gap/Bline (Black line) width and offset setting.
Backing paper transparency.
File list.
Memory available.
Q. Pro 200/Pro 300 printer: How do I interrogate the printer for internal information?
A. Except with early Pro 200 and Pro 300 models, this may be done using the following Diagnostic
tool buttons:
•
•
•
Print Test Page
Dump Text
Configuration Page
Alternatively, to make your Pro 200/Pro 300 printer perform a self test operation, do the following:
1. Switch off the printer and fit the widest possible blank labels, ideally continuous rather than
die-cut.
2. Press the Feed button (on the top of the printer) and switch the printer on while keeping the
button pressed.
3. Release the button any time while the LED is flashing amber. NOTE: It will flash red five times
before flashing amber five times.
Among other things, the printer will print internal settings and a check pattern to test the condition of
the print head. When the printer begins to print ‘dump’ information afterwards, switch it off if you
don’t need it.
To see a video of this and other ‘power-on utilities’ being conducted click here.
Q. Pro 200/Pro 300 printer: How do I recalibrate independently of the computer?
A. To re-calibrate the sensitivity of all sensors, do the following:
1. Switch the printer off and fit the labels and ribbon you wish to use.
2. Press the button on top of the printer and, while keeping it pressed, switch the printer on.
3. You will see the LED flash randomly as the printer resets, then you will see the LED begin a
series of five distinct red flashes. Release the button any time during these five flashes. If you
hold the button too long the LED will flash orange five times then green five times. If you miss
the red flashes, don’t worry, just switch the printer off with the button still pressed. Then try
again. You cannot harm the printer.
NOTE: Recalibration can become necessary after the ribbon or label has been changed, this is
because label backing paper (and ribbon) can differ slightly in transparency from one roll to the next,
but if the behaviour of your printer is unaccountably strange you might need to reset it first, possibly
even returning it to ‘Factory Default’ settings. The purpose of the ribbon sensor is to pause printing
when the ribbon expires.
Q. How do I set up a 245 or 343 driver (Pro 200/Pro300) directly using Properties?
A. Do as follows:
Right-click the appropriate driver in the Windows Driver folder, and select ‘Printer Properties’ from the
drop-list. Use the instructions below, depending on your requirements:
Post Print Action
General > Printing Preferences* > Stock > Post Print Action >
then
Use Current
None
Tear-Off
Peel-Off
Cut
Partial Cut
Click Apply
Speed/Density
General > Printing Preferences* > Options > Options >
then
Print Speed
Darkness
Click Apply
Page Set-up
General > Printing Preferences* > Page Setup >
then
New
Edit
Click Apply
* Printing Preferences might appear directly in right-click drop-list
Q. Pro 200 & Pro 300: How do I transfer label files to the printer’s Flash memory so that I can
use the printer independently of a computer?
A. Firstly you need the KP200 remote keyboard (KDU4350) to access the exported files once they
are in the printer.
LabelDirect Basic software: If you are using version 2.0 or later, you must upgrade to the
Professional edition. To upgrade your version or edition of LabelDirect, please contact Sales at
Advanced Labelling.
For a simple label do as follows:
File > Export > To Printer
BarTender UltraLite software: You can export files without an upgrade.
For a simple label do as follows:
File > Export Printer Code Template > KDU200 (then follow the wizard)
All software: Sophisticated labels, e.g. with variable data and/or special label geometry require
attention to a number of technical details which are explained elsewhere in these Support files.