1
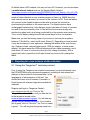
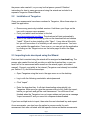
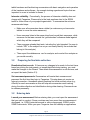
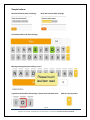
Tangerine™ User ’s Guide
Table of Contents:
Preface: Quick reference setup guide
1.
2.
3.
4.
5.
6.
Hardware selection and setup
Preparing for a new instance of data collection and installation of Tangerine
Collecting data
Synchronization, backup and export of data
Hardware and software maintenance and troubleshooting
Installation of other documents, productivity tools or software
Annex 1: Training Topics and Agenda
Annex 2: Tangerine on Kindle Quick Reference Guide
Annex 3: Tangerine on Nexus Quick Reference Guide
Annex 4: Tangerine Alternative Tip Sheet
Annex 5: Guide to supervisor responsibilities
Note: This user’s guide assumes knowledge of EGRA/EGMA/SSME survey
methodology and is not a methodological guide to conducting these types of oral
assessments. For further information on administering the assessments, please refer
to the toolkit at www.eddataglobal.org .
Authors:
Sarah Pouezevara, RTI International [email protected]
Carmen Strigel, RTI International [email protected]
About TangerineTM:
Tangerine is open-source electronic data collection software designed for mobile devices.
Its primary use is to enable recording of students’ responses in oral early grade reading
and mathematics skills assessments. Tangerine is also used to capture interview responses
from students, teachers, and principals.
Page 1
Tangerine™ User’s Manual - September 2012 – RTI International – Licensed under: Creative Commons BY-NC-SA
Quick Reference Setup Guide
Print out this quick reference guide or use it to send basic instructions by email.
Before installing anything:
•
Allow the tablet to install files. Find the Settings menu of your tablet. Find a menu
item labeled, “Device”, or “Security” and look for an option “Allow installation of
Applications” or “Unknown sources” that allows for installation of apps from sources
other than e.g. amazon or Google Play Store. Enable this function.
•
Uninstall all previous versions of Tangerine. In a main “Apps” menu, see if you
there already is an orange Tangerine icon indicating that a version of Tangerine has
already been installed on this particular tablet. Just touch and hold until you get a
menu with the option to “Remove from Device”. Alternatively, find the “Apps” menu on
the tablet, choose the Tangerine icon, and choose “Uninstall” or similar command
To install Tangerine, ensure you are connected to the web, then:
•
go to the following URL, directly from the tablet, which will lead you to the correct .apk
file to download: http://www.tangerinecentral.org/dlapp
•
You will know that the file is downloading when you see a small number (1) next to
the device name in the upper left-hand corner, or find there a small arrow pointing
down, or find the app listed in the download section of your device. Touch the
number/arrow/listing and install the app.
•
When it is done installing, click “Open”. It may take a little while, but you will know
when it is finished you will see a login screen. You have now installed the application.
From now on, you can get into the application by clicking on the Tangerine icon on
the home page or within the Apps menu.
To load the assessment(s) into the application:
•
Log in with the following credentials: admin/password
•
Click “Import”. Enter the first of the below download key to access the assessments
that are sitting on the server. It will import them into the Tangerine application. Make
sure you give the app some time to fully finish the import, before you go back and get
the next assessment. You will see a list of items in a box under “import successful”,
when the import was completed and the Tangerine in the top left corner does not
rotate anymore. Download keys:
Student [instrument; e.g., EGRA]: _______________ [insert key]
Student [instrument; e.g., EGMA]: _______________ [insert key]
Page 2
Tangerine™ User’s Manual - September 2012 – RTI International – Licensed under: Creative Commons BY-NC-SA
Teacher: _______________ [insert key]
Principal: _______________ [insert key]
If you experience any errors, logout and then login again with the same username and
password (admin/password). Once you have all assessments imported into the application,
Log out of the application by touching the word “logout” in the upper right-hand corner of the
screen.
To simulate the role of an enumerator, log in again using a personal username/password. We
suggest for username to use your Firstname initial immediately followed by your Lastname,
and for password, the name of your project or something equally easy to remember.
You should now see the all your assessments listed.
To start an assessment, simply click on the arrow preceding the title of the assessment and a
new set of options open up for the assessment.
•
The Play
•
The Graph
icon provides access to the list of assessments previously collected by
this enumerator and options for syncing / back up to the central server.
icon starts a new assessment
Information on completing the assessments:
•
Note that the instrument is made up, like the paper, of different “pages”. Pages may
have different formats, e.g. one is a consent page, one a student background
information page, others are grid pages that contain the items from timed tests, e.g.
the letter name subtest, others are question/answer formats. To go from one page to
another, click “Next”. However, if all fields are not completed, you will not be allowed
to advance.
•
On some pages you will see at the very top a “Help” button. Touching that will provide
some more guidance on how to administer the text. Below the Help button, similar to
the paper instrument, you find a grey box with the enumerator instructions – like on
the paper, this contains text that the enumerator needs to read to the child (in bold)
and instructions for the enumerator (nonbold or italic). Below the instructions are the
items.
•
In timed test, you will see a start button. The enumerator will hit that to start the timer
counting backwards from 60 seconds and to see the items in the grid. The
enumerator simply touches whichever item was incorrect (to self-correct, just touch
the same item again to de-select it). When the timer runs out, the system will ask the
enumerator to mark the last item attempted. Alternatively, if a child has completed all
items before the 60 seconds ran out, the enumerator will hit the Stop button to stop
the timer. The enumerator then selects the last item attempted and then move on by
hitting ‘next’ to the next subtest.
Page 3
Tangerine™ User’s Manual, v.10 – September 2012 – RTI International
•
The system is programmed to automatically declare “autostop” if the first line of items
was marked wrong. In this case, the enumerator has only to press “Next”.
•
At the end of the assessment, click “Save”, and then “Start new assessment”
•
To get back to the list of tests, click on the round Tangerine
corner.
icon in the top right
To send data to the server:
•
Connect to wifi/internet.
•
From the list of tests, click on the square “data” icon to the right of the test name. You
will see all of the tests that have been collected by that tablet.
•
Click “Detect options”
•
When you see the option “Cloud” appear, click on it. (It will turn yellow to indicate that
it is activated.).
Tangerine icon:
Delete
Play
Login screen:
Data
Edit
Duplicate
Page 4
Tangerine™ User’s Manual, v.10 – September 2012 – RTI International
1. Hardware selection and setup of Tangerine software
1.1
Hardware selection
Minimum requirements. Tangerine requires the following minimum features for
use as a data collection tool. This does NOT assume flexible use as video player,
etc:
• Capacitive touch screen
• Android OS [any starting 2.3]
• HTML 5-capable browser
• Wi-Fi (b/g/n)
• 4GB HDD
• 512MB Memory
• 7 hours battery life (without Internet turned on)
• Ability to install third-party Android applications
Additionally, the following are desired features:
• 3G connectivity
• Flash 10 capability
• GPRS
• mini-/USB port
• mini-/HD slot
The following is recommended:
• 7 inch screen
• Ideally below 1lb. in weight
• Netbooks are also a possibility and should have many of the same
features above, except that input is through the mouse or touchpad and
the operating system remains intact (Tangerine will run entirely off of a
USB removable disk). See separate documentation for Tangerine for
netbooks.)
Suggested compatible hardware. A range of tablets/eReaders meet the
minimum requirements, including the Archos 70, Barnes & Noble Nook Color and
Tablet, Huawei Ideos 7, Samsung Galaxy Tab 7 (starting with original 7 with
Internet only, although the current generation), Cherry Tablet 2. Several RTI
projects are using the original Kindle Fire. Other compatible devices include the
Google/Asus Nexus 7, as well as the new Kindle Fire HD (7 inch and larger
screens). The current (September 2012) recommended model is the Nexus 7
(USD199, USD227 including tax).
Page 5
Tangerine™ User’s Manual - September 2012 – RTI International – Licensed under: Creative Commons BY-NC-SA
However, other models are coming on the market and there may be other suitable
solutions, but further testing needs to be done.
1.2
Hardware purchase and delivery
Purchasing. At this point in time many of the recommended devices may only be
purchased in the US. If you decide on such a device, you shouldplan significant
time in advance to have the purchase delivered to a US address, and then to
have the hardware delivered to the country for data collection (or hand-carry). The
purchase must be made by an individual using a credit card. When the tablets
arrive, they will automatically be registered to the purchaser, and linked to that
individual’s Amazon.com account (for Kindles), or google account (for Nexus 7).
For Kindles, this also includes including purchase history, billing information,
billing addresses, etc.—and will be enabled to make purchases. Therefore they
need to be deregistered and registered with a new user. For your project, you will
want to create a new Amazon.com or gmail account and assign the devices to
that account.
Setting up your Kindle
1. Create an Amazon.com account with a project-specific name and email
address, and a password that is easy to remember; do not provide a credit
card or other payment information for this account
2. When the Kindles arrive, you will turn them on and it will lead you through a
setup process. You will see a message “Welcome [name of person who
purchased Kindles]”. Next to this message there will be a link that says “Not
[name]? Deregister Kindle”.
3. Click on “Deregister”, and re-register your Kindle to the new name that you
have set up.
Note that each Kindle also has a unique email address. In your project inventory,
you will want to note the serial number of the device, the Kindle name, and the
email address. This information can be found on each device in:
Settings
> More > My Account
You can also manage all of your Kindle devices through the Amazon website:
www.amazon.com/myk
Page 6
Tangerine™ User’s Manual, v.10 – September 2012 – RTI International
Setting up your Nexus
1. Create a gmail account easy to remember.
2. When the Nexus arrive, you will turn them on and it will lead you through a
setup process.
3. Register the devices to the gmail address.
4. Turn off location services and do not allow for using location for search
results, nor use of GPS: Settings/Location services – uncheck all.
5. Do not set up GoogleWallet when (if) asked when you register the devices.
6. Enable screen rotation which is handy for Tangerine: From inside any
application (does not work on home screen), touch the center of the top bar
(same level as where wireless icon and time is). You will see a menu open
(see screenshot), hit the button with the rectangle in between two brackets
next to the dates. It should look like in the screenshot.
7. Make sure Bluetooth is set to off, WiFi to on inside Settings.
8. Disable English language spell checker: Settings/Language & input. Untick
Spell checker and untick Google voice typing.
9. Before you install Tangerine: Go to Settings/Security, and tick the box next to
“Unknown sources”.
Procurement, import and customs requirements will vary from country to
country and depending on the project. If shipping large quantities of equipment,
there may be import duties and customs clearance to arrange. If hand-carrying,
you may need export licenses or other documentation. Customs clearance may
take time. There may be different requirement for tablets, compared to the 3G
routers. It is important to find out what the requirements will be in each situation
and consider that for budget and timeline purposes.
1.3
Recommended accessories
You should plan to purchase a protective case for the device – we like the ones
that feature clip-ins and a zipper to entirely protect the device from dust. It is also
recommended to purchase a stylus and an appropriate soft cloth for wiping the
screen. The only other accessory delivered with the tablet is the power adaptor,
which may be a US model, so you may also need to purchase outlet adaptors for
your country. The AC/DC charger has a voltage adaptor so there is no need to
purchase one.
Page 7
Tangerine™ User’s Manual, v.10 – September 2012 – RTI International
All tablets have a WiFi adapter, but may not have 3G. However, you can purchase
a mobile Internet hotspot such as the Sapido Mobile Hotspot
(http://www.amazon.com/gp/product/B004DM8GV6/ref=oh_details_o04_s03_i00)
which will allow you to connect a USB dongle with a data plan (either for the
month of data collection or over a certain amount of data, e.g. 20MB) from the
local Internet service provider, to connect to the Internet via 3G. Then the tablets
will connect to the Sapido hotspot and be able to access the Internet for
synchronizing the dataset to the remote server. The Sapido devices have
rechargeable batteries that, fully charged, should yield about 6 hours of constant
use and 20 hours of stand-by time. In the field the devices are usually only
switched on when back-up is being conducted for a few minutes every evening.
Thus, one full battery charge should last several days for this use scenario.
Make sure you test the battery power of your device, that may be anywhere
between 7 (KindleFire, used) and 9 hours (Nexus 7). Depending on local context,
it may be necessary to have options for charging the tablets at the end of every
day. Options include: external battery pack, USB-car adaptor, or solar power
adaptor. We have tested the USB-car adaptor sold as a tablet accessory, and it
took about 4.5 hours of continuous driving to fully charge the battery. With a
typical wall outlet, expect that it will take at least two hours to fully charge the
tablet.
2. Preparing for a new instance of data collection
2.1 Using the Tangerine™ test setup wizard
Prior to using the Tangerine test creation environment you should already have
the EGRA/EGMA/survey instruments prepared, including all instructions and
dialogue to be provided to the enumerators, in the
language(s) of administration of the test. You
should also have a list of schools, if possible, in
Excel format with relevant regions/zones/districts
indicated.
Register and login to Tangerine Central –
www.tangerinecentral.org. Click on “My
Tangerine”, and scroll down until you see the link
to the tangerine wizard online
(www.tangerinecentral.org/app). You will see any
groups that you already belong to. If you need to
join a group, click on “Account”, the “Join or create
a group”. You will be given the group name from
Page 8
Tangerine™ User’s Manual, v.10 – September 2012 – RTI International
the person who created it, or you may be that person yourself. Detailed
instructions for how to name groups and using the wizard are included in a
separate Tangerine Wizard Manual.
2.2
Installation of Tangerine
Once your assessments have been rendered in Tangerine, follow these steps to
install the application:
• Remove any previously installed versions. Hold down your finger on the
icon until a remove menu appears.
• Point your tablet's web browsers to this link
www.tangerinecentral.org/dlapp. The download will start automatically.
• When it has finished downloading, click on the download link and choose
“Install”. When it is done installing, click “Open”. It may take a little while,
but you will know when it is finished you will see a login screen. You have
now installed the application. From now on, you can get into the application
by clicking on the Tangerine icon on the home page or within the Apps
menu.
2.3 Importing tests developed using the Wizard.
Each test that is created using the wizard will be assigned a download key. The
person who created the test will provide you with the download key, or you can
read it off in the assessment editor screen on the wizard (again, see wizard
manual). Connect your tablet to the internet (Tangerine must already be installed,
per Section 2.2), and follow these steps:
• Open Tangerine using the icon in the apps menu or on the desktop.
• Log in with the following credentials: admin/password
• Click “Import”.
• Enter the download key. It will start downloading automatically into
Tangerine. Make sure you give the app some time to fully finish the import,
before you go back and get the next assessment. You will know it has
finished when the Tangerine icon no longer rotates and you see a message
“import successful” and you see a list components downloaded.
If you have multiple tests to import, then enter the next download key and repeat.
As an enumerator, you also have the option to access results for each
assessment that were collected with that specific device and delete assessments
Page 9
Tangerine™ User’s Manual, v.10 – September 2012 – RTI International
from a device. Click on the > arrow icon to the left of the assessment name to
open up a list of options for that assessment. The image below shows a list of two
assessments, where the first one has been opened to see the options menu:
3. Collecting data
3.1
Using Tangerine during training
Preparing the database. You may use the steps above to prepare the
assessment and the tablets for enumerator training. The enumerators can
practice entering and saving data, and when you are ready to begin the actual
data collection and no changes were needed to your assessments, you can just
filter your database by date and know which tests were part of training and which
were part of the actual data collection. Similarly, you may use Tangerine for
piloting early versions of your instruments. Remember then to include a
questionnaire item that records the order in which you give the reading passages
if you are testing several different versions of the reading passage. Alternatively,
to create separate versions of the database (i.e., training, piloting, final), just
duplicate your test in the Wizard, by clicking on the duplicate
icon. Then give
the test a different name and download the new test version to the tablets using
the instructions above. Results will not be carried over under duplication, but
double check this before the next collection with the new instrument.
Training topics and duration. Based on pilot experiences with Tangerine
enumerator training, no additional time should be needed with a Tangerine data
collection compared to a paper-based data collection. The training agenda should
be the same, with only an additional one to two hours set aside for introducing the
Page 10
Tangerine™ User’s Manual, v.10 – September 2012 – RTI International
tablet hardware and familiarizing enumerators with basic navigation and operation
of the hardware and software. An example training agenda and topics that are
important to cover is included in Annex 1.
Interrater reliability. Procedurally, the process of interrater reliability does not
change with Tangerine. Please refer to the best practices cited in the EGRA
toolkit or follow those of your project/organization. To summarize the minimum
recommended steps:
• Make sure all enumerators have a tablet (so make sure you have extra
tablets to cover the extra assessors).
• Have everyone listen to the same stimuli and record their responses, while
someone on the team records the ‘gold standard’ reference model against
which they will be compared.
• Then everyone uploads their tests, including the ‘gold standard’ (be sure to
include “IRR” in the subject line so you can easily identify the records that
belong to this analysis).
• Then export the database as .csv for analysis, and conduct the analysis as
you would normally.
3.2
Preparing for final data collection
Reset/reload test records. If there are any changes to be made to the test items
based on piloting the instruments, or issues identified during training, you must
make the changes in the Wizard. Then delete this assessment on all devices, and
re-import the tests (Section 2.3).
Set usernames/passwords. Enumerators will create their username and
password the first time they login to Tangerine. This step does not require an
Internet connection. Usernames should combine first initial and last name (e.g.,
ASmith) for each enumerator as this will help with enumerator work tracking
during the data collection and identification during data cleaning. Passwords can
be chosen personally.
3.2
Entering data
Launch your assessment. Before entering data, you must open the assessment
that you wish to conduct. Some countries may have more than one assessment
developed, i.e., EGRA (potential several in various languages), EGMA, and/or
SSME instruments. When you open Tangerine from the desktop or applications
Page 11
Tangerine™ User’s Manual, v.10 – September 2012 – RTI International
icon and login through the login screen as an enumerator, you will see a list of
available assessments.
To begin the assessment, click the “run” icon. The data icon shown after the
title of each assessment leads to the menu for data syncing to the central server
(see section 4). Enumerators cannot delete assessments from a device.
Types of input. Most input is done through buttons, although some buttons
behave differently than others. Once you have mastered the types of input, each
subtest should be simple to administer, presuming you are familiar with the basic
methodology of assessment or survey administration (not covered in this User’s
Guide). Below are descriptions, with screen shots of the different types of input;
shading in red indicates where you should apply pressure to the screen (either
with stylus or finger) to activate the element.
• Buttons. Most input is done through buttons, including advancing from
screen to screen (“next” button), assigning a student ID, starting or stopping
the timer, or indicating incorrect items in an assessment grid. To use a
button, simply touch the button in the center and release with a short tap or
a firm, but short, press. On grid item pages, the button will turn green to
indicate a wrong answer. You can click a second time to unmark the item
and it will return to grey. You cannot ‘unclick’ the start and stop buttons.
Once you press “Start” or “Stop”, clicking it a second time will have no
effect if the timer has already started. After clicking “Stop”, you can click a
grid item to mark it as the last item attempted. It will be shown in red with a
bracket, as in the example below. Clicking it a second time will have no
effect, but you can change your selection of the last letter attempted by
clicking a different letter.
• List selection. The school name field is an example of an automated list
selection input type. The first step is to place your finger or cursor in the
school name field and begin typing with the touch keyboard that will
appear. As you type, a list will automatically appear with all possible list
choices that have this letter or letters in them. As soon as you see the
Page 12
Tangerine™ User’s Manual, v.10 – September 2012 – RTI International
name of the school you wish to enter, touch the name of the school. The
full details will automatically populate the different fields. If you do not find
the school you want in the list (i.e., if it was a replacement school in the
sample) you can still enter the full details—Name, District, Zone, ID—
manually.
• Automatically generated fields. Certain field values are automatically
filled in. These are the date and time fields, which are generated according
to the date and time that the device is set to when the assessment begins;
and the unique student ID field, which is filled in when the assessor presses
the “Generate” button. (See Section 3.4 for more details). While these fields
can be changed manually, assessors should be instructed not to touch
them, just advance by using the ‘next’ button.
Example of the school list selection feature
While entering text through the keyboard, a list appears. Click on the school in the list to fill in the fields
automatically.
Process. To begin collecting data, start Tangerine, log in and select the
applicable assessment. Note that only data that is explicitly saved at the end of
every test [via the Save button] is complete.
Begin collecting data
1. Open Tangerine by selecting it from the list of applications on your tablet.
2. Login with your username and password (or create a new one)
3. Choose the assessment that you want to conduct from the list of available
assessments start the assessment by choosing the ‘run” icon.
4. Start to test the student – the first screen of each assessment is usually a
date and time verification screen, followed by standard fields such as school
location, student consent form, and student ID, followed by the assessment
subtests.
Page 13
Tangerine™ User’s Manual, v.10 – September 2012 – RTI International
Sample buttons:
Next and Consent (before clicking):
Next and Consent (after clicking):
Grid items (before and after clicking):
Message that appears after clicking “stop”:
A grid item clicked after the message “please touch last item read”:
Mark line wrong button:
Page 14
Tangerine™ User’s Manual - September 2012 – RTI International – Licensed under: Creative Commons BY-NC-SA
Timed subtests. On a timed grid page, you will not see the grid items until you
press “Start”. When you press “start”, the timer will start counting down, and you
will see the items appear in the grid. Once you have started you can not stop and
restart except for exceptional circumstances. If a restart is needed, there is a
button at the bottom of the page for that purpose. Otherwise, do not press start
after the timer has already started counting down. Mark items wrong by clicking
on that item. Re-mark them correct by clicking a second time. Use the line wrong
icon to mark a whole row incorrect. Re-click the line wrong icon to correct the line
all at once. There are three ways to end a timed subtest:
• the program will autostop, if that feature has been turned on in the wizard. If
this occurs, the screen will flash red, and a message will appear that says
“Autostop activated. Discontinue test.”. The next step for the assessor is to
press “next” to move to the next exercise.
• the timer will run out. If the timer runs out while the child is still reading, the
screen will flash red, and a message to “select the last item read” will
appear. The enumerator should ask the child to stop reading, then touch
the last item read by the child when the timer went off. If it is necessary to
mark the last item incorrect, use the “mode” feature (see below). Otherwise,
the next step for the assessor is to press the “next” button.
• the assessor will click the stop button. If a child completes all of the grid
items before the alloted time runs out, the assessor will stop the timer by
using the “stop” button. The next step is to click the last item read, and then
to click “next” to begin the next exercise.
The “Input mode” feature exists because buttons behave differently depending on
what ‘mode’ the application is in. When the timer has started, the buttons are in a
mode that expects a click to mean “mark this item incorrect”. After the timer is
stopped, the application expects that the next click will mean “mark this as the last
item read”. In some cases, the last item read is both the last item AND an
incorrect item. Therefore, the assessor must toggle between modes in order to
mark the button accordingly. There is also a mode for “Capture item at specified
number of seconds”. This is for a special administration case where the subtest is
untimed, but you want to mark the item read at a certain point (i.e., 60 seconds).
Completing an assessment. Upon reaching the end of the assessment (after the
last subtest or student questionnaire), you will see a confirmation page that the
test has been completed, and an overview of results for each subtest (select the
details button on “Subtests completed”). This is for the enumerator’s benefit as a
Page 15
Tangerine™ User’s Manual, v.10 – September 2012 – RTI International
way to verify that all of the subtests were completed. At this point, you must click
“Save Results”
in order for the assessment data to be saved in the main
database. If you accidentally leave this browser window for any reason, the data
will be lost (for example, hitting the browser’s back button, the browser refresh
button, or the Tangerine collect button will cause the data to be lost.)
After saving your test you will see a button to “Perform another assessment”
. You can either press this button to begin assessing another
child on the same test, or you can use the Tangerine icon button
in the upperleft hand corner to get back to the list of available tests and start a new
assessment.
To check the number of assessments collected, return to the list of assessments.
Open the options for the assessment that you are interested in by clicking on the
> to the left of the name. Click on the data icon . You will see a list of
assessments conducted by that assessor for that test. Click on each assessment
to see more details.
3.3
The Student/Participant Identifier
Tangerine allows you to either enter a custom student identifier or to click the
“Create New ID”’ button
to generate a new student ID. The systemgenerated student ID should be the usual choice as several security measures
have been built into the system to ensure that each test /observation corresponds
to a unique entry into the database.
For data collections where one student will undergo more than one assessment
(e.g. English EGRA, Kiswahili EGRA, and English EGMA), we have suggest
preparing index cards that list the various assessments and provide a space to
note the student identifier for each child. If a child reaches an enumerator and the
index card does not yet provide a student ID number (a 6-digit combination of
letters, e.g., XCVRRR), the enumerator must generate a new ID, AND copy it to
the student’s index card. Thus, the enumerators of the second/third assessment
can look at the index card and just copy the student ID by typing it into the
relevant field in Tangerine instead of creating a new one for this student.
Tangerine will tell the enumerator if a student identifier is invalid. The enumerator
shall then double-check the card to make sure she/he didn't make a mistake in
the transcription and press “Next” at the bottom of the screen. If Tangerine still
doesn't accept the Student ID from the notecard, the enumerator shall click
"Create New ID" to create a new one, and write this new identifier down on the
card as well and put a circle around it to indicate the issue. The enumerator of the
Page 16
Tangerine™ User’s Manual, v.10 – September 2012 – RTI International
last assessment for this child should retain the index card to allow for
reconciliation of the observations at data cleaning stage.
For additional confirmation one idea is that each enumerator could have a rubber
stamp and inkpad with a dedicated image that can be stamped on each child’s
hand to easily recognize which and how many assessments that child has already
undertaken. Approaches here may be context specific and new ones need to be
tried. Please give feedback to the RTI Tangerine team as to what worked (or did
not) in a given context.
4.
Synchronization, backup and export of data
4.1
Data storage
At present, all data will be hosted on a secure server which is managed by the RTI
Tangerine team. Check local laws and regulations about export of personal data to
ensure that this is an acceptable solution. For more information contact your
Tangerine administrator.
4.2
Making backups during data collection
Tangerine works in a browser, but does not require an Internet connection. There
are several ways to back up your data during fieldwork, but the easiest way is to
use an existing Internet connection that will send the data to the above-mentioned
(4.1) host and synchronizes between two or more devices within range.
As mentioned in section 2 of this manual, the tablet may not be equipped with 3G.
Where wireless Internet is not available, but a GPRS or 3G mobile phone network
is, there is a workaround. It does, however, have a wireless adaptor and so can
use any wireless Internet connection to back up or synchronize data. At any time
during data collection you can automatically detect what type of data backup is
available.
To send/back up data to the central server
1. Go to the main assessment page by choosing the Tangerine icon in the
upper-left hand corner of the screen.
2. Connect to WiFi/Internet directly from the tablet;
3. From the list of assessments, select the “Data” icon
next to the
assessment name. You will see all of the tests that have been collected by
that tablet for this assessment.
4. Click the “Detect options” button (see screenshot below).
Page 17
Tangerine™ User’s Manual, v.10 – September 2012 – RTI International
5. When you see the option “Cloud” appear, click on it (see screenshot below).
(It will turn yellow to indicate that it is activated) and the data will be sent via
the Internet connection to the central server and then be accessible via the
Tangerine Wizard.
To use the 3G network for data backup, as described earlier, get a USB
Dongle/modem with a SIM card and dataplan from the local telcom provider.
There is usually a one-time set up required using a normal computer to customize
the 3G USB Dongle/modem. The exact steps are different for each telcom, but
are usually easy to follow. Illustratively, in Kenya we used the Safaricom USB 3G
modems. To set it up the following steps were required:
1. Insert the modem into the USB port of your laptop or desktop
2. A window will automatically open on your computer's screen asking you to
install the software necessary to run the broadband modem. Click on OK.
3. Enter the PIN number of your modem's SIM card in the installation wizard
to connect it to the network
4. Enter the modem PIN also into the SAPIDO configuration; alternatively,
remove the PIN from the modem.
5. Secure your wireless by putting a WLAN Key.
6. Set the SAPIDO to dial *99#.
Once this was done, enumerators only needed to plug the USB modem into the
Sapido router, the router started and the WiFi was generated – no further set-up
required. The tablets searched for available WiFi connections and found
“SAPIDO_mobile_hotspot_[number].”
The below image explains the various LED indicators on the device.
Page 18
Tangerine™ User’s Manual, v.10 – September 2012 – RTI International
4.3
Creating master database after data collection is complete
Interoperability standards. After collecting your results through the CSV export
process described above, you can import your dataset into Excel or a statistical
program of your choice. Note that variables names are defined when rendering
the instrument in the Tangerine wizard. The database, one per assessment is
ready for analysis upon export. [Depending on browser and Internet connection, it
may happen that the results file downloads with an extension .part. Just rename
to .csv]
Merging datasets. Each assessment is stored in its own database. Therefore, if
you have conducted multiple tests with one child (i.e., an EGRA and an EGMA),
you will need to merge datasets so that each record is a unique student and
contains their results for both EGRA and EGMA. For this reason, it is very
important to manage the student IDs properly. See section 3.4 for a discussion of
the student ID feature. The process for merging the datasets can be done in a
Page 19
Tangerine™ User’s Manual, v.10 – September 2012 – RTI International
number of ways, which are independent of Tangerine; therefore, this User’s guide
will not go into detail about this process. Instead, contact your EGRA/EGMA
statistician to proceed.
5.
Hardware and software maintenance and troubleshooting
5.1
Maintenance and optimizing performance
Battery maintenance. A new tablet’s battery will last for 8 - 10 straight hours of
use or approximately 20-25 assessments. Performance may be increased if
Internet is disabled and the tablet is powered down when not in use. To fully
recharge the battery, you will need approximately 3 hours.
To maximize battery time, turn off the wireless feature when not in use. You
should only need wireless when you are either updating Tangerine on the tablets
or sending assessment data to the “cloud save”.
Turn off the tablets when not in use. Note the difference between putting in ‘sleep’
mode (screen going black) and powering off by holding the power button of the
device and choosing and option like “Shut down”.
You can see an indication of how much battery life is left by looking at the icon in
the upper right-hand corner of the tablet. Your tablet may make warning sounds or
notifications when battery power is below a certain percentage. When this
happens, you might have time for 2-3 more assessments, but should try to get to
a power source as soon as possible or change devices. Should the device stop
functioning because of low battery, you will not lose the assessments that have
already been saved on your device (even if you have not yet ‘saved to cloud’). If
this happens while you are with a student, however, you may lose the assessment
you are currently conducting.
Other features. There are several other features of the tablets that you can
customize for a better experience, such as screen brightness and screen locking.
Depending on whether you are in a poorly lit classroom, or outdoors in bright
sunlight, you may wish to adjust the screen brightness. Keeping it as low as
possible will also help to maximize battery life.
6.Contact
If you have questions, comments or feedback, or are translating this userguide
into other languages and are ready to share it back to the community, contact
Carmen Strigel ([email protected]) or Sarah Pouezevara ([email protected]).
Page 20
Tangerine™ User’s Manual, v.10 – September 2012 – RTI International
Annex 1: Training Topics and Example Agenda
Training on the use of Tangerine for data collection should be integrated into the regular EGRA
training programs, just as use of paper for marking responses would be. Based on pilot testing,
only an additional hour at most is recommended so that enumerators can become familiar with
the hardware and its main functions.
Topic
Tablet basics
Suggest 1 hour
orientation, including free
time to practice/explore
Login/logout
Practice subtests
Suggest 2 hours, subtest
by subtest, with practice
in pairs.
Troubleshooting
Saving/syncing data
Details
• On/Off/Sleep
• Navigation: touch screen vs. stylus; keypad, including how to hide the keypad.
• Browser: refresh, enter URL
• Settings: check battery life, turn on/off wifi and verify Internet connection;
brightness or screen lock settings; set time and date.
• Touch bottom of screen to show menu items (careful not to touch during testing)
• Icons: settings, wireless, battery, on/off
• Open Tangerine from application list
• Enter UN/P.
• List of tests, openining test options; define each icon.
• Start test using the play icon.
• Logout
Depends on specific assessment(s). General issues to cover:
• Button states (disabled, activated, etc.)
• Using the school information autofill
• Generating student ID
• Start/stop timer
• “mode” feature.
• Ending a test and starting a new assessment
•
•
•
Subtest doesn’t respond
Can’t find current EGRA version
Errors caused by touching wrong, timer start/stop
Depends on local context
Page 21
Tangerine™ User’s Manual, v.10 – September 2012 – RTI International
Annex 2: Tangerine on Kindle – Quick Reference Guide and Tipsheet
Page 22
Tangerine™ User’s Manual, v.10 – September 2012 – RTI International
Annex 3: Tangerine on Nexus – Quick Reference Guide and Tipsheet
Page 23
Tangerine™ User’s Manual, v.10 – September 2012 – RTI International
Annex 4: Tangerine Alternative Tip Sheet
To start:
• Turn on tablet using the exterior buttons on the device
• Locate the “Tangerine” icon (orange square) in your bookshelf or an “Apps” menu
• Touch it once
• Login using your username
• Select the test you want from the list of tests. Open it using the orange arrow icon.
To get back to the test list:
• Click on the round fruit icon in the top left of the screen
To turn on wireless:
• Touch the icons in the top right corner of the screen to active the Wifi, or go via “Settings”
• Touch “wifi”
• Find the SAPIDO wireless hotspot in the list and touch
• Touch “connect”
• Wait for wireless signal icon (without an x) to show up in the list of icons top right
To send test data to the server (EVERY DAY BEFORE LEAVING THE SCHOOL):
• Go to the test list (using the round fruit icon in the top left of the screen)
• Touch the square graph icon to the right of the test that you want to send. You will see a list of all
tests you have administered.
• Touch “detect sync options”
• Touch “cloud save”
• Wait for confirmation that it has saved
• Repeat for each test type (student, teacher, principal) that you have administered.
! Important reminders !
•
•
•
•
For timed grid exercises: Press START when the child starts reading. If the child uses the entire
minute, the timer will stop automatically and the screen will flash. DO NOT PRESS STOP AGAIN. The
next thing to do is mark the last item read. If the child reads everything before the minute is over,
press STOP as soon as the last word is read and then touch the last word read. DO NOT PRESS START
OR STOP TWICE.
For timed grid exercised: Touch an item to mark it wrong. Touch it again to mark it correct if the child
autocorrects or if you have touched it by mistake. A green button with a line through it means
INCORRECT.
Do not ever touch any tablet specific navigation bar, e.g. on the Kindle at the bottom (with home,
arrow, etc.) during a test. During a test you only need the NEXT button to navigate. YOU CAN NOT
GO BACKWARDS OR START OVER.
Never use the “Input mode” buttons UNLESS you must mark the last item wrong. In this case, after
the timer stops and you mark the last letter, change ‘mode’ to “mark item” and touch the item to
mark it wrong.
Page 24
Tangerine™ User’s Manual, v.10 – September 2012 – RTI International
Annex 5: Guide to supervisor responsibilities
Use the following guidelines to modify or create your supervisor guide.
I. Prior to the start of data collection
• (some of this may have been done already by the principal researcher so
you should coordinate closely)
• Create device logsheet, with serial number (and, in the case of Kindles,
Kindle name) and any other accessories that go with the device (charger,
stylus, cover)
• Develop user agreement and check out form
• Carefully proof-read/pre-test the electronic version of the instrument on one
of the devices. Ensure that all subtests, instructions, student dialogue and
items are included and correct. Verify the functionality, including:
o next buttons
o last item marking
o comprehension questions area aligned with distance read in the text
• Download the instrument(s) onto the device. (See user guide section 2.3)
• Verify that each instrument has been fully loaded on the device and all
subtests are present.
• Fully charge all devices
• Ensure that each device is set to the date and time of the country.
• Check out each device to an assessor by receiving a signed copy of the
checkout form and updating the inventory list
II. Before and during the school visit
• Ensure that each enumerator has the device assigned to them and that it is
fully charged.
• Ensure that any alternate devices are charged and ready if needed.
Page 25
Tangerine™ User’s Manual, v.10 – September 2012 – RTI International
• Before leaving the school, verify the number of assessments saved on
each device. (See user guide section 2.3 & 3.2)
• If a network connection is present, upload the data. (See user guide section
4.2). Supervisors should understand how to use the mobile wireless
hotspots if using devices (such as Kindle) that are not enabled with 3G
III. After each school visit
• If network connection was not present at the school, get to a network
connection and upload the data.
• It is up to each project/supervisor to determine whether assessors at the
end of the day will be responsible for their device or if the team supervisor
will be responsible for all of them. The particular arrangement should be
reflected in the device check-out form that each assessor signs.
• Fully charge each of the devices.
IV. At the end of data collection
• Collect the devices and return the user agreement, countersigning it to
confirm that you have received it in good condition.
• Store the devices in a safe place until returning them to the principal
researcher or logistician.
Page 26
Tangerine™ User’s Manual, v.10 – September 2012 – RTI International