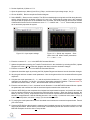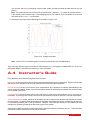
1
STUDENT Workbook IP02 Base Unit Experiment for MATLAB /Simulink Users Standardized for ABET * Evaluation Criteria Developed by: Jacob Apkarian, Ph.D., Quanser Hervé Lacheray, M.A.SC., Quanser Peter Martin, M.A.SC., Quanser Quanser educational solutions are powered by: Course material complies with: Captivate. Motivate. Graduate. *ABET Inc., is the recognized accreditor for college and university programs in applied science, computing, engineering, and technology; and has provided leadership and quality assurance in higher education for over 75 years. c 2012 Quanser Inc., All rights reserved. ⃝ Quanser Inc. 119 Spy Court Markham, Ontario L3R 5H6 Canada [email protected] Phone: 1-905-940-3575 Fax: 1-905-940-3576 Printed in Markham, Ontario. For more information on the solutions Quanser Inc. offers, please visit the web site at: http://www.quanser.com This document and the software described in it are provided subject to a license agreement. Neither the software nor this document may be used or copied except as specified under the terms of that license agreement. All rights are reserved and no part may be reproduced, stored in a retrieval system or transmitted in any form or by any means, electronic, mechanical, photocopying, recording, or otherwise, without the prior written permission of Quanser Inc. IP02 Workbook - Student Version 2 CONTENTS 1 IP02 Modeling 1.1 Background 1.1.1 Modeling Using First-Principles 1.2 Pre-Lab Questions 1.3 In-Lab Exercises 1.3.1 Model Validation Experiment 1.4 System Requirements 1.4.1 Overview of Files 1.4.2 Configuring the IP02 and the Lab Files 5 6 6 9 10 10 12 12 12 2 IP02 Position Control 2.1 Background 2.1.1 Desired Position Control Response 2.1.2 Peak Time and Overshoot 2.1.3 Steady-State Error 2.1.4 IP02 Position Control Specifications 2.1.5 PID Control 2.2 Pre-Lab Questions 2.3 In-Lab Exercises 2.3.1 Simulation 2.3.2 Implementing PV Controller 2.4 System Requirements 2.4.1 Overview of Files 2.4.2 Configuring the IP02 and the Lab Files 14 15 15 15 17 17 18 20 21 21 22 25 25 25 3 IP02 Speed Control 3.1 Background 3.1.1 Desired Speed Control Response 3.1.2 Lead Control Design 3.2 Pre-Lab Questions 3.3 In-Lab Exercises 3.3.1 Simulation 3.3.2 Implementing LEAD Speed Control 3.4 System Requirements 3.4.1 Overview of Files 3.4.2 Configuring the IP02 and the Lab Files 27 28 28 29 35 36 36 37 40 40 40 4 Lab Report 4.1 Template for Modeling Report 4.2 Template for Position Control Report 4.3 Template for Speed Control Report 4.4 Tips for Report Format 42 42 A IP02 QUARC Integration 47 IP02 Workbook - Student Version 43 43 45 v 1.0 A.1 A.2 A.3 A.4 Applying Voltage to IP02 Motor A.1.1 Making the Simulink Model A.1.2 Compiling the Model A.1.3 Running QUARC Code Measuring Position using Encoder Saving Data Instructor's Guide A.4.1 Pre-lab Questions and Lab Experiments A.4.2 Assessment for ABET Accreditation A.4.3 Rubrics 48 48 50 52 53 55 56 57 57 63 IP02 Workbook - Student Version 4 LABORATORY 1 IP02 MODELING The objective of this experiment is to find a transfer function that describes the linear motions of the IP02 cart. The dynamic model is derived analytically from classical electromechanical principles. Topics Covered • Deriving the dynamics equation representing the linear motion servo plant using first-principles. • Obtaining the transfer function that describes the cart velocity with respect to the motor input voltage from the dynamic equation previously found. • Tuning the obtained transfer function and validating it with the actual system response. Prerequisites In order to successfully carry out this laboratory, the user should be familiar with the following: • The required software and hardware outlined in Section 1.4. • Transfer function fundamentals, e.g. obtaining a transfer function from a differential equation. • Basics of QUARCr . • Laboratory described in the QUARC Intergation Section A in order to be familiar using QUARCr with the IP02. IP02 Workbook - Student Version v 1.0 1.1 Background The linear velocity of the IP02 cart with respect to the input motor voltage can be described by the following first-order transfer function Vc (s) K = (1.1.1) Vm (s) τs + 1 where Vc is the Laplace transform of the cart speed vc (t), Vm (s) is the Laplace transform of motor input voltage vm (t), K is the steady-state gain, τ is the time constant, and s is the Laplace operator. The IP02 transfer function model is derived analytically in Section 1.1.1. 1.1.1 Modeling Using First-Principles If we apply Newton's second law of motion to the IP02 system, we can derive the relationship between the force applied to the cart by the DC motor and resultant motion of the cart as M v̇c (t) = Fc (t) − Bc vc (t) (1.1.2) where M is the mass of the cart, vc is the linear velocity of the cart, and Beq is the equivalent viscous damping coefficient as seen at the motor pinion. The inertial force due to the motor's armature in rotation is neglected. The driving force, Fc , generated by the DC motor and acting on the cart through the motor pinion can be expressed as Fc = ηg Kg τm rmp (1.1.3) where ηg is the planetary gearbox efficiency, Kg is the gear ratio, τm is the torque generated by the motor, and rmp is the motor pinion radius. To determine Fc as a function of the motor voltage, we will first focus on the electrical components of the system. The DC motor armature circuit schematic is illustrated in Figure 1.1.1. Recall, as specified in [2], that Rm is the motor resistance, Lm is the inductance, Bm is the motor damping, and km is the back-emf constant. Figure 1.1.1: IP02 DC motor armature circuit As is illustrated in Figure 1.1.1, the back-emf (electromotive) voltage, eb , depends on the speed of the motor shaft and the back-emf constant of the motor according to IP02 Workbook - Student Version 6 eb (t) = km ωm (t) = 0 Using Kirchoff's Voltage Law, which states that voltages in a closed-loop circuit must be equal to zero, we can write the following equation Vm (t) − Rm Im (t) − Lm I˙m (t) − km ωm (t) = 0 Since the motor inductance, Lm is much less than its resistance, it can be ignored. Solving for Im (t), the motor current can be described as Vm (t) − km ωm (t) Im (t) = (1.1.4) Rm By introducing the motor torque constant, kt , we can relate the motor current to the torque generated by the motor as τm (t) = ηm kt Im (t) (1.1.5) where τm is the motor torque, and ηm is the motor efficiency. We can now begin to pull together the electrical and mechanical equations into a complete equation of motion for the IP02 system. Substituting Equation 1.1.4 and Equation 1.1.5 into Equation 1.1.3 yields: Fc (t) = ηg Kg ηm kt (Vm (t) − km ωm (t)) Rm rmp (1.1.6) The translation between the angular velocity of the motor shaft and the linear velocity of the cart can be expressed as ωm (t) = Kg vc (t) rmp (1.1.7) which allows us to define the force applied to the cart in terms of the linear velocity of the cart by substituting Equation 1.1.7 into Equation 1.1.6 as Fc (t) = ηg Kg ηm kt (Vm (t)rmp − km Kg vc (t)) 2 R rmp m (1.1.8) Now that we have the force applied to the cart expressed as a function of the input voltage, we substitute Equation 1.1.8 into the equation of motion Equation 1.1.2 M v˙c (t) + Bc vc (t) = ηg Kg ηm kt (Vm (t)rmp − km Kgvc (t)) 2 R rmp m After collecting the terms, the equation becomes ( ) km ηg Kg2 ηm kt ηg Kg ηm kt Vm (t) M v˙c (t) + + Bc vc (t) = 2 rmp Rm rmp Rm This equation can be re-written as M v˙c (t) + Beq vc (t) = Am Vm (t) IP02 Workbook - Student Version (1.1.9) v 1.0 where the equivalent damping term is given by Beq = 2 ηg Kg2 ηm kt km + Bc rmp Rm 2 R rmp m (1.1.10) ηg Kg ηm kt rmp Rm (1.1.11) and the actuator gain equals Am = IP02 Workbook - Student Version 8 1.2 Pre-Lab Questions Before you begin the lab experiments in Section 1.3, you should study the background material presented in Section 1.1, and work through the questions in this section. 1. In Section 1.1, we obtained Equation 1.1.9 that described the dynamic behavior of the cart speed, vc , as a function of the motor input voltage, vm . Starting from this equation, find the transfer function VVmc (s) (s) . 2. Express the steady-state gain, K, and the time constant, τ , of the first-order process model in terms of the M , Bm , and Am parameters. 3. In the analysis performed in Section 1.1, the inertial force due to the rotating motor armature was neglected. If the inertial force of the motor armature as seen at the cart is included in the equation of motion, by applying Newton's second law of motion and D'Alembert's principle we can recreate Equation 1.1.2 as M v̇c (t) + Faj (t) = Fc (t) − Bc vc (t) (1.2.1) The armature inertial force due to the motor rotation acting on the cart can be expressed as a function of the armature inertial torque using Faj = ηg Kg τaj rmp (1.2.2) By applying Newton's Second Law of motion, we can express the armature inertial torque as Jm ω̇m (t) = τaj (t) (1.2.3) Generate the equation of motion for the more accurate model. 4. How will the revised model you found in Question 3 affect the steady-state gain, K, and the time constant, τ ? Revise the model parameters if necessary. IP02 Workbook - Student Version v 1.0 1.3 In-Lab Exercises The main goal of this laboratory is to find a transfer function (model) that describes the linear motion of the IP02 cart as a function of the input voltage. In this laboratory, you will conduct an experiment to fine tune the parameters of the transfer function you calculated in Section 1.2 to validate them. Experiment Setup The q ip02 mdl Simulink diagram shown in Figure 1.3.1 is used to perform the modeling exercises in this laboratory. The IP02 Speed subsystem contains QUARC blocks that interface with the DC motor and sensors of the IP02 system, as discussed in the QUARC Integration Lab Section A. The IP02 Plant Model subsystem uses a Transfer Fcn block from the Simulink library to simulate the IP02 system. Thus both the measured and simulated cart speed can be monitored simultaneously given the set open-loop input voltage. Figure 1.3.1: q ip02 mdl Simulink diagram used to model IP02 Note: Before you can conduct these experiments, you need to make sure that the lab files are configured according to your IP02 setup. If they have not been configured already, then go to Section 1.4.2 to configure the lab files before you begin. 1.3.1 Model Validation Experiment In this experiment we will adjust the parameters you found in Section 1.2 to tune the transfer function. Our goal is to match the simulated response as closely as possible to the response of the actual system. To create a step input: 1. Double-click on the Signal Generator block and ensure the following parameters are set: • Wave form: square • Amplitude: 1.0 • Frequency: 1 • Units: Hertz IP02 Workbook - Student Version 10 2. Set the Amplitude (V) slider to 1.0 V. 3. Open the speed scope, Meas.(0) and Sim.(1) Resp., and the motor input voltage scope, Vm (V). 4. Click on QUARC | Build to compile the Simulink diagram. 5. Select QUARC | Start to run the controller. The IP02 cart should begin moving back and forth along the track, and the scopes should be as shown in figures 1.3.2 and 1.3.3. Recall that the yellow trace is the measured cart speed and the purple trace is the simulated trace. By default, the steady-state gain and the time constant of the transfer function used in simulation are set to: K = 0.1 rad/s/V and τ = 0.01 s. These model parameters do not accurately represent the system. Figure 1.3.2: Input square voltage. Figure 1.3.3: Speed step response. Simulation done with default model parameters: K = 0.1 and τ = 0.01. 6. Enter the command K = 0.125 in the MATLAB Command Window. 7. Update the parameters used by the Transfer Function block in the simulation by selecting the Edit | Update Diagram item in the q ip02 mdl Simulink diagram and observe how the simulation changes. 8. Enter the command tau = 0.02 in the MATLAB Command Window. 9. Update the simulation again by selecting the Edit | Update Diagram and observe how the simulation changes. 10. Vary the gain and time constant model parameters. How do the gain and the time constant affect the system response? 11. Calculate the model parameters Beq , Am and the equivalent innertia term, Jeq , where Jeq is the acceleration coefficient from Question 3 in Section 1.2 using the appropriate workspace variables. Then use Matlabr to calculate the nominal values, K and τ , that were defined in Section Section 1.2. 12. Enter the nominal values, K and τ , that were found in Question 11 in the MATLAB Command Window. Update the parameters and examine how well the simulated response matches the measured one. 13. Create a MATLAB figure that compares the simulated and experimental response, and provide two reasons why the nominal model does not represent the IP02 with better accuracy. When the model is stopped, the Meas.(0) and Sim.(1) Resp. scope saves the last five seconds of response data to the MATLAB workspace in the data x comp parameter. It has the following structure: data x comp(:,1) is the time vector, data x comp(:,2) is the measured position, and data x comp(:,3) is the simulated position. 14. Try varying the model parameters until the simulated trace matches the measured response better. Record your tuned values. 15. Create a MATLAB figure that shows the measured and simulated response of the system using the nominal and tuned parameters. Recall that the position data is automatically saved each time the model is run in the MATLAB workspace under the data x comp variable. IP02 Workbook - Student Version v 1.0 1.4 System Requirements Before you begin this laboratory make sure: • QUARCr is installed on your PC, as described in the QUARC Installation Guide [3]. • You have a QUARC compatible data-aquisition (DAQ) card installed in your PC. For a listing of compliant DAQ cards, see the QUARC User Manual [1]. • IP02 and amplifier are connected to your DAQ board as described the IP02 User Manual [2]. 1.4.1 Overview of Files File Name IP02 Modeling Workbook (Student).pdf setup ip02 modeling.m config ip02.m q ip02 mdl.mdl Description This laboratory guide contains pre-lab and in-lab exercises demonstrating how to model the Quanser IP02 linear plant. The in-lab exercises are explained using the QUARC software. The main Matlabr script that sets the IP02 model parameters. Run this file only to setup the laboratory. Returns the configuration-based IP02 model specifications Rm, kt, km, Kg, eta g, Beq, Jeq, and eta m, the sensor calibration constant K ENC and the amplifier limits VMAX AMP and IMAX AMP. Simulinkr file that implements the open-loop IP02 model using QUARC. Table 1.4.1: Files supplied with the IP02 Modeling Laboratory. 1.4.2 Configuring the IP02 and the Lab Files Before beginning the lab exercises the IP02 device, the q ip02 mdl Simulink diagram, and the setup ip02 modeling.m script must be configured. Follow these steps to get the system ready for this lab: 1. Set up the IP02 without the additional weight as described in the IP02 User Manual [2]. 2. Load the Matlabr software. 3. Browse through the Current Directory window in Matlabr and find the folder that contains the IP02 modeling files, e.g. q ip02 mdl.mdl. 4. Double-click on the q ip02 mdl.mdl file to open the Simulink diagram shown in Figure 1.3.1. 5. Configure DAQ: Double-click on the HIL Initialize block in the Simulink diagram and ensure it is configured for the DAQ device that is installed in your system. For instance, the block shown in Figure 1.3.1 is setup for the Quanser Q2-USB hardware-in-the-loop board. See the QUARC Installation Guide [3] for more information on configuring the HIL Initialize block. 6. Go to the Current Directory window and double-click on the setup ip02 modeling.m file to open the setup script for the q ip02 mdl Simulink model. IP02 Workbook - Student Version 12 7. Configure setup script: The beginning of the setup script is shown below. Ensure the script is setup to match the configuration of your actual IP02 device. For example, the script given below is setup for an IP02 plant without the additional weight and it is actuated using the Quanser VoltPAQ device with a gain of 1. See the IP02 User Manual [2] for more information on IP02 plant options and corresponding accessories. Finally, make sure MODELING TYPE is set to 'MANUAL'. % ############### IP02 CONFIGURATION ############### % Type of Cart Load: set to 'NO_LOAD', 'WEIGHT' IP02_LOAD_TYPE = 'NO_LOAD'; % IP02_LOAD_TYPE = 'WEIGHT'; % Turn on or off the safety watchdog on the cart position: set it to 1 , or 0 X_LIM_ENABLE = 1; % safety watchdog turned ON %X_LIM_ENABLE = 0; % safety watchdog turned OFF % Safety Limits on the cart displacement (m) X_MAX = 0.3; % cart displacement maximum safety position X_MIN = - X_MAX; % cart displacement minimum safety position % Amplifier Gain: set VoltPAQ amplifier gain to 1 K_AMP = 1; % Power Amplifier Type: set to 'VoltPAQ' AMP_TYPE = 'VoltPAQ'; % Digital-to-Analog Maximum Voltage (V); for Q2-USB cards set to 10 VMAX_DAC = 10; % ############################## % ############### LAB CONFIGURATION ############### % Type of Controller: set it to 'AUTO', 'MANUAL' % MODELING_TYPE = 'AUTO'; MODELING_TYPE = 'MANUAL'; % ############################## 8. Run the script by selecting the Debug | Run item from the menu bar or clicking on the Run button in the tool bar. IP02 Workbook - Student Version v 1.0 LABORATORY 2 IP02 POSITION CONTROL The objective of this laboratory is to develop a feedback system to control the position of the IP02 cart. Using a proportional-velocity (PV) control scheme, a controller is designed to meet a set of specifications. Topics Covered • Design of a proportional-velocity (PV) controller for position control of the linear servo within particular requirements. • Simulation of the PV controller using a developed plant model to ensure the specifications are met. • Implementation of the controller on the Quanser IP02 to evaluate performance. Prerequisites In order to successfully carry out this laboratory, the user should be familiar with the following: • The required software and hardware outlined in Section 2.4. • Transfer function fundamentals, e.g. obtaining a transfer function from a differential equation. • Basics of QUARCr . • Laboratory described in the QUARC Intergation Section A in order to be familiar using QUARCr with the IP02. IP02 Workbook - Student Version 14 2.1 Background 2.1.1 Desired Position Control Response The block diagram shown in Figure 2.1.1 is a general unity feedback system with compensator (controller), C(s), and a transfer function representing the plant model, P (s). The measured output, Y (s), tracks the reference signal, R(s), within a particular set of design specifications. Figure 2.1.1: Unity feedback system The output of this system can be written as: Y (s) = C(s)P (s)(R(s) − Y (s)) By solving for Y (s), we can find the closed-loop transfer function: P (s) = Y (s) C(s)P (s) = R(s) 1 + C(s)P (s) (2.1.1) Recall in Linear Servo Modeling [5], the IP02 voltage-to-speed transfer function was derived. To find the voltage-toposition transfer function, we can introduce an integrator (1/s) in series with the speed transfer function (effectively integrating the speed to get position). The resulting voltage-to-position transfer function becomes: P (s) = K s(τ s + 1) (2.1.2) As you can see from Equation 2.1.2, the plant is a second order system. In fact, when a second order system is placed in series with a proportional compensator in the feedback loop as shown in Figure 2.1.1, the resulting closed-loop transfer function can be expressed as: Y (s) ωn2 = 2 R(s) s + 2ζωn s + ωn2 (2.1.3) where ωn is the natural frequency and ζ is the damping ratio. This is called the standard second-order transfer function. Its response properties depend on the values of ωn and ζ. 2.1.2 Peak Time and Overshoot Consider a second-order system as shown in Equation 2.1.3, subjected to a step input given by R(s) = IP02 Workbook - Student Version R0 s v 1.0 with a step amplitude of 1.5. The system response to this input is shown in Figure 2.1.2, where the red trace is the response (output), y(t), and the blue trace is the step input, r(t). The maximum value of the response is denoted by the variable ymax and it occurs at time tmax . For a response similar to Figure 2.1.2, the percent overshoot is found using PO = 100(ymax − R0 ) . R0 From the initial step time, t0 , the time it takes for the response to reach its maximum value is tp = tmax − t0 . This is called the peak time of the system. Figure 2.1.2: Standard second-order step response In a second-order system, the amount of overshoot depends solely on the damping ratio parameter and it can be calculated using the equation −πζ √ P O = 100e 1 − ζ2 . (2.1.4) The peak time depends on both the damping ratio and the natural frequency of the system, and can be derived as: tp = π √ ωn 1 − ζ 2 (2.1.5) Generally speaking, the damping ratio affects the shape of the response while the natural frequency affects the speed of the response. IP02 Workbook - Student Version 16 2.1.3 Steady-State Error Steady-state error is illustrated in the ramp response given in Figure 2.1.3 and is denoted by the variable ess . It is the difference between the reference input and output signals after the system response has settled. Thus, for a time t when the system is in steady-state, the steady-state error equals: ess = rss (t) − yss (t) (2.1.6) where rss (t) is the value of the steady-state input and yss (t) is the steady-state value of the output. Figure 2.1.3: Steady-state error in ramp response We can find the error transfer function E(s) in Figure 2.1.1 in terms of the reference R(s), the plant P (s), and the compensator C(s). The Laplace transform of the error is E(s) = R(s) − Y (s) (2.1.7) Solving for Y (s) from Equation 2.1.7 and substituting it into Equation 2.1.1 yields E(s) = R(s) 1 + C(s)P (s) (2.1.8) 2.1.4 IP02 Position Control Specifications The desired time-domain specifications for controlling the position of the IP02 position are: tp = 0.15s P O = 10% and ess = 0 IP02 Workbook - Student Version v 1.0 Therefore, when tracking the position reference, the transient response should have a peak time less than or equal to 0.15 seconds, an overshoot of less than or equal to 10%, and a steady-state response with no error. 2.1.5 PID Control The control action of a proportional, integral, and derivative (PID) controller can be expressed mathematically as follows ∫ u(t) = kp e(t) + ki (2.1.9) e(t)dt + kd ė(t) where kp is the proportional gain, ki is the integral gain, kd is the derivative gain, and e(t) is the feedback error where e(t) = r(t) − y(t). The PID controller can also be described by the transfer function C(s) = kp + ki + kd s s (2.1.10) The corresponding block diagram is given in Figure 2.1.4. Figure 2.1.4: Block diagram of PID control The proportional term is based on the the present error, the integral term depends on past errors, and the derivative term is a prediction of future errors. Advanced model-based controllers differ from the PID controller by using a model of the process for prediction. The PID controller described by Equation 2.1.9 is the ideal PID controller. Attempts to implement these formulas directly may not yield good controllers. For example, most measurement signals are subject to noise, which can result in very large fluctuations when differentiated. 2.1.5.1 PV Control In order to control the position of the linear servo cart, a variation of the classic PD control will be used: proportionalvelocity (PV) control, illustrated in Figure 2.1.5. Unlike the standard PD control scheme, the negative velocity is IP02 Workbook - Student Version 18 fed back (as opposed to the velocity of the error) and a high-pass filter, H(s) is used instead of a direct derivative. Filtering the differentiated signal reduces the noise in the negative velocity term. Figure 2.1.5: Block diagram of PV control The PV control strategy has the following structure u = kp (r(t) − y(r)) − kv ẏ(t) where kp is the proportional gain, kd is the derivative gain, r = xd (t) is the setpoint cart position, y = xa (t) is the measured cart position, and u = Vm (t) is the control input or IP02 motor input voltage. IP02 Workbook - Student Version v 1.0 2.2 Pre-Lab Questions Before you begin the lab experiments in Section 2.3, you should study the background material presented in Section 2.1, and work through the questions in this section. 1. Find the closed-loop transfer function Y (s)/R(s) = Xa (s)/Xd (s) for the closed-loop PV position control of the IP02. Assume all initial conditions are zero, i.e., xa (0− ) = 0 and ẋa (0− ) = 0. 2. Using IP02 closed-loop transfer function that was derived in Step 1, find the control gains kp , and kv in terms of ωn and ζ. Hint: Remember the standard second order system Equation 2.1.3. 3. Calculate the minimum damping ratio and natural frequency required to meet the design specifications listed in Section 2.1.4. 4. Based on the nominal IP02 model parameters, K = 0.1433 m/(V-s) and τ = 0.0584 s, found in Linear Servo Modeling [5], calculate the control gains needed to satisfy the time-domain response requirements listed in Section 2.1.4. 5. Find the steady-state error of the system, ess , for the step input R(s) = Rs0 , where R0 is the desired cart position. Use the PV control equation from Step 1, and the error transfer function Equation 2.1.7. HINT: Use the Final-Value Theorem. IP02 Workbook - Student Version 20 2.3 In-Lab Exercises The goal of this laboratory is to explore position control of the IP02 cart using a PV controller. You will conduct an experiment to fine tune the parameters of the PV controller you calculated in Section 2.2 to validate them. 2.3.1 Simulation First, you will simulate the closed-loop response of the IP02 with a PV controller to a step input. Our goals are to confirm that the desired response specifications in an ideal situation are satisfied, and to verify that the motor is not saturated. Experiment Setup The s ip02 position Simulink diagram shown in Figure 2.3.1 is used to simulate the closed-loop position control response with the PV controller. The IP02 Model subsystem uses a Transfer Fcn block from the Simulink library to simulate the IP02 system. The PV Control subsystem contains the PV controller detailed in Section 2.1.5.1. Figure 2.3.1: Simulink diagram used to simulate the IP02 closed-loop position response Note: Before you can conduct these experiments, you need to make sure that the lab files are configured according to your IP02 setup. If they have not been configured already, then go to Section 2.4.2 to configure the lab files before you begin. Closed-loop Response with the PV Controller 1. Run the setup ip02 position script. 2. To generate a step reference, ensure the Signal Generator is set to the following: • Signal type = square • Amplitude = 1 • Frequency = 0.66 Hz 3. In the Simulink diagram, set the Amplitude (m) gain block to 0.01 to generate a step with an amplitude of 10 millimeters (i.e., square wave goes between ±0.01 m which results in a step amplitude of 0.02 m). 4. Inside the PV Control subsystem, set the Manual Switch to the upward position so the Derivative block is used. 5. Open the cart position scope, x c (m), and the motor input voltage scope, Vm (V). 6. Start the simulation. By default, the simulation runs for 5 seconds. The scopes should be displaying responses similar to figures 2.3.2 and 2.3.3. Note that in the x c (m) scope, the yellow trace is the setpoint position while the purple trace is the simulated position (generated by the IP02 Model block). This simulation is called the Ideal PV response as it uses the PV compensator with the derivative block. IP02 Workbook - Student Version v 1.0 Figure 2.3.2: Ideal PV position response. Figure 2.3.3: Ideal PV motor input voltage. 7. Change the proportional gain, kp , and examine its effect on the response. In particular, what happens to the overshoot and settling time as kp is increased? 8. Change the velocity gain, kv , and examine its effect on the response. In particular, what happens to the settling time and overshoot? 9. Enter the proportional and velocity control gains found in Pre-Lab question 2 in Matlabr as kp and kv. 10. Generate a MATLAB figure showing the Ideal PV position response and the ideal input voltage. After each simulation run, each scope automatically saves their response to a variable in the MATLAB workspace. That is, the x c (m) scope saves its response to the variable called data pos and the Vm (V) scope saves its data to the data vm variable. The data pos variable has the following structure: data pos(:,1) is the time vector, data pos(:,2) is the simulated angle, and data pos(:,3) is the setpoint. For the data vm variable, data vm(:,1) is the time and data vm(:,2) is the simulated input voltage. 11. Measure the steady-state error, the percent overshoot and the peak time of the simulated response. Does the response satisfy the specifications given in Section Section 2.1.4? Hint: Use the MATLAB ginput command to take measurements off the figure. 2.3.2 Implementing PV Controller In this experiment, you will control the position of the IP02 cart using the PV controller. Measurements will then be taken to ensure that the specifications are satisfied. Experiment Setup The q ip02 position Simulink diagram shown in Figure 2.3.4 is used to implement the position control experiments. The IP02 Position subsystem contains QUARC blocks that interface with the DC motor and sensors of the IP02 system, as discussed in the QUARC Integration Lab Section A. The PV Control subsystem implements the PV controller detailed in Section 2.1.5.1, except a high-pass filter is used to obtain the velocity signal (as opposed to taking the direct derivative). Note: Before you can conduct these experiments, you need to make sure that the lab files are configured according to your IP02 setup. If they have not been configured already, then go to Section 2.4.2 to configure the lab files before you begin. 1. Run the setup ip02 position script. IP02 Workbook - Student Version 22 Figure 2.3.4: Simulink diagram used with QUARC to run the PV controller on the IP02 2. Enter the proportional and velocity control gains found in Pre-Lab question 2. 3. Set Signal Type in the Signal Generator to square to generate a step reference. 4. Set the Amplitude (m) gain block to 0.01 to generate a step with an amplitude of 10 millimeters. 5. Open the cart position scope, Meas.(0) and Sim.(1) Resp., and the motor input voltage scope, Vm (V). 6. Click on QUARC | Build to compile the Simulink diagram. 7. Select QUARC | Start to begin running the controller. The scopes should display responses similar to figures 2.3.5 and 2.3.6 Note that in the x c (m) scope, the yellow trace is the measured position, the purple trace is the simulated position, and the cyan trace is the setpoint. Figure 2.3.5: Measured PV step response. Figure 2.3.6: PV control input voltage. 8. When a suitable response is obtained, click on the Stop button in the Simulink diagram toolbar (or select QUARC | Stop from the menu) to stop running the code. 9. Generate a MATLAB figure showing the measured PV position response and its input voltage. As in the s ip02 position Simulink diagram, when the controller is stopped each scope automatically saves their response to a variable in the MATLAB workspace. Thus, the x c (m) scope saves its response to the data xc variable and the Vm (V) scope saves its data to the data vm variable. 10. Measure the steady-state error, the percent overshoot, and the peak time of the IP02. Does the response satisfy the specifications given in Section 2.1.4? IP02 Workbook - Student Version v 1.0 11. Why do the experimental results not match the simulated model response? 12. How could you alter the controller to compensate for the steady-state error? 13. Click the Stop button on the Simulink diagram toolbar (or select QUARC | Stop from the menu) to stop the experiment. 14. Turn off the power to the amplifier if no more experiments will be performed on the IP02 in this session. IP02 Workbook - Student Version 24 2.4 System Requirements Before you begin this laboratory make sure: • QUARCr is installed on your PC, as described in Reference [3]. • You have a QUARC compatible data-aquisition (DAQ) card installed in your PC. For a listing of compliant DAQ cards, see Reference [1]. • IP02 and amplifier are connected to your DAQ board as described Reference [2]. 2.4.1 Overview of Files File Name IP02 Position Control Workbook (Student).pdf setup ip02 position.m setup ip02 configuration.m d model param.m s ip02 position.mdl q ip02 position.mdl Description This laboratory guide contains pre-lab and in-lab exercises demonstrating position control of the Quanser IP02 linear plant. The in-lab exercises are explained using the QUARC software. The main Matlabr script that sets the IP02 position control parameters. Run this file only to setup the laboratory. Returns the configuration-based IP02 model specifications Rm, Jm, Kt, Eff m, Km, Kg, Eff g, M, r mp, and Beq Determines the model parameters K, and tau. Simulink file that simulates the closed-loop IP02 position control step response. Simulink file that implements the closed-loop IP02 position controller using QUARC. Table 2.4.1: Files supplied with the IP02 Position Control Laboratory. 2.4.2 Configuring the IP02 and the Lab Files Before beginning the lab exercises the IP02 device, the q ip02 position Simulink diagram and the setup ip02 position.m script must be configured. Follow these steps to get the system ready for this lab: 1. Set up the IP02 without the additional weight as described in [2]. 2. Load the Matlabr software. 3. Browse through the Current Directory window in Matlabr and find the folder that contains the IP02 modeling files, e.g. q ip02 position.mdl. 4. Double-click on the q ip02 position.mdl file to open the Simulink diagram shown in Figure Figure 2.3.4. 5. Configure DAQ: Double-click on the HIL Initialize block in the Simulink diagram and ensure it is configured for the DAQ device that is installed in your system. For instance, the block shown in Figure 2.3.4 is setup for the Quanser Q2-USB hardware-in-the-loop board. See the QUARC Installation Guide [3] for more information on configuring the HIL Initialize block. IP02 Workbook - Student Version v 1.0 6. Go to the Current Directory window and double-click on the setup ip02 position.m file to open the setup script for the q ip02 position Simulink model. 7. Configure setup script: The beginning of the setup script is shown below. Ensure the script is setup to match the configuration of your actual IP02 device. For example, the script given below is setup for an IP02 plant without the additional weight and it is actuated using the Quanser VoltPAQ device with a gain of 1. See the IP02 User Manual [2] for more information on IP02 plant options and corresponding accessories. Finally, make sure MODELING TYPE is set to 'MANUAL'. % ############### IP02 CONFIGURATION ############### % if IP02: Type of Cart Load: set to 'NO_LOAD', 'WEIGHT' IP02_LOAD_TYPE = 'NO_LOAD'; % IP02_LOAD_TYPE = 'WEIGHT'; % Turn on or off the safety watchdog on the cart position: set it to 1 , or 0 X_LIM_ENABLE = 1; % safety watchdog turned ON %X_LIM_ENABLE = 0; % safety watchdog turned OFF % Safety Limits on the cart displacement (m) X_MAX = 0.3; % cart displacement maximum safety position X_MIN = - X_MAX; % cart displacement minimum safety position % Amplifier Gain: set VoltPAQ amplifier gain to 1 K_AMP = 1; % Power Amplifier Type: set to 'VoltPAQ' or 'Q3' AMP_TYPE = 'VoltPAQ'; % Digital-to-Analog Maximum Voltage (V); for Q2-USB cards set to 10 VMAX_DAC = 10; % ############### USER-DEFINED CONTROLLER DESIGN ############### % Type of Controller: set it to 'PV', 'MANUAL' %CONTROLLER_TYPE = 'AUTO_PV'; % PV controller design: automatic mode CONTROLLER_TYPE = 'MANUAL'; % controller design: manual mode % PV Controller Design Specifications PO = 10; % spec #1: maximum of 10% overshoot tp = 0.15; % spec #2: 150 ms time of first peak 8. Run the script by selecting the Debug | Run item from the menu bar or clicking on the Run button in the tool bar. IP02 Workbook - Student Version 26 LABORATORY 3 IP02 SPEED CONTROL The objective of this laboratory is to develop a feedback system to control the speed of the IP02 cart. A lead compensator is designed to regulate the speed of the linear cart accoding to a set of specifications. Topics Covered • Design of a lead compensator for speed control of the linear servo within particular requirements. • Simulation of the lead compensator using the plant model to ensure the specifications are met without saturating the actuator. • Implementation of the controller on the Quanser IP02 to evaluate performance. Prerequisites In order to successfully carry out this laboratory, the user should be familiar with the following: • The required software and hardware outlined in Section 3.4. • Transfer function fundamentals, e.g. obtaining a transfer function from a differential equation. • Basics of QUARCr . • Laboratory described in the QUARC Intergation Section A in order to be familiar using QUARCr with the IP02. IP02 Workbook - Student Version v 1.0 3.1 Background 3.1.1 Desired Speed Control Response The following frequency-domain design requirements are are to be met when designing the lead compensator to reduce steady-state errror, and increase the bandwidth and phase margin of the system to improve the transiant response: ωc = 80 rad/s ϕm = 85 deg The phase margin mainly affects the shape of the response. Having a higher phase margin implies that the system is more stable and the corresponding time response will have less overshoot. The crossover frequency is the frequency where the gain of the Bode plot is 1 (or 0 dB). This parameter mainly affects the speed of the response, thus having a larger ωc decreases the peak time. These frequency-domain specifications should result in a system that fufills the following time-domain specifications: tp ≤ 0.05 s PO ≤ 5 % ess = 0 m/s 3.1.1.1 Steady State Error Consider the speed control system with unity feedback shown in Figure 3.1.1. Let the compensator be C(s) = 1. Figure 3.1.1: Unity feedback loop. We can find the steady-state error using the final value theorem: ess = lim s E(s) s→0 where E(s) = R(s) 1 + C(s) P (s) (3.1.1) IP02 Workbook - Student Version 28 P (s) is the plant transfer function that was determined in the IP02 Modeling Laboratory as K τs + 1 P (s) = (3.1.2) where K is the steady-state gain and τ is the time constant. Substituting R(s) = R0 s and C(s) = 1 gives: ( E(s) = R0 s 1+ K τ s+1 ) Applying the final-value theorem to the system gives ( ess = R0 lim s→0 τs+1 τs+1+K ) When evaluated, the resulting steady-state error due to a step response is ess = R0 1+K (3.1.3) 3.1.2 Lead Control Design In order to control the speed of the IP02 cart within the specifications outlined in Section 3.1.1, a lead compensator with an integrator, as shown in Figure 3.1.2, will be designed. Figure 3.1.2: Closed-loop SRV02 speed control with lead compensator. To obtain zero steady-state error, an integrator is placed in series with the plant. This system is denoted by the transfer function Pi (s) = P (s) s (3.1.4) The phase margin and crossover frequency specifications listed in Section 3.1.1 can be satisfied using a proportional gain, Kc , and the lead transfer function Glead (s) = IP02 Workbook - Student Version 1 + aT s 1+T s (3.1.5) v 1.0 The a and T parameters change the location of the pole and zero of the lead compensator, which changes the gain and phase margins of the system. The design process involves examining the stability margins of the open-loop transfer function G(s) = C(s)P (s), where the compensator is given by C(s) = 3.1.2.1 Kc (1 + a T s) s(1 + T s) (3.1.6) Finding the Lead Compensator Parameters The Lead compensator is an approximation of a proportional-derivative (PD) controller. A PD controller can be used to add damping to reduce the overshoot in the transient portion of a step response, and effectively make the system more stable. In other words, it increases the phase margin. In this particular case, the lead compensator is designed for the following system H(s) = Kc P (s) s (3.1.7) The proportional gain Kc is designed to attain a certain crossover frequency. Increasing the gain crossover frequency essentially increases the bandwidth of the system which decreases the peak-time in the transient response (makes the response faster). However, if Kc > 1 the system less is stable since the phase margin of the H(s) system is therefore lower than the phase margin of the Pi (s) system and this translates to having a large overshoot in the response. The lead compensator is used to dampen the overshoot and increase the overall stability of the system, effectively increasing its phase margin. The frequency response of the lead compensator given in Equation 3.1.5 is Glead (ω j) = 1 + a T ωj 1+T ωj and its corresponding magnitude and phase equations are √ |Glead (ω j)| = T 2 ω 2 a2 + 1 1 + T 2 ω2 and ϕG = arctan(a T ω) − arctan(T ω) The Bode plot of the lead compensator is shown in Figure 3.1.3. IP02 Workbook - Student Version 30 Figure 3.1.3: Bode of lead compensator. 3.1.2.2 Lead Compensator Design In this section, we will design a lead compensator that will satisfy the frequency-based specifications given in Section 3.1.1. 1. Create a Bode diagram of the open-loop uncompensated system, Pi (s): To generate the Bode plot of Pi (s), enter the following commands in Matlabr . Note: If your system has not been set up yet, then you need to first run the the setup ip02 speed.m script, as outlined in Section 3.4.2. This script will create the model parameters K and tau in the MATLAB workspace. The model parameters are used with the commands tf and series to create the Pi (s) transfer function. The margin command generates a Bode plot of the system and it indicates the gain and phase stability margins as well as the phase and gain crossover frequencies. % Plant transfer function P = tf([K],[tau 1]); % Integrator transfer function I = tf([1],[1 0]); % Plant with Integrator transfer function Pi = series(P,I); % Bode of Pi(s) margin(Pi); set (1,'name','Pi(s)'); IP02 Workbook - Student Version v 1.0 Figure 3.1.4: Bode of Pi(s) system. 2. Find the required gain: The gain must be determined such that the gain crossover frequency is 40.0 rad/s (use the ginput Matlabr command). As mentioned before, the lead compensator adds gain to the system and will increases the phase as well. Therefore, gain Kc is not to be designed to meet the specified 80.0 rad/s fully. As given in Figure 3.1.4, the crossover frequency of the uncompensated system is 0.143 rad/s. To move the crossover frequency to 40.0 rad/s, a gain of Kc = 57 dB or Kc = 708 V/rad in the linear range is required. The Bode plot of the loop transfer function Hp (s) (from Section 3.1.2) is given in Figure 3.1.5. Figure 3.1.5: Bode of Hp (s) system. After the initial estimate of the gain was found, the gain was then adjusted according to the crossover frequency calculated in the generated Bode plot of the Hp(s) system. IP02 Workbook - Student Version 32 3. Find the gain needed for specified phase margin: Next, the gain needed to specify the phase margin of 85 degrees must be found. Also, to ensure the desired specifications are reached, we'll add another 5 degrees to the maximum phase of the lead. To attain the necessary phase margin, the maximum phase of the lead can be calculated using ϕm = P Mdes − P Mmeas + 5 Given the desired phase margin, and the phase margin of H(s) is P Mmeas = 23.2 deg the maximum lead phase has to be about ϕm = 66.8 deg or ϕm = 1.17 rad The lead compensator, as explained in Section 3.1.2.1, has two parameters: a and T . To attain the maximum phase ϕm shown in Figure 3.1.3, the Lead compensator has to add 20 log10 (a) of gain. This is determined using the equation a= 1 + sin(ϕm ) 1 − sin(ϕm ) The gain needed is found by inserting the max phase into this equation to get a = 23.73 (3.1.8) which is 20 log 10(a) = 27.5 dB 4. Place the frequency at which the lead maximum phase occurs: The lead maximum phase frequency must be placed at the new gain crossover frequency ωc,new . This is the crossover frequency after the lead compensator is applied. As illustrated in Figure 3.1.3, ωm occurs halfway between 0 dB and 20 log10 (a), i.e. at 10 log10 (a). So, the new gain crossover frequency in the H(s) system will be the frequency where the gain is −10 log10 (a). From Figure 3.1.5, it is found that the frequency where the −10 log10 (a) gain in the H(s) system occurs is at about 99.6 rad/s. Thus, the maximum phase of the lead will be set to ωm = 110 rad/s As illustrated earlier in Figure 3.1.3 in Section Section 3.1.2.1, the maximum phase occurs at the maximum phase frequency ωm . Parameter T , given by T = 1 √ , ωm a (3.1.9) is used to attain a certain maximum phase frequency. This changes where the Lead compensator breakpoint frequencies 1/aT and 1/T shown in Figure 3.1.3 occur. The slope of the lead compensator gain changes at these frequencies. We can find the parameter T by substituting ωm = 99.6 and the lead gain value from Equation 3.1.8 into Equation 3.1.9 T = 0.0019 s/rad Therefore, the lead breakpoint frequencies are: 1 = 22.58 rad/s aT and 1 = 535.88 rad/s T IP02 Workbook - Student Version v 1.0 5. Create a Bode diagram of the lead compensator Glead (s): Defined in Equation 3.1.5. Figure 3.1.6: Bode of lead compensator Glead (s). 6. Create a Bode diagram of the loop transfer function H(s): Described in Equation 3.1.7. The phase margin of H(s) is 78 degrees and is below the desired phase margin of 85 degrees, as specified in Section 3.1.1. Figure 3.1.7: Bode of loop transfer function H(s). 7. Check response: If the crossover frequency and/or phase margin specifications are not satisfied, then the lead design needs to be re-visited. IP02 Workbook - Student Version 34 3.2 Pre-Lab Questions Before you begin the lab experiments in Section 3.3, you should study the background material presented in Section 3.1, and work through the questions in this section. 1. Based on the steady-state error result of a step response from Equation 3.1.3, what type of system is the IP02 when performing speed control (Type 0, 1, or 2) and why? 2. Using the transfer function of the lead compensator Equation 3.1.6, and the error transfer function Equation 3.1.1, find the steady-state error result from a step response when the lead compensator outlined in Section 3.1.2 is used for speed control of the IP02. 3. Find the frequency response magnitude, |Pi (ω)|, of the transfer function Pi (s) given in Equation 3.1.4. 4. The gain crossover frequency, ωc , is the frequency at which the gain of the system is 1, or 0 dB. Express the crossover frequency symbolically in terms of the IP02 model parameters K and τ . Then, evaluate the expression using the nominal IP02 model parameters K=0.1433 m/s/V and τ =0.0584 s, (or use what you found for K and τ in the IP02 Modeling Laboratory). IP02 Workbook - Student Version v 1.0 3.3 In-Lab Exercises The goal of this laboratory is to explore closed-loop speed control of the IP02 cart using a lead controller. You will conduct an experiment to observe the performance of the lead controller designed in Section 3.1.2.2. 3.3.1 Simulation First, you will simulate the closed-loop response of the IP02 with a lead controller to a step input. Our goals are to confirm that the desired response specifications in an ideal situation are satisfied, and to verify that the motor is not saturated. Experiment Setup The s ip02 speed Simulink diagram shown in Figure 3.3.1 is used to simulate the closed-loop speed control response with the lead controller. The IP02 Model subsystem uses a Transfer Fcn block from the Simulink library to simulate the IP02 system. The Lead Compensator subsystem contains the lead controller detailed in Section 3.1.2. Figure 3.3.1: Simulink diagram used to simulate the IP02 closed-loop speed response Note: Before you can conduct these experiments, you need to make sure that the lab files are configured according to your IP02 setup. If they have not been configured already, then go to Section 3.4.2 to configure the lab files before you begin. 1. Run the setup ip02 speed script. 2. To generate a step reference, ensure the Signal Generator is set to the following: • Signal type = square • Amplitude = 1 • Frequency = 0.5 Hz 3. In the Simulink diagram, set the Amplitude (m/s) gain block to 0.1 to generate a step with an amplitude of 0.2 meters/second (i.e., square wave goes between ±0.1 m which results in a step amplitude of 0.2 m). 4. Open the cart speed scope, v c (m/s), and the motor input voltage scope, Vm (V). 5. Start the simulation. By default, the simulation runs for 5 seconds. The scopes should be displaying responses similar to figures 3.3.2 and 3.3.3. Note that in the v c (m/s) scope, the purple trace is the setpoint position while the yellow trace is the simulated position (generated by the IP02 Model block). IP02 Workbook - Student Version 36 Figure 3.3.2: Ideal lead speed response. Figure 3.3.3: Ideal lead motor input voltage. 6. Varify that the time-domain specifications in Section 3.1.1 are satisfied and that the motor is not being saturated. To calculate the steady-state error, peak-time, and percent overshoot, use the simulated response data stored in the data v variable. 7. If the specifications are not satisfied, go back in the lead compensator design. You may have to, for example, add more maximum phase in order to increase the phase margin. If the specifications are met, move on to the next step. 8. Generate a MATLAB figure showing the Simulated Lead speed response and its input voltage. 3.3.2 Implementing LEAD Speed Control In this section, the speed of the IP02 cart is controlled using the lead compensator. Measurements will then be taken to ensure that the specifications are satisfied. Experiment Setup The q ip02 speed Simulink diagram shown in Figure 3.3.4 is used to implement the speed control experiments. The IP02 Speed subsystem contains QUARC blocks that interface with the DC motor and sensors of the IP02 system, as discussed in the QUARC Integration Lab Section A. The Lead Control subsystem implements the lead controller detailed in Section 3.1.2, except a high-pass filter is used to obtain the velocity signal (as opposed to taking the direct derivative). Note: Before you can conduct these experiments, you need to make sure that the lab files are configured according to your IP02 setup. If they have not been configured already, then go to Section 3.4.2 to configure the lab files before you begin. 1. Run the setup ip02 speed script. 2. Enter the Kc , a, and T parameters found in Section 3.1.2.2. 3. Set Signal Type in the Signal Generator to square to generate a step reference. 4. Set the Amplitude (m/s) gain block to 0.1 to generate a step with an amplitude of 0.2 meters. 5. Open the cart speed scope, Meas.(0) and Sim.(1) Resp., and the motor input voltage scope, Vm (V). 6. Click on QUARC | Build to compile the Simulink diagram. IP02 Workbook - Student Version v 1.0 Figure 3.3.4: Simulink diagram used with QUARC to run the lead controller on the IP02 7. Select QUARC | Start to begin running the controller. The scopes should display responses similar to figures 3.3.5 and 3.3.6. Note that in the Meas.(0) and Sim.(1) Resp. scope, the yellow trace is the measured position, the purple trace is the simulated position, and the cyan trace is the setpoint. Figure 3.3.5: Measured and Simulated lead step response. Figure 3.3.6: Lead control input voltage. 8. When a suitable response is obtained, click on the Stop button in the Simulink diagram toolbar (or select QUARC | Stop from the menu) to stop running the code. 9. Generate a MATLAB figure showing the measured speed response and its input voltage. As in the s ip02 speed Simulink diagram, when the controller is stopped each scope automatically saves its response to a variable in the MATLAB workspace. Thus, the Meas.(0) and Sim.(2) Resp. scope saves its response to the data v variable and the Vm (V) scope saves its data to the data vm variable. 10. Measure the steady-state error, the percent overshoot, and the peak time of the IP02. Does the response satisfy the specifications given in Section 3.1.1? 11. Do the experimental results match the simulated model response? Give some possible reasons why discepencies may exist. IP02 Workbook - Student Version 38 12. Click the Stop button on the Simulink diagram toolbar (or select QUARC | Stop from the menu) to stop the experiment. 13. Turn off the power to the amplifier if no more experiments will be performed on the IP02 in this session. IP02 Workbook - Student Version v 1.0 3.4 System Requirements Before you begin this laboratory make sure: • QUARCr is installed on your PC, as described in Reference [3]. • You have a QUARC compatible data-aquisition (DAQ) card installed in your PC. For a listing of compliant DAQ cards, see Reference [1]. • IP02 and amplifier are connected to your DAQ board as described Reference [2]. 3.4.1 Overview of Files File Name IP02 Speed Control Workbook (Student).pdf setup ip02 speed.m s ip02 speed lead.mdl q ip02 speed lead.mdl Description This laboratory guide contains pre-lab and in-lab exercises demonstrating speed control of the Quanser IP02 linear plant. The in-lab exercises are explained using the QUARC software. The main Matlabr script that sets the IP02 speed control parameters. Run this file only to setup the laboratory. Simulink file that simulates the closed-loop IP02 lead speed control step response. Simulink file that implements the closed-loop IP02 lead speed controller using QUARC. Table 3.4.1: Files supplied with the IP02 Speed Control Laboratory. 3.4.2 Configuring the IP02 and the Lab Files Before beginning the lab exercises the IP02 device, the q ip02 speed lead Simulink diagram and the setup ip02 speed.m script must be configured. Follow these steps to get the system ready for this lab: 1. Set up the IP02 without the additional weight as described in [2]. 2. Load the Matlabr software. 3. Browse through the Current Directory window in Matlabr and find the folder that contains the IP02 modeling files, e.g. q ip02 speed.mdl. 4. Double-click on the q ip02 speed.mdl file to open the Simulink diagram shown in Figure Figure 3.3.4. 5. Configure DAQ: Double-click on the HIL Initialize block in the Simulink diagram and ensure it is configured for the DAQ device that is installed in your system. For instance, the block shown in Figure 3.3.4 is setup for the Quanser Q2-USB hardware-in-the-loop board. See the QUARC Installation Guide [3] for more information on configuring the HIL Initialize block. 6. Go to the Current Directory window and double-click on the setup ip02 speed.m file to open the setup script for the q ip02 speed Simulink model. IP02 Workbook - Student Version 40 7. Configure setup script: The beginning of the setup script is shown below. Ensure the script is setup to match the configuration of your actual IP02 device. For example, the script given below is setup for an IP02 plant without the additional weight and it is actuated using the Quanser VoltPAQ device with a gain of 1. See the IP02 User Manual [2] for more information on IP02 plant options and corresponding accessories. Finally, make sure MODELING TYPE is set to 'MANUAL'. % ############### IP02 CONFIGURATION ############### % Type of Cart Load: set to 'NO_LOAD', 'WEIGHT' IP02_LOAD_TYPE = 'NO_LOAD'; % IP02_LOAD_TYPE = 'WEIGHT'; % Turn on or off the safety watchdog on the cart position: set it to 1 , or 0 X_LIM_ENABLE = 1; % safety watchdog turned ON %X_LIM_ENABLE = 0; % safety watchdog turned OFF % Safety Limits on the cart displacement (m) X_MAX = 0.35; % cart displacement maximum safety position X_MIN = - X_MAX; % cart displacement minimum safety position % Amplifier Gain used: set VoltPAQ to 1 K_AMP = 1; % Amplifier Type: set to 'VoltPAQ' or 'Q3' AMP_TYPE = 'VoltPAQ'; % Digital-to-Analog Maximum Voltage (V); for Q4/Q8 cards set to 10 VMAX_DAC = 10; % ############### USER-DEFINED CONTROLLER DESIGN ############### % Type of Controller: set it to 'LEAD', or 'MANUAL' %CONTROLLER_TYPE = 'LEAD'; % LEAD controller design: automatic mode CONTROLLER_TYPE = 'MANUAL'; % controller design: manual mode %CONTROLLER_TYPE = 'PI'; % PI controller design: automatic mode 8. Run the script by selecting the Debug | Run item from the menu bar or clicking on the Run button in the tool bar. IP02 Workbook - Student Version v 1.0 LAB REPORT This laboratory contains three groups of experiments, namely, 1. Linear Servo Modeling, 2. Position Control, and 3. Speed Control. For each experiment, follow the outline corresponding to that experiment to build the content of your report. Also, in Section 4.4 you can find some basic tips for the format of your report. 4.1 Template for Modeling Report I. PROCEDURE 1. Implementation • Briefly describe the main goal of this experiment. • Briefly describe the experimental procedure in Step 10 in Section 1.3.1. • Briefly describe the experimental procedure in Step 14 in Section 1.3.1. II. RESULTS Do not interpret or analyze the data in this section. Just provide the results. 1. Response plot from step 13 in Section 1.3.1, Model and experimental comparison. III. ANALYSIS Provide details of your calculations (methods used) for analysis for each of the following: 1. The model parameters Beq , Am , Jeq , K, and τ in Step 11 in Section 1.3.1. IV. CONCLUSIONS Interpret your results to arrive at logical conclusions for the following: 1. Why the nominal model does not represent the IP02 with better accuracy in Step 13 in Section 1.3.1. IP02 Workbook - Student Version 42 4.2 Template for Position Control Report I. PROCEDURE 1. Simulation • Briefly describe the main goal of the simulation. • Briefly describe the simulation procedure and observations in Step 7 in Section 2.3.1. • Briefly describe the simulation procedure and observations in Step 8 in Section 2.3.1. 2. Implementation • Briefly describe the main goal of this experiment. • Briefly describe the experimental procedure in Step 9 in Section 2.3.2. • Briefly describe the proposed changes in Step 12 in Section 2.3.2. II. RESULTS Do not interpret or analyze the data in this section. Just provide the results. 1. Ideal position response plot from 10 in Section 2.3.1, Position control simulation. 2. Ideal position response plot from 9 in Section 2.3.2, Position control implementation. III. ANALYSIS Provide details of your calculations (methods used) for analysis for each of the following: 1. Peak time, percent overshoot, steady-state error, and input voltage in Step 11 in Section 2.3.1. 2. Peak time, percent overshoot, steady-state error, and input voltage in Step 10 in Section 2.3.2. 3. Explanation of the simulation and implementation response comparison in Step 11 in Section 2.3.2. IV. CONCLUSIONS Interpret your results to arrive at logical conclusions for the following: 1. Whether the controller meets the specifications in Step 11 in Section 2.3.1, Position controller simulation. 2. Whether the controller meets the specifications in Step 10 in Section 2.3.2, Position controller implementation. 4.3 Template for Speed Control Report I. PROCEDURE 1. Simulation • Briefly describe the main goal of the simulation. IP02 Workbook - Student Version v 1.0 2. Implementation • Briefly describe the main goal of this experiment. • Briefly describe the experimental procedure in Step 9 in Section 3.3.2. II. RESULTS Do not interpret or analyze the data in this section. Just provide the results. 1. Simulated Lead speed response plot from 8 in Section 3.3.1, Speed control simulation. 2. Lead speed response plot from 9 in Section 3.3.2, Speed control implementation. III. ANALYSIS Provide details of your calculations (methods used) for analysis for each of the following: 1. Peak time, percent overshoot, steady-state error, and input voltage in Step 6 in Section 3.3.1. 2. Peak time, percent overshoot, steady-state error, and input voltage in Step 10 in Section 3.3.2. 3. Explanation of the simulation and implementation response comparison in Step 11 in Section 3.3.2. IV. CONCLUSIONS Interpret your results to arrive at logical conclusions for the following: 1. Whether the controller meets the specifications in Step 6 in Section 3.3.1, Speed controller simulation. 2. Whether the controller meets the specifications in Step 10 in Section 3.3.2, Speed controller implementation. IP02 Workbook - Student Version 44 4.4 Tips for Report Format PROFESSIONAL APPEARANCE • Has cover page with all necessary details (title, course, student name(s), etc.) • Each of the required sections is completed (Procedure, Results, Analysis and Conclusions). • Typed. • All grammar/spelling correct. • Report layout is neat. • Does not exceed specified maximum page limit, if any. • Pages are numbered. • Equations are consecutively numbered. • Figures are numbered, axes have labels, each figure has a descriptive caption. • Tables are numbered, they include labels, each table has a descriptive caption. • Data are presented in a useful format (graphs, numerical, table, charts, diagrams). • No hand drawn sketches/diagrams. • References are cited using correct format. IP02 Workbook - Student Version v 1.0 IP02 Workbook - Student Version 46 APPENDIX A.0 IP02 QUARC INTEGRATION In this section, we explain how to send voltage commands to the Quanserr IP02 and measure the position of the cart and pendulum in real-time using your computer. Prerequisites In order to successfully carry out this laboratory, the user should be familiar with the following: • The required software and hardware outlined in Section 1.4, Section 2.4 or Section 3.4. • Basics of QUARCr . IP02 Workbook - Student Version v 1.0 -------------------------------------------------------------------------------------------------- A.1 Applying Voltage to IP02 Motor Here are the basic steps to apply a voltage to the IP02 motor using QUARCr : 1. Make a Simulinkr model that interacts with your installed data-acquisition device using blocks from the QUARC Targets library. This is explained in Section Section A.1.1, 2. From the Simulinkr model, build real-time code as shown in Section Section A.1.2, and 3. Execute the code as explained in Section Section A.1.3. A.1.1 Making the Simulink Model In this section, we will make a Simulinkr model as shown in Figure A.1.1 using QUARCr blocks to feed a sinusoidal voltage to the IP02 DC motor. The blocks from the QUARC Targets library are used to interact with a data-acquisition board, e.g. Quanser Q2-USB or Q8-USB device. Figure A.1.1: Simulink model used with QUARC to apply voltage to IP02 Follow these steps to make the Simulinkr diagram: 1. Load the Matlabr software. 2. Create a new Simulinkr diagram. To do this, go to File | New | Model item in the menu bar. 3. Open the Simulink Library Browser window by clicking on the View | Library Browser item in the Simulink menu bar or clicking on the Simulink icon. 4. Expand the QUARC Targets item and go to the Data Acquisition | Generic | Configuration folder, as shown in Figure A.1.2. IP02 Workbook - Student Version 48 Figure A.1.2: QUARC Targets in Simulinkr Library Browser 5. Click-and-drag the HIL Initialize block from the library window into the blank Simulinkr model. This block is used to configure your data-acquisition device, e.g. the Quanser Q2-USB or Q8-USB hardware-in-the-loop (HIL) boards. 6. In the Library Browser, go to the Data Acquisition | Generic | Immediate I/O category. This contains various blocks used to interact with actuators and sensors. 7. Click-and-drag the HIL Write Analog block from the library into the Simulinkr diagram. This block is used to output a voltage from an Analog Output channel, i.e. digital-to-analog (D/A) channel, on the data-acquisition device. 8. Add the Signal Generator block, found in the Simulinkr | Source folder, and the Slider Gain block, from the Simulinkr | Math Operations category, into the Simulinkr model. Connect the blocks as shown in A.1.1. 9. Double-click on the HIL Initialize block: • In the Board type field, select the board that is installed in your PC. For example, if you have a Quanser Q2-USB board then select q2 usb. • If more than one of the same board is installed (e.g. two Q2-USB devices), ensure the Board number field is set correctly, e.g. if two boards are used, then choose either 0 or 1. 10. Go to the Analog Output pane shown in Figure A.1.3. Make sure the Analog output channels field includes 0. This will ensure 0 V is output from Analog Output channel #0 when the QUARC controller is stopped. For more information, click on the Help button. Otherwise, click on the OK button and proceed. Note: If you are using a NI DAQ device, make sure you enter [0] in the Analog Output channel box. The analog output channels for the NI boards are not selected by default. IP02 Workbook - Student Version v 1.0 Figure A.1.3: Configuring Analog Output channel on DAQ device 11. Double-click on the HIL Write Analog block. • Make sure Board name is set to HIL-1 (i.e. points to the HIL Initialize block). • Set Channels to 0 (default setting). Recall that, as instructed in Reference [2], the DC motor is connected to Analog Output Channel #0 on the hardware-in-the-loop board. Therefore, Channels should be set to 0. • Set Sample time to -1 (default setting). This implies that the sampling interval is inherited from the previous block. 12. Click on the OK button to save and close the HIL Write Analog block properties. 13. Save the Simulinkr mode by selecting the File | Save item in the menu bar or clicking on the Save icon. A.1.2 Compiling the Model The Simulinkr model we made in Section Section A.1 can now be used by QUARC to generate code. When you execute this code, a voltage is sent to the IP02. Follow these steps to generate code from a Simulinkr diagram: 1. In the Simulinkr diagram made in Section Section A.1, go to the QUARC | Set default options item to set the correct Real-Time Workshop parameters and setup the Simulinkr model for external use (as opposed to the simulation mode). 2. To view the compiler options shown in Figure A.1.4, go to QUARC | Options in the Simulinkr model tool bar. IP02 Workbook - Student Version 50 Figure A.1.4: Default QUARC solver settings 3. Real-Time Workshop pane: • System target file is set to Target Language Compiler file quarc windows.tlc. • Make command is set to make rtw and the Template makefile is set to quarc default tmf file. 4. Solver pane: • Stop time is set to inf in order for the code to be executed continuously until it is stopped manually by the user. Alternatively, the Stop time parameter can be set to the desired duration (code will cease executing when the stop time value is reached). • Type parameter is set to Fixed-step. When compiling real-time code, the solver must be fixed-step as opposed to variable step which can be used in simulations. • Solver is set to discrete. There are no continuous blocks inside the designed Simulinkr model, therefore having a discrete solver is fine. However, if an Integrator block or another continuous system were be added, then the Solver field would have to be changed to an integration method such as ode1 (Euler). • Fixed-step size field sets the sampling interval, or sampling time, of the controller. By default this is set to 0.002 seconds, which is a sampling rate of 500 Hz. 5. Click on the OK button to close the Configuration Parameters window. 6. Select the QUARC | Build item. Various lines in the Matlabr Command Window should be displayed as the model is being compiled. 7. Once done compiling, a QUARC Windows executable file along with a folder containing various ''C'' and Matlabr files are generated. Note that once the executable is created, the folder is no longer needed. If you like, you can remove the executable and associated code folder may be removed from the current directory by clicking on QUARC | Clean item. See [1] for more information about configuring QUARCr . IP02 Workbook - Student Version v 1.0 A.1.3 Running QUARC Code Once the Simulinkr model has been compiled, the code can be executed and the voltage set in the Simulinkr model can be sent to the SRV02 motor. Here are the steps to follow: 1. Power ON your power amplifier (e.g. Quanser VoltPAQ). 2. To begin executing the code, click on the QUARC | Start item in the Simulinkr model. The IP02 cart should begin moving back-and-forth. This command actually does two things: it connects to the target and then executes the code. Alternatively, users may decide to go through these steps individually: Option 1: In the Simulinkr model tool bar, click on the Connect to target icon and then click on the Run icon. These buttons are shown in Figure A.1.5. Option 2: Select the Simulation | Connect to target item from the menu bar and the select Simulation | Start Real-Time Code item. Figure A.1.5: Simulinkr model toolbar: connect to target and compilation 3. Double-click on the Signal Generator block to open its parameter window. 4. Set the Frequency field to 0.5 Hz and click on the OK button. Notice how the parameter change effects the IP02 immediately: the velocity of the cart begins to switch back-and-forth slowly. 5. Vary the value of the Slider Gain block between 0 and 2. Examine how the speed of the IP02 cart changes proportionally with the amplitude of the sine wave. 6. Select the QUARC | Stop item to stop the code execution (or click on the Stop button in the Simulinkr model tool bar). 7. Power OFF the amplifier if no more experiments will be run in this session. IP02 Workbook - Student Version 52 A.2 Measuring Position using Encoder The Simulinkr diagram designed previously is modified to include an encoder measurement, as illustrated in Figure A.2.1 below. Figure A.2.1: Simulinkr model used with QUARC to send voltage to IP02 and read the encoder sensors. Using the Simulinkr model designed in Section A.1, follow this procedure to add encoder functionality: 1. From the QUARC Targets | Data Acquisition | Generic | Immediate I/O category in the Library Browser, add a HIL Read Encoder block. 2. Recall that, as instructed in [2], the cart encoder is connected to Encoder Input #0 and the pendulum encoder is connected to Encoder Input #1 on the data acquisition board. The HIL Read Encoder block is configured for to read channel 0 by default, and should be changed to read both encoders by updating the Channels: field to ''[0 1]''. The default encoder configurations in the HIL Initialize block are fine (but keep in mind that these can be changed). 3. Add two Scope and Gain blocks from the Math Operations folder in the Library Browser, into the Simulinkr model. 4. Add a Mux block from the Signal Routing folder in the Library Borwser. 5. Connect the Scope and Gain blocks as depicted in Figure A.2.1. • Connect the HIL Read Encoder block outputs to the Mux, followed by the Gain block. Label the gain Encoder Calibration (deg/count). • Connect the output of this gain block to the input of the Scope block and label the scope theta c and theta p (deg). This scope will display the measured angular position of the cart and pendulum in degrees. 6. Set the Frequency parameter in the Signal Generator block to 1.0 Hz and the Slider Gain block to 1. 7. Open the Vm (V) and theta c and theta p (deg) scopes. 8. Save the Simulinkr model (you may want to save the model as a different file). 9. Power ON the power amplifier. 10. Go to QUARC | Build to compile the code. IP02 Workbook - Student Version v 1.0 11. Click on QUARC | Start to execute the code. As the IP02 cart moves back-and-forth, the theta c and theta p (deg) should display the encoder readings. Rotate the pendlum shaft to ensure that the pendulum encoder is functioning correctly. Since the Encoder Calibration (deg/count) gain has not been configured yet, the scope is displaying the number of counts from the encoder output, which is proportional to the position of the encoder shaft. Note: The measurement will be very large. Click on the Autoscale icon in the scope to zoom out and view the entire signal. Alternatively, the y-range of the scope can be set manually. To do this, right-click on the y-axis, select Axes Properties from the drop-down menu, and set the desired y-range values. 12. As discussed in the IP02 User Manual [2], the encoder outputs 4096 counts for every full revolution. To measure the load gear angle, set the Encoder Calibration (deg/count) gain block to 360 / 4096 degrees per count. 13. The measurement will be very small. Click on the Autoscale icon in the scope to zoom up on the signal or adjust the range of the y-axis manually. The position scope should appear similarly as shown in Figure A.2.2. Note that no further calibration is needed since the encoder positions increase when the input voltage goes positive or the pendulum encoder is rotated CCW. Figure A.2.2: Position reading using encoder. 14. Select the QUARC | Stop item to stop the code from running. 15. Power OFF the amplifier if no more experiments will be run in this session. IP02 Workbook - Student Version 54 A.3 Saving Data The scopes in the Simulinkr model can be configured to save variables in the Matlabr workspace. For instance, to configure the position scope theta c and theta p (deg) in the Simulinkr model from Section Section A.2 perform the following: 1. Open the theta c and theta p (deg) scope. 2. Click on Parameters icon and select the Data History tab, as shown in Figure A.3.1. • Select the Save data to workspace check box. • Set the Variable name field to a desired variable, e.g. theta data. • Set Format to Array. Figure A.3.1: Adjusting scope parameters to save data Note: By default, the Limit data points to last box is set to 5000. This means that only the last 5000 points of data will be saved in the variable. Thus, given that the controller runs at 500 Hz, this implies that the last 10 seconds of data shown in the theta l (deg) scope will be captured. 3. Click on the OK button. 4. Save the Simulinkr model. 5. Select QUARC | Build to rebuild the model. 6. Click on QUARC | Run. 7. Run the controller for a few seconds and stop QUARC. 8. When the controller is stopped, the variable theta data is saved to the workspace. The variable is a threedimensional array with a maximum of 5000 elements. The first vector is the running time and the second vector is the position of the cart, and the third vector is the position of the pendulum. You can plot the data into a Matlab figure using a script like: t = theta data(:,1); th c = theta data(:,2); th p = theta data(:,3); plot(t,th c); hold on plot(t,th p,'r'); IP02 Workbook - Student Version v 1.0 You can then add Matlabr commands such as xlabel, ylabel, and title to desribe the data and units you are plotting. Note: If the controller has not run for the full 10 seconds then, it will have tf /Ts number of elements, where tf is the duration of the controller and Ts is the sampling interval. For instance, if you ran QUARC for 4 seconds then there will be 4/0.002 = 2000 elements. 9. Running the script generates a Matlab figure as shown in Figure A.3.2. Figure A.3.2: Plotting saved data Note: Use the Matlabr command ginput to measure points directly from the Matlab figure. There are many different ways to save data for offline analysis, e.g. saving data to a Matlab MAT file. Go to [1] in the QUARC Basics | Data Collection category for more information. A.4 Instructor's Guide Every laboratory in this manual is organized into four parts: Background section provides all the necessary theoretical background for the experiments. Students should read this section first to prepare for the Pre-Lab questions and for the actual lab experiments. Pre-Lab Questions section is not meant to be a comprehensive list of questions to examine understanding of the entire background material. Rather, it provides targetted questions for preliminary calculations that need to be done prior to the lab experiments. Lab Experiments section provides step-by-step instructions to conduct the lab experiments and to record the collected data. The lab may also include a set of pre-lab questions that need to be done prior to the lab experiments. System Requirements section describes all the details of how to configure the hardware and software to conduct the experiments. It is assumed that the hardware and software configuration have been completed by the instructor or the teaching assistant prior to the lab sessions. However, if the instructor chooses to, the students can also configure the systems by following the instructions given in this section. Assessment of ABET outcomes is incorporated into this manual as shown by indicators such as . These indicators correspond to specific performance criteria for an outcome. IP02 Workbook - Student Version 56 A.4.1 Pre-lab Questions and Lab Experiments A.4.1.1 How to use the pre-lab questions All or some of the questions in the Pre-Lab Questions sections can be assigned to students as homework. One possibility is to assign them as a homework one week prior to the actual lab session and ask the students to bring their assignment to the lab session. This would help them get ready for the lab session. You should encourage them to study the background section of the chapter prior to attempting the pre-lab questions. Note that solutions for some of the Pre-Lab questions are parameters needed for the experiments in the lab session. Another possibility is to go over some of these questions either in class or in the lab session together with the students. This could generate an interactive learning opportunity for them prior to the lab. Finally, it is possible to use some of the pre-lab questions in your mid-term or final exams. This would reinforce the concepts covered in the labs; connections between the abstract theory and the real hardware; and would give you an option to integrate some of the work done in the lab sessions into your exams. A.4.1.2 How to use the laboratory experiments This manual is organized into several laboratory sections. Each section contains several experiments which are, for the most part, independent of each other. Therefore, one possible way to use this material is to conduct the individual experiments in your weekly lab sessions. Another possibility is to divide the class into teams and have each team conduct an experiment given in a section. A.4.2 Assessment for ABET Accreditation In the United States, accreditation is a peer-review process. Educational institutions or programs volunteer to undergo this review periodically to determine if certain criteria are being met. The Accreditation Board for Engineering and Technology, ABET, is responsible for the specialized accreditation of educational programs in applied science, computing, engineering, and technology. ABET accreditation is assurance that a college or university program meets the quality standards established by the profession for which it prepares its students. It is the responsibility of the program seeking accreditation to demonstrate clearly that the program meets a set of criteria. One of these criteria is the ``Criterion 3: Program Outcomes''. Engineering programs must demonstrate that their students attain program outcomes (a) through (k). Much more information about this can be found in the ``Criteria for Engineering Accreditation'' document ABET publishes on its website annually (http://www.abet.org). For fulfillment of Criterion 3, a program must show that there is an assessment and evaluation process in place that periodically documents and demonstrates the degree to which the program outcomes are attained by their students. Most programs do this by mapping the outcomes (a) through (k) to the courses in the curriculum1 . Then, these outcomes are assessed in the courses. Finally, the assessment results are collected from the courses and compiled into program-level data to demonstrate the ``degree to which the program outcomes are attained by their students''. If your course is part of a similar assessment effort in your program, you probably need to assess the following outcomes in your course: (A) An ability to apply knowledge of mathematics, science, and engineering, (B) An ability to design and conduct experiments, as well as to analyze and interpret data, (G) An ability to communicate effectively, and (K) An ability to use the techniques, skills, and modern engineering tools necessary for engineering practice. These outcomes can be assessed in your course using various assessment tools, such as student surveys and IP02 Workbook - Student Version v 1.0 assignments or questions targeting specific outcomes. To measure achievement of an outcome (such as outcome ``A'' in the list above), typically some performance criteria are defined for the outcome. The performance criteria are a set of measurable statements to define each learning outcome. They identify the specific knowledge, skills, attitudes, and/or behavior students must demonstrate as indicators of achieving the outcome. For the purpose of this laboratory curriculum, we defined a set of performance criteria for each outcome. These criteria are labeled as ``A-1, A-2, B-3, ..., K-3'' as indicated in the rubrics in Section A.4.3 below. We also embedded these performance criteria in the curriculum shown by indicators such as . A.4.2.1 Assessment in your course Assessment of outcomes is different than grading. A course grade (or a grade on an assignment or exam), is a composite indicator. For example, if a student receives "B" as a grade in your course, it is probably difficult to tell his/her level of achievement in outcome "A" versus "G". One of the purposes of assessment is to "measure" the level of achievement of these specific skills and knowledge so that improvements can be made in the future offerings of the course. So, how should you introduce outcomes assessment into your course? The outcomes assessment approach described here can be applied to each pre-lab homework assignment and lab report of each student throughout the semester. This may or may not be feasible depending on your class size. In general, a representative sample of student work is assessed. You can continue to give assignments/exams and grade them in the traditional way. To introduce assessment into your course, you can pick a representative sample of student work and "score" their work using the scoring sheets and rubrics given in this manual. This is a good way to start introducing assessment into your course. Recall that for fulfillment of Criterion 3, a program must ``document'' the assessment process. Programs collect sample student work in the academic year prior to the site visit by an ABET team. You can retain the sample homeworks, lab reports, their scoring sheets and the assessment workbook as ``evidence'' for the ongoing assessment effort in your course. This collection can then be given to the assessment committee in your program to be incorporated into the program-level evidence they will compile prior to the ABET site visit. A.4.2.2 How to score the pre-lab questions If you choose to assign the pre-lab questions as homework, then the outcome targetted by these questions can be assessed using the student work. The pre-lab questions require students to ``apply'' their math and engineering science knowledge through calculations and problem solving strategies. Therefore, outcome ``A'' was mapped to the pre-lab questions through its performance criteria. If you assign the pre-lab questions as homework, you can ``score'' the returned homeworks using the rubric for outcome ``A'' given in Section A.4.3 and the scoring sheet provided for that pre-lab in that chapter. To score homework of one student: 1. Print the scoring sheet for the Pre-Lab Questions section you assigned as homework. One sheet is used per student. 2. Use the rubric for ``Outcome A'' (Section A.4.3) to assign a score for each question. The rubric gives the description of ``levels of achievement'' (4 = exemplary, 3 = proficient, 2 = developing and 1 = beginning/incomplete) for each criterion. As an example, below is a completed sample scoring sheet after evaluating the homework of one student. 1 Disclaimer: The opionions expressed or the assessment techniques described here have not been endorsed by ABET in any way. IP02 Workbook - Student Version 58 Question A-1 A-2 1 3 2 2 4 2 3 3 4 3 5 4 6 3 7 3 8 9 A-3 3 3 3 10 3 4 11 3 4 32 8 Total 10 3. You can then enter the ``Total'' for each performance criterion into the assessment workbook [4] as shown in Figure A.4.1. Figure A.4.1: Pre-Lab entry into the assessment workbook for one student. A.4.2.3 How to score the lab reports As mentioned earlier in Section A.4.1.2, there are various ways in which you can use the material provided in this manual. In any case, the outcomes targetted by the lab experiments can be assessed from the lab reports submitted by the students. These reports should follow the specific template for content given at the end of each laboratory chapter. This will provide a basis to assess the outcomes easily. The lab activities correspond to the ``applied'' part of engineering. Therefore, outcomes ``B'' and ``K'' were mapped to the lab activities through their performance criteria. The lab reports themselves match outcome ``G'' on effective communication skills. If you choose to do an individual experiment in your weekly lab sessio then you can ask the students to submit a lab report using the report template provided for this experiment. The template contains the main ``content'' sections you would expect in a typical lab report (procedure, results, analysis, conclusions). Each section of the report template IP02 Workbook - Student Version v 1.0 ties back to the activities in the lab and the corresponding assessment indicators. It also contains performance criteria related to the ``format'' of the report. You can score the lab reports using the rubric for outcome ``G'' given in Section A.4.3 and the scoring sheet provided for the experiment in that section. Note that each lab report scoring sheet directly corresponds to the lab report content template for that experiment. Also, note that the rubric for outcome ``G'' already contains rubrics for outcomes ``B'' and ``K'' since these outcomes appear as an integral part of the report. To score the lab report of one student: 1. Print the scoring sheet for the Lab Report for the experiment they conducted in the lab. One sheet is used per student. 2. Use the ``Content'' rubric (Section A.4.3) to assign a score for each entry in the scoring sheet. The rubric gives the description of ``levels of achievement'' (4 = exemplary, 3 = proficient, 2 = developing and 1 = beginning/incomplete) for each criterion. As an example, below is a completed scoring sheet after evaluating the lab report of one student. 3. Use the ``Format'' rubric (Section A.4.3) for the ``GS-1 and GS-2'' criteria to score the formatting of the report on the same scoring sheet. K-1 Item1 I. PROCEDURE K-2 CONTENT B-5 B-6 B-7 B-9 FORMAT GS-1 GS-2 I.1. Frequency Response Experiment 1 I.2. Bump Test Experiment 4 1 4 I.3. Model Validation Experiment 1 II. RESULTS 4 1 4 2 3 3 3 4 III. ANALYSIS 3 III.1. Frequency Response Experiment 1 2 2 3 III.2. Bump Test Experiment 1 3 IV. CONCLUSIONS 1 Total 6 10 12 3 2 3 3 4 3 4. You can then enter the ``Total'' for each performance criterion into the assessment workbook [4] as show in Figure A.4.2. Figure A.4.2: Lab report score entries in the workbook for one student. IP02 Workbook - Student Version 60 A.4.2.4 Assessment of the outcomes for the course As explained earlier, the performance criteria, such as A-1, A-2, A-3, are used to describe a set of measurable statements to define each learning outcome. Up to this point, we explained how to assess each performance criterion using the pre-labs, the lab reports and the scoring sheets. A single score for each outcome can be computed to indicate the level of attainment of that outcome by the entire class. One approach is to simply average the scores for the performance criteria for that outcome. For example, in case of outcome ``A'', you can use: SCOREA = SCOREA−1 + SCOREA−2 + SCOREA−3 3 (A.4.1) Another possibility is to use a weighted-average where some of the performance criteria are considered to be more important than the others. In case of outcome ``A'', you can use: w1 · SCOREA−1 + w2 · SCOREA−2 + w3 · SCOREA−3 (A.4.2) w1 + w2 + w3 where w1 , w2 and w3 are weights you can assign (on the 0 to 1 scale) for the performance criteria A-1, A-2 and A-3, respectively. The total of all weights should equal 1. SCOREA = A.4.2.5 Course Score for outcome A The assessment workbook [4] incorporates the simple average approach as shown in Figure A.4.3. Figure A.4.3: Computation of single score for outcome ``A'' in the assessment workbook. A.4.2.6 Course Scores for outcomes B, K and G Similarly, the simple average approach is also used for outcomes B, K and G. Referring to the rubrics in Section A.4.3, it should be noted that outcome ``G'' contains performance criteria for both ``B'' and ``K'' to assess the content of the report. In addition, there are two performance criteria, GS-1 and GS-2, to assess the format of the report. The scores for all of these performance criteria are averaged to arrive at the single score for outcome G. For example, the single score for outcome G in Figure A.4.4 for the Modelling experiment was calculated using: IP02 Workbook - Student Version v 1.0 (A.4.3) SCOREG = AV ERAGE(SK−1 + SK−2 + SB−5 + SB−6 + SB−7 + SB−9 + SGS−1 + SGS−2 ) where SK−1 · · · SGS−2 are the scaled average scores for K-1 through GS-2 in the workbook. Figure A.4.4: Computation of single score for outcome ``G'' in the assessment workbook. A.4.2.7 Assessment workbook The assessment workbook [4] was developed using Microsoft Excelr . It is intented to give a general idea for how the assessment scores can be tracked and brought together. On purpose we designed the workbook to have no automatic features. You can use it as is or customize it in any way you like. The assessment workbook has a tab for the Pre-Lab Questions and a tab for each of the laboratory chapters. Only 10 students were listed assuming you would use samples of student work and not the entire class. If you want to add more students, you can insert rows into the spreadsheets. Note: If you insert new rows, make sure that the formula ranges in the cells with calculations are correct. At the bottom of each pre-lab section, there is a row entitled ``Total Possible''. To count a pre-lab assignment in the calculation of the overall scores, you need to enter the correct totals here. For example, to count the Pre-Lab for modeling, you need to enter 12, 44 and 8 (Figure A.4.1). If you want to exclude an assignment from the overall calculation, enter ``0'' as shown in Figure A.4.5. Of course, if you are excluding a pre-lab, then do not enter any scores for the students under those columns. IP02 Workbook - Student Version 62 Figure A.4.5: Enter ``0'' to exclude or ``correct totals'' to include a Pre-Lab assignment in the calculation of the overall scores. A.4.3 Rubrics IP02 Workbook - Student Version v 1.0 Apply math, science and engineering Code Perf. Criteria A-1 Has strategies to solve the problem A-2 Performs calculations A-3 Explains results 4 Exemplary 3 Proficient 2 Developing Uses a sophisticated strategy. Employs refined and complex reasoning to arrive at the solution. Arrived at correct answer. Calculations are complete. Precise math language, symbolic notation, graphs diagrams, etc. are used. Explains the result in the context of the completed calculations by providing complex reasoning and interpretations. Clear logical conclusions are drawn. Uses an appropriate strategy for solution. Content knowledge is used correctly. Has a strategy for solution but content knowledge has some conceptual errors. 1 Beginning or incomplete Uses a wrong strategy or there is no evidence of a strategy. Content knowledge has many errors. Arrived at correct answer with correct calculations. Arrived at correct answer. Calculations are mostly correct but there are some minor errors. No answer or arrived at wrong answer. Calculations are mostly or completely wrong. Explains the result in the context of the completed calculations. Logical conclusions are drawn. Some explanation of the result is provided but it does not demonstrate logical reasoning. There are no explanations of the result or an attempt was made to provide an explanation but it is incomplete or wrong. Table A.4.1: OUTCOME A: An ability to apply knowledge of mathematics, science, and engineering IP02 Workbook - Student Version 64 Conduct Design Code Perf. Criteria B-1 Identifies pothesis test hyto B-2 Identifies independent and dependent variables B-3 Lists assumptions made B-4 Formulates experimental plan to investigate a phenomenon B-5 Follows experimental procedures 4 Exemplary 3 Proficient a Framed a Framed testable ques- testable question correctly tion correctly and explained the anticipated cause-andeffect expectation leading to the question variables All variables All identified are identified are correctly, expla- correctly nations about their relations are provided All assumptions All assumptions and their rea- are listed sons are clearly listed Developed a Developed correct experimensophisticated tal procedure to experimental procedure test the hypothcomplete with esis details of every step to test the hypothesis Follows ex- Follows experimental proceperimental dures leading procedures carefully with to correct meagreat atten- surements tion to detail. Makes precise measurements (Continued on the next page) IP02 Workbook - Student Version 2 Developing Framed a question that may or may not be testable 1 Beginning or incomplete Incomplete or no testable question Most variables are identified correctly None or only a few variables are identified correctly Assumptions are listed but some are missing Attempted but could not completely develop an experimental procedure to test the hypothesis No assumptions listed or most of them are missing Could not develop an accurate experimental procedure Follows experimental procedures with some mistakes leading to mostly correct measurements Follows experimental procedures with many mistakes leading to mostly wrong measurements v 1.0 Interpret Analyze Code Perf. Criteria 4 Exemplary 3 Proficient 2 Developing Documents data with some mistakes in the units or some data missing. Data organization needs improvement Some data analysis but incomplete B-6 Documents data collected Systematically documents all data in an exemplary way and by using accurate units Documents all data and with accurate units. B-7 Uses appropriate methods to analyze data Appropriate level of analysis of data using correct methods B-8 Accounts for experimental uncertainties B-9 Interprets results with respect to the original hypothesis Excellent, indepth analysis of the data using appropriate methods Is aware of all potential experimental errors and can fully account for them with suggestions to improve them Provides clear, in-depth, accurate explanations, including trends, and arrives at logical conclusions based on data and results 1 Beginning or incomplete No data are documented or there are major mistakes in the units No analysis or attempts to analyze with wrong methods Is aware of all potential experimental errors Is aware of some of the potential experimental errors Is unaware of any experimental errors Provides accurate explanations and logical conclusions based on data and results Provides explanations and conclusions but with some errors No explanation or conclusions are provided or they are wrong Table A.4.2: OUTCOME B: An ability to design and conduct experiments, as well as to analyze and interpret data. IP02 Workbook - Student Version 66 Code Perf. Criteria B-1 Identifies hypothesis to test Procedure B-2 B-3 B-4 B-5 Identifies independent and dependent variables Lists assumptions made Formulates experimental plan to investigate a phenomenon Follows experimental procedures 4 Exemplary 3 Proficient 2 Developing Framed a testable question correctly and explained the anticipated cause-and-effect expectation leading to the question All variables are identified correctly, explanations about their relations are provided All assumptions and their reasons are clearly listed Developed a sophisticated experimental procedure complete with details of every step to test the hypothesis Framed a testable question correctly Framed a question that may or may not be testable All variables are identified correctly Most variables are identified correctly None or only a few variables are identified correctly All assumptions are listed Assumptions are listed but some are missing Attempted but could not completely develop an experimental procedure to test the hypothesis Could not develop an accurate experimental procedure Follows experimental procedures with some mistakes leading to mostly correct measurements No assumptions listed or most of them are missing Developed correct experimental procedure to test the hypothesis Follows experi- Follows experimenmental procedures tal procedures leadcarefully with great ing to correct meaattention to detail. surements Makes precise measurements (Continued on the next page) IP02 Workbook - Student Version 1 Beginning or incomplete Incomplete or no testable question Follows experimental procedures with many mistakes leading to mostly wrong measurements v 1.0 Results Code Perf. Criteria 3 Proficient 2 Developing 1 Beginning incomplete Documents data with some mistakes in the units or some data missing. Data organization needs improvement Can use software tools for data presentation with only a few mistakes No data are documented or there are major mistakes in the units Cannot use software tools for simulation or attempts to use them but with many mistakes No analysis or attempts to analyze with wrong methods or B-6 Documents data collected Systematically documents all data in an exemplary way and by using accurate units Documents all data and with accurate units. K-2 Uses software tools to present data in useful format (graphs, numerical, table, charts, diagrams) Uses software tools to simulate physical systems Uses appropriate methods to analyze data Accounts for experimental uncertainties Can use various software tools and their advanced features correctly for data presentation Can use software tools correctly for data presentation Can use software tools and their advanced features correctly for simulation Excellent, in-depth analysis of the data using appropriate methods Is aware of all potential experimental errors and can fully account for them with suggestions to improve them Can use various software tools and their advanced features correctly for analysis Provides clear, in-depth, accurate explanations, including trends, and arrives at logical conclusions based on data and results Can use software tools correctly for simulation Can use software tools for simulation with only a few mistakes Appropriate level of analysis of data using correct methods Some data analysis but incomplete Is aware of all potential experimental errors Is aware of some of the potential experimental errors Is unaware of any experimental errors Can use software tools correctly for analysis Can use software tools for analysis with only a few mistakes Provides accurate explanations and logical conclusions based on data and results Provides explanations and conclusions but with some errors Cannot use software tools for analysis or attempts to use them but with many mistakes No explanation or conclusions are provided or they are wrong K-3 B-7 Analysis B-8 Conclusions 4 Exemplary K-1 Uses software tools for analysis B-9 Interprets results with respect to the original hypothesis Cannot use software tools for data presentation or attempts to use them but with many mistakes (missing labels, etc.) Table A.4.3: OUTCOME G: Ability to communicate effectively. (for Lab Report - CONTENT) IP02 Workbook - Student Version 68 Code GS-1 GS-2 3 Proficient 2 Developing • Each of the required sections is completed. • If necessary, subsections are used • All necessary background principles and information for the experiment are given • All grammar/spelling correct • References are cited Two of the conditions for the "exemplary" category were not met Three of the conditions for the "exemplary" category were not met 1 Beginning or incomplete Four or none of the conditions for the "exemplary" category were not met Professional • Has cover page with all necesappearsary details (title, course, student ance name(s), etc.) • Typed • Report layout is neat • Does not exceed specified maximum page limit • Pages are numbered • Equations are consecutively numbered • Figures are numbered, axes have labels, each figure has a descriptive caption • Tables are numbered, they include labels, each table has a descriptive caption • No hand drawn sketches/diagrams • References are cited using correct format Two of the conditions for the "exemplary" category were not met Four of the conditions for the "exemplary" category were not met Five or more of the conditions for the "exemplary" category were not met Perf. Criteria Content presentation well organized 4 Exemplary Table A.4.4: OUTCOME G: Ability to communicate effectively. (for Lab Report - FORMAT) IP02 Workbook - Student Version v 1.0 Use techniques, skills and modern eng. tools Code Perf. Criteria K-1 Uses software tools for analysis K-2 Uses software tools to present data in useful format (graphs, numerical, table, charts, diagrams) K-3 Uses software tools to simulate physical systems 4 Exemplary 3 Proficient 2 Developing Can use various software tools and their advanced features correctly for analysis Can use various software tools and their advanced features correctly for data presentation Can use software tools correctly for analysis Can use software tools for analysis with only a few mistakes Can use software tools correctly for data presentation Can use software tools for data presentation with only a few mistakes Can use software tools and their advanced features correctly for simulation Can use software tools correctly for simulation Can use software tools for simulation with only a few mistakes 1 Beginning or incomplete Cannot use software tools for analysis or attempts to use them but with many mistakes Cannot use software tools for data presentation or attempts to use them but with many mistakes (missing labels, etc.) Cannot use software tools for simulation or attempts to use them but with many mistakes Table A.4.5: OUTCOME K: An ability to use the techniques, skills, and modern engineering tools necessary for engineering practice IP02 Workbook - Student Version 70 BIBLIOGRAPHY [1] Quanser Inc. QUARC User Manual. [2] Quanser Inc. IP02 User Manual, 2009. [3] Quanser Inc. QUARC Installation Guide, 2009. [4] Quanser Inc. IP02 Assessment Workbook, 2012. [5] Quanser Inc. Linear Servo Modeling Workbook, 2012. IP02 Workbook - Student Version v 1.0 Nine linear motion plants for teaching fundamental and advanced controls concepts IP02 Base Unit Linear Pendulum Linear Flexible Inverted Pendulum Double Inverted Pendulum Linear Flexible Joint Linear Flexible Joint with Inverted Pendulum Seesaw Seesaw Pendulum Linear Flexible Joint on Seesaw Quanser’s linear collection allows you to create experiments of varying complexity – from basic to advanced. With nine plants to choose from, students can be exposed to a wide range of topics relating to mechanical and aerospace engineering. For more information please contact [email protected] ©2013 Quanser Inc. All rights reserved. [email protected] +1-905-940-3575 Solutions for teaching and research. Made in Canada. QUANSER.COM