1
k
ParkIT Install Guide
Page 1/14
ParkIT Install Guide
For versions from 1.12.0.8
Document version: 12.07.18
Table of Contents
Compliances........................................................................................................................................... 3
1. Hardware Overview ............................................................................................................................. 4
2. Install the Bracket ................................................................................................................................ 6
2.1 Mounting...................................................................................................................................... 7
3. Setting up the Camera ......................................................................................................................... 7
3.1 Power / Trigger/ Serial Connection ................................................................................................. 7
3.2 Ethernet Connection ..................................................................................................................... 8
4. Software Requirements........................................................................................................................ 8
5. Accessing the Camera.......................................................................................................................... 9
6. Recommended Camera Position......................................................................................................... 10
7. Maintenance / Storage....................................................................................................................... 12
Appendix ............................................................................................................................................. 13
Contact Information.............................................................................................................................. 14
WARNING
The camera emits invisible, high-power infrared light. Prolonged direct exposure to
this radiant energy can cause permanent damage to the eye!
ParkIT Install Guide
Page 2/14
Compliances
CE Certificates:
The ARH ParkIT ANPR digital camera family complies with the European CE requirements specified in the EMC Directive 89/336/EEC.
The ANPR cameras conform to the following Product Specifications:
Emission:
EN 55022, EN 55024
Immunity:
EN 61000-4-2, -3, -4, -5, -6, -8, -11
FCC Compliance:
This product has been tested and found to comply with the limits for a Class A digital device pursuant to Part 15 of the FCC Rules. These
limits are designed to provide reasonable protection against harmful interference when the equipment is operated in a commercial
environment. This product generates, uses, and can radiate radio frequency energy and, if not installed and used in accordance with the
manufacturer’s instruction manual, may cause harmful interference with radio communications. Operation of this product in a residential
area is likely to cause harmful interference, in which case you will be required to correct the interference at your own expense.
This device complies with Part 15 of the FCC Rules. Operation is subject to the following two conditions:
1) This device may not cause harmful interference.
2) This device must accept any interference received, including interference that may cause undesired operation.
Notice: The FCC regulations provide that changes or modifications not expressly approved by ARH Inc. could void your authority to operate
this equipment.
These limits are designed to provide reasonable protection against harmful interference in a non-residential installation. However, there is
no guarantee that interference will not occur in a particular installation. If this equipment does cause harmful interference with radio or
television reception, which can be determined by turning the equipment off and on, you are encouraged to try to correct the interference
by one or more of the following measures:
Reorient or relocate the antenna of the radio/television receiver.
Increase the separation between this equipment and the radio/television receiver.
Connect the equipment into a different outlet so that the equipment and the radio/television receiver are on different power
mains branch circuits.
Consult a distributor of ARH Inc. or an experienced radio/television technician for additional suggestions.
Declaration of RoHS Compliance for Electrical and Electronic Products:
ARH Inc. ("the Company") hereby declares that the ParkIT ANPR camera family placed on the European Community market by the Company
after 1st July 2006 are compliant with EC Directive 2002/95/EC on the Restrict of Certain Hazardous Substances in Electrical and Electronic
Equipment (commonly known as the EU RoHS Directive.)
Compliance with RoHS means that where the product falls under the scope of the EU RoHS Directive, the product does not contain the
following substances:
- Mercury (Hg) 0.1%
- Lead (Pb) 0.1%
- Cadmium (Cd) 0.01%
- Hexavalent Chromium (Cr+6) 0.1%
- Polybrominated Biphenyls (PBB) 0.1%
- Polybrominated Diphenyl Ethers (PBDE) 0.1%
above the indicated maximum concentration values by weight in homogeneous materials unless the substance is subject to an exemption
specified in the Directive or in subsequent Commission Decisions.
This declaration represents the Company's best knowledge, which is partially based on information provided by third party suppliers.
Equipment modifications:
This equipment must be installed and used according with the instructions given in its documentation. This equipment contains no
serviceable components. Unauthorized equipment changes or modifications cause warranty to void.
ParkIT Install Guide
Page 3/14
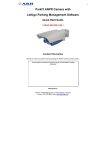
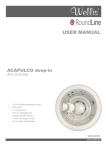
1. Hardware Overview
Sunshield
Wall bracket
Infrared LEDs
Camera with bracket
Camera optics
Infrared LEDs
Cover
Green status LED
Light sensor
Head
Foot
Red status LED
Camera front
Bracket
ParkIT Install Guide
Page 4/14
Bracket Details and Sizes
ParkIT Install Guide
Page 5/14
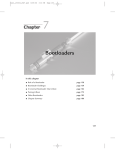
2. Install the Bracket
The bracket can be adjusted at two different points:
1. Adjusting the ball joint (A). The bracket allows rotating the ball joint in a 35-degree spatial angle in any
direction.
2. Adjusting the foot (B). If the necessary extent of rotation exceeds 35 degrees then the foot of the bracket
can be rotated by 180º extending the 35 degree spatial angle with additional 20° according to the figure.
B
A
Bracket foot rotated by 180°
enables additional 20°
to rotate the camera by.
Steps of rotating the foot
1. Remove the four screws (1) located at the back of the foot. (Use size 4 Allen key).
2. Rotate the foot (2) by 180 degrees.
3. Place the screws back into the holes and screw them back on.
NOTE: Do not overtighten the screws.
1
1
1
1
2
ParkIT Install Guide
Page 6/14
2.1 Mounting
The bracket can be mounted into different surfaces. Use appropriate screws for installation according to the
mountable surface.
NOTE: Failures due to inappropriate installation void the warranty.
3. Setting up the Camera
NOTE: Technical specifications are subject to change without prior notice.
The camera is equipped with two cables. The first cable is responsible for the power, trigger and serial connections
while the second cable is for communication via TCP/IP. The lengths of the pre-assembled cables are 1.5 meters
and they can be extended (if necessary) according to the followings:
RJ45: with e.g. inline coupler
Power/Trigger/Serial: with e.g. junction box
IMPORTANT NOTICE! For cabling use quality, outdoor-certified cables!
Improper cabling causes warranty to void! Water may enter into the camera inside through loose cable
ends. Use smooth circular cables only (6-8mm diameter).
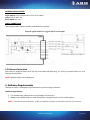
3.1 Power / Trigger/ Serial Connection
Description
Cable color
1. +12VDC................................Red
2. GND ..................................Black
3. Opto out G (-)** ........................ Red
4. Opto out S (+)** ...................... Grey
5. Opto in S (+)* ......................... Brown
6. Opto in G (-)* ........................ Orange
7. NC (no connect) ................... Yellow
8. Serial RX*** ...............................Green
9. Serial TX*** ............................... White
10. Serial GND*** .............................Blue
*
For trigger input
For trigger output
***
General-purpose serial port
**
IMPORTANT: SEAL THE UNUSED CABLE ENDINGS (END SLEEVES) BEFORE CONNECTING TO POWER IN
ORDER TO AVOID DAMAGES DUE TO SHORT CIRCUIT!
POWER SPECIFICATIONS:
DC Input
Power
Input Current
ParkIT WideVGA
ParkIT 1.3MP
12V nominal (11V..15V), reverse polarity protected
12W
14W
1.0A
1.1A
(max. 2.5A transients occur for a few msecs)
(max. 2.5A transients occur for a few msecs)
Over-current
Protection
by fuse
ParkIT Install Guide
Page 7/14
TRIGGER SPECIFICATIONS:
Logic output: Open Collector (max. 12VDC/ max. 10mA)
Input: min. 5V, max. 12V
Pulse width: min. 1 ms
SERIAL CONNECTION:
The serial port of the camera complies with the RS 232 standard.
Sample application for trigger input and output
3.2 Ethernet Connection
The camera is equipped with CAT5e UTP crossover cable with RJ45 plug. It is ready to connect both to PC and
network switch directly.
NOTE: The RJ45 plug is not weatherproof.
4. Software Requirements
The ParkIT camera is developed to operate without any kind of special software.
Software requirements
For network setup, administrator (root) privileges are necessary.
Web browser: Mozilla Firefox 4, Internet Explorer 8, Google Chrome 14.X.X.X or later editions
NOTE: To enable all camera functions, enable and update JavaScript and ActiveX controls in your browser.
ParkIT Install Guide
Page 8/14
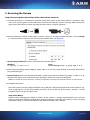
5. Accessing the Camera
Steps of accessing the web interface of the camera from a browser:
1. Connect the camera to a computer or network switch, then power on the camera. After it is turned on, both
status LEDs (red and green on the camera front) are turned on while the camera is booting. After finished, the
green status LED flashes two times signaling that the camera is ready for operation.
2. Enter an alternate IP address in the 192.0.2.x subnet – where x is an integer number between 1 and 254 except
3 – with the subnet mask of 255.255.255.0. For more information, see Appendix.
3. Use the ping command to test the communication with the camera
Windows:
C:\>ping -t 192.0.2.3
Linux:
username@mylinux:~$ ping 192.0.2.3
4. Soon, the ping package returns: Reply from 192.0.2.3. If not, power off then on and enter the previous
ping command again.
5. Start a browser then enter the default IP address of the camera into the address bar (http://192.0.2.3).
After this, the camera starts with administrator privileges, ready to be set up and configured.
NOTE: To enable all camera functions, enable (and update) JavaScript and ActiveX controls in your browser.
6. Configure the Camera
The ParkIT camera must be configured before using. With the Configuration Wizard, the camera features (e.g.
zoom, triggering etc.) can be set up quickly and easily. Of course, the use of the wizard is optional – camera
properties can be set up manually as well.
Steps of the Wizard:
Network setup (Changing the default IP address of the camera is strongly recommended), time and date
settings, camera task selection, configuration of image properties, autozoom and autofocus, event managing
and profile settings. For more information on the Wizard, see ParkIT User’s Manual.
ParkIT Install Guide
Page 9/14
Web interface after configuring the camera:
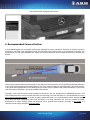
6. Recommended Camera Position
A good ANPR engine can read plates from images captured in various conditions. However, to achieve over 95%
recognition rate with short recognition times, the position of the camera have to be calculated accurately. The
best position is if the angle between the camera axis and the direction of the vehicle movement is minimal (see
below).
The distance between the camera and plate is also important. If the camera is too far from the plate, the characters
may not be large enough for recognizing them. In this case, zoom-in until you reach the proper size. If the distance
is too short it may happen that, a part of the plate is over the camera’s field of view (when the vehicle is near to the
side of the lane or the plate is not at the middle of the vehicle).
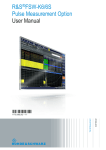
Generally, sharp and characters easily readable to the human eye are appropriate for ANPR/LPR purposes. The
most important factor is the size of the characters on the image. For Latin characters it is recommended to have at
least 16 pixel character height, for Arabic or other special characters it is recommended to have 20 pixel height
(since they are more calligraphic than Latin characters). Too large characters are also not suitable for ANPR,
therefore try to avoid settings where the character size is greater than 50 pixels in height. A line width of a
character on the image should be at least 2 pixels.
ParkIT Install Guide
Page 10/14
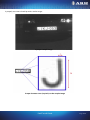
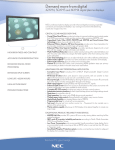
A properly set camera should provide a similar image:
A proper sample image
Proper character sizes (in pixels) on the sample image
ParkIT Install Guide
Page 11/14
7. Maintenance / Storage
The cameras are designed for 24/7/365 work under every weather condition and they do not need special
maintenance. Please keep clean the camera front. During the cleaning process, avoid scratching the front cover.
Never use the camera without its sunshield as it was specially designed to protect the device against
environmental effects such as heat, moisture or contamination.
The cameras should be stored in low humidity environment in the temperature range of -35 °C – +55 °C.
NOTE: The startup temperature of the camera is -20 °C.
ParkIT Install Guide
Page 12/14
Appendix
Adding Alternate IP Address
Windows Vista/Windows 7
1. Click Start and select Control Panel.
2. Make sure you are in Classic View by clicking Classic View
on the left of the Control Panel.
3. Open Network and Sharing Center.
4. Click Manage Network Connections on the left side of
Network and Sharing Center.
5. Right click on the network connection you want to add an IP
address for (to which the camera has been connected) and
select Properties.
6. Select Obtain an IP address automatically and click on the
Alternate Configuration tab.
7. Select User configured and enter e.g. the 192.0.2.54 IP
address and 255.255.255.0 as Subnet mask as shown on
Figure 1.
8. Click OK in the opened windows.
Figure 1.
Windows XP
1. Click Start and select Settings / Control Panel.
2. Make sure you are in Classic View by clicking Classic View
on the left of the Control Panel.
3. Click Network Connections.
4. Right click on the network connection you want to change
the IP address of (to which the camera has been connected)
and select Properties.
5. On the General tab click once the Internet Protocol
(TCP/IP) item, and click Properties.
6. Select Obtain an IP address automatically and click on the
Alternate Configuration tab.
7. Select User configured and enter e.g. the 192.0.2.88 IP
address and 255.255.255.0 as Subnet mask as shown on
Figure 2.
8. Click OK in the opened windows.
Linux
Figure 2.
1. Open a terminal.
2. Enter the ifconfig command to see the reserved Ethernets (e.g. eth0).
3. Enter the following command: ifconfig eth:Y 192.0.2.25
where Y is a free eth (e.g. eth1) and 192.0.2.25 is a sample IP address.
ParkIT Install Guide
Page 13/14
Contact Information
Should you have any problem during operating the ParkIT cameras, our support team is at your disposal. Please try
to explain the problem as detailed as possible and do not forget to send the following information to make it
easier to help you:
The name of your company (for administration purposes).
The exact type of the product you have (serial number is appreciated).
If you have problems during recognition, send images in the original file format.
If there is any error code or message appearing, please send us the code snippet where it occurs (a
screenshot may also be helpful).
If you noticed the problem while running a Demo or a sample application, please let us know the name of
the application you tested.
If you have some problem while developing your own application, please specify the followings:
o your programming language
o your operating system
o the name and version number of the compiler you use
o the programming technology (e.g. native C/C++ / ActiveX / .NET)
o If possible please send a short part of the source code. Please try to determine the place where the
error occurs (e.g. “the scapture?getshutter command returns a negative number…“).
IMPORTANT NOTES:
Before sending back a faulty device, always contact ARH Support Team.
Repairs may be executed by the manufacturer only!
Office address:
ARH Inc.
41 Alkotás Road
HU-1123 Budapest
Hungary
Phone: +36 1 2019650
Web: www.arh.hu
Email: [email protected]
Service address:
ARH Inc.
Ipari Park HRSZ 1113/1
HU-2074 Perbál
Hungary
Phone: +36 1 2019650
Web: www.arh.hu
Email: [email protected]
ParkIT Install Guide
Page 14/14