1
"" Copyright Psion PLC 1995
All rights reserved. This manual and the programs referred to herein
are copyrighted works of Psion PLC, London, England. Reproduction
in whole or in part, including utilisation in machines capable of
reproduction or retrieval, without the express written permission
of Psion PLC is prohibited. Reverse engineering is also prohibited.
The information in this document is subject to change without notice.
Psion and the Psion logo are registered trademarks, and Psion Workabout,
3Link, SSD and Solid State Disk are trademarks of Psion PLC.
Some names referred to are registered trademarks.
Psion reserves the right to change the designs and specifications
of its products at any time without prior notice.
v1.0 February 95
English
Part no. 6104-0001-01
FCC Information for the USA
Radio and Television Interference
This equipment generates and uses radio frequency energy and if not
used properly that is, in strict accordance with the instructions
in this manual may cause interference to Radio and Television
reception.
If the label on the top of the Workabout displays the words
"FCC ID:" followed by a code, then it complies to the limits for a
Class B computing device in accordance with the specifications in
Part 15 of FCC rules. If "FCC ID:" does not appear on the label, it
complies to Class A limits. See the statements below for further details.
Limits for Class A computing devices
This equipment has been tested and found to comply with the limits
for a Class A computing device pursuant to part 15 of the FCC Rules.
These are designed to provide reasonable protection against harmful
interference when the equipment is operated in a commercial environment.
This equipment can radiate radio frequency energy and, if not installed
and used in accordance with the instructions, may cause harmful interference
to radio communications. Operation of this equipment in a residential
area is likely to cause harmful interference, in which case the user
will be required to correct the interference at his own expense.
Limits for Class B computing devices
This equipment has been tested and found to comply with the limits
for a Class B computing device pursuant to Part 15 of FCC Rules. These
are designed to provide reasonable protection against harmful interference
in a residential installation. This equipment can radiate radio frequency
energy and, if not installed and used in accordance with the instructions,
may cause harmful interference to radio communications. However, there
is no guarantee that interference will not occur in a particular installation.
If this equipment does cause interference to radio or television reception,
which can be determined by turning the equipment off and on, the user
is encouraged to try to correct the interference by one or more of
the following measures:
*) Reorient or relocate the receiving antenna.
*) Increase the separation distance between the equipment and
the receiver.
*) If you are using the Workabout with a mains adaptor,
plug it into an outlet which is on a different circuit from that to
which the receiver is connected.
*) Consult an authorised Psion dealer or an experienced radio/television
technician for help.
Important
This equipment was tested for FCC compliance under conditions that
included the use of shielded cables and connectors between it and
any peripherals that are attached. It is important that you use shielded
cables and connectors to reduce the possibility of causing Radio and
Television interference. Shielded cables, suitable for the Workabout,
can be obtained from an authorised Psion dealer.
If the user modifies the Workabout computer or its Expansion
Modules in any way, and these modifications are not approved by Psion,
the FCC may withdraw the user's right to operate the equipment.
For customers in the USA, the following booklet prepared by the Federal
Communications Commission may be of help: "How to Identify and Resolve
Radio-TV Interference Problems". This booklet is available from the
US Government Printing Office, Washington, DC 20402 Stock No 004-000-00345-4.
Introduction
You should read this chapter first; it contains basic
information that you need to know before you read the other chapters
in this manual. In this chapter you will find details about:
The various Workabout components.
Fitting the the Workabout's batteries and connecting
it to the mains.
The notational conventions used in this manual are
as follows:
Wherever there are things for you to do, the instructions
appear as a numbered list.
Extra notes, which you may find useful, are preceded
by a "+" symbol.
Important information is indicated by the word Important:,
or is printed in bold type.
Technical or jargon terms appear in italic type the
first time that they are referred to in the text.
To move quickly to information about a specific subject,
look in the index for an appropriate entry. Index entries are grouped
according to topics; for example, to find out about batteries, look
for an appropriate entry under the major entry "Batteries".
-----------------------------------************ About the Workabout
The Workabout is a robust handheld computer which uses the
same Solid State Disks (SSDs) as the Psion HC and Series 3 ranges.
Its advanced windowing and multi-tasking software system makes it
simple to use and easy to integrate with existing computer systems.
*** Package contents
In the Workabout box you will find:
*) The Workabout
*) This User Guide
*) A lithium backup battery
*) A Warranty leaflet
*** Care of the Workabout
The Workabout is dust proof and splash proof. Should you ever
need to clean it, first turn it off and then gently wipe the keyboard
and screen with a soft, clean, dry cloth.
****** Where things are
The following diagram shows where the main components of the Workabout
are:
(picture)
(picture)
-----------------------------------************ Powering the Workabout
The Workabout can be powered in four ways:
*) by two AA batteries (not supplied). You should use alkaline
batteries for best results.
*) by a Psion Ni-Cd (Nickel-Cadmium) rechargeable battery
pack, supplied separately from the Workabout (Part no. 2802-0005).
You can also use 2 standard Ni-Cd rechargeable batteries, however,
you cannot recharge these batteries while they are fitted in the Workabout
and so they are not recommended for use.
*) by the AC (mains) supply via a Docking Holster (Part
no. 1804-0003-01) and Workabout mains adaptor (Part no. 2502-0010
for use in the U.K. Part no. 2502-0011 for use in the rest of Europe).
Neither the Docking Holster nor the mains adaptor are supplied with
the Workabout, they must be purchased separately; see your Psion distributor
for more information.
*) by placing it in a Workabout Docking Station.
A small lithium battery is supplied as a backup battery (battery type:
3V Lithium R16 battery - CR1620).
When there is no other power supply, it will preserve information
in the Workabout's internal memory (RAM) for approximately
five days.
Important: When the main batteries and backup battery are removed,
all the information in the internal memory (RAM) is lost. Before removing
both batteries, you should therefore copy any important information
in the internal memory to an SSD or PC.
If you plan not to use the Workabout for long periods of time,
it is best to copy all the data on the internal disk (M:) to an SSD
and then remove both the main and backup batteries.
*** Fitting / changing the backup battery
When the backup battery supplied with the Workabout becomes
discharged, you must replace it with the same or an equivalent type
of battery as recommended by Psion. You can purchase them from your
Psion distributor (Part no. 4900-0018, description BAT LITH. 3V 60mAH
2x16D) or from other battery stockists (Battery type: 3V Lithium R16
[CR1620]).
The backup battery is located in a slot in the SSD/Battery drawer
that slides out of the centre of the Workabout. To fit it:
1.
Turn the Workabout off.
2.
Press down the SSD/Battery drawer release button (on
the left hand side of the screen)
to release the drawer and pull it out until the backup battery cover
is revealed.
3.
Slide open the backup battery cover in the direction indicated by the arrow, then fit the
backup battery into its slot as shown in the following diagram:
(picture)
Important: Make sure that the positive terminal of the backup
battery (the flatter of the two sides and marked with a + symbol)
faces towards the outer edge of the Workabout as you insert
it. There is a risk of explosion if you incorrectly replace lithium
batteries.
4.
Slide the backup battery cover back into its original
position to secure the battery in place.
5.
Close the SSD/Battery drawer.
Warning: You should tape, or otherwise protect the terminals
of discharged lithium batteries before you dispose of them. Do not
incinerate or crush them, or attempt to recharge them.
*** Fitting / changing the main batteries
Rechargeable Ni-Cd battery packs are normally not charged when new.
So if you are fitting a new one, you will probably need to charge
it first. See the `Recharging a Ni-Cd battery pack' section for details
of how to do this.
When the main batteries become discharged and need to be replaced,
you should leave them in the Workabout until you are ready
to fit charged batteries; this will prolong the life of the backup
battery. The backup battery preserves the contents of the internal
memory while the main batteries are being changed; however, you should
not rely upon it as a permanent source of power.
The main batteries (or rechargable Ni-Cd battery pack) fit in a recess
in the SSD/Battery drawer that slides out of the centre of the Workabout.
To fit or change the main batteries:
1.
Turn the Workabout off, then press down the SSD/Battery
drawer release button to open the SSD/Battery drawer and pull it out
until the main battery compartment is visible.
2.
Remove any discharged batteries that are present.
3.
Insert two AA batteries (alkaline ones are recommended)
or a freshly charged Ni-Cd battery pack as shown in the diagram below:
(picture)
4.
Close the SSD/Battery drawer.
You can now turn the Workabout back on.
Important: Ni-Cd rechargeable battery packs contain Cadmium,
a toxic substance that is harmful to the environment. You should only
recharge them by the recommended methods. Do not short circuit, dismantle
or incinerate them dispose of a spent or damaged Ni-Cd battery
pack safely.
*** Recharging a Ni-Cd battery pack
A Ni-Cd rechargeable battery pack can be recharged in three ways:
*) by placing the Workabout in which it is fitted in a
Workabout Docking Station. You can insert a second, spare
Ni-Cd battery pack in the Docking Station for charging at the same
time. The battery pack will be fast charged (see `About the
Workabout Docking Station' later for more details).
*) by placing the Ni-Cd battery pack directly in a
Workabout Docking Station. Again, the battery pack will be
fast charged.
*) by connecting the Workabout in which it is fitted to
the mains with a Docking Holster and the Workabout mains
adaptor. This method only trickle charges the Ni-Cd battery
pack.
Fast charging a discharged battery pack takes about an hour. With
trickle charging it takes approximately 14 hours to fully recharge a
discharged battery pack, although it will be 90% charged within 12
hours.
Detailed instructions on inserting a Workabout and battery
pack in the Workabout Docking Station are given in the manual
supplied with the Docking Station.
*** Connecting the Workabout to mains power
You cannot plug a mains adaptor directly into the Workabout;
you must insert the Workabout into a Docking Holster and plug
the mains adaptor into the Docking Holster. See `The LIF-PFS socket'
section later in this chapter for more information.
When the Workabout is connected to mains power, the External
power LED becomes green.
*** About the Workabout Docking Station
The Workabout Docking Station provides mains power to the
Workabout and recharges its Ni-Cd battery pack (if fitted) at
the same time.
Detailed instructions on inserting a Workabout are given in
the manual supplied with the Docking Station.
When a Workabout is placed in a Docking Station, its External
power LED becomes green to indicate that it is being powered by the
Docking Station.
*** What happens when the power is low
When the main batteries become low, a `Main battery is low' message
is displayed. With low
main batteries, the Workabout may have enough power to display
information on the screen and accept data that you type on the keyboard;
however, it may not have enough to save information to an SSD or to
transfer information to other devices, e.g. a printer, via its Internal
Expansion ports.
If you try to do something for which the Workabout does not
have enough power, it will automatically switch off. You should fit a new set of AA batteries,
recharge the
Ni-Cd battery pack, or connect the Workabout to an AC (mains)
power supply (using a LIF converter and Psion mains adaptor) before
trying the operation again.
When the power in the main batteries gets very low, the Workabout
will automatically turn itself off and you will not be able to use
it until you fit charged batteries. However, no information will be
lost; the backup battery will maintain the information in the internal
memory for several days.
Applications running on the Workabout may allow you
to check the power in the batteries;see your application developer
for details.
*** Power consumption
The Workabout's power consumption depends on the applications
that you are running and the type of peripherals that are attached
to the Workabout. Using the Backlight or printing via an Internal
Expansion port, for example, dramatically reduces the life of the
main batteries. For more information on battery life, contact your
application developer.
In order to conserve its batteries, the Workabout automatically
switches off when you are not using it. The default
switch off time is 5 minutes, however this time limit is under application
control; you should contact your application developer for more details
about the automatic switch off time on your Workabout.
No information is lost when the Workabout automatically
turns off; when you turn it back on, you can continue from where you
were.
-----------------------------------************ The Workabout components
The following Workabout components are described in this section:
*) the LCD screen
*) the alphanumeric keyboard
*) the Solid State Disk (SSD) drives
*) the Buzzer
*) the LIF-PFS socket
*) the Internal Expansion ports
****** The LCD screen
*** The text displayed
Your application(s) may allow you to change the size of the characters
displayed on the screen. If they do, you will be able to press a certain
combination of keys to "zoom in" and "zoom out" to increase and reduce
the font size.
In the built-in applications, press Psion-Z to zoom in; to zoom out
again, press Shift-Psion-Z.
Zooming out (moving from a larger to a smaller font) will re-display
some of the information that scrolls off the screen in a larger font
size.
*** Screen contrast
The screen contrast setting controls how light or dark the Workabout
screen appears. There are 16 contrast settings, so you can "fine-tune"
the appearance of the screen to suit your needs.
To adjust the contrast, simply press the Contrast key
(picture) until the screen reaches the desired appearance.
Press the Shift and Contrast keys at the same time to reverse the
direction of the change in contrast.
*** Backlight
The Workabout can be fitted with a light behind the screen
to help you view information in poor lighting conditions.
To turn the Backlight on simply press the Backlight key
(picture) and to turn it off press the Backlight key again.
As you would expect, the Backlight switches off when
you turn the Workabout off. However, when you turn the Workabout
on again, the Backlight does not come on automatically; this is to
prevent you from using it unintentionally and wasting battery power.
Applications can change this behaviour, though.
Important: The Backlight is not designed to be used continuously.
It switches off automatically when the Workabout has been idle
for a certain time to preserve battery power; the length of time that
it remains on is under application control. See your application developer for more information
about
control of the Backlight.
****** The Keyboard
The Workabout can use two different keyboards - you may have
the UK version or the Western European one (see your application developer
for details).
Each has a set of 57 keys as shown below:
(picture)
ENGLISH KEYBOARD WESTERN EUROPEAN KEYBOARD
The main navigation keys - the On, Arrow and Enter keys - are yellow;
they are positioned so that you can reach them with your thumb when
you are holding the Workabout, making one-handed operation
easy. The accented characters indicated on the Western European keyboard
surround are entered by pressing the Psion key and the appropriate
letter key at the same time. For capital accented letters, press ShiftPsion
and the appropriate letter key.
The Special function keys are not indicated on the machine; the lists
that follow explain the uses of some of these special keys.
For information about other customised keyboards, you should contact
your Psion distributor.
COLUMNS(3), DIMENSION(IN), COLWIDTHS(.9842,E1,E2), HGUTTER(.0555),
KEEP(OFF)
TABHEADING, TABLE HEADING, TABLE HEADING
KEY, FUNCTION, USAGE
KEYPCX, TABLE TEXT, TABLE TEXT
(picture), ON , Turns the Workabout on when the machine
is off.
(picture), OFF, Turns the Workabout off when the machine
is on.
(picture), CONTRAST, Controls the contrast of the LCD screen.
(picture), BACKLIGHT , Switches the Workabout's screen
Backlight on and off.
(picture), ESC , Under application control; see your application
developer for details. In text editors it typically clears a line
of text input when the machine is on.
(picture), ENTER , Under application control; see your application
developer for details. In command processors it typically terminates
a line of text input and in text editors it starts a new line of text.
(picture), DELETE, Under application control; see your application
developer for details. In command processors and text editors it is
usually used to edit typing.
(picture), TAB , Under application control. In text editors
it typically moves the cursor on the screen to the next tab position.
(picture), MENU , Under application control; see your application
developer for details.
(picture), SPACE , Inserts a space in a line of text input.
(picture), SHIFT , Gives access to upper case letters; press
Shift and a letter key to type its capital.
(picture), CONTROL , Under application control; see your application
developer for details.
(picture), PSION (SPECIAL FUNCTION), Acts as an accelerator
key in combination with other keys.
(picture), ARROWS, Move the cursor around the screen. On command
lines the " UP " and " DOWN " keys recall previous commands
so that you can re-enter them without having to type them a second
time.
*** Combination keypresses
The following list shows the combination keypresses that give you
access to the in-built special functions on the Workabout.
They are not indicated on the keyboard.
COLUMNS(3), DIMENSION(IN), COLWIDTHS(1.3783,E1,E2), HGUTTER(.0555),
KEEP(OFF)
TABLE HEADING, TABLE HEADING, TABLE HEADING
KEYPRESS, FUNCTION, USAGE
TABLE TEXT, TABLE TEXT, TABLE TEXT
(picture), TASK, Press Psion and Tab at the same time to Task
(cycle) through all the running applications and tasks on the Workabout.
The keypress does nothing until at least two visible tasks are running.
(picture), CAPS LOCK , Press Psion and Space at the same
time to switch the keyboard to upper case letters.
(picture), HELP , Press Shift and On/Esc at the same time for
this function. It is under application control and typically displays
help text for the current application. See your application developer
for more details.
(picture), HELP INDEX, Press Shift,, On/Esc and Ctrl at the
same time for this function. It is under application control and typically
displays the index of help for the current application. See your application
developer for more details.
(picture), BATTERY INFO, Displays a dialog that gives you
information about the current condition of the Workabout's
batteries.
****** The Solid State Disk drives
The Workabout has two Solid State Disk drives (SSD drives)
which allow you to extend its data storage capacity with Solid State
Disks (SSDs). SSDs are a highly secure and compact form of data storage.
The speed of data transfer to and from them is much faster than with
PC floppy disks and comparable to that with many PC hard disks.
The Workabout's SSD drives are located in the SSD/Battery drawer
that slides out of the centre of the machine, as shown in the diagram
below:
(picture)
The uppermost SSD drive is called drive" A:" and the lower one
drive" B:" .
To insert an SSD:
1.
Press the SSD/Battery drawer release button to open
the SSD drive drawer and pull it out until the SSD drives appear.
2.
Slide the SSD into the slot the arrow on its
front edge should point towards the slot. Then close the drawer.
Removing an SSD is just the reverse of inserting it: press the SSD/Battery
drawer release button to open the drawer, then pull the SSD out of
its slot and close the drawer.
Important: It is best not to open the Solid State Disk (SSD)
drive drawer while the Workabout is accessing an SSD. However,
most applications are designed to prevent you from losing data unwittingly
and will prompt you to replace an SSD that you have removed while
the Workabout is reading information from or writing information
to it.
****** The Buzzer
The Workabout has a built-in buzzer for producing sounds which
is under application control. See your application developer for more
details.
****** The LIF-PFS socket
The Workabout is supplied with a LIF-PFS (Low Insertion Force
Power & Fast Serial) socket at the base of the unit. This
can be used to connect the Workabout to:
*) a mains adaptor, via a LIF converter (supplied with the
Docking Holster) so that the Workabout can be powered from the
mains.
*) a Workabout Docking Station, so that a Ni-Cd battery
pack in the Workabout can be recharged without removing it
from the machine.
*) other computers and devices, for example printers, that
can be connected and communicate via a serial port. In order to utilise
the LIF-PFS socket for this purpose you need to attach a Psion 3Link
lead to a LIF converter and then plug the LIF converter into the Workabout's
LIF-PFS socket. The 3Link lead thus becomes the Workabout's
serial port C.
*) other computers and devices, for example printers, that
can be connected and communicate via a parallel port. To use the LIF
socket for parallel printing, you need a LIF converter and a Psion
Parallel 3Link; see your Psion distributor for more information.
*** The LIF converter
A LIF converter is supplied as part of the Docking Holster. The Mains
Adaptor and 3Link cable can also be obtained from your Psion
distributor.
(picture)
****** The Internal Expansion ports
The Workabout supports Internal Expansion ports at each end
of the machine which allow it to be connected to other computers and
devices via Expansion modules. It can be supplied with the following
Expansion modules factory-fitted and ready for use:
*) RS-232 AT & RS-232 TTL interface module (suitable for connecting
it to a number of computers and devices, for example industry standard
barcode scanners and printers) in the two top ports.
*) Barcode & RS-232 AT interface module in the two top
ports.
A Barcode & RS-232 TTL interface module is not available.
Labels on the Workabout indicate which Expansion modules are
fitted (if any).
Important: The current drawn by a peripheral attached to the
Workabout must not exceed 200mA.
****** The Fuse
The Workabout is protected against damage due to problems with
its battery power supply by a main fuse. This is fitted beneath the
main batteries in the SSD/Battery drawer. Under normal circumstances,
you should never need to replace it; however the following situations
can cause the fuse to blow:
*) Batteries fitted the wrong way round if mechanical failure
stops the normal mechanisms preventing them making contact.
*) A short circuit across the main batteries.
*) A fault with the Workabout that causes an excessive
current flow from the main batteries.
If the fuse does blow, the Workabout will lose battery power
and you will not be able to use it with battery power until a new
fuse has been fitted. You should not replace the fuse yourself.
Instead, you should send your Workabout along with your name
and address details by registered or recorded delivery to the Psion
Production and Service Centre at the following address:
Psion Production and Service Centre
17-19 Bristol Road
Greenford
Middlesex UB6 8UP
where it will be tested for faults and the fuse replaced. You will
be sent a return note to confirm receipt of your Workabout
and it will be returned to you as soon as possible.
Basic use
This chapter describes how to operate a Workabout
that is using the default settings. If the setup on your Workabout
differs from the standard one, some aspects of the keyboard and
screen display may not match the descriptions that are given in this
section. If you are in any doubt, contact your application developer.
This chapter tells you how to:
switch the Workabout on and off.
use a Startup file to run applications.
reset the Workabout, should it ever be necessary
for you to do so.
It also contains "Troubleshooting" information which
you can refer to if anything ever goes wrong with the Workabout.
-----------------------------------************ Turning on and off
You can turn the Workabout on as soon as you have fitted charged
batteries or connected it to a mains power supply.
To turn on: press the On key. The Workabout will switch
on and continue from where it was when it was last turned off.
To turn off: press the Off key.
When you turn the Workabout off, no information is
lost, but neither is any information saved; the Workabout gets
switched to a "stand-by" state in which the screen, Internal Expansion
ports and processor are de-activated. If you remove both sets of batteries
when the Workabout is in this state you will lose all the information
currently stored in the internal memory and on the internal disk"
M:".
The Workabout switches off automatically when the machine has
been idle for a certain time. The default automatic switch off time
is 5 minutes, however this time limit is under application control;
see your application developer for details.
*** Turning on for the first time
When you switch the Workabout on for the first time, the Copyright
screen is displayed for a short time. Meanwhile, the Workabout
searches all its disk drives (internal disk and both SSD drives) for
a Startup file.
A Startup file is a batch file that normally contains
commands to set various system settings, for example the auto switch
off time, and run applications. For more information, see the `Advanced
use' chapter later in this manual.
If a Startup file is found, the Workabout runs it automatically.
You will then see the screen prompts or application screen that your
Startup file is set to display.
If the Workabout doesn't find a Startup file, you will see
a message on the screen that tells you what to do, it will typically
say:
"Insert Startup (autoexec) SSD and press Enter"
You should, in the latter case, insert the SSD that contains your
Startup file and press Enter.
-----------------------------------************ Troubleshooting
If your Workabout seems to be malfunctioning, read the relevant
section below and carry out the recommended checks and corrective
actions. If they do not solve your problem, you should seek assistance
from your application developer; alternatively, you may wish to contact
your Psion distributor.
Important: There are no user-serviceable parts within the Workabout.
*** The Workabout won't turn on
When you first switch on the Workabout, there may be a delay
of a few seconds before any information is displayed. If the screen
continues to remain blank, try pressing the Contrast key to adjust
the screen contrast.
If this doesn't work, you will need to check that the Workabout
is receiving power: make sure that charged batteries are fitted and
that the main fuse is not blown. If the fuse has blown you will need
to return your Workabout to a Psion Service Centre. See the
`Introduction' chapter earlier in this manual for more information
about the fuse.
If the Workabout has power and adjusting the contrast does
not solve the problem, it may be that an application running on the
Workabout has disabled or wrongly set the contrast control;
see your application developer for assistance.
*** Screen too dark, or insufficient contrast
Press the Contrast key to adjust the screen contrast.
*** Beeping
The Workabout will beep if you try to type in too many characters
in a particular place for example, when typing filenames in
a dialog. The volume of these beeps is controlled by the `Sound' option
in the in-built System screen.
*** The Workabout switches off
Make sure that the batteries are charged, or check that the LIF converter
and mains adaptor are securely fitted if you are using mains power.
If the Workabout has power, it could be that the Workabout's
auto switch off time is set to an unsuitably short interval.
*** Some keys do not work
There are a number of reasons why this may happen, most of them concern
the applications running on the Workabout. For example, an
application may disable the use of certain keys, or it may not recognise
your local country and keyboard layout.
*** The Workabout does not "auto switch off"
The most likely explanation for this problem is that an application
running on the Workabout has disabled this function. Contact
your application developer for more information.
Important: You should ensure that the automatic switch off function
is left active; otherwise, if you leave the Workabout on for
a long period of time by mistake, you could discharge both the main
and backup batteries completely. You would then lose data and not
be able to use the Workabout again until the batteries have
been recharged or replaced.
*** `Memory full', `No system memory' or `Disk full'
A `Memory full', `No system memory' or `Disk full' message is shown
when you have almost filled the internal memory with information on
the internal disk. Many of the things you do on the Workabout
need just a little free memory in order to work displaying
dialogs, menus, or Help information; so when you get an out of memory
message you will often be unable to enter more information or change
any settings until you have freed some memory.
Don't worry if you fill up the internal memory your information
on the internal disk is still safe. Just try the following to free
some memory:
*) Open any Database files that you have stored on the internal
disk and use the Database's `Compress' option, then exit each file.
This will reclaim any space taken up by deleted or edited information.
*) Internal memory is used to keep each file or application
open, so close down open files and applications that you don't need
right now. To do this, press Psion-Tab to cycle through all the running
applications and use their exit options to close them down; if an
application doesn't have an exit option, just press Psion-Esc.
*) Delete any unwanted files on the internal disk.
*) Copy files to an SSD, then delete them from the internal
disk.
*) Sometimes you can free (temporarily) a certain amount of
memory by moving to an open application, for example the in-built
Database, and using its `Copy text' option on as small an amount of
information as possible. This places the small amount of text on the
clipboard, deleting any previously stored text.
If you edit a large file, then open a small file, the Program
editor may under some circumstances still take up more internal memory
than necessary for the new file. Exit the file, then open it again.
If you want to keep an eye on the amount of internal memory which
is still free, use the `Memory info' option on the `Info' menu in the in-built System screen. This
will show you the amount of internal memory used and the amount free.
If you press the " LEFT " and " RIGHT " keys, more details
are given of what is using up the memory the internal disk,
each open Database file, and so on. Memory is measured in K
(short for kilobyte) 1K can hold just over a thousand
characters.
*** Problems with menus
You cannot use the Menu key to display a menu in these situations:
*) While a dialog is being shown on the screen.
*) While you are using Help on the screen.
*) While full screen messages, such as alarms and disk error
messages, are displayed.
*** The Workabout "locks
up"
If an application "crashes" (i.e. you get no response when you type
things on the keyboard, etc.), you need to reset the Workabout.
See the instructions given under `Resetting the Workabout'
later in this chapter. However, if you are not able to save the
information on your internal disk to an SSD, you should see your
application developer for help before attempting to reset the
Workabout.
*** Problems with SSDs
It's best not to remove an SSD while information is being written
to it, for example when you have chosen to copy or save a file on
an SSD drive, or when you have exited a file, to look at a new file.
If you do remove an SSD while it is being written to, a message is
usually displayed asking you to replace it. If the disk's volume name
is "backup" , for example, the message will typically say something
like `Please replace volume "backup"'.
You must either reinsert the disk and choose to retry, or opt to abandon
the operation; you cannot use the Workabout until you do so.
Important: If a file was being saved or written to in any way,
and you choose to abandon, the file will almost certainly be corrupted
and become unusable. You should then delete the file.
A `Media is corrupt' message means that the Workabout
cannot read the structure of a disk. You may see it when trying to
access an unformatted SSD. If the SSD is formatted, remove it, then
re-insert it and try again. If you still can't get the Workabout
to access it, there may be a hardware problem with the SSD. Contact
Psion Technical Support for information.
*** Problems with the LIF-PFS socket and LINK software
If you cannot access Port C, or the LINK software refuses to run,
you should try the following:
1. Turn the Workabout off and on again.
2. Type "STOP LINK" on the command line in the
Command processor to stop the LINK software.
3. Disconnect the LIF converter and 3Link lead from the
Workabout.
4. Plug the 3Link lead into the LIF converter and then
connect the LIF converter to the Workabout.
5. Finally, type "LINK" on the command line in the
Command processor to run the LINK software again.
*** Password-protected
files
If you have given a password to a Spreadsheet file, and then forgotten
it, that file is no longer available to you.
If it is the only Spreadsheet file (perhaps still called `Sheet'),
you will need to create a new file in order to use Sheet again, and
use that instead. Position the highlight under the Word or Sheet icon
in the System screen, and use the `New file' option on the `File'
menu. Enter a different name for the new file. However, you will still
be unable to access the password-protected file, until you remember
the password.
****** Resetting the Workabout
You should never normally need to reset your Workabout. Most
applications are designed in such a way that they exit automatically
when anything goes wrong, without affecting any of the information
you have stored in the internal memory (RAM) or on the internal disk"
M:". However, in the unlikely event of an application going wrong
to the extent that it stops the Workabout responding to things that
you type on the keyboard, you will need to perform a reset."
When an application "crashes" (fails) you should first try a soft
reset, as follows:
*) Press the Psion-Ctrl-Del keys at the same time.
When you turn the Workabout on again, it will beep, briefly
display the Copyright screen and then perform the normal startup routine,
i.e. it will look for a Startup file and display a prompt if it doesn't
find one. All the information that you had saved in the internal memory
and on the internal disk" M: "should still be there.
If the soft reset doesn't work, you will need to perform a hard
reset:
*) Press the Shift-Psion-Ctrl-Del keys at the same time.
This action resets the Workabout completely - you will lose
all the information that you had previously stored in the internal
memory and on the internal disk. For this reason, you should only
use a hard reset when a soft reset fails.
If a hard reset doesn't work, you will need to "reboot" the Workabout:
*) Remove all power from the Workabout, i.e. disconnect
it from any mains supply and remove both the main batteries and backup
battery for a few minutes.
Rebooting also removes all the information currently held in the internal
memory and on the internal disk.
Advanced use
This chapter is intended for experienced computer users
and developers. It gives information about:
setting up a new Workabout.
the Workabout's system-wide settings.
creating a Startup batch file.
developing applications for the Workabout and
downloading them from a PC.
the Command processor, the command line editor and
the commands available on the Workabout.
peripheral products for the Workabout that extend
its capabilities.
-----------------------------------************ Setting up a new Workabout
Setting up a new Workabout can involve one or more of the following
procedures, depending on what the machine is going to be used for
and by whom:
*) Setting the system-wide settings, for example the system
date and time and the automatic switch off settings.
*) Creating a Startup batch file ("AUTOEXEC.BTF") that will
be automatically run by the Workabout whenever it is switched
on. The Startup batch file can set system-wide settings and load applications
and files so that the user does not have to do it manually.
*) Developing applications for the Workabout.
*) Downloading applications from a PC to the Workabout's
internal disk or to an SSD and installing them.
*) Setting up the Internal Expansion ports for printing.
*) Running applications.
****** Switching on for the first time
The first time you switch the Workabout on you will briefly
see a Copyright screen and then the following message will be
displayed:
"Insert Startup (autoexec) SSD and press Enter
or press Menu for System Interface"
This screen is referred to as the Startup Shell throughout this manual.
Pressing Menu displays a menu of options that allow you to move to
the Command processor and the System screen. There is also an option
to `Restart shell', i.e. restart the Workabout and display
the initial Copyright screen.
*) You can use the Command processor in a similar way
to a DOS command processor; unlike a DOS command processor, however,
it also has a number of menu options for setting various system-wide
settings.
*) The System screen is a built-in application that
provides a "front-end" to the other built-in applications on the Workabout;
it also has menu options for a number of file management and system
settings. The System screen is described in `The built-in applications'
chapter later in this manual.
****** Changing the system-wide settings
You can change the Workabout's system-wide settings via the
menu options provided in the Command processor. If it is not already
displayed, press Menu in the Startup Shell and then select the `Command
processor' option. You can also set some of the system-wide settings
with the Workabout's SETDEF command on the command line or
in a batch file.
It is a good idea to set at least the current date and time for a
new Workabout since these settings are likely to be utilised
by other applications.
*** The date and time
To enter the current date and time, use the `Time and date' option
on the `Time' menu in the Command processor. The formats in which
the date and time are displayed are those specified with the `Formats'
option described below.
If you enter incorrect or unsuitable numbers for the date,
the day and month numbers are corrected to the largest values allowed.
For example, if you typed 88888888 for the date, the numbers would
be corrected to 31/12/2049 (the last date allowed by the Workabout).
When setting the time, you can press "A" or "P" to
change between "am" and "pm".
In "am-pm" format, midnight is written with a "12" ,
and not "00" . For example, half past midnight is "12:30am" .
The Workabout is accurate to within a few seconds a week. You
can use the `Time and date' option again if you ever need to reset
the system time.
*** The date and time formats
The `Formats' option on the `Time' menu in the Command processor allows
you to change the date and time formats, for example from a 12 hour
to a 24 hour format, and the characters that are used for the date
and time separators. By default the Workabout is set to use
the DMY date format with "/" as the date separator, and a
24 hour time format with : as the time separator.
*** Summer time settings
Most countries set their clocks forwards by an hour during their summer.
The timing of these "summer times" in different countries is not something
that can be calculated precisely, so it is not something that can
be done automatically by the Workabout. Consequently you need
to set summer time on or off manually with the `Summer time' option
on the `Time' menu in the Command processor; by default summer time
is off.
*** The sound settings
The Workabout can make two sounds: beeps and key clicks. The
default setting is for both sound options to be turned on with beeps
set to `Quiet' and keyclicks to `Loud'. However, if you wish to you
can use the `Sound' option on the `Control' menu in the Command processor
to turn one or both of them off, or change the volume of the sounds
that are produced.
*** The auto switch off settings
To conserve power the Workabout is able to automatically switch
off the screen Backlight after a specifiable period of time (the default
switch off time being 10 minutes). It is also able to switch itself
off when it has been idle for a certain time, the default setting
is after 5 minutes. To change either of these automatic switch off
settings, select the `Auto switch off' option on the `Control' menu
in the Command processor.
Important: If you set the `Auto switch off machine' line to
`Off', the Workabout will only turn off when you press the
Off key. You should not in general disable `Auto switch off machine'
when using battery power - if you were to leave the Workabout
on by mistake, it would stay on until the batteries failed. The Workabout
would then turn itself off and you would not be able to turn it back
on again until you replaced the batteries.
The Workabout does not automatically switch off when it is
busy - for example when it is printing or transferring a file to another
computer.
*** Keyboard settings
Every Workabout can be set to use a UK keyboard or a Western
European one (see `The keyboard' section earlier in this manual for
keyboard layouts of both types). However, Workabouts are supplied
with keyboard surrounds that indicate either UK keypresses or Western
European ones. So if you often need write in French, for example,
you can set a UK Workabout to use the special keyboard so that
you can type accented characters, though you will have to know where
these characters are as they will not be indicated on the keyboard
surround.
To change the keyboard in use select the `Special keyboard' option
on the `Control' menu in the Command processor.
When the special keyboard is selected, you will not be able
to use all the hot-keys, for example Psion-X to exit the built-in
applications; you will need to use the menu options provided in the
application.
By default the Backlight key is enabled for both the UK and Western
European versions of the keyboard. If you wish to disable it, select
the `Auto switch off' option on the `Control' menu in the Command
processor and change its setting.
*** Text wrapping
By default, text is not wrapped to the Workabout's screen width.
You can use the `Wrap on/off' option on the `Special' menu in the
Command processor to alter text wrapping.
*** The SETDEF parameters
The following switches are used on the SETDEF command line to alter
some of the system settings the default settings are marked
with a hash (#), with any numerical settings given in brackets:
SWITCH
SETS
TS+
Summer time on
TS- #
Summer time off
S+ #
Sound on
SSound off
AMnn #(5)
Auto switch off machine at nn minutes
ABnn #(10)
Auto switch off Backlight at nn minutes
DDMY #
Set date format to DD/MM/YY
DMDY Set date format to MM/DD/YY
DYMD Set date format to YY/MM/DD
Dn #(0)
Set start of week to n (where 0 is Monday etc.)
K0 #
Standard (UK) keyboard
K1
Special (West European) keyboard
You would normally only ever use the SETDEF command in a batch file
to set up a number of system-wide settings.
****** Creating a Startup (AUTOEXEC.*) file
A Startup file can be used to set system-wide settings and run applications
automatically when the Workabout is first switched on so that
the user does not have to perform these actions manually. The Workabout
automatically searches all its drives for a Startup file and runs
it when it is first switched on.
Startup files must have the filename "AUTOEXEC" and
can have any one of the following filename extensions: ".IMG" ,
".APP" , "OPO" , ".OPA" , or ".BTF" .
The default filename extension is ".BTF" .
To create a Startup batch file from the Command processor:
1.
Type" EDIT AUTOEXEC.BTF"
The file" AUTOEXEC.BTF "is then created in the" \BTF "directory
on the default disk and the Workabout's text editor is displayed.
2.
Type the commands for the actions that you want the
Workabout to perform on startup in the order in which you want
them to occur; a list of all the Workabout's commands is given
later in this chapter. For example, you might have the following list
of commands in your Startup file:
"SETDEF AM10
REM sets auto switch off to 10 mins
SETDEF AB5
REM sets Backlight auto switch off to 5 mins
SETDEF DMDY
REM sets date format to MMDDYY
SETDEF K1
REM sets special Western European keyboard
SETDEF T24
REM sets 24 hour time format
LINK
REM runs Remote Link software
START MYPROG CLIENTS
REM runs Myprog application and tells it to use the data REM file
CLIENTS"
See the section on `The SETDEF parameters' earlier in this chapter
for details of all the system settings that you can define with the
SETDEF command.
If you want to use a number of different Startup files, it's best
to create them on separate SSDs (saving them in a" \BTF "directory
on each SSD). You can then just insert the SSD that contains the Startup
file for the setup and applications that you wish to run when you
need it; every time you wish to change setup, simply turn the Workabout
off, insert a different "Startup SSD" and switch the machine back
on again.
If you do not wish to use SETDEF to change the system-wide settings
when the Workabout is first switched on and just wish to run
an application, you can create the following kinds of Startup file:
*) for" .IMG "and" .OPO "applications (and all the
built-in applcations) you can simply rename the application filename
to" AUTOEXEC.BTF "to make the Workabout run the application
as its Startup file.
*) for other application types, you can create a batch file
called "AUTOEXEC.BTF" that simply contains the command(s)
to run the application and load the required file(s). For example,
to run an application called "MYPROG.APP" using a data file
called "DATA2" , the "AUTOEXEC.BTF" file would contain
the following command:
"START MYPROG DATA2"
****** Developing applications for the Workabout
You can develop applications for the Workabout in two ways:
*) By creating them on the Workabout in the in-built
Program editor using the Workabout's OPL programming language.
You can then translate and run them. The Program editor is described
in `The built-in applications' chapter later in this manual.
*) Alternatively, you can base your development on the PC and
create your applications with OPL, or `C' if you prefer. For this
method of development you will need to obtain a copy of the relevant
Psion Software Development Kit (SDK).
For more detailed information about application development please
refer to the SIBO OPL SDK (Software Development Kit). If you intend
to program in `C', please refer to the latest version of the Psion
SIBO `C' SDK (currently 2.1).
Application files must have a .IMG, .APP, .OPO, or .OPA filename
extension.
****** Downloading applications from a PC
You can link the Workabout to a PC using a Psion Serial 3Link
lead and a LIF converter.
Important: When connecting and disconnecting a LIF converter
and 3Link lead, you should not have the LINK software running on the
Workabout. So you should plug the LIF converter and 3Link lead
into the Workabout before running the LINK software,
and exit the LINK software before disconnecting the LIF converter
and 3Link lead.
If you have an Internal Expansion module fitted, you can also connect
Port A (the nine-pin one beside the LIF-PFS socket) to a PC via an
ordinary serial cable and a null modem in the same way that you would
connect two PCs.
When you have connected the Workabout and PC, you need to run
suitable communications software on both the computers. The Workabout
has its own built-in communications software; select the `Remote link'
option on the `Special' menu in the Command processor or System screen,
or type" LINK "in the Command processor to run it. The Psion Serial
3Link lead may be supplied with communications applications for Windows
and DOS PCs. For more information about communications software for
linking the Workabout to PCs, see your Psion distributor.
Once the communications software is running on both computers you
can simply copy application files from the PC to the Workabout,
either to the internal disk "M:" or to an SSD in the "A:"
or "B:" drives. Drives on the PC are seen as "REM::"
(remote) drives by the Workabout; a PC's "C:" drive
for example will be seen as "REM::C:" . (For more information about the Workabout's
filing system, see `Files and directories' later in this chapter.)
See your Psion distributor for more information about the products
available for linking your Workabout to other computers.
****** Setting up the Internal Expansion ports
Two Internal Expansion ports suitable for printing may be fitted to
a Workabout: Port A, the 9-pin serial port, and Port C, the
LIF-PFS socket; both are situated at the base of the unit. Port A
is a serial port, and Port C can be a serial or parallel port, depending
on what is connected to it (see `The LIF-PFS socket' section earlier
in this manual for more information).
The Startup Shell sets the following two environment variables:
"P$PP=C
P$SP=C"
When you press Psion-P to print, data is therefore sent to Port C
by default. If you wish to use Port A for serial printing, you must
set the serial port variable to Port A by typing" SET P$SP=A "
on the command line, or include this line in any batch file that you
have created for printing.
There are no plans at this time for any parallel port other than C.
****** Running applications
You can run an application synchronously from the Command processor
by simply typing its name, in the same way as you would at the DOS
prompt on a PC. For example, you would type" JOBSHEET "to run
an application called Jobsheet. The Command processor will be suspended
by the operating system until you exit the application when you run
it in this way (synchronously).
To launch an application asynchronously (without suspending the Command
processor), use the START command. For example you might type" START
JOBSHEET". The Command processor will continue
to run concurrently with the application and you will normally be
able to press Psion-Tab to switch between the application and the
Command processor.
You can run the built-in applications synchronously from the Command
processor by typing their application names as follows:
Application
Type
Database
"DATA"
Calculator
"CALC"
Sheet
"SH3" or "SHEET"
Program/script editor
"EDIT"
Comms
"COMMS"
To run them asynchronously, use the START command, for example you
might type "START CALC"
Although the Workabout's multi-tasking operating system,
EPOC, runs operations asynchronously by default, the Command processor
is designed to run them synchronously (unless the START command is
used) for the sake of compatibility with MS-DOS.
-----------------------------------************ The Command processor
You can enter Workabout commands at the Command processor prompt
"M>" in the same way that you would enter them at a DOS prompt.
The Command processor pauses automatically at the end of each screenful
of information, except when commands are executed from a batch file.
The Workabout can run batch files of commands from the Command
processor; they have a" .BTF "filename extension. These will usually
look just like DOS batch files - they may even be DOS batch files
as the Workabout's commands are so similar to DOS commands.
More information about batch files is given later in this chapter.
*** Files and directories
Just as under MS-DOS on PCs, files are stored on the Workabout
disks in directories and sub-directories. These are referred to in
exactly the same way as they are on a PC's DOS command line. For example,
a batch file called "BACKUP.BTF" in the "BTF" directory
of the internal disk would be referred to as "M:\BTF\BACKUP.BTF" .
Files on disks on a remote computer that is connected to the Workabout
via the LIF-PFS socket are referred to in exactly the same way, just
add "REM::" to the start of the file specification; for example
the file "BACKUP.BTF" in the "BTF" directory of a
remote PC's "C:" drive would be referred to as "REM::C:\BTF\BACKUP.BTF"
*** Keys and keypresses in the Command processor
" LEFT RIGHT " move the cursor.
" UP " and " DOWN " recall up to 31 previous commands
as they do with DOSKEY.
Ctrl-" LEFT " and Ctrl-" RIGHT "
move the cursor a word at a time.
Psion-" LEFT " and Psion-" RIGHT " go the the start and end
of the command line respectively.
Del deletes the next character and any highlighted text.
Shift-Del deletes the next character.
Shift" LEFT RIGHT " highlights text.
Esc deletes the entire line.
Psion-Del deletes from the cursor position to the start of the line.
Shift-Psion-Del deletes from the cursor position to the end of the
line.
*** Exiting the Command processor
If no application has been launched from the Command processor, you
can press Psion-X (or select the `Exit' option on the `Special' menu)
or type "EXIT" to exit and return to the Startup Shell screen.
****** The Workabout commands
The Workabout has a number of DOS commands which perform similarly
to their DOS counterparts, for example COPY, DEL, MD,
RD and CD, and a number of other commands for which
there are no DOS equivalents.
An alphabetical list of all the Workabout commands and their
usage is given below:
COLUMNS(2), DIMENSION(IN), COLWIDTHS(1.1808,E1), HGUTTER(.0555),
KEEP(OFF)
TABLE HEADING, TABLE HEADING
COMMAND, USAGE
TABLE TEXT, TABLE TEXT
"A:
B:", Changes the default disk.
"ATTRIB" filename, Displays and alters file attributes such as
read-only,, archive,, etc.
"CALL filename", Calls a batch file from another batch file.
"CD,, CHDIR", Displays or alters the current directory.
"CLS", Clears the Workabout screen.
"COPY
[source ]
[destination]
[/S][/Y]", Copies a file or files. The source and destinations can
be specified as a drive letter and colon,, a directory name,, a filename
or a complete path. If a destination filename is not specified,, the
new file(s) will have the same filename(s) as the source file(s).
Use the /S switch on the command line to include files in sub-directories
and the /Y switch to suppress a confirmation dialog.
"DATE", Displays the current system date.
"DEL,, ERASE
filename(s)
[/S][/Y]", Deletes one or more files.
You can also delete files in subdirectories by using the /S switch
at the end of the DEL command line. For example,, you would type:
"DEL M:\DATA\*.* /S "to delete all the files in the DATA directory
on the internal drive (M:),, including those in subdirectories. You
can use the /Y switch to suppress a confirmation dialog.
"DIR [/S][/B]", Lists the files and directories in the current
directory. You can use the /S switch on the command line to
list the files in sub-directories. The /B switch will display
files in bare format
"ECHO
[text]
[ON/OFF]", Without parameters,, "ECHO" displays the current
ECHO state.
"ECHO [text]" displays the given text on the screen.
"ECHO [ON/OFF]" selects the ECHO mode for batch files.
"EDIT filename", Runs the Workabout's plain text editor.
This is intended mainly for editing batch files
"ERRLEVEL", Displays the current errorlevel state.
"EXIT", Terminates the Command processor,, returning you to the
process that launched it,, usually the Startup Shell.
"FILES drive", Lists open files on the specified drive.
"FOR", Runs the given command for each file in a set of files.
The syntax is as follows:
"FOR %var IN (set) DO command [params]"
where %var specifies a replaceable parameter,, (set) specifies the
set of files (wildcards can be used) and [params] specifies the switches
to use with the given command. When using FOR in a batch file,, use
"%%var" instead of "%var".
"FORMAT
drive
[label]", Formats a disk in the specified drive.
"GOTO label", Jumps to the specified.a label in a batch file.
"HELP", Provides Help information on the Workabout commands.
Type "help" for a full list and brief description of the commands.
Type" help command" for detailed information about a specific
command.
"IF", Runs a command conditionally. This is mainly for use in
batch files.
"KILL process", Kills (terminates) all processes that match the
specification; they do not need to have been launched from the Command
processor. Note that the process is not sent a terminate message.
This is intended for emergency use only - under normal circumstances
you should use the exit command provided in the application or the
STOP command to terminate processes.
"LABEL drive name", Adds or alters the volume label of a disk.
"LLDEV
[devicename]", Lists all the logical device drivers that match a
specified device name,, or lists all logical device drivers if a device
name is not specified.
"LINK", Starts the LINK software that is used when connecting
the Workabout directly to another computer. This command is
intended mainly for use in batch files. Note that you need to enter
the required port and Baud rate on the command line. "STOP LINK"
exits the LINK software.
"LPDEV
[devicename]", Lists all the physical device drivers that match
a specified device name,, or lists all physical device drivers if
a device name is not specified.
"LPROC [process]", Lists all the running processes that match
the specified process name,, or lists all running processes if a process
name is not specified.
"LSEG [segment]", Lists all memory segments that match the specified
segment,, or lists all memory segments if a segment is not specified.
"MD,, MKDIR directory, Makes a directory."""
"MEM", Displays the current system memory.
"PAUSE", Suspends batch file processing.
"QUIT", Exits the batch file in which it appears.
"RD,, RMDIR directory
[/Y]", Removes a directory. You can use the /Y switch to
suppress a confirmation dialog.
"REM text", Marks a line of text in a batch file as a comment.
"REN filename", Renames a file or set of files.
"SET
variable
variable=", "SET variable" displays the values for the variable.
"SET var=" deletes the values in the variable.
Note that variable names are case sensitive.
"SETDEF", Alters system settings that are otherwise set by menu
options. This command is intended for use in batch files. See `The
SETDEF parameters' section earlier in this chapter for more information.
"SHIFT", Shifts batch file parameters.
"START process
[parameters]", Launches the specified process asynchronously and
returns to the Command processor immediately. You can press Psion-Tab
to switch between running processes.
"STOP process
[/Y]", Terminates all processes that match the specification; processes
do not need to have been launched from the Command processor for STOP
to work. Use the /Y switch on the command line to suppress
a confirmation dialog. Note that processes are sent a termination
message. It is better to use the exit command provided in applications
"TIME", Displays the current system time.
"TYPE filename", Displays the contents of a text file.
"VER", Displays the Workabout's version information.
"VOL drive", Displays the volume label of a disk.
"WAIT process", Waits for completion of the specified process
which has been started by the Command processor.
Typing" help "at the M> prompt displays a full list and description
of available commands. For detailed information about a specific command,
type" help "followed by the command name, for example type "
help copy "for help on the COPY command. Unless you have already
set `Wrap on', you may need to press Psion-W (or select the `Wrap
on' option on the `Special' menu) in order to read all the help text.
Alternatively, you can press Shift-Psion-Z to zoom out and view the
text in a smaller font.
The Workabout records the return code from errorlevels
after each command. You can use the DOS-standard IF command (IF ERRORLEVEL...)
to test the success or otherwise of the previous command. You can
also use ERRORLEVEL to display this information. The errorlevels returned
are TRUE and FALSE.
*** Batch files of commands
You can create batch files for other purposes in the same way that
you create a Startup file, just type" EDIT "and then the name
of the new batch file, for example you might type" EDIT BACKUP.BTF".
Batch files can have any filename (up to eight characters long), but
must have the filename extension" .BTF" .
*** Running batch files
Startup batch files (AUTOEXEC.BTF) are run automatically when the
Workabout is first switched on. Other batch files can be run
from the Command processor by typing the name of the batch file, followed
by any required parameters.
Batch files are always run synchronously; if you enter the START command,
it is ignored.
****** Error messages
The Workabout displays the following messages in the Command
processor whenever an error has occurred:
COLUMNS(2), DIMENSION(IN), COLWIDTHS(1.7717,E1), HGUTTER(.0555),
KEEP(OFF)
TABLE HEADING, TABLE HEADING
ERROR MESSAGE, MEANING
TABLE TEXT, TABLE TEXT
Remote link not connected, The remote link that connects the
Workabout to another computer is disconnected and you have
tried to perform an action that relies on the existence of the link.
You should physically connect the two computers,, run the linking
software on both machines,, and then try again.
Bad command or file name, You have mis-typed a command or file
name,, or entered a command or filename that does not exist. You can
use the HELP command to verify the command that you entered.
Invalid directory, You have selected or entered the name of
a directory that does not exist.
Invalid drive specification, You have selected or entered a
drive that is currently unavailable or does not exist.
Invalid parameters, You have used a command with a parameter
that is currently unavailable or does not exist. Check the parameters
available with the HELP command.
Syntax error, You have entered a command using the wrong syntax.
Check the correct syntax using the HELP command.
Unknown process, You have tried to STOP,, WAIT OR KILL an application
that is not currently running on the Workabout.
xx failed, The operation xx has failed.
-----------------------------------************ Peripheral products for the Workabout
A number of peripheral products that extend the Workabout's
capabilities are briefly described below. For more information about
any of these products, please contact your Psion distributor.
*** Solid State Disks
Two types of SSD are available that provide extra data storage capacity:
Flash SSDs and RAM SSDs. Both types are supplied in a variety of capacities
- larger capacity SSDs are continually being developed.
*) Flash SSDs are a highly secure medium as they do not
require a battery or other power supply to preserve data. Information
on a Flash SSD should remain intact for at least ten years. Flash
SSDs are best suited to storing data that is not frequently altered
because they do not allow selective overwriting of information. When
they become full, you must format them to make them blank again.
There is a special Psion utility to format a Flash SSD which
is available with version 2.1 of the Psion SIBO `C' SDK (Software
Development Kit). For more information please contact your Psion distributor.
*) RAM SSDs, unlike Flash SSDs, require a power source
to keep the information stored on them secure. When they are inside
the Workabout they use the computer's power supply to keep
the data secure. They also contain a 3V lithium battery (the same
as the Workabout's backup battery) which provides the power
to keep the data safe when they are removed from a computer. When
there is no other power supply, a new battery will preserve
information on a RAM SSD for at least 3 months. Removing a battery
from a RAM SSD, or removing a RAM SSD from an SSD drive when the battery
is "flat", results in the loss of all the information it contained.
Before changing the battery in a RAM SSD, you should copy all the
data it contains to another SSD or the Workabout's internal
disk.
RAM SSDs are ideal for storing data that is frequently altered
since you can overwrite information selectively.
(picture)If you wish to protect the data on an SSD, you can write-protect
it. To do this you simply use something like the end of an opened
paper clip to set the write-protect switch on the edge of the SSD
to the `Protect' position. To turn off write-protection, just set
the write-protect switch back to the `Write' position.
*** Solid State Disk drives for PCs
Although you cannot directly use SSDs with PCs, a Solid State Disk
drive unit for PCs (and the software to control it) is available from
Psion. SSDs inserted in the unit can be accessed by the PC like any
other PC drive. For more information about SSD drives for the PC,
please contact your Psion distributor.
*** The Holster
A rigid plastic Holster is available for storing the Workabout.
You can screw it to any convenient vertical surface, for example the
side of a desk, or the dashboard of a vehicle. This is supplied as
part of the Docking Holster.
*** The Docking Station
A Docking Station is available for the Workabout which can be
used to fast charge the Workabout's rechargeable Ni-Cd battery
pack and transfer data to other peripherals, for example a printer.
The Docking Station can charge the battery pack inside a
Workabout and a spare battery pack.
The leaflet supplied with the Docking Station explains how to use
it.
*** The Mains adaptor
A mains adaptor suitable for connecting the Workabout to an AC
mains power supply is available. The mains adaptor cannot be plugged
directly into the Workabout it must be used in
conjunction with a Docking Holster.
*** The Accessory pack
The Accessory pack contains an elasticated strap which can be fitted
to the back of the Workabout. This allows you to wear the Workabout
on your arm or belt for easy carrying, leaving your hands free.
*** Internal Expansion modules
A number of Internal Expansion modules can be fitted to the Workabout
which allow it to communicate with other computers and devices. These
are described under `The Internal Expansion ports' in the `Introduction'
chapter earlier in this manual.
*** The Docking Holster
A Docking Holster is used to connect a mains adaptor (for mains power
and trickle charging the battery pack) and/or 3Link cable (for
communications with a PC) to the Workabout. The Docking Holster
consists of a Holster and LIF converter.
The built-in applications
This chapter tells you about the following applications:
The System screen that acts as a "front-end" to the
other built-in applications.
Data, the database application which you can use like
a card index system for storing a variety of information, for example
names and addresses.
Calc, the scientific calculator which you can use in
a similar way to a pocket calculator.
Sheet, the spreadsheet that you can use to create tables,
perform inter-related calculations and produce a graphical representation
of your data.
The Program editor which allows you to write and translate
your own programs for the Workabout.
Comms, the communications software that provides terminal
emulation, allowing you to connect the Workabout to other computers
or to other devices.
-----------------------------------************ Introduction
Although the applications that are built into the Workabout
are fully functioning, they are only really intended to demonstrate
the sophistication and flexibility of applications that can be developed
for the Workabout. They are included with the Workabout
as an aid to application development and would therefore only normally
be used by application developers.
To display the built-in applications, press Menu in the Startup Shell
and select the `System screen' option. A copyright information message
will appear briefly and then the System screen will be displayed,
as described below.
****** The System screen
The System screen displays icons for all the built-in applications,
some of which are shown in the following screenshot:
(picture)
Menu options are provided for installing additional applications and
removing applications that you no longer wish to use. Press Menu to
display the menu bar and use the " LEFT RIGHT " keys to move between
the menus. (Menus and dialogs are described in detail later in this
chapter.) The System screen menus are as follows:
*) `File' and `Disk' menu options allow you to manage your
files, directories and disks. For more information, see the `File
Management' section later in this chapter.
*) `Apps' (Applications) menu options which you can use to
install, remove and exit applications.
*) `Info' (Information) menu options display information about
the Workabout's batteries, disks and memory.
*) `Ctrl' (Control) menu options allow you to change system
settings as described in the section that follows.
*) `Spec' (Special) menu options determine the default display
of information, among other things; these are described later in this
chapter.
*** System settings
The system settings are utilised in the built-in applications where
appropriate. They are as follows:
*) The `Sound' option settings determine the sounds that applications
on the Workabout are able to produce via the buzzer. The initial
setting is for all sounds to be on. However, you can turn some, or
all of the sounds off, and change their volume.
*) The `Auto switch off' option specifies whether the
Workabout switches itself off after a certain period of
idleness. You can disable automatic switch off, set the
Workabout to switch off automatically if it has no external
power, and also alter the switch off time interval.
Important: You should not, in general, disable `Auto
switch off' when using battery power - if you were to leave the Workabout
on by mistake, it would stay on until the main and backup batteries
became completely discharged. The Workabout would then turn
off and you would lose all the data stored on the internal disk and
not be able to turn it on again until you changed the batteries.
*) The `Set time and date' option sets the current system time
and date.
*) The `Time and date formats' option sets the date and time
formats and the characters that are used for the date and time separators.
See `Changing the system-wide settings' in the `Advanced use' chapter
earlier in this manual for more information.
*) the `Default disk' option sets the disk that is selected
by default in any dialog where you specify the location of a file.
The default disk is also the disk on which applications may save files
as and when they are required.
*** User preferences
Display preferences that cannot really be classed as system settings
are grouped together and alterable from the `Set preferences' option
on the `Special' menu in the System screen, as follows:
*) Press Tab on the `Number formats' line to set the currency
symbol, decimal point character, etc. that is used in the Calc and
Sheet applications. These settings may also be used by other applications
that have been installed on the Workabout.
*) Press Tab on the `"Evaluate" format' line to set the format
in which the results of calculations peformed using the `Evaluate'
option in the Database application are returned. You can set the number
format, e.g. fixed or scientific, number of decimal places, and trigonometry
units. These settings may also be used by other applications that
have been installed on the Workabout.
*) Select `Shift-Enter' or `Enter' on the `Open multiple files'
line to determine the keypress that you should use to open an application
file without closing any previously opened application file from the
built-in System screen.
*) The setting on the `Font' line determines the font that
is used for the Workabout's built-in System screen display;
you can choose between a Swiss or Roman font.
*) Set the `Keyboard' line to `Special' if you wish to use
the special Western European keypresses on the Workabout.
General application features
The following section gives you information about the features that
are provided in all the Workabout's built-in applications.
****** Menus and dialogs
All of the built-in applications on the Workabout, including
the System screen described earlier in this chapter, have menus and
dialogs to give access to commands. Each menu option also has a hot
key that you can use to display its dialog that consists of the Psion
accelerator key and a letter key that is appropriate to the option.
If you press Menu to display the menu bar, you will see a hot key
listed to the right of each option.
As you will see, the organisation of the menus and options broadly
conforms to the standards used by many Windows-based applications.
Since many computer users are familiar with this type of layout, it
makes sense to implement it in the Workabout applications.
The " LEFT RIGHT "
keys allow you to move between menus and the " UP DOWN " keys to
move between the options in a menu.
(picture)
To select a menu option, simply position the highlight
over it and press Enter. For example, in the System screen, selecting
`Sound' from the `Ctrl' menu displays the following dialog:
(picture)
Within dialogs you can use the " UP DOWN " keys to move between
the lines. Where the setting for a dialog line can be selected from
a list of options, you can use the " LEFT RIGHT " to cycle through
the available options.
As is normal practice, Enter closes a dialog and Escape cancels it,
leaving the original settings.
Where a dialog line requires the user to select a file, pressing Tab
displays the File selector which allows them to navigate to the file.
Pressing Enter then runs the file, if it is the type of file that
can be run.
*** Sub-dialogs
Where a further sub-dialog is required from a dialog line, three dots
are displayed at the end of the line and the user has to press Tab
to move to the sub-dialog. To see an example of the latter, select
the `Set preferences' option on the `Special' menu in the System screen;
both the `Number formats' and `"Evaluate" format' lines have `...'
at the end to indicate a further dialog.
*** Special keys and keypresses
All the in-built applications support a number of special keys and
keypresses, as described below:
COLUMNS(2), DIMENSION(IN), COLWIDTHS(1.2600,E1), WIDTH(4.4092),
HGUTTER(.0555), VGUTTER(.0555), KEEP(OFF)
TABLE HEADING, TABLE HEADING
KEY/KEYPRESS, ACTION
TABLE TEXT, TABLE TEXT
(picture), Displays help for the current screen. Use the " UP DOWN "
keys to select a topic and press Enter.
(picture), Displays the index of help for the current application.
(picture), Press this key to remove Help,, a menu or a dialog
from the screen.
(picture), This key does nothing on its own. It is a modifier
key that is used with other keys for extra characters and functions.
These keypresses are written Psion-X for example.
(picture), Pressing Tab on lines in dialogs where you select
or type the name of a file,, displays the File selector. This allows
you to navigate to your files and disks. Pressing the " UP DOWN "
keys moves you up and down the directory structure,, while pressing
the " LEFT RIGHT " keys switches between disk drives. When you have
navigated to your file,, press Enter and its name is entered in the
dialog for you.
Pressing Ctrl-Tab on a file name in the System screen displays the
`Specify filelist' dialog which shows the full path of the file. Press
Enter and this dialog will disappear,, leaving the File selector on
display.
*** Help
All the built-in applications have their own help to which users can
turn for guidance. Press Shift-Esc and you will see the index of help
for the application. You can move the highlight to the required topic
with the " UP DOWN " keys and press Enter to view the help text.
Where there is more text than will fit on one screen, a small arrow
is displayed in the bottom right hand corner of the screen and you
can press " UP DOWN " to scroll the screen. Pressing Esc moves you
back up through the levels of help.
*** Opening and closing applications
You can run all the applications by highlighting the application icon
on the System screen and pressing Enter. To close one, you can use
the `Exit' option in the application or highlight its icon in the
System screen and press Delete.
You do not have to exit one application before opening another; the
Workabout is multi-tasking and can switch between applications
without any need to close them. You can press Psion-Tab to cycle through
all the running applications.
*** Cut/Copy/Paste, and Delete/Undelete
If you've used commands like these in other personal computer software,
note that in the Workabout's in-built applications the `delete'
and `cut' concepts are combined:
*) When you copy highlighted information with `Copy...'
menu options (such as `Copy text'), the information is copied to a
clipboard. You can insert (paste) this information,
as many times as you like, with `Insert...' menu options. (This is
usually called `Insert text'; in the Spreadsheet it is called `Paste'.)
*) When you delete highlighted information with the
Delete key, it is deleted from the file, but is also put on
the clipboard. (This also happens if you delete part of a line with
Psion-Delete or Shift-Psion-Delete. If you just delete a single character
with the Delete key, however, the clipboard is not affected.)
So if you delete information by mistake, you can use the
`Insert...' option to put it back (undelete it).
Each open application has its own clipboard. Whenever you copy, or
Delete information to any application clipboard, information previously
on the clipboard is lost. However, you can delete highlighted information
without replacing the clipboard, by pressing Shift-Delete. (You
cannot do this in the Spreadsheet, though.)
You can use the clipboard to copy and paste information between two
files from the same application; just copy the information, open the
second file and paste the information in. To copy information between
files of a different type, you have to use the `Bring' options.
*** File management
You can perform basic file management of most application files from
the System screen and from within the application itself. Applications
automatically save a file when an alternative file is opened.
*) Many file management operations are available from options
on the application's `File' menu.
*) Where operations must be done outside the application, for
example copying, renaming and deleting files, as well as backing up
and restoring files, there are options on the `File' menu in the System
screen.
****** Display features
*** Text wrapping
By default, text is not wrapped to the Workabout's screen width.
A menu option is provided in all the applications that require them,
for example the Command processor has a `Wrap on/off' option on the
`Special' menu.
*** Status windows
The built-in applications support the display of a Status window on
the right hand side of the screen. This contains text and graphical
information, for example, the system time and date, battery information
and the presence of SSDs:
(picture)
Press Ctrl-Menu to turn the Status window on and off or to change
its size in any built-in application. The `Status window' option on
the System screen's `Ctrl' menu sets up Status windows in all the
built-in applications (except the Command processor).
You can display a Status window temporarily by pressing Psion-Menu
in all the built-in applications, including the Command processor.
*** `Zoom' settings
`Zoom in' and `Zoom out' options are provided in applications for
switching between the four different font (character) sizes supported
by the Workabout. As well as changing the size of text, this
changes the amount of information displayed on the screen.
The four different zoom settings give the following number of characters
per line and number of lines of text on the screen:
COLUMNS(5), DIMENSION(IN), COLWIDTHS(E2,E1,E1,E1,E1),
WIDTH(3.9367), ABOVE(.0555), HGUTTER(.0555), VGUTTER(.0555), BOX(Z_SINGLE),
HGRID(Z_SINGLE), VGRID(Z_SINGLE), KEEP(OFF)
TABLE HEADING, TABLE NUMBER, TABLE NUMBER, TABLE NUMBER,
TABLE NUMBER
Zoom setting, 1, 2, 3, 4
No. characters, 29, 27, 23, 18
No. lines, 9, 7, 6, 5
Font size, 8, 11, 13, 16
You can see four of the font sizes by pressing Psion-Z and Shift-Psion-Z
in the System screen or Command processor - all but the smallest font
size are implemented. The text editor launched by the EDIT command
also supports zooming. The Command processor supports a fifth zoom
setting that displays 39 characters on 12 lines in a size 6 font.
-----------------------------------************ Data - the database
In the Workabout's Database, each field in the entry is called
a line and each line has a label to indicate the information that
should be entered on the line. The `Edit labels' option on the `Edit'
menu allows you to change the default labels to reflect the information
that is to be stored in the file. Labels can be turned on and off
with the `Hide/Show labels' option.
*** Adding, updating and removing entries
The first time you use the Database the `Add' screen is shown so that
you can type a new name and address entry straight away:
(picture)
When you have finished adding entries, you can press Shift-Psion-F
to switch to the `Find' screen. To change an entry, you simply have
to find it and then move to the `Update' screen by pressing Shift-Psion-C.
As you have just seen, there is a different screen for each of the
operations you might want to perform: adding an entry, finding an
entry and updating an entry. Options on the `Entry' menu allow you
to switch between the screens. The text at the bottom of the screen
lets you know which screen you are viewing and what you can do.
To completely remove an entry, you simply have to find it and Press
Psion-D, (or select the `Delete entry' option on the `Edit' menu)
or press the Delete key. As a security measure there is a confirmation
prompt following the delete command.
*** Searching
You can only search for an entry, or for information in any entry,
from the `Find' screen. The search clue that you enter can be on any
line in any entry, unless you have chosen to limit the search to particular
lines with the `Find by label' option on the `Search' menu; in this
case the text along the bottom of the screen will change to reflect
the label that you have chosen to search on, e.g. "Name" rather than
"Find":
(picture)
If a match is found, the entry is displayed; if there is more than
one matching entry, you can press Enter to look at them in turn. If
no match is found, or there are no more matching entries, a message
is displayed such as `Not found' or `No more found'.
*** Moving directly to an entry
Entries in the Database file are numbered. The current entry number,
along with the total number of entries, is displayed in the bottom
right hand corner of the screen as, for example, 1/13 (entry 1 of
13 entries) in the previous screenshot.
If you know the number of an entry, you can move directly to it with
the `Jump to entry' option on the `Search' menu.
When you update and save an entry, it is moved to the end
of the Database file, so its entry number changes to the last entry
in the file.
*** Compressing a Database file
The space used by changed and deleted Database entries is not automatically
reclaimed. A menu option is therefore provided on the `File' menu
to allow you to compress the Database file manually.
Important: You cannot compress Database files that are stored
on Flash SSDs. You need to copy them to the Workabout's internal
disk and compress them there, and format the Flash SSD before copying
the file back again. Alternatively, you can use the `Save as' option
to create a new, compressed copy of the file on the Flash SSD.
*** Other useful functions
*) Options on the `Display' menu allow you to change the way
that information is displayed, you can for example, hide all the labels.
*) The `Merge in' option on the `File' menu lets you merge
the entries and/or display settings from another Database file. You
might wish to do this to create a single Database file from two separate
files, or to copy the settings from another Database file into the
current one so that both files look the same.
*) The `Save as' option on the `File' menu allows you to save
a Database file as a file of plain text with line breaks, rather than
separate entries. This can be useful if you wish to utilise the information
in a Database file in other applications.
*) The `Bring text' option on the `Edit' menu can be used to
insert text that is highlighted in other applications and other Database
files at the cursor position.
-----------------------------------************ Calc - the scientific calculator
Calc is a programmable scientific Calculator. It can handle positive
and negative numbers between 9.999999999999e99 and 1e-99.
The Calc screen is divided into three areas:
(picture)
*) the top line displays the contents of the current memory;
*) the bottom line displays the calculations you type, and
*) the central area above the calculation line shows your previous
calculations and their results.
*** New calculations
To perform a new calculation, you can just type it without any spaces
between the numbers and the operators, for example" 34.5+23.6+89",
and press Enter. See `Precedence of operators' below for the order
in which calculations are done. Pressing Esc clears a previous calculation.
You can utilise the "result" or answer of a calculation you have just
performed as part of a new calculation, just type the operator you
want to use and then the next number.
*** Precedence of operators
Calc performs calculations in a specific order, according to the precedence
(ranking) of the operators in the calculation:
First:
**
*/
(` . . . to the power of . . . ')
(make negative, as in -45)
(multiplication and division)
Last:
+-
(addition and subtraction).
then
then
then
Parts of calculations in brackets are worked out first.
For example, the result of the calculation 2+3*5 is 14 because the
multiplication is done first.
If two operators have equal precedence (such as addition and subtraction)
the calculation is worked out from left to right. For example,"
7-3+2 "is" 6 "(not 2). Powers, however, are worked out from
right to left, so" 2**3**2 "is" 512 "i.e. "(2**9)" not
"64 (8**2)". For more information, see the `Operators and logical
expressions' appendix.
*** Percentages
The percentage operator can be used like this:
60+5% =
60-5% =
60*5% =
60/5% =
210>5%
210<5%
60 plus 5% of 60 = 63
60 minus 5% of 60 = 57
5% of 60 = 3
What number is 60 5% of? = 1200
=
What number, when increased by 5% becomes 210 = 200
=
How much of 210 was a 5% increase = 10
For more information, see the `Operators and logical expressions'
appendix.
*** `Syntax error' messages
Typing errors produce a `Syntax error' message at the bottom right
hand side of the screen. The cursor also moves to the first mistake.
Calc holds the previous "calculation" or sum in memory, so you can
use the " UP DOWN " keys to bring back the old calculation, correct
the mistake and then press Enter to re-calculate.
*** Very large and very small numbers
*) Calc does not support the use of commas when you enter large
numbers, you should enter 1000000 not 1,000,000.
*) For very large or very small numbers, you should use"
e "(upper or lower case) as the exponent of the number. An e usually
follows a number between 1 and 10 and is itself followed by another
number; 3.435e3 means 3.435 times `ten to the power of' 3 (i.e. 1000),
so 3.435e3 means 3435.
*** Changing the number format
Calc supports a number of different number formats, including hexadecimal
numbers (or base 16) as used by some programmers. The `Format' option
on the `Special' menu allows you to switch between them. You can use
hexadecimal numbers in any calculation, regardless of the format used
for the result. For example, &F9*2 is the same as 249*2 and gives
the same result: 498, or &1F2 in hexadecimal format.
Arithmetical operators used with hexadecimal calculations always give
a whole number as a result. Whereas 3/2 and &3/2 give 1.5 as the result,
&3/&2 gives 1.
*** Calculator memories
Calc has ten memories (M0, M1, . . , M9) that can be used for saving
the results of calculations. The `Min', `M+', `M-', `Mclear' and `Mrecall'
options on the `Memories' menu all operate on the current memory.
You can use the `Change memories' option to change the current memory.
*** Advanced calculations - functions, powers, and logs
There are two ways to perform calculations using mathematical functions,
powers and logs. Either:
*) Select the appropriate option from the `Trig', `Powers',
or `Logs' menu and then type the numerical value in the brackets.
Or:
*) Highlight the numerical value and then select the appropriate
option from `Trig', `Powers' or `Logs' menu.
There are hot-keys listed beside each of the menu options to make
entering calculations easier. If you want to do `to the power of'
calculations for which there is no menu option, use the ** operator.
For example, 2**3 is 2 cubed or 2x2x2.
*** OPL modules in Calc
You can load and use OPL modules in Calc. If you do so, the module
must be available for all future calculations. If you delete
it, or remove the SSD which contains it, a `Module does not exist' message will be shown on
every future calculation.
There are two ways to solve the problem:
*) Reinsert or recreate the translated OPL module.
*) Exit then reopen the Calculator.
-----------------------------------************ Sheet - the spreadsheet
Sheet works in a similar way to Lotus versions 1a and 2, but there
are some differences (see `Notes and tips for advanced users' later
in this chapter). Sheet creates files called worksheets.
As with most other spreadsheets, each "box" in a worksheet is referred
to as a cell and each cell is referred to by its grid reference,
i.e. A1, B2, etc.:
(picture)
There are three types of information you can type into a cell:
COLUMNS(2), DIMENSION(IN), COLWIDTHS(.9842,E1), WIDTH(4.4092),
HGUTTER(.0555), VGUTTER(.0555), KEEP(OFF)
TABLE TEXT, TABLE TEXT
Numeric, The first character is either 0123456789(.+- . The data
is treated like a number and you can therefore use it in calculations
Formulae, These are used to perform calculations. To tell Sheet that
the data in a cell is a formula type an = first. E.g. =SUM(D2:D7)
Text, These cells start with any other character. To make Sheet treat
a number as text,, type an apostrophe (') before the number.
You can start typing immediately to create a new entry in a cell.
To change the contents of a cell, you simply move the cursor onto
it and press Enter. A cursor appears on the editing line at the top
of the screen along with the cell contents and you can edit the text
in the usual way. Enter confirms any changes made.
*** Performing calculations using formulae
All calculations in Sheet are specified with formulae that contain
references to appropriate cells rather than numbers. Formulae always
start with an = character, not a +. For example you might have cells
containing the following:
=A1+B1
=SUM(C1:C5)
=(A1+A2+A3)-(B1+B2+B3) or =SUM(A1:A3)-SUM(B1:B3)
=((A1+A2)*B1)/2
If the number in a cell referred to in the formula changes, the result
of the formula then changes automatically. Formulae cells display
the result of the calculation, not the formula itself.
Formulae can contain mathematical functions; see `Calc - the scientific
calculator' earlier in this chapter or press Shift-Esc in Sheet for
more information.
*** Altering the appearance of a worksheet
*) You can insert and delete cells, rows and columns with the
`Open/close gap' option on the `Edit' menu.
*) Options on the `View' menu allow you to format cells in
your worksheet, to change the column widths and the alignment of text
and numbers in cells.
*) Titles that you enter to label rows and columns can be "turned
on" to lock them in position when you move away from the top left
hand of the table. To switch `Titles on/off' you need to move to the
cell immediately beneath the column titles and next to the row titles
(this will usually be cell B2) and select `Titles on' or `Titles off'
from the `View' menu.
You cannot turn `Titles on' if the cell pointer is in A1.
You cannot edit the data in title cells when the `Titles on'
option is set.
*) You can show or hide grid lines and labels with the `Show'
option on the `View' menu. Set to `Yes' the items you want to show
and to `No' those that you wish to hide. To hide any cell containing
the number zero, or a formula returning zero set the `Zero values'
line to `No'.
*** Notes and tips for advanced users
*) An @ symbol is not needed at the start of function names.
*) Ranges of cells are referred to with colons: e.g. A1:C3
not A1..C3.
*) The power operator is ** not ^.
*) To hide a column, set its width to zero.
*) Logical operators, such as AND and OR, do not need # symbols
around them.
*) The Lotus @ function is called AT in the Spreadsheet.
*** Other useful functions
*) `Find' on the `Search' menu allows you to find text or numbers
in cells. You can also jump directly to a cell reference with the
`Jump to' option on this menu.
*) You can highlight a range of cells and press Psion-/ (or
select `Graph' on the `Special' menu) to plot their data as a graph.
To change the range of data included in the graph, you must select
a new range manually from within the `Graph' view (use the `Set ranges'
option on the `Ranges' menu).
*) You can name ranges of cells with the `Name range' option
on the `Range' menu. This allows you to jump directly to ranges, sort
information and apply password protection to areas of the worksheet.
*) Sheet has a database facility, available from the `Data'
option on the `Special' menu. To use it, each column of your worksheet
must have a field name in the first row. Thereafter, each row is a
record and each column is a field. Each worksheet can have just one
database; this becomes a named range called "database".
-----------------------------------************ The Program editor
The Program editor lets you write your own programs for the Workabout
in the built-in OPL programming language and then translate and run
them. It is the text editor that is run for ".OPL" files when
you type "EDIT" in the Command processor. You can type and
edit in the Program editor in much the same way as you would in a
text editor, however, the text that you type does not word-wrap you must press Enter at the end of each line to start a new one.
OPL is a procedure-based language, that is to say, the procedure is
the building-block of OPL programs. Each specific task (or function)
that you want the Workabout to perform is defined by a procedure;
this procedure can contain a number of statements or commands which
the Workabout acts upon. Although a simple OPL program may
have just one procedure, a number of tasks or procedures can be grouped
to form a module for sophisticated programs.
When
you first move into the Program editor you will see that" PROC:
"has already been entered on the first line, and" ENDP "on the
third:
(picture)
These are the keywords that mark the start and end of procedures
in OPL. You enter the statements for your procedure in order between
the" PROC: "and" ENDP". When you eventually run the program,
the Workabout goes through these statements, one by one.
When you have finished typing your program, you use the `Translate'
option to convert your procedure into a program that you can run on
the Workabout. To run a translated program, use the `Run' option
on the `Prog' menu, or type the program name in the Command processor.
For more information about creating your own OPL programs in the Program
editor, see the `Creating and running programs' chapter later in this
manual. Please contact your Psion distributor or refer to the SIBO
OPL SDK (Software Development Kit) for further help.
-----------------------------------************ Comms - the communications software
Comms is an application that allows you to use the Workabout's
RS-232 serial port to communicate with:
*) another computer directly. (Note that Comms would not normally
be used to directly connect the Workabout to another computer
because there are a number of Windows and DOS packages available that
make this operation seamless; please contact your Psion distributor
for details.)
*) other computers via a modem.
*) text peripherals like electronic mail systems and bulletin
boards via a modem.
It is the same application that you reach by typing "COMMS"
in the Command processor.
*** What you need to use Comms
To link the Workabout to another computer you will need a Psion
Serial 3Link lead and a LIF converter. To connect it to a modem, you
will need a Psion Serial 3Link cable, a LIF converter and a Psion
modem adaptor. If you have an RS-232 Internal Expansion module, you
could use a plain cable to connect Port A (the nine-pin D-type connector
beside the LIF-PFS socket) directly to your modem in the same way
that you would connect your PC to a modem. Please contact your Psion
distributor for more information about communications products for
the Workabout.
*** About Comms
If the other computer allows direct input via its serial port, you
can run Comms and use the Workabout as a terminal, typing
commands to the other computer and displaying its responses on the
Workabout screen.
Much of the power of Comms lies in using its script language
to automate control of modems and remote systems. The Workabout
has a built-in editor for creating these files; see the `Advanced
use' chapter earlier in this manual for more details. Further information
about the creation and use of script files is beyond the scope of
this manual; see the manual supplied with the Psion Serial 3Link lead,
the SIBO OPL SDK (Software Development Kit) or the latest version
of the SIBO `C' SDK (currently v2.1) for more information.
*** Setting up a link with Comms
There are three steps involved in setting up a direct or modem link
to another computer with Comms:
*) Physically connecting your Workabout and the other
computer or modem.
*) Running Comms to display the Terminal Emulation screen.
*) Setting up the serial port so that the Workabout
and the other computer can communicate with each other.
*** Running Comms - the Terminal emulation screen
When you first start Comms, it will automatically search for a free
port; it will go through the ports that are fitted in alphabetical
order. Unless you have specified a particular port in a script file,
it will open the first one that it finds. It will then briefly display
a message in the bottom right hand corner of the screen showing the
port that is being used, for example `Port TTY:A online...'; when the screen clears, the Terminal
emulation screen will be displayed:
(picture)
If there is no free port, you will see the message `Failed to open
a comms port. No port currently available'. You should press Esc to
exit Comms. Most machines will only be fitted with one port, so if
this happens it is likely that LINK or some other application is using
the port. If this is the case, you will need to type "STOP LINK"
in the Command processor to exit the LINK software.
If Comms has opened a port other than the one that you want to use,
you can use the `Port' option on the `Special' menu to change it.
If a message like the following: `Cannot open comms port TTY:A' is
displayed, the port is either not installed, not plugged in (in the
case of TTY:C), or in use by another application.
Ports D: to I: are TTL ports and are therefore not suitable for modems
etc.
If you press the Menu key, you will see the various Comms menus. There are options for,
among other things, selecting and setting up the serial port, and
for transmitting and receiving files:
(picture)
When you have finished using Comms you should exit the application
to save memory. You will return to the screen from which you launched
Comms, if it is still running, if not you will move to another running
application. If there are no running applications, you will return
to the Startup Shell.
*** Port settings
The `Port' option on the `Special' menu sets up the serial port for
communication. The settings for Baud rate (speed), Parity, Data bits
and Stop bits must match those on the computer or modem with which
you are communicating. If they do not, data transmitted in either
direction will almost certainly be interpreted wrongly.
Without handshaking, the Workabout can display received data
at up to 4800 Baud, without losing data. (If you are saving received
data as a file, you must use slower speeds.)
If you set 7 data bits and `Even' or `Odd' parity, but set
`Ignore parity' to `Yes', any data received will be treated as 7-bit
data, with the eigth bit set to zero. The effect of this is that you
can correctly receive data which is sent as 7-bit even parity, 7-bit
odd parity, or even 8-bit no parity (for character codes below 128).
When communicating via modems, bear in mind that modern modems can
sense the speed at which you are transmitting, and adjust to it.
However, older modems may require that you communicate with them at a
particular speed. See your modem manual for more
information.
*** Handshaking settings
The `Handshaking' option on the `Special' menu can be used to alter
the handshaking settings. The Workabout is initially set to
use XON/XOFF handshaking. The XOFF character is Control-S (character
19) and the XON character is Control-Q (character 17).
If the computer to which you are connected is set to use XON/XOFF
handshaking, you should never lose any characters. If it uses a different
method, change the handshaking settings on the Workabout to
match.
*** Special codes for Enter and Delete keys
By default Comms sends a "Carriage Return" character (character 13)
when the Enter key is pressed and a "Backspace" (character 8) when
the Delete key (sometimes known as Backspace) is pressed. However,
different computers require different codes to be sent when these
keys are pressed and you should change the Comms character code settings
to match those required by the remote computer. To do this:
1.
Select the `Translates' option on the `Special'
menu.
2.
Type the one or two character codes that you wish to
be sent for each key between angle brackets. For example, you might
set the `Enter key' line to "<13><10>" (a "Carriage return"
"Linefeed" pair) and the Delete line to "<127>" .
The numbers are shown in the dialog in hexadecimal format, beginning
with a "$" sign. You can use hexadecimal yourself, if you
prefer - the above example could be entered in hexadecimal as "<$d><$a>" ,
or "<$0D><$0A>" .
*** The type of terminal emulation
When you are using the Workabout as a terminal connected to
the serial port of another computer, Comms acts like a plain 80 by
25 character "teletype" - it does not emulate any type of terminal,
such as the "VT100".
*** The display of information
Each character you type in the Terminal emulation screen is transmitted
via the Workabout's serial port to the attached computer or
modem. When a character is received via the serial port, it is displayed
on the screen.
You can set the Workabout to display characters as you type
them, if you need this, by setting `Echo' to `On' from the `Translates'
option on the `Special' menu.
The Workabout screen has a border around the outside. You can
turn it on and off with the `Border on/off' option on the `Screen'
menu. Without the border, there is slightly more room for text. The
`Screen rows' option on the `Screen' menu controls the numbers of
rows of text on the screen. The default number of rows is 25, but
you can set any number between 25 and 100.
To see the 26th line with the 80x26 font, you must increase
the `Screen rows' setting.
When lines longer than the width of the screen are received, only
the first part of them is displayed. You can, however, review any
part of the screen area by using the " LEFT " " UP " " DOWN " " RIGHT "
keys. The Workabout screen "moves" as if it were a window on
top of an 80 by 25 character screen.
If a character is received while you are using the arrow keys, or
if you type a character yourself, the display moves back to the most
recently received data, at the bottom of the 80 by 25 area.
*** Pausing the display
You can use the `Pause screen' option on the `Edit' menu to freeze
the display of received information to give yourself more time to
read it. (The screen is paused using whichever handshaking method
is currently set.) You can then use the arrow keys to move around
the 80 by 25 area.
Important: If you have no handshaking set, or if the other computer
is not using your handshaking method, and you pause the screen display
using the preceding method, you may soon begin to lose data.
To resume the display press a key, such as Enter or Space. The Workabout
will tell the other computer (via handshaking) that it can send characters
again.
The Control-S (XOFF) keypress has the same effect as `Pause
screen' (whichever handshaking method is in use). Press Control-Q
(XON) to resume the transmission.
****** Sending commands to a modem
You can type commands directly to an attached modem from the Terminal
emulation screen - for example, to tell it to dial a particular number.
When the modem successfully connects with the modem of a remote system,
it usually sends a "CONNECT" message via the serial port to
the Workabout, and the Workabout displays this on the
screen. You can then proceed with logging on to the remote system.
The commands for controlling modems are beyond the scope of this manual.
See your modem's manual for more details.
****** File transfer to another computer
The Comms application on the Workabout is an updated version
of the Comms application that is supplied with the Psion 3Link lead.
The 3Link manual gives full details of transmitting and receiving
files using the protocols supported by Comms; this section merely
provides a synopsis of that information.
*** Software on the other computer
To transfer files between the Workabout and another computer
via a modem, the other computer must have suitable communications
software. This software should support one or preferably both of the
following services:
*) terminal emulation with the ability to transmit and receive/capture
ASCII files.
*) XMODEM or YMODEM file transfer.
These services may be provided by a specialised communications program
or may be part of an integrated software package. Bulletin board and
Electronic Mail systems usually have XMODEM and/or YMODEM capability.
Instead of using terminal emulation, you may be able to configure
the serial port and then copy to and from the other computer using
its operating system commands - if its operating system is sufficiently
advanced.
*** Setting the file transfer protocols
To use file transfer commands, you must use the same file transfer
protocol on both computers. You can use the `Protocol' option
on the `Transfer' menu to set Comms to use any of the following protocols:
XMODEM 128-byte checksum
XMODEM 128-byte CRC
XMODEM 1K-byte CRC
YMODEM 128-byte
YMODEM/G 128-byte
YMODEM 1K-byte
YMODEM/G 1K-byte
ASCII (straight binary - no protocol)
It is best to use an XMODEM or YMODEM protocol, if possible, for file
transfer. Transmissions are then error-checked, and if any errors
are detected the information is sent again. If the other computer
does not support the XMODEM or YMODEM protocols, you can try using
ASCII transfer (no protocol) to transfer plain text. With ASCII, no
error-checking is done, and any errors during transmission result
in a corrupted file.
If you have a choice of Baud rates, use the highest supported by both
computers. The Workabout supports up to 19200 Baud. (You may
have to reduce the Baud rate for poor telephone lines.)
*** About the YMODEM protocols
Important: The YMODEM protocols in Comms are YMODEM BATCH
protocols. These cannot be used with the original `plain' YMODEM.
Many computers have YMODEM options which are in fact YMODEM BATCH;
if a computer has options for both, you must set it to use a YMODEM BATCH
protocol. YMODEM BATCH protocols allow more than one file to be
sent at a time.
YMODEM/G is designed for use with error-correcting modems. You should use it with RTS/CTS
handshaking, whether you are
connected via modems or directly. If you do not, files may be received
incompletely. (You could see this by checking the file size at either
end.) If you are in any doubt, use a different XMODEM or YMODEM protocol
instead.
*** Filenames and directories
When you select a file `Transfer' option, Comms initially offers files
in the root directory of the default disk. If you wish to transfer
a file in a different directory you can type its full file specification,
or you can press Tab and navigate to it with the File selector.
If you wish to change the default disk, you should change
it before you start Comms in order to use the new default within Comms.
(You can use the `Default disk' option in the System screen to alter
the current default disk.)
Comms remembers the directory of the file last used by a `Transmit'
or `Receive' option. The `Capture' option will always fill in an incomplete
file specification with the root directory and the default disk.
The TRANSMIT and RECEIVE commands in the Script
language can also affect the directory or disk used.
*** Transmitting files
The general procedure that you need to follow to transmit files is
as follows:
1.
Set the other computer to a protocol that is supported
by Comms and specify the filename to use on that computer. You may
need to give the other computer a command to transmit or receive a
file as well.
2.
Select the `Protocol' option on the `Transfer' menu
to set the Workabout to use the same protocol.
3.
Select the `Transmit' or `Receive' option on the `Transfer'
menu. Enter the filename or directory to use on the Workabout.
A message will show that the transfer is going ahead, like this:
"Block nn"
where "nn" indicates the number of blocks successfully received
or transmitted.
If all goes well, the block count will steadily increase, until a"
Receive OK "or" Send OK "message is displayed.
If no connection is made: If you set the Workabout to
receive a file, it will "time out" if connection is not made within
a certain time. When transmitting, however, it will not "time out"
and will continue waiting for a connection.
To abandon the transfer: Press Esc at any time during the transfer.
If you are receiving to the Workabout, the file being received
is not saved.
More detailed information about transferring files is beyond the scope
of this manual. Please refer to your modem or PC application manuals
for more information.
Creating and running programs
There are 3 stages to producing a program using OPL,
the Workabout programming language:
Type in the program, using the Program editor
described in `The built-in applications' chapter earlier in this manual.
Translate the program. This makes a new version
of your program in a format which the Workabout can "run".
Run the program. If it does not work as you
had intended, re-edit it, then translate and run it again.
This chapter guides you through these stages with a
simple example. If you wish to follow the example, note that each
instruction for you to do something is numbered.
Note: The example programs in the next few chapters
do not include full error handling. This keeps the programs short
and easy to understand. But it means that when you run one of these
programs and, for example, fail to type in the kind of value which
the program asks for, the program may fail harmlessly stopping
before it completed. As you develop your own programs, you should
usually add some error handling code to them. A later chapter gives
a full explanation of error handling.
-----------------------------------************ Creating a new
module
As well as the word program, you'll often see the word module
used. The terms program and module are used almost interchangeably
to describe each OPL file you say "OPL module" like
you might say "word processor document".
Create a new module and give it a name:
From the System screen:
1.
Move to the Program icon and select `New file' from
the `File' menu.
2.
Type "test" as the name to use for this OPL module
and press Enter.
From the Command processor:
1.
Type "EDIT TEST.OPL" .
You will move into the Program editor.
Module names can be up to 8 characters
long, like other filenames on the Workabout. The names can
include numbers, but must start with a letter.
It's always best to choose a name that describes what the module does.
Then, when you've written several modules, you can still recognise
which is which.
*** Inside the Program editor
When you first move into the Program editor you will see that "PROC :"
has already been entered on the first line, and "ENDP" on the
third.
"PROC" and "ENDP" are the keywords that are used to
mark the start and end of a procedure. Larger modules are broken
up into procedures, each of which has one specific function to perform.
A simple OPL module, like the one you are going to create, consists
of only one procedure.
A procedure consists of a number of statements instructions which the Workabout acts upon.
You type these statements, in order, between "PROC :" and "ENDP".
When you come to run the program, the Workabout goes
through the statements one by one. When the last statement in the
procedure has been acted upon and "ENDP" is reached, the procedure
ends.
You can type and edit in the Program editor in much the same way as
in the Word Processor, except that text you type does not word-wrap;
you should press Enter at the end of each statement. Note also that
the Program editor does not offer text layout features such as styles
and emphases.
You can use upper or lower case letters when entering OPL
keywords.
-----------------------------------************ An example procedure to type in
The next few pages work with this example procedure:
PROC test:
PRINT "This is my OPL program"
PAUSE 80
CLS
PRINT "Press a key to finish"
GET
ENDP
This procedure does nothing of any real use it is just an
example of how some common OPL keywords ( "PRINT" , "PAUSE" ,
"CLS" and "GET" ) are used. (The procedure first displays
"This is my OPL program" on the screen. After a few
seconds this is replaced by "Press a key to finish" .
Then, when you press a key, the program finishes.)
****** Type in and edit the procedure
Before you type the statements that constitute the procedure, you
must type a name for it, after the word "PROC". The flashing cursor
is automatically in the correct place (before the colon) for you to
do this. You can choose any name you like (with the same restrictions
as when entering the filename earlier). For simple procedures which
are the only procedure in a module, you might use the same filename
you gave the module.
1.
Type "test" . The top line should now read "PROC test:" .
2.
Press " DOWN ". The cursor is already indented,
as if the Tab key had been pressed.
You can now type the statements in this procedure:
3.
Type "PRINT "This is my OPL program"". (Note the
space after "PRINT".) Press Enter at the end of the line.
Each new line is automatically indented, so you don't need to press
the Tab key each time. These indents are not obligatory, though as
you'll see, they can make a procedure easier to read. However,
other spacing such as the space between "PAUSE" and "80"
is essential for the procedure to work properly.
4.
Type the other statements in the procedure. Press Enter
at the end of each line. You are now ready to translate the module
and then run it.
When you are entering the statements in a procedure you can, if you
want, combine adjacent lines by separating them with a space and colon.
For example, the two lines:
PAUSE 80
CLS
could be combined as this one line:
PAUSE 80 :CLS
You can, of course, use the other applications on the Workabout
at any time while you are editing an OPL module. Press Psion-Tab to
task through all the running applications until the Program editor
is displayed to continue editing your program.
*** What the keywords do when the program runs
"PRINT" takes text you enter between quote marks, and
displays it on the screen. The text to be displayed, in the first
statement, is "This is my OPL program" .
"PAUSE" pauses the program, for a specified number of
twentieths of a second. "PAUSE 80" waits for 4 seconds. ("PAUSE 20"
would wait for 1 second, and so on.)
"CLS" clears the screen.
"GET" waits for you to press a key on the keyboard.
-----------------------------------************ Translating a module
The translation process makes a separate version of your program in
a format which the Workabout can run.
You'd usually try to translate a module as soon as you finish typing
it in, to check for any typing mistakes you've made, and then to see
if the program runs as you intended.
1.
Select the `Translate' option from the `Prog' menu.
The `Prog' menu also has an `S3 translate' option, for translating
the current program in a form which can run on a Psion Series 3
(as opposed to a Workabout or Series 3a).
*** What happens when you translate a module?
First: the procedures in the module are checked for errors.
If the Workabout cannot understand a procedure, because of
a typing error, a message is shown, such as `Syntax error'. The cursor is positioned at the point
where
the error was detected, so that you can correct it. For example, you
might have typed "PRONT "This is..."", or "PAUSE80"
without the space.
When you think you've corrected the mistake, select `Translate' from
the `Prog' menu again. If there is still a mistake, you are again
taken back to where it was detected.
If you've already used up almost all of the memory, the Workabout
may be unable to translate the program, and will report a `No system memory' message. You'll
need
to free some memory, as described in the `Troubleshooting' section
in the `Basic use' chapter earlier in this manual.
When `Translate' can find no more errors, the translation will
succeed, producing a separate version of your module in a format which
the Workabout can run.
There may still be errors in your program at this point because there
are some errors which cannot be detected until you try to run the
program.
*** Running after translating
When your module translates successfully, the `Run program' dialog
is displayed, asking whether to run the translated module. You'd usually
run it straight away in order to test it.
Running a module does require some free memory, so again a
`No system memory' message
is possible.
1.
Press `Y' to run the module; the screen is cleared,
and the module runs.
When the module has finished running, you return to the Program editor,
with the cursor where it was before.
If an error occurs while the module is running, you will return to
editing the module, with the cursor at the point where the error occurred.
-----------------------------------************ File management
*** New OPL modules
You can create new OPL modules in the following ways:
*) Within the Program editor use the `New file' option.
*) From the System screen move to the Program icon and use
the `New File' option.
Your existing module names are listed below the Program icon. The
word `Program' is shown below the icon if there are no modules at
all. The names under the RunOpl icon are those modules which have
been translated successfully.
*) In the Command processor type "EDIT" and then the
name for the new file including the ".OPL" filename extension.
To re-edit an existing OPL program, use the `Open file' option in the Program editor, or move
to the Program icon in the System screen and select the filename from
the list, or type "EDIT" and then the filename of the program
in the Command processor.
*** Copying modules
You can copy existing modules (or translated modules) by:
*) Using the `Copy file' option
in the System screen.
*) Using the `Save as' option in the Program editor itself.
*) Using the COPY command in the Command processor.
*** Deleting modules
You can delete an OPL module (or a translated version) as you would
any other file:
*) Go to the System screen, move the highlight onto the file
and use the `Delete file' option.
If you delete all of your translated modules, the RunOpl icon
will remain on the System screen, with the word `RunOpl' beneath it.
*) Go to the Command processor and use the DEL or ERASE
command. See the `Advanced use' chapter earlier in this manual for
more details.
*** `File or device in use'
If you see a `File or device in use' error message when deleting or copying an OPL module,
the file is open it is currently being edited in the Program
editor. Exit the file, eg with the Delete key in the System screen,
then try again.
If it's the translated file you're trying to delete or copy, `File
or device in use'
means that the translated file is currently running. Stop the running
program by pressing Psion-Tab (to task through all the running applications
until you reach the running program), then Psion-Esc (to stop it),
and then you can try again.
-----------------------------------************ More about running modules
*** Running from the Program editor
You can run a module at any time from within the Program editor, by
selecting `Run' from the `Prog' menu. This runs the
translated version of your program; if you've made changes to
the module and haven't translated it again, you must translate the
module again, or the changes have no effect.
`Run' displays a dialog, letting you select the name of any
translated module which you want to run.
*** Running modules from the Command processor
To run a module synchronously from the Command processor, simply type
its filename - you don't have to include the filename extension. To
run one asynchronously, type "START" and then the filename.
*** Running modules from the System screen
The names of any successfully translated programs automatically appear
under a new icon in the System screen. The icon is just the word "OPL"
in a speech bubble, and is called the `RunOpl' icon. It appears at
the right-hand end of the list of icons (past the Program icon), and
is usually off the right-hand edge of the screen. Just move the highlight
onto the name of the translated program you want to run, and press
Enter.
While you're still editing and testing a module, it's quicker to run
it from inside the Program editor. This also positions the cursor
for you, if errors occur.
*** Stopping a program while it's running
To stop a running program, press Psion-Esc. (If you've gone away from the
running program it will still be running, and you must first return
to it perhaps by pressing Psion-Tab to task to it or selecting
it from under the RunOpl icon in the System screen before
pressing Psion-Esc.)
To pause a running program, press Control-S. It will be paused
as soon as it next tries to display something on the screen. Press
any other key to let the program resume running.
*** Displaying a status window
A temporary status window is always available while an OPL program
is running. Press Psion-Menu to see it. As you'll see,
there are keywords for displaying a status window yourself.
*** Looking at a running program
If you translate and run a module from the Program editor, the Psion-Tab
keypress will still task to the Program editor, even if the translated
program has not finished running. A `Busy' message
is shown you can move the cursor around the program as normal,
but you can't edit it.
To return to the running version, select it from beneath the RunOpl
icon in the System screen. It will be in bold, at the top of the list,
to show that it is currently running.
*** Running more than one module
If a module is running, and you select a second one from the System
screen, the first one is not replaced both modules run
together, and will be in bold on the file list. Psion-Tab swaps between them.
-----------------------------------************ Menu options while editing
While you're typing in the procedure, all the options
on the `Edit' menu such as `Copy text' and `Insert text'
are available and can be used.
The `Prog' menu has options for translating and running
the current program. It also has a `Show error' option, to re-display an error which prevented
successful
translation, and an `Indentation' option, for setting the tab width and to turn
auto-indentation on and off in the Program editor.
The Program editor only ever uses one template for creating new files,
called `default'. If you wish to change the `default' template, you
can use the `Save as template' option to replace it with the current
file. Do not try to swap templates between the Program editor and
any other text editor or word processor you have on the Workabout.
`Set preferences' allows you to choose between bold/normal and mono/proportional
text. It also has options for showing tabs, spaces, paragraph ends,
soft hyphens and forced line breaks.
There is no `Password' option.
-----------------------------------************ SUMMARY
Move to the Program icon in the System screen and select the `New
file' option or type "EDIT filename.opl" in the Command processor.
Type in your procedure.
Select `Translate' from the `Prog' menu.
When a module translates correctly you are given the option to run
it. You can run it again at any time, either with `Run' on the `Prog'
menu, or directly from the filename under the RunOpl icon in the System
screen, or by typing the filename in the Command processor.
Variables and constants
Programs can process data in a variety of ways. They
may, for example, perform calculations with numbers, or save and recall
strings of text (such as names and phone numbers in a data
file).
In all cases, your program must be able to handle values
different types of numbers, strings, and so on.
In OPL, there are two ways of handling values: variables
and constants. Constants are fixed values, such as 1, 2, 3.
Variables are used to store values which may change for example,
a variable called "X" may start with the value 3 but later take
the value 7.
-----------------------------------************ Declaring variables
Most procedures begin by declaring (creating) variables:
LOCAL x,y,z
LOCAL is the word telling the Workabout to create variables,
with the names which follow here "x", "y" and "z"
separated by commas.
The statement "LOCAL x,y,z" defines three variables called "x",
"y" and "z". The Workabout will recognise these names whenever
you use them in this procedure. (If you used them in another procedure,
they wouldn't be recognised; the variables are `local' to the procedure
in which they are declared.)
These variables are initially given the value 0.
Any variables you wish to use must be declared at the start
of a procedure.
****** Choosing the variable
Before declaring variables, decide what information they are going
to contain. There are different types of variables for different sorts
of values. If you try to give the wrong type of value to a variable,
an error message will be displayed.
You specify the type of each variable when you declare it, by adding
a symbol at the end of its name.
*** Numbers
*) For small whole numbers for example 6 use
an integer variable. Integer variables have a "%" symbol
on the end, for example "number%".
Integer variables can handle numbers only in the range -32768
to +32767. If you try to give an integer variable a whole number bigger
than this, an error message will be displayed.
*) For larger whole numbers for example 10000000
use a long integer variable. Long integer variables have an
"&" symbol on the end, for example "number&".
Long integer variables can handle whole numbers in
the range -2147483648 to +2147483647. If a variable may have to handle
numbers outside normal integer range, make it a long integer
variable.
*) For non-whole numbers for example 2.5 use a floating-point
variable. Floating-point variables have no symbol on the end
"price", for example.
If you know that at some stage in your program your variable
will have to handle non-whole numbers, like 1.2, use a floating-point,
not an integer variable. Otherwise you may get unpredictable results.
(There's more about this later in this chapter.)
*) For very large numbers outside long integer range
you should also use floating-point variables. These can handle numbers
as big as "‘"9.99999999999e99 and as small as "‘"1e-99. (Intermediate
results in calculations may even be up to about "‘"10307.)
*** Text
For text "Are you sure?", "54th", etc. use
a string variable. (Pieces of text are called strings
in OPL.) String variables have a "$" symbol on the end
for example, "name$".
To declare a string variable, you must follow the "$" symbol
with the maximum length of string you want the variable to handle,
in brackets. So if you want to store names up to 15 characters long
in the variable "NAME$", declare it like this: "LOCAL NAME$(15)".
Strings cannot be longer than 255 characters.
*** Array variables
You may want a group of variables, for example to store lists of values.
Instead of having to declare separate variables "a", "b",
"c", "d" and "e", you can declare array variables
"a(1)" to "a(5)" in one go like this:
"LOCAL a%(5)" (array of integer variables)
"LOCAL a(5)"
(array of floating-point variables)
"LOCAL a$(5,8)"
(array of string variables)
or
"LOCAL a&(5)" (array of long integers)
The number in brackets is the number of elements in the array. So
"LOCAL a%(5)" creates five integer variables: "a%(1)", "a%(2)",
"a%(3)", "a%(4)" and "a%(5)".
With strings, the second number in the brackets specifies the maximum
length of the strings. All the elements in the string array have the
same capacity for example, "LOCAL ID$(5,10)" allocates
memory space for five strings, each up to ten characters in length.
OPL does not support two-dimensional arrays.
*** Initial values
All numeric variables have zero as their initial value. String variables
have a string with no characters in it. Every element in an array
variable is also initialised in the appropriate way.
*** Choosing descriptive names
To make it easier to write your programs, and understand them when
you read through them at a later date, give your main variables names
which describe the values they hold. For example, in a procedure which
calculates fuel efficiency, you might use variables named "speed"
and "distance".
All variable names:
*) May be up to 8 characters long;
*) Must start with a letter, but after that may use any
combination of numbers and letters;
*) May be entered in any combination of upper and lower case.
"sPeeD" and "SpEEd" would be considered the same name.
Additionally, you must not use any of the names of keywords, as listed
in the `Alphabetic listing' chapter if you use these you will
see a `Declaration error'
message when you translate your module.
The "$ & "and "%" symbols are included in the 8 characters
allowed in variable names so "V2345678%" is too long to
be a valid variable name, but "V234567%" is acceptable.
****** Examples
*) "LOCAL clients$(12),z&(3)" declares one string variable,
"clients$", of capacity twelve characters, and one long integer
array variable containing three elements, "z&(1)", "z&(2)"
and "z&(3)"
*) "LOCAL AGE%,B5$(10),i" declares one integer variable,
"AGE%", one string variable, "B5$", of capacity ten characters,
and one floating-point variable, "i"
*) "LOCAL profit93" declares one floating-point variable,
"profit93"
*) "LOCAL x,MAN6$(4,7)" declares one floating-point variable,
"x", and one string array variable, "man6$", containing four
elements, "man6$(1)", "man6$(2)", "man6$(3)" and "man6$(4)",
each of capacity 7 characters
*** For preference
*) Integer variables use less memory than long integer variables,
and both use less than floating-point.
*) Integer variables are processed faster than floating-point.
-----------------------------------************ Giving values to variables
*** Assigning values
You can assign a value to a variable directly, like this:
x=5
y=10
This procedure adds two numbers together:
PROC add:
LOCAL x%,y%,z%
x%=569
y%=203
z%=x%+y%
PRINT z%
GET
ENDP
"add:" is the procedure name.
The LOCAL statement defines three variables "x%", "y%"
and "z%", all initially with the value 0. PRINT displays
the value of "z%" on the screen. You can display the value of
any variable like this.
PROC and ENDP define the beginning and end of the procedure
as you saw in Chapter 1.
Assigning values to string variables
String variables can be assigned text values like this:
a$="some text"
The text to use must be enclosed in double quote characters.
Assigning values to an array variable
If you declare a%(4), assign values to each of the elements in the
array like this: "a%(1)=56, a%(2)=345" and so on. Similarly for
the other variable types: "a(1)=.0346, a&(3)=355440, a$(10)="name"".
*** Arithmetic operations
You can use these operators:
+
/
*
**
%
plus
minus or make negative
divide
multiply
raise to a power
percentage
Operators have the same precedence as in the Calculator described in
`The built-in applications' chapter earlier. For example,
"3+51.3/8" is treated as "3+(51.3/8)", not "(3+51.3)/8".
For more information on operators and precedence, see the `Operators
and logical expressions' appendix.
*** Values from functions
There are two kinds of keyword commands and functions:
*) A command is just a straightforward instruction to OPL to
do some particular thing. PRINT and PAUSE, for example,
are commands.
*) A function is just like a command but it also returns
a value which you can then use.
GET is in fact a function; it waits for you to press a
key on the keyboard, and then returns a value which identifies the
key which was pressed. (In previous example programs, the value
returned by GET was ignored, as GET was
being used to provide a pause while you read the screen. This is a
common use of the GET function.)
The number returned by GET will always be a small whole number,
so you might store it away in an integer variable, like this:
a%=GET
There is more about the GET function later in this chapter.
*** Expressions
You can assign a value to a variable with an expression
that is, a combination of numbers, variables, and functions. For example:
"z=x+y/2" gives the "z" the value of "x" plus the value
of " y/2 ".
"z=x*y+34.78" gives "z" the value of "x" times "y",
plus "34.78".
"z=x+COS(y)" gives "z" the value of "x" plus the cosine
of "y". COS is another OPL function. Unlike the GET function, COS requires a value
or variable to work with. As you can see, you put this in brackets,
after the function name. Values you give to functions in this way
are called arguments to the function. There is more information
about arguments in the next chapter.
All of the above are operations using the variables "x"
and "y" assigning the result to "z" and not actually
affecting the value of "x" or "y".
The ways you can change the values of variables fall into these groups:
*) Arithmetic operations, such as multiplication or addition
for example "z=sales+costs" or "z=y%*(4-x%)"
*) Using one of the OPL functions, for example "z=SIN(PI/6)"
or
*) Using certain keywords like INPUT or
EDIT which wait for you to type in values from the
keyboard.
Self reference
In expressions, variables can refer to themselves. For example:
"z%=z%+1" (make the value of "z%" one greater than its current
value)
"x%=y+x%/4" (make the value of "x%" a quarter of its current
value, plus the value of "y")
*** Constants
In an OPL program, numbers (and strings in quote marks) are sometimes
called constants. In practice, you will use constants without
thinking about them. For example:
x=0.32
x%=569
x&=32768
x$="string"
x(1)=4.87
OPL can also represent hexadecimal constants. This is explained under
the HEX$ entry in the `Alphabetic listing' chapter.
Exponential notation may be useful for very large or very small numbers.
Use E (capital or lower case) to mean "times ten to the power
of" for example, 3.14E7 is 3.14*10^7 (31400000), while
1E-9 is 1*10^-9 (0.000000001).
*** Problems with integers
When calculating an expression, OPL uses the simplest arithmetic possible
for the numbers involved. If all of the numbers are integers, integer
arithmetic is used; if one is outside integer range but within long
integer range, then long integer arithmetic is used; if any of the
numbers are not whole numbers, or are outside long integer range,
floating-point arithmetic is used.
This has the benefit of maximising speed, but you must beware of calculations
going out of the range of the type of arithmetic used. For example,
in "X=200*300" both "200" and "300" are integers, so integer
arithmetic is used for speed (even though "X" is a floating-point
variable). However, the result, 60000, cannot be calculated because
it is outside integer range (32767 to -32768), so an `Integer Overflow'
error is produced.
You can get around this by using the INT function, which turns
an integer into a long integer, without changing its value. If you
rewrite the previous example as "X=INT(200)*300", OPL has to use
long integer arithmetic, and can therefore give the correct result
(60000). (If you understand hexadecimal numbers, you can instead write
one of the numbers as a hexadecimal long integer eg "200"
would become "&C8".)
Integer arithmetic uses whole numbers only. For
example, if "y%" is 7 and "x%" is 4, "y%/x%" gives 1.
However, you can use the INTF function to convert an integer
or long integer into a floating-point number, forcing floating-point
arithmetic to be used for example, "INTF(y%)/x%" gives
1.75. This rule applies to each part of an expression -e.g.
"1.0+2/4" works out as "1.0+0" (=1.0), while "1+2.0/4"
works out as "1+0.5" (=1.5).
If one of the integers in an all-integer calculation is a constant,
you can instead write it as a floating-point number. 7/4 gives 1,
but 7/4.0 gives 1.75.
*** Operations on strings
If "a$" is ""down"" and "b$" is ""wind"", then the
statement "c$=a$+b$" means "c$" becomes ""downwind"".
Alternatively, you could give "c$" the same value with the statement
"c$="down"+"wind"".
When adding strings together, the result must not be longer than the
maximum length you declared eg if you declared "LOCAL a$(5)"
then "a$="first"+"second"" would cause an error to be displayed.
Most operators do not work on strings. To cut up strings, use string
functions like MID$, LEFT$ and RIGHT$, explained
in a later chapter. You need them to extract even a single character
you cannot, for example, refer to the 4th character in "a$(7)"
as "a$(4)".
****** Displaying variables
PRINT is one of the most useful OPL commands. Use it to display
any combination of text messages and the values of variables.
*** Where the cursor goes after a PRINT
In general, each PRINT statement ends by moving to a new line.
For example:
" A%=127 :PRINT "A% is"
PRINT a%"
would display as
" A% is
127"
You can stop a PRINT statement from moving to a new line by
ending it with a semicolon. For example:
" A%=127 :PRINT "A% is";
PRINT a%"
would display as
" A% is127"
If you end a PRINT statement with a comma, it stays on the
same line but displays an extra space. For example:
" A%=127 :PRINT "A% is",
PRINT a%"
would display as
" A% is 127"
*** Displaying a list of things
You can use commas or semicolons to separate things to be displayed
on one line, instead of using one PRINT statement for each.
They have the same effect as before:
" A%=127 :PRINT "A% is",a%"
would display as
" A% is 127"
while
" user$="Fred""
" PRINT "Hello",user$;"!""
would display as
" Hello Fred!"
*** Displaying the quote character
Each string you use with PRINT must start and end with a quote
character. Inside the string to display, you can represent the quote
character itself by entering it twice. So "PRINT "Press "" key""
displays as "Press " key", while "PRINT """"" displays
a single quote character.
****** Values from the keyboard
If you want a program to be reusable, it often needs to be able to
accept different sets of information each time you use it. You can
do this with the INPUT command, which takes numbers and text
typed in at the keyboard and stores them in variables.
For example, this simple procedure converts from Pounds Sterling to
Deutschmarks. It asks you to type in two numbers the number
of Pounds Sterling, and the current exchange rate. You can edit as
you type the numbers the Delete key, for example, deletes
characters, and Esc clears everything you've typed. Press Enter when
you've finished each number. The values are assigned to the variables
"pounds" and "rate", and the result of the conversion is then
displayed:
PROC exch:
LOCAL pounds,rate
AT 1,4
PRINT "How many Pounds Sterling?",
INPUT pounds :REM value from keyboard
PRINT "Exchange rate (DM to œ1)?",
INPUT rate :REM value from keyboard
PRINT "=",pounds*rate,"Deutschmarks"
GET
ENDP
Here PRINT is used to show messages (often called prompts)
before the two INPUT commands, to say what information needs
to be typed in. In both cases the PRINT command ends in a comma,
which displays a single space, and keeps the cursor position on the
same line. Without the commas, the numbers you type to the INPUT
commands would appear on the line below.
The value entered to an INPUT command must be of the appropriate
kind for the variable which INPUT is setting. If you enter
the wrong type (for example, if you enter the string "three" for
the floating-point variable "rate"), INPUT will show a
"?" prompt, and wait for you to enter another value.
When using INPUT with a numeric variable (integer, long integer
or floating-point), you can enter any number within the range of that
type of variable. Note that if you enter a non-whole number as the
value for an integer variable, it will take only the whole number
part (so eg if you enter 12.75 for an integer variable, it will be
set to 12).
Comments
The REM command lets you add comments to a program to help
explain how it works. Begin the comment with the word REM (short
for `remark'). Everything after the REM command is ignored.
If you put a REM command on the end of a line, the colon you
would normally put before it is optional. For example, you could use
either of these:
CLS :REM Clears the screen
or
CLS REM Clears the screen
AT command
This positions the cursor or your message at the co-ordinates you
specify. Use the command like this:
AT column%,row%
where "column%" and "row%" give the character position to
use.
"AT 1,1" positions the cursor to the top left corner.
*** Single keypresses
In addition to using INPUT to ask for values, your program
can ask for single keypresses. Use one of these functions:
*) GET waits for a keypress and returns the key pressed.
*) KEY returns a key if any was pressed, but doesn't
wait for one.
Every separate letter, number or symbol has a number which represents
it, called a character code. The full list of character
codes the character set is included in the
`Character set and character codes' appendix to this manual.
GET and KEY return the character code of the key
pressed for example, if "A" were pressed, these
functions would return the value 65. KEY returns 0 if no key
was pressed.
KEY$ and GET$ work in the same way as KEY and
GET, except that they return the key pressed as a string, not
as a character code:
*) GET$ waits for a keypress and returns the key pressed,
as a string.
*) KEY$ returns a key if any was pressed, but doesn't
wait for one. KEY$ returns a null string ("") if no key was
pressed.
Unlike INPUT, these functions do not display the key pressed
on the screen, and do not wait for you to press Enter.
*** Example using GET$
PROC kchar:
LOCAL k$(1)
PRINT "Press a key, A-Z:"
k$=GET$
PRINT "You pressed",k$
PAUSE 60
ENDP
Single keypresses are often useful for making decisions. A program
might, for example, offer a set of choices which you choose from by
typing the word's first letter, like this:
"Add (A) Erase (E) or Copy (C) ?"
Or it might ask for confirmation of a decision, by displaying a "YES
or NO?" message and waiting until "Y" or "N" is pressed.
*** Modifier keys
If you need to check for the Shift, Control, Psion keys and/or Caps
Lock being used, see the description of the KMOD function,
in the `Alphabetic listing' chapter.
*** SUMMARY
Declare variables with one or more LOCAL statements in the
line after "PROC:"
*) Integer variables for example "year%"
*) Floating-point variables for example "price"
*) String variables for example "name$(12)"
where the maximum length is given in the brackets
*) Long integer variables for example "profit&"
Variables will be floating-point unless you add a symbol to the end
of the variable name.
*) Array variables for example "prices%(4)"
or "clients$(5,12)" where the first number inside the brackets
specifies the number of elements, and the second number in the brackets,
in the case of string arrays, specifies the maximum length.
Assign values to variables:
*) Expressions for example "x=5.5/y" , "profit=x-y"
*) INPUT command for example "INPUT a$"
*) `Add' strings for example "a$="MR"+names$"
REM allows you to add comments to a program.
AT positions the cursor.
GET and KEY return the key pressed as a character code.
GET$ and KEY$ return the key pressed as a single-character
string.
GET and GET$ wait until a key is pressed, KEY
and KEY$ do not.
Loops and branches
The programs in the previous two chapters consist of
a number of instructions which are executed one by one, from start
to finish.
However, there are a number of other ways a program can
proceed:
Repeating a set of instructions (called loops)
Doing one set of instructions or another (called IF statements)
Jumping from one line of your program to another
****** Repeating instructions (loops)
The DO...UNTIL and WHILE...ENDWH commands are structures
they don't actually do anything to your data, but control the order
in which other commands are executed:
*) DO...UNTIL repeats a set of instructions until a
certain condition is true.
*) WHILE...ENDWH repeats a set of instructions so long
as a certain condition is true.
There is a test condition at the end of the DO...UNTIL
loop, and at the beginning of the WHILE...ENDWH loop.
*** DO...UNTIL
PROC test:
LOCAL a%
a%=10
DO
PRINT "A=";a%
a%=a%-1
UNTIL a%=0
PRINT "Finished"
GET
ENDP
The instruction DO says to OPL:
"Execute all the following instructions until an UNTIL is reached.
If the condition following UNTIL is not met, repeat the same
set of instructions until it is."
The first time through the loop, "a%"=10. 1 is subtracted from
"a%", so that "a%" is 9 when the "UNTIL" statement is
reached. Since "a%" isn't zero yet, the program returns to DO
and the loop is repeated.
"a%" goes down to 8, and again it fails the UNTIL condition.
The loop therefore repeats 10 times until "a%" does equal zero.
When "a%" equals zero, the program continues with the instructions
after UNTIL.
The statements in a DO...UNTIL loop are always executed at
least once.
*** WHILE...ENDWH
PROC test2:
LOCAL a%
a%=10
WHILE a%>0
PRINT "A=";a%
a%=a%-1
ENDWH
PRINT "Finished"
GET
ENDP
The instructions between the WHILE and ENDWH statements
are executed only if the condition following the WHILE is true
in this case if "a%" is greater than 0.
Initially, "a%"=10 and so "A=10" is displayed on the screen.
"a%" is then reduced to 9. "a%" is still greater than zero,
so "A=9" is displayed. This continues until "A=1" is displayed.
"a%" is then reduced to zero, and so "Finished" is displayed.
Unlike DO...UNTIL, it's possible for the instructions between
WHILE and ENDWH not to be executed at all.
*** Example using WHILE...ENDWH
PROC newkey:
WHILE KEY :ENDWH
PRINT "Press a new key."
ENDP
This procedure ignores any keys which may already have been typed,
then waits for a new keypress.
KEY returns the value of a key that was pressed, or "0"
if no key has been pressed. WHILE KEY :ENDWH reads any
keys previously pressed, one by one, until they have all been read
and KEY returns zero.
****** Choosing between instructions
In a program, you might have several possible cases ("x%" may
be 1, or it may be 2, or 3...) and want to do something different
for each one (if it's 1, do this, but if it's 2, do that...). You
can do this with the IF...ENDIF structure:
IF condition1
do these statements
ELSEIF condition2
do these statements
ELSEIF condition3
do these statements
.
.
ELSE
do these statements
ENDIF
These lines would do either
*) the statements following the IF line (if condition1
is met)
or
*) the statements following one of the ELSEIF lines
(if one of condition2, condition3... is met)
or
*) the statements following the ELSE line (if none of
condition1, condition2, condition3... have been met).
and then continue with the statements after the ENDIF.
You can cater for as many cases as you like with ELSEIF statements.
You don't have to have any ELSEIFs. There may be either one
ELSE statement or none; you do not specify conditions for the
ELSE statement.
Every IF in your program must be matched by an ENDIF
otherwise you'll see an error message when you try to translate the
module. The structure must start with an IF and end with an
ENDIF.
*** "Nesting" loops the `Too complex' message
You can have up to 8 DO...UNTIL, WHILE...ENDWH
and/or IF...ENDIF structures nested within each other. If you
nest them any deeper, a `Too complex'
error message will be displayed.
*** Example using IF
PROC zcode:
LOCAL g%
PRINT "Are you going to press Z?"
g%=GET
IF g%=%Z OR g%=%z
PRINT "Yes!"
ELSE
PRINT "No."
ENDIF
PAUSE 60
ENDP
% operator
The program checks character codes with the % operator.
"%a" returns the code of "a", "%Z" the code of "Z"
and so on. Using "%A" is entirely equivalent to using 65, the
actual code for "A", but it saves you having to look it up, and
it makes your program easier to follow.
Be careful not to confuse character codes like these with integer
variables.
OR operator
"OR" lets you check for either of two conditions.
OR is an example of a logical operator. There is more
about logical operators later in this chapter.
*** Example using DO...UNTIL and IF
PROC testny:
DO
g$=UPPER$(GET$)
UNTIL g$="N" OR g$="Y" REM wait for a Y or N
IF g$="N"
REM was it an N?
... REM `N' pressed
ELSE
REM must have been a Y
... REM `Y' pressed
ENDIF
ENDP
This procedure checks for a `Y' or `N' keypress. You'd put your own
code in the IF statement, where "..." has been used in
the above example.
****** Arguments to functions
Some functions, as with commands like PRINT and PAUSE,
require you to give a value or values. These values are called arguments.
The UPPER$ function needs you to specify a string argument,
and returns the same string but with all letters in upper case. For
example, "UPPER("12.+aBcDeF")" returns ""12.+ABCDEF"".
Functions as arguments to other functions
Since GET$ returns a string, you can use this as the argument
for UPPER$. "UPPER$(GET$)" waits for you to press a key,
because of the "GET$"; the "UPPER$" takes the string returned
and, if it's a letter, returns it in upper case. This means that you
can check for ""Y"" without having to check for ""y"" as well.
****** `True' and `False'
The test condition used with DO...UNTIL, WHILE...ENDWH
and IF...ENDIF can be any expression, and may include any valid
combination of operators and functions. Examples:
Condition
"x=21"
this is a test
Meaning
does the value of "x" equal 21? (Note as
"a%<>b%
"
"x%=(y%+z%)"
condition, it does not assign "x" the value 21)
is the value of "a%" not equal to the value of "b%"?
is the value of "x%" equal to the value of "y%+z%"?
(does not asssign the value "y%+z%" to "x%").
The expressions actually return a logical value that
is, a value meaning either `True' or `False'. Any non-zero value is
considered `True' (to return a `True' value, OPL uses -1), while zero
means `False'. So if "a%" is 6 and "b%" is 7, the expression
"a%>b%" will return a zero value, since "a%" is not
greater than "b%".
These are the conditional operators:
"<"
""
"="
less than
greater than
equal to
"<>"
"<="
less than or equal to
"="
greater than or equal to
not equal to
*** Logical operators
The operators AND, OR and NOT allow you to combine
or change test conditions. This table shows their effects. ("c1"
and "c2" represent conditions.)
Example
"c1 AND c2"
"c1 OR c2"
"NOT c1"
Result
True if both "c1" and "c2" are true
False if either "c1" or "c2" are false
True if either "c1" or "c2" is true
False if both "c1" and "c2" are false
True if "c1" is false
False if "c1" is true
Integer returned
-1
0
-1
0
-1
0
However, AND, OR and NOT become bitwise operators
something very different from logical operators when used
exclusively with integer or long integer values. If you use "IF A% AND B%",
the AND acts as a bitwise operator, and you may not get the
expected result. You would have to rewrite this as "IF A%<>0 AND B%<>0".
(Operators, including bitwise operators, are discussed further in
the `Operators and logical expressions' Appendix.)
****** Jumping to a different line
*** Jumping out of a loop: BREAK
The BREAK command jumps out of a DO...UNTIL or WHILE...ENDWH
structure. The line after the UNTIL or ENDWH statement
is executed, and the lines following are then executed as normal.
For example:
(picture)
*** Jumping to the test condition: CONTINUE
The CONTINUE command jumps from the middle of a loop to its
test condition. The test condition is either the UNTIL line
of a DO...UNTIL loop or the WHILE line of a WHILE...ENDWH
loop. For example:
(picture)
*** Jumping to a `label': GOTO
The GOTO command jumps to a specified label. The label
can be anywhere in the same procedure (after any LOCAL or GLOBAL
variable declarations). In this example, when the program reaches
the GOTO statement, it jumps to the label "exit::", and
continues with the statement after it.
(picture)
The two PRINT statements are missed out.
Labels themselves must end in a double colon. This is optional
in the "GOTO" statement both "GOTO exit::" and
"GOTO exit" are OK.
The jump to the label always happens it is not conditional.
Don't use GOTOs instead of DO...UNTIL or WHILE...ENDWH,
as they make procedures difficult to understand.
*** Vectoring to a label: VECTOR/ENDV
VECTOR jumps to one of a list of labels, according to the value
in an integer variable. The list is terminated by the ENDV
statement. For example:
VECTOR P%
FUNCA,FUNCX
FUNCR
ENDV
PRINT "P% was not 1/2/3" :GET :STOP
FUNCA::
PRINT "P% was 1" :GET :STOP
FUNCX::
PRINT "P% was 2" :GET :STOP
FUNCR::
PRINT "P% was 3" :GET :STOP
Here, if "P%" is 1, VECTOR jumps to the label "FUNCA::".
If it is 2, it jumps to "FUNCX::", and if 3, "FUNCR::". If
"P%" is any other value, the program continues with the statement
after the "ENDV" statement.
The list of labels may spread over several lines, as in this example,
with a comma separating labels in any one line but no comma at the
end of each line. Again, you can write each label in the list with
a double colon, if you like.
VECTOR...ENDV can sometimes save you from having to write very
long "IF...ENDIF" structures, with "ELSEIF" used many times.
Stopping a running program
This example introduces the STOP command. This
stops a running program completely, just as if the end of the program
had been reached. In a module with a single procedure, STOP
has the same effect as using GOTO to jump to a label above
the final ENDP.
*** UNTIL 0, WHILE 1
Zero and non-zero are logical values meaning `False' and `True' respectively.
"UNTIL 0" and "WHILE 1" therefore mean `do forever',
since the condition 0 is never `True' and the condition 1 is always
`True'. Use loops with these conditions when you need to check the
real condition somewhere in the middle of the loop. When the real
condition is met, you can BREAK out of the loop. For example:
PROC test:
WHILE 1
... REM some other lines here
IF KEY :BREAK :ENDIF
... REM some other lines here
ENDWH
ENDP
This example uses the KEY command. KEY returns 0 if
no key has been pressed. When a key is pressed, KEY returns
a non-zero value which counts as `True', and the BREAK is executed.
*** SUMMARY
DO
statements
UNTIL condition
WHILE condition
statements
ENDWH
IF condition
statements
(ELSEIF condition
statements)
(ELSE
statements)
ENDIF
VECTOR int%
label1, label2
label3...
ENDV
"GOTO label" jumps to "label::"
"BREAK" goes to the first line after the end of the loop
the line following the UNTIL or ENDWH line.
"CONTINUE" goes to the test condition of the loop the
UNTIL or the WHILE line.
"STOP" stops a running program completely.
Calling procedures
****** Using more than one procedure
If you wanted a single procedure to perform a complex task, the procedure
would become long and complicated. It is more convenient to have a
module containing a number of procedures, each of which you can write
and edit separately.
Many OPL modules are in fact a set of linked procedures
each procedure doing just one job (such as a certain calculation)
and then passing its results on to other procedures so they can do
other operations:
(picture)
OPL is designed to encourage programs written in this way, since:
*) You can store all the procedures which make up a program in
the same module file
and
*) One procedure can call, that is run, another.
*** Modules containing more than one procedure
You can have as many procedures as you like in a module. Each must
begin with PROC and end with ENDP.
When you run a translated module it is always the first procedure,
at the top of the module, which is actually run. When this finishes,
the module stops; any other procedures in the file are only run if
and when they are called.
Although you can use any name you want, it's common to give the first
procedure a name like "start".
Procedures which run on their own should be written and translated
as separate modules, otherwise you won't be able to run them.
*** Calling procedures
To run another procedure, simply give the name of the procedure (with
the colon). For example, this module contains two procedures:
PROC one:
PRINT "Start"
PAUSE 40
two: REM calls procedure two:
PRINT "Finished"
PAUSE 40
ENDP
PROC two:
PRINT "Doing..."
PAUSE 40
ENDP
Running this module would run procedure "one:", with this effect:
"Start" is displayed; after a PAUSE it calls "two:",
which displays "Doing..."; after another PAUSE "two:"
returns to the "one:" procedure; "one:" displays "Finished";
and after a final PAUSE, "one:" finishes.
*** Uses of calling procedures
Calling procedures can be used to:
*) Structure your programs more clearly so they're easier to
adapt after you've written them, and
*) Use the same procedure in different programs say,
to perform a certain common calculation.
For example, when your program asks you "Do this or do that?", make
two procedure calls either "this:" or "that:" procedure
depending on what you reply, for example:
PROC input:
LOCAL a$(1)
PRINT "Add [A] or Subtract [S]?:",
a$=UPPER$(GET$)
IF a$="A"
add:
REM first procedure
ELSEIF a$="S"
subtract: REM second procedure
ENDIF
ENDP
To make full use of procedure calls, you must be able to communicate
values between one procedure and another. There are two ways of doing
this: global variables and parameters.
****** Parameters
Values can be passed from one procedure to another by using parameters.
They look, and act, very much like arguments to functions.
In the example below, the procedure "price:" calls the procedure
"tax:". At the same time as it calls it, it passes a value (in
this case, the value which INPUT gave to the variable "x")
to the parameter "p" named in the first line of "tax:". The
parameter "p" is rather like a new local variable inside "tax:",
and it has the value passed when "tax:" is called. (The "tax:"
procedure is not changing the variable "x".)
The "tax:" procedure displays the value of "x"
plus 17.5% tax.
PROC price:
(picture)
LOCAL x
PRINT "ENTER PRICE",
INPUT x
tax:(x) REM Passes the value of x to p
GET
ENDP
PROC tax:(p)
PRINT "PRICE INCLUDING TAX =",p*1.175
ENDP
*) In the called procedure, follow the procedure name
by the names to use for the parameters, in brackets and separated
by commas for example "proc2:(cost,profit)".
The parameter type is specified as with variables for example
"p" for a floating-point parameter, "p%" for an integer, "p&"
for a long integer, "p$" for a string. You can't have array parameters.
*) In the calling procedure, the values for the
parameters are given in brackets, in the right order and separated
by commas, after the colon of the called procedure for example
"proc2:(60,30)".
The values passed as parameters may be the values of variables, strings
in quotes, or constants. So a call might be "calc:(a$,x%,15.8)"
and the first line of the called procedure "PROC calc:(name$,age%,salary)"
In the called procedure, you cannot assign values to parameters
for example, if "p" is a parameter, you cannot use a statement
like "p=10".
You will see a `Type mismatch' error displayed if you try to pass
the wrong type of value to a parameter for example, 45
to (a$).
*** Multiple parameters
In the following example, the second procedure "tax2:" has two
parameters:
*) The value of the price variable "x" is passed to the
parameter "p1".
*) The value of the tax rate variable "r" is passed to
the parameter "p2".
"tax2:" displays the price plus tax at the rate specified.
PROC price2:
(picture)
LOCAL x,r
PRINT "ENTER PRICE",
INPUT x
PRINT "ENTER TAX RATE",
INPUT r
tax2:(x,r)
GET
ENDP
PROC tax2:(p1,p2)
PRINT p1+p2 %
ENDP
This uses the "%" symbol as an operator "p1+p2 %"
means "p1" plus "p2" percent of "p1". Note the space before
the "%"; without it, "p2%" would be taken as representing
an integer variable.
Appendix B has more about the "%" operator.
*** Returning values
In the following example, the RETURN command is used to return
the value of "x" plus tax at "r" percent to be displayed
in "price3:". This is very similar to the way functions return
a value.
The "tax3:" procedure calculates, but doesn't display the result.
This means it can be called by other procedures which need to perform
this calculation but do not necessarily need to display it.
PROC price3:
(picture)
LOCAL x,r
PRINT "ENTER PRICE",
INPUT x
PRINT "ENTER TAX RATE",
INPUT r
PRINT "PRICE INCLUDING TAX =",tax3:(x,r)
GET
ENDP
PROC tax3:(p1,p2)
RETURN p1+p2 %
ENDP
Only one value may be returned by the RETURN command.
The name of a procedure which returns a value must end with the correct
identifier "$" for string, "%" for integer, or "&"
for long integer. To return a floating-point number, it should end
with none of these symbols. For example, "PROC abcd$:" can return
a string, while "PROC counter%:" can return an integer. In this
example, "ref$:" returns a string:
PROC refname:
LOCAL a$(30),b$(2)
PRINT "Enter reference and name:",
INPUT a$
b$=ref$:(a$)
PRINT "Ref is:",b$
GET
ENDP
PROC ref$:(name$)
RETURN LEFT$(name$,2)
REM LEFT$ takes first 2 letters of name$
ENDP
If you don't use the RETURN command, a string procedure returns
the null string (""""). Other (numeric) types of procedure return
zero.
****** GLOBAL variables
You can only return one value with the RETURN command. If you
need to pass back more than one value, use GLOBAL variables.
Instead of declaring "LOCAL x%,name$(5)" declare
"GLOBAL x%,name$(5)". The difference is that:
*) Local variables are valid only in the procedure in which
they are declared.
*) Global variables can also be used in any procedures (including
those in loaded modules) called by the procedure in which they are
declared.
So this module would run OK:
PROC one:
GLOBAL a%
PRINT a%
two:
GET
ENDP
PROC two:
a%=2 REM Sees a% declared in one:
PRINT a%
ENDP
When you run this, the value 0 is displayed first, and then the value
2.
You would see an `Undefined externals' error displayed if you used
LOCAL instead of GLOBAL to declare "a%", since the
procedure "two:" wouldn't recognise the variable "a%". In
general, though, it is good practice to use the LOCAL command
unless you really need to use GLOBAL.
A local declaration overrides a global declaration in that procedure.
So if "GLOBAL a%" was declared in a procedure, which called
another procedure in which "LOCAL a%" was declared, any modifications
to the value of "a%" in this procedure would not effect the value
of the global variable "a%".
*** Passing back values
You can effectively pass as many values as you like back from one
procedure to another by using global variables. Any modifications
to the value of a variable in a called procedure are automatically
registered in the calling procedure.
For example:
PROC start:
GLOBAL varone,vartwo
varone=2.5
vartwo=2
op:
PRINT varone,vartwo
GET
ENDP
PROC op:
varone=varone*2
vartwo=vartwo*4
ENDP
This would display "5 8"
*** `Undefined externals' error
If, perhaps because of a typing error, you use a name which is not
one of your variables, no error occurs when you translate the module.
This is because it could be the name of a global variable, declared
in a different procedure, which might be available when the procedure
in question was called. If no such global variable is available, an
`Undefined externals' error is shown. This also displays the variable
name which caused the error, together with the module and procedure
names, in this format: `Error in MODULE\PROCEDURE,VARIABLE'.
*** SUMMARY
Call a procedure by stating its name, including the colon.
Pass parameters to a procedure by following the procedure call
with the values for the parameters, eg "calc2:(4.5,32)". In the
called procedure, follow the procedure name with the parameter names,
eg "PROC calc2:(mod,div%)".
To make variables declared in one procedure accessible to called procedures,
declare the variables with GLOBAL instead of LOCAL.
Data file handling
You can use OPL to create data files (databases) like
those used by the in-built Database application described in `The
built-in applications' chapter earlier in this manual. You can store
any kind of information in a data file, and retrieve it for display,
editing or calculations.
This chapter covers:
Creating data files
Adding and editing records
Searching records
Using a data file both in OPL and in the Database
****** Files, records and fields
Data files (or databases)
(picture)
are made up of records
(picture)
For example, in a data file of names and addresses, each record might
have a name field, a telephone number field, and separate fields for
each line of the address.
In OPL you can:
*) Create a new file with CREATE, or open an
existing file with OPEN, and copy, delete and rename files
with COPY, DELETE and RENAME.
*) Add a new record with APPEND, change an existing
one with UPDATE, and remove a record with ERASE.
*) Fill in a field by assigning a value to a field variable.
****** Creating a data file
Use the CREATE command like this:
CREATE filename$,logical name,field1,field2,...
For example:
CREATE "clients",B,nm$,tel$,ad1$,ad2$,ad3$
creates a data file called "clients".
The file name is a string, so remember to put quote marks around it.
You can also assign the name string to a string variable (for example
"fil$="clients"") and then use the variable name as the argument
"CREATE fil$,A,field1,field2".
*** Logical names
You can have up to 4 data files open at a time. Each of these must
have a logical name: "A", "B", "C" or "D". The logical
name lets you refer to this file without having to keep using the
full file name.
A different logical name must be used for each data file opened
one called "A", one called "B", one called "C" and one
called "D". A file does not have to be opened with the same logical
name as the last time it was opened. When a file is closed, its logical
name is freed for use by another file.
*** Fields
"field1, field2",... are the field names up to 32 in any
record. These are like variables, so use "%" "&" or "$"
to make the appropriate types of fields for your data. You cannot
use arrays. Do not specify the maximum length of strings that the
string fields can handle. The length is automatically set at 255 characters.
Field names may be up to 8 characters long, including any qualifier
like "&".
When referring to fields, add the logical file name to the front of
the field name, to specify which opened file the fields belong to.
Separate the two by a dot. For example, "A.name$" is the "name$"
field of the file with logical name "A", and "C.age%" is the
"age%" field of the file with logical name "C".
The values of all the fields are 0 or null to start with. You can see
this if you run this example program:
PROC creatfil:
CREATE "example",A,int%,long&,float,str$
PRINT "integer=";a.int%
PRINT "long=";a.long&
PRINT "float=";a.float
PRINT "string=";a.str$
CLOSE
GET
ENDP
****** Opening a file
When you first CREATE a data file it is automatically open,
but it closes again when the program ends. If
a file already exists, trying to CREATE it again will give
an error- so if you ran the procedure "creatfil:" a second
time you would get an error. To open an existing file, use the OPEN
command.
OPEN works in the same way as the CREATE command. For
example:
OPEN "clients",B,a$,b$,c$,d$,e$
*) You must use the same filename as when you first created
it.
*) You must include in the OPEN command each of the
fields you intend to alter or read. You can omit fields from the end
of the list; you cannot miss one out from the middle of the
list, for example "field1$,,name$" They must remain the same type
of field, but you can change their names. So a file created with fields
"name$,age%" could later be opened with the fields "a$,x%".
*) Give the file a logical name. Up to 4 files may be open
at any one time, with logical names "A", "B", "C" and
"D". You can't have two files open simultaneously with the same
logical name, so when opening the files, remember which logical names
you have already used.
You might make a new module, and type these two procedures into
it:
PROC openfile:
IF NOT EXIST("example")
CREATE "example",A,int%,lng&,fp,str$
ELSE
OPEN "example",A,int%,lng&,fp,str$
ENDIF
PRINT "Current values:"
show:
PRINT "Assigning values"
A.int%=1
A.lng&=&2**20 REM the 1st & avoids integer overflow
A.fp=SIN(PI/6)
PRINT "Give a value for the string:"
INPUT A.str$
PRINT "New values:"
show:
ENDP
PROC show:
PRINT "integer=";A.int%
PRINT "long=";A.lng&
PRINT "float=";A.fp
PRINT "string=";A.str$
GET
ENDP
*** Notes
Opening/creating the file
The IF...ENDIF checks to see if the file already exists, using
the EXIST function. If it does, the file is opened; if it doesn't,
the file is created.
Giving values to the fields
The fields can be assigned values just like variables. The field name
must be used with the logical file name like this: "A.f%=1"
or "INPUT A.f$".
If you try to give the wrong type of value to a field (for example
""Davis"" to "f%") an error message will be displayed.
You can access the fields from other procedures, just like global
variables. Here the called procedure "show:" displays the values
of the fields.
Field names
You must know the type of each field, and you must give each a separate
name you cannot refer to the fields in any indexed way, eg
as an array.
Opening a file for sharing
The OPENR command works in exactly the same way as OPEN,
except that the file cannot be written to (with UPDATE or APPEND),
only read. However, more than one running program can then look at
the file at the same time.
****** Saving records
The last example procedure did not actually save the field values
as a record to a file. To do this you need to use the APPEND
command. This program, for example, allows you to add records to the
"example" data file:
PROC count:
LOCAL reply%
OPEN "example",A,f%,f&,f,f$
DO
CLS
AT 20,1 :PRINT "Record count=";COUNT
AT 9,5 :PRINT "(A)dd a record"
AT 9,7 :PRINT "(Q)uit"
reply%=GET
IF reply%=%q OR reply%=%Q
BREAK
ELSEIF reply%=%A OR reply%=%a
add:
ELSE
BEEP 16,250
ENDIF
UNTIL 0
ENDP
PROC add:
CLS
PRINT "Enter integer field:";
INPUT A.f%
PRINT "Enter long integer field:";
INPUT A.f&
PRINT "Enter numeric field:";
INPUT A.f
PRINT "Enter string field:";
INPUT A.f$
APPEND
ENDP
BEEP
The BEEP command makes a beep of varying pitch and length:
BEEP duration%,pitch%
The duration is measured in 1/32 s of a second, so "duration%=32"
would give a beep a second long. Try "pitch%=50" for a high beep,
or "500" for a low beep.
*** The number of records
The COUNT function returns the number of records in the file.
If you use it just after creating a database, it will return 0. As
you add records the count increases.
*** How the values are saved
Use the APPEND command to save a new record. This has no arguments.
The values assigned to "A.f%", "A.f&", "A.f" and "A.f$"
are added as a new record to the end of the "example" data file.
If you only give values to some of the fields, not all, you won't
see any error message. If the fields happen to have values, these
will be used; otherwise null strings ("") will be given to string
fields, and zero to numeric fields.
New field values are always added to the end of the current data
file as the last record in the file (if the file is a new
one, it will also be the first record).
At any time while a data file is open, the field names currently in
use can be used like any other variable for example, in a
PRINT statement, or a string or numeric expression.
APPEND and UPDATE
APPEND adds the current field values to the end of the file
as a new record, whereas UPDATE deletes the current record
and adds the current field values to the end of the file as a new
record.
****** Moving from record to record
When you open or create a file, the first record in the file is current.
To read, edit, or erase another record, you must make that record
current that is, move to it. Only one record is current at
a time. To change the current record, use one of these commands:
POSITION `moves to' a particular record, setting the field
variables to the values in that record. For example, the instruction
"POSITION 3" makes record 3 the current record. The first
record is record 1.
You can find the current record number by using the POS function,
which returns the number of the current record.
FIRST moves to the first record in a file.
NEXT moves to the following record in a file. If the end of
the file is passed, NEXT does not report an error, but the
current record is a new, empty record. This case can be tested for
with the EOF function.
BACK moves to the previous record in the file. If the current
record is the first record in the file then that first record stays
current.
LAST moves to the last record in the file.
*** Deleting a record
ERASE deletes the current record in the current
file.
The next record is then current. If the erased record was the last
record in a file, then following this command the current record will
be empty and EOF will return true.
****** Finding a record
FIND makes current the next record which has a field matching
your search string. Capitals and lower-case letters match. For example:
r%=FIND("Brown")
would select the first record containing a string field with the value
"Brown", "brown" or "BROWN", etc. The number of that record is returned,
in this case to the variable "r%". If the number returned is zero,
no matching field was found. Any other number means that a match was
found.
The search includes the current record. So after finding a matching
record, you need to use NEXT before you can continue searching
through the following records.
"FIND("Brown")" would not find a field "Mr Brown". To find this,
use wildcards, as explained below.
You can only search string fields, not number fields. For example,
if you assigned the value 71 to the field "a%", you could not
find this with FIND. But if you assigned the value "71" to
"a$", you could find this.
*** Wildcards
"r%=FIND("*Brown*")" would make current the next record containing
a string field in which "Brown" occurred for example,
the fields "MR BROWN", "Brown A.R." and "Browns Plumbing"
would be matched. The wildcards you can use are:
?
matches any one character
*
matches any number of characters.
Once you've found a matching record, you might display it on the screen,
erase it or edit it. For example, to display all the records containing
"BROWN":
FIRST
WHILE FIND("*BROWN*")
PRINT a.name$, a.phone$
NEXT
GET
ENDWH
*** More controlled finding
FINDFIELD , like FIND , finds a string, makes the record
with this string the current record, and returns the number of this
record. However you can also use it to do case-dependent searching,
to search backwards through the file, to search from the first record
(forwards) or from the last record (backwards), and to search in one
or more fields only.
You may experience some problems in using FINDFIELD with some
versions of OPL. To ensure that problems are avoided use the line:
POKEB(peekw($1c)+7),0
immediately before each call to FINDFIELD.
The first argument to FINDFIELD is the string to look for,
as for FIND. The second is the number of the string field to
start looking in (1 for the first string field), and the third is
the number of string fields to search in (starting from the string
field specified by the second argument). For example, "FINDFIELD(a$,1,2,0)"
will match with the 15th field, if that is the first string field.
If you want to search in all fields, use 1 as the second argument
and for the third argument use the number of fields you used in the
OPEN/CREATE command.
The fourth argument adds together two values:
*) 0 for a case independent match, where capitals and
lower-case letters match, or 16 for a case dependent match.
*) 0 to search backwards from the current record, 1 to search
forwards from the current record, 2 to search backwards from the end
of the file, or 3 to search forwards from the start of the file.
For a case-dependent search (16) forwards from the start of the file
(3), use 16+3, i.e. 19. If you wanted to search only in the second
and third string fields, the full statement might look like this:"FINDFIELD("brown",2,2,19)"
If you understand hexadecimal arithmetic, as described
under HEX$ in the `Alphabetic listing' chapter, note that you
can combine the two values more easily using hexadecimal numbers.
Use a "$" symbol, then the digit for case-dependency (0/1), then
the digit for the start/direction (0/1/2/3). In the previous example
the digits are 1 and 3, producing the hexadecimal number "$13"
(=19).
If you find a matching record and then want to search again from this
record, you must first use NEXT or BACK (according to
the direction you are searching in), otherwise the same match will
be "found" in the current record again."
****** Changing/closing the current file
Immediately after a file has been created or opened, it is automatically
current. This means that the APPEND or UPDATE commands
save records to this file, and the record-position commands (explained
below) move around this file. You can still use the fields of other
open files, for example "A.field1=B.field2"
USE makes current one of the other opened files. For example
"USE B" selects the file with the logical name B (as specified
in the OPEN or CREATE command which opened it).
If you try to USE a file which has not yet been opened or created,
an error is reported.
In this procedure, the EOF function checks whether you are
at the end of the current data file that is, whether you've
gone past the last record. You can use EOF in the test
condition of a loop UNTIL EOF or WHILE NOT EOF
in order to carry out a set of actions on all the records in a file.
*** Example copies selected records from one file to
another
PROC copyrec:
OPEN "example",A,f%,f&,f,f$
TRAP DELETE "temp"
REM If file doesn't exist, ignore error
CREATE "temp",B,f%,f&,f,f$
PRINT "Copying EXAMPLE to TEMP"
USE A REM the EXAMPLE file
DO
IF a.f%>30 and a.f<3.1415
b.f%=a.f%
b.f&=a.f&
b.f=a.f
b.f$="Selective copy"
USE B REM the TEMP file
APPEND
USE A
ENDIF
NEXT
UNTIL EOF REM until End Of File
CLOSE REM closes A; B becomes current
CLOSE REM closes B
ENDP
This example uses the DELETE command to delete any "temp"
file whch may exist, before making it afresh. Normally, if there was
no "temp" file and you tried to delete it, an error would be generated.
However, this example uses TRAP with the DELETE command.
TRAP followed by a command means "if an error occurs in the
command, carry on regardless". There are more details of TRAP
in the chapter on `Error handling'.
*** Closing a data file
You should always `close' a data file (with the CLOSE command)
when you have finished using it. Data files close automatically when
programs end. You can only have 4 files open at a time if
you have 4 files open and you want to access another one, close one
of them. CLOSE closes the current file.
*** Keeping data files compressed
When you change or delete records in a data file, the space taken
by the old information is not automatically recovered. By default,
the space is recovered when you close the file, provided it
is on `Internal drive' or on a RAM SSD (ie it is not on a Flash
SSD).
Closing a very large file which contains changed or deleted records
can be slow when compression is enabled, as the whole file beyond
each old record needs copying down, each time.
You can prevent data file compression if you wish, with these
two lines:
p%=PEEKW($1c)+$1e
POKEW p%,PEEKW(p%) or 1
(Use any suitable integer variable for "p%".) Files used by the
current program will now not compress when they close.
Use these two lines to re-enable auto-compression:
p%=PEEKW($1c)+$1e
POKEW p%,PEEKW(p%) and $fffe
Warning: Be careful to enter these lines exactly as shown. These
examples work by setting a system configuration flag.
If you have closed a file without compression, you can recover
the space by using the COMPRESS command to create a new, compressed
version of the file. "COMPRESS "dat" "new"", for example,
creates a file called "new" which is a compressed version of "dat",
with the space which was taken up by old information now recovered.
(You have to use COMPRESS to compress data files which are
kept on a Flash SSD.)
****** Data files and the Database
The files you use with the Database (listed under the Data icon in
the in-built System screen) often called databases
or database files are also just data files.
Data files created by the Database can be viewed in OPL, and vice
versa.
In OPL: to open a data file made by the Database, begin its
name with "\DAT\", and end it with ".DBF". For example,
to open the file called "data" which the Database normally uses:
OPEN "\dat\data.dbf",A,a$,b$,c$,d$...
Restrictions:
*) You can use up to 32 field variables, all strings. It is
possible for records to contain more than 32 fields, but these fields
cannot be accessed by OPL. It's safe to change such a record and use
UPDATE, though, as the extra fields will remain unchanged.
*) The maximum record length in OPL is 1022 characters. You
will see a `Record too large' error (-43) if your program tries
to open a file which contains a record longer than this.
*) The Database breaks up long records (over 255 characters)
when storing them. They would appear as separate records to OPL.
In the Database: to examine an OPL data file, press the Data
button, select `Open' from the `File' menu, and type the name with
"\OPD\" on the front and ".ODB" at the end for example:
\opd\example.odb
Restrictions:
*) All of the fields must be string fields.
*) You can have up to a maximum of 32 fields, as specified
in the CREATE command. If you view an OPL data file with the
Database, and add more lines to records than the number of fields
specified in the original CREATE command, you will get an error
if you subsequently try to access these additional fields in OPL.
In both cases, you are using a more complete file specification.
There is more about file specifications in the `Advanced topics' chapter.
Graphics
OPL graphics allow you, for example, to:
Draw lines and boxes.
Fill areas with patterns.
Display text in a variety of styles, at any position
on the screen.
Scroll areas of the screen.
Manipulate windows and bit patterns.
Read data back from the screen.
You can draw using black, grey and white.
Graphics keywords begin a "G". In this manual a
lower case "g" is used for example, "gBOX"
but you can type them using upper or lower case letters.
IMPORTANT: Some graphics keywords are mentioned only
briefly in this chapter. For more details about them, see the `Alphabetic
listing' chapter.
-----------------------------------************ Simple graphics
The Workabout screen is made up of a regular pattern of 240
points across by 100 down. These points are sometimes referred to
as pixels.
Each pixel is identified
by two numbers, giving its position across and down from the top left
corner of the screen. 0,0 denotes the pixel in the top left corner;
2,1 is the pixel 2 points across and one down, and so on. 239,99 is
the pixel in the bottom right corner.
Note that these co-ordinates are very different to the cursor positions
set by the AT command.
OPL maintains a current position on the screen. Graphics
commands which draw on the screen generally take effect at this position.
Initially, the current position is the top left corner, 0,0.
You can draw using black, grey and white although grey is not accessible
by default. See the section `Drawing in grey' later in this chapter
for further details.
****** Screen positions
*** Drawing lines
Here is a simple procedure to draw a horizontal line in the middle
of the screen:
PROC lines:
gMOVE 90,40
gLINEBY 60,0
GET
ENDP
gMOVE moves the current
position by the specified amount. In this case, it moves the current
position 90 pixels right and 40 down, from 0,0 to 90,40. It does not
display anything on the screen.
gLINEBY (g-Line-By) draws a line from the current position
(just set to 90,40) to a point at the distance you specify
in this case 60 to the right and 0 down, ie 150,40.
When drawing a horizontal line, as in the above example, the line
that is drawn includes the pixel with the lower x coordinate and excludes
the pixel with the higher x coordinate. Similarly, when drawing a
vertical line, the line includes the pixel with the lower y coordinate
and excludes the pixel with the higher y coordinate.
On the Workabout screen the y coordinate decreases
as you move toward the top of the screen.
When drawing a diagonal line, the coordinates of the end pixels are
turned into a rectangle. The top left pixel lies inside the boundary
of this rectangle and the bottom right pixel lies outside it. The
line drawing algorithm then fills in those pixels that are intersected
by a mathematical line between the corners of the rectangle. Thus
the line will be drawn minus one or both end points.
gLINEBY also has the effect of moving the current position
to the end of the line it draws.
With both gMOVE and gLINEBY, you specify positions relative
to the current position. Most OPL graphics commands do likewise.
gMOVE and gLINEBY, however, do have corresponding commands
which use absolute pixel positions. gAT moves
to the pixel position you specify; gLINETO
draws a line from the current position to an absolute position. The
horizontal line procedure could instead be written:
PROC lines:
gAT 90,40
gLINETO 150,40
GET
ENDP
gAT and gLINETO may be useful in very short graphics
programs, and gAT is always the obvious command for moving
to a particular point on the screen, before you start drawing. But
once you do start drawing, use gMOVE and gLINEBY. They
make it much easier to develop and change programs, and allow you
to make useful graphics procedures which can display things anywhere
you set the current position. Almost all graphics drawing commands
use relative positioning for these reasons.
*** Drawing dots
You can set the pixel at the current position with "gLINEBY 0,0".
*** Right and down, left and up
gMOVE and gLINEBY find the position to use by adding
the numbers you specify onto the current position. If the numbers
are positive, it moves to the right and down the screen. If you use
negative numbers, however, you can specify positions to the left of
and/or above the current position. For example, this procedure draws
the same horizontal line as before, then another one above it:
PROC lines2:
gMOVE 90,40
gLINEBY 60,0
gMOVE 0,-20
gLINEBY -60,0
GET
ENDP
The first two program lines are the same as before. gLINEBY
moves the current position to the end of the line it draws, so after
the first gLINEBY the current position is 150,40. The second
gMOVE moves the current position up by 20 pixels; the
second gLINEBY draws a line to a point 60 pixels to the left.
For horizontal and vertical lines, the right-hand/bottom pixel
is not set. For diagonal lines, the right-most and bottom-most pixels
are not set; these may be the same pixel.
*** Going off the screen
No error is reported if you try to draw off the edge of the screen.
It is quite possible to leave the current position off the screen
for example, "gLINETO 300,40" will draw a line from the current
position to some point on the right-hand screen edge, but the current
position will finish as 300,40.
There's no harm in the current position being off the screen. It allows
you to write procedures to display a certain pattern at the current
position, and not have to worry whether that position is too close
to the screen edge for the whole pattern to fit on.
*** Clearing the screen
"gCLS" clears the screen.
****** Drawing in grey
*** Initialising for the use of grey
To draw in grey you need to use "DEFAULTWIN 1"
at the start of your program. (Note that this clears the screen.)
Grey is not automatically available because it requires twice the
memory (and takes longer to scroll or move) compared to having just
black. So programs that do not need to use grey are not unnecessarily
penalised.
"DEFAULTWIN 0" disables the use of grey again, also clearing
the screen.
It is not possible to have a screen using grey only.
"DEFAULTWIN 1" does not cause PRINT to print in grey
it applies only to graphics and graphics text (see gPRINT later).
When you use "DEFAULTWIN 1" the existing black-only screen is
cleared and replaced by one which contains a black plane and
also a grey plane. The black plane is also sometimes called
the the normal plane. These are referred to as `planes' because
intuitively it is simplest to think of there being a plane of black
pixels in front of (or on top of) a plane of grey pixels, with
any grey only ever visible if the black pixel in front of it is clear.
If you draw a pixel using both black and grey, it will appear black.
If you then clear the black plane only, the same pixel will appear
grey. If you draw a pixel using grey only it will appear grey unless
it is already black, in which case it is effectively hidden behind
the black plane.
If you need to use grey, you are recommended to use "DEFAULTWIN 1"
once and for all at the start of your program. One reason is because
DEFAULTWIN can fail with a `No system memory' error and it is unlikely that you would
want to continue without grey after trying to enable it.
Note that gXBORDER , gBUTTON and gDRAWOBJECT
all use grey and therefore can only be used when grey in enabled.
If grey is not enabled, they raise a `General failure' error.
*** Using grey
Once you have used "DEFAULTWIN 1" you can use the gGREY
command to set which plane should be used for all subsequent graphics
drawing (until the next use of gGREY).
"gGREY 0"
"gGREY 1"
"gGREY 2"
draws to the black plane only.
draws to the grey plane only.
draws to both planes.
"gGREY 1" and "gGREY 2" raise an error if the current
window does not have a grey plane.
As mentioned earlier, when you set a pixel using both black and grey,
the pixel appears black because the black plane is effectively in
front of the grey plane. So drawing to both planes is generally only
used for clearing pixels. For example, if your screen has both black
and grey pixels, gCLS will clear the pixels only in the plane
selected by gGREY. To clear the whole screen with gCLS,
you therefore need "gGREY 2".
To draw in grey when the pixels to which you are drawing are currently
black, you first need to clear the black.
A pixel will appear white only if it is clear in both planes.
*** Example
The following procedure initialises the screen to allow grey, draws
a horizontal line in grey, another below it in black only and a third
below it in both black and grey. Pressing a key clears the black plane
only, revealing the grey behind the black in the bottom line and clearing
the middle line altogether.
PROC exgrey:
DEFAULTWIN 1
REM enable grey
gAT 0,20 :gGREY 1 :gLINEBY 240,0 REM grey only
gAT 0,21 :gLINEBY 240,0
gAT 0,40 :gGREY 0 :gLINEBY 240,0 REM black only
gAT 0,41 :gLINEBY 240,0
gAT 0,60 :gGREY 2 :gLINEBY 240,0 REM both planes
gAT 0,61 :gLINEBY 240,0
GET
gGREY 0
REM black only
gCLS
REM clear it
GET
ENDP
****** Overwriting pixels
*** Drawing rectangles
The gBOX command draws a box outline. For example,
"gBOX 100,20" draws a box from the current position to a point
100 pixels to the right and 20 down. If the current position were
100,40, the four corners of this box would be at 100,40, 200,40, 200,60
and 100,60.
If you have used "DEFAULTWIN 1" and gGREY as described
earlier, the box is drawn to the black and/or grey plane as selected.
gBOX does not change the current position.
gFILL draws a filled box in the same way as
gBOX draws a box outline, but it has a third argument to say
which pixels to set. If set to 0, the pixels which make up the box
would be set. If set to 1, pixels are cleared; if set to 2, they are
inverted, that is, pixels already set on the screen become cleared,
and vice versa. The values 1 and 2 are used when overwriting
areas of the screen which already have pixels set.
If you have used "DEFAULTWIN 1" and gGREY as described
earlier, the filled box will be set, cleared or inverted in the black
and/or grey plane as selected. Once again, it helps to think of the
pixels being set or clear in each plane independently: so clearing
the pixel in the black plane reveals the grey plane behind it where
the pixel may be set or clear.
So with "gGREY 1" set for drawing to the grey plane only, inverting
the pixels in the filled box will change the grey plane only
black pixels are left alone but clear or grey pixels are inverted
to grey and clear pixels respectively. Similarly, inverting the black
plane changes clear pixels to black, but "clearing" black pixels displays
grey if the pixel is set in the grey plane.
The following procedure displays a "robot" face, using gFILL
to draw set and cleared boxes:
PROC face:
gFILL 60,60,0 REM set the entire face
gMOVE 5,10 :gFILL 15,10,1 REM left eye
gMOVE 35,0 :gFILL 15,10,1 REM right eye
gMOVE -15,15 :gFILL 10,15,1 REM nose
gMOVE -10,20 :gFILL 30,10,1 REM mouth
GET
ENDP
Before calling such a procedure, you would set the current position
to be where you wanted the top left corner of the head.
You could make the robot wink with the following procedure, which
inverts part of one eye:
PROC wink:
gMOVE 5,10 REM move to left eye
gFILL 15,7,2 REM invert most of the eye
PAUSE 10
gFILL 15,7,2 REM invert it back again
GET
ENDP
Again, you would set the current position before calling this.
The gPATT command can be used to draw a shaded
filled rectangle. To do this, use "-1" as its first argument,
then the same three arguments as for gFILL width, height,
and overwrite method. Overwrite methods 0, 1 and 2 apply only to the
pixels which are `on' in the shading pattern. Whatever was on the
screen may still show through, as those pixels which are `clear' in
the shading pattern are left as they were.
To completely overwrite what was on the screen with the shaded pattern,
gPATT has an extra overwrite method of 3. So, for example,
"gPATT -1,120,120,3" in the first procedure would have displayed
a shaded robot head, whatever may have been on the screen.
Again, the shaded pattern will be drawn in grey if you have selected
the grey plane only using "gGREY 1". And again, if you are writing
to the black plane only, any pixels set in the grey plane can be seen
if the corresponding pixels in the black plane are clear.
*** Overwriting with any drawing command
By using the gGMODE command, any drawing
command such as gLINEBY or gBOX can be made to clear
or invert pixels, instead of setting them. gGMODE determines
the effect of all subsequent drawing commands.
The values are the same as for gFILL: "gGMODE 1" for
clearing pixels, "gGMODE 2" for inverting pixels, and "gGMODE 0"
for setting pixels again. (0 is the initial setting.)
For example, some white lines can give the robot a furrowed brow:
PROC brow:
gGMODE 1 REM gLINEBY will now clear pixels
gMOVE 5,4 :gLINEBY 50,0
gMOVE 0,2 :gLINEBY -50,0
gGMODE 0
GET
ENDP
The setting for gGMODE applies to the planes selected by gGREY.
With "gGREY 1" for instance, "gGMODE 1" would cause gLINEBY
to clear pixels in the grey plane and "gGMODE 0" to set pixels
in the grey plane.
*** Other drawing keywords
*) gBUTTON: draw a 3-D button (a picture of a key, not
of an application button) enclosing supplied text. The button can
be raised, depressed or sunken.
*) gBORDER, gXBORDER: draw 2-D/3-D borders.
*) gINVERT: invert a rectangular area, except for its
four corner pixels.
*) gCOPY: copy a rectangular area from one position
on the screen to another. Both black and grey planes are copied.
*) gSCROLL: move a rectangular area from one position
on the screen to another, or scroll the contents of the screen in
any direction. Both black and grey planes are moved.
*) gPOLY: draw a sequence of lines.
*) gDRAWOBJECT: draw a graphics object.
Note that commands such as gSCROLL,, which move existing
pixels, affect both black and grey planes. gGREY only restricts
drawing and clearing of pixels.
****** Graphical text
*** Displaying text with gPRINT
The PRINT command displays text in one font, in a screen area
controlled by the FONT or SCREEN commands. You can,
however, display text in a variety of fonts and styles, at any pixel
position, with gPRINT. gPRINT also lets you draw text
to the grey plane, if you have used DEFAULTWIN and gGREY
(discussed earlier).
You can (to a lesser degree) control the font and style
used by OPL's other text-drawing keywords, such as PRINT and
EDIT. See `The text and graphics windows' section under `Advanced
graphics' at the end of this chapter.
gPRINT is a graphical version of PRINT, and displays
a list of expressions in a similar way. Some examples:
"gPRINT "Hello",name$"
"gPRINT a$"
"gPRINT "Sin(PI/3) is",sin(pi/3)"
Unlike PRINT, gPRINT does not end by moving to a new
line. A comma between expressions is still displayed as a space, but
a semi-colon has no effect. "gPRINT" used on its own does nothing.
The first character displayed has its left side
and baseline at the current position. The baseline is like
a line on lined notepaper graphically, this is the horizontal
line which includes the lowest pixels of upper case characters. Some
characters, such as `g', `j', `p', `q' and `y', set pixels below the
baseline.
After using gPRINT, the current position is at the end of the
text so that you can print something else immediately beyond it. As
with other graphics keywords, no error is reported if you try to display
text off the edge of the screen.
While "CURSOR ON" displays a flashing cursor for ordinary text
displayed with PRINT, "CURSOR 1" switches on a cursor
for graphical text which is displayed at the current position. "CURSOR OFF"
removes either cursor.
*** Fonts
The gFONT command sets the font to be used
by subsequent gPRINT commands.
A large set of fonts which can be used with gFONT is provided
in the Workabout ROM. In the following list, Swiss fonts refer
to fonts without serifs while Roman fonts either have serifs (eg font
6) or are in a style designed for serifs but are too small to show
them (eg font 5). Mono-spaced fonts have characters which all
have the same width (and have their `pixel size' listed as width "x" height);
in proportional fonts each character can have a different width.
font number
1
2
3
4
5
6
7
8
9
10
11
12
13
Description
Series 3 normal
Series 3 bold
Series 3 digits
Mono
Roman
Roman
Roman
Roman
Swiss
Swiss
Swiss
Swiss
Mono
pixel size
8
8
6x6
8x8
8
11
13
16
8
11
13
16
6x6
The special font number "$9a" is set aside to give a machine's
default graphics font; this is the font used initially for graphics
text. The actual font may vary from machine to machine eg
it is font 1 on the Series 3 and font 11 on the Series 3a and
Workabout. So "gFONT 11" or "gFONT $9a" both set the
Workabout standard font, which gPRINT normally uses.
Fonts 1,2 and 3 are the Series 3 fonts, used when running
in compatibility mode.
See gINFO in the `Alphabetic listing' chapter if you need to
find out more information about fonts.
The following program shows you examples of the fonts. ("!!!" is displayed
to emphasise the mono-spaced fonts):
PROC fonts:
showfont:(4,15,"Mono 8x8")
showfont:(5,25,"Roman 8")
showfont:(6,38,"Roman 11")
showfont:(7,53,"Roman 13")
showfont:(8,71,"Roman 16")
showfont:(9,81,"Swiss 8")
showfont:(10,94,"Swiss 11")
showfont:(11,109,"Swiss 13")
showfont:(12,127,"Swiss 16")
showfont:(13,135,"Mono 6x6")
GET
ENDP
PROC showfont:(font%,y%,str$)
gFONT font%
gAT 20,y% :gPRINT font%
gAT 50,y% :gPRINT str$
gAT 150,y% :gPRINT "!!!"
ENDP
*** Text style
The gSTYLE command sets the text style to
be used by subsequent gPRINT commands.
Choose from these styles:
"gSTYLE 1"
bold
"gSTYLE 2"
underlined
"gSTYLE 4"
inverse
"gSTYLE 8"
double height
"gSTYLE 16" mono
"gSTYLE 32" italic
The `mono' style is not proportionally spaced each character
is displayed with the same width, in the same way that PRINT
displays characters. A proportional font can be displayed as a mono-spaced
font by setting the `mono' style. See the previous section for the
list of mono-spaced and proportional fonts.
It is inefficient to use the `mono' style to display a font
which is already mono-spaced.
You can combine these styles by adding the relevant numbers together.
"gSTYLE 12" sets the text style to inverse and double-height
(4+8=12). Here's an example of this style:
PROC style:
gAT 20,50 :gFONT 11
gSTYLE 12 :gPRINT "Attention!"
GET
ENDP
Use "gSTYLE 0" to reset to normal style.
The bold style provides a way to make any font appear in bold. Except
for the smaller fonts, most Workabout fonts look reasonably
bold already. Note that using the bold style sometimes causes a change
of font; if you use gINFO you may see the font name change.
*** Overwriting with gPRINT
gPRINT normally displays text as if writing it with a pen
the pixels that make up each letter are set, and that is all. If you're
using areas of the screen which already have some pixels set, or even
have all the pixels set, use gTMODE to change
the way gPRINT displays the text.
gTMODE controls the display of text in the same way as gGMODE
controls the display of lines and boxes. The values you use with gTMODE
are similar to those for gGMODE: "gTMODE 1" for clearing
pixels, "gTMODE 2" for inverting pixels, and "gTMODE 0"
for setting pixels again. There is also "gTMODE 3" which sets
the pixels of each character while clearing the character's background.
This is very useful as it guarantees that the text is readable (as
far as the current plane is concerned).
As for gGMODE, the setting for gTMODE applies to the
planes selected by gGREY. With "gGREY 1" for instance,
"gTMODE 1" would cause gLINEBY to clear pixels in the
grey plane and "gTMODE 0" to set pixels in the grey plane.
This procedure shows the various effects possible via gTMODE:
PROC tmode:
DEFAULTWIN 1
REM enable grey
gFONT 11 :gSTYLE 0
gAT 160,0 :gFILL 160,80,0 REM Black box
gAT 220,0 :gFILL 40,80,1 REM White box
gAT 180,20 :gTMODE 0 :gPRINT "ABCDEFGHIJK"
gAT 180,35 :gTMODE 1 :gPRINT "ABCDEFGHIJK"
gAT 180,50 :gTMODE 2 :gPRINT "ABCDEFGHIJK"
gAT 180,65 :gTMODE 3 :gPRINT "ABCDEFGHIJK"
gGREY 1
gAT 160,80 :gFILL 160,80,0 REM Grey box
gAT 220,80 :gFILL 40,80,1 REM White box
gAT 180,100 :gTMODE 0 :gPRINT "ABCDEFGHIJK"
gAT 180,115 :gTMODE 1 :gPRINT "ABCDEFGHIJK"
gAT 180,130 :gTMODE 2 :gPRINT "ABCDEFGHIJK"
gAT 180,145 :gTMODE 3 :gPRINT "ABCDEFGHIJK"
GET
ENDP
*** Other graphical text keywords
*) gPRINTB: Display text left aligned, right aligned
or centred, in a cleared box. The gTMODE setting is ignored.
With "gGREY 1", only grey background pixels in the box are cleared
and with "gGREY 0", only black pixels; with "gGREY 2"
all background pixels in the box are cleared.
*) gXPRINT: Display text underlined/highlighted.
*) gPRINTCLIP: Display text clipped to whole characters.
*) gTWIDTH: Find width required by text.
All of these keywords take the current font and style into account,
and work on a single string. They display the text in black
or grey according to the current setting of gGREY.
-----------------------------------************ Windows
So far, you've used the whole of the screen for displaying
graphics. You can, however, use windows rectangular
areas of the screen.
Sprites (described in the `Advanced topics' chapter) can display
non-rectangular shapes.
OPL allows a program to use up to eight windows at any one time.
*** Window IDs and the default window
Each window has an ID number, allowing you to specify which
window you want to work with at any time.
When a program first runs, it has one window called the default window.
Its ID is 1, it
is the full size of the screen, and initially all graphics commands
operate on it. (This is why `0,0' has so far referred to the top left
of the screen: it is true for the default window.)
Other windows you create will have IDs from 2 to 8. When
you make another window it becomes the current window, and all subsequent graphics
commands operate on it.
The first half of this chapter used only the default window. However,
everything actually applies to the current window. For example, if
you make a small window current and try to draw a very long line,
the current position moves off past the window edge, and only that
part of the line which fits in the window is displayed.
*** Graphics keywords and windows
For OPL graphics keywords, positions apply to the window you are
using at any given time. The point 0,0 means the top left corner
of the current window, not the top left corner of the screen.
Each window can be created with a grey plane if required, in which
case gGREY is used
to specify whether the black plane, the grey plane or both should
be used for all subsequent graphics commands until the next call to
gGREY, exactly as described in the first half of this chapter.
For the default window, the special command DEFAULTWIN
is required to enable grey because that window is automatically created
for you with only a black plane; "DEFAULTWIN 1" closes the default
window and creates a new one which has a grey plane. All other windows
must be created with a grey plane if grey is required.
Once a window has been created with a grey plane, grey is used in
precisely the same way as in the default window with grey enabled:
"gGREY 0" directs all drawing to the black plane only, "gGREY 1"
to the grey plane only and "gGREY 2" to both planes. "gGREY 1"
and "gGREY 2" raise an error if the current window does not
have a grey plane.
gGREY, gGMODE, gTMODE, gFONT and gSTYLE can all be used with created windows in
exactly
the same way as with the default window, as desribed earlier. They
change the settings for the current window only; all the settings
are remembered for each window.
*** Creating new windows
The gCREATE function sets up a new window
on the screen. It returns an ID number for the window. Whenever
you want to change to this window, use gUSE
with this ID.
You can create a window with only a black plane or with both a black
and a grey plane. You cannot create a window with just a grey plane.
Here is an example using gCREATE and gUSE, contrasting
the point 20,20 in the created window with 20,20 in the default window.
PROC windows:
LOCAL id%
id%=gCREATE(30,40,180,30,1,1)
gBORDER 0 :gAT 20,20 :gLINEBY 0,0
gPRINT " 20,20 (new)"
GET
gUSE 1 :gAT 20,20 :gLINEBY 0,0
gPRINT " 20,20 (default)"
GET
gUSE id%
gGREY 1
REM draw grey
gPRINT " Back"
gGREY 0
gPRINT " (with grey)"
GET
ENDP
The line "id%=gCREATE(30,40,180,30,1,1)" creates a window with
its top left corner at 30,40 on the screen. The window is set to be
180 pixels wide and 30 pixels deep. (You can use any integer values
for these arguments, even if it creates the window partially or even
totally off the screen.) The fifth argument to gCREATE specifies
whether the window should immediately be visible or not; 0 means invisible,
1 (as here) means visible. The sixth argument specifies whether the
window should have a grey plane or not; 0 means black only, 1 (as
here) means black and grey. If the sixth argument is not supplied
at all (eg. "id%=gCREATE(30,40,180,30,1)") the window will not
have a grey plane.
gCREATE automatically makes the created window the current
window, and sets the current position in it to 0,0. It returns an
ID number for this window, which in this example is saved in
the variable "id%".
The "gBORDER 0" command draws a border one pixel wide around the current
window. Here this helps show the position and size of the window.
(gBORDER can draw a variety of borders. You can even display
the Workabout 3-D style borders seen in menus and dialogs,
with the gXBORDER keyword.)
The program then sets the pixel at 20,20 in this new window, using
"gLINEBY 0,0".
"gUSE 1" goes back to using the default window. The program
then shows 20,20 in this window.
Finally, "gUSE id%" goes back to the created window again, and
a final message is displayed, in grey and black.
Note that each window has its own current position. The current
position in the created window is remembered while the program goes
back to the default window. All the other settings, such as the
font, style and grey setting are also remembered.
*** Closing windows
When you've finished with a particular window, close it with gCLOSE
followed by its ID for example, "gCLOSE 2".
You can create and close as many windows as you like, as long as there
are only eight or fewer open at any one time.
If you close the current window, the default window (ID=1)
becomes current.
An error is raised if you try to close the default window.
*** When windows overlap
Windows can overlap on the screen, or even hide each other entirely.
Use the gORDER command to control the foreground/background
positions of overlapping windows.
"gORDER 3,1" sets the window whose ID is 3 to be in the
foreground. This guarantees that it will be wholly visible. "gORDER 3,2"
makes it second in the list; unless the foreground window overlaps
it, it too will be visible.
Any position greater than the number of windows you have is interpreted
as the end of the list. "gORDER 3,9" will therefore always force
the window whose ID is 3 to the background, behind all others.
Note in particular that making a window the current window with
gUSE does not bring it to the foreground. You can make
a background window current and draw all kinds of things to it, but
nothing will happen on the screen until you bring it to the foreground
with gORDER.
When a window is first created with gCREATE it always becomes
the foreground window as well as the current window.
*** Hiding windows
If you are going to use several drawing commands on a particular window,
you may like to make it invisible while doing so. When you then make
it visible again, having completed the drawing commands, the whole
pattern appears on the screen in one go, instead of being built up
piece by piece.
Use "gVISIBLE ON" and "gVISIBLE OFF"
to perform this function on the current window. You can also make
new windows invisible as you create them, by using 0 as the fifth
argument to the gCREATE command, and you can hide windows behind
other windows.
*** The graphics cursor in windows
To make the graphics cursor appear in a particular window, use the
CURSOR command with the ID of the
window. It will appear flashing at the current position in that window,
provided it is not obscured by some other window.
The window you specify does not have to be the current window, and
does not become current; you can have the cursor in one window while
displaying graphical text in another. If you want to move to a different
window and put the graphics cursor in it, you must use both gUSE
and CURSOR.
Since the default window always has an ID of 1, "CURSOR 1"
will, as mentioned earlier, put the graphics cursor in it.
CURSOR OFF turns off the cursor, wherever it is.
*** Information about your windows
You don't have to keep a complete copy of all the information pertaining
to each window you use. These functions return information about the
current window:
*) gIDENTITY returns its ID number.
*) gRANK returns its foreground/background position,
from 1 to 8.
*) gWIDTH and gHEIGHT return its size.
*) gORIGINX and gORIGINY return its screen position.
*) gINFO returns information about the font, style,
grey setting, overwrite modes and cursor in use.
*) gX and gY return the current position.
*** Other window keywords
*) gSETWIN changes the position, and optionally the
size, of the current window.
You can use this command on the default window, if you
wish, but you must also use the SCREEN command to ensure
that the text window the area for PRINT commands
to use is wholly contained within the default window. See
`The text and graphics windows' in the `Advanced graphics' section
later in this chapter.
*) gSCROLL scrolls all or part of both black and grey
planes of the current window.
*) gPATT fills an area in the current window with repetitions
of another window, or with a shaded pattern.
*) gCOPY copies an area from another window into the
current window, or from one position in the current window to another.
*) gSAVEBIT saves part or all of a window as a bitmap file.
If a window has a grey plane, the planes are saved as two bitmaps
to the same file with the black plane saved first and the grey plane
saved next. gLOADBIT, described later, can be used to load
bitmap files.
*) gPEEKLINE reads back a horizontal line of data from
either the black or grey plane of a specified window.
*** Copying grey
between windows
The commands gCOPY and gPATT can use two windows and
therefore special rules are needed for the cases when one window has
a grey plane and the other does not.
With "gGREY 0" in the destination window, only
the black plane of the source is copied.
With "gGREY 1" in the destination window, only the grey plane
of the source is copied, unless the source has only one plane in which
case that plane is used as the source.
With "gGREY 2" in the destination window, if the source has
both planes, they are copied to the appropriate planes in the destination
window (black to black, grey to grey); if the source has only one
plane, it is copied to both planes of the destination.
-----------------------------------************ Advanced graphics
This section should provide a taste of some of the more sophisticated
things you can do with OPL graphics.
*** Bitmaps
A bitmap is an area in memory which acts just like an off-screen
window, except that it does not have two planes so that gGREY
cannot be used. You can create bitmaps with gCREATEBIT. They have the following uses:
*) You can manipulate an image in a bitmap before copying it
with gPATT or gCOPY
to a window on the screen. This is generally faster than manipulating
an image in a hidden window.
*) You can load bitmap files into
bitmaps in memory using gLOADBIT, then copy them to on-screen
windows using gCOPY or gPATT. (If a black and grey window
was saved to file as two bitmaps using gSAVEBIT, you must load
them separately into two bitmaps in memory, and copy them one at a
time to the respective planes of a window.)
OPL treats a bitmap as the equivalent of a window in most cases:
*) Both are identified by ID numbers. Only one window
or bitmap is current at any one time, set by gUSE.
*) If you use bitmaps as well as windows, the total number
must be eight or fewer.
*) The top left corner of the current bitmap is still referred
to as 0,0, even though it is not on the screen at all.
Together, windows and bitmaps are known as drawables
places you can draw to.
Most graphics keywords can be used with bitmaps in the same way as
with windows, but remember that a bitmap corresponds to only one plane
in a window. Once you have drawn to it, you might copy it to the appropriate
plane of a window.
The keywords that can be used with bitmaps include: gUSE, gBORDER,
gCLOSE, gCLS, gCOPY, gGMODE, gFONT,
gIDENTITY, gPATT, gPEEKLINE, gSAVEBIT,
gSCROLL, gTMODE, gWIDTH, gHEIGHT and gINFO.
These keywords are described earlier in this chapter.
*** Speed improvements
The Workabout screen is usually updated whenever you display
anything on it. gUPDATE OFF switches off this feature. The
screen will be updated as few times as possible, although you can
force an update by using the gUPDATE command
on its own. (An update is also forced by GET, KEY and
by all graphics keywords which return a value, other than gX,
gY, gWIDTH and gHEIGHT).
This can result in a considerable speed improvement in some cases.
You might, for example, use "gUPDATE OFF", then a sequence of
graphics commands, followed by "gUPDATE". You should certainly
use "gUPDATE OFF" if you are about to write exclusively to bitmaps.
"gUPDATE ON" returns to normal screen updating.
As mentioned previously, a window with both black and grey planes
takes longer to move or scroll than a window with only a black plane.
So avoid creating windows with unnecessary grey planes.
Also, remember that scrolling and moving windows require every pixel
in a window to be redrawn.
The gPOLY command draws a sequence of lines,
as if by gLINEBY and gMOVE commands. If you have to
draw a lot of lines (or dots, with "gLINEBY 0,0"), gPOLY
can greatly reduce the time taken to do so.
*** Displaying a running clock
gCLOCK
displays or removes a running clock showing the system time. The clock
can be digital or conventional, and can use many different formats.
*** User-defined fonts and cursors
If you have a user-defined font you can load it into memory with gLOADFONT. This returns an ID
for the font; use this with gFONT
to make the font current. The gUNLOADFONT command removes a user-defined font from
memory when you
have finished using it.
You can use four extra arguments with the CURSOR command.
Three of these specify the ascent, width and height of the cursor.
The ascent is the number of pixels (-128 to 127) by which the
top of the cursor should be above the baseline of the current font.
The height and width arguments should both be between 0 and 255. For
example, "CURSOR 1,12,4,14" sets a cursor 4 pixels wide by 14
high in the default window (ID=1), with the cursor top at 12
pixels above the font baseline.
If you do not use these arguments, the cursor is 2 pixels wide, and
has the same height and ascent as the current font.
By default the cursor has square corners, is black and is flashing.
Supply the fifth argument as 1 for a rounded cursor, 2 for non-flashing
or 4 for grey. You can add these together eg use 5 for a grey,
rounded cursor.
Note that the gINFO command returns information about the cursor
and font.
*** The text and graphics
windows
PRINT displays
mono-spaced text in the text window. You can change the text
window font (ie that used by PRINT) using the FONT keyword.
You can use any of those listed earlier in the chapter in the description
of gFONT; initially font 4 is used.
The text window is in fact part of the default graphics window. If
you have other graphics windows in front of the default window, they
may therefore hide any text you display with PRINT.
Initially the text window is very slightly smaller than the default
graphics window which is full-screen size. They are not the same because
the text window height and width always fits a whole number of
characters of the current text window font. If you use the FONT
command to change the font of the text window, this first sets the
default graphics window to the maximum size that will fit in
the screen (excluding any status window) and then resizes the text
window to be as large as possible inside it.
You can also use the STYLE keyword to set the style for all
characters subsequently written to the text window. This allows the
mixing of different styles in the text window. You can only use those
styles which do not change the size of the characters ie inverse
video and underline. (Any other styles will be ignored.) Use the same
values as listed for gSTYLE, earlier in the chapter.
To find out exactly where the text window is positioned, use "SCREENINFO info%()".
This sets "info%(1)/info%(2)" to the number of pixels from the
left/top of the default window to the left/top of the text window.
(These are called the margins.) "info%(7)" and "info%(8)"
are the text window's character width and height respectively.
The margins are fully determined by the font being used and
therefore change from their initial value only when FONT is
used. You cannot choose your own margins. gSETWIN and SCREEN
do not change the margins, so you can use FONT to select a
font (also clearing the screen), followed by SCREENINFO to
find out the size of the margins with that font, and finally gSETWIN
and SCREEN to change the sizes and positions of the default
window and text window taking the margins into account (see the example
that follows). The margins will be the same after calling gSETWIN and
SCREEN as they were after FONT.
It is not generally recommended to use both the text and graphics
windows. Graphics commands provide much finer control over the screen
display than is possible in the text window, so it is not easy to
mix the two.
If you do need to use the text window, for example to use keywords
like EDIT, it's easy to use SCREEN to place it out of
the way of your graphics windows. You can, however, use it on top
of a graphics window for example, you might want to use EDIT
to simulate an edit box in the graphics window. Use gSETWIN
to change the default window to about the size and position
of the desired edit box. The text window moves with it you
must then make it the same size, or slightly smaller, with the SCREEN
command. Use 1,1 as the last two arguments to SCREEN, to keep
its top left corner fixed. "gORDER 1,1" will then bring the
default window to the front, and with it the text window. EDIT
can then be used.
Here is an example program which uses this technique moving
an `edit box', hiding it while you edit, then finally letting you
move it around.
PROC gsetw1:
LOCAL a$(100),w%,h%,g$(1),factor%,info%(10)
LOCAL margx%,margy%,chrw%,chrh%,defw%,defh%
SCREENINFO info%()
REM get text window information
margx%=info%(1) :margy%=info%(2)
chrw%=info%(7) :chrh%=info%(8)
defw%=23*chrw%+2*margx% REM new default window width
defh%=chrh%+2*margy% REM ... and height
w%=gWIDTH :h%=gHEIGHT
gSETWIN w%/4+margx%,h%/4+margy%,defw%,defh%
SCREEN 23,1,1,1 REM text window
PRINT "Text win:"; :GET
gCREATE(w%*.1,h%*.1,w%*.8,h%*.8,1) REM new window
gPATT -1,gWIDTH,gHEIGHT,0 REM shade it
gAT 2,h%*.7 :gTMODE 4
gPRINT "Graphics window 2"
gORDER 1,0 REM back to default+text window
EDIT a$
REM you can see this edit
gORDER 1,9 REM to background
CLS
a$=""
PRINT "Hidden:";
GIPRINT "Edit in hidden edit box"
EDIT a$
REM YOU CAN'T SEE THIS EDIT
GIPRINT ""
gORDER 1,0 :GET REM now here it is
gUSE 1 REM graphics go to default window
DO REM move default/text window around
CLS
PRINT "U,D,L,R,Quit";
g$=UPPER$(GET$)
IF kmod=2 REM Shift key moves quickly
factor%=10
ELSE
factor%=1
ENDIF
IF g$="U"
gSETWIN gORIGINX,gORIGINY-factor%
ELSEIF g$="D"
gSETWIN gORIGINX,gORIGINY+factor%
ELSEIF g$="L"
gSETWIN gORIGINX-factor%,gORIGINY
ELSEIF g$="R"
gSETWIN gORIGINX+factor%,gORIGINY
ENDIF
UNTIL g$="Q" OR g$=CHR$(27)
ENDP
Friendlier interaction
Everyday OPL programs can use the same graphical interface
seen throughout the Workabout's in-built applications described
earlier in this manual:
Menus offer lists of options for you to choose
from. You can also select these options with hot-keys like
Psion-A, Psion-B etc.
Dialogs let a program ask for all kinds of information
numbers, filenames, dates and times etc in one go.
The status window, and screen messages such
as `Busy' are also available.
Menu keywords begin with an "M", and dialog keywords
with a "D". In this manual a lower case is used for these letters
for example, "mINIT" and "dEDIT" but you can type
them using upper or lower case letters.
-----------------------------------************ Menus
Menus provide a simple way for any reasonably complex OPL program
to let you choose from its various options.
To display menus in OPL takes three steps:
*) Use the mINIT command. This prepares
OPL for new menus.
*) Use the mCARD command to define
each menu.
*) Use the MENU function to display
the menus.
You use the displayed menus like any others on the Workabout.
Use the arrow keys to move around the menus. Press Enter (or an option's
hot-key) to select an option, or press Esc to cancel the menus without
making a choice. In either case, the menus are removed, the screen
redrawn as it was, and MENU returns a value to indicate the
selection made.
*** Defining the menus
The first argument to mCARD is the name of
the menu. This will appear at the top of the menu; the names of all
of the menus form a bar across the top of the screen.
From one to six options on the menu may be defined, each specified
by two arguments. The first is the option name, and the second the
keycode for a hot-key. This specifies a key which, when
pressed together with the Psion key, should select the option. (Your
program must still handle hot-keys which are pressed without using
the menu.) It is easiest to specify the hot-key with "%"
eg "%a" gives the value for "a".
If an upper case character is used for the hot-key
keycode, the Shift key must be pressed as well to select the option.
If you supply a keycode for a lower case character, the option is
selected only without the Shift key pressed. Both upper and
lower case keycodes for the same character can be used in the same
menu (or set of menus). This feature may be used to increase the total
number of hot-keys available, and is also commonly used for related
menu options eg. "%z" might be used for zooming to a
larger font and "%Z" for zooming to a smaller font (as in the
built-in applications).
For example,
"mCARD "Comms","Setup",%s,"Transfer",%t"
defines a menu with the title "Comms". When you move to this menu
using " LEFT RIGHT ", you'll see it has the two options "Setup"
and "Transfer", with hot-keys Psion-S and Psion-T respectively
(and no Shift key required). On the other hand, "mCARD "Comms","Setup",%S,"Transfer",%T"
would give these options the hot-keys Shift-Psion-S and Shift-Psion-T.
The options on a large menu may be divided into logical groups (as
seen in many of the menus for the built-in applications) by displaying
a grey line under the final option
in a group. To do this, you must pass the negative value corresponding
to the hot-key keycode for the final option in the group. For example,
"-%A" specifies hot-key Shift-Psion-A and displays a grey line
under the associated option in the menu.
Each subsequent mCARD defines the next menu to the right. A
large OPL application might use mCARD like this:
mCARD "File","New",%n,"Open",%o,"Save",%s
mCARD "Edit","Copy",%c,"Insert",-%i,"Eval",%e
mCARD "Search","First",%f,"Next",%g,"Previous",%p
*** Displaying the menus
The MENU function displays the menus defined
by mINIT and mCARD, and waits for you to select an option.
It returns the hot-key keycode of the option selected, in the case
supplied by you, whether you used Enter or the hot-key itself to select
it. If you supplied a negative hot-key keycode for an underlined option,
it is converted to its positive equivalent.
If you cancel the menus by pressing Esc, MENU returns 0.
When a set of menus is displayed, the cursor is positioned to the
menu and option that the user selected previously (or, if no menus
have previously been displayed, to the first option in the first menu).
This works only if your program has only one set of menus. If you
have another set of menus, the cursor is still set to the position
of the menu and option selected in the first set of menus (if that
position exists in the new menus). To get around this, use "m%=menu(init%)"
and set "init%" to zero the first time a set of menus is displayed.
The cursor will in this case be positioned to the first option in
the first menu. "init%" is set to a value which specifies the
menu and option selected, and should be passed to MENU the
next time that same set of menus is called If your program
has more than one set of menus, you should have a different "init%"
variable for each set of menus.
*** Problems with menus
When choosing hot-keys, do not use those such as the number
keys which produce different characters when used with the Psion key.
Unless you have a good reason not to, stick with "a" to "z"
and "A" to "Z".
You must ensure that you do not use the same hot-key twice when defining
the menus, as OPL does not check for this.
Each menu definition uses some memory, so `No system memory' errors are possible.
Don't forget to use mINIT before you begin defining the menus.
If the menu titles defined by mCARD are too wide in total to
fit on the screen, MENU will raise an error.
*** A menu example
This procedure allows you to press the Menu key and see a menu. You
might instead be typing a number or some text into the program, or
moving around in some way with the arrow keys, and this procedure
returns any such keypresses. You could use this procedure instead
of a simple GET whenever you want to allow a menu to be shown,
and its hot-keys to work.
Each option in the menus has a corresponding procedure named "proc"
plus the hot-key letter so for example, the option with hot-key
Psion-N is handled by the procedure "procn".
This procedure uses the technique of calling procedures by strings,
as described in the `Advanced topics' chapter.
PROC kget%:
LOCAL k%,h$(9),a$(5)
h$="nosciefgd" REM our hot-keys
WHILE 1
k%=GET
IF k%=$122 REM Menu key?
mINIT
mCARD "File","New",%n,"Open",%o,"Save",%s
mCARD "Edit","Copy",%c,"Insert",-%i,"Eval",%e
mCARD "Search","First",%f,"Next",%g,"Previous",%d
k%=MENU
IF k% AND (LOC(h$,CHR$(k%))<>0) REM MENU CHECK
a$="proc"+CHR$(k%)
"@"(a$): REM procn:, proco:, ...
ENDIF
REM END OF MENU CHECK
ELSEIF k% AND $200 REM hot-key pressed directly?
k%=k%-$200
REM remove Psion key code
IF LOC(h$,CHR$(k%))
REM DIRECT HOT-KEY CHECK
a$="proc"+CHR$(k%)
"@"(a$): REM procn:, proco:, ...
ENDIF
REM END OF DIRECT HOT-KEY CHECK
ELSE REM some other key
RETURN k%
ENDIF
ENDWH
ENDP
PROC procn:
...
ENDP
PROC proco:
...
ENDP
...
Note: this procedure allows you to press a hot-key with or without
the Shift key. So Shift-Psion-N would be treated the same as Psion-N.
Neither LOC nor the "@" operator (for calling procedures
by strings) differentiate between upper and lower case. If you have
Shifted hot-keys you will need to compare against
two sets of hot-key lists. For example, with hot-keys "%A", "%C",
"%a" and "%d", you would have upper/lowercase hot-key lists
like "hu$="AC"" and "hl$="ad"", and the "MENU CHECK" section
becomes:
IF k%<=%Z REM if upper case hot-key
IF LOC(hu$,CHR$(k%))
a$="procu"+CHR$(k%)
"@"(a$): REM procua:, procuc:, ...
ENDIF
ELSE
REM else lower case hot-key
IF LOC(hl$,CHR$(k%))
a$="procl"+CHR$(k%)
"@"(a$): REM procla:, procld:, ...
ENDIF
ENDIF
(This calls procedures "procua:", "procuc:", "procla:"
and "procld:"). If a hot-key was pressed directly you cannot tell
from "k%" whether Shift was used; so make the same change to the
"DIRECT HOT-KEY CHECK" section, but use "IF KMOD AND 2"
instead of "IF k%<=%Z".
-----------------------------------************ Dialogs
In OPL, dialogs are constructed in a similar way to menus:
*) Use the dINIT or dINITS command to prepare OPL for a new dialog. (dINIT creates
a dialog using the standard font, while dINITS creates one
using a small font.) If you give a string argument to dINIT
or dINITS it will be displayed as a title for the dialog, separated
from the rest of the dialog by a horizontal line.
*) Define each line of the dialog, from top to bottom. There
are separate commands for each type of item you can use in a dialog
for example, dEDIT for editing a string, dDATE for typing
in a date, and so on. If you used dINIT you can define a maximum
of five dialog lines; using dINITS you can define up to eight
dialog lines.
Note that if you use dINITS and define eight dialog
lines, the top and bottom border of the dialog is severely clipped.
To preserve the integrity of the dialog border, you must limit yourself
to seven dialog lines.
*) Use the DIALOG function to display
the dialog. In general it returns a number indicating the line you
were on when you pressed Enter (counting any title line as line 1),
or 0 if you pressed Esc.
Use " UP DOWN " to move from line to line, and enter the relevant
information, as in any other Workabout dialog. You can even
press Tab to produce vertical lists of options.
Each of the commands like dEDIT and dDATE specifies
a variable to take the information you type in. If you press Enter
to complete the dialog, the information is saved in those variables.
The dialog is then removed, and the screen redrawn as it was.
You can press Esc to abandon the dialog without making any changes
to the variables.
If you enter information which is not valid for the particular line
of the dialog, you will be asked to re-enter different information.
Here is a simple example. It assumes a global variable "name$"
exists:
PROC getname:
dINIT "Who are you?"
dEDIT name$,"Name:"
DIALOG
ENDP
This procedure displays a dialog with "Who are you?" as its top-line
title, and an edit box for typing in your name. If you end by pressing
Enter, the name you have typed will be saved in "name$"; if you
press Esc, "name$" is not changed.
When the dialog is first displayed, the existing contents of "name$"
are used as the string to edit.
Note that the dialog is automatically created with a width suitable
for the item(s) you defined, and is centred in the screen.
****** Lines you can use in dialogs
This section describes the various commands that can define a line
of a dialog. In all cases:
*) "prompt$" is the string which will appear on the left
side of the line.
*) "var" denotes an argument which must be a LOCAL
or GLOBAL variable, because it takes the value you enter.
Single elements of arrays may also be used, but not field variables
or procedure parameters. (`"var"' is just to show you where you
must use a suitable variable you don't actually type `"var"'.)
Where appropriate, this variable provides the initial value
shown in the dialog.
Although examples are given using each group of commands, you can
mix commands of any type to make up your dialog.
More details of the commands may be found in the `Alphabetic listing'
chapter.
*** Strings, secret strings and filenames
"dEDIT var str$,prompt$,len%""
"defines a string edit box.
"len%" is an optional argument. If supplied, it gives the width
of the edit box (allowing for the widest possible character in the
font). The string will scroll inside the edit box, if necessary. If
"len%" is not supplied, the edit box is made wide enough for the
maximum width "str$" could be. (You may wish to set a suitably
small "len%" to stop some dialogs being drawn all the way across
the screen)
"dXINPUT var str$,prompt$""
"defines a secret string edit box, such as for a password. A special
symbol will be displayed for each character you type, to preserve
the secrecy of the string.
"dFILE var str$,prompt$,f%""
"defines a filename edit box.
Here is an example dialog using these three commands:
PROC info:
dINIT "Your personal info"
dEDIT n$,"Name:",15
dXINPUT pw$,"Password:"
dFILE f$,"Log file:",0
RETURN DIALOG
ENDP
This returns `True' if Enter was used, indicating that the GLOBAL
variables "n$", "pw$" and "f$" have been updated.
dFILE automatically has a `Disk' selector on the line below
it. The third argument to dFILE controls the type of file editor
you see, and the kind of input allowed. See the `Alphabetic listing'
chapter for more details of dFILE.
*** Choosing one of a list
"dCHOICE var choice%,prompt$,list$""
"defines a choice list. "list$" should contain the possible
choices, separated by commas for example, ""Yes,No"".
The "choice%" variable specifies which choice should initially
be shown 1 for the first choice, 2 for the second, and so
on.
For example, here is a simple "choice" dialog:
PROC dcheck:
LOCAL c%
c%=2
REM default to "Internal"
dINIT "Disk Check"
dCHOICE c%,"Disk:","A,Internal,B"
IF DIALOG REM returns 0 if cancelled
... REM disk-check code
ENDIF
ENDP
*** Numbers, dates and times
"dLONG var long&,prompt$,min&,max&""
" and
"dFLOAT var fp,prompt$,min,max"
define edit boxes for long integers and floating-point numbers respectively.
Use dFLOAT to allow fractions, and dLONG to disallow
them. "min(&)" and "max(&)" give the minimum and maximum values
which are to be allowed. There is no separate command for ordinary
integers use dLONG with suitable "min&" and "max&"
values.
"dDATE var long&,prompt$,min&,max&""
" and
"dTIME var long&,prompt$,type%,min&,max&"
define edit boxes for dates and times. "min&" and "max&" give
the minimum and maximum values which are to be allowed.
For dDATE, "long&", "min&" and "max&" are specified
in "days since 1/1/1900". The DAYS function is useful for converting
to "days since 1/1/1900".
For dTIME, "long&", "min&" and "max&" are in "seconds
since 00:00". The DATETOSECS and SECSTODATE functions
are useful for converting to and from "seconds since midnight" (they
actually use "seconds since 00:00 on 1/1/1970").
dTIME also has a "type%" argument. This specifies the type
of display required:
"type%"
0
1
2
3
time display
absolute time without seconds
absolute time with seconds
duration without seconds
duration with seconds
For example, "03:45" is an absolute time while 3 hours 45 minutes
is a duration.
This procedure creates a dialog, using these commands:
PROC delivery:
LOCAL d&,t&,num&,wt
d&=DAYS(DAY,MONTH,YEAR)
DO
t&=secs&:
UNTIL t&=secs&:
num&=1 :wt=10
dINIT "Delivery"
dLONG num&,"Boxes",1,1000
dFLOAT wt,"Weight (kg)",0,10000
dDATE d&,"Date",d&,DAYS(31,12,1999)
dTIME t&,"Time",0,0,DATETOSECS(1970,1,1,23,59,59)
IF DIALOG REM returns 0 if cancelled
... REM rest of code
ENDIF
ENDP
PROC secs&:
RETURN HOUR*INT(3600)+MINUTE*60
ENDP
The "secs&:"
procedure uses the HOUR and MINUTE functions, which
return the time as kept by the Workabout. It is called twice
to guard against an incorrect result, in the (albeit rare) case where
the time ticks past the hour between calling HOUR and calling
MINUTE.
The INT function is used in "secs&:" to force OPL to use
long integer arithmetic, avoiding the danger of an `Integer overflow'
error.
"d&" and "t&" are set up to give the current date and time
when the dialog is first displayed. The value in "d&" is also
used as the minimum value for dDATE, so that in this example
you cannot set a date before the current date.
DATETOSECS is used to give the number of seconds representing
the time 23:59. The first three arguments, "1970", "1" and
"1", represent the first day from which DATETOSECS begins
calculating.
*** Results from dDATE
dDATE returns a value as a number of days. To convert this
to a date:
*) If you are dealing only with days on or after 1/1/1970,
you can subtract 25567 ("DAYS(1,1,1970)"), multiply by 86400 (the
number of seconds in a day), and use SECSTODATE.
*) To handle days before 1/1/1970 as well, you can call the
Operating System to perform the conversion. This procedure is passed
one parameter, the number of days, and from it sets four global variables
"day%", "month%", "year%" and "yrdy%". It calls the
Operating System with the OS function:
PROC daytodat:(days&)
LOCAL dyscent&(2),dateent%(4)
LOCAL flags%,ax%,bx%,cx%,dx%,si%,di%
dyscent&(1)=days&
si%=ADDR(dyscent&()) :di%=ADDR(dateent%())
ax%=$0600 REM TimDaySecondsToDate fn.
flags%=OS($89,ADDR(ax%)) REM TimManager int.
IF flags% AND 1
RAISE (ax% OR $ff00)
ELSE
year%=PEEKB(di%)+1900 :month%=PEEKB(UADD(di%,1))+1
day%=PEEKB(UADD(di%,2))+1 :yrdy%=PEEKW(UADD(di%,6))+1
ENDIF
ENDP
If you do use this procedure, be careful to type it exactly as shown
here.
*** Displaying text
"dTEXT prompt$,body$,type%""
"defines "prompt$" to be displayed on the left side of the line,
and "body$" on the right. There is no variable associated with
dTEXT. If you use a null string ("""") for "prompt$",
"body$" is displayed across the whole width of the dialog.
"type%" is an optional argument. If specified, it controls the
alignment of "body$":
"type%"
0
1
2
effect
left align "body$"
right align "body$"
centre "body$"
In addition, you can add any or all of the following three values
to "type%", for these effects:
"type%"
$100
$200
$400
effect
use bold text for "body$".
draw a line below this item.
make this line selectable. (It will also be
bulleted if "prompt$" is not """".)
dTEXT is not just for displaying information. Since DIALOG
returns a number indicating the line you were on when you pressed
Enter (or 0 if you pressed Esc), you can use dTEXT to offer
a choice of options, rather like a menu:
PROC selact:
dINIT "Select action"
dTEXT "","Add",$402
dTEXT "","Copy",$402
dTEXT "","Review",$402
dTEXT "","Delete",$402
RETURN DIALOG
ENDP
In each case "type%" is $402 ($400+2). The "$400" makes each
text string selectable, allowing you to move the cursor onto it, while
"2" makes each string centred.
*** Displaying exit keys
Most dialogs are completed by pressing Enter to confirm the information
typed, or Esc to cancel the dialog. These keys are not usually displayed
as part of the dialog.
However, some Workabout dialogs offer you a simple choice,
by showing pictures of the keys you can press. A simple "Are you sure?"
dialog might, for example, show the two keys `Y' and `N', and indicate
the one you press.
If you want to display a message and offer Enter, Esc and/or Space
as the exit keys, you can display the entire dialog with the ALERT function.
If you want to use other keys, such as "Y" and "N", or display
the keys below other dialog items such as dEDIT, create the
dialog as normal and use the dBUTTONS command
to define the keys.
ALERT and dBUTTONS are explained in detail in the `Alphabetic
listing' chapter.
****** Other dialog information
*** Positioning dialogs
If a dialog overwrites important information on the screen, you can
position it with the dPOSITION command.
Use dPOSITION at any time between dINIT or dINITS
and DIALOG.
dPOSITION uses two integer values. The first specifies the
horizontal position, and the second, the vertical. "dPOSITION -1,-1"
positions to the top left of the screen; "dPOSITION 1,1" to
the bottom right; "dPOSITION 0,0" to the centre, the usual position
for dialogs.
"dPOSITION 1,0", for example, positions to the right-hand edge
of the screen, and centres the dialog half way up the screen.
*** Restrictions on dialogs
The following general restrictions apply to all dialogs:
*) Only one dialog may be in use at a time.
*) A dialog must be initialised (dINIT or dINITS),
defined (dEDIT etc) and displayed (DIALOG) in the same
procedure.
*) A dialog may consist of up to seven lines, including any
title if you used dINIT or nine if you used dINITS.
Filename editors count as two lines, and exit keys count as three.
A `Too many items' error is raised
if this limit is exceeded.
*) If the width of any line would make the dialog too wide,
a `Too wide' error is raised when DIALOG
is called.
-----------------------------------************ Giving information
*** Status window temporary and permanent
Pressing Psion-Menu when an OPL program is running will
always display a temporary status window. This status window is in
front of all the OPL windows, so your program can't write over it.
Use "STATUSWIN ON" or "STATUSWIN ON,type%" to display a permanent status window.
It will be displayed until you use "STATUSWIN OFF". "type%"
specifies the status window type. The small status window is displayed
for "type%=1" and the large status window either when "type%"
is not supplied or when "type%=2".
You might use "STATUSWIN ON" when Control-Menu is pressed, for
consistency with the rest of the Workabout.
The status window is displayed on the right-hand side of the screen.
*** The rank of the status window
Important: The permanent status window is behind all other
OPL windows. In order to see it, you must use either FONT or both SCREEN and gSETWIN, to
reduce the size
of the text window and the default graphics window. You should ensure
that your program does not create windows over the top of it.
FONT automatically resizes these windows to the maximum size
excluding any status window. It should be called after creating the
status window because the new size of the text and graphics windows
depends on the size of the status window. Note that "FONT -$3fff,0"
leaves the current font and style R it just changes the window
sizes and clears them.
If you use SCREEN and gSETWIN instead of FONT,
you should use the STATWININFO keyword (described next) to
find out the size of the status window.
*** Finding the position and size of a status window
"curtype%=STATWININFO(type%,extent%())"
sets the four element array "extent%()" as follows:
"extent%(1)" = pixels from left of screen to status window
"extent%(2)" = pixels from top of screen to status window
"`Aextent%(3)"' chapter = status window width in pixels
"extent%(4)" = status window height in pixels for status window
"type%".
"type%=3" specifies the compatibility mode status window and "type%=-1"
specifies whichever type of status window is currently shown. Otherwise,
use the same values of "type%" as for STATUSWIN.
STATWININFO returns the type of the current status window.
The values are as for "type%", or zero if there is no current
status window.
If "type%=-1" for the current status window and there
is none, STATWININFO returns consistent information in "extent%()"
corresponding to a status window of width zero and full screen height
positioned one pixel to the right of the physical screen.
So to set a graphics window to have height "h%" and to use the
full screen width up to the current status window (if any), but leaving
a one pixel gap between the graphics window and the status window,
you could use:
"STATWININFO(-1,extent%()) :gSETWIN 0,0,extent%(1),h%"
Alternatively you could simply use "FONT -$3fff,0" as
described under STATUSWIN above, which also sets the height
to full screen height and sets the text window size to fit inside
it.
*** What the status window does
The status window always displays the OPL program name and a clock. In addition, the settings
selected in the `Status
window' menu option of the System screen are automatically used in
OPL status windows. The status window will therefore also display
all the indicators required, and a digital or analog clock as selected
there.
The status window is inaccessible to, and does not affect, the OPL
keywords gORDER and gRANK.
You can set or change the name displayed in the status window with
SETNAME for example, "SETNAME "ABCD""
or "SETNAME a$".
*** Information messages
GIPRINT displays an information message for 2 seconds, in the
bottom right corner of the screen. For example,
"GIPRINT "Not Found"" displays "Not Found". The string
you specify can be up to 63 characters. If a string is too long for
the screen, it will be clipped.
You can add an integer argument to control the corner in which the
message appears:
value
0
1
2
3
corner
top left
bottom left
top right
bottom right
For example, "GIPRINT "Who?",0" prints "Who?" in the top
left corner.
Only one message can be shown at a time. You can make the message
go away for example, if a key has been pressed with
"GIPRINT """.
*** `Busy' messages
Messages which say a program is temporarily busy, or cannot respond
for some reason, are by convention shown in the bottom left corner.
The BUSY command lets you display your own messages of this
sort. Use "BUSY OFF" to remove it.
"BUSY "Paused..."", for example, displays ""Paused...""
in the bottom left corner. This remains shown until "BUSY OFF"
is used.
You can control the corner used in the same way as for GIPRINT.
You can also add a third argument, to specify a delay time (in half
seconds) before the message should be shown. Use this to prevent `busy'
messages from continually appearing very briefly on the screen.
For example, "BUSY "Wait:",1,4" will display "Wait:" in
the bottom left corner after a delay of 2 seconds. As soon as your
program becomes responsive to the keyboard, it should use "BUSY OFF".
If this occurs within two seconds of the original BUSY, no
message is seen.
Only one message can be shown at a time. The string to display can
be up to 19 characters long.
OPL and Solid State Disks
*** Types of Solid State Disk
Solid State Disks (SSDs) are explained in detail in the `Advanced
use' chapter earlier in this manual. There are two main reasons for
using them:
*) To provide more room for storing information.
*) To make backup copies of important information, in case
you accidentally change or delete it (or even lose your Workabout).
There are two types Ram SSDs and Flash SSDs.
They fit into the SSD drives in the SSD/Battery drawer that
slides out of the centre of the Workabout. (For more information,
see the `Introduction' chapter earlier in this manual.)
*) Flash SSDs are for storing or backing up information which
is infrequently changed. This includes finished OPL programs.
*) Ram SSDs are for storing or backing up information which
changes frequently. This includes OPL programs that you are still
writing or testing.
You can, though, save programs and data files to either kind of SSD,
as you see fit.
*** How to put programs on an SSD
To create a new OPL module on an SSD, use the `New file' option in
the System screen as before, but set the "Disk" line of the
dialog to "A" or "B" as required. Alternatively, type "EDIT
filespec.OPL" in the Command processor, where filespec
gives the full file specification (drive, directory and filename)
of the module you want to create. For example, you might type "EDIT
A:\OPL\MYPROG.OPL" to create a module called "MYPROG.OPL"
in the "\OPL" directory on an SSD in drive "A".
To copy an OPL module onto an SSD from the System screen: move
onto the module name where it is listed under the Program icon, and
use the `Copy file' option on the `File' menu. Set the `To file: Disk'
line to "A" or "B". If you want this copy to have a different
name to the original, type the name to use on the `To file: Name'
line. The new copy will appear in the list under the Program icon,
but with "[A]" or "[B]" after its name.
To copy an OPL module to an SSD from the Command processor:
type "COPY sourcefile destination" . For example to copy the
file OPLPROG.OPL from the \OPL directory on the internal disk to the
\OPL directory on an SSD in the A: drive you would type "COPY
M:\OPL\OPLPROG.OPL A:\OPL\OPLPROG.OPL" .
To copy the translated version of an OPL module from the System
screen, move onto the name in the list under the RunOpl icon (to the
right of the Program icon), then proceed as before. If you wish to
copy them from the Command processor, you will find your translated
OPL modules in the \OPO directory on the internal disk.
*** SSDs from inside OPL
Your OPL programs can create or use data files on SSDs. To do so,
begin the name of the data file with "A:" or "B:"
for example:
CREATE "B:JKQ",A,X1$,X2$
tries to create a data file "JKQ" on an SSD in "B", while
DELETE "A:X300"
tries to delete a data file "X300" on an SSD in "A".
Don't confuse the drive names "A" and "B" with the logical
names "A", "B", "C" and "D". Logical names are unaffected
by which drive a data file is on.
The internal memory can be referred to as "M:", if required. For
example:
PROC delx300:
LOCAL a$(3),c%
a$="MAB" :c%=1 REM default to "Internal"
dINIT "Delete X300 data file"
dCHOICE c%,"Disk:","Internal,A,B"
IF DIALOG REM returns 0 if cancelled
DELETE MID$(A$,c%,1)+":X300"
ENDIF
ENDP
In this example, "MID$(A$,c%,1)" gives ""M"", ""A"" or
""B"", according to the choice made in the dialog. This is added
on the front of "":X300"" to give the name of the file to delete
""M:X300"", ""A:X300"" or ""B:X300"".
When using data files with SSDs, follow the same guidelines as with
OPL programs Flash SSDs are for one-off or "finished" information,
while Ram SSDs are for information which is still being changed.
*** Directories and DOS structure
The internal memory and SSDs use a DOS-compatible directory structure,
the same as that used by disks on business PCs. For more details,
see the `Advanced topics' chapter.
Example programs
This chapter contains example programs written in OPL. The programs
are not intended to demonstrate all the features of OPL, but they
should give you a few hints. To find out more about a particular command
or function, refer to the `Alphabetic listing' chapter later in this
manual.
There are some other example programs in the `Advanced topics' chapter.
*** When you're typing in
*) You can type procedures in all uppercase, all lowercase
or any mixture of the two. Be careful with character codes, though
"%A" is different to "%a" .
*) When there is more than one command or function on a line,
separate each one with a space and colon for example:
CLS :PRINT "hello" :GET
However, the colon is optional before a REM statement
for example:
CLS REM Clears the screen
and
CLS :REM Clears the screen
are both OK.
*) Put a space between a command and the arguments which follow
it for example "PRINT a$". But don't put a space between
a function and the arguments in brackets for example "CHR$(16)".
*) It doesn't matter how many spaces or tabs you have at the
beginning of a line.
*** Errors
The following programs do not include full error handling code. This
means that they are shorter and easier to understand, but may fail
if, for example, you enter the wrong type of input to a variable.
If you want to develop other programs from these example programs,
it is recommended that you add some error handling code to them. See
the chapter on error handling for further details.
Countdown Timer
PROC timer:
LOCAL min&,sec&,secs&,i%
CACHE 2000,2000
sec&=1
dINIT "Countdown timer"
dLONG min&,"Minutes",0,59
dLONG sec&,"Seconds",0,59
dBUTTONS "Cancel",-27,"Start",13
IF DIALOG=13
STATUSWIN ON
FONT 11,16
secs&=sec&+60*min&
WHILE secs&
PAUSE -20
REM a key gets us out
IF KEY
RETURN
ENDIF
secs&=secs&-1
AT 20,6 :PRINT NUM$(secs&/60,-2);"m"
AT 24,6 :PRINT NUM$(mod&:(secs&,int(60)),-2);"s"
ENDWH
DO
BEEP 5,300
PAUSE 10
IF KEY :BREAK :ENDIF
i%=i%+1
UNTIL i%=10
ENDIF
ENDP
PROC mod&:(a&,b&)
REM modulo function
REM computes (a&)mod(b&)
RETURN a&-(a&/b&)*b&
ENDP
Dice
When the program is run, a message is displayed saying that the dice
is rolling. You then press a key to stop it. A random number from
one to six is displayed and you choose whether to roll again or not.
PROC dice:
LOCAL dice%
DO
CLS :PRINT "DICE ROLLING:"
AT 1,3 :PRINT "Press a key to stop"
DO
dice%=(RND*6+1)
AT 1,2 :PRINT dice%
UNTIL KEY
BEEP 5,300
dINIT "Roll again?"
dBUTTONS "No",%N,"Yes",%Y
UNTIL DIALOG<>%y
ENDP
Random numbers: in this example, the RND
function returns a random floating-point number, between 0 and 0.9999999...
It is then multiplied by 6, and 1 is added, to give a number from
1 to 6.9999999... This is rounded down to a whole number (from 1 to
6) by assigning to the integer "dice%".
Birthdays
This procedure finds out on which day of the week people were born.
PROC Birthday:
LOCAL day&,month&,year&,DayInWk%
DO
dINIT
dTEXT "","Enter your date of birth",2
dTEXT "","Use numbers, eg 23 12 1963",$202
dLONG day&,"Day",1,31
dLONG month&,"Month",1,12
dLONG year&,"Year",1900,2155
IF DIALOG=0
BREAK
ENDIF
DayInWk%=DOW(day&,month&,year&)
CLS :PRINT DAYNAME$(DayInWk%),day&,month&,year&
dINIT "Again?"
dBUTTONS "No",%N,"Yes",%Y
UNTIL DIALOG<>%y
ENDP
The DOW function works out what day of the week, from 1 to
7, a date is. The DAYNAME$ function then converts this to Mon,
Tue and so on. Mon is 1 and Sun is 7.
Data files
The following module works on a data file called "DATA", containing
names, addresses, post codes and telephone numbers. It assumes this
file has already been created with a statement like this:
CREATE "DATA",A,nm$,ad1$,ad2$,ad3$,ad4$,tel$
To use the "DATA" file which the Database application uses, you
need to open ""\DAT\DATA.DBF"".
The first procedure is the controlling, calling procedure, offering
you choices. The next two let you add or edit records.
PROC files:
GLOBAL nm$(255),ad1$(255),ad2$(255)
GLOBAL ad3$(255),ad4$(255),tel$(255),title$(30)
LOCAL g%
OPEN "DATA",A,nm$,ad1$,ad2$,ad3$,ad4$,tel$
DO
CLS
dINIT "Select action"
dTEXT "","Add new record",$402
dTEXT "","Find and edit a record",$402
g%=DIALOG
IF g%=2
add:
ELSEIF g%=3
edit:
ENDIF
UNTIL g%=0
CLOSE
ENDP
PROC add:
nm$="" :ad1$="" :ad2$=""
ad3$="" :ad4$="" :tel$=""
title$="Enter a new record"
IF showd%:
APPEND
ENDIF
ENDP
PROC edit:
LOCAL search$(30),p%
dINIT "Find and edit a record"
dEDIT search$,"Search string",15
IF DIALOG
FIRST
IF FIND("*"+search$+"*")=0
ALERT("No matching records")
RETURN
ENDIF
DO
nm$=A.nm$ :ad1$=A.ad1$ :ad2$=A.ad2$
ad3$=A.ad3$ :ad4$=A.ad4$ :tel$=A.tel$
title$="Edit matching record"
IF showd%:
UPDATE :BREAK
ELSE
NEXT
ENDIF
FIND("*"+search$+"*")
IF EOF
ALERT("No more matching records")
BREAK
ENDIF
UNTIL 0
ENDIF
ENDP
PROC showd%:
LOCAL ret%
dINITS title$
dEDIT nm$,"Name",25
dEDIT ad1$,"Street",25
dEDIT ad2$,"Town",25
dEDIT ad3$,"County",25
dEDIT ad4$,"Postcode",25
dEDIT tel$,"Phone",25
ret%=DIALOG
IF ret%
A.nm$=nm$ :A.ad1$=ad1$ :A.ad2$=ad2$
A.ad3$=ad3$ :A.ad4$=ad4$ :A.tel$=tel$
ENDIF
RETURN ret%
ENDP
Re-order
When you use the Database application and enter or change an entry,
it goes to the end of the database file. However, if, in your
address book, each entry begins with a person's second name
for example, "Tate, Hazel" you can use this program
to re-order all of the entries. This doesn't change the way you find
an entry, but after running it you can step through it like a paper
address book, or print it out neatly ordered.
This procedure can be used as required for any data file in internal
memory or on Ram SSDs. If used on a data file held on a Flash SSD
it would use up disk space each time you run it. The dialog it shows
is set to show data files used by the Database.
You can adapt this procedure to sort other types of data files in
other ways.
PROC reorder:
LOCAL last%,e$(255),e%,lpos%,n$(128),c%
n$="\dat\*.dbf"
dINIT "Re-order Data file"
dFILE n$,"Filename",0
IF DIALOG REM returns 0 if cancelled
OPEN n$,a,a$
LAST :last%=POS
IF COUNT>0
WHILE last%<>0
POSITION last% :e%=POS
e$=UPPER$(a.a$)
DO
IF UPPER$(a.a$)<e$
e$=UPPER$(a.a$) :e%=POS
ENDIF
lpos%=POS :BACK
UNTIL pos=1 and lpos%=1
POSITION e%
PRINT e$
UPDATE :last%=last%-1
ENDWH
ENDIF
CLOSE
ENDIF
ENDP
If you try to reorder a file which is already open (ie shown in bold
on the System screen) you will see a `File or device in use' error.
Move the highlight onto the file's name in the System screen, use
the Delete key to exit the file, then try again. Alternatively, use
the `Exit' option in the Database.
Stopwatch
Here is a simple stopwatch with lap times. Note that the Workabout
switches off automatically after a time if no keys are pressed; you
may want to disable this feature (with the `Auto switch off' option
in the System screen) before running this program.
Each timing is only accurate to within one second, as the procedure
is based on the SECOND function.
PROC watch:
LOCAL k%,s%,se%,mi%
FONT 11,16
AT 20,1 :PRINT "Stopwatch"
AT 15,11 :PRINT "Press a key to start"
GET
DO
CLS :mi%=0:se%=0:s%=SECOND
AT 15,11 :PRINT " S=Stop, L=Lap "
loop::
k%=KEY AND $ffdf REM ensures upper case
IF k%=%S
GOTO pause::
ENDIF
IF k%=%L
AT 20,6 :PRINT "Lap: ";mi%;":";
IF se%<10 :PRINT "0"; :ENDIF
PRINT se%;" ";
ENDIF
IF SECOND<>s%
s%=SECOND :se%=se%+1
IF se%=60 :se%=0:mi%=mi%+1 :ENDIF
AT 17,8
PRINT "Mins",mi%,"Secs",
IF se%<10 :PRINT "0"; :ENDIF
PRINT se%;" ";
ENDIF
GOTO loop::
pause::
mINIT
mCARD "Watch","Restart",%r,"Zero",%z,"Exit",%x
k%=MENU
IF k%=%r
GOTO loop::
ENDIF
UNTIL k%<>%z
ENDP
Inserting a new line in a database
If you insert a new label in a database, the entries will no longer
match up with the labels. Rather than using the `Update' option on
every entry, to insert a suitable blank line in each one, you can
use this program to do this for the entire data file.
The Database allows you to use as many lines (fields) as you want
in an entry (record); however, OPL can only access 32 fields. This
program only lets you insert a new field in the first 16 fields, although
you can adapt the program simply to check up to 31 fields.
If, in the Database, you enter a line longer than 255 characters,
it is stored as two fields, with a character of code 20 at the start
of the second field. This program correctly handles any such fields.
The program checks that the 17th field is blank, as it will be overwritten
by what was the 16th field. If a long entry has a 17th field, and
it contains text, the program skips this entry. The rest of longer
entries even if there are more than 32 fields will
be unchanged.
If you insert a new field at a position below the last label, the
Database will not show it, even when using `Update'.
The maximum record length in OPL is 1022 characters. The OPEN
command will display a `Record too large' error if the file contains
a record longer than this.
PROC label:
LOCAL a%,b%,c%,d%,s$(128),s&,i$(17,255)
s$="\dat\*.dbf"
dINIT "Insert new field"
dFILE s$,"Data file",0
dLONG s&,"Break at line (1-16)",1,16
IF DIALOG
OPEN s$,A,a$,b$,c$,d$,e$,f$,g$,h$,i$,j$,k$,l$,m$,n$,o$,p$,q$
c%=COUNT :a%=1
WHILE a%<=c%
AT 1,1 :PRINT "Entry",a%,"of",c%,
IF A.q$="" REM Entry (hopefully) not too long
i$(1)=A.a$ :i$(2)=A.b$ :i$(3)=A.c$ :i$(4)=A.d$
i$(5)=A.e$ :i$(6)=A.f$ :i$(7)=A.g$ :i$(8)=A.h$
i$(9)=A.i$ :i$(10)=A.j$ :i$(11)=A.k$ :i$(12)=A.l$
i$(13)=A.m$ :i$(14)=A.n$ :i$(15)=A.o$ :i$(16)=A.p$
d%=0 :b%=0
WHILE d%<s&+b% REM find field to break at
d%=d%+1
IF LEFT$(i$(d%),1)=CHR$(20) REM line>255...
b%=b%+1 REM ...so it's 2 fields
ENDIF
ENDWH
b%=17
WHILE b%>d% REM copy the fields down
i$(b%)=i$(b%-1) :b%=b%-1
ENDWH
i$(d%)="" REM and make an empty field
A.a$=i$(1) :A.b$=i$(2) :A.c$=i$(3) :A.d$=i$(4)
A.e$=i$(5) :A.f$=i$(6) :A.g$=i$(7) :A.h$=i$(8)
A.i$=i$(9) :A.j$=i$(10) :A.k$=i$(11) :A.l$=i$(12)
A.m$=i$(13) :A.n$=i$(14) :A.o$=i$(15) :A.p$=i$(16)
A.q$=i$(17)
ELSE
PRINT "has too many fields"
PRINT "Press a key..." :GET
ENDIF
UPDATE :FIRST
a%=a%+1
ENDWH :CLOSE
ENDIF
ENDP
Bouncing Ball
PROC bounce:
LOCAL posX%,posY%,changeX%,changeY%,k%
LOCAL scrx%,scry%,info%(10)
SCREENINFO info%()
scrx%=info%(3) :scry%=info%(4)
posX%=1 :posY%=1
changeX%=1 :changeY%=1
DO
posX%=posX%+changeX%
posY%=posY%+changeY%
IF posX%=1 OR posX%=scrx%
changeX%=-changeX%
REM at edge ball changes direction
BEEP 2, 600 REM low beep
ENDIF
IF posY%=1 or posY%=scry% REM same for y
changeY%=-changeY%
BEEP 2, 200 REM high beep
ENDIF
AT posX%,posY% :PRINT "0";
PAUSE 2 REM Try changing this
AT posX%,posY% :PRINT " ";
REM removes old `0' character
k%=KEY
UNTIL k%
ENDP
Circles
Here are two example programs for drawing circles the first
hollow, the second filled:
PROC circle:
LOCAL a%(963),c&,d%,x&,y&,r&,h,y%,y1%,c2%
dINIT "Draw a circle"
x&=120 :dLONG x&,"Centre x pos",0,239
y&=50 :dLONG y&,"Centre y pos",0,99
r&=20 :dLONG r&,"Radius",1,120
h=1 :dFLOAT h,"Relative height",0,999
IF DIALOG
a%(1)=x&+r& :a%(2)=y& :a%(3)=4*r&
c&=1 :d%=2*r& :y1%=0
WHILE c&<=d%
c2%=c&*2 :y%=-SQR(r&*c2%-c&**2)*h
a%(2+c2%)=-2 :a%(3+c2%)=y%-y1%
y1%=y% :c&=c&+1
ENDWH
c&=1
WHILE c&<=d%
c2%=c&*2 :y%=SQR(r&*c2%-c&**2)*h
a%(2+a%(3)+c2%)=2 :a%(3+a%(3)+c2%)=y%-y1%
y1%=y% :c&=c&+1
ENDWH
gPOLY a%()
ENDIF
GET
ENDP
PROC circlef:
LOCAL c&,d%,x&,y&,r&,h,y%
dINIT "Draw a filled circle"
x&=120 :dLONG x&,"Centre x pos",0,239
y&=50 :dLONG y&,"Centre y pos",0,99
r&=20 :dLONG r&,"Radius",1,120
h=1 :dFLOAT h,"Relative height",0,999
IF DIALOG
c&=1 :d%=2*r& :gAT x&-r&,y& :gLINEBY 0,0
WHILE c&<=d%
y%=-SQR(r&*c&*2-c&**2)*h
gAT x&-r&+c&,y&-y% :gLINEBY 0,2*y%
c&=c&+1
ENDWH
ENDIF
GET
ENDP
If you use "gUPDATE OFF" after the "IF DIALOG" line, and
"gUPDATE ON" before the "ENDIF", the procedure will run
a little faster. However, all but the smaller circles will be drawn
rather jerkily, piece by piece.
Zooming
For each of the three types of status window, this program changes
the font to implement zooming.
Press Psion-Z to cycle between small, medium and large fonts, and
Shift-Psion-Z to cycle in the other direction. Esc changes to the
next status window.
As well as changing the font and style for the text window (for PRINT
etc.), the FONT command automatically changes the default graphics
window size (ID=1) and the text window size to fit exactly in the
space left by any status window. (A special feature not used here
is that "FONT -$3fff,0" just changes the window sizes without
changing font).
The procedure "dispinfo:" uses the command SCREENINFO to
display the margin sizes in pixels between the default window and
the text window, the text screen size in character units, and the
text screen's character width and line height in pixels.
PROC tzoom:
STATUSWIN OFF REM no status window
zoom:
REM display with zooming
STATUSWIN ON,2 REM large status window
zoom:
STATUSWIN ON,1 REM and small
zoom:
ENDP
PROC zoom:
LOCAL font%(3),font$(3,20),style%(3)
LOCAL g%,km%,zoom%
zoom%=1
font%(1)=13 :font$(1)="(Mono 6x6)" :style%(1)=0
font%(2)=4 :font$(2)="(Mono 8x8)" :style%(2)=0
font%(3)=12 :font$(3)="(Swiss 16)" :style%(3)=16
g%=%z+$200
DO
IF g%=%z+$200
IF km% AND 2
REM Shift-PSION-Z
zoom%=zoom%-1
IF zoom%<1 :zoom%=3 :ENDIF
ELSE
REM PSION-Z
zoom%=zoom%+1
IF zoom%>3 :zoom%=1 :ENDIF
ENDIF
FONT font%(zoom%),style%(zoom%)
PRINT "Font=";font%(zoom%),font$(zoom%)
PRINT "Style=";style%(zoom%)
dispinfo:
gBORDER 0
ENDIF
g%=GET
km%=KMOD
UNTIL g%=27
ENDP
PROC dispinfo:
LOCAL scrInfo%(10)
SCREENINFO scrInfo%()
PRINT "Left margin=";scrInfo%(1)
PRINT "Top margin=";scrInfo%(2)
PRINT "Screen width=";scrInfo%(3)
PRINT "Screen height=";scrInfo%(4)
PRINT "Char width=";scrInfo%(7)
PRINT "Line height=";scrInfo%(8)
ENDP
Animation example
This program requires five bitmap files "one.pic" to "five.pic".
Each of these would differ slightly they might, for example,
be five `snapshots' of a running human figure, each with the legs
at a different point in their cycle.
The program copies each bitmap into a window of its own, then makes
each window visible in turn, each time slightly further across the
screen.
To make bitmap files, first draw the pattern you want with any of
the graphics drawing commands. (Use "gLINEBY 0,0" to draw single
dots.) When the pattern is complete, use gSAVEBIT to make the
bitmap file. For advanced animation, you could use a sprite
as described in the `Advanced topics' chapter.
PROC animate:
LOCAL id%(5),i%,j%,s$(5,10),w%,h%
w%=16 :h%=28 REM example width and height
s$(1)="one" :s$(2)="two" :s$(3)="three"
s$(4)="four" :s$(5)="five" :j%=1
WHILE j%<6
i%=gLOADBIT(s$(j%))
id%(j%)=gCREATE(0,0,w%,h%,0)
gCOPY i%,0,0,w%,h%,3
gCLOSE i% :j%=j%+1
ENDWH
i%=0 :gORDER 1,9
DO
j%=(i%-5*(i%/5))+1 REM (i% MOD 5)+1
gVISIBLE OFF REM previous window
gUSE id%(j%) REM new window
gSETWIN i%,20 REM position it
gORDER id%(j%),1 REM make foreground
gVISIBLE ON REM make visible
i%=i%+1 :PAUSE 2
UNTIL KEY OR (i%>(480-w%)) REM screen edge
ENDP
Error handling
-----------------------------------************ Syntax errors
Syntax errors are those which are reported when translating a procedure.
(Other errors can occur while you're running a program.) The OPL translator
will return you to the line where the first syntax error is detected.
All programming languages are very particular about the way commands
and functions are used, especially in the way program statements are
laid out. Below are a number of errors which are easy to make in OPL.
The incorrect statements are in bold and the correct versions are
on the right.
*** Punctuation errors
Omitting the colon between statements on a multi-statement line:
Incorrect
Correct
"a$="text" PRINT a$
a$="text" :PRINT a$"
Omitting the space before the colon between statements :
Incorrect
Correct
"a$=b$:PRINT a$
a$=b$ :PRINT a$"
Omitting the colon after a called procedure name:
Incorrect
Correct
"PROC proc1:
PROC proc1:
GLOBAL a,b,c
GLOBAL a,b,c
.
.
ENDP
ENDP
proc2
proc2:"
Using only 1 colon after a label in GOTO/ONERR/VECTOR (instead
of 0 or 2):
Incorrect
Correct
"GOTO below:
GOTO below
.
.
below::
below::"
*** Structure errors
The DO...UNTIL, WHILE...ENDWH and IF...ENDIF
structures can produce a `Structure fault' error if used incorrectly:
*) Attempting to nest any combination of these structures more
than eight levels deep.
*) Mixing up the three structures eg by using DO...WHILE
instead of DO...UNTIL.
*) Using BREAK or CONTINUE in the wrong place.
*) Using ELSE IF with a space, instead of ELSEIF.
VECTOR...ENDV can also produce a `Structure fault' error if
used incorrectly.
-----------------------------------************ Errors in running procedures
OPL may display an error message and stop a running program if certain
`error' conditions occur. This may happen because:
*) There is a mistake, or bug, in your program, which
could not be detected during translation for example, a calculation
has involved a division by zero.
*) A problem has occurred which prevents a command or function
from working for example, an APPEND command may fail
because an SSD is full.
Unless you include statements which can handle such errors when they
occur, OPL will use its own error handling mechanism. The program
will stop and an error message be displayed. The first line gives
the name of the procedure in which the error occurred, and the module
this procedure is in. The second line is the `error message'
one of the messages listed at the end of this chapter. If appropriate,
you will also see a list of variable names or procedure names causing
the error.
If you were editing the module with the Program editor and you ran
it from there, you would also be taken back to editing the OPL module,
with the cursor at the line where the error occurred.
*** Error handling functions and commands
To prevent your program being stopped by OPL when an error occurs,
include statements in your program which anticipate possible
errors and take appropriate action. The following error handling facilities
are available in OPL:
*) TRAP temporarily suppresses OPL's error processing.
*) ERR and ERR$ find out what kind of error has
occurred.
*) ONERR establishes an error handler which can suppress
OPL's error processing over whole modules.
*) RAISE can be used to simulate error conditions.
These facilities put you in control and must be used carefully.
*** Strategy
You should design the error handling of a program in the same way
as the program itself. OPL works best when programs are built up from
procedures, and you should design your error handling on the same
basis. Each procedure should normally contain its own local error
handling:
(picture)
The error handling statements can then be appropriate to the procedure.
For example, a procedure which performs a calculation would have one
type of error handling, but another procedure which offers a set of
choices would have another.
****** TRAP
TRAP can be used with any of these commands: APPEND, BACK, CACHE,
CLOSE, COMPRESS, COPY, CREATE, DELETE, ERASE, EDIT, FIRST, gCLOSE,
gCOPY, gFONT, gPATT, gSAVEBIT, gUNLOADFONT, gUSE, INPUT, LAST, LCLOSE,
LOADM, LOPEN, MKDIR, NEXT, OPEN, OPENR, POSITION, RENAME, RMDIR, UNLOADM,
UPDATE and USE.
The TRAP command immediately precedes any of these commands,
separated from it by a space for example:
TRAP INPUT a%
If an error occurs in the execution of the command, the program does
not stop, and the next line of the program executes as if there had
been no error. Normally you would use ERR on the line after
the TRAP to find out what the error was.
*** Example
When INPUT is used without TRAP and a text string is
entered when a number is required, the display just scrolls up and
a "?" is shown, prompting for another entry. With TRAP
in front of INPUT, you can handle bad entries yourself:
PROC trapinp:
LOCAL profit%
DO
PRINT
PRINT "Enter profit",
TRAP INPUT profit%
UNTIL ERR=0
PRINT "Valid number"
GET
ENDP
This example uses the ERR function, described next.
****** ERR and ERR$
When an error occurs in a program, check what number the error was,
with the ERR function:
e%=ERR
If ERR returns zero, there was no error. The value returned
by ERR is the number of the last error which occurred
it changes when a new error occurs. TRAP sets ERR to
zero if no error occurred. Check the number it returns against the
error messages listed at the end of this chapter.
The ERR$ function gives you the message for error number "e%":
e$=ERR$(e%)
You can also use ERR and ERR$ in conjunction:
e$=ERR$(ERR)
This returns the error message for the most recent error.
*** Example
The lines below anticipate that error number -101 (File already open)
may occur. If it does, an appropriate message is displayed.
TRAP OPEN "main",A,a$
e%=ERR
IF e% REM Checks for an error
IF e%=-101
PRINT "File is already open!"
ELSE
PRINT ERR$(e%)
ENDIF
ENDIF
The inner IF...ENDIF structure displays either the message
in quotes if the error was number -101, or the standard error message
for any other error.
*** TRAP INPUT/EDIT and the Esc key
If in response to a "TRAP INPUT" or "TRAP EDIT" statement,
the Esc key is pressed while no text is on the input/edit line, the
`Escape key pressed' error (number -114) will be raised. (This error
will only be raised if the INPUT or EDIT has been trapped.
Otherwise, the Esc key still leaves you editing.)
You can use this feature to enable someone to press the Esc key to
escape from editing or inputting a value. For example:
PROC trapInp:
LOCAL a%,b%,c%
PRINT "Enter values."
PRINT "Press Esc to exit"
PRINT "a% =", :TRAP INPUT a% :PRINT
IF ERR=-114 :GOTO end :ENDIF
PRINT "b% =", :TRAP INPUT b% :PRINT
IF ERR=-114 :GOTO end :ENDIF
PRINT "a%*b% =",a%*b%
PAUSE -40
RETURN
end::
PRINT :PRINT "OK, finishing..."
PAUSE -40
RETURN
ENDP
****** ONERR ... ONERR OFF
ONERR sets up an error handler. This means that, whenever an error
occurs in the procedure containing ONERR, the program will
jump to a specified label instead of stopping in the normal way. This
error handler is active until an ONERR OFF statement.
You specify the label after the word ONERR.
The label itself can then occur anywhere in the same procedure
even above the ONERR statement. After the label should come
the statements handling whatever error may have caused the program
to jump there. For example, you could just have the statement "PRINT
ERR$(ERR)" to display the message for whatever error occurred.
All statements after the ONERR command, including those in
procedures called by the procedure containing the ONERR, are
protected by the ONERR, until the ONERR OFF instruction
is given.
*** Example
(picture)
If an error occurs in the lines between "ONERR errHand" and "ONERR
OFF", the program jumps to the label "errHand::" where a message
is displayed.
Always cancel ONERR with ONERR OFF immediately after
the label.
*** When to use ONERR OFF
You could protect the whole of your program with a single ONERR.
However, it's often easier to manage a set of procedures which each
have their own ONERR...ONERR OFF handlers, each covering their
own procedure. Secondly, an endless loop may occur if all errors feed
back to the same single label.
For example, the diagram below shows how an error handler is left
active by mistake. Two completely different errors cause a jump to
the same label, and cause an inappropriate explanatory message to
be displayed. In this example an endless loop is created because "next:"
is called repeatedly:
(picture)
*** Multiple ONERRs
You can have more than one ONERR in a procedure, but only the
most recent ONERR is active. Any errors cause a jump to the
label for the most recent ONERR.
ONERR OFF disables all ONERRs in the current
procedure. But if there are other ONERRs in procedures above
this procedure (calling procedures) these ONERRs are not
disabled.
*** TRAP and ONERR
TRAP has priority over ONERR. In other words, an error from
a command used with TRAP will not cause a jump to the error
handler specified with ONERR.
****** RAISE
The RAISE command generates an error, in the same way that
OPL raises errors whenever it meets certain conditions which it recognises
as unacceptable (for example, when invalid arguments are passed to
a function). Once an error has been raised, either by OPL or by the
RAISE command, the error-handling mechanism currently in use
takes effect the program will stop and report a message, or
if you've used ONERR the program will jump to the ONERR
label.
There are two reasons for using RAISE:
*) You may want to mimic OPL's error conditions in your own
procedures. For example, if you create a new procedure which performs
a calculation and returns a value, you may want to RAISE an
`Overflow' or `Divide by zero' error if unsuitable numbers are passed
as parameters.
In this case, you would RAISE one of the standard
error numbers. You could handle this yourself with ONERR, or
let OPL handle it in the normal way.
*) OPL raises only a limited range of errors for general use,
and you may want to raise new kinds of error error codes specific
to your program or particular circumstances.
In this case, you would RAISE a new error number.
With ONERR on, RAISE would go to the ONERR label,
where you would have code to interpret your new error numbers. You
could then display appropriate messages.
You can use any positive number (from 0 to 127) as a new
error code. Do not use any of the numbers in the `Erro messages' list
that follows.
You may also find RAISE useful for testing your error handling.
Example:
PROC main:
REM calling procedure
PRINT myfunc:(0.0) REM will raise error -2
ENDP
PROC myfunc:(x)
LOCAL s
REM returns 1/sqr(x)
s=SQR(x)
IF s=0
RAISE -2
REM `Invalid arguments'
REM avoids `divide by zero'
ENDIF
RETURN (1/s)
ENDP
This uses RAISE to raise the `Invalid arguments' error not
the `Divide by zero' error, since the former is the more appropriate
message.
-----------------------------------************ Error messages
These are the numbers of the errors which OPL can raise, and the message
associated with them:
Number Message:
-1
General failure
-2
-3
-4
-5
-6
-7
-8
-9
-10
-13
-14
-15
-16
-17
-18
-19
-20
-21
-22
-23
-24
Workabout)
-25
Invalid arguments
O/S error
Service not supported
Underflow (number too small)
Overflow (number too large)
Out of range
Divide by zero
In use (eg serial port being used by another program)
No system memory
Process table full/Too many processes
Resource already open
Resource not open
Invalid image/device file
No receiver
Device table full
File system not found (eg if you unplug cable to PC)
Failed to start
Font not loaded
Too wide (dialogs)
Too many items (dialogs)
Batteries too low for digital audio (not applicable to standard
Batteries too low to write to Flash
File and device errors
-32
File already exists
-33
File does not exist
-34
Write failed
-35
Read failed
-36
End of file (when you try to read past end of file)
-37
Disk full
-38
Invalid name
-39
Access denied (eg to a protected file on PC)
-40
File or device in use
-41
Device does not exist
-42
Directory does not exist
-43
Record too large
-44
Read only file
-45
Invalid I/O request
-46
I/O operation pending
-47
Invalid volume (corrupt disk)
-48
I/O cancelled
-50
-51
-52
-53
-54
-55
-56
-57
-58
-59
-60
-61
Disconnected
Connected
Too many retries
Line failure
Inactivity timeout
Incorrect parity
Serial frame (usually because Baud setting is wrong)
Serial overrun (usually because Handshaking is wrong)
Cannot connect to remote modem
Remote modem busy
No answer from remote modem
Number is black listed (you may try a number only a certain
number of times; wait a while and try again)
-62
-63
-64
-65
-66
-67
-68
-69
Not ready
Unknown media (corrupt SSD)
Root directory full (on any device, the root directory
has a maximum amount of memory allocated to it)
Write protected
Media is corrupt
User abandoned
Erase pack failure
Wrong file type
Translator errors
-70
Missing "
-71
String too long
-72
Unexpected name
-73
Name too long
-74
Logical device must be A-D
-75
Bad field name
-76
Bad number
-77
Syntax error
-78
Illegal character
-79
Function argument error
-80
Type mismatch
-81
Missing label
-82
Duplicate name
-83
Declaration error
-84
Bad array size
-85
Structure fault
-86
Missing endp
-87
Syntax Error
-88
Mismatched ( or )
-89
Bad field list
-90
Too complex
-91
Missing ,
-92
Variables too large
-93
Bad assignment
-94
Bad array index
-95
Inconsistent procedure arguments
OPL specific errors
-96
Illegal Opcode (corrupt module translate again)
-97
Wrong number of arguments (to a function or
parameters to a procedure)
-98
Undefined externals (a variable has been
encountered which hasn't been declared)
-99
Procedure not found
-100
Field not found
-101
File already open
-102
File not open
-103
Record too big (data file contains record too big for OPL)
-104
Module already loaded (when trying to LOADM)
-105
Maximum modules loaded (when trying to LOADM)
-106
Module does not exist (when trying to LOADM)
-107
Incompatible translator version (OPL file needs
retranslation)
-108
Module not loaded (when trying to UNLOADM)
-109
Bad file type (data file header wrong or corrupt)
-110
-111
-112
-113
-114
-115
-116
-117
-118
-119
-120
Type violation (passing wrong type to parameter)
Subscript or dimension error (out of range in array)
String too long
Device already open (when trying to LOPEN)
Escape key pressed
Incompatible runtime version
ODB file(s) not closed
Maximum drawables open (maximum 8 windows and/or
bitmaps allowed)
Drawable not open
Invalid Window (window operation attempted on a bitmap)
Screen access denied (when run from Calculator)
Advanced topics
Many of the subjects covered in this chapter may provide
benefits for all levels of programmers.
The subjects become progressively more technical, however.
This manual cannot cover every OPL keyword in detail, as some give
access to the innermost workings of the Workabout, however,
some of these keywords are touched on in this chapter.
-----------------------------------************ Programs, modules, procedures
*** Programs using more than one module
Program is the more general word for the "finished product"
a set of procedures which can be run. A program may consist of one
module containing one or more procedures:
(picture)
It may also consist of a number of modules containing various procedures:
(picture)
A procedure in one module can call procedures in another module, provided
this module has been loaded with the LOADM command.
LOADM needs the filename of the module to load.
For example, if an OPL module "MAIN" has these two procedures:
PROC main:
LOADM "library"
pthis: REM run pthis: in this module
pother: REM run pother: in "library"
PRINT "Finished"
PAUSE 40
UNLOADM "library"
ENDP
PROC pthis:
PRINT "Running pthis:"
PRINT "in this module"
PAUSE 40
ENDP
and a module called "LIBRARY" has this one:
PROC pother:
PRINT "Running pother:"
PRINT "in module called LIBRARY"
PAUSE 40
ENDP
then running "MAIN" would display "Running pthis:" and "in this module";
then display "Running pother:" and "in module called LIBRARY";
and then display "Finished".
You would usually only need to load other modules when developing
large OPL programs.
You can use LOADM up to three times, to load up to three modules.
If you want to load a fourth module, you must first unload one of
those currently loaded, by using UNLOADM
with the filename. To keep your program tidy, you should UNLOADM
a module as soon as you have finished using it.
If there is an error in the running program, you will only
be positioned in the Program editor to the place where the error occurred
if you were editing the module concerned (and you ran the program
from there).
In spite of its name, LOADM does not "load" the whole of another
module into memory. Instead, it just loads a block of data stored
in the module which lists the names of the procedures which it contains.
If such a procedure is then called, the procedure will be searched
for, copied from file into memory and the procedure will then be run.
The modules are searched through in the order that they were loaded
the module loaded last is searched through last. You may make considerable
improvements in speed if you have few modules loaded at a time (so
avoiding a long search for each procedure) and if you load the modules
with the most commonly called procedures first.
*** Cacheing procedures for speed
Without procedure cacheing, procedures are loaded from file whenever
they are called, and discarded when they return. This is true even
when procedures are all in one module. (With more than one module,
LOADM simply loads a map listing procedure names and their
positions in the module file so that they can be loaded fairly efficiently.
It does not load procedures into memory.)
If a well-designed program calls procedures regularly, you can speed
it up by cacheing procedures keeping the code for a
procedure loaded in memory after it returns, so that if it is called
again there is no need to fetch it from file again. The CACHE command takes two arguments the
initial size of the
cache and the maximum size (both in bytes). These can be up to 32,767
bytes. The minimum in both cases is 2000 bytes.
For a small program, you might use "CACHE 2000,2000" at the
start of the program. Up to 2000 bytes of procedure code will be cached.
If the cache fills up, and a procedure is called which is not in the
cache, space will be made for it in the cache by removing other procedures
from it.
For a much larger program, you might use "CACHE 10000,10000".
You may wish to change the settings and find the smallest setting
which produces the maximum speed improvement.
Once a cache has been created, "CACHE OFF" prevents further
cacheing, although the cache is still searched when calling subsequent
procedures. "CACHE ON" may then be used to re-enable cacheing.
*** Calling procedures by strings
Procedures can be called using a string expression for the procedure
name. Use an "@" symbol, optionally followed by a character to
show what type of value is returned for example, "%" for
an integer. Follow this with the string expression in brackets. You
can use upper or lower case characters.
Here are examples showing the four types of value which can be returned:
"i% = @%(name$):(parameters)" for integer
"l& = @&(name$):(parameters)" for long integer
"s$ = @$(name$):(parameters)" for string
"f = @(name$):(parameters)" for floating-point
So, for example, "test$:(1.0,2)" and "@$("test"):(1.0,2)"
are equivalent.
Note that the string expression does not itself include a symbol
for the type ("%", "&" or "$").
You may find this useful if, in a more complex program, you want to
"work out" the name of a procedure to call at a particular point.
The chapter on `Friendlier interaction' includes an example program
which uses this method.
-----------------------------------************ Where files are kept
The internal memory and SSDs use a DOS-compatible directory structure,
the same as that used on disks on business PCs. However, in the built-in
applications on the Workabout the complexities of this are
hidden. You have only to supply a filename, and to say whereabouts
a file is internal, on an SSD, or on another computer to which
the Workabout is linked.
In fact, in order to completely specify a file, the Workabout
uses a filing system, drive (or device), directory
and filename:
*) The filing system usually specifies the computer, and is
usually "LOC::" (`local' the Workabout) or "REM::"
(`remote' an attached computer). This is always three letters
and two colons.
*) The drive is the area on that computer where the file is
kept. On the Workabout this can be "M:" (internal
disk), "A:" (left SSD drive) or "B:" (right
SSD drive).
*) Every drive has one root directory, usually written
as a backslash ("\"). This can "contain" files and/or other directories,
each of which can contain more files and/or more directories. When
you have "directories in directories" like this, they're often called
subdirectories. Their names show where they are. For example,
the root directory ("\") could contain a directory called "\JO",
which might in turn contain a directory called "\JO\BACKUP", which
might contain some files.
*) Filenames are composed of one to eight letters and/or numbers,
optionally followed by a file extension comprised of a dot
and from one to three letters/numbers. File extensions are by convention
used to group different types of files. The Workabout uses
file extensions in this way, but hides this from you in the built-in
applications.
To completely specify a file, you add the four parts together. The
directory part must end with a backslash. So an OPL module named "TEST",
in a directory called "\JO" in the Workabout internal memory
can be specified as "LOC::M:\JO\TEST.OPL". If this file were in
the "\JO\BACKUP" directory, it would be completely specified as
"LOC::M:\JO\BACKUP\TEST.OPL". If it were in the root directory,
you would specify it as "LOC::M:\TEST.OPL".
A full file specification may be up to 128 characters long.
In OPL, unless you say otherwise, files are kept on the Workabout
"(LOC::"), in the internal memory ("M:"). The directories
and file extensions used are:
Type of file
Directory
OPL modules
translated modules
data files
bitmaps
\OPD
File extension
\OPL
\OPO
\OPD
.OPL
.OPO
.ODB
.PIC
*** Using file specifications in OPL
OPL commands which specify a filename, such as OPEN, CREATE,
gLOADBIT and so on, can also use any or all of the other parts
that make up a full file specification. (Normally, the only other
part you might use is the drive name, if the file were on an SSD.)
So for example, "OPEN "REM::C:\ADDR.TXT""... tries to open a
data file called "ADDR.TXT" on the root directory of a hard disk
"C:" on an attached PC.
You can use the PARSE$ function if you need
to build up complex filenames. See the alphabetic listing for more
details of PARSE$.
Unless you have a good reason, though, it's best not to change directories
or file extensions for files on the Workabout. You can lose
information this way, unless you're careful.
*** Control of directories
Use the MKDIR command to make a new directory.
For example, "MKDIR "M:\MINE\TEMP"" creates a "M:\MINE\TEMP"
directory, also creating "M:\MINE" if it is not already there.
An error is raised if the chosen directory exists already
use "TRAP MKDIR" to avoid this.
SETPATH sets the current directory for file
access for example, "SETPATH "A:\DOCS"". LOADM
continues to use the directory of the running program, but all other
file access will be to the new directory instead of \OPD.
Use RMDIR to remove a directory for
example, "RMDIR "M:\MINE"" removes the "MINE" directory
on "M:\". An error is raised if the directory does not exist
use "TRAP RMDIR" to avoid this.
You can only remove empty directories.
*** File specifications on REM::
You should not assume that remote file systems use DOS-like file specifications
for example, an Apple Macintosh
specification is "disk:folder:folder:filename". You can only assume
that there will be four parts disk/device, path, filename
and (possibly null) extension. PARSE$, however, will always
build up or break down "REM::" file specifications correctly.
-----------------------------------************ Safe pointer arithmetic
Whenever you wish to add or subtract something from an integer which
is an address of something (or a pointer to something) you should
use UADD and USUB.
If you do not, you will risk an `Integer overflow' error.
An address can be any value from 0 to 65535. An integer variable can
hold the full range of addresses, but treats those values from 32768
to 65535 as if they were -32768 to -1. If your addition or subtraction
would convert an address in the 0-32767 range to one in the 32768-65535
range, or vice versa, this would cause an `Integer overflow'.
UADD and USUB treat integers as if they were unsigned,
ie as if they really held a value from 0 to 65535.
For example, to add 1 to the address of a text string (in order to
skip over its leading byte count and point to the first character
in the string), use "i%=UADD(ADDR(a$),1)", not "i%=ADDR(a$)+1".
USUB works in a similar way, subtracting the second integer
value from the first integer, in unsigned fashion for example,
"USUB(ADDR(c%),3)".
"USUB(x%,y%)" has the same effect as "UADD(x%,-y%)".
-----------------------------------************ OPL applications (OPAs)
You can make an OPL program appear as an icon in the System screen,
and behave like the other icons there, by converting it into an OPL application,
or OPA. There are five different types of OPA, called type
0 to type 4:
*) "TYPE 0" (like Calc): The OPA uses no files.
*) "TYPE 1": Only one file is used. A type 1 OPA will
look the same as a type 0. The only difference is that the type 1
is using a file, of the same name as the OPA.
*) "TYPE 2": You can have more than one file, but only
one can be in use (bold) at any time.
When you pick a new file to use, its name becomes bold,
and the one that was previously bold reverts to normal. What has
actually happened is that the running OPA has switched files
it has not closed down, and no new copy of the OPA is
run.
*) "TYPE 3" (like the in-built Data and Sheet applications):
You can have more than one file, and any number may be open (bold)
at a given time.
When you select a new file, one of the running OPAs normally
switches to this file, as with type 2 OPAs. You can, however, with
Shift-Enter, start a new OPA running just for this file, without a
different file exiting.
*) "TYPE 4" (like RunOpl): Many files can be used, and
any number may be in use at a given time. When you select a new file,
a new version of the OPA is always run, to use the new file.
Types 3 and 4 allow more than one file to be in use (ie have
their names in bold). When this happens a separate version of the
OPA runs for each bold file. With types 0, 1 and 2, only one version
of the OPA can be running at any time.
Initially, the OPA's name appears beneath the icon. If you move onto
this name and press Enter, file-based OPAs (types 1 to 4) will use
a file of this name. Types 2, 3 and 4 allow you to create lists of
files below the icon (with the `New file' option). You use the file
lists in the same way as the lists under the other icons in the System
screen.
You can stop a running OPA by moving the cursor onto its bold name
and pressing Delete. After a `Confirm' dialog, the System screen tells
the OPA to stop running.
*** Defining an OPA
To make an OPA, your OPL file should begin with the APP keyword, followed by a name for the
OPA. The name should
begin with a letter, and comprise of 1 to 8 letters and/or numbers.
(Note that it does not have quote marks.) The APP line may
be followed by any or all of the keywords PATH, EXT,
ICON and TYPE. A Workabout OPA should also
add $1000 to the type if it has its own 48x48 pixel, black/grey icon
(see the discussion of ICON below for details). Finally, use
ENDA, and then the first procedure may begin
as in a normal OPL file. Here is an example of how an OPA might start:
APP Expenses
TYPE $1003
PATH "\EXP"
EXT "EXP"
ICON "\OPD\EXPENSES.PIC"
ENDA
Here is another example:
APP Picture
TYPE 1
ENDA
TYPE takes an integer argument from 0 to 4.
The various types of OPA are outlined earlier. If you don't specify
the type, 0 is used.
PATH gives the directory to use for this OPA's
files. If you do not use this, the normal "\OPD" directory will
be used. The maximum length, including a final "\", is 19 characters.
Don't include any drive name in this path.
EXT gives the file extension of files used by
this OPA. If you do not specify this, ".ODB" is used. Note that
the files used by an OPA do not have to be data files, as the I/O
commands give access to files of all kinds. EXT does not define
the file type, just the file extension to use. However, for simplicity's
sake, examples in this section use data files.
(PATH and EXT provide information for the System screen
they do not affect the program itself. The System screen displays
under the OPA icon all files with the specified extension in the path
you have requested.)
ICON gives the name of the bitmap file to use
as the icon for this OPA. If no file extension is given, .PIC
is used. If you do not use ICON, the OPA is shown on the System
screen with a standard OPA icon.
As mentioned above, you should add $1000 to the argument to TYPE
for a Workabout icon. This specifies that the icon has size
48x48 pixels (instead of 24x24 as it was on the Series 3). If the
first bitmap has size 24x24, it is ignored and the following two bitmaps
must be the 48x48 black and grey icons respectively. If the first
bitmap is 48x48, it is assumed to be the black icon and the grey icon
must follow. If $1000 is not set, a scaled up 24x24 icon
will be used. The translator does not check the size of the icons.
If you want to design your own icon using an OPL program, see gSAVEBIT
for details on saving both black and grey planes to a bitmap file.
The arguments to any of the keywords between APP and
ENDA must be constants and not expressions. So, for
example, you must use "TYPE $1003" instead of "TYPE $1000 OR 3".
*** Running the OPA
Once you've translated the OPL file, return to the System screen and
use Install on the App menu to install the OPA in the System screen.
(You only need to do this once.) Once installed, file-based OPAs are
shown with the list of available files, if any are found. Otherwise,
the name used after the APP keyword appears below the icon.
(Note: the translated OPA is saved in a "\APP" directory. If you
previously translated the module without the APP...ENDA at
the start, the old translated version will still be listed under the
RunOpl icon, and should be deleted.)
The first thing a file-based OPA should do is to get the name of the
file to use, and check whether it is meant to create it or open it.
"CMD$(2)" returns the full name of the file to use; "CMD$(3)"
returns "C" for "Create" or "O" for "Open". All file-based OPAs
(types 1 to 4) should handle both these cases; if a "Create" fails
because the file exists already, or an "Open" fails because it does
not, OPL raises the error, and the OPA should take suitable action perhaps even just exiting.
*** How the Workabout talks to an OPA
When the Workabout wants an OPA to exit or to switch files,
it sends it a System message, in the form of an event.
This would happen if you press Delete to stop a running OPA, or select
a new file for a type 2 or 3 OPA.
TESTEVENT and GETEVENT check for certain events, including both keypresses and System
messages. All types of OPA must use these keywords to check
for both keypresses and System messages; keyboard commands such
as GET, KEY and KEYA cause other events to be discarded.
GETEVENT waits for an event whereas TESTEVENT simply
checks whether an event has occurred without getting it.
If TESTEVENT returns non-zero, an event has occurred, and can
be read with GETEVENT. This takes one argument, the name of
an integer array for example, "GETEVENT a%()". The array
should be at least 6 integers long. (This is to allow for future upgrades
you only need use the first two integers.)
If the event is a keypress:
"a%(1)"= keycode (as for GET)
"a%(2) AND $00ff"= modifier (as for KMOD)
"a%(2)/256"= auto-repeat count (ignored by GET; you can ignore
it too)
For non-key events "(a%(1) AND $400)" will be non-zero. If
the event is a System message to change files or quit, "a%(1)=$404".
You should then use GETCMD$ to find the action required.
GETCMD$ returns a string, whose first character
is "C", "O" or "X". If it is "C" or "O", the rest of the string is
a filename.
You can only call GETCMD$ once for each event. You should
do so as soon as possible after reading the event. Assign the value
returned by GETCMD$ to a string variable so that you can extract
its components.
If you have "c$=GETCMD$", the first character, which you can extract
with "LEFT$(c$,1)", has the following meaning:
"C" close down the current file, and create the specified
new file.
"O" close down the current file, and open the specified existing
file.
"X" close down the current file (if any) and quit the OPA.
Again with "c$=GETCMD$", "MID$(c$,2,128)" is the easiest way
to extract the filename.
Note: events are ignored while you are using keywords which
pause the execution of the program GET, GET$,
EDIT, INPUT, PAUSE, MENU and DIALOG.
If you need to use these keywords, use "LOCK ON / LOCK OFF"
(described later) around them to prevent the System screen from sending
messages.
*** Example OPAs
Here is a type 0 OPA, which just prints the keys you press. The keyboard
procedure "getk%:" returns the key pressed, as with GET,
but jumps to a procedure "endit:" if a System message to close
down is received. (Type 0 OPAs do not receive "change file" messages.)
"getk%:" does not return events with values 256 ($100) or above,
as they are not simple keypresses. This includes the non-typing keys
like Menu ($100-$1FF), hot-keys ($200-$3FF), and non-key events ($400
and above).
APP myapp0
TYPE $1000
ICON "\opd\me"
ENDA
PROC start:
GLOBAL a%(6),k%
STATUSWIN ON :FONT 10,16
PRINT "Q to Quit"
PRINT " or press Del in"
PRINT " the System screen"
DO
k%=getk%:
PRINT CHR$(k%);
UNTIL (k% AND $ffdf)=%Q REM Quick way to do uppercase
ENDP
PROC getk%:
DO
GETEVENT a%()
IF a%(1)=$404
IF LEFT$(GETCMD$,1)="X"
endit:
ENDIF
ENDIF
UNTIL a%(1)<256
RETURN a%(1)
ENDP
PROC endit:
STOP
ENDP
Here is a similar type 3 OPA. It does the same as the previous example,
but System messages to change files cause the procedure "fset:"
to be called. The relevant files are opened or created; the name of
the file in use is shown in the status window.
APP myapp3
TYPE $1003
ICON "\opd\me"
ENDA
PROC start:
GLOBAL a%(6),k%,w$(128)
STATUSWIN ON :FONT 10,16 :w$=CMD$(2)
fset:(CMD$(3))
PRINT "Create/change files"
PRINT "in the System screen"
DO
k%=getk%:
PRINT CHR$(k%);
UNTIL (k% AND $ffdf)=%Q
ENDP
PROC getk%:
LOCAL t$(1)
DO
GETEVENT a%()
IF a%(1)=$404
w$=GETCMD$
t$=LEFT$(w$,1)
w$=MID$(w$,2,128)
IF t$="X"
endit:
ELSEIF t$="C" OR t$="O"
TRAP CLOSE
IF ERR
CLS :PRINT ERR$(ERR)
GET :CONTINUE
ENDIF
fset:(t$)
ENDIF
ENDIF
UNTIL a%(1)<256
RETURN a%(1)
ENDP
PROC fset:(t$)
LOCAL p%(6)
IF t$="C"
TRAP DELETE w$ REM SYS.SCREEN DOES ANY "OVERWRITE?"
TRAP CREATE w$,A,A$
ELSEIF t$="O"
TRAP OPEN w$,A,A$
ENDIF
IF ERR
CLS :PRINT ERR$(ERR)
GET :STOP
ENDIF
SETNAME w$
ENDP
PROC endit:
STOP
ENDP
You should, as in both these examples, be precise in checking for
the System message; if in future the GETCMD$ function were
to use values other than "C", "O" or "X", these procedures would ignore
them.
If you need to check the modifier keys for the returned keypress,
use "a%(2) AND $00ff" instead of KMOD.
SETNAME extracts the main part of the filename
from any file specification (even one that is not DOS-like), in the
same way as PARSE$. Using SETNAME ensures that the correct
name will be used in the file list in the System screen. If an OPA
lets you change files with its own `Open file' option, it should always
use SETNAME to inform the System screen of the new file in
use.
To be strict, whenever creating a file, an OPA should first
use PARSE$ to find the disk and directory requested. It should
then use "TRAP MKDIR" to ensure that the directory exists.
*** When an OPA cannot respond
The LOCK command marks an OPA as locked or
unlocked. When an OPA is locked with "LOCK ON", the System will
not send it events to change files or quit. If, for example, you move
onto the file list in the System screen and press Delete to try to
stop that running OPA, a message will appear, indicating that the
OPA cannot close down at that moment.
You should use "LOCK ON" if your OPA uses a keyword, such as
EDIT, which pauses the execution of the program. You might
also use it when the OPA is about to go busy for a considerable length
of time, or at any other point where a clean exit is not possible.
Do not forget to use "LOCK OFF" as soon as possible afterwards.
An OPA is initially unlocked.
*** Designing an icon
As discussed earlier, an OPA icon is black and grey and has size 48
by 48 pixels. The icon is stored as two 48x48 bitmaps, black followed
by grey, in a bitmap file. Here is a simple example program which
creates a suitable bitmap:
PROC myicon:
gCREATE(0,0,48,48,1,1)
gBORDER $200
gAT 6,28
gPRINT "me!"
gSAVEBIT "me"
ENDP
Here the window is created with a grey plane (the sixth argument to
gCREATE) gSAVEBIT automatically saves a window with
both black and grey plane to a file in the required format.
In the OPA itself use the ICON keyword, as
explained previously, to give the name of the bitmap file to use
here, "ICON "\opd\me"".
*** OPAs and the status window
If you use "STATUSWIN ON,2" to display
the status window, it shows the name used with the APP keyword.
"STATUSWIN ON,1" displays the smaller status window.
Important: The permanent status window is behind all other
OPL windows. In order to see it, you must use FONT (or
both SCREEN and gSETWIN) to reduce the size of the text
and graphics windows. You should ensure that your program does not
create windows over the top of it.
The name can be changed with the SETNAME
command. In general, an OPA should use SETNAME whenever it
changes files, or creates a new file.
*** Other TYPE options
You can add any of these numbers to the value you use with TYPE:
*) $8000 (-32768) stops the System screen's `New file' option
from working, as for the RunOpl icon (translated OPL modules).
*) $4000 (16384) stops the System screen from closing the OPA,
as for the Time icon. You should not use this without a very
good reason.
*) $100 (256) causes the System screen to terminate the OPA
(when Delete is pressed there) without sending a message to the OPA
to quit ("X"), as for the RunOpl icon again. This should be used only
for OPAs which have no data that could be lost by sudden termination.
For example, use "TYPE $8001" for a type 1 OPA having the first
of the features above. (Note that "TYPE $8000+1" would fail
to translate as the translator cannot evaluate expressions for any
keywords between APP and ENDA).
-----------------------------------************ Tricks
*** The calculator memories
The calculator memories M0 to M9 are available as floating-point variables
in OPL. You might use them to allow OPL access to results from the
calculator, particularly if you use OPL procedures from within the
calculator.
It's best not to use them as a substitute for declaring your own variables.
Your OPL program might go wrong if another running OPL program uses
them, or if you use them yourself in the calculator.
*** Running a program twice
Although you may never need to, you can run more than one copy
of the same translated OPL module at the same time. There are
two ways:
*) Use `Copy file' in the System screen to make a new copy
of the module, with a different filename. Then run both files.
*) Run the file as normal. Then move the highlight to under
the RunOpl icon, press Tab to show the file selector, and pick the
name of the translated module again.
*** Foreground and background
*) "CALL ($6c8d)" tells the Workabout to send
a "machine switch on" event to the current program, whenever the Workabout
switches on, even if this program is in the background. If required,
use it just once at the start of your program.
*) "CALL($198d,0,0)" brings the current program to the
foreground.
*) "CALL($198d,100,0)" sends it to the background again.
Each of these should be followed by "gUPDATE" to ensure they take
effect immediately.
This example program comes to the foreground and beeps whenever you
turn the Workabout on. Be careful to enter the CALL
and GETEVENT statements exactly as shown.
PROC beepon:
local a%(6)
print "Hello"
call($6c8d) :gupdate
while 1
do
getevent a%()
if a%(1)=$404 :stop :endif :REM closedown
until a%(1)=$403 :REM machine ON
call($198d,0,0) :gupdate
beep 5,300 :pause 10 :beep 5,500
call($198d,100,0) :gupdate
endwh
ENDP
Note that the beep sound is produced by a buzzer on the Workabout
rather than a loudspeaker and so it is not very loud.
Note: when a program runs in the background it can stop the "automatic
turn off" feature from working. However, as soon as the program waits
for a keypress or an event, with GET/GET$ or GETEVENT,
auto-turn off can occur.
Auto-turn off can also occur if the program does a PAUSE (of
2 or more 20ths of a second), but only if the program has used "CALL($138b)"
("unmark as active")
-----------------------------------************ Cacheing procedures
Without procedure cacheing, procedures are loaded from file whenever
they are called and discarded when they return LOADM
simply loads a map listing procedure names and their positions in
the module file so that they can be loaded fairly efficiently. The
cache handling commands provide a method for keeping the code for
a procedure loaded after it returns it remains loaded until
a procedure called later requires the space in the cache. The strategy
is then to remove the least recently used procedures, making it more
likely that all the procedures called together in a loop, for example,
remain in the cache together, thus speeding up procedure calling significantly.
Cache handling keywords allow you to:
*) create a cache of a specified initial and maximum size using
"CACHE init%,max%". You can specify these up
to 32,767 bytes.
If you use hex, you can even exceed this figure, if you need
to eg "CACHE $9000,$9000". However, you cannot exceed
the 64k total memory limit which each Workabout process has.
*) prevent loading and removal of procedures from the cache
so that a given set of procedures can be guaranteed to remain in the
cache using "CACHE OFF". Procedures already in the cache are
still used when cacheing is off. The loading and removal of procedures
can subsequently be resumed using "CACHE ON".
*) tidy the cache by removing procedures that are no longer
in use (ie. procedures that have returned) using "CACHETIDY".
*) for advanced use during program development, further keywords
are provided for inspecting the contents of the cache at any time
(see CACHEHDR and CACHEREC).
*** Cache size
Cacheing procedures is not a cure all. Care should be taken that the
cache size is sufficient to load all procedures required for a fast
loop otherwise, for example, a large procedure may cause all the small
ones in a loop to be removed and equally, a small one may require
the large one to be removed, so that the cache provides no benefit
at all. In fact, the overhead needed for cache management can then
make your program less efficient than having no cache at all. If the
maximum cache size you can have is limited, careful use of "CACHE OFF"
should prevent such problems at the expense of not fitting all the
procedures in the loop in the cache. "CACHE OFF" is implemented
very efficiently and calling it frequently in a loop should not cause
much concern.
To guarantee that there is enough memory for a given cache size, create
the cache passing that value as the initial size using "TRAP CACHE init%,max%".
TRAP ensures that if the cache creation succeeds, ERR
returns zero and otherwise the negative `Out of memory' error is raised.
After creation, the cache will grow as required up to the maximum
size "max%" or until there is not enough free memory to grow it.
On failure to grow the cache, any procedures which will not fit into
the existing cache, even when unused procedures are removed, are simply
loaded without using the cache and are discarded when they return.
If you want to ensure a certain minimum cache size, say 10000 bytes,
but do not care how large it grows, you could use "TRAP CACHE 10000,$ffff"
so that the cache just grows up to the limits of memory. For a relatively
small program, you might want to load the whole program into cache
by making the cache size the same size as the module. This will in
fact be a little larger than required, unnecessarily including a procedure
name table and module file header which are not loaded into the cache.
The minimum cache size is 2000 bytes, which is used if any lower value
is specified. If the maximum size specified is less than the initial
size, the maximum is set to the initial size. The maximum cache size
cannot be changed once the cache has been created and an error is
returned if you attempt to do so.
The initial cache size should ideally be large enough to hold
all procedures that are to be cached simultaneously. There is no advantage
in growing the cache from its initial size when you know that a certain
minimum size is needed.
*** Procedures in unloaded modules
When a module is unloaded, all procedures in it that are no longer
in use are removed from the cache. Any procedure that is still in
use, is hidden in the cache by changing its first character to lower
case; when it finally returns, a hidden procedure is removed in the
normal manner to make room for loading a new procedure when the cache
is full. Note that it considered bad practice to unload a module containing
procedures that are still running eg. for a procedure to unload
its own module.
*** Cache timings
Calling an empty procedure that simply returns is approximately 10
times faster with a cache. This figure was obtained by calling such
a procedure 10000 times in a loop, both with cacheing off and on,
and subtracting the time taken running an empty loop in each case.
Clearly that case is one of the best for showing off the advantages
of cacheing and there is no general formula for calculating the speed
gain. The procedures that benefit most will be those that need most
module file access relative to their size in order to load them into
memory. The programmer cannot reasonably write code taking this into
account, so no further details are provided here.
The case described above does not require any procedures to be removed
from the cache to make room for new procedures when the cache is full,
and removal of procedures requires a fair amount of processing by
the cache manager. If many procedures in a time-critical section of
your program are loaded into the cache and not used often before removal,
the speed gain may be less than expected a larger cache may
be called for to prevent too many removals.
It should be noted however, that even with the worst case of procedures
being loaded into the cache for use just once before removal, having
a cache is often superior to having no cache. This is because the
cache manager reads module file data (required for loading the procedures
into memory) in one block rather than a few bytes at a time and it
is the avoidance of excessive file access which provides the primary
speed gains for cacheing.
*** Compatibility mode modules
Procedures in modules translated for the Series 3 cannot be loaded
into the cache. On encountering such a procedure, the cache manager
simply loads it without using the cache and discards it when it returns.
The reason for this is that a few extra bytes of data are stored in
the Workabout modules which are needed by the cache manager.
*** Potential problems in existing programs
It is possible that previously undiscovered bugs in existing OPL programs
are brought to light simply by adding code to use the cache.
Without cacheing, the variables in a procedure are followed immediately
by the code for the procedure. Writing beyond the variables (for example
reading too many bytes into the final variable using such keywords
as gPEEKLINE or KEYA) would have written over the code
itself but would have gone unnoticed unless you happened to loop back
to the corrupted code. With a cached procedure, the code no longer
follows your variables, so the corruption occurs elsewhere in memory,
resulting quite probably in the program crashing.
*** Controlling procedure cacheing
"TRAP CACHE initSize%,maxSize%" creates a cache of a specified
initial number of bytes, which may grow up to the specified maximum.
If the maximum is less than the initial size, the initial size becomes
the maximum. If growing the cache fails, normal loading without the
cache is used. The `In use' error (-9) is raised if a cache has
been created previously or the `Out of memory' error (-10) on failure
to create a cache of the specified initial size use the TRAP
command if required. Procedure code and other information needed for
setting up variables are loaded into the cache when the procedure
is called. If there is no space in the cache and enough space can
be regained, the least recently used procedures are removed. Otherwise
the procedure is loaded in the normal way without cacheing.
Once a cache has been created, "CACHE OFF" prevents further
cacheing although the cache is still searched when calling subsequent
procedures. "CACHE ON" may then be used to reenable cacheing.
Note that "CACHE ON" or "CACHE OFF" are ignored if used
before "CACHE initSize%,maxSize%".
*** Tidying the cache
CACHETIDY removes any procedures from
the cache that have returned to their callers. This might be called
after performing a large, self-contained action in the program which
required many procedures. Using CACHETIDY will then result
in speedier searching for procedures called subsequently and, more
importantly, will prevent the procedures being unloaded one at a time
when the need arises it is very efficient to remove a set
of procedures that are contiguous in the cache as is likely to be
the case in this situation.
Note that a procedure which has returned is automatically removed
from the cache if you unload the module it is in, so CACHETIDY
needn't be used for such a procedure.
*** Getting cache index header information
The CACHEHDR command is provided for advanced
use and is intended for use during program development only.
"CACHEHDR ADDR(hdr%())" reads the current cache index header
into the array "hdr%()" which must have at least 11 integer elements.
Note that any information returned is liable to change whenever a
procedure is called, so you cannot save these values over a procedure
call.
If no cache has yet been created, "hdr%(10)=0" and the other
data read is meaningless. Otherwise, the data read is as follows:
"hdr%(1)"
"hdr%(2)"
"hdr%(3)"
"hdr%(4)"
"hdr%(5)"
"hdr%(6)"
current address of the cache itself
number of procedures currently cached
maximum size of the cache in bytes
current size of the cache in bytes
number of free bytes in the cache
total number of bytes in cached procedures which are
freeable (ie. not running)
"hdr%(7)"
offset from the start of the cache index to the first
free index record
"hdr%(8)"
offset from start of cache index to most recently used
procedure's record; zero if none
"hdr%(9)"
offset from start of cache index to least recently used
procedure's record; zero if none
"hdr%(10)"
address of the cache index, or zero if no cache created
yet
"hdr%(11)"
non-zero if cacheing is on, and zero if it is off
The cache manager maintains an index for the cache consisting of an
index header containing overall information for the whole cache as
well as one index record for each procedure cached. All offsets mentioned
above give the number of bytes from the start of the index to the
procedure record specified. The index records for cached procedures
form a doubly linked list, with one list beginning with the most recently
used procedure (MRU), with offset given by "hdr%(8)", and the
other with the least recently used procedure (LRU) with offset given
by "hdr%(9)". A further singly linked list gives the offsets to
free index records. The linkage mechanism is described in the discussion
of CACHEREC below.
*** Getting a cache index record
The CACHEREC command is provided for advanced
use and is intended for use during program development only.
"CACHEREC ADDR(rec%()),offset%" reads the cache index record
(see the description of CACHEHDR above) at "offset%" into
array "rec%()" which must have at least 18 integer elements. "offset%=0"
specifies the most recently used (MRU) procedure's record if any and
"offset%<0" the least recently used (LRU) procedure's record if
any.
The data returned by CACHEREC is meaningless if no cache
exists (in which case "rec%(17)=0") or if there are no procedures
cached yet (when "hdr%(8)=0" as returned by CACHEHDR).
Each record gives the offset to both the more recently used and to
the less recently used procedure's record in the linked lists, except
for the MRU and the LRU procedures' records themselves which each
terminate one of the lists with a zero offset. The first free index
record (see CACHEHDR above) starts the free record list, in
which each record gives the offset of the next free record or zero
offset to terminate the list. To "walk" the cache index, you would
always start by calling CACHEREC specifying either the MRU
or LRU record offset, and use the values returned to read the less
or more recently used procedure's record respectively. Note that any
information returned is liable to change whenever a procedure is called,
so you cannot save these values over a procedure call.
For the free cell list, only "rec%(1)" is significant, giving
the offset of the next free index record. For the records in the lists
starting with either the LRU or MRU record, the data returned in "rec%()"
is:
"rec%(1)"
offset to less recently used procedure's record or zero
if on LRU
"rec%(2)"
offset to more recently used procedure's record or zero
if on MRU
"rec%(3)"
usage count zero if not running
"rec%(4)"
offset in cache itself to descriptor for building the
procedure frame
"rec%(5)"
offset in cache itself to translated code for the procedure
"rec%(6)"
offset in cache itself to the end of the translated
code for the procedure
"rec%(7)"
number of bytes used by the procedure in the cache itself
"rec%(8-15)"
leading byte counted procedure name, followed by
some private data
"rec%(16)"
address of the procedure's leading byte counted module
name
"rec%(17)"
address of the cache index, or zero if no cache created
yet
"rec%(18)"
non-zero if cacheing is on, and zero if it is off
For example, to print the names of procedures and their sizes from
MRU to LRU:
CACHEHDR ADDR(hdr%())
IF hdr%(10)=0
PRINT "No cache created yet"
RETURN
ENDIF
IF hdr%(8)=0
rem MRU zero?
PRINT "None cached currently"
RETURN
ENDIF
rec%(1)=0
rem MRU first
DO
CACHEREC ADDR(rec%()),rec%(1) rem less recently used
rem proc
PRINT PEEK$(ADDR(rec%(8))),rec%(7) rem name and size
UNTIL rec%(1)=0
-----------------------------------************ Sprite handling
*** How sprites work
OPL includes a set of keywords for handling a sprite
a user-defined black/grey/white graphics object of variable size,
displayed on the screen at a specified position.
The sprite can also be animated you can specify up
to 13 bitmap-sets which are automatically presented in a cycle,
with the duration for each bitmap-set specified by you. Each bitmap-set
may be displayed at a specifiable offset from the sprite's notional
position.
The 13 bitmap-sets are each composed of up to six bitmaps. The set
pixels in each bitmap specify one of the following six actions: black
pixels to be drawn; black pixels to be cleared; black pixels to be
inverted; grey pixels to be drawn; grey pixels to be cleared; or grey
pixels to be inverted. The bitmaps in a set must have the same size.
All the bitmaps in a set are drawn to the screen together and displayed
for the specified duration, followed by the next set, and so on.
If you do not specify that a pixel is to be drawn, cleared or inverted,
the background pixel is left unchanged.
Black pixels are drawn "on top of" grey pixels, so if you clear/invert
just the grey pixels in the sprite they will be hidden under any pixels
set black. So to clear/invert pixels on a background which has
both grey and black pixels set, you need to clear/invert both black
and grey pixels in the sprite.
The pixels of one colour (black or grey) which are set in
one bitmap of the bitmap-set should not overlap with those of the
same colour which are set in another bitmap in the same
bitmap-set. This is because the order in which the bitmaps are applied
is undefined. So, for example, do not specify that pixel (0,0) should
have the black pixel both drawn and cleared.
*** Why use sprites?
A sprite is useful for displaying something in foreground without
having to worry about restoring the background display. Also a sprite
can have any shape, leaving the background display all around it intact,
and it can even be hollow only the pixels specified by you
are drawn, cleared or inverted. Typically only one bitmap-set containing
two black bitmaps would be used one for setting and one for
clearing pixels.
You would not often use the sprite features in their full generality.
In fact, more than one bitmap-set is needed only for animation and
it is also seldom necessary to use all the available bitmaps in a
single bitmap-set.
*** Creating a sprite
"sprId%=CREATESPRITE" creates a sprite and returns the sprite
ID.
*** Appending a bitmap-set to a sprite
"APPENDSPRITE tenths%,bitmap$()"
"APPENDSPRITE tenths%,bitmap$(),dx%,dy%"
append a single bitmap-set to a sprite. These may be called up to
13 times for each sprite. "APPENDSPRITE" may be called only before
the sprite is drawn, otherwise it raises an error. "tenths%" gives
the duration in tenths of seconds for the bitmap-set to be displayed
before going on to the next bitmap-set in the sequence. It is ignored
if there is only one bitmap-set.
"bitmap$()" contains the names of the six bitmap files in the
set:
"bitmap$(1)" for setting black pixels
"bitmap$(2)" for clearing black pixels
"bitmap$(3)" for inverting black pixels
"bitmap$(4)" for setting grey pixels
"bitmap$(5)" for clearing grey pixels
"bitmap$(6)" for inverting grey pixels
Use """" to specify no bitmap. If """" is used for all the
bitmaps in the set, the sprite is left blank for the specified duration.
The array must have at least 6 elements.
All the bitmaps in a single bitmap-set must be the same size, otherwise
an `Invalid arguments' error is raised on attempting to draw the sprite.
Bitmaps in different bitmap-sets may differ in size. "dx%" and
"dy%" are the (x,y) offsets from the sprite position (see CREATESPRITE)
to the top-left of the bitmap-set with positive for right and down.
The default value of each is zero.
Sprites may use considerable amounts of memory. A sprite should generally
be created, initialised and closed in the same procedure to prevent
memory fragmentation. Care should also be taken in error handling
to close a sprite that is no longer in use.
Creating or changing a sprite consisting of many bitmaps requires
a lot of file access and should therefore be avoided if very fast
sprite creation is required. Once the sprite has been drawn, no further
file access is performed (even when it is animated) so the number
of bitmaps is no longer important.
*** Drawing a sprite
"DRAWSPRITE" x%,y%" draws a sprite in
the current window with top-left at pixel position "(x%,y%)".
The sprite must previously have been initialised using APPENDSPRITE
or the `Resource not open' error (-15) is raised. If any bitmap-set
contains bitmaps with different sizes, DRAWSPRITE raises an
`Invalid arguments' error (-2).
*** Changing a bitmap-set in a sprite
"CHANGESPRITE index%,tenths%,bitmap$()"
"CHANGESPRITE index%,tenths%,bitmap$(),dx%,dy%"
change the bitmap-set specified by "index%" (1 for the first bitmap-set)
in the sprite using the supplied bitmap files, offsets and duration
which are all used in the same way as for APPENDSPRITE.
CHANGESPRITE can be called only after DRAWSPRITE.
Note that if all or many bitmap-sets in the sprite need changing
or if each bitmap-set consists of many bitmaps, the time required
to read the bitmaps from file may be considerable, especially if fast
animation is in progress. In such circumstances, you should think
about closing the sprite and creating a new one, which will often
be more efficient.
*** Positioning a sprite
"POSSPRITE x%,y%" sets the position of the sprite to "(x%,y%)".
*** Closing a sprite
"CLOSESPRITE sprId%" closes the sprite with ID "sprId%".
*** Sprite example
The following code illustrates all the sprite handling keywords using
a sprite consisting of just two bitmap-sets each containing a single
bitmap.
PROC sprite:
LOCAL bit$(6,6),sprId%
crBits:
REM create bitmap files
gAT gWIDTH/2,0
gFILL gWIDTH/2,gHEIGHT,0 REM fill half of screen
sprId%=CREATESPRITE
bit$(1)="" :bit$(2)=""
bit$(3)="cross" REM black cross, pixels inverted
bit$(4)="" :bit$(5)="" :bit$(6)=""
APPENDSPRITE 5,bit$(),0,0 REM cross for half a second
bit$(1)="" :bit$(2)="" :bit$(3)=""
bit$(4)="" :bit$(5)="" :bit$(6)=""
APPENDSPRITE 5,bit$(),0,0 REM blank for half a second
DRAWSPRITE gWIDTH/2-5,gHEIGHT/2-5
REM animate the sprite
BUSY "flash cross, c",3 REM no offset
REM ('c' for central)
GET
bit$(3)="box"
REM black box, pixels inverted
CHANGESPRITE 2,5,bit$(),0,0
REM in 2nd bitmap-set
BUSY "cross/box, c/c",3 REM central/central
GET
CHANGESPRITE 2,5,bit$(),40,0
REM offset by 40 pixels right
BUSY "cross/box, c/40",3 REM central/40
GET
bit$(3)=""
REM Remove the cross in set 1
CHANGESPRITE 1,3,bit$(),0,0 REM display for 3/10 seconds
BUSY "flash box, 40",3 REM box at offset 40 still
GET
bit$(3)="cross"
CHANGESPRITE 1,5,bit$(),0,0
REM cross centralised - set 1
bit$(3)="box"
CHANGESPRITE 2,5,bit$(),0,0
REM box centralised - set 2
BUSY "Escape quits"
DO
POSSPRITE RND*(gWIDTH-11),RND*(gHEIGHT-11)
REM move sprite randomly
PAUSE -20
REM once a second
UNTIL KEY = 27
CLOSESPRITE sprId%
ENDP
PROC crBits:
REM create bitmap files if they don't exist
IF NOT EXIST("cross.pic") OR NOT EXIST("box.pic")
gCREATE(0,0,11,11,1,1)
gAT 5,0 :gLineBy 0,11
gAT 0,5 :gLineBy 11,0
gSAVEBIT "cross"
gCLS
gAT 0,0
gBOX gWIDTH,gHEIGHT
gSAVEBIT "box"
gCLOSE gIDENTITY
ENDIF
ENDP
-----------------------------------************ Scanning the keyboard directly
It is sometimes useful to know which keys are being pressed at a given
moment and also when a key is released. For example, in a game, a
certain key might start some action and releasing the key might stop
it.
"CALL($288e,ADDR(scan%()))" returns with the array "scan%()",
which must have at least 10 elements, containing a bit set for keys
currently being pressed.
Every key on the keyboard is represented by a unique bit, including
the modifier keys (Shift, Control etc).
A set bit simply signifies a pressed key a key pressed on
its own gives one bit set; that same key with a modifier gives the
same bit set with another bit for the modifier; the modifier on its
own gives the same modifier bit on its own.
The following table lists each key (according to the text printed
on the physical key itself), the "scan%()" array element for that
key and the hexadecimal bit mask to be "AND"ed with that array
element to check whether the key is being pressed.
key
Esc
1
2
3
4
5
6
7
8
9
0
+
Delete
Tab
Q
"scan%()"
8
8
8
6
5
5
8
4
3
3
2
2
3
1
7
mask
$100
$02
$04
$40
$04
$08
$08
$40
$08
$10
$10
$08
$01
$04
$02
W
E
R
T
Y
U
I
O
P
Enter
Control
A
S
D
F
G
H
J
K
L
*
/
Left shift
Z
X
C
V
B
N
M
,
.
Up
Right shift
Psion
Menu
Space
Help
Left
Down
Right
7
6
5
5
1
4
3
3
2
2
1
3
7
7
6
6
5
8
4
3
3
2
2
2
7
7
6
6
5
1
4
4
8
8
4
1
6
5
4
1
1
1
$20
$20
$02
$10
$08
$20
$04
$20
$20
$04
$01
$80
$04
$10
$10
$02
$20
$40
$10
$02
$40
$40
$02
$80
$08
$40
$08
$04
$40
$40
$08
$02
$10
$20
$80
$80
$80
$01
$04
$10
$20
$02
For example, pressing Tab sets bit 2 of "scan%(1)", pressing Control
sets bit 7 of "scan%(3)" and pressing both together sets both
these bits. So Tab is being pressed if "scan%(1) AND $04" is non-zero,
and Control is being pressed if "scan%(3) AND $80" is non-zero.
A possible strategy for scanning the keys might be to wait for any
key of interest using "GETEVENT" or "GET" (allowing switch
off and less intensive use of the battery); start the required action
which is to be continued only while the key is being pressed; scan
the keyboard as discussed above until the key is released and then
stop the action; wait for the next key and repeat.
Note that the key returned by GETEVENT or GET
is not precisely synchronised with those scanned, so once you have
waited for a relevant key you should scan for all the keys pressed,
ignoring the keycode returned by GETEVENT or GET.
-----------------------------------************ I/O functions and commands
OPL includes powerful facilities to handle input and output (`I/O').
These functions and commands can be used to access all types of files
on the Workabout, as well as various other parts of the low-level
software.
This section describes how to open, close, read and write to files,
and how to set the position in a file. The data file handling commands
and functions have been designed for use specifically with data files.
The I/O functions and commands are designed for general file access.
You don't need to use them to handle data files.
These are powerful functions and commands and they must be used
with care. Before using them you must read this chapter closely
and have a good grounding in OPL in general.
*** Error handling
You should have a good understanding of error handling before using
the I/O functions.
The functions in this section never raise an OPL error message. Instead
they return a value if this is less than zero an error has
occurred. It is the responsibility of the programmer to check all
return values, and handle errors appropriately. Any error number returned
will be one of those in the list given in the error handling chapter.
You can use ERR$ to display the error as usual.
*** Handles
Many of these functions use a handle, which must be an integer
variable. IOOPEN assigns this handle variable a value, which
subsequent I/O functions use to access that particular file. Each
file you IOOPEN needs a different handle variable.
*** `var' variables
`var' denotes an argument which should normally be a LOCAL
or GLOBAL variable. (Single elements of arrays may also be
used, but not field variables or procedure parameters.) Where you
see `var' the address of the variable is passed, not the value
in it. (This happens automatically; don't use ADDR yourself.)
In many cases the function you are calling passes information back
by setting these `var' variables.
`var' is just to show you where you must use a suitable variable
you don't actually type it.
For example:
"ret%=IOOPEN(var handle%,name$,mode%)"
indicates that "IOOPEN(h%,"abc",0)" is OK while" "IOOPEN(100,"abc",0)"
is incorrect.
It is possible, though, that you already have the address
of the variable to use. It might be that this address is held in a
field variable, or is even a constant value, but the most common situation
is when the address was passed as a parameter to the current procedure.
If you add a `#' prefix to a `var' argument, this tells OPL that the
expression following is the address to be used, not a variable whose
address is to be taken.
Here is an example program:
PROC doopen:(phandle%, name$, mode%)
REM IOOPEN, handling errors
LOCAL error%
error% = IOOPEN(#phandle%, name$, mode%)
IF error% : RAISE error% : ENDIF
ENDP
The current value held in "phandle%" is passed to IOOPEN.
You might call "doopen:" like this:
local filhand%,...
...
doopen:(addr(filhand%), "log.txt", $23)
...
The "doopen:" procedure calls IOOPEN with the address of
"filhand%", and IOOPEN will write the handle into "filhand%".
If you ever need to add or subtract numbers from the address
of a variable, use the UADD and USUB functions, or
you run the risk of `Integer overflow' errors.
*** Opening a file with IOOPEN
"ret%=IOOPEN(var handle%,name$,mode%)"
or
"ret%=IOOPEN(var handle%,address%,mode%)"
for unique file creation
Creates or opens a file (or device) called "name$" and sets "handle%"
to the handle to be used by the other I/O functions.
"mode%" specifies how the file is to be opened. It is formed by
ORing together values which fall into the three following categories:
Mode Category 1 Open mode
One and only one of the following values must be chosen from this
category.
$0000
Open an existing file (or device). The initial current
position is set to the start of the file.
$0001
Create a file which must not already exist.
$0002
Replace a file (truncate it to zero length) or create
it if it does not exist.
$0003
Open an existing file for appending. The initial current
position is set to the end of the file. For text format files (see
$0020 below) this is the only way to position to end of file.
$0004
Creates a file with a unique name. For this case, you
must use the address of a string instead of "name$". This
string specifies only the path of the file to be created (any file
name in the string is ignored). The string at "address%" is then
set by IOOPEN to the unique file name generated (this will
include the full path). The string must be large enough to take 130
characters (the maximum length file specification). For example:
" s$="M:\home\"
IOOPEN(handle%,ADDR(s$),mode%)
"This mode is typically used for temporary files which will later
be deleted or renamed."
Mode Category 2 File format
One and only one of the following values must be chosen from this
category. When creating a file, this value specifies the format of
the new file. When opening an existing file, make sure you use the
format with which it was created.
$0000
The file is treated as a byte stream of binary data with
no restriction on the value of any byte and no structure imposed upon
the data. Up to 16K can be read from or written to the file in a single
operation.
$0020
The file is treated as a sequence of variable length records.
The records are assumed to contain text terminated by any combination
of the CR and LF ("$0D", "$0A") characters.
The maximum record length is 256 bytes and Control-Z ("$1A") marks
the end of the file.
Mode Category 3 Access flags
Any combination of the following values may be chosen from this category.
$0100
Update flag. Allows the file to be written to as well
as read. If not set, the file is opened for reading only. You must
use this flag when creating or replacing a file.
$0200
Choose this value if you want the file to be open for
random access (not sequential access), using the IOSEEK
function.
$0400
Specifies that the file is being opened for sharing
for example, with other running programs. Use if you want to read,
not write to the file. If the file is opened for writing ("$0100"
above), this flag is ignored, since sharing is then not feasible.
If not specified, the file is locked and may only be used by this
running program.
*** Closing a file with IOCLOSE
Files should be closed when no longer being accessed. This releases
memory and other resources back to the system.
ret%=IOCLOSE(handle%)
Closes a file (or device) with the handle "handle%" as set by
IOOPEN.
*** Reading a file with
IOREAD
ret%=IOREAD(handle%,address%,maxLen%)
Reads up to "maxLen%" bytes from a file with the handle "handle%"
as set by IOOPEN. "address%" is the address of a buffer
into which the data is read. This buffer must be large enough to hold
a maximum of "maxLen%" bytes. The buffer could be an array or
even a single integer as required. No more than 16K bytes can be read
at a time.
The value returned to "ret%" is the actual number of bytes read
or, if negative, is an error value.
Text files
If "maxLen%" exceeds the current record length, data only up to
the end of the record is read into the buffer; no error is returned
and the file position is set to the next record.
If a record is longer than "maxLen%", the error value `Record
too large' (-43) is returned. In this case the data read is valid
but is truncated to length "maxLen%", and the file position is
set to the next record.
A string array "buffer$(255)" could be used, but make sure that
you pass the address "UADD(ADDR(buffer$),1)" to IOREAD.
This leaves the leading byte free. You can then POKEB the leading
byte with the count (returned to "ret%") so that the string conforms
to normal string format. See the example program.
Binary files
If you request more bytes than are left in the file, the number of
bytes actually read (even zero) will be less than the number requested.
So if "ret%<maxLen%", end of file has been reached. No error is
returned by IOREAD in this case, but the next IOREAD
would return the error value `End of file' (-36).
To read up to 16K bytes (8192 integers), you could declare an integer
array "buffer%(8192)".
*** Writing to a file
ret%=IOWRITE(handle%,address%,length%)
Writes "length%" bytes stored in a buffer at "address%" to
a file with the handle "handle%".
When a file is opened as a binary file, the data written by IOWRITE
overwrites data at the current position.
When a file is opened as a text file, IOWRITE writes a single
record; the closing CR/LF is automatically added.
*** Positioning within a file
ret%=IOSEEK(handle%,mode%,var offset&)
Seeks to a position in a file that has been opened for random access
(see IOOPEN above).
"mode%" specifies how the argument "offset&" is to be used.
"offset&" may be positive to move forwards or negative to move
backwards. The values you can use for "mode%" are:
1
Set position in a binary file to the absolute value specified
in "offset&", with 0 for the first byte in the file.
2
Set position in a binary file to "offset&" bytes from the
end of the file.
3
Set position in a binary file to "offset&" bytes relative
to the current position.
6
Rewind a text file to the first record. "offset&" is not
used, but you must
still pass it as a argument, for compatibility with the other cases.
IOSEEK sets the variable "offset&" to the absolute position
set.
*** Example - displaying a plain
text file
This program opens a plain text file, such as one created
with the `Save as' option in the in-built Database, and types it to
the screen.
Press Esc to quit and any other key to pause the typing to the screen.
PROC ioType:
LOCAL ret%,fName$(128),txt$(255),address%
LOCAL handle%,mode%,k%
PRINT "Filename?", :INPUT fName$ : CLS
mode%= $0400 OR $0020
REM open=$0000, text=$0020, share=$0400
ret%=IOOPEN(handle%,fName$,mode%)
IF ret%<0
showErr:(ret%)
RETURN
ENDIF
address%=ADDR(txt$)
WHILE 1
k%=KEY
IF k% REM if keypress
IF k%=27 REM Esc pressed
RETURN
REM otherwise wait for a key
ELSEIF GET=27
RETURN REM Esc pressed
ENDIF
ENDIF
ret%=IOREAD(handle%,address%+1,255)
IF ret%<0
IF ret%<>-36 REM NOT EOF
showErr:(ret%)
ENDIF
BREAK
ELSE
POKEB address%,ret%
REM leading byte count
PRINT txt$
ENDIF
ENDWH
ret%=IOCLOSE(handle%)
IF ret%
showErr:(ret%)
ENDIF
PAUSE -100 :KEY
ENDP
PROC showErr:(val%)
PRINT "Error",val%,err$(val%)
GET
ENDP
*** I/O device handling
The following I/O functions provide access to devices. A full description
is not within the scope of this manual, since these functions require
extensive knowledge of the Workabout operating system
and related programming techniques. The syntax and argument descriptions
are provided here for completeness.
"ret%=IOW(handle%,func%,var arg1,var arg2")"
The device driver opened with "handle%" (as returned by IOOPEN)
performs the synchronous I/O function "func%" with the two further
arguments. The size and structure of these two arguments is specified
by the particular device driver's documentation.
"ret%=IOA(handle%,func%,var status%,var arg1,var arg2)"" The device driver opened with
"handle%"
(as returned by IOOPEN) performs the asynchronous I/O function
"func%" with two further arguments. The size and structure of
these two arguments is specified by the particular device driver's
documentation.
Asynchronous means that the IOA returns immediately,
and the OPL program can carry on with other statements. "status%"
will usually be set to -46, which means that the function is still
pending.
When, at some later time, the function completes, "status%" is
automatically changed. (For this reason, "status%" should usually
be global if the program is still running, "status%" must
be available when the request completes, or the program will probably
crash.) If "status%" >=0, the function completed without error.
If <0, the function completed with error. The error number is specific
to the device driver.
At the same time, a signal is sent to the running OPL program.
In most cases, you cannot perform another I/O read/write function
to this device until you first read the signal of this function's
completion. If this is the only I/O device with a function pending,
wait for the signal with "IOWAITSTAT status%". (If you have
other functions pending on other devices, you must use IOWAIT
and IOSIGNAL. These commands are described below.)
Alternatively, you can cancel the pending function with "IOW(handle%,4)".
The program will still receive a signal, which should be read with
IOWAITSTAT or IOWAIT.
If an OPL program is ready to exit, it does not have to wait for any
signals from pending IOA calls.
"IOWAIT"" Wait for an asynchronous
request (such as one requested by IOC or IOA) to complete.
IOWAIT returns when any asynchronous I/O function completes.
Check "status%" to see whether it was the function which you called
with IOA. You must keep a count of the number of times IOWAIT
returns due to other functions completing. When "status%" finally
shows that IOWAIT has returned because of this function
completing, you must then call IOSIGNAL once for each other
function which completed, to replace these other signals.
If you have no other functions pending on different I/O handles, use
IOWAITSTAT instead.
"IOSIGNAL"" Replace a signal of
an I/O function's completion. See IOWAIT.
"IOWAITSTAT var status%""
Wait for a particular asynchronous function, called with IOA,
to complete. This saves using IOWAIT, checking each time to
see if it was the desired function completing, and finally calling
IOSIGNAL for each unexpected function completion.
"IOYIELD"" Ensure that any asynchronous
function is given a chance to run. Some devices are unable to perform
an asynchronous request if an OPL program becomes computationally
intensive, using no I/O (screen, keyboard etc) at all. In such cases,
the OPL program should use IOYIELD before checking its "status%"
variable. IOYIELD is the equivalent of IOSIGNAL followed
by IOWAIT the IOWAIT returns immediately with
the signal from IOSIGNAL, but the IOWAIT causes any
asynchronous handlers to run.
"IOC(handle%,func%,var status%,var a1,var a2")
"IOC(handle%,func%,var status%,var a1)"
"IOC(handle%,func%,var status%)" Make an I/O request
with guaranteed completion. This has the same form as IOA but
it returns zero always (ie the return value can be ignored). It is
effectively the same as:
ret%=IOA(h%,f%,status%,...)
IF ret%<0
IF ret%=-46 :RAISE -1 :ENDIF
status%=ret% :IOSIGNAL
ENDIF
IOC allows you to assume that the request started successfully
any error is always given in the status word "status%". If there
was an error, "status%" contains the error code and the IOSIGNAL
causes the next IOWAIT to return immediately as if the error
occurred after completion. There is seldom a requirement to
know whether an error occurred on starting a function, and IOC
should therefore be used in preference to IOA nearly always.
"IOCANCEL(handle%)"" Cancels
any outstanding asynchronous I/O request (IOC or IOA)
on the specified channel, causing them to complete with the completion
status word containing -48 ("I/O cancelled"). The return value is
always zero and may be ignored. Device drivers that support truly
asynchronous services provide a cancel service. The detailed effect
of the cancel depends on the device driver. However, the following
general principles apply:
*) The cancel precipitates the completion of the request (it
does not stop the request from completing).
*) The cancel may or may not be effective (ie. the request
may complete naturally before the cancel is processed).
*) After a cancel, you must still process the completion of
the asynchronous request (typically by immediately calling IOWAITSTAT
to "use up" the signal).
The IOCANCEL function is harmless if no request is outstanding
(eg if the function completed just before cancellation requested).
"err%=KEYA(var status%,key%(1))""
This is an asynchronous keyboard read function. You must declare an
integer array with two elements here, "key%(1)" and "key%(2)"
to receive the keypress information. If a key is pressed, the information
is returned in this way:
*) "key%(1)" is assigned the character code of the key.
*) The least significant byte of "key%(2)" takes the key
modifier, in the same way as KMOD 2 for Shift down,
4 for Control down and so on. KMOD cannot be used with KEYA.
*) The most significant byte of "key%(2)" takes the count
of keys pressed (0 or 1).
KEYA needs an IOWAIT in the same way as IOA.
KEYA has been included in OPL because the handle of the keyboard
driver is unknown to the programmer. Otherwise it is equivalent to
"IOA(keyhand%,1,status%,key%())".
"err%=KEYC(var status%)"" Cancels
a KEYA.
*** Some useful IOW functions
IOW has this specification:
ret%=IOW(handle%,func%,var arg1,var arg2)
Here are some uses:
LOCAL a%(6)
a%(1)=x1% :a%(2)=y1%
a%(3)=x2% :a%(4)=y2%
IOW(-2,8,a%(),a%()) REM 2nd a% is ignored
reads the cursor
position in the rectangle "x1%,y1%" (top left),
"x2%,y2%" (bottom right), writing the "x" and
"y" positions to "a%(5)" and
"a%(6)" respectively. This returns "0,0", not
"1,1", as the top left.
Set "x1%,y1%,x2%,y2%" to the screen top left and bottom right
(set by SCREEN), to read the cursor position in the current
screen.
LOCAL i%,a%(6)
i%=2
a%(1)=x1% :a%(2)=y1%
a%(3)=x2% :a%(4)=y2%
IOW(-2,7,i%,a%())
clears a rectangle at
"x1%,y1%" (top left), "x2%,y2%" (bottom
right). If "y2%" is one greater than "y1%",
this will clear part or all of a line.
*** Example of IOW screen functions
The final two procedures in this module call the two IOW screen
functions described beforehand. The rest of the module lets you select
the function and values to use. It uses the technique used in the
`Friendlier interaction' chapter of handling menus and hot-keys by
calling procedures with string expressions.
PROC iotest:
GLOBAL x1%,x2%,y1%,y2%
LOCAL i%,h$(2),a$(5)
x1%=2 :y1%=2
x2%=25 :y2%=5 REM our test screensize
SCREEN x2%-x1%,y2%-y1%,x1%,y1%
AT 1,1
PRINT "Text window IO test"
PRINT "Psion-Esc quits"
h$="cr" REM our hot-keys
DO
i%=GET
IF i%=$122 REM Menu key
mINIT
mCARD "Set","Rect",%r
mCARD "Sense","Cursor",%c
i%=MENU
IF i% AND INTF(LOC(h$,CHR$(i%)))
a$="proc"+chr$(i%)
@(a$):
ENDIF
ELSEIF i% AND $200 REM hot-key
i%=(i%-$200)
i%=LOC(h$,CHR$(i%)) REM One of ours?
IF i%
a$="proc"+MID$(h$,i%,1)
@(a$):
ENDIF REM ignore other weird keypresses
ELSE REM some other key, so return it
PRINT CHR$(i%);
ENDIF
UNTIL 0
ENDP
PROC procc:
LOCAL a&
a&=iocurs&:
PRINT "x";1+(a& AND &ffff);
PRINT "y";1+(a&/&10000);
ENDP
PROC procr:
LOCAL xx1%,yy1%,xx2%,yy2%
LOCAL xx1&,yy1&,xx2&,yy2&
dINIT "Clear rectangle"
dLONG xx1&,"Top left x",1,x2%-x1%
dLONG yy1&,"Top left y",1,y2%-y1%
dLONG xx2&,"Bottom left x",2,x2%-x1%
dLONG yy2&,"Bottom left y",2,y2%-y1%
IF DIALOG
xx1%=xx1&-1 :xx2%=xx2&-1
yy1%=yy1&-1 :yy2%=yy2&-1
iorect:(xx1%,yy1%,xx2%,yy2%)
ENDIF
ENDP
PROC iocurs&:
LOCAL a%(4),a&
REM don't change the order of these!
a%(1)=x1% :a%(2)=y1%
a%(3)=x2% :a%(4)=y2%
IOW(-2,8,a%(),a%()) REM 2nd a% is ignored
RETURN a&
ENDP
PROC iorect:(xx1%,yy1%,xx2%,yy2%)
LOCAL i%,a%(6)
i%=2 :REM "clear rect" option
a%(1)=xx1% :a%(2)=yy1%
a%(3)=xx2% :a%(4)=yy2%
IOW(-2,7,i%,a%())
ENDP
-----------------------------------************ OPL database information
"ODBINFO var info%()" is provided for advanced
use only and allows you to use OS and CALL to call DbfManager
interrupt functions not accessible with other OPL keywords.
The description given here will be meaningful only to those who have
access to full SDK documentation of the DbfManager services, which
explains any new terms. Since that documentation is essential for
use of "ODBINFO", no attempt is made here to explain these terms.
ODBINFO returns "info%()", which must have four elements
containing pointers to four blocks of data; the first corresponds
to the file with logical name "A", the second to "B" and so
on.
Take extreme care not to corrupt these blocks of memory, as they
are the actual data structures used by the OPL runtime interpreter.
A data block which has no open file using it has zero in the first
two bytes. Otherwise, the block of data for each file has the following
structure, giving the offset to each component from the start of the
block and with offset 0 for the 1st byte of the block:
Offset Bytes
0
2
2
4
6
8
10
12
13
14
15
16
2
2
2
2
2
1
1
1
1
2
Description
DBF system's file control block (handle)
or zero if file not open
offset in the record buffer to the current record
pointer to the field name buffer
number of fields
pointer to start of record buffer
length of a NULL record
non-zero if all fields are text
non-zero for read-only file
non-zero if record has been copied down
number of text fields
pointer to device name
****** Example
To copy the Descriptive Record of logical file "B"
to logical file "C":
PROC dbfDesc:
LOCAL ax%,bx%,cx%,dx%,si%,di%
LOCAL info%(4),len%,psrc%,pdest%
ODBINFO info%()
bx%=PEEKW(info%(2)) REM handle of logical file B
ax%=$1700
REM DbfDescRecordRead
IF OS($d8,ADDR(ax%)) and 1
RETURN ax% OR $ff00 REM return the error
ENDIF
REM the descriptive record has length ax%
REM and is at address peekW(uadd(info%(2),8))
IF ax%=0
RETURN 0
REM no DescRecord
ENDIF
len%=ax%+2
REM length of the descriptive
REM record read + 2-byte header
psrc%=PEEKW(uadd(info%(2),8))
pdest%=PEEKW(uadd(info%(3),8))
CALL($a1,0,len%,0,psrc%,pdest%)
REM copy to C's buffer
cx%=len%
bx%=PEEKW(info%(3)) REM handle of logical file C
ax%=$1800
REM DbfDescRecordWrite
IF OS($d8,ADDR(ax%)) and 1
RETURN ax% OR $ff00
ENDIF
RETURN 0
REM success
ENDP
-----------------------------------************ DYL handling
This section contains a complete reference description of OPL's support
for accessing previously created dynamic libraries (DYLs).
These libraries have an object-oriented programming (OOP) user-interface
and several have been built into the Workabout ROM for use
by the ROM applications. DYLs cannot be created using OPL.
Since a vast amount of documentation would need to be provided
to describe the essential concepts of OOP and the services available
in existing DYLs, no attempt is made to supply it here. This section
simply introduces the syntax for all the OOP keywords supported in
OPL with a brief description of each. Also, OOP terminology is used
here without explanation, to cater for those who have previous experience
of DYL handling in the `C' programming language.
*** `var' arguments
The use of `var' and "#" for arguments was discussed earlier in
this chapter in the section `I/O functions and commands'. The DYL
handling keywords use `var' and "#" in the same way, for example:
"ret%=SEND(pobj%,method%,var p1,var p2,var p3)".
This is because many DYL methods need the address of a variable
or of a structure to be passed to them.
When you use a LOCAL or GLOBAL variable as the `var'
argument, the address of the variable is used. (You cannot use procedure
parameters or field variables, for this reason.) If you use a "#"
before a `var' argument, though, the argument/value is used directly,
instead of its address being used.
If, for example, you need to call a method with "p1" the address
of a long variable "a&", "p2" the integer constant 3, and
"p3" the address of a zero terminated string "X", you could call
it as follows:
s$="X"+CHR$(0) REM zero terminate
p%=UADD(ADDR(s$),1) REM skip leading count byte
ret%=SEND(pobj%,method%,a&,#3,#p%)
The address of "a&" is passed because there is no "#".
"3" and the value in "p%" are passed directly (no address
is taken) because they are preceded by "#".
*** Loading a DYL
"ret%=LOADLIB(var cathand%,name$,link%)" loads and optionally
links a DYL that is not in the ROM. If successful, writes the category
handle to "cathand%" and returns zero. You would normally only
set "link%" to zero if the DYL uses another DYL which you have
yet to load in which case LINKLIB would subsequently
be used. The DYL is shared in memory if already loaded by another
process.
*** Unloading a DYL
"ret%=UNLOADLIB(cathand%)" unloads a DYL from memory. Returns
zero if successful.
*** Linking a DYL
"LINKLIB cathand%" links any libraries that have been loaded
using LOADLIB. LINKLIB is not likely to be used much
in OPL pass "link%" with a non-zero value to LOADLIB
instead.
*** Finding a category handle given its name
"ret%=FINDLIB(var cathand%,name$)" finds DYL category "name$"
(including ".DYL" extension) in the ROM. On success returns zero and
writes the category handle to "cathand%". To get the handle of
a RAM-based DYL, use LOADLIB which guarantees that the DYL
remains loaded in RAM. FINDLIB will get the handle of a RAM-based
DYL but does not keep it in RAM.
*** Converting a category number to a handle
"cathand%=GETLIBH(catnum%)" converts a category number "catnum%"
to a handle. If "catnum%" is zero, this gets the handle for "OPL.DYL" .
*** Creating an object by category number
"pobj%=NEWOBJ(catnum%,clnum%)" creates a new object by category
number "catnum%" belonging to the class "clnum%", returning
the object handle on success or zero if out of memory. This keyword
simply converts the category number supplied to a category handle
using GETLIBH and then calls NEWOBJH.
*** Creating an object by category handle
"pobj%=NEWOBJH(cathand%,clnum%)" creates a new object by category
handle "cathand%" belonging to the class "clnum%", returning
the object handle on success or zero if out of memory.
*** Sending a message to an object
"ret%=SEND(pobj%,method%)"
"ret%=SEND(pobj%,method%,var p1)"
"ret%=SEND(pobj%,method%,var p1,var p2)"
"ret%=SEND(pobj%,method%,var p1,var p2,var p3)"
send a message to the object "pobj%" to call the method number
"method%", passing between zero and three arguments depending
on the requirements of the method, and returning the value returned
by the selected method.
*** Protected message sending
"ret%=ENTERSEND(pobj%,method%)"
"ret%=ENTERSEND(pobj%,method%,var p1)"
"ret%=ENTERSEND(pobj%,method%,var p1,var p2)"
"ret%=ENTERSEND(pobj%,method%,var p1,var p2,var p3)"
send a message to an object with protection.
Methods which return errors by leaving must be called with
protection.
ENTERSEND is the same as SEND except that, if the method
leaves, the error code is returned to the caller; otherwise the value
returned is as returned by the method.
Use ENTERSEND0 (described next) for methods which leave but
do not return a value explicitly on success.
*** Protected message sending (returns zero on success)
"ret%=ENTERSEND0(pobj%,method%)"
"ret%=ENTERSEND0(pobj%,method%,var p1)"
"ret%=ENTERSEND0(pobj%,method%,var p1,var p2)"
"ret%=ENTERSEND0(pobj%,method%,var p1,var p2,var p3)"
send a message to an object with protection and guarantee that the
known value zero is returned on success. Otherwise ENTERSEND0
is the same as ENTERSEND.
Methods which return errors by leaving but return nothing (or
NULL) on success must use ENTERSEND0. Besides providing
protection, ENTERSEND0 also returns zero if the method did
not leave, or the negative error code if it did.
If ENTERSEND were incorrectly used instead and the method completed
successfully (i.e. without leaving), the return value would be random
and could therefore be in the range of the error codes implying that
the method failed.
-----------------------------------************ Dynamic memory allocation
*** Overview of memory usage
For each running OPL program (or process) the operating system
automatically allocates memory which can grow up to a maximum of 32
bytes less than 64K. The actual memory used, up to this limit, depends
on the requirements of the process and is automatically grown or shrunk
as necessary. This memory is called the process data segment
and contains all the data used by the process as well as some fixed
length data at low memory in the segment needed by the operating system
to manage the process and for other system data.
Although the data segment for an OPL process contains several components,
the only component of significant interest to the OPL programmer is
the process heap. This section describes several keywords for
accessing the heap.
The heap is essentially a block of memory at the highest addresses
in a process data segment, so that the operating system can grow and
shrink the heap simply by growing and shrinking the data segment and
without having to move other blocks of memory at higher addresses
in the data segment. The heaps of different processes are totally
independent you need concern yourself only with the heap used
in your own data segment.
*** The heap allocator
The heap allocator keywords are used to allocate, resize and free
variable length memory cells from the process heap. Cells typically
range in size from tens of bytes to a few kilobytes. Allocated cells
are referenced directly by their address; they do not move to compact
free space left by freed cells.
Heap allocator keywords are:
*) ALLOC allocates a cell of specified
size, returning its address.
*) FREEALLOC frees a previously
allocated cell, which is returned to the heap.
*) REALLOC changes the size of a
cell, returning its new address.
*) ADJUSTALLOC opens or closes
a gap in the middle of a cell (useful for insertion or deletion of
cell content), changing the size of the cell as appropriate.
*) LENALLOC returns the size of
a cell.
*** The heap structure
Initially, the heap consists of a single free cell. After a number
of calls to allocate and free cells, the heap typically consists of
ranges of adjacent allocated cells separated by single free cells
(which are linked). If a cell being freed is next to another free
cell the two cells are automatically joined to make a single cell
to prevent the free cell linked list from growing unnecessarily.
Writing beyond the end of a cell will corrupt the heap's integrity.
Such errors are difficult to debug because there is no immediate effect
the corruption is a "time bomb". It will eventually be detected
resulting in the process exiting prematurely by a subsequent
allocator call such as "FREEALLOC".
*** Growing and shrinking the heap
The heap is not fixed in size. The operating system can grow the heap
to satisfy allocation requests or shrink it to release memory back
to the system.
Allocation of cells is based on "walking" the free space list to find
the first free cell that is big enough to satisfy the request. If
no free cell is big enough, the operating system will attempt to grow
the data segment to add more free space at the end of the heap.
If there is no memory in the system to accommodate growth or if the
data segment has reached its maximum size of (approximately) 64K,
the allocate request fails. There are few circumstances when an allocate
request can be assumed to succeed and calls to ALLOC, REALLOC
and ADJUSTALLOC should have error recovery code to handle a
failure to allocate.
*** Lost cells
There are cases in which programs allocate a sequence of cells which
must either exist as a whole or not at all. If during the allocate
sequence one of the later allocations fails, the previously allocated
cells must be freed. If this is not done, the heap will contain unreferenced
cells that consume memory to no purpose.
When designing multi-cell sequences of this kind, you should be mindful
of the recovery code that must be written to free partially built
multi-cell structures. The fewer the cells in such a structure, the
simpler the recovery code is.
*** Internal fragmentation
The free space in the heap is normally fragmented to some extent;
the largest cell that can be allocated is substantially smaller than
the total free space. Excessive fragmentation, where the free space
is distributed over a large number of cells and where, by
implication, many of the free cells are small should be avoided
because it results in inefficient use of memory and reduces the speed
with which cells are allocated and freed.
Practical design hints for limiting internal fragmentation are:
*) Avoid using the heap for small, highly transient data structures
for which ordinary variables are adequate. High frequency cycling
through allocate and free pairs, "churns" the heap and leads to a
long free space list.
*) When you have a large number of variable length data structures
particularly when they are frequently resized, "granularise" them
(ie. round the allocation up to a multiple of some reasonable value)
so that you decrease the chance of leaving small, unusable free space
cells.
*** The OPL runtime interpreter and the heap
The OPL runtime interpreter, which actually runs your program, uses
the same data segment and heap as your program and makes extensive
use of the heap. It is very important that you should understand the
interpreter's use of the heap at least to a limited extent
to avoid substantial internal fragmentation as described above.
Whenever an OPL procedure is called, a cell is allocated to store
data required by the interpreter to manage the procedure. The same
cell contains all the variables that you have declared in the procedure.
When cacheing is not being used, the same cell also contains the translated
code for the procedure which is interpreted. When the procedure returns
(or implicitly returns due to an error) the cell is freed again back
to the heap. This use of the heap is very tidy adjacent cells
are allocated and freed with little opportunity for leaving gaps in
the heap.
Unfortunately various other keywords also cause cells to be allocated
and these can cause fragmentation. For example, LOADM, CREATE,
OPEN etc. all allocate cells; UNLOADM, CLOSE
etc. free those cells. If a procedure is called which uses CREATE
to create a data file, the procedure cell is allocated, followed by
the CREATE cell and the procedure cell is then freed when the
procedure returns. The heap structure therefore contains a gap where
the procedure cell was, which remains until all cells at higher addresses
are freed.
Although a small number of gaps are not too serious and should eventually
disappear in most cases anyway, the new heap allocating keywords provide
ample opportunity to fragment the heap. Provided that you create and
free cells in a careful and structured way, where any task needing
the allocator frees them tidily on completion, there should not be
a problem.
*** Warning peeking/poking the cell
Using the allocator is by no means simple in OPL since the data in
an allocated cell usually has to be read or written in OPL using
the PEEK and POKE set of keywords which are intrinsically
subject to programming error. OPL does not provide good support for
handling pointers (variables containing addresses), which are basic
to heap usage, nor for complicated data structures, so that it is
all too easy to make simple programming errors that have disastrous
effects.
For these reasons, you are recommended to use the heap accessing keywords
only when strictly necessary (which should not be very often) and
to take extreme care when you do use them. On the other hand, for
programmers with previous experience of dynamic memory allocation,
the heap allocation keywords will often prove most useful.
*** Reasons for using the heap allocator
A few common instances where the allocator might be used are:
*) when the amount of data to be stored is variable or cannot
be determined at the time of writing the program. Without using the
allocator, you would have to declare a large array to hold the data
always even when it turns out that only a few bytes are needed in
a particular case. Using the allocator allows you to grow the cell
containing your data as and when required.
*) the amount of data may be specified in a file or by the
user of the program. Once again, you would need to declare a possibly
unnecessarily large array to cope with all allowed cases.
*) a system of library procedures might use a common cell,
usually called a control block, to store common data. You could
have one procedure creating the cell and initialising data in it,
other procedures in the system could be passed the address of the
cell, using and possibly updating the data in it, and finally a further
procedure could free the cell.
This concept will be familiar to you if you have used handles
for the I/O keywords, where the handle references a cell used internally
by the I/O system.
If you did not use the allocator in this case, you would
probably need to declare a global array in the procedure calling the
library procedures, with the disadvantages that the name and size
of the array would need to be fixed for all time even when
a better alternative mechanism has been devised for the library code
with different data requirements.
*) ADJUSTALLOC allows you to insert or remove data at
the start or in the middle of data that has previously been set up.
With an array, you would need to copy each element to the next or
previous element to make or close a gap.
****** Using the heap allocator
*** Allocating a cell
Use "pcell%=ALLOC(size%)" to allocate cell on heap of specified
size returning the pointer to the cell or zero if there is not enough
memory. The new cell is uninitialised you cannot assume
that it is zeroed.
*** Freeing an allocated cell
Use "FREEALLOC pcell%" to free a previously allocated cell at
"pcell%" as returned, for example, by ALLOC. Does nothing
if "pcell%" is zero.
*** Changing a cell's size
Use "pcelln%=REALLOC(pcell%,size%)" to change the size of a previously
allocated cell at address "pcell%" to "size%", returning the
new cell address or zero if there is not enough memory. If out of
memory, the old cell at "pcell%" is left as it was.
If successful, "pcelln%" will not be the same as "pcell%"
on return only if the size increases and there is no free cell following
the cell being grown which is large enough to accomodate the extra
amount.
*** Inserting or deleting data in cell
Use "pcelln%=ADJUSTALLOC(pcell%,offset%,amount%)" to open or close
a gap at "offset%" within the allocated cell "pcell%" returning
the new cell address or zero if there is not enough memory. "offset%"
is 0 for the first byte in the cell. Opens a gap if "amount%"
is positive and closes it if negative. The data in the cell is automatically
copied to the new position.
If successful, "pcelln%" will not be the same as "pcell%"
on return only if "amount%" is positive and there is no free cell
following the cell being adjusted which is large enough to accomodate
the extra amount.
*** Finding out the cell length
Use "len%=LENALLOC(pcell%)" to get the length of the previously
allocated cell at "pcell%".
****** Example using the allocator
This example illustrates the careful error checking which is essential
when using the allocator. RAISE is used to jump to the error
recovery code.
If you cannot understand this example it would be wise to avoid using
the allocator altogether.
local pcell% rem pointer to cell
LOCAL pcelln%
rem new pointer to cell
LOCAL p%
rem general pointer
LOCAL n%
rem general integer
ONERR e1
pcell%=ALLOC(2+2*8) rem holds an integer and
rem 2 8-byte floats initially
IF pcell%=0
RAISE -10
rem out of memory; go to e1::
ENDIF
POKEW pcell%,2
rem store integer 2 at start of cell
rem ie. no. of floats
POKEF UADD(pcell%,2),2.72 rem store float 2.72
POKEF UADD(pcell%,10),3.14 rem store float 3.14
...
pcelln%=REALLOC(pcell%,2+3*8) rem space for 3rd float
IF pcelln%=0
RAISE -10
rem out of memory
ENDIF
pcell%=pcelln%
rem use new cell address
n%=PEEKW(pcell%)
rem no. of floats in cell
POKEF UADD(pcell%,2+n%*8),1.0 rem 1.0 after 3.14
POKEW pcell%,n%+1
rem one more float in cell
...
pcelln%=ADJUSTALLOC(pcell%,2,8) rem open gap before 2.72
IF pcelln%=0
RAISE -10
rem out of memory
ENDIF
pcell%=pcelln%
rem use new cell address
POKEF UADD(pcell%,2),1.0 rem store 1.0 before 2.72
POKEW pcell%,4
rem 4 floats in cell now
...
p%=UADD(pcell%,LENALLOC(pcell%)) rem byte after cell end
p%=USUB(p%,8)
rem address of final float
POKEF p%,90000.1
rem overwrite with 90000.1
RAISE 0
rem clear ERR value
e1::
FREEALLOC pcell%
rem free any cell created
IF err<>0
...
rem display error message etc
ENDIF
RETURN ERR
Overview
Keywords can be subdivided into functions,
which return a value, and commands, which do not. In practice
you use functions and commands together, often using functions as
if they were commands, ignoring the values they return.
This chapter lists all the keywords, grouped according
to their purpose. Use this chapter if you know what you'd like to
do, but not which function or command will do it.
The chapter which follows this one lists the keywords
alphabetically, with explanations and full specifications.
Program control
*** Loops, branches, jumps
Repeat a set of instructions
{DO...UNTIL
WHILE...ENDW
Do either one set of instructions or another set, or
another, or another...
IF...ENDIF
Go...
...to a specified label
GOTO
...to one of a list of labels
VECTOR/ENDV
...to the end/start of a repeating set of instructions
BREAK, CONTINUE
...back to the calling procedure
RETURN
End the program
STOP
*** Error handling
Raise an error
RAISE
Put an explanatory comment in your program
REM
Declare an error-handler
ONERR
Let the program continue after an error
TRAP
After an error, find out what the error was
ERR, ERR$
Screen and keyboard control
Display a string to be edited and get a value from the
keyboard
EDIT
Get a value from the keyboard
INPUT
Display text, numbers etc.
PRINT
Set screen update method
gUPDATE
Pause...
...for a number of seconds
PAUSE
...until a key is pressed
GET, GET$
Position or hide the cursor
AT, CURSOR
Clear the text window
CLS
Sound the buzzer
BEEP
Set the size/position of the text window
SCREEN
Get information on the text window
SCREENINFO
Set text window font and style
FONT, STYLE
Find out which key was pressed, if any
KEY, KEY$, GET, GET$
Find out what combination of modifiers was pressed
KMOD
Disable/enable stopping from a running program
ESCAPE Off/On
Turn the Workabout off
OFF
Files
*** General file management
Copy a file
COPY
Delete or rename a file
DELETE, RENAME
Check to see if a certain file exists
EXIST
Find out what files there are
DIR$
*** OPL procedures and modules
Set up a procedure cache
CACHE
Load an OPL module file so you can use the procedures
in it
LOADM
Remove a module from memory
UNLOADM
*** Data files
Create a new data file
CREATE
OPEN or CLOSE a data file
OPEN, OPENR, CLOSE
Use a different data file that has been opened
USE
Copy a data file, optionally appending to another data
file, and removing deleted records
COMPRESS
Once a data file has been OPENed, you can:
Make a new record
APPEND
Change a record
UPDATE
Search for those records which contain a certain string
FIND, FINDFIELD
Erase a record
ERASE
Move to a different record
{FIRST, LAST, NEXT, BACK, POSITION
Count the records
COUNT
Find whether you're at the end of the file yet
EOF
Find the current record number
POS
Find the number of bytes used by the current record
RECSIZE
*** Managing directories
Create directory
MKDIR
Set current directory
SETPATH
Remove directory
RMDIR
Memory
Declare variables
GLOBAL, LOCAL
Find how much free memory there is on a device
SPACE
Printing
Specify a device or file to print to
LOPEN
Close the print device or file opened with LOPEN
LCLOSE
Print to a device or file
LPRINT
Numbers
*** Trigonometry
Trig functions
{COS, SIN, TAN,
ACOS, ASIN, ATAN
Convert between degrees and radians
RAD, DEG
*** Other functions
Raise e to a power
EXP
Logarithms
LN, LOG
Pi as a constant
PI
Square root
SQR
Use random numbers
RND, RANDOMIZE
Unsigned integer/pointer arithmetic
UADD, USUB
*** Lists of numbers
Find the greatest or smallest value in the list
MAX, MIN
Average the list
MEAN
Add up the list
SUM
Find the standard deviation or variance
STD, VAR
*** Changing the format of numbers
Knock the minus sign off a number
ABS, IABS
Take whole number, removing any fractional part
INT, INTF
Convert...
...an integer into floating-point
FLT
...an integer into a hexadecimal string
HEX$
...a number into a string
{FIX$, GEN$
SCI$, NUM$
...a string into a number
EVAL, VAL
Strings
Copy characters from a string
LEFT$, MID$, RIGHT$
Repeat a string
REPT$
Make a string upper or lower case
LOWER$, UPPER$
Find out...
...how long a string is
LEN
...the character code of the first character of a string
ASC
...where a certain string is within a string
LOC
Convert...
... a string of digits to a number
VAL
...a number to a string
{FIX$, GEN$
SCI$, NUM$
Get the character with a certain character code
CHR$
Date and time
Find out the current date and time...
...as a string
DATIM$
...just the current time
{SECOND,
MINUTE, HOUR
...just the current date
DAY, MONTH, YEAR
Find out...
...the number of days between two dates
DAYS
...what day of the week, or what week number, a certain
date falls in
DOW, WEEK
Express...
...1-12 as the name of a month
MONTH$
...1-7 as a day of the week
DAYNAME$
Convert between time formats
{DATETOSECS
SECSTODATE
Graphics
*** Drawing commands
Set current position
gAT, gMOVE
Draw a line
gLINEBY, gLINETO
Draw a sequence of lines
gPOLY
Draw a rectangle
{gBOX, gBORDER
gXBORDER
Fill a rectangle
gFILL
Invert a rectangle
gINVERT
Scroll a rectangle
gSCROLL
Get current position
gX, gY
Display a running clock
gCLOCK
Draw a 3-D button (key)
gBUTTON
Draw a lozenge
gDRAWOBJECT
*** Displaying graphics text
Display a list of expressions
gPRINT
Display text in a cleared box
gPRINTB
Display text neatly clipped
gPRINTCLIP
Find width required by text
gTWIDTH
Display text underlined/highlighted
gXPRINT
*** Setting styles
Set font to use
gFONT
Set to user-defined fonts
{gLOADFONT
gUNLOADFONT
Set graphics to set / clear / invert points
gGMODE
Set text to set / clear / invert / replace points
gTMODE
Set text to bold / underline / inverse / double /
mono / italic
gSTYLE
*** Windows and bitmaps
Create a new window
gCREATE
Set position and/or size of a window
gSETWIN
Set order to show windows
gORDER
Get order of a window
gRANK
Set window visible / invisible
gVISIBLE
Get screen position of a window
{gORIGINX
gORIGINY
Create a bitmap
gCREATEBIT
Load a bitmap from file
gLOADBIT
Clear a window / bitmap
gCLS
Save window / bitmap to bitmap file
gSAVEBIT
Close down a window / bitmap
gCLOSE
Set which window / bitmap to use
gUSE
Set grey on/off in a window
{gGREY
DEFAULTWIN
Fill an area with repetitions of another window /
bitmap
gPATT
Copy an area from one window / bitmap to another
gCOPY
Read data back from a window / bitmap
gPEEKLINE
Get ID number of a window / bitmap
gIDENTITY
Get size of a window / bitmap
gWIDTH, gHEIGHT
Get status information about a window / bitmap and
about the cursor
gINFO
*** Sprites
Create a sprite
CREATESPRITE
Define bitmap-sets for a sprite
{APPENDSPRITE
CHANGESPRITE
Draw a sprite
DRAWSPRITE
Set a sprite's position
POSSPRITE
Close a sprite
CLOSESPRITE
Menus
Start a new set of menus
mINIT
Define a menu
mCARD
Display menus
MENU
Dialogs
Start a new dialog
dINIT
Start a new dialog using small fonts
dINITS
Position a dialog
dPOSITION
Define text for a dialog
dTEXT
Define an edit box for a dialog
dEDIT
Define a secret edit box for a dialog
dXINPUT
Define a filename edit box for a dialog
dFILE
Define a choice list for a dialog
dCHOICE
Define a numeric edit box for a dialog
dFLOAT, dLONG
Define a date/time edit box for a dialog
dDATE, dTIME
Define exit keys for a dialog
dBUTTONS
Display a dialog
DIALOG
Display a simple "alert" dialog
ALERT
Status Window
Display/hide status window
STATUSWIN
Get status window information
STATWININFO
Set a program's name
SETNAME
Screen messages
Display information messages
GIPRINT
Display `busy' messages
BUSY
Advanced use
Run machine code
USR, USR$
Find out where a certain variable is in memory
ADDR
Store a value in a specific place in memory
POKE commands
Find out the value stored at a certain place in memory
PEEK commands
Open any type of file
IOOPEN
Read from a file opened with IOOPEN
IOREAD
Write to a file opened with IOOPEN
IOWRITE
Close a file opened with IOOPEN
IOCLOSE
Position within a file opened with IOOPEN
IOSEEK
Keywords which provide low-level access to the Workabout
Call an operating system service
CALL, OS
Perform an aysnchronous I/O function
IOA, IOC
Cancel an aysnchronous I/O function
IOCANCEL
Wait for completion of a function performed by IOA
or IOC
{IOWAIT
IOWAITSTAT
Signal completion of an I/O function
IOSIGNAL
Ensure an asynchronous handler runs
IOYIELD
Perform a synchronous I/O function
IOW
Perfom an asynchronous keyboard read
KEYA
Cancel a KEYA
KEYC
Get command line information
CMD$, GETCMD$
Parse a full file specification
PARSE$
Check for system events
{GETEVENT
TESTEVENT
Mark an OPA as locked or unlocked
LOCK
Get system-level info on data files
ODBINFO
Load/link a DYL
LOADLIB, LINKLIB
Unload a DYL
UNLOADLIB
Find category handles
FINDLIB, GETLIBH
Create new objects
NEWOBJ, NEWOBJH
Send a message to an object
{SEND, ENTERSEND
ENTERSEND0
Allocate a heap cell
ALLOC
Free an allocated cell
FREEALLOC
Change size of allocated cell
REALLOC
Insert or delete section of cell
ADJUSTALLOC
Find length of allocated cell
LENALLOC
Remove returned procedures from a cache
CACHETIDY
Read cache index header
CACHEHDR
Read cache index record
CACHEREC
Alphabetic listing
This chapter explains how keywords (functions and commands)
are specified and used, then lists them all alphabetically. Use this
chapter if you know which keyword you need to use, but need to check
how to use it. Each one is listed with the specification of its usage,
then a description of what it does.
Note: the example programs in this chapter do not include
full error handling code. This means that the programs have been kept
short and easy to understand, but may fail if, for example, you enter
the wrong type of value for a variable.
If you want to develop programs from these examples,
it is recommended that you add some error handling code to them. An
earlier chapter covers error handling.
Typing commands, functions and arguments
Commands, functions and arguments may be typed in any
combination of UPPER and lower case.
To put more than one statement on a line, separate
them by a space followed by a colon eg: "CLS :PRINT "hello"
:GET"
Any commands may be strung together like this, and
as many of them as you like provided the total line length
does not exceed 255 characters. The colon is optional before a REM
statement.
Where one space is allowed, any number of spaces is
allowed, eg:
"CLS : PRINT "Press Esc""
Functions may be used as arguments to other functions
or commands eg
"PRINT LEFT$(A$,3)" and "a=COS(ABS(x))" are OK.
How commands are specified
Commands are specified as "COMMAND argument(s)"
where "argument(s)" follow the command after a space and
are separated from each other by commas. The arguments may include:
Floating-point expression (eg "SIN(30)+2"), variable
(eg "price" or "z") or literal value (eg "78.9")
Integer expression (eg "3*567"), variable (eg "price%",
or "price&" if in range) or literal value (eg "-5676")
Long integer expression (eg "3*56799"), variable
(eg "profit&") or literal value (eg "-5676869")
String expression (eg "b$+MID$(a$)"), variable
(eg "price$") or literal value (eg ""word"")
Logical file name ("A", "B", "C" or "D")
Field name
For example, "AT X%,Y%" might be used like this:
"AT 15,2"
How functions are specified
Functions are specified as "variable=FUNCTION(argument(s))"
where "variable" may be "f%" or "f&" for a function returning
an integer or long integer result, "f" for a function returning
a floating-point result, or "f$" for a function returning a string
result. The argument(s):
follow the command immediately
are enclosed in brackets ( )
are separated from each other in the brackets by a
comma
may include variables, literal values or expressions
of the appropriate kind integer, long integer, floating-point
or string, as described above.
Eg "f$=LEFT$(g$,x%)" might be used like this:
"PRINT LEFT$(fname$,2)"
If you use the wrong type of number as an argument it
will, where possible, be converted. For example, you can use an integer
for a floating-point argument, or a long integer for an integer argument.
If the conversion is not possible for example, if you use
a floating-point number for an integer argument and its value is outside
the range of integers an error will be produced and the program
stopped.
Some functions, such as GET, have no arguments.
ABS
Usage:
a=ABS(x)
Returns the absolute value of a floating-point number that
is, without any "+"/"-" sign for example "ABS(-10.099)"
is "10.099"
If "x" is an integer, you won't get an error, but the result will
be converted to floating-point for example "ABS(-6)" is
"6.0". Use IABS to return the absolute value as a long
integer.
ACOS
Usage:
a=ACOS(x)
Returns the arc cosine, or inverse cosine (COS^-1) of "x".
"x" must be in the range -1 to +1. The number returned will be
an angle in radians. To convert the angle to degrees, use the DEG
function.
ADDR
Usage:
a%=ADDR(variable)
Returns the address at which "variable" is stored in memory.
The values of different types of variables are stored in bytes starting
at "ADDR(variable)". See PEEK for details.
See also UADD, USUB.
ADJUSTALLOC
Usage:
pcelln%=ADJUSTALLOC(pcell%,
off%,am%)
Opens or closes a gap at "off%" within the allocated cell "pcell%",
returning the new cell address or zero if out of memory. "off%"
is 0 for the first byte in the cell. Opens a gap if the amount "am%"
is positive, and closes it if negative.
ALERT
Usage any of:
r%=ALERT(m1$,m2$,b1$,b2$,b3$)
r%=ALERT(m1$,m2$,b1$,b2$)
r%=ALERT(m1$,m2$,b1$)
r%=ALERT(m1$,m2$)
r%=ALERT(m1$)
Presents an alert a simple dialog with the
messages and keys specified, and waits for a response. "m1$" is
the message to be displayed on the first line, and "m2$" on the
second line. If "m2$" is not supplied or if it is a null string,
the second message line is left blank.
Up to three keys may be used. "b1$", "b2$" and "b3$" are
the strings (usually words) to use over the keys. "b1$" appears
over an "Esc" key, "b2$" over "Enter", and "b3$" over
"Space". This means you can have "Esc", or "Esc" and "Enter",
or "Esc", "Enter" and "Space" keys. If no key strings
are supplied, the word "CONTINUE" is used above an "Esc" key.
The key number 1 for "Esc", 2 for "Enter" or 3 for
"Space" is returned.
ALLOC
Usage:
pcell%=ALLOC(size%)
Allocates a cell on the heap of the specified size, returning the
pointer to the cell or zero if there is not enough memory.
APP
Usage:
APP name
...
ENDA
Begins definition of an OPA. "name" gives the name of the OPA.
See the `Advanced topics' chapter for more details of OPAs.
APPEND
Usage:
APPEND
Adds a new record to the end of the current data file. The record
which was current is unaffected. The new record, the last in the file,
becomes the current record.
The record added is made from the current values of the field variables
"A.field1$", "A.field2$", and so on, of the current data file.
If a field has not been assigned a value, zero will be assigned to
it if it is a numeric field, or a null string if it is a string field.
Example:
PROC add:
OPEN "address",A,f1$,f2$,f3$
PRINT "ADD NEW RECORD"
PRINT "Enter name:",
INPUT A.f1$
PRINT "Enter street:",
INPUT A.f2$
PRINT "Enter town:",
INPUT A.f3$
APPEND
CLOSE
ENDP
To overwrite the current record with new field values, use UPDATE.
APPENDSPRITE
Usage:
APPENDSPRITE time%,bit$(),
dx%,dy%
"or"
APPENDSPRITE time%,
bit$()
Appends a single bitmap-set to the current sprite.
"time%" gives the duration in tenths of seconds for the bitmap-set
to be displayed before going on to the next bitmap-set in the sequence.
"bit$()" contains the names of bitmap files in the set, or ""
to specify no bitmap. The array must have at least 6 elements:
"bit$(1)" for setting black pixels
"bit$(2)" for clearing black pixels
"bit$(3)" for inverting black pixels
"bit$(4)" for setting grey pixels
"bit$(5)" for clearing grey pixels
"bit$(6)" for inverting grey pixels
All the bitmaps in a single bitmap-set must be the same size or `Argument'
error (-2) is raised on attempting to draw the sprite. Bitmaps in
different bitmap-sets may differ in size.
"dx%" and "dy%", if supplied, are the (x,y) offsets from the
sprite position to the top-left of this bitmap-set, with positive
for right and down. The default value of each is zero.
ASC
Usage:
a%=ASC(a$)
Returns the character code of the first character of "a$".
See the `Character set and character codes' appendix at the end of
this manual for the character codes. Alternatively, use "A%=%char"
to find the code for "char" eg "%X" for `X'.
If a$ is a null string ("") ASC returns the value 0.
Example "A%=ASC("hello")" returns 104, the code for "h".
ASIN
Usage:
a=ASIN(x)
Returns the arc sine, or inverse sine (SIN^-1) of "x".
"x" must be in the range -1 to +1. The number returned will be
an angle in radians. To convert the angle to degrees, use the DEG
function.
AT
Usage:
AT x%,y%
Positions the cursor at "x"% characters across the text window
and "y"% rows down. "AT 1,1" always moves to the top left
corner of the window. Initially, the window is the full size of the
screen, but you can change its size and position with the SCREEN
command.
A common use of AT is to display strings at particular positions
in the text window. For example:
"AT 5,2 :PRINT "message"".
*) PRINT statements without an AT display
at the left edge of the window on the line below the last PRINT
statement (unless you use `","' or `";"') and strings displayed
at the top of the window eventually scroll off as more strings are
displayed at the bottom of the window.
*) Displayed strings always overwrite anything that is on the
screen they do not cause things below them on the screen to
scroll down.
Example:
PROC records:
LOCAL k%
OPEN "clients",A,name$,tel$
DO
CLS
AT 1,7
PRINT "Press a key to"
PRINT "step to next record"
PRINT "or Q to quit"
AT 2,3 :PRINT A.name$
AT 2,4 :PRINT A.tel$
NEXT
IF EOF
AT 1,6 :PRINT "EndOfFile"
FIRST
ENDIF
k%=GET
UNTIL k%=%Q OR k%=%q
CLOSE
ENDP
ATAN
Usage:
a=ATAN(x)
Returns the arc tangent, or inverse tangent (TAN^-1) of
"x".
The number returned will be an angle in radians. To convert the angle
to degrees, use the DEG function.
BACK
Usage:
BACK
Makes the previous record in the current data file the current record.
If the current record is the first record in the file, then the current
record does not change.
BEEP
Usage:
BEEP time%,pitch%
Sounds the buzzer. The beep lasts for "time%/32" seconds
so for a beep a second long make "time%"=32, etc. The maximum
is 3840 (2 minutes).
The pitch (frequency) of the beep is "512/(pitch%+1)" KHz.
"BEEP 5,300" gives a comfortably pitched beep.
If you make "time%" negative, BEEP first checks whether
the sound system is in use (perhaps by another OPL program), and returns
if it is. Otherwise, BEEP waits until the sound system is free.
Example a scale from middle C:
PROC scale:
LOCAL freq,n%
REM n% relative to middle A
n%=3 REM start at middle C
WHILE n%<16
freq=440*2**(n%/12.0)
REM middle A = freq 440Hz
BEEP 8,512000/freq-1.0
n%=n%+1
IF n%=4 OR n%=6 OR n%=9 OR
n%=11 OR n%=13
n%=n%+1
ENDIF
ENDWH
ENDP
(Note that the "IF" statement should all be on the same line).
Alternatively, sound the buzzer with this statement: "PRINT CHR$(7)".
This beeps at a fixed pitch for a fixed length of time.
(Note that sounds produced by the Workabout are not as loud
as those from the Series 3a; this is because the Workabout
has a buzzer and not a loudspeaker.)
BREAK
Usage:
BREAK
Makes a program performing a DO...UNTIL or WHILE...ENDWH
loop exit the loop and immediately execute the line following the
UNTIL or ENDWH statement.
Example:
(picture)
DO
...
....
IF a=b
BREAK
ENDIF
..
...
.....
UNTIL a=b
x%=3
..
BUSY
Usage - one of:
BUSY str$,c%,delay%
BUSY str$,c%
BUSY str$
BUSY OFF
"BUSY str$" displays "str$" in the bottom left of the screen,
until "BUSY OFF" is called. Use this to indicate `Busy' messages,
usually when an OPL program is going to be unresponsive to keypresses
for a while.
If "c%" is given, it controls the corner in which the message
appears:
"c%"
0
1
2
3
corner
top left
bottom left (default)
top right
bottom right
"delay%" specifies a delay time (in half seconds) before the message
should be shown. Use this to prevent `busy' messages from continually
appearing very briefly on the screen.
Only one message can be shown at a time. The string to display can
be up to 19 characters long.
CACHE
Usage one of:
CACHE init%,max%
CACHE ON
CACHE OFF
CACHE creates a procedure cache of a specified initial number
of bytes "init%" which may grow up to the maximum size "max%".
You should usually TRAP this.
Once a cache has been created, "CACHE OFF" prevents further
cacheing, although the cache is still searched when calling subsequent
procedures. "CACHE ON" may then be used to re-enable cacheing.
CACHEHDR
Usage:
CACHEHDR addr(hdr%())
Read the current cache index header into array "hdr%()", which
must have at least 11 integer elements.
See the `Advanced topics' chapter for more details.
CACHEREC
Usage:
CACHEREC addr(rec%()),off%
Read the cache index record at offset "off%" into array "rec%()",
which must have at least 18 integer elements.
See the `Advanced topics' chapter for more details.
CACHETIDY
Usage:
CACHETIDY
Remove from the cache any procedures that have returned to their callers.
CALL
Usage:
e%=CALL(s%,bx%,cx%,dx%,si%,
di%)
This function enables you to make operating system calls. To use it
requires extensive knowledge of the Operating System and related
programming techniques. The syntax of this command is included here
for completeness.
The INT number itself is the least significant byte of "s%". The
AH value (the subfunction number) is the most significant byte of
"s%". The values of the other arguments are passed to the corresponding
8086 registers. The value of the AX register is returned.
CHANGESPRITE
Usage:
CHANGESPRITE ix%,time%,
bit$(),dx%,dy%
"or"
CHANGESPRITE ix%,time%,bit$()
Changes the bitmap-set specified by "ix%" (1 for the first bitmap-set)
in the current sprite, using the supplied bitmap files, offsets and
duration in the same way as for APPENDSPRITE.
CHR$
Usage:
a$=CHR$(x%)
Returns the character with character code "x%".
You can use it to display characters not easily available from the
keyboard for example, the instruction "PRINT CHR$(174)"
displays "®".
The full character set is given in the `Character set and character
codes' appendix to this manual.
CLOSE
Usage:
CLOSE
Closes the current file (that is, the one which has been OPENed
and most recently USEd).
If you've used ERASE to remove some records, CLOSE recovers
the memory used by the deleted records, provided it is held either
in the internal memory or on a Ram SSD.
CLOSESPRITE
Usage:
CLOSESPRITE id%
Closes the sprite with ID "id%".
CLS
Usage:
CLS
Clears the contents of the text window.
The cursor then goes to the beginning of the top line. If you have
used CURSOR OFF the cursor is still positioned there, but is
not displayed.
CMD$
Usage:
c$=CMD$(x%)
Returns the command-line arguments passed when starting a program.
Null strings may be returned. "x%" should be from 1 to 5. cmd$(2)
to cmd$(5) are only for OPAs (OPL applications).
cmd$(1) returns the full path name used to start the running
program.
cmd$(2) returns the full path name of the file to be used by
an OPA application.
cmd$(3) returns ""C"" for "Create file" or ""O"" for
"Open file". If the OPA is being run with a new filename, this
will return ""C"". This happens the very first time the OPA
is used, and whenever a new filename is used to run it. Otherwise,
the OPA is being run with the name of an existing file, and
"cmd$(3)" will return ""O"".
cmd$(4) returns the alias information, if any. In
practice this has no relevance for OPAs.
cmd$(5) returns the application name, as declared with the
APP keyword.
See the `Advanced topics' chapter for more details of OPAs.
See also GETCMD$.
COMPRESS
Usage:
COMPRESS src$,dest$
Copies data file "src$" to another data file "dest$". If "dest$"
already exists, the records in "src$" are appended to the end
of "dest$".
Deleted records are not copied. This makes COMPRESS particularly
useful when copying from a Flash SSD. (The space used by deleted records
on a Ram SSD or in internal memory is automatically freed when you
close the file.)
If you want "src$" to overwrite instead of append to "dest$",
use:
"TRAP DELETE dest$"
before the COMPRESS statement.
You can use wildcards if you wish to copy more than one file at a
time. But if the first name contains any wildcards, the second name
must not include a filename, just the device and directory to which
the files are to be copied under their original names.
Example: to copy all the data files on A: (in "\OPD", the default
directory) to "B:\BCK\":
COMPRESS "A:*.ODB","B:\BCK\"
(Remember the final backslash on the directory name.)
See COPY for copying any type of file.
CONTINUE
Usage:
CONTINUE
Makes a program immediately go to the UNTIL... line of a DO...UNTIL
loop or the WHILE... line of a WHILE...ENDWH loop
ie to the test condition.
Example:
(picture)
DO
...
.....
....
IF a<3.5
CONTINUE
ENDIF
..
....
...
UNTIL a=b
..
See also BREAK.
COPY
Usage:
COPY src$,dest$
Copies the file "src$", which may be of any type, to the file
"dest$". Any existing file with the name "dest$" is deleted.
You can copy across devices.
Use the appropriate file extensions to indicate the type of file,
and wildcards if you wish to copy more than one file at a time:
*) If "src$" contains wildcards, "dest$" must not specify
a filename, just the device and directory to which the files are to
be copied under their original names.
*) You must specify either an extension or .* on the
first filename. The file type extensions are listed under `Files and
directories' in the `Advanced use' chapter.
Example:
To copy all the OPL files from internal memory (in "\OPL") to
"B:\ME\":
COPY "M:\OPL\*.OPL","B:\ME\"
(Remember the final backslash on the directory name.)
See COMPRESS for more control over copying data files. If you
use COPY to copy a data file, deleted records are copied
and you cannot append to another data file.
There are more details of full file specifications in the Advanced
Topics chapter.
COS
Usage:
c=COS(x)
Returns the cosine of "x", where "x" is an angle in radians.
To convert from degrees to radians, use the RAD function.
COUNT
Usage:
c%=COUNT
Returns the number of records in the current data file.
This number will be 0 if the file is empty.
CREATE
Usage:
CREATE file$,log,f1,f2,...
Creates a data file called "file$".
*) The filename may be a full file specification of up to 128
characters. Field names may be up to 8 letters/numbers.
*) The file may have up to 32 fields, as specified by "f1",
"f2"... (if viewed in the in-built Database application, field
"f1" starts on the top line of the window, "f2" is below it,
etc.).
*) "log" specifies the logical file name "A",
"B", "C" or "D". This is used as an abbreviation for the
file name when you use other data file commands such as USE.
Immediately after the CREATE statement, the file is open and
can be accessed.
Example:
"CREATE "CLIENTS",B,NM$,PHON$
would create a data file in the internal memory with the name "CLIENTS"
and the logical name "B".
CREATESPRITE
Usage:
id%=CREATESPRITE
Creates a sprite, returning the sprite ID.
CURSOR
Usage one of the following:
CURSOR ON"
"CURSOR OFF
CURSOR id%,asc%,w%,h%
CURSOR id%,asc%,w%,h%,type%
CURSOR id%
CURSOR ON switches the text cursor on at the current cursor
position. Initially, no cursor is displayed.
You can switch on a graphics cursor in a window by following CURSOR
with the ID of the window. This replaces any text cursor. At
the same time, you can also specify the cursor's shape, and its position
relative to the baseline of text.
"asc%" is the ascent the number of pixels (-128
to 127) by which the top of the cursor should be above the baseline
of the current font. "h%" and "w%" (both from 0 to 255) are
the cursor's height and width.
If you do not specify them, the following default values are used:
"asc%" =font ascent
"h%" =font height
"w%" =2
If "type%" is given, it can have these effects:
"1"
obloid
"2"
not flashing
"4"
grey
You can add these values together to combine effects eg if
"type%" is 6 a grey non-flashing cursor is drawn.
An error is raised if "id%" specifies a bitmap rather than a window.
CURSOR OFF switches off any cursor.
DATETOSECS
Usage:
s&=DATETOSECS(yr%,mo%,dy%,
hr%,mn%,sc%)
Returns the number of seconds since 00:00 on 1 January 1970 at the
date/time specified.
Raises an error for dates before 1 January 1970.
The value returned is an unsigned long integer. (Values up to
+2,147,483,647, which is 03:14:07 on 19/1/2038, are returned as expected.
Those from +2,147,483,648 upwards are returned as negative numbers,
starting from -2,147,483,648 and increasing towards zero.)
See also SECSTODATE, HOUR, MINUTE, SECOND.
DATIM$
Usage:
d$=DATIM$
Returns the current date and time from the system clock as a string
for example:
""Fri 16 Oct 1992 16:25:30""
The string returned always has this format 3 mixed-case characters
for the day, then a space, then 2 digits for the day of the month,
and so on.
DAY
Usage:
d%=DAY
Returns the current day of the month (1 to 31) from the system clock.
DAYNAME$
Usage:
d$=DAYNAME$(x%)
Converts "x%",a number from 1 to 7, to the day of the week, expressed
as a three letter string.
Eg "d$=DAYNAME$(1)" returns "Mon".
Example:
PROC Birthday:
LOCAL d&,m&,y&,dWk%
DO
dINIT
dTEXT "","Date of birth",2
dTEXT "","eg 23 12 1963",$202
dLONG d&,"Day",1,31
dLONG m&,"Month",1,12
dLONG y&,"Year",1900,2155
IF DIALOG=0 :BREAK :ENDIF
dWk%=DOW(d&,m&,y&)
CLS :PRINT DAYNAME$(dWk%),
PRINT d&,m&,y&
dINIT
dTEXT "","Again?",$202
dBUTTONS "No",%N,"Yes",%Y
UNTIL DIALOG<>%y
ENDP
See also DOW.
DAYS
Usage:
d&=DAYS(day%,month%,year%)
Returns the number of days since 01/01/1900.
Use this to find out the number of days between two dates.
Example:
PROC deadline:
LOCAL a%,b%,c%,deadlin&
LOCAL today&,togo%
PRINT "What day? (1-31)"
INPUT a%
PRINT "What month? (1-12)"
INPUT b%
PRINT "What year? (19??)"
INPUT c%
deadlin&=DAYS(a%,b%,1900+c%)
today&=DAYS(DAY,MONTH,YEAR)
togo%=deadlin&-today&
PRINT togo%,"days to go"
GET
ENDP
See also dDATE, SECSTODATE.
dBUTTONS
Usage one of these:
dBUTTONS p1$,k1%,p2$,k2%,
p3$,k3%
dBUTTONS p1$,k1%,p2$,k2%
dBUTTONS p1$,k1%
Defines exit keys to go at the bottom of a dialog.
From one to three exit keys may be defined. Each pair of "p$"
and "k%" specifies an exit key; "p$" is the text to be displayed
above it, while "k%" is the keycode of the key. DIALOG
returns the keycode of the key pressed (in lower case for letters).
For alphabetic keys, use the "%" sign "%A" means `the
code of "A"', and so on. The `Character codes' appendix lists
the codes for keys (such as Tab) which are not part of the character
set. If you use the code for one of these keys, its name (eg `Tab',
or `Enter') will be shown in the key.
If you use a negative value for a "k%" argument, that key is a
`Cancel' key. The corresponding positive value is used for the key
to display and the value for DIALOG to return, but if you do
press this key to exit, the var variables used in the commands
like dEDIT, dTIME etc. will not be set.
The Esc key will always cancel a dialog box, with DIALOG returning
0. If you want to show the Esc key as one of the exit keys, use -27
as the "k%" argument (its keycode is 27) so that the var
variables will not be set if Esc is pressed.
There can be only one dBUTTONS item per dialog, and it takes
up three lines on the screen. dBUTTONS must be the last dialog
command you use before DIALOG itself.
Some keypresses, such as those using the Control key, cannot be specified.
This example presents a simple query, returning `True'
for Yes, or `False' for No.
PROC query:
dINIT
dTEXT "","FORGET CHANGES",2
dTEXT "","Sure?",$202
dBUTTONS "No",%N,"Yes",%Y
RETURN DIALOG=%y
ENDP
See `I/O functions and commands' in the `Advanced topics' chapter
for a description of the use of `var' variables.
dCHOICE
Usage:
dCHOICE var choice%,p$,list$
Defines a choice list to go in a dialog.
"p$" will be displayed on the left side of the line. "list$"
should contain the possible choices, separated by commas for
example, ""Yes,No"". One of these will be displayed on the right
side of the line, and " LEFT RIGHT " can be used to move between
the choices.
"choice%" must be a LOCAL or a GLOBAL variable.
It specifies which choice should initially be shown 1 for
the first choice, 2 for the second, and so on. When you finish using
the dialog, "choice%" is given a value indicating which choice
was selected again, 1 for the first choice, and so on.
See `I/O functions and commands' in the `Advanced topics' chapter
for a description of the use of `var' variables.
dDATE
Usage:
dDATE var lg&,p$,min&,max&
Defines an edit box for a date, to go in a dialog.
"p$" will be displayed on the left side of the line.
"lg&", which must be a LOCAL or a GLOBAL variable,
specifies the date to be shown initially. Although it will appear
on the screen like a normal date, for example "15/03/92", "lg&"
must be specified as "days since 1/1/1900".
"min&" and "max&" give the minimum and maximum values which
are to be allowed. Again, these are in days since 1/1/1900. An error
is raised if "min&" is higher than "max&".
When you finish using the dialog, the date you entered is returned
in "lg&", in days since 1/1/1900.
The system setting determines whether years, months or days are displayed
first.
See also DAYS, SECSTODATE. See `I/O functions and commands'
in the `Advanced topics' chapter for a description of the use of `var'
variables.
dEDIT
Usage:
dEDIT var str$,p$,len%
"or"
dEDIT var str$,p$
Defines a string edit box, to go in a dialog.
"p$" will be displayed on the left side of the line.
"str$" is the string variable to edit. Its initial contents will
appear in the dialog. The length used when "str$" was defined
is the maximum length you can type in.
"len%", if supplied, gives the width of the edit box (allowing
for widest possible character in the font). The string will scroll
inside the edit box, if necessary. If "len%" is not supplied,
the edit box is made wide enough for the maximum width "str$"
could possibly be.
See also dTEXT. See `I/O functions and commands' in the `Advanced
topics' chapter for a description of the use of `var' variables.
DEFAULTWIN
Usage:
DEFAULTWIN mode%
Change the default window (ID=1) to enable or disable the use of grey.
Initially grey cannot be used in that window.
"mode%=1" enables the use of grey.
"mode%=0" disables the use of grey.
A side-effect of DEFAULTWIN is to clear the default window.
Using grey does use more memory than using black only.
You are advised to call DEFAULTWIN once and for all near the
start of your program if you need to use grey. If it fails with `Out
of memory' error, the program can then exit cleanly without losing
vital information.
See also gGREY and gCREATE.
DEG
Usage:
d=DEG(x)
Converts from radians to degrees.
Returns "x", an angle in radians, as a number of degrees. The
formula used is: "180*x/PI"
All the trigonometric functions (SIN,COS etc.) work in radians,
not degrees. You can use DEG to convert an angle returned by
a trigonometric function back to degrees:
Example:
PROC xarctan:
LOCAL arg,angle
PRINT "Enter argument:";
INPUT arg
PRINT "ARCTAN of",arg,"is"
angle=ATAN(arg)
PRINT angle,"radians"
PRINT DEG(angle),"degrees"
GET
ENDP
To convert from degrees to radians, use RAD.
DELETE
Usage:
DELETE filename$
Deletes any type of file.
You can use wildcards for example, to delete all the OPL files
in B:\OPL
"DELETE "B:\OPL\*.OPL""
The file type extensions are listed under `Files and directories'
in the `Advanced use' chapter.
See also RMDIR.
dFILE
Usage:
dFILE var str$,p$,f%
Defines a filename edit box, to go in a dialog. A `Disk' selector
is automatically added on the line below. (See `I/O functions and
commands' in the `Advanced topics' chapter for a description of the
use of `var' variables.)
"p$" will be displayed on the left side of the line.
"f%" controls the type of file editor, and the kind of input allowed.
You can add together any of the following values:
value
1
2
4
8
16
32
128
meaning
use an edit box
allow directory names
directory names only
disallow existing files
query existing files
allow null string input
obey/allow wildcards
The first of the list is the most crucial. If you add 1 into "f%",
you will see a file edit box, as when creating a new file. If you
do not add 1, you will see the `matching file' selector, used when
choosing an existing file.
If performing a `copy to' operation, you might use 1+2+16, to specify
a file edit box, in which you can type the name of a directory
to copy to, and which will produce a query if you type the name of
an existing file.
If asking for the name of a directory to remove, you might use 4,
to allow an existing directory name only.
`Query existing' is ignored if `disallow existing' is set. These two,
as well as `allow null string input', only work with file edit boxes,
not `matching file' selectors.
"str$" is the string variable to edit. Its initial contents always
control the initial drive and directory used. For a file edit box,
any filename part of "str$" is shown. For a `matching file' selector,
you can use wildcards in the filename part (such as "*.tmp") to
control which filenames are matched. To do this, you must add 128
to "f%". 128 also allows wildcard specifications to be entered
(returned in "str$"), for both `matching' and `new file' selectors.
If "str$" does not contain any drive or directory information,
the path as set by SETPATH is used. If SETPATH has not
been used, the "\OPD" directory on the default drive (usually
"M:", `Internal') is used.
With a matching file selector (as opposed to an edit box) the
value 8 restricts the selection to files which match the filename/extension
in "str$". Matching file selectors can also use 64, in which case
files with the same extension as that in "str$" are shown without
this extension. (Many Workabout file selectors are like this.)
You can always press Tab to produce the full file selector with a
dFILE item.
"str$" must be declared to be at least 128 bytes long, or an error
will be raised.
dFLOAT
Usage:
dFLOAT var fp,p$,min,max
Defines an edit box for a floating-point number, to go in a dialog.
(See `I/O functions and commands' in the `Advanced topics' chapter
for a description of the use of `var' variables.)
"p$" will be displayed on the left side of the line.
"min" and "max" give the minimum and maximum values which
are to be allowed. An error is raised if "min" is higher than
"max".
"fp" must be a LOCAL or a GLOBAL variable. It specifies
the value to be shown initially. When you finish using the dialog,
the value you entered is returned in "fp".
DIALOG
Usage:
n%=DIALOG
Presents the dialog prepared by dINIT or dINITS and
commands such as dTEXT and dCHOICE. If you complete
the dialog by pressing Enter, your settings are stored in the variables
specified in dTEXT, dCHOICE etc., although you can prevent
this with dBUTTONS.
If you used dBUTTONS when preparing the dialog, the keycode
which ended the dialog is returned. Otherwise, DIALOG returns
the line number of the item which was current when Enter was pressed.
The top item (or the title line, if present), has line number 1.
If you cancel the dialog by pressing Esc, the variables are not changed,
and 0 is returned.
dINIT
Usage:
dINIT title$
"or"
dINIT
Prepares for definition of a dialog, cancelling any existing one.
Use dTEXT, dCHOICE etc. to define each item in the dialog,
then DIALOG to display the dialog.
If "title$" is supplied it will be displayed at the top of the
dialog, centred and with a line across the dialog below it.
Use dINIT if the dialog contains less than 6 lines of text
(or 4 lines if underlines are also utilised); for more lines use dINITS.
dINITS
Usage:
dINITS title$
"or"
dINITS
Prepares for definition of a dialog using small fonts, cancelling
any existing one. Use dTEXT, dCHOICE etc. to define
each item in the dialog, then DIALOG to display the dialog.
If "title$" is supplied it will be displayed at the top of the
dialog, centred and with a line across the dialog below it.
Use dINITS if the dialog is to contain more than 6 lines of
text (or 4 lines if underlines are also utilised); for fewer lines
use dINIT.
DIR$
Usage:
d$=DIR$(filespec$) "then"
d$=DIR$("")
Lists filenames, including subdirectory names, matching a file specification.
You can include wildcards in the file specification. If "filespec$"
is just a directory name, include the final backslash on the end
for example, ""M:\TEMP\"" . Use the function like this:
*) "DIR$(filespec$)" returns the name of the first
file matching the file specification.
*) "DIR$("")" then returns the name of the second file
in the directory.
*) "DIR$("")" again returns the third, and so on.
*) When there are no more matching files in the directory,
"DIR$("")" returns a null string.
Example, listing all the ".DBF" files in "M:\DAT":
PROC dir:
LOCAL d$(128)
d$=DIR$("M:\DAT\*.DBF")
WHILE d$<>""
PRINT d$
d$=DIR$("")
ENDWH
GET
ENDP
dLONG
Usage:
dLONG var lg&,p$,min&,max&
Defines an edit box for a long integer, to go in a dialog. (See `I/O
functions and commands' in the `Advanced topics' chapter for a description
of the use of `var' variables.)
"p$" will be displayed on the left side of the line.
"min&" and "max&" give the minimum and maximum values which
are to be allowed. An error is raised if "min&" is higher than
"max&".
"lg&" must be a LOCAL or a GLOBAL variable. It specifies
the value to be shown initially. When you finish using the dialog,
the value you entered is returned in "lg&".
DO...UNTIL
Usage:
DO
statement
statement
.
.
.
UNTIL condition
DO forces the set of statements which follow it to execute
repeatedly until the "condition" specified by UNTIL is
met.
This is the easiest way to repeat an operation a certain number of
times.
*) Every DO must have its matching UNTIL to end
the loop.
*) If you set a "condition" which is never met, the program
will go round and round, locked in the loop forever. You can escape
by pressing Psion-Esc, provided you haven't set ESCAPE OFF.
If you have set ESCAPE OFF, you will have to return to the
System screen, move to the program name under the RunOpl icon, and
press Delete. Alternatively, you can use the STOP command in
the Command processor to escape from the program.
DOW
Usage:
d%=DOW(day%,month%,year%)
Returns the day of the week from 1 (Monday) to 7 (Sunday)
given the date.
"day%" must be between 1 and 31, "month%" from 1 to 12 and
"year%" from 1900 to 2155.
For example, "D%=DOW(4,7,1992)" returns 6, meaning Saturday.
dPOSITION
Usage:
dPOSITION x%,y%
Positions a dialog. Use dPOSITION at any time between dINIT
or dINITS and DIALOG.
dPOSITION uses two integer values. The first specifies the
horizontal position, and the second, the vertical. "dPOSITION -1,-1"
positions to the top left of the screen; "dPOSITION 1,1" to
the bottom right;" dPOSITION 0,0" to the centre, the usual position
for dialogs.
"dPOSITION 1,0", for example, positions to the right-hand edge
of the screen, and centres the dialog half way up the screen.
DRAWSPRITE
Usage:
DRAWSPRITE x%,y%
Draws the current sprite in the current window with top-left at pixel
position "x%,y%".
dTEXT
Usage:
dTEXT p$,body$,t%
"or"
dTEXT p$,body$
Defines a line of text to be displayed in a dialog.
"p$" will be displayed on the left side of the line, and "body$"
on the right side. If you only want to display a single string, use
a null string ("""") for "p$", and pass the desired string
in "body$". It will then have the whole width of the dialog to
itself. An error is raised if "body$" is a null string.
"body$" is normally displayed left aligned (although usually in
the right column). You can override this by specifying "t%":
"t%"
0
1
2
effect
left align "body$"
right align "body$"
centre "body$"
In addition, you can add any or all of the following three values
to "t%", for these effects:
"t%"
$100
$200
$400
effect
use bold text for "body$"
draw a line below this
item
(allow this item to
be selected)
Only one line can be drawn across a dialog. It will be below the last
item which asks for it, whether the title from dINIT, dINITS
or a dTEXT item.
See also dEDIT.
dTIME
Usage:
dTIME var lg&,p$,t%,min&,max&
Defines an edit box for a time, to go in a dialog. (See `I/O functions
and commands' in the `Advanced topics' chapter for a description of
the use of `var' variables.)
"p$" will be displayed on the left side of the line.
"lg&", which must be a LOCAL or a GLOBAL variable,
specifies the time to be shown initially. Although it will appear
on the screen like a normal time, for example "18:27", "lg&"
must be specified as seconds after 00:00. A value of 60 means one
minute past midnight; 3600 means one o'clock, and so on.
"min&" and "max&" give the minimum and maximum values which
are to be allowed. Again, these are in seconds after 00:00. An error
is raised if "min&" is higher than "max&".
When you finish using the dialog, the time you entered is returned
in "lg&", in seconds after 00:00.
"t%" specifies the type of display required, as follows:
"t%"
0
1
2
3
time display
absolute time no seconds
absolute time with seconds
duration no seconds
duration with seconds
For example, "03:45" represents an absolute time while 3 hours
45 minutes represents a duration.
Absolute times are displayed in 24-hour or am/pm format according
to the current system setting.
dXINPUT
Usage:
dXINPUT var str$,p$
Defines a secret string edit box, such as for a password, to go in
a dialog. (See `I/O functions and commands' in the `Advanced topics'
chapter for a description of the use of `var' variables.)
"p$" will be displayed on the left side of the line.
"str$" is the string variable to take the string you type. Important:
"str$" must be at least eight characters long.
Initially the dialog does not show any characters for the string;
the initial contents of "str$" are ignored. A special symbol will
be displayed for each character you type, to preserve the secrecy
of the string.
EDIT
Usage:
EDIT a$
Displays a string variable which you can edit directly on the screen.
All the usual editing keys are available the arrow keys move
along the line, Esc clears the line, and so on.
When you have finished editing, press Enter to confirm the changes.
If you press Enter before you have made any changes, then the string
will be unaltered.
If you use EDIT in conjunction with a PRINT
statement, use a comma at the end of the PRINT statement, so
that the string to be edited appears on the same line as the displayed
string:
...
PRINT "Edit address:",
EDIT A.address$
UPDATE
....
TRAP EDIT
If the Esc key is pressed while no text is on the input line, the
`Escape key pressed' error (number -114) will be returned by ERR
provided that the EDIT has been trapped. You can use this feature
to enable someone to press the Esc key to escape from inputting a
string.
See also INPUT, dEDIT.
ELSE(IF)/ENDA/ENDIF/ENDV/
ENDWH
See IF, APP, VECTOR, WHILE.
ENTERSEND
Usage:
ret%=ENTERSEND(pobj%,m%,
var p1,...)
This is the same as SEND except that, if the method leaves,
the error code is returned to the caller. Otherwise the value returned
is as returned by the method. (See `I/O functions and commands' in
the `Advanced topics' chapter for a description of the use of `var'
variables.)
ENTERSEND0
Usage:
ret%=ENTERSEND0(pobj%,m%,
var p1,...)
This is the same as ENTERSEND except that, if the method does
not leave, zero is returned. (See `I/O functions and commands'
in the `Advanced topics' chapter for a description of the use of `var'
variables.)
EOF
Usage:
e%=EOF
Finds out whether you're at the end of a file yet.
Returns -1 (true) if the end of the file has been reached, or 0 (false)
if it hasn't.
When reading records from a file, you should test whether there are
still records left to read, otherwise you may get an error.
Example:
PROC eoftest:
OPEN "myfile",A,a$,b%
DO
PRINT A.a$
PRINT A.b%
NEXT
PAUSE -40
UNTIL EOF
PRINT "The last record"
GET
RETURN
ENDP
ERASE
Usage:
ERASE
Erases the current record in the current file.
The next record is then current. If the erased record was the last
record in a file, then following this command the current record will
be null and EOF will return true.
ERR
Usage:
e%=ERR
Returns the number of the last error which occurred, or 0 if there
has been no error.
Example:
..
PRINT "Enter age in years"
age::
TRAP INPUT age%
IF ERR=-1
PRINT "Number please:"
GOTO age
ENDIF
...
See also ERR$.
See the `Error handling' chapter for full details, including the list
of error numbers and messages.
ERR$
Usage:
e$=ERR$(x%)
Returns the error message for the specified error code "x%".
"ERR$(ERR)" gives the message for the last error which occurred.
Example:
TRAP OPEN "B:\FILE",A,field1$
IF ERR
PRINT ERR$(ERR)
RETURN
ENDIF
See also ERR.
See the Error handling chapter for full details, including the list
of error numbers and messages.
ESCAPE OFF
Usage:
ESCAPE OFF...ESCAPE ON
"ESCAPE OFF" stops Psion-Esc being used to break out of the
program when it is running. "ESCAPE ON" enables this feature again.
"ESCAPE OFF" takes effect only in the procedure in which it occurs,
and in any sub-procedures that are called. Psion-Esc is always enabled
when a program begins running.
If your program enters a loop which has no logical exit, and "ESCAPE
OFF" has been used, you will have to return to the System screen,
move to the program name under the RunOpl icon, and press the Delete
key. Alternatively, you can use the STOP command in the Command
processor to escape from the program.
EVAL
Usage:
d=EVAL(s$)
Evaluates the mathematical string expression "s$" and returns
the floating-point result. "s$" may include any mathematical function
or operator, but cannot include variables (eg. "sin(x)/(2**3)").
Note that floating-point arithmetic is always performed.
For example:
DO
AT 10,5 :PRINT "Calc:",
TRAP INPUT n$
IF n$="" :CONTINUE :ENDIF
IF ERR=-114 :BREAK :ENDIF
CLS :AT 10,4
PRINT n$;"=";EVAL(n$)
UNTIL 0
See also VAL.
EXIST
Usage:
e%=EXIST(filename$)
Checks to see that a file exists.
Returns -1 (`True') if the file exists and 0 (`False') if it doesn't.
Use this function when creating a file to check that
a file of the same name does not already exist, or when opening a
file to check that it has already been created:
IF NOT EXIST("CLIENTS")
CREATE "CLIENTS",A,names$
ELSE
OPEN "CLIENTS",A,names$
ENDIF
...
EXP
Usage:
e=EXP(x)
Returns ex that is, the value of the arithmetic
constant e (2.71828...) raised to the power of "x".
EXT
Usage:
EXT name$
Gives the file extension of files used by an OPA. This can only be
used between APP and ENDA. (See the `Advanced topics'
chapter for more details of OPAs.)
FIND
Usage:
f%=FIND(a$)
Searches the current data file for fields matching "a$". The search
starts from the current record, so use NEXT to progress to
subsequent records. FIND makes the next record containing "a$"
the current record and returns the number of the record found. Capitals
and lower-case letters match.
You can use wildcards:
"?"
matches any single character
"*"
matches any group of characters."
To find a record with a field containing "Dr" and either "BROWN"
or "BRAUN", use:
"F%=FIND("*DR*BR??N*")
"FIND("BROWN")" will find only those records with a field consisting
solely of the string "BROWN".
You can only search string fields.
On failure to find a match "FIND" returns 0.
See also FINDFIELD.
FINDFIELD
Usage:
f%=FINDFIELD(a$,start%,no%,
flags%)
FINDFIELD, like FIND, finds a string, makes the record
with this string the current record, and returns the number of this
record.
You may experience some problems in using FINDFIELD with some
versions of OPL. To ensure that problems are avoided use the line:
POKEB(peekw($1c)+7),0
immediately before each call to FINDFIELD.
"a$" is the string to look for, as for FIND. "start%"
is the string field at which to start the matching (1 for the first
field), and "no%" is the number of string fields to search in
(starting from the field specified by the "start%"). If you want
to search in all fields, use "start%=1" and for "no%" use
the number of fields you used in the OPEN/CREATE command.
"flags%" adds together two values:
*) 0 for a case-independent match, where capitals and
lower-case letters match, or 16 for a case-dependent match.
*) 0 to search backwards from the current record, 1 to search
forwards from the current record, 2 to search backwards from the end
of the file, or 3 to search forwards from the start of the file.
On failure to find a match "FINDFIELD" returns 0.
FINDLIB
Usage:
ret%=FINDLIB(var cat%, name$)
Find DYL category "name$" (including ".DYL" extension) in
the ROM. On success returns zero and writes the category handle to
"cat%". (See `I/O functions and commands' in the `Advanced topics'
chapter for a description of the use of `var' variables.)
FIRST
Usage:
FIRST
Positions to the first record in the current data file.
FIX$
Usage:
f$=FIX$(x,y%,z%)
Returns a string representation of the number "x", to "y%"
decimal places. The string will be up to "z%" characters long.
Example: "FIX$(123.456,2,7)" returns ""123.46"".
*) If "z%" is negative then the string is right-justified
for example "FIX$(1,2,-6)" returns
"" 1.00"" where there are two spaces to the left of the "1".
*) If "z%" is positive then no spaces are added
for example "FIX$(1,2,6)" returns ""1.00"".
*) If the number "x" will not fit in the width specified
by "z%", then the string will just be asterisks, for example "FIX$(256.99,2,4)"
returns ""****"".
See also GEN$, NUM$, SCI$.
FLT
Usage:
f=FLT(x&)
Converts an integer expression (either integer or long integer) into
a floating-point number. Example:
PROC gamma:(v)
LOCAL c
c=3E8
RETURN 1/SQR(1-(v*v)/(c*c))
ENDP"
You could call this procedure like this: "gamma:(FLT(a%))" "if
you wanted to pass it the value of an integer variable without having
first to assign the integer value to a floating-point variable."
See also INT and INTF.
FONT
Usage:
FONT id%,style%
Sets the text window font and style.
See `The text and graphics windows' at the end of the `Graphics' chapter
for more details.
FREEALLOC
Usage:
FREEALLOC pcell%
Frees a previously allocated cell at "pcell%".
gAT
Usage:
gAT x%,y%
Sets the current position using absolute co-ordinates. "gAT 0,0"
moves to the top left of the current drawable.
See also gMOVE.
gBORDER
Usage:
gBORDER flags%,width%,height%
"or"
gBORDER flags%
Draws a one-pixel wide border around the edge of the current drawable.
If "width%" and "height%" are supplied, a border shape of
this size is drawn with the top left corner at the current position.
If they are not supplied, the border is drawn around the whole of
the current drawable.
"flags%" controls three attributes of the border a shadow
to the right and beneath, a one-pixel gap all around, and the type
of corners used:
"flags%"
effect
1
2
3
4
$100
$200
single pixel shadow
gap for single pixel
shadow
double pixel shadow
gap for double pixel
shadow
one-pixel gap all round
more rounded corners
You can combine the values to control the three different effects.
("1", "2", "3" and "4" are mutually exclusive
you cannot use more than one of them.) For example, for rounded corners
and a gap for a double pixel shadow, use "flags%=$204".
Set "flags%=0" for no shadow, no gap, and sharper corners.
For example, to de-emphasise a previously emphasised
border, use gBORDER with the shadow turned off:
gBORDER 3 REM show border
GET
gBORDER 4 REM border off
...
See also gXBORDER.
gBOX
Usage:
gBOX width%,height%
Draws a box from the current position, "width%" to the right and
"height%" down. The current position is unaffected.
gBUTTON
Usage:
gBUTTON text$,type%,
w%,h%,state%
Draws a 3-D black and grey button (or key) at the current position
in a rectangle of the supplied width "w%" and height "h%",
which fully encloses the button in all its states. "text$" specifies
up to 64 characters to be drawn in the button in the current font
and style. You must ensure that the text will fit in the button.
"type%=0" draws a Series 3 style button; "type%=1" draws
a Series 3a/Workabout style button.
The meaning of "state%" varies according to "type%":
*) For "type%=0", "state%=0" for a raised button and
"state%=1" for a depressed (flat) button.
*) For "type%=1", "state%=0" for a raised button, "state%=1"
for a semi-depressed (flat) button and "state%=2" for a fully-depressed
(sunken) button. An error is raised if the current window has no grey
plane.
gCLOCK
Usage - one of:
gCLOCK ON/OFF
gCLOCK ON,mode%
gCLOCK ON,mode%,offset%
gCLOCK ON,mode%,offset%,
format$
gCLOCK ON,mode%,offset%,
format$,font%
gCLOCK ON,mode%,offset%,
format$,font%,style%
Displays or removes a clock showing the system time. The current position
in the current window is used. Only one clock may be displayed in
each window.
"mode%" controls the type of clock. Modes 1 to 5 are provided
for Series 3 compatibility, and produce Series 3 clocks: small
(digital), medium (system setting), medium (analog), medium (digital),
and large (analog) respectively. Other values are:
"6" black and grey medium, system setting
"7" black and grey medium, analog
"8" second type medium, digital
"9" black and grey extra large
"10" formatted digital (described below)
You can OR the value with any of these:
"$10" shows the date in all except the extra large and formatted
clocks
"$20" shows seconds in small digital, large analog, black
and grey medium analog and extra large clocks
"$40" shows am/pm in small digital and black medium clocks
only.
"$80" specifies that a clock is to be drawn in the grey plane
(only for clocks that do not contain both black and grey: ie. all
except the black and grey, medium, analog clock and the extra large
clock).
"format$", "font%" and "style%" are used only for formatted
digital clocks as described below.
Do not use gSCROLL to scroll the region containing
a clock. When the time is updated, the old position would be used.
The whole window may, however, be moved using gSETWIN.
It is possible to draw clocks that include grey in windows
that have no grey plane.
Digital clocks display in 24-hour or 12-hour mode according to the
system-wide setting. The `am/pm' flag ("$40") can be used with
digital clocks in 12-hour mode, and with medium analog clocks.
"offset%" specifies an offset in minutes from the system time
to the time displayed. This allows you to display a clock showing
a time other than the system time.
If these arguments are not supplied, "mode%" is taken as 1, and
"offset%" as 0.
For the formatted digital clock ("mode%=10"), you may optionally
specify "font%" and "style%" with values as for gFONT
and gSTYLE. The default font for gCLOCK is the system
font (value $9a). The default style is normal (0).
For the formatted digital clock, a format string (up
to 255 characters long) specifies how the clock is to be displayed.
The format string contains a number of format specifiers in
the form of a "%" followed by a letter. (Upper or lower case may
be used.) For example, "%H" means "hours" and "%T" means "minutes";
"gCLOCK ON,10,0,"h:%H, m:%T"", at 11:05 pm, displays a running
clock as "h:23, m:05".
To make each item as abbreviated as possible, you can use a "*"
after the "%". For example, ""%*T"" at 11:05 pm abbreviates
`05' to `5'. In the following list of specifiers, those which produce
numbers will do so without any leading zero, if you use "%*" instead
of "%". Other abbreviations are marked, appropriately, by "Abbrev":
"%%" =a "%" character
"%:", "%/" =time and date separators, as set for the system-wide
setting
"%A" =`am' or `pm' text (Abbrev: 1st letter)
"%D","%W","%M" =day/week/month number as two digits,
01-31, 01-53 and 01-12
"%E","%N" =day/month name (Abbrev: shorter form,
eg 1st 3 characters in English)
"%H","%I" =hour in 24-hour or 12-hour format, 00-23 and
01-12
"%S","%T" =seconds/minutes, 00-59
"%X" =suffix string for day number, eg "st" in `1st', "nd"
in `2nd'
"%Y" =year as a four digit number (Abbrev: discards the
century)
"%1","%2","%3" =day,month,year as ordered by the system-wide
setting. Eg Europe is Day/month/year, so "%1=%D", "%2=%M",
"%3=%Y". So to display a date in correct format use ""%1/%2/%3"".
(Abbrev: see "%G"/"%P"/"%U".)
"%4","%5" =day,month as ordered by the system-wide setting.
"%F","%O" =toggles days/months (displayed by "%1",
"%2" and "%3") between numeric and name formats. On 9th March
1993, with European date type, ""%1%F%1%F%1"" gives "09Tuesday09"
"%G","%P", "%U" =toggles "%1", "%2" and "%3"
between long form and abbreviation. On 9th March 1993, with European
date type, ""%F%1%G%1%G%1"" gives "TuesdayTueTuesday"
"%L" =toggles the suffix on the day number for "%1"/"%2"/"%3"
(in numeric form only). On 9th March 1993, with European date type,
""%G%1%L%1%L%1"" gives "99th9"
"%6","%7" =hour and am/pm text according to the format
set as the system-wide setting. With am-pm format, "%6=%I" and
"%7=%A". With 24-hour format, "%6=%H" and "%7" gives no
`am/pm' characters.
So the format string ""%1%/%2%/%3"" automatically generates a
clock with day, month and year in the order selected as the system-wide
setting. ""%4%/%5"" gives a clock with just day and month in selected
order. Similarly, ""%6%:%T%:%S%7"" gives a clock with hour, minute
and second automatically conforming to the system configuration.
Note that for those specifiers that toggle between two different
options (eg. "%F"), the state of toggle is remembered only within
one format string and not from one string to the next ie the
toggle state is restored to the default setting when displaying a
new clock.
As a final example, assuming that the system-wide settings are for
`Day/month/year' date format, `am-pm' time format and `:' time separator
and that the time is 11:30:05 pm on 9th March 1993, ""%G%L%P%O%*E, %1 %2
%3 %6%:%T:%S%""
generates "Tue, 9th Mar 1993 11:30:05pm". With the same setup
except for `Month/day/year' date format in `24-hour' mode, the same
string generates "Tue, Mar 9th 1993 23:30:05".
gCLOSE
Usage:
gCLOSE id%
Closes the specified drawable that was previously opened by gCREATE,
gCREATEBIT or gLOADBIT.
If the drawable closed was the current drawable, the default window
(ID=1) becomes current.
An error is raised if you try to close the default window.
gCLS
Usage:
gCLS
Clears the whole of the current drawable and sets the current position
to 0,0, its top left corner.
gCOPY
Usage:
gCOPY id%,x%,y%,w%,h%,mode%
Copies a rectangle of the specified size (width "w%", height "h%")
from the point "x%,y%" in drawable "id%", to the current
position in the current drawable.
As this command can copy both set and clear pixels, the same modes
are available as when displaying text. Set "mode%" = 0 for set,
1 for clear, 2 for invert or 3 for replace. 0, 1 and 2 act only on
set pixels in the pattern; 3 copies the entire rectangle, with set
and clear pixels.
The current position is not affected in either window.
gCOPY is affected by the setting of gGREY (in the current
window) as follows: with "gGREY 0" it copies black to black;
with "gGREY 1" it copies grey to grey, or black to grey if source
is black only; with "gGREY 2" it copies grey to grey and black
to black, or black to both if source is black only.
gCREATE
Usage:
id%=gCREATE(x%,y%,w%,h%,v%)
"or"
id%=gCREATE(x%,y%,w%,h%,v%,
grey%)
Creates a window with specified position and size (width "w%",
height "h%"), and makes it both current and foreground. Sets the
current position to 0,0, its top left corner. If "v%" is 1, the
window will immediately be visible; if 0, it will be invisible.
If "grey%" is not given or is 0, the window will not have a grey
plane. If "grey%" is 1, it will have one.
Returns "id%" (2 to 8) which identifies this window for other
keywords.
See also gCLOSE, gGREY, DEFAULTWIN.
gCREATEBIT
Usage:
id%=gCREATEBIT(w%,h%)
Creates a bitmap with the specified width and height, and makes it
the current drawable. Sets the current position to 0,0, its top left
corner.
Returns "id%" (2 to 8) which identifies this bitmap for other
keywords.
See also gCLOSE.
gDRAWOBJECT
Usage:
gDRAWOBJECT type%,flags%,
w%,h%
Draws the scaleable graphics object specified by "type%", scaled
to fit in the rectangle with top left at the current graphics cursor
position and with the specified width "w%" and height "h%".
The Workabout has only one object type (set "type%=0")
a `lozenge'. This is a 3-D rounded box lit from the top left, with
a shadow at bottom right and a grey body.
For "type%=0", "flags%" specifies the corner roundness:
0 for normal roundness
1 for more rounded
2 for a single pixel removed from each corner.
An error is raised if the current window has no grey plane.
GEN$
Usage:
g$=gen$(x,y%)
Returns a string representation of the number "x". The string
will be up to "y%" characters long.
Example "GEN$(123.456,7)" returns ""123.456"" and "GEN$(243,5)"
returns ""243"
*) If "y%" is negative then the string is right-justified
for example "GEN$(1,-6)" returns "
" 1"" where there are five spaces to the left of the
"1".
*) If "y%" is positive then no spaces are added
for example "GEN$(1,6)" returns ""1"".
*) If the number "x" will not fit in the width specified
by "y%", then the string will just be asterisks, for example "GEN$(256.99,4)"
returns ""****"".
See also FIX$, NUM$, SCI$.
GET
Usage:
g%=GET
Waits for a key to be pressed and returns the character code for that
key.
For example, if the `A' key is pressed with Caps Lock off, the integer
returned is 97 ("a"), or 65 ("A") if `A' was pressed with
the Shift key down.
The character codes of special keys, such as `Pg Dn', are given
in the `Character set and character codes' appendix at the back of
this manual; this appendix also lists the full Workabout character
set.
You can use KMOD to check whether modifier keys (Shift,
Control, Psion and Caps Lock) were used.
See also KEY.
GET$
Usage:
g$=GET$
Waits until a key is pressed and then returns which key was pressed,
as a string.
For example, if the `A' key is pressed in lower case mode, the string
returned is ""a"".
You can use KMOD to check whether any modifier keys
(Shift, Control, Psion and Caps Lock) were used.
See also KEY$.
GETCMD$
Usage:
w$=GETCMD$
Returns new command-line arguments to an OPA, after a "change
files" or "quit" event has occurred. The first character of the returned
string is ""C"", ""O"" or ""X"". If it is ""C"" or
""O"", the rest of the string is a filename.
The first character has the following meaning:
""C"" close down the current file, and create the specified
new file.
""O"" close down the current file, and open the specified
existing file.
""X"" close down the current file (if any) and quit the
OPA.
You can only call GETCMD$ once for each system message.
See the `Advanced topics' chapter for more details of OPAs.
See also CMD$.
GETEVENT
Usage:
GETEVENT var a%()
Waits for an event to occur. Returns with "a%()" specifying the
event. The data returned in "a%()" depends on the type of event
that occurred. If the event is a key-press, "(a%(1) AND $400)"
is guaranteed to be zero. For other events "(a%(1) AND $400)"
is guaranteed to be non-zero.
If a key has been pressed:
"a%(1)"= keycode (as for GET)
"a%(2) AND $00ff"= modifier (as for KMOD)
"a%(2)/256"= auto-repeat count (ignored by GET)
If a program has moved to foreground:
"a%(1)"= $401
If a program has moved to background:
"a%(1)"= $402
If the machine has switched on:
"a%(1)"= $403
If the Workabout wants an OPA to change files or exit:
"a%(1)"= $404
If the date changes:
"a%(1)"= $405
Note: Events are ignored while you are using keywords which
wait for keypresses GET, GET$, EDIT,
INPUT, MENU and DIALOG. If you need to use these
keywords in OPAs, use "LOCK ON / LOCK OFF" around them.
If you do use GETEVENT you should allow for other events to
be specified in the future.
For a key-press event, the modifier is returned in "a%(2)" and
is not returned by KMOD.
Note: If a non-key event such as `foreground' occurs while a
keyboard keyword such as GET, INPUT, MENU or
DIALOG is being used, the event is discarded. So GETEVENT
must be used if non-key events are to be monitored. (OPAs can still
handle the $404 event correctly see the LOCK command
for more details.)
The array (or string of integers) must be at least 6 integers
long.
See also TESTEVENT, GETCMD$. See `I/O functions and
commands' in the `Advanced topics' chapter for a description of the
use of `var' variables.
GETLIBH
Usage:
cat%=GETLIBH(num%)
Convert a category number "num%" to a category handle. If "num%"
is zero, gets the category handle for OPL.DYL.
gFILL
Usage:
gFILL width%,height%,gMode%
Fills a rectangle of the specified size from the current position,
according to the graphics mode specified.
The current position is unaffected.
gFONT
Usage:
gFONT fontId%
Sets the font for current drawable to "fontId%". The font may
be one of the predefined fonts in the ROM or a user-defined font.
See the `Graphics' chapter for more details of fonts.
User-defined fonts must first be loaded by gLOADFONT, which
returns the "fontId%" needed for gFONT.
See also gLOADFONT, FONT.
gGMODE
Usage:
gGMODE mode%
Sets the effect of all subsequent drawing commands gLINEBY,
gBOX etc. on the current drawable.
"mode%"
0
1
2
Pixels will be:
set
cleared
inverted
When you first use drawing commands on a drawable, they set pixels
in the drawable. Use gGMODE to change this. For example, if
you have drawn a black background, you can draw a white box outline
inside it with either "gGMODE 1" or "gGMODE 2", followed
by "gBOX".
gGREY
Usage:
gGREY mode%
Controls whether all subsequent graphics drawing and graphics text
in the current window draw to the grey plane, the black plane
or to both.
"mode%=0" for black plane only (default)
"mode%=1" for grey plane only
"mode%=2" for both planes
It is helpful to think of the black plane being in front of the grey
plane, so a pixel set in both planes will appear black. See the `Graphics'
chapter for details.
To enable the use of grey in the default window (ID=1) use "DEFAULTWIN 1"
at the start of your program. If grey is required in other windows
you must create the windows with a grey plane using gCREATE.
gGREY cannot be used with bitmaps which have only one plane.
See also DEFAULTWIN and gCREATE.
gHEIGHT
Usage:
height% = gHEIGHT
Returns the height of the current drawable.
gIDENTITY
Usage:
id%=gIDENTITY
Returns the ID of the current drawable.
The default window has ID=1.
gINFO
Usage:
gINFO var i%()
Gets general information about the current drawable and about the
graphics cursor (whichever window it is in). The information is returned
in the array "i%()" which must be at least 32 integers long.
The information is about the drawable in its current state, so eg
the font information is for the current font in the current style.
The following information is returned:
"i%(1) "
lowest character code
"i%(2)"
highest character code
"i%(3)"
height of font
"i%(4)"
descent of font
"i%(5)"
ascent of font
"i%(6)"
width of '0' character
"i%(7)"
maximum character width
"i%(8)"
flags for font (see below)
"i%(9-17)"
name of font
"i%(18)"current graphics mode
(gGMODE)
"i%(19)"current text mode
(gTMODE)
"i%(20)"current style (gSTYLE)
"i%(21)"cursor state
(ON=1,OFF=0)
"i%(22)"ID of window containing
cursor (-1 for text cursor)
"i%(23)"cursor width
"i%(24)"cursor height
"i%(25)"cursor ascent
"i%(26)"cursor x position in
window
"i%(27)"cursor y position in
window
"i%(28)"1 if drawable is a bitmap
"i%(29)"cursor effects
"i%(30)"gGREY setting
"i%(31)"reserved (window server
ID of drawable)
"i%(32)"reserved
"i%(8)" specifies a combination of the following font characteristics:
Value: Meaning:
1
font uses standard ASCII
characters (32-126)
2
font uses Code Page 850
characters (128-255)
4
font is bold
8
font is italic
16
font is serifed
32
font is monospaced
$8000 font is stored expanded
for quick drawing
(See HEX$ for an explanation of hexadecimal numbers. See `I/O
functions and commands' in the `Advanced topics' chapter for a description
of the use of `var' variables.)
Use "PEEK$(ADDR(i%(9)))" to read the name of the font as a string.
If the cursor is on ("i%(21)"=1), it is visible in the window
identified by "i%(22)".
"i%(29)" has bit 0 set ("i%(29) AND 1") if the cursor
is obloid, bit 1 set ("i%(29) AND 2") if not flashing, and
bit 2 set ("i%(29) AND 4") if grey.
If the cursor is off ("i%(21)"=0), or is a text cursor ("i%(22)=-1"),
"i%(23)" to "i%(27)" and "i%(29)" should be ignored.
gINVERT
Usage:
gINVERT width%,height%
Inverts the rectangle "width%" to the right and "height%"
down from the cursor position, except for the four corner pixels.
GIPRINT
Usage:
GIPRINT str$,c%
"or"
GIPRINT str$
GIPRINT displays an information message for about two seconds,
in the bottom right corner of the screen. For example, "GIPRINT "Not Found""
displays "Not Found". The string you specify can be up to 64
characters. If a string is too long for the screen, it will be clipped.
If "c%" is given, it controls the corner in which the message
appears:
"c%"
0
1
2
3
corner
top left
bottom left
top right
bottom right (default)
Only one message can be shown at a time. You can make the message
go away for example, if a key has been pressed with
"GIPRINT """.
gLINEBY
Usage:
gLINEBY dx%,dy%
Draws a line from the current position to a point "dx%" to the
right and "dy%" down. Negative "dx%" and "dy%" mean left
and up respectively.
For horizontal lines, the line includes the pixel with the lower x
coordinate and excludes the pixel with the higher x coordinate. Similarly
for vertical lines, the line includes the pixel with the lower y coordinate
and excludes the pixel with the higher y coordinate. For oblique lines
(where the x and y coordinates change), the line is drawn minus one
or both end points.
The current position moves to the end of the line drawn.
"gLINEBY 0,0" sets the pixel at the current position.
See also gLINETO, gPOLY.
gLINETO
Usage:
gLINETO x%,y%
Draws a line from the current position to the point "x%,y%". The
current position moves to "x%,y%".
For horizontal lines, the line includes the pixel with the lower x
coordinate and excludes the pixel with the higher x coordinate. Similarly
for vertical lines, the line includes the pixel with the lower y coordinate
and excludes the pixel with the higher y coordinate. For oblique lines
(where the x and y coordinates change), the line is drawn minus one
or both end points.
To plot a single point, use gLINETO to the current position
(or "gLINEBY 0,0").
See also gLINEBY, gPOLY.
gLOADBIT
Usage - one of:
id%=gLOADBIT(name$,write%,i%)
id%=gLOADBIT(name$,write%)
id%=gLOADBIT(name$)
Loads a bitmap from the named bitmap file and makes it the current
drawable. Sets the current position to 0,0, its top left corner. If
"name$" has no file extension ".PIC" is used. The bitmap is
kept as a local copy in memory.
Returns "id%" (2 to 8) which identifies this bitmap for other
keywords.
"write%"=0 sets read-only access. Attempts to write to the bitmap
in memory will be ignored, but the bitmap can be used by other programs
without using more memory. "write%"=1 allows you to write to and
re-save the bitmap. This is the default case.
For bitmap files which contain more than one bitmap, "i%" specifies
which one to load. For the first bitmap, use "i%"=0. This is also
the default value. Bitmap files saved with gSAVEBIT have only one
bitmap, and this argument is not needed for them.
See also gCLOSE.
gLOADFONT
Usage:
fontId%=gLOADFONT(name$)
Loads the user-defined font "name$". It returns a font ID;
use this with gFONT to make the current drawable use this font.
If "name$" does not contain a file extension, ".FON" is used.
gFONT itself is very efficient, so you should normally load
all required fonts at the start of a program.
Note: The built-in Workabout fonts are automatically
available, and do not need loading.
See also gUNLOADFONT.
GLOBAL
Usage:
GLOBAL variables
Declares variables to be used in the current procedure (as does the
LOCAL command) and (unlike LOCAL) in any procedures
called by the current procedure, or procedures called by them.
The variables may be of 4 types, depending on the symbol they end
with:
*) Variable names not ending with "$ % &" or "()"
are floating-point variables, for example "price", "x"
*) Those ending with a "%" are integer variables,
for example "x%", "sales92%"
*) Those ending with an "&" are long integer variables,
for example "x&", "sales92&".
*) Those ending with a "$" are string variables.
String variable names must be followed by the maximum length of the
string in brackets for example "names$(12)", "a$(3)"
Array variables have a number immediately following them in
brackets which specifies the number of elements in the array. Array
variables may be of any type, for example: "x(6),y%(5),f$(5,12),z&(3)"
When declaring string arrays, you must give two numbers in the brackets.
The first declares the number of elements, the second declares their
maximum length. For example "surname$(5,8)" declares five elements,
each up to 8 characters long.
Variable names may be any combination of up to 8 numbers and alphabetic
letters. They must start with a letter. The length includes
the "% &" or "$" sign, but not the "()" in string and
array variables.
More than one GLOBAL or LOCAL statement may be used,
but they must be on separate lines, immediately after the procedure
name.
See also LOCAL.
gMOVE
Usage:
gMOVE dx%,dy%
Moves the current position "dx%" to the right and "dy%" downwards,
in the current drawable.
A negative "dx%" causes movement to the left; a negative "dy%"
causes upward movement.
See also gAT.
gORDER
Usage:
gORDER id%,position%
Sets the window specified by "id%" to the selected foreground/background
position, and redraws the screen. Position 1 is the foreground window,
position 2 is next, and so on. Any position greater than the number
of windows is interpreted as the end of the list.
On creation, a window is at position 1 in the list.
Raises an error if "id%" is a bitmap.
See also gRANK.
gORIGINX
Usage:
x%=gORIGINX
Returns the gap between the left side of the screen and the left side
of the current window.
Raises an error if the current drawable is a bitmap.
gORIGINY
Usage:
y%=gORIGINY
Returns the gap between the top of the screen and the top of the current
window.
Raises an error if the current drawable is a bitmap.
GOTO
Usage:
GOTO label "or" GOTO label::
..
..
label::
Goes to the line following the "label::" and continues from there.
The label
*) Must be in the current procedure
*) Must start with a letter and end with a double colon, although
the double colon is not necessary in the GOTO statement
*) May be up to 8 characters long excluding the colons.
gPATT
Usage:
gPATT id%,width%,height%,
mode%
Fills a rectangle of the specified size from the current position
with repetitions of the drawable "id%".
As with gCOPY, this command can copy both set and clear pixels,
so the same modes are available as when displaying text. Set "mode%"
= 0 for set, 1 for clear, 2 for invert or 3 for replace. 0, 1 and
2 act only on set pixels in the pattern; 3 copies the entire rectangle,
with set and clear pixels.
If you set "id%"=-1 a pre-defined grey pattern is used.
The current position is unaffected.
gPATT is affected by the setting of gGREY (in the current
window) in the same way as gCOPY: with "gGREY 0" it
copies black to black; with "gGREY 1" it copies grey to grey,
or black to grey if source is black only; with "gGREY 2" it
copies grey to grey and black to black, or black to both if source
is black only.
gPEEKLINE
Usage:
gPEEKLINE id%,x%,y%,d%(),ln%
Reads a horizontal line from the black plane of the drawable "id%",
length "ln%", starting at "x%,y%". The leftmost 16 pixels
are read into "d%(1)", with the first pixel read into the least
significant bit.
The array "d%()" must be long enough to hold the data. You can
work out the number of integers required with "((ln%+15)/16)"
(using whole-number division).
If you set "id%" to 0, this just reads from the whole screen,
not from any particular window.
If you add $8000 to "id%", the grey plane (not the black plane)
will be peeked.
gPOLY
Usage:
gPOLY "a%()"
Draws a sequence of lines, as if by gLINEBY and gMOVE
commands.
The array is set up as follows:
"a%(1)" starting "x" position
"a%(2)" starting "y" position
"a%(3)" number of pairs of offsets
"a%(4)" "dx1%"
"a%(5)" "dy1%"
"a%(6)" "dx2%"
"a%(7)" "dy2%" etc.
Each pair of numbers "dx1%,dy1%", for example
specifies a line or a movement. To draw a line, "dy%" is the amount
to move down, while "dx%" is the amount to move to the right multiplied
by two.
To specify a movement (ie without drawing a line) work out the "dx%,dy%"
as for a line, then add 1 to "dx%".
(For drawing/movement up or left, use negative numbers.)
gPOLY is quicker than combinations of gAT, gLINEBY
and gMOVE.
Example, to draw three horizontal lines 50 pixels
long at positions 20,10 , 20,30 and 20,50:
a%(1)=20 :a%(2)=10 REM 20,10
a%(3)=5 REM 5 operations
REM draw right 50
a%(4)=50*2 :a%(5)=0
REM move down 20
a%(6)=0*2+1 :a%(7)=20
REM draw left 50
a%(8)=-50*2 :a%(9)=0
REM move down 20
a%(10)=0*2+1 :a%(11)=20
REM draw right 50
a%(12)=50*2 :a%(13)=0
gPOLY a%()
gPRINT
Usage:
gPRINT list of expressions
Displays a list of expressions at the current position in the current
drawable. All variable types are formatted as for PRINT.
Unlike PRINT, gPRINT does not end by moving to a new
line. A comma between expressions is still displayed as a space, but
a semi-colon has no effect. gPRINT without a list of expressions
does nothing.
See also gPRINTB, gPRINTCLIP, gTWIDTH, gXPRINT,
gTMODE.
gPRINTB
Usage any of:
gPRINTB t$,w%,al%,tp%,bt%,m%
gPRINTB t$,w%,al%,tp%,bt%
gPRINTB t$,w%,al%,tp%
gPRINTB t$,w%,al%
gPRINTB t$,w%
Displays text "t$" in a cleared box of width "w%" pixels.
The current position is used for the left side of the box and for
the baseline of the text.
"al%" controls the alignment of the text in the box 1
for right aligned, 2 for left aligned, or 3 for centred.
"tp%" and "bt%" are the clearances between the text and the
top/bottom of the box. Together with the current font size, they control
the height of the box. An error is raised if "tp%" plus the font
ascent is greater than 255.
"m%" controls the margins. For left alignment, "m%" is an
offset from the left of the box to the start of the text. For right
alignment, "m%" is an offset from the right of the box to the
end of the text. For centering, "m%" is an offset from the left
or right of the box to the region in which to centre, with positive
"m%" meaning left and negative meaning right.
If values are not supplied for some arguments, these defaults are
used:
"al%"
"tp%"
"bt%"
"m%"
left
0
0
0
See also gPRINT, gPRINTCLIP, gTWIDTH, gXPRINT.
gPRINTCLIP
Usage:
w%=gPRINTCLIP(text$,width%)
Displays "text$" at the current position, displaying only as many
characters as will fit inside "width%" pixels. Returns the number
of characters displayed.
See also gPRINT, gPRINTB, gTWIDTH, gXPRINT,
gTMODE.
gRANK
Usage:
rank%=gRANK
Returns the foreground/background position, from 1 to 8, of the current
window.
Raises an error if the current drawable is a bitmap.
See also gORDER.
gSAVEBIT
Usage:
gSAVEBIT name$,width%,height%
"or"
gSAVEBIT name$
Saves the current drawable as the named bitmap file. If "width%"
and "height%" are given, then only the rectangle of that size
from the current position is copied. If "name$" has no file extension
".PIC" is used.
Saving a window to file when it includes grey will save both planes
to the file black bitmap first followed by grey.
gSCROLL
Usage:
gSCROLL dx%,dy%,x%,y%,wd%,ht%
"or"
gSCROLL dx%,dy%
Scrolls pixels in the current drawable by offset "dx%,dy%". Positive
"dx%" means to the right, and positive "dy%" means down. The
drawable itself does not change its position.
If you specify a rectangle in the current drawable, at "x%,y%"
and of size "wd%,ht%", only this rectangle is scrolled.
The areas "dx%" wide and "dy%" deep which are "left behind"
by the scroll are cleared.
The current position is not affected.
gSETWIN
Usage:
gSETWIN x%,y%,width%,height%
"or"
gSETWIN x%,y%
Changes position and, optionally, the size of the current window.
An error is raised if the current drawable is a bitmap.
The current position is unaffected.
If you use this command on the default window, you must also
use the SCREEN command to ensure that the area for PRINT
commands to use is wholly contained within the default window.
gSTYLE
Usage:
gSTYLE style%
Sets the style of text displayed in subsequent gPRINT, gPRINTB
and gPRINTCLIP commands on the current drawable.
"style%"
0
1
2
4
Text style:
normal
bold
underlined
inverse
8
16
32
double height
mono
italic
You can combine these styles by adding their values for example,
to set bold, underlined and double height, use "gSTYLE 11",
as 11=1+2+8.
This command does not affect non-graphics commands, like PRINT.
gTMODE
Usage:
gTMODE mode%
Sets the way characters are displayed by subsequent gPRINT
and gPRINTCLIP commands on the current drawable.
"mode%"
0
1
2
3
Pixels will be:
set
cleared
inverted
replaced
When you first use "graphics text" commands on a drawable, each dot
in a letter causes a pixel to be set in the drawable. This is "mode%"=0.
When "mode%" is 1 or 2, graphics text commands work in a similar
way, but the pixels are cleared or inverted. When "mode%" is 3,
entire character boxes are drawn on the screen pixels are
set in the letter and cleared in the background box.
This command does not affect other text display commands.
gTWIDTH
Usage:
width%=gTWIDTH(text$)
Returns the width of "text$" in the current font and style.
See also gPRINT, gPRINTB, gPRINTCLIP, gXPRINT.
gUNLOADFONT
Usage:
gUNLOADFONT fontId%
Unloads a user-defined font that was previously loaded using gLOADFONT.
Raises an error if the font has not been loaded.
Note: The built-in Workabout fonts are not held in memory
and cannot be unloaded.
See also gLOADFONT.
gUPDATE
Usage one of:
gUPDATE ON
gUPDATE OFF
gUPDATE
The Workabout screen is usually updated whenever you display
anything on it. "gUPDATE OFF" switches off this feature. The
screen will then be updated as few times as possible (though note
that some keywords will always cause an update.) You can still force
an update by using the gUPDATE command on its own.
This can result in a considerable speed improvement in some cases.
You might, for example, use "gUPDATE OFF", then a sequence of
graphics commands, followed by "gUPDATE". You should certainly
use gUPDATE OFF if you are about to write exclusively to
bitmaps.
"gUPDATE ON" returns to normal screen updating.
gUPDATE affects anything that displays on the screen. If you
are using a lot of PRINT commands, "gUPDATE OFF" may
make a noticeable difference in speed.
Note that with gUPDATE OFF, the location of errors which
occur while the procedure is running may be incorrectly reported.
For this reason, gUPDATE OFF is best used in the final stages
of program development, and even then you may have to remove it to
locate some errors.
gUSE
Usage:
gUSE id%
Makes the drawable "id%" current. Graphics drawing commands will
now go to this drawable. gUSE does not bring a drawable
to the foreground (see gORDER).
gVISIBLE ON/OFF
Usage:
gVISIBLE ON/OFF
Makes the current window visible or invisible.
Raises an error if the current drawable is a bitmap.
gWIDTH
Usage:
width%=gWIDTH
Returns the width of the current drawable.
gX
Usage:
x%=gX
Returns the "x" current position (in from the left) in the current
drawable.
gXBORDER
Usage:
gXBORDER type%,flags%,w%,h%
"or"
gXBORDER type%,flags%
Draws a border in the current drawable of a specified type, fitting
inside a rectangle of the specified size or with the size of the current
drawable if no size is specified.
"type%=0" for drawing the Series 3 type border; "flags%"
are then as for gBORDER.
"type%=1" for drawing the Workabout 3-D grey and black
border. A shadow or a gap for a shadow is always assumed. "flags%=1,2,3,4"
are as for gBORDER. When the shadow is enabled (1 or 3) only
the grey and black parts of the border are drawn; you should pre-clear
the background for the white parts. When the shadow is disabled (2
or 4) the outer and inner border lines are drawn, but the areas covered
by grey/black when the shadow is enabled are now cleared. (This allows
a shadow to be turned off simply by calling gXBORDER again.)
The following values of "flags%" apply to all border types:
0 for normal corners
OR with $100 leaves 1 pixel gap around the border.
OR with $200 for more rounded corners
OR with $400 for losing a single pixel.
If both $400 and $200 are mistakenly supplied, $200 has priority.
An error is raised if the current window has no grey plane.
See also gBORDER.
gXPRINT
Usage:
gXPRINT string$,flags%
Displays "string$" at the current position, with precise highlighting
or underlining. The current font and style are still used, even if
the style itself is inverse or underlined. Text mode 3 (replace) is
used both set and cleared pixels in the text are drawn.
"flags%" has the following effect:
"flags%"
0
1
2
3
4
5
6
effect
normal, as with gPRINT
inverse
inverse, except corner
pixels
thin inverse
thin inverse, except
corner pixels
underlined
thin underlined
Where lines of text are separated by a single pixel, the thin
options maintain the separation between lines.
gXPRINT does not support the display of a list of expressions
of various types.
gY
Usage:
y%=gY
Returns the "y" current position (down from the top) in the current
drawable.
HEX$
Usage:
h$=HEX$(x&)
Returns a string containing the hexadecimal (base 16) representation
of integer or long integer "x&".
For example "HEX$(255)" returns the string ""FF"".
Notes
To enter integer hexadecimal constants (16 bit) put a "$" in front
of them. For example "$FF" is 255 in decimal. (Don't confuse this
use of "$" with string variable names.)
To enter long integer hexadecimal constants (32 bit) put a "&"
in front of them. For example "&FFFFF" is 1048575 in decimal.
Counting in hexadecimal is like this: "0 1 2 3 4 5 6 7 8 9 A B C
D E F 10"... "A" stands for decimal 10, "B" for decimal
11, "C" for decimal 12 ... up to "F" for decimal 15. After
"F" comes 10, which is equivalent to decimal 16. To understand
numbers greater than hexadecimal 10, again compare hexadecimals with
decimals. In these examples, 10^2 means 10x10, 10^3 means
10x10x10 and so on.
253 in decimal is:
(2x10^2)+(5x10^1)+(3x10^0)
= (2x100)+(5x10)+(3x1)
= 200+50+3
By analogy, &253 in hexadecimal is:
(&2x16^2)+(&5x16^1)+(&3x16^0)
=(2x256)+(5x16)+(3x1)
=512+80+3 = 595 in decimal.
Similarly, &A6B in hexadecimal is:
(&Ax16^2)+(&6x16^1)+(&Bx16^0)
=(10x256)+(6x16)+(11x1)
=2560+96+11 = 2667 in decimal.
You may also find this table useful for converting between hex and
decimal:
"hex.
decimal
&1 1
=16^0
&10 16 =16^1
&100 256 =16^2
&1000 4096 =16^3
"
For example, &20F9 is (2x&1000)+(0x&100)+(15x&10)+9
which in decimal is: (2x4096)+(0x256)+(15x16)+9 = 8441.
All hexadecimal constants are integers ("$") or long integers
("&"). So arithmetic operations involving hexadecimal numbers
behave in the usual way. For example, "&3/&2" returns "1",
"&3/2.0" returns "1.5", "3/$2" returns "1"."
HOUR
Usage:
h%=HOUR
Returns the number of the current hour from the system clock as an
integer between 0 and 23.
IABS
Usage:
i&=IABS(x&)
Returns the absolute value, ie without any sign, of the integer or
long integer expression "x&".
For example "IABS(-10)" is "10".
See also ABS, which returns the absolute value as a floating-point
value.
ICON
Usage:
ICON name$
Gives the name of the bitmap file to use as the icon for an OPA.
This can only be used between APP and ENDA.
See the `Advanced topics' chapter for more details of OPAs.
IF...ENDIF
Usage:
IF condition1
..
...
.
ELSEIF condition2
...
....
ELSE
..
ENDIF
Does either
*) the statements following the IF condition
or
*) the statements following one of the ELSEIF conditions
(there may be as many ELSEIF statements as you like
none at all if you want)
or
*) the statements following ELSE (or, if there is no
ELSE, nothing at all). There may be either one ELSE
statement or none.
After the ENDIF statement, the lines following ENDIF
carry on as normal.
IF, ELSEIF, ELSE and ENDIF must be in that order.
Every IF must be matched with a closing ENDIF.
You can also have an IF...ENDIF structure within another, for
example:
IF condition1
..
...
.
ELSE
...
IF condition2
....
ENDIF
..
ENDIF
"condition" is an expression returning a logical value
for example "a<b". If the expression returns logical true (non-zero)
then the statements following are executed. If the expression returns
logical false (zero) then those statements are ignored. For more details
about logical expressions, see the `Operators and logical expressions'
appendix.
INPUT
Usage:
INPUT variable
"or"
INPUT log.field
Waits for a value to be entered at the keyboard, and then assigns
the value entered to a variable or data file field.
You can edit the value as you type it in. All the usual editing keys
are available the arrow keys move along the line, Esc clears
the line and so on.
If inappropriate input is entered, for example a string when the input
was to be assigned to an integer variable, a "?" is displayed
and you can try again. However, if you used "TRAP INPUT", control
passes on to the next line of the procedure, with the appropriate
error condition being set and the value of the variable remaining
unchanged.
INPUT is usually used in conjunction with a
PRINT statement:
PROC exch:
LOCAL pds,rate
DO
PRINT "Pounds Sterling?",
INPUT pds
PRINT "Rate (DM)?",
INPUT rate
PRINT "=",pds*rate,"DM"
GET
UNTIL 0
ENDP
Note the commas at the end of the PRINT statements, used so
that the cursor waiting for input appears on the same line as the
messages.
TRAP INPUT
If a bad value is entered (for example ""abc"" for "a%") in
response to a TRAP INPUT, the "?" is not displayed, but
the ERR function can be called to return the value of the error
which has occurred. If the Esc key is pressed while no text is on
the input line, the `Escape key pressed' error (number -114) will
be returned by ERR (provided that the INPUT has been
trapped). You can use this feature to enable someone to press the
Esc key to escape from inputting a value.
See also EDIT. This works like INPUT, except that it
displays a string to be edited and then assigned to a variable or
field. It can only be used with strings.
INT
Usage:
i&=INT(x)
Returns the integer (in other words the whole number) part of the
floating-point expression "x". The number is returned as a long
integer.
Positive numbers are rounded down, and negative numbers are rounded
up for example "INT(-5.9)" returns "-5" and "INT(2.9)"
returns "2". If you want to round a number to the nearest integer,
add 0.5 to it (or subtract 0.5 if it is negative) before you use INT.
In the in-built Calculator application, you need to use INT
to pass a number to a procedure which requires a long integer parameter.
This is because the Calculator passes all numbers as floating-point
by default.
See also INTF.
INTF
Usage:
i=INTF(x)
Used in the same way as the INT function, but the value returned
is a floating-point number. For example, "INTF(1234567890123.4)"
returns "1234567890123.0"
You may also need this when an integer calculation may exceed integer
range.
See also INT.
I/O functions
These functions and the use of `var' variables are covered in detail
in the `Advanced topics' chapter.
r%=IOA(h%,f%,var status%,
var a1,var a2)
The device driver opened with handle "h%" performs the
asynchronous I/O function "f%" with two further arguments, "a1"
and "a2". The argument "status%" is set by the device driver.
An IOWAIT must be performed for each IOA.
r%=IOC(h%,f%,var status%,
var a1,var a2)
Make an I/O request with guaranteed completion. This has
the same form as IOA etc but it returns zero always.
IOCANCEL(h%)
Cancels any outstanding asynchronous I/O request (IOC
or IOA).
r%=IOCLOSE(h%)
Closes a file with the handle "h%".
r%=IOOPEN(var h%,name$,
mode%)
Creates or opens a file called "name$". Defines "h%"
for use by other I/O functions. "mode%" specifies how to open
the file. For unique file creation, use
"IOOPEN(var h%,addr%,mode%)
r%=IOREAD(h%,addr%,maxLen%)
Reads from the file with the handle "h%". "address%"
is the address of a buffer large enough to hold a maximum of "maxLen%"
bytes. The value returned to "r%" is the actual number of bytes
read or, if negative, is an error value.
r%=IOSEEK(h%,mode%,var off&)
Seeks to a position in a file that has been opened for random
access. "mode%" specifies how the offset argument "off&" is
to be used.
IOSIGNAL
Signals an I/O function's completion.
r%=IOW(h%,func%,var a1,
var a2)
The device driver opened with handle "h%" performs the
synchronous I/O function "func%" with the two further arguments.
IOWAIT
Waits for an asynchronous I/O function to signal completion.
IOWAITSTAT var stat%
Waits for an asynchronous function, called with IOA
or IOC, to complete.
r%=IOWRITE(h%,addr%,length%)
Writes "length%" bytes in a buffer at "address%"
to the file with the handle "h%".
IOYIELD
Ensures that any asynchronous handler set up with IOA
or IOC is given a chance to run.
KEY
Usage:
k%=KEY
Returns the character code of the last key pressed, if there has been
one since the last call to the keyboard. These functions count as
calling to the keyboard: INPUT, EDIT, GET, GET$, KEY and KEY$.
If no key has been pressed, zero is returned.
See the `Character set and character codes' appendix for a list of
special key codes. You can use KMOD to check whether modifier keys
(Shift, Control, Psion and Caps Lock) were used.
This command does not wait for a key to be pressed, unlike GET.
KEY$
Usage:
k$=KEY$
Returns the last key pressed as a string, if there has been a keypress
since the last use of the keyboard by INPUT, EDIT, GET, GET$,
KEY or KEY$.
If no key has been pressed, a null string ("") is returned.
See the `Character set and character codes' appendix for a list of
special key codes. You can use KMOD to check whether modifier keys
(Shift, Control, Psion and Caps Lock) were used.
This command does not wait for a key to be pressed, unlike GET$.
KEYA
Usage:
err%=KEYA(var stat%,
var key%(1))
This is an asynchronous keyboard read function.
See the `Advanced topics' chapter for details, including the use of
`var' variables.
Cancel with KEYC.
KEYC
Usage:
err%=KEYC(var stat%)
Cancels the previously called KEYA function with status "stat%".
See the `Advanced topics' chapter for details, including the use of
`var' variables.
KMOD
Usage:
k%=KMOD
Returns a code representing the state of the modifier keys (whether
they were pressed or not) at the time of the last keyboard access,
such as a KEY function. The modifiers have these codes:
2
4
8
16
Shift down
Control down
Psion down
Caps Lock on
binary
10
100
1000
10000
If there was no modifier, the function returns 0. If a combination
of modifiers was pressed, the sum of their codes is returned
for example 20 is returned if Control (4) was held down and Caps Lock
(16) was on.
Always use immediately after a KEY/KEY$/GET/GET$ statement.
The value returned by KMOD has one binary bit set for each
modifier, as shown above. By using the logical operator AND
on the value returned by KMOD you can check which of the bits
are set, in order to see which modifier keys were held down. For more
details on AND, see the `Operators and logical expressions'
appendix.
Example:
PROC modifier:
LOCAL k%,mod%
PRINT "Press a key" :k%=GET
CLS :mod%=KMOD
PRINT "Key code",k%,"with"
IF mod%=0
PRINT "no modifier"
ENDIF
IF mod% AND 2
PRINT "Shift down"
ENDIF
IF mod% AND 4
PRINT "Control down"
ENDIF
IF mod% AND 8
PRINT "Psion down"
ENDIF
IF mod% AND 16
PRINT "Caps Lock on"
ENDIF
ENDP
LAST
Usage:
LAST
Positions to the last record in a data file.
LCLOSE
Usage:
LCLOSE
Closes the device opened with LOPEN. (The device is also closed
automatically when a program ends.)
LEFT$
Usage:
b$=LEFT$(a$,x%)
Returns the leftmost "x%" characters from the string "a$".
For example if "n$" has the value "Charles", then "b$=LEFT$(n$,3)"
assigns "Cha" to "b$".
LEN
Usage:
a%=LEN(a$)
Returns the number of characters in "a$".
Eg if "a$" has the value
"34 Kopechnie Drive" then "LEN(a$)" returns "18".
You might use this function to check that a data file string field
is not empty before displaying:
IF LEN(A.client$)
PRINT A.client$
ENDIF
LENALLOC
Usage:
len%=LENALLOC(pcell%)
Returns the length of the previously allocated cell at "pcell%".
LINKLIB
Usage:
LINKLIB cat%
Link any libraries that have been loaded using LOADLIB.
LN
Usage:
a=LN(x)
Returns the natural (base e) logarithm of "x".
Use LOG to return the base 10 log of a number.
LOADLIB
Usage:
ret%=LOADLIB(var cat%,name$,
link%)
Load and optionally link a DYL that is not in the ROM. If successful,
this writes the category handle to "cat%" and returns zero. The
DYL is shared in memory if already loaded by another process.
See `I/O functions and commands' in the `Advanced topics' chapter
for a description of the use of `var' variables.
LOADM
Usage:
LOADM module$
Loads a translated OPL module so that procedures in that module can
be called. Until a module is loaded with LOADM, calls to procedures
in that module will give an error.
"module$" is a string containing the name of the module. Specify
the full file name only where necessary.
Example "LOADM "MODUL2""
Up to 8 modules can be in memory at any one time; if you try to LOADM
a ninth module, you get an error. Use UNLOADM to remove a module
from memory so that you can load a different one.
By default, LOADM always uses the directory of the initial
running program, or the one specified by a OPA application.
It is not affected by the SETPATH command.
LOC
Usage:
a%=LOC(a$,b$)
Returns an integer showing the position in "a$" where "b$"
occurs, or zero if "b$" doesn't occur in "a$". The search
matches upper and lower case.
Example: "LOC("STANDING","AND")" would return the value "3"
because the substring "AND" starts at the third character of the
string "STANDING".
LOCAL
Usage:
LOCAL variables
Used to declare variables which can be referenced only in the current
procedure. Other procedures may use the same variable names to create
new variables. Use GLOBAL to declare variables common to all
called procedures.
The variables may be of 4 types, depending on the symbol they end
with:
*) Variable names not ending with "$ % &" or "()"
are floating-point variables, for example "price", "x"
*) Those ending with a "%" are integer variables,
for example "x%", "sales92%"
*) Those ending with an "&" are long integer variables,
for example "x&", "sales92&".
*) Those ending with a "$" are string variables.
String variable names must be followed by the maximum length of the
string in brackets,
for example "names$(12)", "a$(3)"
Array variables have a number immediately following them in
brackets which specifies the number of elements in the array. Array
variables may be of any type, for example: "x(6),y%(5),f$(5,12),z&(3)"
When declaring string arrays, you must give two numbers in the brackets.
The first declares the number of elements, the second declares their
maximum length. For example "surname$(5,8)" declares five elements,
each up to 8 characters long.
Variable names may be any combination of up to 8 numbers and alphabetic
letters. They must start with a letter. The length includes
the "% &" or "$" sign, but not the "()" in string and
array variables.
More than one GLOBAL or LOCAL statement may be used,
but they must be on separate lines, immediately after the procedure
name.
See also GLOBAL and the `Variables and constants' chapter.
LOCK
Usage:
LOCK ON
"or"
LOCK OFF
Mark an OPA (OPL application) as locked or unlocked. When an OPA is
locked with "LOCK ON", the System screen will not send it events
to change files or quit. If, for example, you move onto the file list
in the System screen and press Delete to try to stop that running
OPA, a message will appear, indicating that the OPA cannot close down
at that moment. In the Command procesor, the STOP command may
not work.
You should use "LOCK ON" if your OPA uses a command, such as
EDIT or DIALOG, which accesses the keyboard. You might
also use it when the OPA is about to go busy for a considerable length
of time, or at any other point where a clean exit is not possible.
Do not forget to use "LOCK OFF" as soon as possible afterwards.
`Foreground', `Background' and `Machine on' events may still occur
while the OPA is accessing the keyboard, and will be discarded.
An OPA is initially unlocked.
LOG
Usage:
a=LOG(x)
Returns the base 10 logarithm of "x".
Use LN to find the base e (natural) log.
LOPEN
Usage:
LOPEN device$
Opens the device to which LPRINTs are to be sent.
No LPRINTs can be sent until a device has been opened with
LOPEN.
You can open any of these devices:
*) The parallel port, with "LOPEN "PAR:C""
*) Either of the two serial ports, with "LOPEN "TTY:A""
or "LOPEN "TTY:C""
*) A file on the Workabout or an attached computer.
LOPEN the file name, eg on a PC:
"LOPEN "REM::C:\BAK\MEMO.TXT""
or on an Apple Macintosh:
"LOPEN "REM::HD40:ME:MEMO5""
Any existing file of the name given will be overwritten
when you print to it.
You can open ports A and C at the same time. Use LCLOSE to
close a device. (It will also close automatically when a program finishes
running.)
See the `Serial/parallel ports and printing' appendix for more information.
LOWER$
Usage:
b$=LOWER$(a$)
Converts any upper case characters in the string "a$" to lower
case and returns the completely lower case string.
Eg if a$=""CLARKE"", "LOWER$(a$)" returns the string "clarke"
Use UPPER$ to convert a string to upper case.
LPRINT
Usage:
LPRINT list of expressions
Prints a list of items, in the same way as PRINT, except that
the data is sent to the device most recently opened with LOPEN.
The expressions may be quoted strings, variables, or the evaluated
results of expressions. The punctuation of the LPRINT statement
(commas, semi-colons and new lines) determines the layout of the printed
text, in the same way as PRINT statements.
If no device has been opened with LOPEN you will get an error.
See PRINT for displaying to the screen.
See LOPEN for opening a device for LPRINT.
See the `Serial/parallel ports and printing' appendix for an overview
of printing.
MAX
Usage:
m=MAX(list)
"or"
m=MAX(array(),element)
Returns the greatest of a list of numeric items.
The list can be either:
*) A list of variables, values and expressions, separated by
commas
or
*) The elements of a floating-point array.
When operating on an array, the first argument must be the array name
followed by "()". The second argument, separated from the first
by a comma, is the number of array elements you wish to operate on
for example" m=MAX(arr(),3)" would return the value of the largest
of elements "arr(1)", "arr(2)" and "arr(3)".
mCARD
Usage:
mCARD title$,n1$,k1%
"or"
mCARD title$,n1$,k1%,n2$,k2%
"etc."
Defines a menu. When you have defined all of the menus, use MENU
to display them.
"title$" is the name of the menu. From one to six items on the
menu may be defined, each specified by two arguments. The first is
the item name, and the second the keycode for a hot-key. This specifies
a key which, when pressed together with the Psion key, will select
the option. If the keycode is for an upper case key, the hot-key will
use both the Shift and Psion keys.
The options can be divided into logical groups by displaying a grey
line under the final option in
a group. To do this, pass the negative value corresponding to the
hot-key keycode for the final option in the group. For example, "-%A"
specifies hot-key Shift-Psion-A and displays a grey line under the
associated option in the menu.
MEAN
Usage:
m=MEAN(list)
"or"
m=MEAN(array(),element)
Returns the arithmetic mean (average) of a list of numeric items.
The list can be either:
*) A list of variables, values and expressions, separated by
commas
or
*) The elements of a floating-point array.
When operating on an array, the first argument must be the array name
followed by "()". The second argument, separated from the first
by a comma, is the number of array elements you wish to operate on
for example" m=MEAN(arr(),3)" would return the average of elements
"arr(1)", "arr(2)" and "arr(3)".
This example displays "15.0":"
a(1)=10
a(2)=15
a(3)=20
PRINT MEAN(a(),3)
MENU
Usage:
val%=MENU
"or"
val%=MENU (var init%)
Displays the menus defined by mINIT and mCARD, and waits
for you to select an item. Returns the hot-key keycode of the item
selected, as defined in mCARD, in lower case.
If you cancel the menu by pressing Esc, MENU returns 0.
If the name of a variable is passed is sets the initial menu and item
to be highlighted. "init%" should be "256*(menu%)+item%";
for both "menu%" and "item%", 0 specifies the first, 1 the
second and so on. If "init%" is 517 (=256*2+5), for example, this
specifies the 6th item on the third menu.
If "init%" was passed, MENU writes back to "init%"
the value for the item which was last highlighted on the menu. You
can then use this value when calling the menu again. You only need
to use this technique if you have more than one menu in your program.
See `I/O functions and commands' in the `Advanced topics' chapter
for a description of the use of `var' variables.
MID$
Usage:
m$=MID$(a$,x%,y%)
Returns a string comprising "y%" characters of "a$", starting
at the character at position "x%".
Eg if "name$="McConnell"" then "MID$(name$,3,3)" would return
the string "Con".
MIN
Usage:
m=MIN(list)
"or"
m=MIN(array(),element)
Returns the smallest of a list of numeric items.
The list can be either:
*) A list of variables, values and expressions, separated by
commas
or
*) The elements of a floating-point array.
When operating on an array, the first argument must be the array name
followed by "()". The second argument, separated from the first
by a comma, is the number of array elements you wish to operate on
for example" m=MIN(arr(),3)" would return the minimum of elements
"arr(1)", "arr(2)" and "arr(3)".
mINIT
Usage:
mINIT
Prepares for definition of menus, cancelling any existing menus. Use
mCARD to define each menu, then MENU to display them.
MINUTE
Usage:
m%=MINUTE
Returns the current minute number from the system clock (0 to 59).
Eg at 8.54am "MINUTE" returns "54".
MKDIR
Usage:
MKDIR name$
Creates a new directory. For example, "MKDIR "M:\MINE\TEMP""
creates a "M:\MINE\TEMP" directory, also creating "M:\MINE"
if it is not already there.
MONTH
Usage:
m%=MONTH
Returns the current month from the system clock as an integer between
1 and 12.
Eg on 12th March 1992 "m%=MONTH" returns "3" to "m%".
MONTH$
Usage:
m$=MONTH$(x%)
Converts "x%", a number from 1 to 12, to the month name, expressed
as a three-letter mixed case string.
Eg "MONTH$(1)" returns the string "Jan".
NEWOBJ
Usage:
pobj%=NEWOBJ(num%,clnum%)
Create a new object by category number "num%" belonging to the
class "clnum%", returning the object handle on success or zero
if out of memory.
NEWOBJH
Usage:
pobj%=NEWOBJH(cat%,clnum%)
Create a new object by category handle "cat%" belonging to the
class "clnum%", returning the object handle on success or zero
if out of memory.
NEXT
Usage:
NEXT
Positions to the next record in the current data file.
If NEXT is used after the end of a file has been reached, no
error is reported but the current record is a null and the EOF
function returns true.
NUM$
Usage:
n$=NUM$(x,y%)
Returns a string representation of the integer part of the floating-point
number "x", rounded to the nearest whole number. The string will
be up to "y%" characters wide.
*) If "y%" is negative then the string is right-justified
for example "NUM$(1.9,-3)" returns "
" 2"" where there are two spaces to the left of the "2".
*) If "y%" is positive no spaces are added: eg
"NUM$(-3.7,3)" returns ""-4"".
*) If the string returned to "n$" will not fit in the width
"y%", then the string will just be asterisks; for example "NUM$(256.99,2)"
returns ""**"".
See also FIX$, GEN$, SCI$.
ODBINFO
Usage:
ODBINFO var info%()
Provided for advanced use only, this keyword allows you to use OS
and CALL to access data file interrupt functions not accessible
with OPL keywords. See the `Advanced topics' chapter for more details,
including the use of `var' variables.
OFF
Usage:
OFF
"or"
OFF x%
Switches the Workabout off.
When you switch back on, the statement following the OFF command
is executed, for example:
"OFF :PRINT "Hello again""
If you specify an integer, "x%", between 8 and 16383, the machine
switches off for that number of seconds and then automatically turns
back on and continues with the next line of the program (16383 is
about 4 1/2 hours). However, during this time the machine may be
switched on with ON/Esc.
Warning: Be careful how you use this command. If, due to a programming
mistake, a program uses OFF in a loop, you may find it impossible
to switch the Workabout back on, and may have to reset the
computer.
ONERR
Usage:"
ONERR label "or"
ONERR label::
..
..
ONERR OFF
"ONERR label::" establishes an error handler in a procedure.
When an error is raised, the program jumps to the "label::" instead
of the program stopping and an error message being displayed.
The label may be up to 8 characters long starting with a letter. It
ends with a double colon ("::"), although you don't need to use
this in the ONERR statement.
ONERR OFF disables the ONERR command, so that any errors
occurring after the ONERR OFF statement no longer jump to the
label.
It is advisable to use the command ONERR OFF immediately after
the "label::" which starts the error handling code.
See the Error handling chapter for full details.
OPEN
Usage:
OPEN file$,log,f1,f2...
Opens an existing data file "file$", giving it the logical file
name "log", and giving the fields the names "f1," "f2"..
You need only specify those fields which you intend to update or append,
though you cannot miss out a field.
The opened file is then referred to within the program by its logical
name ("A", "B", "C" or "D").
Up to 4 files can be open at once.
Example:
OPEN "clients",A,name$,addr$
See also CREATE, USE and OPENR.
OPENR
This command works exactly like OPEN except that the opened
file is read-only in other words, you cannot APPEND
or UPDATE the records it contains.
This means that you can run two separate programs at the same time,
both sharing the same file.
OS
Usage:
a%=OS(i%, addr1%)
"or"
a%=OS(i%, addr1%, addr2%)
Calls the Operating System interrupt "i%", reading the values
of all returned 8086 registers and flags. The CALL function, although simpler to use, does not
allow the AL register
to be passed and no flags are returned, making it suitable only for
certain interrupts.
The input registers are passed at the address "addr1%". The output
registers are returned at the address "addr2%" if supplied, otherwise
they are returned at "addr1%". Both addresses can be of an array,
or of six consecutive integers.
Register values are stored sequentially as 6 integers and represent
the register values in this order: AX, BX, CX,
DX, SI and DI. The interrupt's function number,
if required, is passed in AH.
The output array must be large enough to store the 6 integers returned
in all cases, irrespective of the interrupt being called.
The value returned by OS is the flags register. The Carry flag,
which is relevant in most cases, is in bit 0 of the returned value,
so "(a% and 1)" will be `True' if Carry is set. Similarly,
the Zero flag is in bit 6, the Sign flag in bit 7 and the Overflow
flag in bit 10.
For example, to find "cos(pi/4)":
PROC cos:
local a%,b%,c%,d%,si%,di%
local result,cosArg,flags%
cosArg=pi/4
si%=addr(cosArg)
di%=addr(result)
ax%=$0100 REM AH=1
REM for cosine
flags%=os(140,addr(ax%))
return peekF(di%)
ENDP
The OS function requires extensive knowledge of the
Operating System and related programming techniques.
See also CALL.
PARSE$
Usage:
p$=PARSE$(f$,rel$,var off%())
Returns a full file specification from the filename "f$", filling
in any missing information from "rel$". (See `I/O functions and
commands' in the `Advanced topics' chapter for a description of the
use of `var' variables.)
The offsets to the filename components in the returned string is returned
in "off%()" which must be declared with at least 6 integers:
"off%(1)"
filing system offset
(1 always)
"off%(2)"
"off%(3)"
"off%(4)"
"off%(5)"
"off%(6)"
device offset
path offset
filename offset
file extension offset
flags for wildcards in
returned string
The flag values in "offset%(6)" are:
0 : no wildcards
1 : wildcard in filename
2 : wildcard in file extension
3 : wildcard in both
If "rel$" is not itself a complete file specification, the current
filing system, device and/or path are used as necessary to fill in
the missing parts.
"f$" and "rel$" should be separate strings.
Example:
p$=PARSE("NEW",
"LOC::M:\ODB\*.ODB",x%())
sets "p$" to "LOC::M:\ODB\NEW.ODB" and "x%()" to
"(1,6,8,13,16,0)".
PATH
Usage:
PATH name$
Gives the directory to use for an OPA's files.
This can only be used between APP and ENDA.
See the `Advanced topics' chapter for more details of OPAs.
PAUSE
Usage:
PAUSE x%
Pauses the program for a certain time, depending on the value of "x%":
"x%"
0
+ve
-ve
result
waits for a key to be pressed.
pauses for "x%" twentieths
of a second.
pauses for "x%" twentieths
of a second or until a key
is pressed.
So "PAUSE 100" would make the program pause for 100/20 = 5
seconds, and "PAUSE -100" would make the program pause for 5 seconds
or until a key is pressed.
If "x%" is 0 or negative, a GET, GET$, KEY
or KEY$ will return the key press which terminated the pause.
If you are not interested in this keypress, but in the one which follows
it, clear the buffer after the PAUSE with a single KEY
function: "PAUSE 0 :KEY"
PEEK functions
The PEEK functions find the values stored in specific bytes.
Usage:
"p%=PEEKB(x%)" returns the integer value of the byte at address
"x%"
"p%=PEEKW(x%)" returns the integer at address "x%"
"p&=PEEKL(x%)" returns the long integer value at address
"x%"
"p=PEEKF(x%)" returns the floating-point value at address
"x%"
"p$=PEEK$(x%)" returns the string at address "x%"
Usually you would find out the byte address with the ADDR function.
For example, if "var%" has the value 7, "PEEKW(ADDR(var%))" returns
"7". (See `I/O functions and commands' in the `Advanced topics'
chapter for a description of the use of `var' variables.)
The different types are stored in different ways across bytes:
*) Integers are stored in two bytes. The first byte
is the least significant byte, for example:
(picture)
ADDR returns the address of the first (least significant)
byte.
*) Long integers are stored in four bytes, the least
significant first and the most significant last, for example:
(picture)
ADDR returns the address of the first (least significant)
byte.
*) Strings are stored with one character per byte, with
a leading byte containing the string length, eg:
(picture)
Each letter is stored as its character code for
example, "A" as 65.
For example, if "var$="ABC"", "PEEK$(ADDR(var$))"
will return the string "ABC". ADDR returns the address
of the length byte.
*) Floating-point numbers are stored under IEEE
format, across eight bytes. PEEKF automatically reads all eight
bytes and returns the number as a floating-point. For example if "var=1.3"
then "PEEKF(ADDR(var))" returns "1.3".
You can use ADDR to find the address of the first element in
an array, for example "ADDR(x%())". You can also specify individual
elements of the array, for example "ADDR(x%(2))".
See also the POKE commands and ADDR.
PI
Usage:
p=PI
Returns the value of Pi (3.14... ).
POKE commands
The POKE commands store values in specific bytes.
Usage:
"POKEB x%,y%" stores the integer value "y%" (less than 256)
in the single byte at address "x%"
"POKEW x%,y%" stores the integer "y%" across two consecutive
bytes, with the least significant byte in the lower address, that
is "x%"
"POKEL x%,y&" stores the long-integer "y&" in bytes starting
at address "x%"
"POKEF x%,y" stores the floating-point value "y" in bytes
starting at address "x%"
"POKE$ x%,y$" stores the string "y$" in bytes starting
at address "x%"
Use ADDR to find out the address of your declared variables.
Warning: Casual use of these commands can result in the loss
of data in the Workabout.
See PEEK for more details of how the different types are stored
across bytes.
POS
Usage:
p%=POS
Returns the number of the current record in the current data file,
from 1 (the first record) upwards.
A file can have up to 65534 records. However integers can only be
in the range -32768 to +32767. Record numbers above 32767 are therefore
returned like this:
record
32767
32768
32769
32770
.
.
65534
value returned by POS
32767
-32768
-32767
-32766
.
.
-2
To display record numbers, you can use this check:
IF POS<0
PRINT 65536+POS
ELSE PRINT POS
ENDIF
POSITION
Usage:
POSITION x%
Makes record number "x%" the current record in the current data
file.
If "x%" is greater than the number of records in the file then
the EOF function will return true.
POSSPRITE
Usage:
POSSPRITE x%,y%
Set the position of the current sprite to pixel "x%,y%".
PRINT
Usage:
PRINT list of expressions
Displays a list of expressions on the screen. The list can be punctuated
in one of these ways:
*) If items to be displayed are separated by commas, there
is a space between them when displayed.
*) If they are separated by semi-colons, there are no spaces.
*) Each PRINT statement starts a new line, unless the
preceding PRINT ended with a semi-colon or comma.
*) There can be as many items as you like in this list. A single
PRINT on its own just moves to the next line.
Examples:
On 1st January 1993,
"PRINT "TODAY is",
PRINT DAY;".";"MONTH "
would display "TODAY is 1.1"
PRINT 1
1
PRINT "Hello"
Hello
PRINT "Number",1 Number 1
See also LPRINT, gUPDATE, gPRINT, gPRINTB,
gPRINTCLIP, gXPRINT.
RAD
"Usage:
r=RAD(x)
Converts "x" from degrees to radians.
All the trigonometric functions assume angles are specified in radians,
but it may be easier for you to enter angles in degrees and then convert
with RAD.
Example:
PROC xcosine:
LOCAL angle
PRINT "Angle (degrees)?:";
INPUT angle
PRINT "COS of",angle,"is",
angle=RAD(angle)
PRINT COS(angle)
GET
ENDP
(The formula used is ^PI*x/180)
To convert from radians to degrees use DEG.
RAISE
Usage:"
RAISE x%
Raises an error.
The error raised is error number "x%". This may be one of the
errors listed in the `Error handling' chapter, or a new error number
defined by you.
The error is handled by the error processing mechanism currently in
use either OPL's own, which stops the program and displays
an error message, or the ONERR handler if you have ONERR
on.
For a full explanation, see the Error handling chapter.
RANDOMIZE
Usage:"
RANDOMIZE x&
Gives a `seed' (start-value) for RND.
Successive calls of the RND function produce a sequence of
random numbers. If you use RANDOMIZE to set the seed back to
what it was at the beginning of the sequence, the same sequence will
be repeated.
For example, you might want to use the same `random' values to test
new versions of a procedure. To do this, precede the RND statement
with the statement RANDOMIZE "value". Then to repeat the
sequence, use RANDOMIZE "value" again.
Example:
PROC SEQ:
LOCAL g$(1)
WHILE 1
PRINT "S: set seed to 1"
PRINT "Q: quit"
PRINT "other key: continue"
g$=UPPER$(GET$)
IF g$="Q"
BREAK
ELSEIF g$="S"
PRINT "Setting seed to 1"
RANDOMIZE 1
PRINT "First random no:"
ELSE
PRINT "Next random no:"
ENDIF
PRINT RND
ENDWH
ENDP
REALLOC
Usage:
pcelln%=REALLOC(pcell%,
size%)
Change the size of a previously allocated cell at "pcell%" to
"size%", returning the new cell address or zero if there is not
enough memory.
RECSIZE
Usage:"
r%=RECSIZE
Returns the number of bytes occupied by the current record.
Use this function to check that a record may have data added to it
without overstepping the 1022-character limit.
Example:
PROC rectest:
LOCAL n$(20)
OPEN "name",A,name$
PRINT "Enter name:",
INPUT n$
IF RECSIZE<=(1022-LEN(n$))
A.name$=n$
APPEND
ELSE
PRINT "Won't fit in record"
ENDIF
ENDP
REM
Usage:"
REM text
Precedes a remark you include to explain how a program works. All
text after the REM up to the end of the line is ignored.
When you use REM at the end of a line you need only precede
it with a space, not a space and a colon.
Examples:
INPUT a
b=a*.175 REM b=TAX
INPUT a
b=a*.175 :REM b=TAX
RENAME
Usage:"
RENAME file1$,file2$
Renames "file1$" as "file2$". You can rename any type of file.
You cannot use wildcards.
You can rename across directories "RENAME "\dat\x.dbf","\x.dbf""
is OK. If you do this, you can choose whether or not to change the
name of the file.
Example:
PRINT "Old name:" :INPUT a$
PRINT "New name:" :INPUT b$
RENAME a$,b$
REPT$
Usage:"
r$=REPT$(a$,x%)
Returns a string comprising "x%" repetitions of "a$".
For example, if "a$="ex"", "r$=REPT$(a$,5)" returns "exexexexex".
RETURN
Usage:"
RETURN" or "RETURN variable
Terminates the execution of a procedure and returns control to the
point where that procedure was called (ENDP does this automatically).
"RETURN 102Ivariable" does this as well, but also passes the value
of "variable" back to the calling procedure. The variable may
be of any type. You can return the value of any single array element
for example "RETURN x%(3)". You can only return one variable.
"RETURN" on its own, and the default return through ENDP,
causes the procedure to return the value 0 or a null string.
Example:
(picture)
PROC price:
LOCAL x
PRINT "Enter price:",
INPUT x
x=tax:(x)
PRINT x
GET
ENDP
PROC tax:(price)
RETURN price+17.5%
ENDP
RIGHT$
Usage:
r$=RIGHT$(a$,x%)
Returns the rightmost "x%" characters of "a$".
Example:
PRINT "Enter name/ref",
INPUT c$
ref$=RIGHT$(c$,4)
name$=LEFT$(c$,LEN(c$)-4)
RMDIR
Usage:
RMDIR str$
Removes the directory given by "str$". You can only
remove empty directories.
RND
Usage:"
r=RND
Returns a random floating-point number in the range 0 (inclusive)
to 1 (exclusive).
To produce random numbers between 1 and "n" eg between
1 and 6 for a dice use the following statement: "f%=1+INT(RND*n)"
RND produces a different number every time it is called within
a program. A fixed sequence can be generated by using RANDOMIZE.
You might begin by using RANDOMIZE with an argument generated
from MINUTE and SECOND (or similar), to seed the sequence
differently each time.
Example:
PROC rndvals:
LOCAL i%
PRINT "Random test values:"
DO
PRINT RND
i%=i%+1
GET
UNTIL i%=10
ENDP
SCI$
Usage:
s$=SCI$(x,y%,z%)
Returns a string representation of "x" in scientific format, to
"y%" decimal places and up to "z%" characters wide. Examples:
SCI$(123456,2,8)="1.23E+05"
SCI$(1,2,8)="1.00E+00"
SCI$(1234567,1,-8)=" 1.2E+06"
If the number does not fit in the width specified then the returned
string contains asterisks.
If "z%" is negative then the string is right-justified.
See also FIX$, GEN$, NUM$.
SCREEN
Usage:
SCREEN width%,height%
"or"
SCREEN width%,height%,x%,y%
Changes the size of the window in which text is displayed. "x%,y%"
specify the character position of the top left corner; if they are
not given, the text window is centred in the screen.
An OPL program can initially display text to the whole screen.
SCREENINFO
Usage:
SCREENINFO var info%()
Gets information on the text screen (as used by PRINT etc.)
This keyword allows you to mix text and graphics. It is required because
while the default window is the same size as the physical screen,
the text screen is slightly smaller and is centred in the default
window. The few pixels gaps around the text screen, referred to as
the left and top margins, depend on the font in use.
On return, the array "info%()", which must have at least 10 elements,
contains this information:
"info%(1)" left margin in pixels
"info%(2)" top margin in pixels
"info%(3)" text screen width in character units
"info%(4)" text screen height in character units
"info%(5)" reserved (window server id for default window)
"info%(6)" font id (FONT and gFONT)
"info%(7)" pixel width of text window character cell
"info%(8)" pixel height of text window line
"info%(9)" and "info%(10)" reserved
Initially SCREENINFO returns the values for the initial text
screen. Subsequently any keyword which changes the size of the text
screen font, such as FONT, will change some of these values
and SCREENINFO should therefore be called again.
See also FONT. See `I/O functions and commands' in the `Advanced
topics' chapter for a description of the use of `var' variables.
SECOND
Usage:
s%=SECOND
Returns the current time in seconds from the system clock (0 to 59).
Eg at 6:00:33 "SECOND" returns "33".
SECSTODATE
Usage:
SECSTODATE s&,var yr%,
var mo%,var dy%,var hr%,
var mn%,var sc%,var yrday%
Returns the date that corresponds to "s&", the number of seconds
since 00:00 on 1 January 1970. "yrday%" is set to the day in the
year (1-366).
"s&" is an unsigned long integer. To use values greater
than +2,147,483,647, subtract 4,294,967,296 from the value.
See also DATETOSECS, HOUR, MINUTE, SECOND, dDATE, DAYS. See
`I/O functions and commands' in the `Advanced topics' chapter for
a description of the use of `var' variables.
SEND
Usage:
ret%=SEND(pobj%,m%,
var p1,...)
Send a message to the object "pobj%" to call the method number
"m%", passing between zero and three arguments ("p1"...) depending
on the requirements of the method, and returning the value returned
by the selected method. (See `I/O functions and commands' in the `Advanced
topics' chapter for a description of the use of `var' variables.)
SETNAME
Usage:
SETNAME name$
Sets the name of the running OPA to "name$" and redraws any status
window, using that name below the icon.
SETPATH
Usage:
SETPATH name$
Sets the current directory for file access for example, "SETPATH "a:\docs"".
LOADM continues to use the directory of the initial program,
or the one specified by a OPA application, but all other file
access will be to the new directory.
SIN
Usage:
s=SIN(angle)
Returns the sine of "angle", an angle expressed in radians.
To convert from degrees to radians, use the RAD function.
SPACE
Usage:
s&=SPACE
Returns the number of free bytes on the device on which the current
(open) data file is held.
Example:
PROC stock:
OPEN "A:stock",A,a$,b%
WHILE 1
PRINT "Item name:";
INPUT A.a$
PRINT "Number:";
INPUT A.b%
IF RECSIZE>SPACE
PRINT "Disk full"
CLOSE
BREAK
ELSE
APPEND
ENDIF
ENDWH
ENDP
SQR
Usage:
s=SQR(x)
Returns the square root of "x".
STATUSWIN
Usage one of:
STATUSWIN ON,type%
STATUSWIN ON
STATUSWIN OFF
Displays or removes a "permanent" status window.
If "type%=1" the small status window is shown. If "type%=2"
the large status window is shown. STATUSWIN ON on its own
displays an appropriate status window; on the Workabout this
will always be the large status window.
The permanent status window is behind all other OPL windows.
In order to see it, you must use FONT (or both SCREEN
and gSETWIN) to reduce the size of the text and graphics windows.
You should ensure that your program does not create windows over the
top of it.
STATWININFO
Usage:
t%=STATWININFO(type%,
var xy%())
Sets xy%(1),xy%(2), xy%(3) and xy%(4) to the top left x, top left
y, width and height respectively of the specified type of status window.
"type%=1" is the small status window; "type%=2" is the large
status window; "type%=3" is the Series 3 compatibility mode
status window; "type%=-1" is whichever status window is current.
STATWININFO returns "t%", the type of the current
status window (with values as for "type%", or zero if there is
no current status window).
See `I/O functions and commands' in the `Advanced topics' chapter
for a description of the use of `var' variables.
STD
Usage:
s=STD(list)
"or"
s=STD(array(),element)
Returns the standard deviation of a list of numeric items.
The list can be either:
*) A list of variables, values and expressions, separated by
commas
or
*) The elements of a floating-point array.
When operating on an array, the first argument must be the array name
followed by "()". The second argument, separated from the first
by a comma, is the number of array elements you wish to operate on
for example" m=STD(arr(),3)" would return the standard deviation
of elements "arr(1)", "arr(2)" and "arr(3)".
This function gives the sample standard deviation, using the formula:
SQR(""(xi-x)^2/(n-1))" where
"x" means" ""xi/n". To convert
to population standard deviation, multiply the result by" SQR((n-1)/n).
STOP
Usage:
STOP
Ends the running program.
STYLE
Usage:
STYLE style%
Sets the text window character style. "style%" can be 2 for underlined,
or 4 for inverse.
See `The text and graphics windows' at the end of the `Graphics' chapter
for more details.
SUM
Usage:
s=SUM(list)
"or"
s=SUM(array(),element)
Returns the sum of a list of numeric items.
The list can be either:
*) A list of variables, values and expressions, separated by
commas
or
*) The elements of a floating-point array.
When operating on an array, the first argument must be the array name
followed by "()". The second argument, separated from the first
by a comma, is the number of array elements you wish to operate on
for example" m=SUM(arr(),3)" would return the sum of elements
"arr(1)", "arr(2)" and "arr(3)".
TAN
Usage:
t=TAN(angle)
Returns the tangent of "angle", an angle expressed in radians.
To convert from radians to degrees, use the DEG function.
TESTEVENT
Usage:
t%=TESTEVENT
Returns `True' if an event has occurred, otherwise returns `False'.
The event is not read by TESTEVENT it may be read with
GETEVENT.
TRAP
Usage:
TRAP command
TRAP is an error handling command. It may precede any of these
commands:
Data file commands:
APPEND, UPDATE
BACK, NEXT, LAST, FIRST, POSITION
USE, CREATE, OPEN, OPENR, CLOSE, DELETE
File commands:
COPY, COMPRESS, ERASE, RENAME
LOPEN, LCLOSE
LOADM, UNLOADM
Directory commands:
MKDIR, RMDIR
Data entry commands:
EDIT, INPUT
Graphics commands:
gSAVEBIT, gCLOSE, gUSE
gUNLOADFONT, gFONT, gPATT, gCOPY
For example, "TRAP FIRST".
Any error resulting from the execution of the command will be trapped.
Program execution will continue at the statement after the TRAP
statement, but ERR will be set to the error code.
TRAP overrides any ONERR.
See the Error handling chapter for further details.
TYPE
Usage:
TYPE num%
Sets the type of an OPA, from 0 to 4, with "num%". On the Workabout
you should set "num%" from $1000 to $1004 to set type 0 to 4 respectively;
the $1000 allows a 48x48 black/grey icon to be used.
This can only be used between APP and ENDA.
See the `Advanced topics' chapter for more details of OPAs.
UADD
Usage:
i%=UADD(val1%, val2%)
Add "val1%" and "val2%", as if both were unsigned integers
with values from 0 to 65535. Prevents integer overflow for pointer
arithmetic eg "UADD(ADDR(text$),1)" should be used instead
of "ADDR(text$)+1".
One argument would normally be a pointer and the other an offset expression.
See also USUB.
UNLOADLIB
Usage:
ret%=UNLOADLIB(var cat%)
Unload a DYL from memory. If successful, returns zero. (See `I/O functions
and commands' in the `Advanced topics' chapter for a description of
the use of `var' variables.)
UNLOADM
Usage:
UNLOADM module$
Removes from memory the module "module$" loaded with LOADM.
"module$" is a string containing the name of the translated module.
The procedures in an unloaded module cannot then be called by another
procedure.
UNTIL
See DO.
UPDATE
Usage:
UPDATE
Deletes the current record in the current data file and saves the
current field values as a new record at the end of the file.
This record, now the last in the file, remains the current record.
Example:
A.count=129
A.name$="Brown"
UPDATE
Use APPEND to save the current field values as a new record.
UPPER$
Usage:
u$=UPPER$(a$)
Converts any lower case characters in "a$" to upper case, and
returns the completely upper case string.
Example:
...
CLS :PRINT "Y to continue"
PRINT "or N to stop."
g$=UPPER$(GET$)
IF g$="Y"
nextproc:
ELSEIF g$="N"
RETURN
ENDIF
...
Use LOWER$ to convert to lower case.
USE
Usage:
USE logical name
Selects the data file with the logical name "A", "B",
"C" or "D". The file must previously have been opened with
OPEN, OPENR or CREATE and not yet be closed.
All the record handling commands (such as POSITION or UPDATE)
then operate on this file.
USR
Usage:
u%=USR(pc%,ax%,bx%,cx%,dx%)
Executes your machine code, returning an integer. The USR code
(ie the assembler code you have written) must return with a far
RET, otherwise the program will crash.
The values of "ax%,bx%"... are passed to the AX, BX...
8086 registers. The microprocessor then executes the machine code
starting at "pc%". At the end of the routine, the value in the
AX register is passed back to "u%".
Warning: Casual use of this function can result in the loss
of data in the Workabout.
This example shows a simple operation, ending with a far RET:
PROC trivial:
LOCAL t%(2),u%,ax%
t%(1)=$c032 REM xor al,al
t%(2)=$cb REM retf
ax%=$1ab
u%=usr(addr(t%(1)),ax%,0,0,0)
REM returns (ax% AND $FF00)
PRINT u% REM 256 ($100)
GET
ENDP
See also USR$, ADDR, PEEK, POKE.
USR$
Usage:
u$=USR$(pc%,ax%,bx%,cx%,dx%)
Executes your machine code, returning a string. The USR$ code
you have written must return with a far RET, otherwise the
program will crash.
The values of "ax%,bx%"... are passed to the AX, BX...
8086 registers. The microprocessor then executes the machine code
starting at "pc%". At the end of the routine, the value in the
ax register must point to a length-byte preceded string. This string
is then copied to "u$".
Warning: Casual use of this function can result in the loss
of data in the Workabout.
See USR for an example. See also ADDR, PEEK,
POKE.
USUB
Usage:
i%=USUB(val1%, val2%)
Subtract "val2%" from "val1%", as if both were unsigned integers
with values from 0 to 65535. Prevents integer overflow for pointer
arithmetic.
See also UADD.
VAL
Usage:
v=VAL(numeric string)
Returns the floating-point number corresponding to a numeric string.
The string must be a valid number eg not ""5.6.7"" or
""196f"". Expressions, such as ""45.6*3.1"", are not
allowed. Scientific notation such as ""1.3E10"", is OK.
Eg "VAL("470.0")" returns "470"
See also EVAL.
VAR
Usage:
v=VAR(list)
"or"
v=VAR(array(),element)
Returns the variance of a list of numeric items.
The list can be either:
*) A list of variables, values and expressions, separated by
commas
or
*) The elements of a floating-point array.
When operating on an array, the first argument must be the array name
followed by "()". The second argument, separated from the first
by a comma, is the number of array elements you wish to operate on
for example" m=VAR(arr(),3)" would return the variance of elements
"arr(1)", "arr(2)" and "arr(3)".
This function gives the sample variance, using the formula:
""(xi-x)^2/(n-1)" where
"x" means ""xi/n".
To convert to population variance, multiply the result by"
(n-1)/n
VECTOR
Usage:
VECTOR I%
label1,label2,...
labelN
ENDV
"VECTOR I%" jumps to label number "i%" in the list
if "i%" is 1 this will be the first label, and so on. The list
is terminated by the ENDV statement. The list may spread over
several lines, with a comma separating labels in any one line but
no comma at the end of each line.
If "i%" is not in the range 1 to "N", where "N" is the
number of labels, the program continues with the statement after the
"ENDV" statement.
See also GOTO.
WEEK
Usage:"
w%=WEEK(day%,month%,year%)
Returns the week number in which the specified day falls, as an integer
between 1 and 53.
"day% "must be between 1 and 31, "month%" between 1 and 12,
"year%" between 1900 and 2155.
Each week is taken to begin on the `Start of week' day which by default
is Monday, though you can change it with the `Time and date' option
on the `Time' menu in the Command processor. When a year begins on
a different day, it counts as week 1 if there are four or more days
before the next week starts.
WHILE...ENDWH
Usage:
WHILE expression
..
...
..
....
ENDWH
Repeatedly performs the set of instructions between the WHILE
and the ENDWH statement, so long as "expression "returns
logical true non-zero.
If "expression" is not true, the program jumps to the line after
the ENDWH statement.
Every WHILE must be closed with a matching ENDWH.
See also DO...UNTIL and the `Loops and branches' chapter earlier
in this manual.
YEAR
Usage:
y%=YEAR
Returns the current year as an integer between 1900 and 2155 from
the system clock.
For example, on 5th May 1992 "YEAR" returns "1992".
Character set and character codes
Character set
The Workabout contains many fonts, but they all have the same
basic character set: the IBM Code Page 850 character set. Characters
with decimal codes from 32 to 127 are the same as ASCII characters.
Those from 0 to 32 are special control codes.
The characters available on the Workabout are as follows; for
each character, first the decimal, then the hexadecimal code is given.
32 is the space character.
*** Entering characters using the "standard" keyboard
Any of the characters in the character set can be entered directly
from the keyboard. To enter one:
1.
Look up the decimal code of the character you want in
the preceding table.
2.
Hold down the Ctrl key and type the 3-digit code, then
release the Ctrl key.
Make sure you add preceding zeros, if they are required, to make a
code three digits long for example, use Ctrl-096 to enter
a left single quote, "`"
*** Accented characters
The Ctrl key turns the number keys 1 to 6 into accent keys (Ctrl-1
is a special case see overleaf):
ACCENT
"
(umlaut/diaeresis)
(picture)
(grave)
3
(acute)
~
(tilde)
^
(circumflex)
NUMBER TO PRESS WITH CTRL
2
4
5
6
The letters a, e, i, n, o, u, y (upper or lower case) can be accented,
as appropriate.
To get the accent, hold down the Ctrl key while you press the accent's
number. Then press the letter to be accented. It will appear on the
screen with an accent.
Examples:
…type:
¤-
Ctrl-3
Ctrl-2
Ctrl-5
a
u
n
To get the letters in upper case, either have Caps Lock on or hold
down a Shift key while you enter the letter.
Example:
¥type:
Ctrl-5
Shift-n
*** Other characters
The following characters are also available:
Press Ctrl-1
and then:
a, A
c, C
d, D
(picture)
e, E
o, O
t, T
(picture)
Result:
†, DOWN
‡, €
‘, ’
,
To get the upper case versions, have Caps Lock on, or hold down either
Shift key.
Press Ctrl-1
and then:
s
l
r
q
x
p
Result:
á
®
¯
¨
œ
All of these characters are part of the character set given above.
Character codes
To find out a character's character code either look up the character
in the table given earlier in this chapter, or run the built-in Calc
application and type the "%" sign followed by the character
for example "%P" returns 80. Characters with codes from 0 to 127
are the same as in the ASCII character set. Codes 128 to 255
are compatible with the IBM code page 850.
Codes from 256 upwards are for other Workabout keys
see the list below.
*** Character codes of special keys
The GET and KEY functions return the character code
of the key that was pressed. Some of the keys are not in the character
set. They return these numbers:
Esc
Delete
27
8
Tab
Enter
9
13
Special keys
" UP "
" RIGHT "
Pg Up
Home
Menu
256
260
262
290
" DOWN "
258
" LEFT "
Pg Dn
261
End
263
Help
291
257
259
The Psion key adds 512 to the value of the key pressed. For example,
Psion-a is 609 (512+97), and Psion-Help (Dial) is 803 (512+291).
*** Special character codes with PRINT
These values can be used with PRINT and CHR$():
7
beep
8
backspace
9
tab
10
line feed
12
form feed (clear screen)
13
carriage return (cursor to left of window)
For example, "PRINT CHR$(8)" moves the cursor backwards, one
character to the left.
Specification
*** Physical characteristics
Size
180mm x 90mm x 35mm
Weight 325g (incl. batteries)
Screen size
6.24 x 3.00 cm (2.45 x 1.18 ")
Screen type
Backlit (optional), 240 x 100 pixel LCD
Pixel size: 0.27 x 0.23 mm
Pixel pitch: 0.30 x 0.26 mm
Sound
Piezo buzzer
*** Power supply
Internal Nickel Cadmium rechargeable battery pack (Part no. 2802-0005)
or 2 x AA alkaline batteries
Backup 3V Lithium R16 battery (CR 1620)
External
for the U.K.
Psion Series 3 range mains adapter (Part no. 2502-0010
Part no. 2502-0011 for the rest of Europe)
Note: This mains adaptor must be used in conjunction with a LIF
converter (Part no. 2802-0011)
Workabout Docking Station
Fuse
1.25amp 20mmx5mm glass fast blow
*** Memory
Built-in 1Mb Masked ROM and 256KB/1MB/2MB RAM
Two SSD drives allow extra storage space on Flash/RAM SSDs
*** System information
Processor
NEC V30 running at 7.68MHz
Operating
System
EPOC
*** Expansion
Internal One internal expansion card can be installed.
Currently RS-232 AT, RS-232 AT & RS-232 TTL, and Barcode &
RS-232 AT serial interfaces are available. Expansion
modules must be factory or distributor fitted. Contact your Psion
distributor for more information.
External
- is
A combined external LIF-PFS connector - LIF converter unit
available. This plugs into the standard LIF socket and allows
standard 3Link peripherals, such as the Serial 3Link lead, Parallel
3Link lead and the mains adaptor to be connected to the Workabout.
Peripherals
External peripherals (such as a modems, printers or barcode
readers) can be plugged into any suitable socket connected to an
internal expansion cards (where fitted), or connected to a Serial
3Link lead that is attached to the Workabout, or connected
to a
Docking Station in which the Workabout is placed.
*** Environment
Operating temp.
-20§C to 60§C
Storage temp.
-25§C to 80§C
Operating humidity
0% to 90% non condensing
EMC
For Europe:
EN55022 Class B
For the USA:
For Germany:
FCC Part 15 Class B (Pending)
Vfg 243 Class B (Pending)
Safety
For Europe:
EN 60950 (Pending)
Static
IEC801
Drop
1m onto concrete on any face
Other
Dust proof & splash proof (IP54)
Summary for experienced OPL users
OPL has evolved from the Psion Organiser II through the
MC and HC computers to the Series 3, Series 3a and now the
Workabout. This appendix explains the changes
made. For more details of the following topics
and keywords, look them up in the Index or Table of contents.
Bear in mind that some OPL keywords return or allow different
values according to screen size and keyboard layout.
Note: the comparisons against HC and MC OPL in this
appendix assume the original versions of these computers. Some of
the Series 3/3a and Workabout OPL features may be incorporated
into future releases in the HC and MC ranges.
Using OPL on the Workabout
To create an OPL module from the Command processor: type "EDIT
filename.OPL" . You can edit an existing OPL module by typing its
name on the command line.
To create an OPL module from the System screen: move the cursor
to the Program icon. Select `New file' from the `File' menu and give
the filename to use. Existing OPL modules are listed under the Program
icon on the System screen. To edit one, move the cursor onto the module
name and press Enter.
Type in the module in the Program editor that will be displayed. You
can type and edit in the Program editor in much the same way as you
would in any text editor, the text you type does not word-wrap; you
must press Enter at the end of each line to start a new one. The keywords
that mark the start and end of your first procedure: PROC:
and ENDP are already entered for you.
When you have finished your module, select the `Translate' option
on the `Prog' menu to translate it, then use the `Run' option to run
it. You can also run the translated module from the System screen,
its name automatically appears under a `RunOpl' icon you can
simply move the cursor right to the RunOpl icon, down onto the module
name, and press Enter to run it.
To stop a running OPL program that has no exit option, press Psion-Esc.
The Workabout screen is 240 points (pixels) wide by
100 points deep.
OPL programs can be translated as applications which may be installed
in the System screen. This is done with the APP keyword. You can also specify the type
of application using the keyword TYPE, and
the icon using ICON, the filename extension
of data files to be listed under the icon in the System screen using
EXT and the directory in which these files are
stored using PATH.
*** Files
If you use the `S3 Translate' option on the `Prog' menu, the Program editor
will translate as if for the Series 3. The translated program can
then be run on either a Series 3, Series 3a or Workabout.
If you use the `Translate' option on the `Prog' menu, the translated program will run on the
Series 3a and Workabout.
Important: If you used the keyword dINITS to create dialogs
in your program, you will not be able to run it on a Series 3 or
Series 3a because the dINITS keyword is not supported by
OPL on these machines.
Modules translated for the Series 3 (not the Series 3a and
Workabout) are also compatible with HC and MC computers, provided
that they only use keywords also available on those machines. You
can build code libraries which can be used on all four machines, bearing
in mind differences between screen size, location of files etc.
Procedures translated on the Organiser need re-translation, as they
will not run on the Series 3a or Workabout.
The Workabout uses the same MS-DOS filing system as the MC,
Series 3 and Series 3a. The directories and file extensions concerned
with OPL are:
Type of file
Directory
File extension
OPL modules
translated modules
bitmaps
\OPD
\OPL
\OPO
.PIC
.OPL
.OPO
data files
\OPD
.ODB
(unless specified with the PATH or EXT keywords.
On the MC, Series 3 and Series 3a, the directory structure is
hidden from view for everyday use. In the Workabout's Command
processor, however, it is not and you therefore have greater freedom
over the organisation of files on the internal disk. Having said this,
you are recommended to stick to the structure outlined above, unless
you have a good reason not to.
The evolution of OPL
OPL has evolved from the early days of the Psion Organiser II through
the MC and HC computers to the Series 3, Series 3a and now the
Workabout. The following sections explain the changes that
were made at each stage of its development:
*) changes from Organiser to MC OPL;
*) changes from MC to HC OPL;
*) changes from HC to Series 3 OPL;
*) changes from Series 3 to Series 3a OPL;
and finally:
*) changes from Series 3a to Workabout OPL;
So if you have been used to the HC version of OPL, for example, you
should look at all the sections from `Changes from HC to Series 3
OPL' onwards to see how OPL is different on the Workabout.
Changes from Organiser to MC OPL
*** Procedures and modules
More than one procedure may be stored in a single .OPL file,
or module. The beginning of each procedure is identified by
the line "PROC procedure name:" and the end of each procedure
by the line "ENDP". So a module might look like this:
PROC oneroot:
LOCAL x
PRINT "Type a number:"
INPUT x
root:(x)
GET
ENDP
PROC root:(p)
CLS
PRINT "Root of",p,"is",sqr(p)
ENDP
When you run the module, the first procedure in the module is executed.
Any other procedures in the module are available to be called by the
first procedure.
Procedures can be called from other modules only if you've loaded
the modules with the new LOADM command. Up to four modules
can be held in memory at any one time. Use UNLOADM to remove
a module from memory.
*** Other changes
Data files now have a special format. Records can be a maximum of
1022 bytes long.
The FIND function compares a search string
against entire text fields. To find text anywhere within text fields,
add an asterisk at either end of the string eg "FIND("*JONES*")".
When you use REM at the end of a line you need only precede
it with a space, not a space and a colon. So these two lines are equivalent:
RAISE -37 :REM disk full
RAISE -37 REM disk full
No calculator memories are available to OPL on the MC (although they
are on the Series 3/3a and Workabout.)
The specification of the BEEP command has changed.
Different effects are produced by values below 32, used with "PRINT CHR$()".
See the `Character set and character codes' appendix for more details.
New functions and commands:
*) SCREEN allows you to set the maximum size of the
text window.
*) LOPEN must now be used before LPRINTing, to
specify the destination of the LPRINTs. Use LCLOSE if
you then want to LPRINT to another device. You can also use
LOPEN to print to a file.
*) COMPRESS copies data files, and makes sure that erased
records aren't copied to the destination device.
*) FINDW, DIRW$, COPYW and DELETEW on
Organiser model LZ have been renamed FIND, DIR$, COPY
and DELETE the functions/commands which previously
had these names having been removed.
These functions/commands have been removed from OPL: CLOCK, UDG,
DISP, VIEW, FREE, MENU and MENUN. Also, the Comms Link commands
are not available.
*** Long integers
A new variable type has been added long integers, specified
by adding an "&" symbol to the variable name instead of the "%"
symbol, eg "price&", "x&(5)".
Long integers are 32-bit rather than 16-bit signed integers, giving
the range +2,147,483,647 to -2,147,483,648 rather than +32767 to -32768.
Long hexadecimal constants should have an "&" instead of a "$"
sign in front of them. Even when the constant fits into an integer,
you can use "&" to widen the constant to 32 bits.
*** Advanced use
POKEL, POKEF and POKE$ have been added to POKEB
and POKEW, and PEEKL, PEEKF and PEEK$ have been
added to PEEKB and PEEKW. This means you can poke and
peek the full range of value types strings, long integers
etc.
There is a range of I/O file handling facilities, allowing
you to open, read, write and position within any type of file.
To complement the keypress functions, KMOD allows you to detect
any modifiers, such as Control, which have been pressed.
Changes from MC to HC OPL
*** Graphics commands
Many graphics commands are available. They can, for example:
*) Draw lines and boxes.
*) Fill areas with patterns.
*) Display text in a variety of styles, at any position on
the screen.
*) Scroll areas of the screen.
*) Manipulate up to eight separate windows and bit patterns.
*) Read data back from the screen.
The TRAP command can be used with several new commands.
The CURSOR command can be still be used to switch the text
cursor on and off, but can also define the shape and position of a
graphics cursor.
The gUPDATE command affects anything that displays on the screen.
It may make a noticeable difference in speed if, for example, you
are using a lot of PRINT commands.
*** Other changes
When a program runs, it is given the full screen on which to display
text. Use the SCREEN command to define a
different window size for text display.
The SCREEN command can position the text window anywhere on
the screen. You can also use SCREEN repeatedly to change the
size of the window.
A new function, OS, allows you to call any interrupt service
in the Operating System, and read all returned registers and flags.
GETEVENT and TESTEVENT give details of system events
of any kind.
Changes from HC to Series 3 OPL
*** Everyday features
Many of the interface features of the Series 3 applications
for example menus, dialog boxes, shadowed boxes and status windows
are available via OPL keywords.
Several keywords have been added for OPAs (OPL applications).
The two colons at the end of the label in ONERR or GOTO
are optional. The colons must still be used where the label itself
occurs in the program.
You can pause a running program by pressing Control-S. It will be
paused as soon as it next tries to display something on the screen.
Press any other key to let the program resume running.
The EVAL function evaluates a string and returns the result
as a floating-point number.
The VECTOR command allows you to jump to one of a list of labels.
This can save cumbersome IF statements.
Procedures may now be called using a string expression for the procedure
name.
BEEP may be used with the duration made negative. It will first
check whether the sound system is in use (perhaps by another OPL program),
and return if it is. This stops BEEP waiting until the sound
system is free.
There are new graphics keywords gINVERT, gXPRINT,
gBORDER and gCLOCK.
DATETOSECS and SECSTODATE convert between standard system
dates / times and the number of seconds since midnight on 1/1/1970.
The calculator memories M0 to M9 are available to OPL.
*** Advanced features
MKDIR makes a new directory, RMDIR removes a directory,
and SETPATH sets the current directory for file access.
The command line arguments of the OPL program you run, including its
full pathname, are returned by CMD$.
Two new I/O commands, IOWAITSTAT and IOYIELD, have been
added.
PARSE$ will produce a single full file specification from two
separate parts, or break one down into its constituent parts.
Changes from Series 3 to Series 3a OPL
*** Everyday features
A new SCREENINFO command provides information about the screen
size and type. You can use it to write machine-independent programs.
All appropriate graphics keywords can now draw in grey as well as
black. To allow drawing in grey use "DEFAULTWIN 1".
By default grey is not available as drawing grey as well as black
uses more memory and takes longer.
TYPE supports new larger black/grey icons, and allows you to
specify different icons for the Series 3 and Series 3a.
New FONT and STYLE keywords set the font and style for
displaying text with PRINT (etc).
gFONT and FONT can access many new fonts which are built
into the Series 3a ROM.
gCLOCK supports many more types of clocks.
A dialog on the Series 3 can have up to seven lines including the
title, whereas a dialog on the Series 3a can have nine.
A menu on the Series 3 can have up to six options whereas a menu
on the Series 3a can have eight. The MENU function allows
you to set which menu and item should be highlighted initially.
Series 3 programs will always run correctly in compatibility mode
but if retranslated (in normal Series 3a mode) may need changing
as follows:
*) Menu keywords support case-dependent hot-keys. The hot-keys
you specify should now be in the correct case upper or lower.
If you specify "%P" (upper case), for example, this is the hot-key
Shift-Psion-P. On selecting an option, MENU returns the hot-key
keycode in the case which you specified.
On some very early versions of the Series 3, menus exited
when any key was pressed together with the Psion key. Later
Series 3 versions and all Series 3a versions exit menus only when
valid hot-keys are pressed.
*) "STATUSWIN ON" displays a large Series 3a status window
containing an icon. This is 64 pixels wide, whereas it was 50 pixels
wide on the Series 3.
STATWININFO returns information about the sizes of status windows
and/or the current status window.
gBUTTON draws keys such as those displayed in certain dialogs.
gDRAWOBJECT draws a graphics object. You can use this
to draw the "lozenge" used to display the words `City' and `Home'
in the World application.
gXBORDER draws bordered boxes, such as those used to display
dialogs. (The gBORDER keyword works as it did on the Series 3.)
FINDFIELD finds text in a particular string field, or group
of string fields.
BEEP cannot play tones as high as those played
on the Series 3.
gPEEKLINE can now read from the screen as a whole.
CURSOR can display new kinds of cursors, and gINFO can
return this (and other) information.
TYPE supports new actions and icon types for OPAs.
*** Advanced features
IOC performs an asynchronous I/O request, like IOA,
but with guaranteed completion. IOCANCEL cancels any outstanding
IOA or IOC.
A new set of keywords supports the definition of a sprite,
which you can move around "on top of" the rest of the screen. The
sprite can be animated, displaying a sequence of different bitmaps.
Cacheing keeping frequently used procedures in memory
instead of loading them from file every time they are called
can help increase the speed of OPL programs.
New keywords provide access to dynamic libraries (DYLs), to
the memory allocator and to Operating System data file calls.
UADD and USUB allow addition and subtraction of pointers/addresses
without the risk of `Integer overflow'.
GETEVENT now returns the event $405 when the date changes.
Some new system services, not available on the Series 3,
are mentioned in this manual for example, the `Foreground
and background' section in the `Advanced topics' chapter uses a "event
on machine turn on" service.
Changes from Series 3a to Workabout OPL
OPL on the Workabout is the same as OPL on the Series 3a
except for the following:
*) The translator only allows 6 menu items to be defined for
each menu tile due to the smaller size of the Workabout screen.
*) You cannot display an application icon or diamond list in
status windows on the Workabout because the status windows
are not large enough. The DIAMINIT and DIAMPOS keywords
are therefore not supported by OPL on the Workabout.
*) A new keyword, dINITS, has been provided for creating
dialogs using a small font. This allows you to create dialogs that
contain nine lines (including the title line); dINIT as provided
on the Series 3a allows only six lines in a dialog on the Workabout.
Compatibility between Series 3, Series 3a and Workabout
Programs translated for the Series 3 can run on the Workabout
without retranslation. Those translated for the Series 3a can run
on the Workabout without modification and retranslation only
if they do not contain the keywords DIAMINIT and DIAMPOS
which are not provided in OPL on the Workabout.
The Workabout has a much smaller screen than both the Series 3
and Series 3a. Information in Series 3 and Series 3a applications
that does not fit on the screen is clipped - it is not rescaled to
fit the smaller area available.
*** Slowing down Series 3 programs
Time dependent programs, such as games, written for the Series 3
will run too fast on the Workabout and Series 3a. If you
wish to slow down a Series 3 program, you can write a short OPL
program to run in the background, like this:
proc slowdn:
local i%,j
print "Slow down S3a"
call($138b) rem "unmark as active"
while 1
i%=10 :j=j+1
while i% :i%=i%-1 :endwh
if j=300000
j=0 :pause 2
else
pause 1
endif
endwh
endp
If you change the number 10 assigned to "i%" at the top of the
WHILE loop, you can control the amount by which the Workabout
slows down a bigger value slows it down by more, and a smaller
value by less. You may need to use different values for different
Series 3 programs.
Warning: Running this program will cause the Workabout
to use more battery power.
The loop which "j" counts is designed to do a "pause 2"
instead of a "pause 1", roughly every twenty five minutes. A
"pause 2" gives just enough delay for the automatic turn off
of the Workabout to have a chance to work. Without this,
automatic turn off cannot work.
Using "pause 2" in the main delay loop might cause the
foreground process to have a noticeably jerky appearance.
You can change the value 300000 to change the time before
automatic turn off will occur. If you make it too small you may notice
the "pause 2" occasionally. (If you make "i%" a lot bigger
than 10 in the loop, you may also find the period before automatic
turn off increases.)
If you do not allow automatic turn off like this, and you then forget
to exit the "slowdown" program, no automatic turn off can occur. If
you left the Workabout turned on it would stay on until the
batteries were run down. It would then turn off, and you would not
be able to use it again until you changed the batteries.
Do not forget to exit the program (with Psion-Esc) when you want to
use the Workabout at full speed again.
Operators and logical expressions
Operators
These operators are available in OPL:
*** Arithmetic operators
+
"-"
*
/
**
"-"
%
add
subtract
multiply
divide
raise to a power
unary minus (in negative numbers for example, "-10")
percent
*** Comparison operators
=
<
<=
=
<>
greater than
greater than or equal to
less than
less than or equal to
equal to
not equal to
*** Logical and bitwise operators
AND
OR
NOT
*** The % operator
The percentage operator can be used in expressions like this:
"60+5%"
"605%"
"60*5%"
"60/5%"
ie 60 plus 5% of 60. Result: 63
ie 60 minus 5% of 60. Result: 57
ie 5% of 60. Result: 3
ie what number is 60 5% of. Result: 1200.
It can also be used like this:
"105>5%"
100
"105<5%"
ie what number, when increased by 5%, becomes 105. Result:
ie how much of 105 was a 5% increase. Result: 5
Examples
To add 15% tax to 345:
"345+15%"
Result = 396.75
To find out what the price was before tax:
"396.75>15%"
Result = 345
To find out how much of a total price is tax:
"396.75<15%"
Result = 51.75
Precedence
Highest:
**
- (unary minus) NOT
* /
+ = > < <> >= <=
Lowest: AND OR
So "7+3*4" returns 19 (3 is first multiplied by 4, and 7 is added
to the result) not 40 (4 times 10).
*** When there is equal precedence
In an expression where all operators have equal precedence, they are
evaluated from left to right (with the exception of powers). For example,
in "a+b-c", "a" is added to "b" and then "c" is subtracted
from the result.
Powers are evaluated from right to left for example, in "a%**b%**c%",
"b%" will first be raised to the power of "c%" and then "a%"
will be raised to the power of the result.
*** Changing precedence with brackets
The result of an expression such as "a+b+c" is the same whether
you first add "a" to "b", or "b" to "c". But how is
"a+b*c/d" evaluated? You may want to use brackets to either:
*) Make it obvious what the order of calculation is
or
*) Change the order of calculation.
By default, "a+b*c/d" is evaluated in the order: "b" multiplied
by "c", then divided by "d", then added to "a". To perform
the addition and the division before the multiplication, use brackets:
"(a+b)*(c/d)". When in doubt, simply use brackets.
*** Precedence of integer and floating-point values
You are free to mix floating-point and integer values in expressions,
but be aware how OPL handles the mix:
*) In each part of the calculation, OPL uses the simplest
arithmetic possible. Two integers will use integer arithmetic, and
this can give unexpected results: "7/2" gives the
integer "3" . Otherwise floating-point arithmetic is
used ( "7.0" is a floating-point number, so
"7.0/2" gives the floating-point number
"3.5" ).
*) Finally, the evaluted result of the right-hand side of an
expression is automatically converted to the same type as the variable
to which it is assigned.
For example, your procedure might include the expression
"a%=b%+c" . This is handled like this:
"b%" is converted to floating-point and added to
"c" . The resulting floating-point value is then
automatically converted to an integer in order to be assigned to the
integer variable "a%" .
Such conversions may produce odd results for example "a%=3.0*(7/2)"
makes "a%=9", but "a%=3.0*(7.0/2)" makes "a%=10". OPL
does not report this as an error, so it's up to you to ensure that
it doesn't happen unless you want it to.
*** Type conversions and rounding down
There are three numeric types floating-point, integer and
long integer. You can assign any of these types to any other. The
value on the right-hand side will be automatically converted to the
type of the variable on the left-hand side. For example:
*) If you assign an integer value to a floating-point variable,
there are no problems.
*) If you assign a floating-point value to an integer variable,
the value is converted to an integer, always rounded towards zero
for example, if you declare" LOCAL c%" and then say "c%=3.75",
the value "3.75" is converted to the value "3".
Rounding down towards zero can sometimes cause unusual results. For
example, "a%=2.9" would give "a%" the value 2, and "a%=-2.3"
would give "a%" the value -2.
When you run a module, if the left-hand side of an assignment has
a narrower range than the right-hand side, you may get an error (for
example, if you had "x%=a&" where "a&" had the value 320000).
To control how floating-point numbers are rounded when converted, use the INT function.
Logical expressions
The comparison operators and logical operators are based on the idea
that a certain situation can be evaluated as either true or
false. For example, if "a%=6" and "b%=8", "a%>b%"
would be `False'.
These operators are useful for setting up alternative paths in your
procedures. For example you could say:
IF salary<expenses
doBad:
ELSE
doGood:
ENDIF
You can also make use of the fact that the result of these logical
expressions is represented by an integer:
*) `True' is represented by the integer -1
*) `False' is represented by the integer 0 (zero).
<
<=
Eg
"a<b"
Result returned
True if a less than b
False if a greater than or equal to b
"a>b" True if a greater than b
False if a less than or equal to b
"a<=b" True if a less than or equal to b
Return value
-1
0
-1
0
-1
=
<>
=
False if a greater than b
"a>=b" True if a greater than or equal to b
False if a less than b
"a<>b" True if a not equal to b
False if a equal to b
"a=b" True if a equal to b
False if a not equal to b
0
-1
0
-1
0
-1
0
These integers can be assigned to a variable or displayed on the screen
to tell you whether a particular condition is true or false, or used
in an IF statement.
For example, in a procedure you might arrive at two sub-totals, "a"
and "b". You want to find out which is the greater. So use the
statement, "PRINT a>b". If zero is displayed, "a" and "b"
are equal or "b" is the larger number; if -1 is displayed, "a>b"
is true "a" is the larger.
Logical and bitwise operators
The operators AND, OR and NOT have different
effects depending on whether they are used with floating-point numbers
or integers:
When used with floating-point numbers...
... AND, OR and NOT are logical operators,
and have the following effects:
Example
"a AND b"
"a OR b"
"NOT a"
Result
True if both "a" and "b" are non-zero
False if either "a" or "b" are zero
True if either "a" or "b" is non-zero
False if both "a" and "b" are zero
True if "a" is zero
False if "a" is non-zero
Integer returned
-1
0
-1
0
-1
0
When used with integer or long integer values...
... AND, OR and NOT are bitwise operators.
The way OPL holds integer numbers internally is as a binary code
16-bit for integers, 32-bit for long integers. Bitwise means that
an operation is performed on individual bits. A bit is set
if it has the value 1, and clear if it has the value 0. Long
integer values with AND, OR and NOT behave the same
as integer values.
AND Sets the result bit if both input bits are set,
otherwise clears the result bit.
For example, the statement "PRINT 12 AND 10" displays 8. To understand
this, write 12 and 10 in binary:
"12
10
0000000000001100
0 0 0 0 0 0 0 0 0 0 0 0 1 0 1 0"
AND acts on each pair of bits. Thus, working from left to right
discounting the first 12 bits (since "0 AND 0" gives 0):
"1 AND 1
1 AND 0
0 AND 1
0 AND 0
" RIGHT "
" RIGHT "
" RIGHT "
" RIGHT "
1
0
0
0"
The result is therefore the binary number 1000, or 8.
OR Sets the result bit if either input bit is set,
otherwise clears the result bit.
What result would the statement "PRINT 12 OR 10" give? Again,
write down the numbers in binary and apply the operator to each pair
of digits:
"1 OR 1 " RIGHT "
1 OR 0 " RIGHT "
0 OR 1 " RIGHT "
0 OR 0 " RIGHT "
1
1
1
0"
The result is the binary number 1110, or 14 in decimal.
NOT Sets the result bit if the input bit is not
set, otherwise clears the result bit.
NOT works on only one number. It returns the one's complement,
ie it replaces 0s with 1s and 1s with 0s.
So since 7 is 0000000000000111, "NOT 7" is 1111111111111000.
This is the binary representation of -8.
A quick way of calculating NOT for integers is to add 1 to
the original number and reverse its sign. So "NOT 23" is -24,
"NOT 0" is -1 and "NOT -1" is 0.
Serial/parallel ports and printing
You can use LPRINT in an OPL program to send information (for
printing or otherwise) to either of the two Expansion ports that can
be fitted to the Workabout:
*) A 9-pin serial port, Port A.
*) A LIF (Low Insertion Force) socket, Port C, which
can be a serial or parallel port, depending on what is connected to
it. See the `LIF-PFS socket' section in the `Introduction' chapter
for a description.
*) A file on the Workabout or an attached computer.
You can also read information from the serial port.
Using the parallel port
In your OPL program, set up the port with the statement "LOPEN "PAR:C"".
Provided the port is not already in use, the connection is now ready.
LPRINT will send information down a parallel 3Link lead connected
to the LIF-PFS socket for example, to an attached printer.
*** Example
PROC prints:
OPEN "clients",A,a$
LOPEN "PAR:C"
PRINT "Printing..."
DO
IF LEN(A.a$)
LPRINT A.a$
ENDIF
NEXT
UNTIL EOF
LPRINT CHR$(12); :LCLOSE
PRINT "Finished" :GET
ENDP
Using the serial port
In your OPL program, set up the port with the statement
"LOPEN "TTY:A"" or "LOPEN "TTY:C""
whichever port you require.
Now LPRINT should send information down the serial cable connected
to the 9-pin serial port for example, to an attached printer.
If it does not, the serial port settings are not correct.
*** Serial port settings
"LOPEN "TTY:A"" or "LOPEN "TTY:C"" opens the
serial ports A or C with the following default
characteristics:
9600 baud
no parity
8 data bits
1 stop bit
RTS handshaking.
*) If your printer (or other device) does match these
characteristics, the LOPEN statement sets the port up correctly,
and subsequent LPRINT statements will print there successfully.
*) If your printer does not match these characteristics,
you must use a procedure like the one listed below to change the characteristics
of the serial port, before LPRINTs will print successfully
to your printer.
Printers very often use DSR (DSR/DTR) handshaking, and you
may need to set the port to use this.
*** Setting the serial port characteristics
Calling the procedure
The "rsset:" procedure listed below provides a convenient way
to set up the serial port.
Each time you use an "LOPEN "TTY: "" statement, follow
it with a call to the "rsset:" procedure. Otherwise "the"
LOPEN will use the default characteristics.
Passing values to the procedure
Pass the procedure the values for the five port characteristics, like
this:
rsset:(baud%,parity%,data%,stop%,hand%,&0)
The final parameter, which should be "&0" here, is only
used when reading from the port.
To find the value you need for each characteristic, use the tables
below. You must give values to all five parameters, in the
correct order.
Baud =
value =
50 75 110 134 150 300 600 1200
1 2 3 4 5 6 7 8
1800 2000 2400 3600 4800 7200 9600 19200
9 10 11 12 13 14 15 16
Parity =
value =
NONE EVEN ODD
0 1 2
Data bits =
5, 6, 7 or 8
Stop bits =
2 or 1
Handshaking =
value =
ALL NONE XON RTS XON+RTS
11 4 7 0 3
DSR XON+DSR RTS+DSR
12 15
8
The "rsset:" procedure:
PROC rsset:(baud%,parity%,data%,stop%,hand%,term&)
LOCAL frame%,srchar%(6),dummy%,err%
frame%=data%-5
IF stop%=2 :frame%=frame% OR 16 :ENDIF
IF parity% :frame%=frame% OR 32 :ENDIF
srchar%(1)=baud% OR (baud%*256)
srchar%(2)=frame% OR (parity%*256)
srchar%(3)=(hand% AND 255) OR $1100
srchar%(4)=$13
POKEL ADDR(srchar%(5)),term&
err%=IOW(-1,7,srchar%(1),dummy%)
IF err% :RAISE err% :ENDIF
ENDP
Take care to type this program in exactly as it appears here.
Example of calling the procedure
PROC test:
PRINT "Testing port settings"
LOPEN "TTY:A"
LOADM "rsset"
rsset:(8,0,8,1,0,&0)
LPRINT "Port OK" :LPRINT
PRINT "Finished" :GET
LCLOSE
ENDP
"rsset:(8,0,8,1,0,&0)" sets 1200 Baud, no parity, 8 data bits,
1 stop bit, and RTS/CTS handshaking.
Advanced use
The section of the "rsset:" procedure which actually sets the
port is this:
srchar%(1)=baud% OR (baud%*256)
srchar%(2)=frame% OR (parity%*256)
srchar%(3)=(hand% AND 255) OR $1100
srchar%(4)=$13
POKEL ADDR(srchar%(5)),term&
err%=IOW(-1,7,srchar%(1),dummy%)
IF err% :RAISE err% :ENDIF
The elements of the array "srchar%" contain the values specifying
the port characteristics. If you want to write a shorter procedure,
you could work out what these values need to be for a particular setup
you want, assign these values to the elements of the array, and then
use the IOW function (followed by the error check) exactly
as above.
*** Reading from the serial port
If you need to read from the serial port, you must also pass a parameter
specifying terminating mask for the read function. If "term&"
is not supplied, the read operation terminates only after reading
exactly the number of bytes requested. In practice, however, you may
not know exactly how many bytes to expect and you would therefore
request a large maximum number of bytes. If the sender sends less
than this number of bytes altogether, the read will never complete.
The extra parameter, "term&" , allows you to specify that one
or more characters should be treated as terminating characters. The
terminating character itself is read into your buffer too allowing
your program to act differently depending on its value.
The 32 bits of "term&" each represent the corresponding ASCII
character that should terminate the read. This allows any of the ASCII
charcaters 1 to 31 to terminate the read.
For example, to terminate the read when Control-Z (ie. ASCII 26) is
received, set bit 26 of "term&". To terminate on Control-Z or
"<CR>" or "<LF>" which allows text to be read
a line at a time or until end of file set the bits 26, 10
and 13. In binary, this is:
0000 0100 0000 0000 0010 0100 0000 0000
Converting to a long integer gives &04002400 and this is the value
to be passed in "term&" for this case.
Clearly "term&" cannot be used for binary data which
may include a terminating character by chance. You can sometimes get
around this problem by using "term&" and having the sender
transmit a leading non-binary header specifying the exact number of
full-binary data following. You could then reset the serial characteristics
not to use "term&" , read the binary data, and so forth.
Example reading from serial port
This example assumes that each line sent has maximum length 255 characters
and is terminated by a "<CR>" and that Control-Z signals the
end of all the data.
PROC testread:
LOCAL ret%,pbuf%,buf$(255),end%,len%
PRINT "Test reading from serial port"
LOPEN "TTY:A"
LOADM "rsset"
REM receive at 2400 without h/shake
rsset:(11,0,8,1,0,&04002000) REM Control-Z or CR
pBuf%=ADDR(buf$)
DO
REM read max 255 bytes, after leading count byte
len%=255
ret%=IOW(-1,1,#UADD(pbuf%,1),len%)
POKEB pbuf%,len% REM len% = length actually read
REM including terminator char
end%=LOC(buf$,CHR$(26)) REM non-zero for Control-Z
IF ret%<0 and ret%<>-43
BEEP 3,500
PRINT
PRINT "Serial read error: ";ERR$(ret%)
ENDIF
IF ret%<>-43
REM if received with terminator
POKEB pbuf%,len%-1 REM remove terminator
PRINT buf$
REM echo with CRLF
ELSE
PRINT buf$;
REM echo without CRLF
ENDIF
UNTIL end%
PRINT "End of session" :PAUSE -30 :KEY
ENDP
Note that passing -1 as the first argument to I/O keywords
means that the LOPEN handle is to be used. Also, OPL
strings have a leading byte giving the length of the rest of the string,
so the data is read beyond this byte. The byte is then poked to the
length which was read.
Printing to a file
*** Printing to a file on a PC or Apple Macintosh
As if you were going to transfer a file:
*) Physically connect the Workabout and the other computer.
*) Type "LINK" in the Command processor or
select the `Remote link' option in the System screen and press Enter.
*) Run the server program (supplied with 3Link) on the other
computer.
In your OPL program, specify the destination file with an LOPEN
statement. For example, to a PC:
LOPEN "REM::C:\BACKUP\PRINTOUT\MEMO.TXT"
Any subsequent LPRINT would go to the file "MEMO.TXT" in
the directory "\BACKUP\PRINTOUT" on the PC's drive "C:".
With a Macintosh, you might use a file specification like this:
LOPEN "REM::HD40:MY BACKUP:PRINTED:MEMO5"
An LPRINT would now go to the file "MEMO5" in the "PRINTED"
folder, itself in the "MY BACKUP" folder on the hard drive "HD40".
Note that colons are used to separate the various parts of the file
specification.
*** Printing to a file on the Workabout
In your OPL program, specify the destination file with an LOPEN
statement like this:
LOPEN "B:\PRINT\MEMO.TXT"
This would send each subsequent LPRINT to the file
"MEMO.TXT" in the "\PRINT\" directory on an
SSD in drive "B:" .


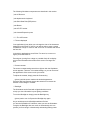
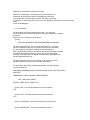

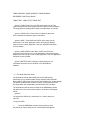

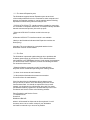
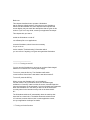

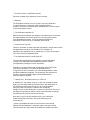
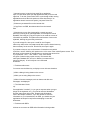
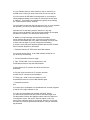
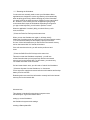
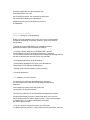


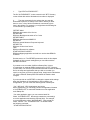
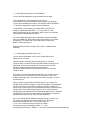
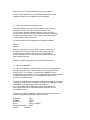

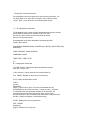
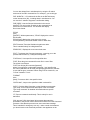


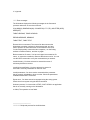

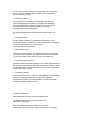
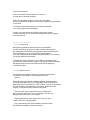

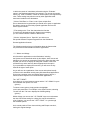
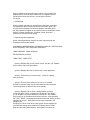

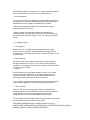

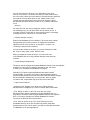
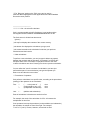
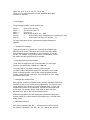


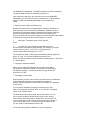
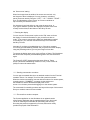
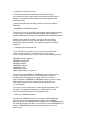
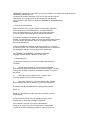
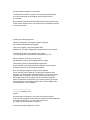
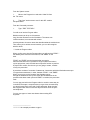
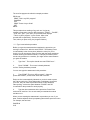

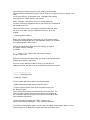

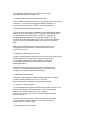
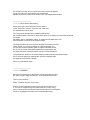


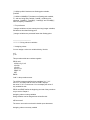


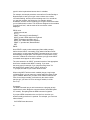
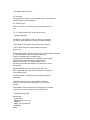

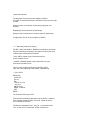
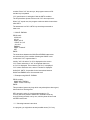
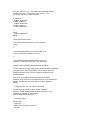

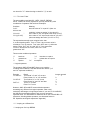
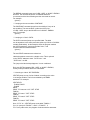
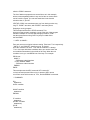
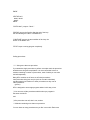


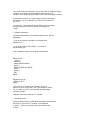
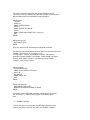
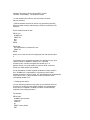
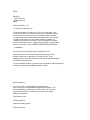
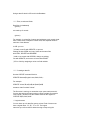
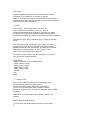
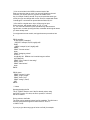
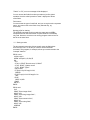
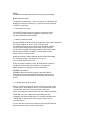
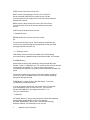

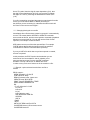
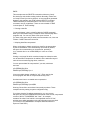
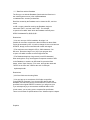


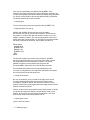

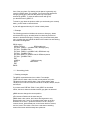
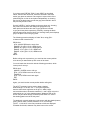


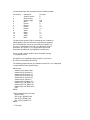


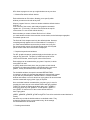


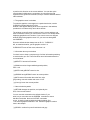

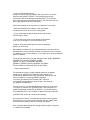
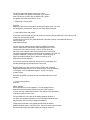
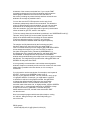


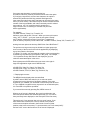
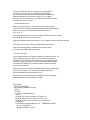

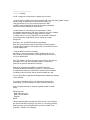

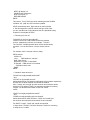
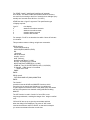

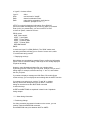

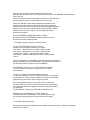
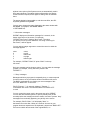
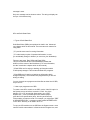
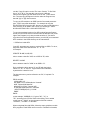

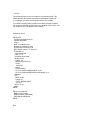

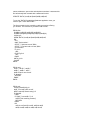

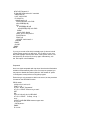
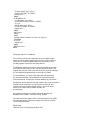


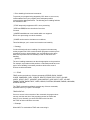
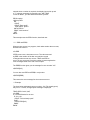

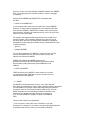

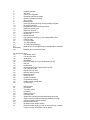
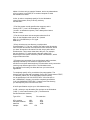
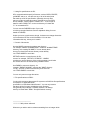

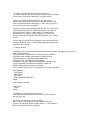
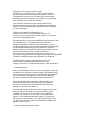
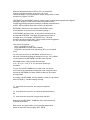
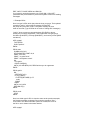

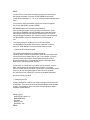
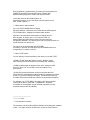

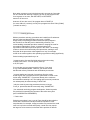

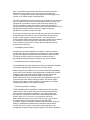


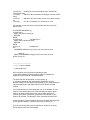
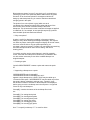
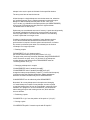

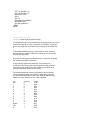

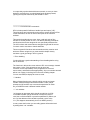
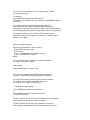


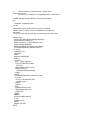

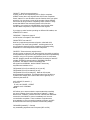
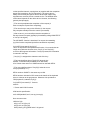
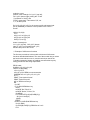

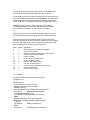

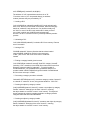
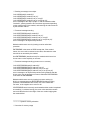


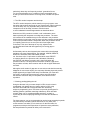
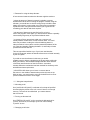
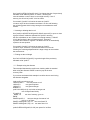
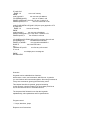

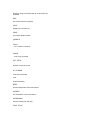
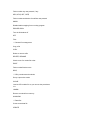
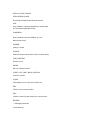
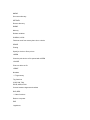
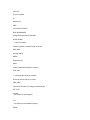

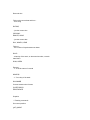
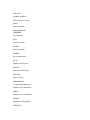
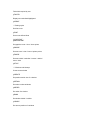
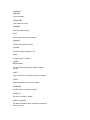


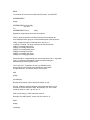
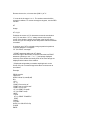

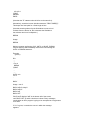


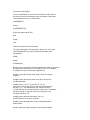
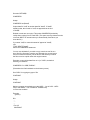
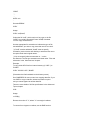
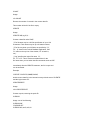


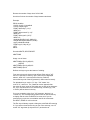
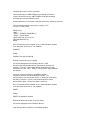
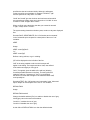
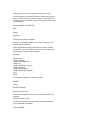
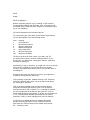

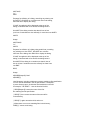
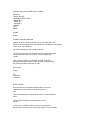
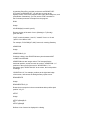
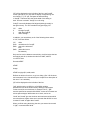
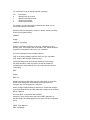

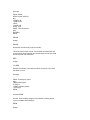

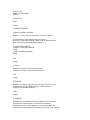

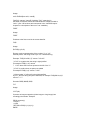
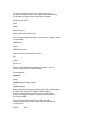
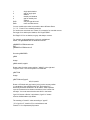


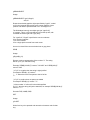
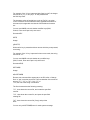

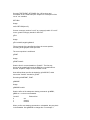

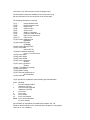

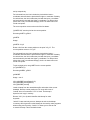
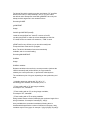
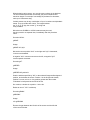

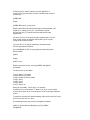
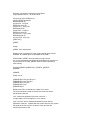
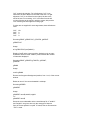
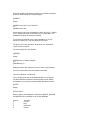
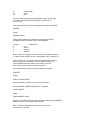
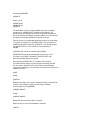
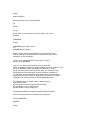
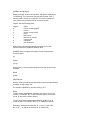
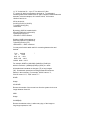
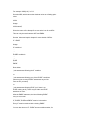


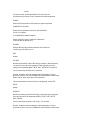

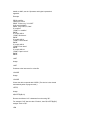
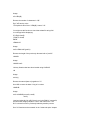


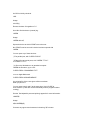
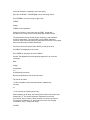

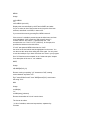

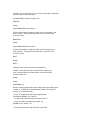
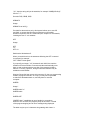

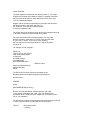

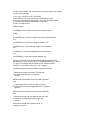
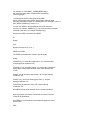


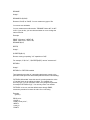

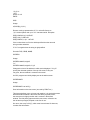
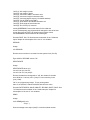


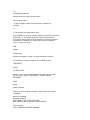
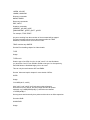

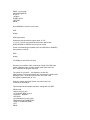


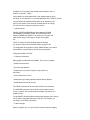
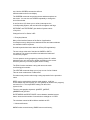


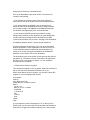
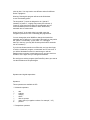
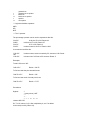
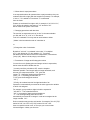
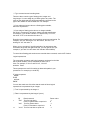

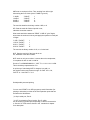
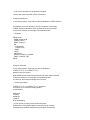

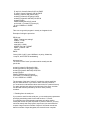


![[ Team LiB ] In this new edition of the best selling title, the author](http://vs1.manualzilla.com/store/data/005787639_1-73d0050a51fd68261a86e8b5d7df46e8-150x150.png)