1
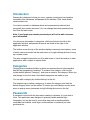
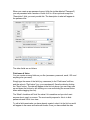
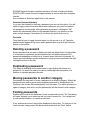
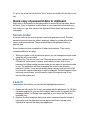
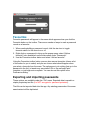
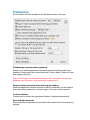
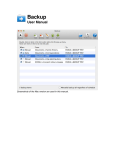
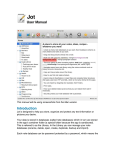
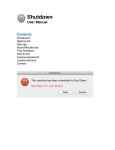
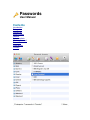
Passwords
User Manual
Contents
Introduction
Categories
Passwords
Secure codes
Launch
Auto-complete
Master password
Favourites
Preferences
Contact
This manual will use screenshots from the Mac version.
Introduction
Passwords is designed to help you store, organise, protect and use sensitive
information like usernames and passwords for websites, PINs, bank details,
serial numbers etc.
Your data is stored in a database which can be password protected (and
encrypted) by a master password. You can change the master password any
time from the main menu.
Note: If you forget your master password you will not be able to access
your information.
You store your information in categories, which are listed on the left of the
application window, and password records are listed on the right of the
application window.
The toolbar across the top of the window displays commonly used options, some
of which can be accessed via the main menu or by right-clicking the lists to bring
up a context menu.
The auto-complete feature lets you fill in web forms or 'send' information to other
applications with a couple of mouse clicks.
Categories
Categories are containers/folders in which your passwords and other sensitive
data will be grouped and contained. To create a new category, click the first
toolbar button (labeled "Category"), and enter a name for the category. When you
use the app for the first time a few default categories are made for you.
You can edit a category by double-clicking it in the list.
The simplest way to delete a category is to select the category and click the
delete category button on the toolbar. Of course you could always use the main
menu or pop-up menu (accessed via right clicking the mouse in the list).
Passwords
A password record holds the information relative to whatever it is you wish to
store. This application was designed to primarily handle website login
information, but can be used to store other data such as banking details,
credit/debit card details, email login, serial numbers for software you have
purchased etc.
When you create a new password record (click the toolbar labeled "Password")
you are presented with a number of fields to fill in. All are optional except the
"Description" field, you must provide this. The description is what will appear in
the password list.
The other fields are as follows:
Field name & Value
You can create as many fields as you like (username, password, email, URL and
anything else you need).
Simply type the name of the field (e.g. username) in the "Field name" edit box,
and the value in "Field value" (e.g. your name/email). Save the data by clicking
the "Save" button. The data will appear in the list box above (you can drag rows
up and down the list box by left-clicking on a row and holding the mouse button
down while dragging the row).
The "Mask" checkbox will 'hide' the value if it is sensitive and you don't want
anyone else to see it on screen. The most useful purpose for this is to hide
passwords and URL's from view.
To edit a field name/value you have already created, select it in the list box and it
will appear in the name and value edit boxes. Once you have edited the data
(you can also toggle the "Mask" checkbox) click "Save" to save it back to the list
box.
You can right-click on the list box for a pop-up menu which allows you to copy
values to the clipboard, or to delete selected name/values. The buttons to the left
of the list box can also be used for these purposes.
To specify a URL for using with the app's Launch/Auto-complete features, use
the text 'URL' (without quotes) as the field name, and type the url in the field
value.
Tip: For quick entry of multiple field names/values, type the field name, press
ENTER, type your value, press ENTER to return to the name field and repeat.
Notes
This field is for writing any comments you have about this particular password
record.
File
Used to store a path to a file/application which can be launched (run) when the
Launch feature is used (more about that later).
Mac users: As the app is Sandboxed, you will need to provide confirmation that
the app may access the folder you select a file from. The best thing to do is to
select your user folder which will grant the app access to all the folders within
your user folder. Otherwise you will need to do a lot of confirming!
Secure code
This last field is optional and allows you to specify a secure code (or password)
to protect this particular password record. Secured password records cannot be
edited, launched, viewed or printed without the secure code being entered. They
are identifiable in the password list by a padlock icon. More about secure codes
elsewhere in this manual.
Auto-complete commands (button)
This button opens a dialog where you can create a list of commands for use with
the auto-complete feature.
Auto-complete will execute the commands you specify, automatically typing them
into another application or a website form. This saves you from typing your
passwords/login yourself or using copy and paste.
To add a command use the appropriate "Add" button after selecting/entering a
field, key or text. The command will appear in the list in the order it will be
executed. To change the order you can drag the commands with the mouse, or
use the Up and Down buttons.
For example, for a web site login you could create the commands:
<Username>
TAB
<Password>
ENTER
When auto-complete is used, the program will send the value of "Username",
then a TAB key, the value of "Password" and then an ENTER key to whichever
window was last active. So, for a web login you place the cursor in the first box
(usually username) and then click the Auto-complete button (you will see this
when using the auto-complete feature).
Another example. Some online banking sites require you to enter some data on
one page (such as a username) and more data on another page (such as
password, account number etc). You can use the PAUSE command (action) to
pause auto-complete while another page loads, before it proceeds to autocomplete more data. So for the above bank example the command sequence you
need to create would look like this:
<Username>
<ENTER>
<PAUSE>
<Password>
<ENTER>
The first ENTER action loads the next page after your username has been typed.
The PAUSE command then makes auto-complete pause before it does anything
else. It displays a dialog window with the options to Continue or Abort. To abort
the auto-complete routine click Abort, otherwise wait for the next page to load
(and if necessary place your cursor in the correct field on the web page) and then
click Continue. Your password and the ENTER key will then be 'pressed'.
If you want to expand the auto-complete window to see other data, or leave the
auto-complete window open, use the EXPAND and DONTCLOSE commands.
Placing these commands first (at the top) of your command list is good practice,
otherwise they may take the cursor focus away from the application you are
using.
Full list of actions (commands):
ENTER Simulates pressing the ENTER/RETURN key
TAB Simulates pressing the TAB key
SPACE Simulates pressing the SPACE bar key
PAUSE Pauses the auto-complete routine and displays a 'pause' window
EXPAND Expands the auto-complete window to full view, showing all details
DONTCLOSE Leaves the auto-complete window on screen after auto-complete
finishes
Auto-complete is discussed again later in this manual.
Generate Password (button)
If you can't be bothered to think up a password you can use this option. You will
need to supply some information about what characters you want to include in
the password, and its length. After generating a password, clicking the "OK"
button will automatically place it in the password field for you (where you can
make further changes if you desire) if you check the check box to do so.
Favourite
Click the star icon to toggle favourite status for this record on or off. Favourite
passwords will appear in the menu which appears when you click the Favourite
button on the toolbar.
Deleting a password
Select the password you want to delete and click the delete button on the toolbar.
It is important to remember that this delete button will delete categories OR
passwords depending on which list is 'focused' when the button is pressed. Of
course you could always use the main menu or pop-up menu (accessed via right
clicking the mouse in the list).
Duplicating a password
This option is available via the main menu or right-clicking the mouse on a
password. It is useful for when you need to create duplicate information in a
number of separate password records.
Moving passwords to another category
Sometimes you may want to move a password to a different category. Select the
passwords you want to move (select multiple passwords by holding down the
Cmd key), the choose "Move passwords" from the menu. You will be prompted to
select a category from a list, and the password(s) will be moved to that category.
Finding passwords
Enables you to search the database for text in password records. The Find dialog
will open, allowing you to enter the text you want to search for. You can perform
a case sensitive search, or a whole word match.
If any matches are found, they will be displayed in the list box. To view any of the
found records, simply select the desired record and click the "View" button.
To ‘go to’ the actual record click the “Go to” button (or double-click the item in the
list).
Quick copy of password data to clipboard
Right click on a password in the password list to access a pop-up menu. Below
the entry “Copy to clipboard:” are the fields of your password record which you
can click on to copy their value to the clipboard. Below these are regular menu
commands.
Secure codes
A secure code can be used to protect a particular password record. Secured
password records cannot be edited, launched, viewed or printed without the
secure code being entered. They are identifiable in the password list by a
padlock icon.
Secure codes can be a combination of letters and numbers. They can be
created/modified in two ways.
1. When you create or edit a password record, you can change the secure code
using the edit box provided.
2. By using the "Set secure code" and "Remove secure code" options in the
"Passwords" main menu (or pop-up menu when you right-click on the
password list).
When setting a secure code you are asked to provide the code
to use. The application will then change/set the code for the selected
password records. If any records already have a secure code you will HAVE
to provide the original code before it can be changed. The same applies when
removing secure codes, you will need to supply the original code of any
records which have one.
Launch
Launch does the following on the selected (highlighted) password:
1. Opens the URL and/or file (if any) associated with the password. If a URl field
has been specified in your record the default web browser is opened and the
webpage loaded. If a file has been specified in your record the file will be
launched (ran).
2. Displays the Auto-complete dialog from which commands can be issued or
information from the password record can be read and/or copied to the
clipboard for use with the web page/application.
Auto-complete
The Auto-complete dialog displays the auto-complete button for issuing
commands for the selected password record, and optionally shows all information
for the password record for reference and/or copying to the clipboard.
Simply place your cursor in the web form or application and click the "Autocomplete" button, the commands you specified will be carried out (executed).
To view all details of the password, click the "Show details" button. This expands
the dialog to show all password fields. You can right-click on all fields for a popup menu to copy content to the clipboard.
Master password
Select this option to change the master password which protects the database.
Simply enter the current password and supply a new one.
Note: If you forget your master password you will not be able to access the
database (and, obviously, your passwords contained in it).
When a master password is set, you will be presented with a screen like the one
below when you open the app:
Favourites
Favourite passwords will appear in the menu which appears when you click the
Favourite button on the toolbar. There are a number of ways to mark a password
record as a favourite.
1. When creating/editing a password record, click the star icon to toggle
favourite status for the record on or off.
2. Right-click on a password to bring up the popup menu, select “Add as
favourite” (also available from the main menu under “Passwords”.
3. Use the Favourites toolbar button and select “Add as favourite”.
Using the Favourites toolbar button you can also remove favourites (shows a list
of favourites for you to select) and you can choose what should happen when
you select a favourite from the menu. The options are to do nothing (just go to the
password in the list); to launch any associated URL or file and begin autocomplete; or just begin auto-complete. You can also set this option in the
Preferences dialog.
Exporting and importing passwords
These options are available under the “File” menu. Exported data is saved in a
simple proprietary text file (it is NOT encrypted or password protected).
That file can be imported back into the app. Any existing passwords of the same
name/content will be duplicated.
Preferences
Some options won’t be available in the Windows version of the app.
Database/app optional master password
Allows you to set/change/remove the master password which protects the
database. Simply enter the current password (or leave blank if there isn’t one)
and supply a new one.
Note: If you forget your master password you will not be able to access the
database (and, obviously, your passwords contained in it).
Require master password when restoring app window
When the application window has been closed or minimised, you will need to
enter the master password to access it again. Use as a security measure.
Confirm deletions
Prompts you to confirm the permanent deletion of categories/passwords.
Save deleted passwords
When checked, any passwords you delete will be saved and not permanently
deleted.
They will be stored in a separate part of the database and can be accessed by
clicking the Manage Trash button on the Preferences window.
Naturally, storing these records will increase the size of the database, and it is
your responsibility to maintain this list by permanently deleting records from it
when you're sure you no longer need them.
If this option is left unchecked, any records you delete from the database will be
permanently deleted and not recoverable.
Clicking the Manage button displays any records which were saved instead of
deleted. From here you can view the records, permanently delete them, or
restore them. The “Empty” button permanently deletes all the saved passwords.
Clear clipboard when application quits
Clears the contents of the clipboard when the application quits. Use with
CAUTION as you may end up removing information from other applications that
you may need.
Close auto-complete window after auto-complete used
After you click the "Auto-complete" button the auto-complete dialog will close. If
this option is left unchecked the dialog will remain open, allowing further access
to the password record details if necessary.
Auto-complete window background colour
(Not available for Windows app).
Allows you to set the background colour of the auto-complete window. Click the
box to bring up a colour picker, where you can select what colour you want.
Double-clicking on the password list
Two options available: Edit the password, or launch the password/URL/file.
When selecting a favourite from the favourite menu go to that password
and:
Choose what should happen when you select a favourite from the menu (via the
toolbar button). The options are to do nothing (just go to the password in the list);
to launch any associated URL or file and begin auto-complete; or just begin autocomplete.
I’m using a UK keyboard layout under Lion OS X...
Allows the proper keystrokes for auto-complete to occur for such a keyboard
layout.
Backup/Restore database
Allows you to create a duplicate of the database in another location, as a backup,
or to restore a backup.
Contact
If you have any questions about this product please contact us:
Email: [email protected]
Or visit our website:
http://www.codeinventors.com