1
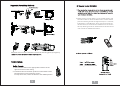
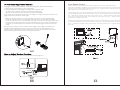
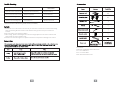
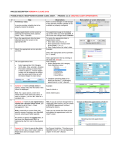
Thank you for purchasing our Tab Tension screens using our excellent screen materials, and
mechanical components to give you years of trouble free enjoyment. Please take a moment to read the
user manual before installation to avoid any potential issues.
1. When assembling, do not stand right under the screen. Expansive bolts should be firmly
punched and fixed into the wall or ceiling.
2. Be sure the ground wire is connected with power cable to avoid electric shock
3. When using the laser pointer on the remote control, please not point it directly into people’s eyes
to avoid injury.
4. Keep screen fabric away from the high temperatures to avoid permanent material deformation.
2. Adjust the position between the two mounting plates.
Note: Please keep the screen case horizontal when assem bl ing
2. Make sure the control switch is in the neutral position and
the switch cable is disconnected from the screen. Please
press the learning hole at the right-end-cap for 3 seconds,
indicated by a red LED flash. Then press the back of the
remote control, if successful the red flash from the screen
will stop flashing and be on. Please refer to remote control
user manual for detailed instructions.
Adjust the screw counter-clockwise to loosen the mounting plate.(see figure A)
Press
1. Insert switch cord into the appropriate interface of the
right end of the screen casing
2. Push the button to the down position to extend the screen
Push the button up to retract the screen
To stop the screen, return the button to the middle position
to extend the screen
Limit Switch Control
The trigger has been set up at the factory, and should work right away. Please operate as follows:
1. Make sure the control switch is in the neutral position
2. Insert the trigger directly into trigger out interface of the projector. When
you power on the projector, the screen should extend automatically.
When you power off the projector, the screen will retract automatically.
If you need to control another screen with the same trigger, or changed new remote control than the
trigger needs to be mated to the screen again.
1. Make sure the control switch is in the neutral position. Also make sure your projector trigger
function is enabled. Press the small hole at the right end cap for 3 seconds with screen learn
needle. The LED in the screen casing will flash and continue to flash. Then please press the hole in
the back of the cordless trigger for 3 seconds, the LED light in the screen casing should become
constantly on if the mating is successful. Please refer to cordless trigger control user manual for
details.
After finishing the learning function, insert the wireless trigger into the trigger out interface. Our
patented cordless trigger allows your screen synchronize its extension and retraction to your
projector’s power cycle. When projector is powered on, the screen will automatically come down.
When projector is powered off, the screen will automatically retract.
If the tension is slack or over-tensioned, please follow Figure 9.
loosen
loosen
The Limit Switch Controls of the screen adjust how far the screen goes down(extends) and
up(retracts). The Down Limit Switch controls the extension and the Up switch controls the retraction.
The controls are set at their default positions in the factory. To adjust the limit switches please use the
adjusting tools that’s included with your screen.
1. Adjusting for the up limit position(how far the screen retracts): When the screen retracts and you
want to change the position of where the bottom bar stops, use the adjusting tool to turn the switch in
the “+” direction to make the screen drop more, and turn it in the “-” direction and the screen will rise
more into the casing. Be careful with up limit switch has as too many turns in the “-” direction will send
the bar into the casing of the screen.
2. Adjusting for the bottom limit position(how far the screen extends): When the screen extends and
you want to change the position of where the bottom bar stops, use the adjusting tool to turn the switch
in the “+” direction to make the screen extend further. Turning the switch in the “-” direction will retract
the screen.
Fault
Reason
Resolution
Remote control malfunction
Check for drained battery
Replace Battery
Abnormal noise from motor
Broken Capacitor
Contact Dealer
Motor not running
Broken Motor
Contact Dealer
Screen not retracting fully
Limit Switches
Refer to “Limit Control”
Section of manual
(If there are other malfunctions, please consult your dealer)
1. Please do not run the screen continuously for more than 5 minutes to avoid motor damage
from overheating. Please let motor cool down if running continuously for more than 5
minutes.
2. Do not scratch up or fold up the fabric
3. After usage, please check again there are no foreign objects on the screen surface and
then retract the screen into the case.
4. Please note small changes to net picture area due to temperature changes are normal.
EluneVision
A Division of Edith-Min International Inc
Tel: 1-905-296-6819
Fax: 1-905-627-9567
Web: www.EluneVision.com