1
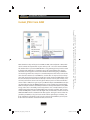
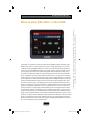
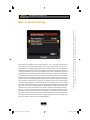
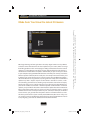
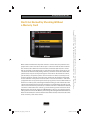
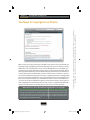
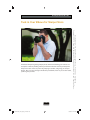
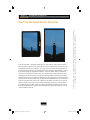
Chapter Nine
How to Sidestep Those Things
That Drive You Crazy
Today’s digital cameras are amazingly sophisticated devices, and
if you take a moment to really think about it, you’re holding in
your hands a lens, a shutter mechanism, a color TV monitor, and a
computer. That’s right, there actually is a computer inside every single digital
camera. That’s what those menus on the back are for—you’re navigating the
camera’s software and turning on/off specific features, just like you do on
your computer at work or at home. You’re setting the preferences for how
your computer works. So, at this point, you’re not really taking a photo, you’re
tweaking your software to get a specific desired result. When you press the
shutter button, it sends a signal to the software to briefly let some amount
of light into the computer-controlled sensor, and that amount is determined
through a mathematical calculation performed by (that’s right) your onboard
computer. So, is it any wonder that occasionally we make a mistake with
this handheld computer, and a photo doesn’t look how we wanted it to?
No, it’s not. So, technically, when the photo doesn’t look the way we want
it to, it’s not our fault—it’s that darn computer. Well, that’s what this chapter
is all about. Blame. You’ll learn how to quickly and easily redirect the blame
for any bad shot back to how the software behaved in your camera, and
you’ll be able to do it in such a convincing and logical way that there’s no
way you could ever be held personally responsible for taking any photo that
is not literally Ansel Adams quality. Underexposed? “That stupid software!”
Out of focus? “Darn autofocus got me again!” Took a shot of your foot as
you were walking? “It fired without me pressing the button!” See? It’s easier
than you’d think. Let’s try a few more: You hear, “Gee, the color looks off.” You
reply, “My stupid LCD isn’t color balanced.” (Oooh, good one!)
Excerpted from The Digital Photography Book, Volume 3 by Scott Kelby.
Copyright © 2010. Used with permission of Pearson Education, Inc. and Peachpit Press.
Avoiding Problems
Like a Pro
[ 191 ]
0321617657_text_press_pr1.indb 191
6/26/09 11:27 AM
Chapter 9
The Digital Photography Book
You read a lot online about not being able to really trust what you see on the LCD
screen on the back of your camera. Some of that is old outdated information, some of it
depends on camera settings (which we’ll cover in just a minute), and some of it is true.
Here are my thoughts on it: If you shoot in JPEG mode using one of today’s newer dSLR
cameras (and the more expensive the camera, usually the better quality the LCD monitor),
what you’re seeing on the monitor is a JPEG preview, and it’s pretty close to what you’ll
actually see when you open the photo on your computer (or get prints made). However,
if you shoot in RAW mode, you’re not seeing a preview of the RAW photo—you’re seeing
a preview of the JPEG image, and the JPEG image usually looks better than an unedited
RAW photo. That’s because JPEG images have been “processed” inside your camera, and
they have sharpening applied, color correction, contrast, and basically your camera tries
to make JPEGs look really good. But when you shoot in RAW, you’re telling your camera,
“Turn all that in-camera, make-it-look-good stuff off, and just give me the raw, untouched
file, and then I’ll do all that sharpening, color correction, and contrast stuff myself in Photoshop, or Lightroom, or whatever.” However, you’re still seeing that processed JPEG preview
on your camera, so if you shoot in RAW mode, don’t be startled when what you see on
your computer doesn’t look nearly as good as it did on the back of your camera. I’m not
telling you on any level not to shoot in RAW mode, I’m just letting you know how what you
see on your LCD relates to what you’re going to see on your computer. Now ya know.
Excerpted from The Digital Photography Book, Volume 3 by Scott Kelby.
Copyright © 2010. Used with permission of Pearson Education, Inc. and Peachpit Press.
SCOTT KELBY
Can You Trust Your Cameraʼs LCD Monitor?
[ 192 ]
0321617657_text_press_pr1.indb 192
6/26/09 11:27 AM
Avoiding Problems Like a Pro
Resetting Your Camera to the Factory Defaults
Excerpted from The Digital Photography Book, Volume 3 by Scott Kelby.
Copyright © 2010. Used with permission of Pearson Education, Inc. and Peachpit Press.
If you’ve tweaked and played around with the menus in your camera and you feel like
you’ve totally messed something up, and you just wish everything was back like it was
when you bought the camera, then you’ll be happy to learn that most cameras have a
“return to default” setting that puts all the customizable settings back to their original
factory-default settings. I use this when it just seems like my camera is all whacked out
for some reason, and resetting to the defaults usually snaps it right out of its insanity.
The only downside of doing this is when it returns to the defaults, any of the settings
you changed in your camera are erased, too, so you have to go back and customize
whatever settings you had customized again (which is why it helps to write those little
changes down—that way you won’t forget what your settings were). Anyway, here’s
how it’s done: On a Canon camera, you press the Menu button, then go to the Set-Up 3
menu, and choose Clear Settings. Now choose Clear All Camera Settings and then
select OK. If you’re using a Nikon camera, press-and-hold the Qual (Quality) button and
the +/– (Exposure Compensation button) down for more than two seconds, or you can
press the Menu button, go to the Shooting menu, and choose Reset Shooting Menu,
then go to the Custom Setting menu, and choose Reset Custom Settings. Doesn’t matter which way you do it, it’ll reset the camera to the factory fresh settings.
[ 193 ]
0321617657_text_press_pr1.indb 193
6/26/09 11:27 AM
Chapter 9
The Digital Photography Book
Instant JPEG From RAW
Excerpted from The Digital Photography Book, Volume 3 by Scott Kelby.
Copyright © 2010. Used with permission of Pearson Education, Inc. and Peachpit Press.
Most dSLRs these days will let you shoot RAW, or JPEG, and usually Raw + JPEG, which
means it writes two separate files to your memory card—one is the untouched RAW
file, and the other is a processed JPEG file. This is a big advantage for anyone who needs
to quickly send a JPEG file to a client (like a pro sports photographer who needs to
email shots to the magazine or wire service while the event is still going on. RAW files
are much larger in file size, so they’re a somewhat impractical for email, some clients
don’t have the software to read RAW files, and the files are unprocessed, unsharpened, and uncorrected, so having an already processed, compressed JPEG makes sense
for some shooters). The downside is it takes up a lot more room on your memory card,
and now you have two versions of every photo. Now, if you’re one of those folks who
shoots in Raw + JPEG, have I got a tip for you! Michael Tapes at RawWorkflow.com (the
guy who makes the popular WhiBal white balance tool) created a free downloadable
software utility that extracts the JPEG preview that’s already embedded in every RAW
image, and it does it incredibly, ludicrously (if that’s even a word) fast! All you do is
download the utility from www.rawworkflow.com and run the installer. Then, click on
a folder of RAW photos, Control-click (PC: Right-click) on that folder, and choose Instant
JPEG from RAW from the contextual menu that appears. You’ll get to choose what size
you’d like your JPEG (in case you need a smaller size for uploading to a website), and
then click Extract and, literally in just seconds, it extracts those JPEGs for you and puts
them in their own folder. I use this all the time, and I love it!
[ 194 ]
0321617657_text_press_pr1.indb 194
6/26/09 11:27 AM
Avoiding Problems Like a Pro
When to Shoot JPEG; When to Shoot RAW
Excerpted from The Digital Photography Book, Volume 3 by Scott Kelby.
Copyright © 2010. Used with permission of Pearson Education, Inc. and Peachpit Press.
I get asked on a regular basis, “When should I shoot in RAW and when should I shoot in
JPEG mode?” This is one sticky question, because some photographers are so fanatical about shooting in RAW that there’s no reason you could ever give them that makes
sense not to shoot in RAW. If the photo you’re going to take is of your wrecked car, and
it’s only going to be 3x4" in size, and the only person who would ever possibly see it is
the insurance adjuster in a different state processing your repair claim, they would still
shoot it in RAW. So, for those people (you know who you are), I’m going to save myself a
lot of angry letters (not all, mind you, but a few), and state categorically that you should
shoot all photos, no matter what the final intended use, in RAW format. There, I said it. It’s
been documented. Now, that being said, I’ve heard of some photographers who don’t
post-process their images—meaning they don’t open the photos in Photoshop, or Elements, or Lightroom, or Capture, or whatever—they just take the shots, and then either
put them on the Web, or put them on disc, or print them out as is. So, if you are one of
those people who are pretty happy with how their photos look right out of the camera,
and you do very little, if any, editing in a photo software application, and you enjoy fitting thousands of photos on a 4-GB memory card (rather than a few hundred), and you
enjoy not having the hard drive on your laptop crammed full all the time, I guess in that
situation, it’s okay to shoot in JPEG Fine mode. Just don’t ever tell anyone. Also, two other
groups of people who often shoot in JPEG mode are pro sports photographers (who
shoot thousands of shots per event), and many pro wedding photographers, as well, but
hey—I’m not telling you it’s okay (wink, wink).
[ 195 ]
0321617657_text_press_pr1.indb 195
6/26/09 11:27 AM
Chapter 9
The Digital Photography Book
Built-In Sensor Cleaning
Excerpted from The Digital Photography Book, Volume 3 by Scott Kelby.
Copyright © 2010. Used with permission of Pearson Education, Inc. and Peachpit Press.
The sensor on your digital camera collects dust like…like…well, like something that
really collects a lot of dust (like that film camera up in your closet). The sensors in
today’s cameras are magnetized, and each time you change lenses, you’re screwing a piece
of metal into a metal mount, and not surprisingly, tiny metal shavings appear, and those
can get sucked down onto your sensor, and before you know it, you’ve got tiny spots and
specks on your sensor, which means you now have tiny spots and specks on every photo
you’re about to take. That’s why we have to do our best to keep our sensors clean, and that’s
why more and more of the newer digital cameras now have built-in sensor cleaning capabilities. This basically demagnetizes your sensor for a moment to shake the sensor dust
off, and it does a decent job. Not a great job, an okay job (it doesn’t replace having your
sensor fully cleaned), but if your camera has it built-in, you might as well use it. For example,
on a Canon camera like the 50D, if you turn the power switch to the On higher position, this
turns on the auto sensor cleaning feature, and it shakes the dust off your sensor right then
and there. It cleans the sensor when it shuts down, too. With the power switch in the On
position, you can also go to the Set-Up 2 menu, choose Sensor Cleaning, and then choose
Clean Now. If you have a Nikon camera (like a D300), press the Menu button, go to the
Setup menu, and choose Clean Image Sensor. In the next menu, choose Clean Now, and
your sensor will be cleaned. If you want it to automatically clean the sensor each time you
turn on the camera, choose Clean at Startup/Shutdown.
[ 196 ]
0321617657_text_press_pr1.indb 196
6/26/09 11:27 AM
Avoiding Problems Like a Pro
Shortcut for Formatting Your Memory Card
Don’t Go Out Shooting with Just One Memory Card
If you shoot with just one memory card, it’s going to catch up with you. Your card’s going
to be full, or you’re going to have to wind up formatting the card without having two
backups (or you’ll have to stop shooting for the day), which is why you’ve got to have at
least a second, if not a third, memory card with you on every shoot. I just checked and
a 4-GB memory card is going for as little as $18.95. You can also find lots of cards with
manufacturer’s rebates (I recently bought a number of 8-GB memory cards for $69 with
a $69 mail-in rebate. I kid you not. That’s right—free cards. It happens).
Excerpted from The Digital Photography Book, Volume 3 by Scott Kelby.
Copyright © 2010. Used with permission of Pearson Education, Inc. and Peachpit Press.
Many dSLRs have a shortcut which lets you quickly reformat (erase all your images
on) your memory card without having to dig through all the menus on the back of
the camera. On a Nikon, the shortcut actually appears in red beside the two buttons
you need to hold down to reformat (you hold the Delete [trash can] button and the
Mode button down together for two or three seconds, until you see the word “For”
flashing in the LCD info window on top of the camera. Once “For” is flashing, release
those buttons and press them again just once, and your card will format). On a Canon,
there isn’t a shortcut, but you can go under the Set-Up 1 menu, select Format, and
then press the Set button. Select OK and your card will be formatted.
[ 197 ]
0321617657_text_press_pr1.indb 197
6/26/09 11:27 AM
Chapter 9
The Digital Photography Book
Make Sure You Have the Latest Firmware
Excerpted from The Digital Photography Book, Volume 3 by Scott Kelby.
Copyright © 2010. Used with permission of Pearson Education, Inc. and Peachpit Press.
One huge advantage of having the brains of today’s digital cameras run by software
is that the camera manufacturer can release updates to your camera, which can range
from fixing problems in the camera (bugs) to adding new features. These free camera
updates are called “firmware” updates and you download them directly from the
manufacturer’s website. Once an update is downloaded, you just connect your camera
to your computer (using that little USB cable that came with your camera), and run the
firmware updater software (which usually has some simple instructions with it), and
it updates your camera (by the way, it’s not just cameras that get firmware updates—
off-camera flash units can get them, too). The good news is they don’t issue firmware
updates very often—maybe only two or three times in the life of a camera, so this
isn’t something you’ll have to be checking every week, but it doesn’t hurt to stop by
Google.com every once in a while and type in your camera’s name plus firmware (so
your search would be “Canon 50D” + “Firmware update” or “Nikon D700” + “Firmware
update”), and you’ll find a direct link to download the update from the manufacturer.
Once you find the update online, check to see if the one available online is a higher
number than the one currently installed on your camera (for example, on Nikon or
Canon cameras, you go under the Setup menu and choose Firmware Version, and it
will show you the version of your currently installed firmware [like version 1.01]). So, if
you see that a more recent firmware update has been released (like firmware version
1.02 [or higher]), you’ll want to download and install that firmware.
[ 198 ]
0321617657_text_press_pr1.indb 198
6/26/09 11:27 AM
Avoiding Problems Like a Pro
Donʼt Get Burned by Shooting Without
a Memory Card
Excerpted from The Digital Photography Book, Volume 3 by Scott Kelby.
Copyright © 2010. Used with permission of Pearson Education, Inc. and Peachpit Press.
When camera manufacturers ship their cameras to camera stores, they want the sales
people at the camera store to be able to open a camera box and hand the customer
the camera to take a few shots and see how the camera feels (after all, how a camera
feels in your hands is very important). So, at the factory, they set the camera up so you
can take shots without actually having a memory card in the camera. The shutter fires
just like usual, and you see the picture appear on the LCD on the back of the camera,
just like always, except those photos vanish into thin air after, because they’re not
saved to a memory card. This is one thing you usually learn about the hard way. Well,
at least I did when I did a photo shoot in a studio—I shot for 35 minutes—and when
I popped the door on my camera open to back up my photos, I was shocked to find out
there was no memory card, even though I had been looking at some of the shots on the
camera’s LCD monitor. Those shots were gone forever, so the first thing I do with any new
camera is turn the memory card lock on, so it won’t even take a shot without a memory
card in the camera. On Canon cameras, go to the Shooting menu and choose Shoot
Without Card, then set this function to Off. On Nikon cameras, go under the Custom
Setting menu and choose No Memory Card. Change the setting from Enable Release to
Release Locked. Now, the camera’s shutter release will be locked, and it won’t take a shot
unless a memory card is in the camera.
[ 199 ]
0321617657_text_press_pr1.indb 199
6/26/09 11:27 AM
Chapter 9
The Digital Photography Book
You Need to Copyright Your Photos
Watch These Free, Short, Absolutely Fascinating Videos on Copyright
Excerpted from The Digital Photography Book, Volume 3 by Scott Kelby.
Copyright © 2010. Used with permission of Pearson Education, Inc. and Peachpit Press.
With so many of us posting our images on the Web, you’ve got to protect yourself (and your
images) by legally copyrighting your work. Luckily, the process (at least in the U.S.) is all now
Web-based, so it’s never been faster, easier, or more affordable than it is today. What copyrighting does is to legally define who owns the photo, and even though, technically, there is
some very limited amount of protection afforded simply by the fact that you took the shot, if
someone takes your photo off the Web and uses it in their brochure, or website, or print ad,
etc., without actually having registered your work as copyrighted with the U.S. Copyright office,
your chances of winning a judgment in court against the “photo thief” are virtually nil. Because
this process has become so quick, easy, and inexpensive, there’s no reason not to add this process as part of your photo workflow. To register your work online in the U.S., start by going to
www.copyright.gov/eco/index.html (it only costs $35, and you can register literally thousands
of photos at a time for that same fee). By the way, make sure you read the tip below.
I did a series of video interviews with intellectual property attorney and noted photography
copyright expert Ed Greenburg, and followed up with interviews with photographer rights
advocate Jack Resnicki, in July 2008. These videos have been a huge hit with photographers,
and I invite you to watch them on my blog: www.scottkelby.com. Once you’re there, search
for copyright and you’ll find the videos.
[ 200 ]
0321617657_text_press_pr1.indb 200
6/26/09 11:27 AM
Avoiding Problems Like a Pro
Back Up Twice Before Formatting
Excerpted from The Digital Photography Book, Volume 3 by Scott Kelby.
Copyright © 2010. Used with permission of Pearson Education, Inc. and Peachpit Press.
There’s a rule a lot of photographers (well, paranoid photographers anyway, like me)
follow, and that is: we don’t erase our memory cards until we absolutely know that
we have two copies of our photos elsewhere. For example, when you download your
photos to your computer, that’s only one copy, and you shouldn’t format your memory
card with just this one copy (because when your hard drive crashes one day [notice
that I said “when”] all those photos are gone forever). Now, once you back up those
photos from your computer to a second drive (a backup hard drive), then you’ll have
two copies—one set on your computer and one set on your backup drive—and then
it’s safe to format (erase) your memory card and keep shooting with that card. Without
two backups, it’s just a matter of time before those photos are gone forever (I could tell
you the saddest stories of people who have written me who have lost every photo of
their kids for the past eight or 10 years, because they had them on their computer, and
their computer died. I wish it was just one story, but I’ve got dozens and dozens).
My Personal Photo Backup Strategy
I wrote about my entire photography backup and archiving strategy in a very detailed
article on my blog at www.scottkelby.com/blog/2008/archives/1410, and if you’re paranoid
about losing all your photos (and you should be), it’s worth a read.
[ 201 ]
0321617657_text_press_pr1.indb 201
6/26/09 11:27 AM
Chapter 9
The Digital Photography Book
How You Press the Shutter Button Matters!
Excerpted from The Digital Photography Book, Volume 3 by Scott Kelby.
Copyright © 2010. Used with permission of Pearson Education, Inc. and Peachpit Press.
Want another tip for getting sharper images? Start gently squeezing the shutter button, rather than just pressing it. Actually, for the least vibration possible, you should
kind of roll your finger over the shutter button from back to front. By doing this gentle
pressing of the shutter button, you’ll wind up with sharper photos every time.
[ 202 ]
0321617657_text_press_pr1.indb 202
6/26/09 11:27 AM
Avoiding Problems Like a Pro
Tuck in Your Elbows for Sharper Shots
Excerpted from The Digital Photography Book, Volume 3 by Scott Kelby.
Copyright © 2010. Used with permission of Pearson Education, Inc. and Peachpit Press.
Another technique for getting sharper photos when hand-holding your camera is to
steady the camera by holding it with your elbows tucked in toward your body. This
helps anchor the camera to your body, keeping it steadier, and giving you sharper
photos. This is an easier change to make than you’d think, and once you see the results,
you’ll be glad you did it.
[ 203 ]
0321617657_text_press_pr1.indb 203
6/26/09 11:27 AM
Chapter 9
The Digital Photography Book
If you’ve ever taken a shot that looked great on your camera, only to open it later on
your computer to find out that your killer shot was incredibly blurry, don’t feel bad—
everything looks sharp on a tiny 2.5" or 3" LCD screen, and every photographer has
been burned by this (well, every photographer I know anyway). That’s why it’s so critical
to check the sharpness right then and there—out in the field—while you still have
a chance to reshoot the shot. When you see a shot that looks really great on the LCD,
stop right there and make sure it’s sharp by zooming in tight and checking the focus.
Just press the Zoom In (on a Nikon) or Magnify (on a Canon) button on the back of the
camera to zoom in. Once zoomed in, you move to view different parts of your zoomedin photo using the multi selector (on a Nikon) or the multi-controller (on a Canon) on
the back of the camera. Once you’re done checking the sharpness, press the Zoom
In (magnifying glass) button again (on a Nikon) or the Reduce button (on a Canon) to
zoom back out. Keep your surprises to a minimum by checking the sharpness now, in
camera, before it’s too late.
Excerpted from The Digital Photography Book, Volume 3 by Scott Kelby.
Copyright © 2010. Used with permission of Pearson Education, Inc. and Peachpit Press.
SCOTT KELBY
Donʼt Let the Small Screen Fool You!
[ 204 ]
0321617657_text_press_pr1.indb 204
6/26/09 11:27 AM
Avoiding Problems Like a Pro
Avoiding the Memory Card Moment of Doubt
Excerpted from The Digital Photography Book, Volume 3 by Scott Kelby.
Copyright © 2010. Used with permission of Pearson Education, Inc. and Peachpit Press.
If you use more than one memory card (and I highly recommend that you do—see the
tip at the bottom of page 197), you’ll have experienced that “moment of doubt” when
you go reaching for your second memory card, and you ask yourself, “What’s on this
card? Have I downloaded these? Is it okay to erase it?” I’ve had it happen to me more than
once, but here’s a way to avoid this moment of doubt altogether. Once you’ve downloaded the images to your computer, and then backed them up to a second hard drive (CDs
and DVDs are a little too risky), right then and there, format your memory card. That way,
if you see a memory card in your memory card case, you know it’s formatted and ready to
go, and that the images that were once on there are now safely backed up twice.
[ 205 ]
0321617657_text_press_pr1.indb 205
6/26/09 11:27 AM
Chapter 9
The Digital Photography Book
If you’re in a situation where you’re having to shoot in low light without a tripod (if
your shutter speed gets under 1/60 of second, there’s a pretty good chance your photo
will be somewhat blurry if you’re hand-holding), and you don’t want to raise your ISO
because your photo will get too noisy, here’s a trick you can try that will usually get a
sharp photo: shoot multiple shots in Burst or High-Speed Continuous mode. Chances
are, if you take three or four shots in a quick burst, at least one of those shots will be in
focus. I’ve done this numerous times and I’m always amazed at the results. You’ll see
a blurry one, blurry one, then all of a sudden there’s a nice crisp shot (as shown here
with the five-star image labeled yellow), and then right back to blurry. So, next time
you’re in one of those situations, crank off a few right in a row, and keep your fingers
crossed that at least one of those will be in focus (hey, it’s better than the alternative).
Excerpted from The Digital Photography Book, Volume 3 by Scott Kelby.
Copyright © 2010. Used with permission of Pearson Education, Inc. and Peachpit Press.
SCOTT KELBY
Shoot Multiple Shots in Low-Light Situations
[ 206 ]
0321617657_text_press_pr1.indb 206
6/26/09 11:27 AM
Avoiding Problems Like a Pro
The High-Speed Memory Card Myth
Excerpted from The Digital Photography Book, Volume 3 by Scott Kelby.
Copyright © 2010. Used with permission of Pearson Education, Inc. and Peachpit Press.
If you upgrade to the latest high-speed Compact Flash or SD memory cards, is it going
to really make a difference? Well, honestly, for most folks—probably not. These more
expensive high-speed cards are designed for people like serious sports photographers,
with higher-end dSLRs, who need to shoot long, continuous bursts of images. The reason
high-speed cards matter to them is that they need any images temporarily stored in
their camera’s built-in memory buffer to be written to the memory card as quickly as
possible to free that buffer for their next continuous burst of shots. If you’re reading this
and thinking, “I never shoot that many shots at once,” then there’s good news—you don’t
really need one of those expensive high-speed cards. This is good news, because regularspeed cards are much less expensive. For example, I just looked up what a regular 8-GB
SD Lexar memory card costs at B&H Photo. It was $9.99. The 133x higher-speed 8-GB
card sells for $61.95, but it did come with a mail-in rebate of $25 (however, retail statistics
show only a very small percentage of consumers ever actually mail in these rebates,
which is why mail-in rebates are so popular), but even with that, it’s still $36.95—more
than 3.5 times as much as the regular-speed card. So, why pay the difference if you won’t
experience a difference, eh?
[ 207 ]
0321617657_text_press_pr1.indb 207
6/26/09 11:27 AM
Chapter 9
The Digital Photography Book
Do This Before You Close Your Camera Bag
Excerpted from The Digital Photography Book, Volume 3 by Scott Kelby.
Copyright © 2010. Used with permission of Pearson Education, Inc. and Peachpit Press.
My friend Janine Smith shared this tip with me last year, and ever since she did, I’ve
been using it and it’s saved my bacon more than once. When you’re packing your camera bag for a shoot, before you close the bag, pick up the camera and take a quick shot
of anything. This will tell you instantly if you have a memory card with you, whether
your battery is charged, and whether your camera is in basic working order. You don’t
want to learn about any of these problems once you’re on location (or on vacation).
You’d rather know now, while you still have time to grab a memory card, charge your
battery, or fix a potential problem.
[ 208 ]
0321617657_text_press_pr1.indb 208
6/26/09 11:27 AM
Avoiding Problems Like a Pro
Why You Should Download Your User Manual
Excerpted from The Digital Photography Book, Volume 3 by Scott Kelby.
Copyright © 2010. Used with permission of Pearson Education, Inc. and Peachpit Press.
One of the biggest problems with camera user manuals is quickly finding what you’re
looking for. That’s why I always download the free PDF electronic version of the user
manual from the manufacturer’s website, because the PDF versions have a search feature, and you can find what you’re looking for in five seconds, rather than five minutes
(of course, it’s only five minutes if you’re lucky. I’ve spent much more time looking for
certain features). Once you use the free PDF version of the manual, you’ll only reach
for the printed manual in an emergency situation, when you’re out in the field and
you don’t mind hauling the user manual around with you. By the way, I download the
manuals for all my gear—flashes, cameras, wireless triggers, you name it. They’re so
small in file size, and so handy, there’s no reason not to.
Where to Find Those Downloadable Manuals
If you’re a Nikon user in the U.S., go to www.nikonusa.com/Service-And-Support/DownloadCenter.page, and if you’re a Canon user in the U.S., go to www.usa.canon.com, click on the
Download link in the menu bar across the top, and choose Consumer.
[ 209 ]
0321617657_text_press_pr1.indb 209
6/26/09 11:27 AM
Chapter 9
The Digital Photography Book
If you want to do a quick test to see if you’ve got “junk” on your camera’s sensor, try
this: aim at something like a solid gray wall, or a gray, cloudless sky, and take a shot.
Import this photo into your computer, open it in Photoshop, and then press Command-I (PC: Ctrl-I). This inverts your photo, and any spots, specks, dust, or junk will stick
out like a sore thumb, and you’ll know right then if you need to clean your camera’s
sensor (by the way, although you can buy sensor cleaning kits, and cleaning your sensor
is surprisingly easy, some folks just don’t feel comfortable digging around inside their
camera body, and in that case, you should stop by your local camera store and have one
of their techs do a quick cleaning for you. They’ll charge you a few bucks for it, but
it beats having spots on all your shots). Make sure you do this before a big trip. (See
page 196 for a tip on using your camera’s built-in sensor cleaner.)
Excerpted from The Digital Photography Book, Volume 3 by Scott Kelby.
Copyright © 2010. Used with permission of Pearson Education, Inc. and Peachpit Press.
SCOTT KELBY
The Photoshop Trick for Finding Dust Spots
[ 210 ]
0321617657_text_press_pr1.indb 210
6/26/09 11:27 AM
Avoiding Problems Like a Pro
Shooting in Bad Weather
What to Do When You Don’t Have Protective Gear
If you get caught in the rain and don’t have protective gear (hey, it happens), when you get
back to a dry place, try patting dry the outside of your gear with a cleaning cloth, or a dry
towel if a cleaning cloth isn’t handy. Don’t wipe it, or you risk moving water into places you
don’t want it, so just carefully pat it dry. I’ve heard of photographers using a blow dryer set
on low to help dry things off, but luckily I haven’t had to test that one out. Also, leave your
camera off until the camera has had plenty of time to dry the inside on its own.
Excerpted from The Digital Photography Book, Volume 3 by Scott Kelby.
Copyright © 2010. Used with permission of Pearson Education, Inc. and Peachpit Press.
Sometimes the best images come from the worst weather, but if you’re going to be
shooting in this type of weather, you need to take a few precautions for your gear. Some
cameras, like Nikon’s D300, D700, and D3 line, have weather-sealed bodies that help keep
moisture out, but your best bet is to buy rain covers for your gear that still allow you to
hold your camera and operate the zooms on your lenses, while keeping the electronics inside your camera nice and dry. The set I use is the KT E-702 Elements Cover made
by Kata (www.kata-bags.com), and it’s got special sleeves on the side so you can reach
inside the cover and adjust your camera settings and lens zoom. I don’t have to use this
often, but when I do, it’s great not having to worry about my gear getting toasted.
If you get caught in an unexpected rain situation, try using the shower cap from your
hotel room to cover the entire back of your camera body (so just the lens sticks out).
[ 211 ]
0321617657_text_press_pr1.indb 211
6/26/09 11:27 AM
Excerpted from The Digital Photography Book, Volume 3 by Scott Kelby.
Copyright © 2010. Used with permission of Pearson Education, Inc. and Peachpit Press.
6/26/09 11:27 AM
0321617657_text_press_pr1.indb 212
PHOTOGRAPHER: SCOTT KELBY
FOCAL LENGTH : 70 MM
ISO: 100
F-STOP: F /11
SHUTTER SPEED: 1/8 SEC