1
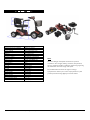
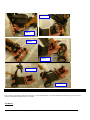
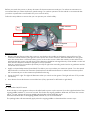
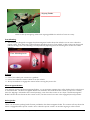
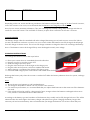
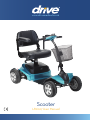
www.drivemedical.co.uk Scooter HW007 User Manual CONTENTS 1. 2. 3. 4. 5. 6. 7. 8. 9. 10. Safety Instructions Electromagnetic Interference (EMI) Specifications Adjustment Control Panel Operation Charging Instructions Battery Instruction and Maintenance Scooter Maintenance and Repair Troubleshooting and Fault Repair Warranty Do not ride your scooter in traffic. Do not make a sharp turn or a sudden stop while riding your scooter. Do not attempt to climb kerbs greater than limitation shown in the specification Do not remove your hands and legs from the scooter when driving. Do not ride your scooter during snow in order to avoid accidents. Do not allow unsupervised children to play near this equipment while the batteries are charging. SAFETY INSTRUCTIONS Always use a seat belt, and keep your feet on the scooter at all times. Never operate the scooter while you are under the influence of alcohol. Never use mobile phones or radio transmitters such as walkie-talkies. Make sure that there are no obstacles behind you while reserving your scooter. HW007 Scooter Owner’s Handbook (HW007_IFU 08/15) Page 1 Warning – Do not operate your scooter for the first time without completely reading and understanding this owner’s handbook 1. Do not operate the scooter on public streets and highways. Be aware that it may be difficult for traffic to see you when you are seated on the scooter. Obey all local pedestrian traffic rules. Wait until your path is clear of traffic, and then proceed with extreme caution. 2. To prevent injury to yourself or others, always ensure that the power is switched off when getting on or off of the scooter. 3. Always check that the drive wheels are engaged (drive mode) before driving. Do not switch off the power when the scooter is still moving forward. This will bring the scooter to an extremely abrupt stop. 4. Do not use this product or any available optional equipment without first completely reading and understanding these instructions. If you are unable to understand the warnings, cautions or instructions, contact your dealer before attempting to use this equipment, otherwise, injury or damage may occur. 5. There are certain situations, including some medical conditions, where the scooter user will need to practice operating the scooter in the presence of a trained attendant. A trained attendant can be defined as a family member or care professional especially trained in assisting a scooter user in various daily living activities. 6. Do not attempt to lift or move a scooter by any of its removable parts including the armrests, seats or shrouds. Personal injury and damage to the scooter may result. 7. Never try to use your scooter beyond its limitations as described in this manual. 8. Please do not sit on your scooter while it is in a moving vehicle such as a car, bus or train. 9. Keep your hands away from the wheels (tyres) while driving scooters. Be aware that loose fitting clothing can become caught in the drive wheels. 10. Consult your physician if you are taking prescribed medication or if you have any certain physical limitations. Some HW007 Scooter Owner’s Handbook (HW007_IFU 08/15) medications and limitations may impair your ability to operate scooters in a safe manner. Consult with your physician if you are taking any medication that may affect your ability to operate your scooter safely. 11. Do not drive or sit on the scooter when in freewheel mode. 12. Do not remove the anti-tipper (if fitted) 13. Always switch off the scooter and charger, and disconnect the battery before doing any work or using any tools on the scooter. 14. Do not attempt to lift or move your scooter by any of its removable parts, such as the armrests, seats, or shroud. 15. Do not climb a gradient at an angle. Always drive straight up a gradient, as this greatly reduces the risk of tipping or a fall. Do not climb a gradient steeper than 10º. 16. Do not drive backwards down any step, kerb or other obstacle. This may cause the scooter to tip or fall. 17. Always reduce your speed and maintain a stable centre of gravity when cornering sharply. Do not corner sharply when driving scooters at higher speeds. 18. Operating in rain, snow, salt, mist and on icy or slippery surfaces may have an adverse affect on the electrical system. 19. Never sit on your scooter when it is being used in connection with any type of lift or hoist. Your scooter is not designed with such use in mind and any damage or injury incurred from such use is not the responsibility of Drive. Modifications Your scooter has been designed to be as practical as possible. However, under no circumstances should you modify, add, remove, or disable any part or function of your scooter. Personal injury and damage to the scooter may result. 1. Do not modify your scooter in any way not authorized by Drive. Do not use accessories if they have not been tested or approved for Drive products. 2. Get to know the feel of your scooter and its Page 2 capabilities. Drive recommends that you perform a safety check before each use to make sure your scooter operates safely. Inspections prior to using your scooter: 1. If equipped with pneumatic tyres, please check for the tyres are not flat. 2. Please check all electrical connections and make sure they are tight and not corroded. 3. Please check all harness connections and make sure they are secured properly. 4. Please check the brakes. Weight limitation. 1. Do not exceed the weight capacity stated in the Specification section. Exceeding the weight capacity voids your warranty. Drive will not be held responsible for injuries or property damage resulting from failure to observe weight limitations. 2. Do not carry passengers on scooters. Carrying passengers on your scooter may affect the centre of gravity, resulting in a tip or a fall. Tyre inflation 1. If your scooter is equipped with pneumatic tyres, check the tyre pressure every week. 2. The correct tyre pressure will prolong the life of your tyres and ensure a smooth ride. 3. Do not under-inflate or over-inflate your tyres. It is critically important that tyre pressure is maintained between 25 – 30 psi (2.0 – 2.4 bar). Temperature 1. Some of the parts of the scooter are susceptible to change in temperature. The controller can only operate in temperature that ranges between -25ºC ~ 50ºC (-13ºF to 122ºF). 2. At extreme low temperatures, the batteries may freeze, and your scooter may not be able to operate. In extreme high temperatures, it may operate at slower speeds due to a safety feature of the controller that prevents damage to the motors and other electrical components. ELECTROMAGNETIC INTERFERENCE HW007 Scooter Owner’s Handbook (HW007_IFU 08/15) The rapid development of electronics, especially in the area of communications, has saturated our environment with electromagnetic (EM) radio waves that are emitted by television, radio and communication signals. These EM wave are invisible and their strength increases as one approaches the source. All electrical conductors act as antennas to the EM signals and, to varying degrees, all power wheelchairs and scooters are susceptible to electromagnetic interference (EMI). The interference could result in abnormal, unintentional movement and/or erratic control of the vehicle. Scooters may be susceptible to electromagnetic interference (EMI), which is interfering electromagnetic energy emitted from sources such as radio stations, TV stations, amateur radio (HAM) transmitters, two-way radios, cellular phones and alarm systems. The interference (from radio wave sources) can cause the scooter to release its brakes, move by itself or move in unintended directions. It can also permanently damage the powered scooter’s control system. The intensity of the EM energy can be measured in volts per meter (V/m).Each powered scooter can resist EMI up to a certain intensity. This is called “immunity level”. The higher the immunity level the greater the protection. At this time, current technology is capable of providing at least 20 V/m of immunity level, which would provide useful protection against common sources of radiated EMI. Following the warnings listed below should reduce the chance of unintended brake release or powered scooter movement that could result in serious injury: 1. Do not turn on hand-held personal communication devices such as citiHW007s band (CB) radios and cellular phones while the powered scooter is turned on. 2. Be aware of nearby transmitters such as radio or TV stations and try to avoid coming close to them. 3. If unintended movement or brake release occurs, turn the powered scooter off as soon as it is safe. 4. Be aware that adding accessories or components, or modifying the powered scooter, may make it more susceptible to Page 3 interference from radio wave sources (Note: It is difficult to evaluate the effect on the overall immunity of the powered scooter). 5. Report all incidents of unintended movement or brake release to the powered scooter manufacturer, and note whether there is a radio wave source nearby. TURN OFF YOUR POWERED SCOOTER AS SOON AS POSSIBLE IF YOU EXPERIENCE THE FOLLOWING: Unintentional scooter movements Unintended or uncontrollable direction. Unexpected brake release The higher the immunity level the greater the protection. Your powered scooter has an immunity level of 20 V/m which should protect against common sources of EMI. Warning: The scooter itself can disturb the performance of the electromagnetic fields such as emitted by an alarm system HW007 Scooter Owner’s Handbook (HW007_IFU 08/15) Page 4 SPECIFICATION Model Weight Capacity (MUW) Drive Wheel Front Wheel Maximum Speed Battery Maximum Range Charger Type Controller Motor Type Turning Radius Suspension Maximum Gradient Length Width Height Seat Width Seat Height Seat Depth Back Height Wheel Base Ground Clearance Footwell HW007 120kg (19 stone) 24 x 7.5cm (9.5” x 3”) 24 x 7.5cm (9.5” x 3”) 4mph (6.4kph) 12V 22Ah x 2pc 13 mile (20km) 2A Offboard 120/240V PG Drives S-Drive 400W 4400RPM 22:1 198cm (78”) Rear 10º 107cm (42”) 58cm (23”) 92cm (36”) 40cm (16”) 40cm (16”) 41cm (16”) 35cm (14”) 82cm (32”) 7cm (3”) 30cm (12”) HW007 Scooter Owner’s Handbook (HW007_IFU 08/15) Note: Maximum Range and Speed are based on optimal conditions. User weight, battery condition, temperature, terrain, gradient, weather conditions and driving style may all reduce the maximum range and speed. Drive Medical Ltd reserves the right to change specifications without prior notice. Specifications of the product purchased may differ from those stated. Page 5 ADJUSTMENT Tiller Positioning: Loosen the quick release lever, fold the tiller up to vertical position and tighten the quick release lever. If you want to adjust the tiller angle, you have to lift the tiller upper to make sure the stopper goes into the groove by releasing the quick release lever. Adjust the tiller Quick release lever To adjust the width of the Arm-rest: Loosen the tension fixing nuts and adjust the width to your seating comfort. Assembling the rear part: Tilt the rear part of scooter backwards at approximately 45º. Lift the front body and catch the lower frame tube with the frame hooks properly at the proper position before combining the rear part and front part. Assemble the rear part and front part carefully in order not to scratch the cover. Frame hook Lift up the front body Lower frame tube Easy-to-dismantle HW007 Scooter Owner’s Handbook (HW007_IFU 08/15) Page 6 The HW007 scooter has carbon steel frame and can be easily dismantled to fit in the car for transportation. It also has easy to use controls and adjustable tiller positioning. Distinctive stylish lightweight scooter Easy to use controls Sturdy Front basket Adjustable tiller positioning Easy to remove the battery pack Dismantles for transporting in a car Note: The weight of the front body frame is 21kg so seek assistance when lifting. Front Body Frame Assembly 1) Tilt the rear section slightly back on to the anti-tip wheel while combining the front & rear sections. 2) Please use the frame release lever to lift the front section, aligning and combining the frame hooks of the front HW007 Scooter Owner’s Handbook (HW007_IFU 08/15) Page 7 section with the lower frame tube. 3) Lower the front section completely once the frame hooks are over the lower frame tube, which will engage the frame lock-up. 4) Raise the tiller and tighten the quick release lever completely to secure. 5) Insert the battery pack back in to the scooter. 6) Reinstall the seat and rotate it until it is secured into proper position. Frame release lever Lower frame tube Step 1 Step 2 & 3 Step 4 Step 5 Frame hook Step 4-1. Tighten the quick release lever lever Step 6 Disassembly 1) Remove the seat by lifting it straight up and off of the scooter. If there is any resistance encountered when removing the seat, please release the seat rotation knob and swivel the seat back and forth while lifting up on the seat. 2) Remove the battery back from the scooter carefully. 3) Lift up on the frame release lever until the frame hooks are no longer resting on the frame tubes and then carefully and slowly separate these two sections of scooter. 4) Put the tiller in to the lower position by loosening the quick release lever. HW007 Scooter Owner’s Handbook (HW007_IFU 08/15) Page 8 Step 1-1 Step 1 Step 2 Step 3 Step 4 Step 4-1 CONTROL PANEL OPERATION The scooter is simple to operate. However, we recommend that you read carefully the following instructions to become familiarized with your new vehicle. For Safety: HW007 Scooter Owner’s Handbook (HW007_IFU 08/15) Page 9 Before you switch the power on, always be aware of the environment around you. For indoor environments we recommend that you select the slowest speed setting. For outdoor operation of this vehicle we recommend that you select a speed that is comfortable for you to control safely. Follow the steps below to ensure that you can operate your vehicle safely. Power ON/OFF Light Key Battery Indicator Horn Button High/Low Speed Adjustment . Button functions 1. Battery Indicator Gauge: When the scooter is switched on the, needle on the battery gauge will move. The further the needle moves to the right, the more power the scooter will have. When the needle is in the green area, this means there is sufficient battery power to drive the scooter. When the needle is in the amber area, indicates that the scooter can still drive but the batteries should be recharged shortly. If the needle is in the red area, then the batteries should be charged as soon as possible. Note: It is natural for the needle to fluctuate from left to right when travelling under load or on gradients and this should not cause concern. 2. High/Low Speed Adjustment (Speed Dial): This allows you to pre-select your maximum speed. Turn the speed dial clockwise to increase the maximum speed and turn the dial anticlockwise to reduce the maximum speed. WE recommend you set the maximum speed before driving. 3. Power ON/OFF Light: The light will illuminate when you switch on the ignition. The light will turn off if you take out the key. 4. Horn button: Press this button to sound the horn.( Easy operation for left hand or right hand) Driving: A) Controller ON/OFF Switch Insert the key in to the ignition socket on the tiller head to power up the scooter. Press the right hand side of the wigwag paddle (marked “F”) to move forward. The further the wigwag paddle is deflected, the faster the scooter will go. To stop, release the wigwag paddle and the brake will automatically apply. Press the left hand side of the wigwag paddle (marked “R”) to move backwards. The parking brake will automatically apply when the wigwag paddle is released and the scooter stops. HW007 Scooter Owner’s Handbook (HW007_IFU 08/15) Page 10 Wigwag Paddle Note: In case of emergency, release the wigwag paddle the vehicle will come to a stop. Free-Wheeling: 1. The motors are designed to engage the electromagnetic brakes when the vehicle is not in use or when the power is OFF. They also have a manual feature that allows them to “free-wheel” so the scooter can be moved without turning it on. Free-wheeling is accomplished by adjusting the free-wheeling lever to the free-wheel position. Free- Wheeling Lever Warning ! Never free-wheel your scooter on a gradient. Never free-wheel the motors whilst sat on the vehicle. Always remember to engage the motors before turning the power ON. Electromagnetic Brakes: Your scooter comes with Electromagnetic Brakes., i.e. an automatic magnetic disc safety brake which is also known as Fail-Safe brake. The electro-magnetic Brakes are automatic and work when the scooter is ON but in a steady state (i.e. Wigwag is released to the neutral position), even when the scooter is on a slope. The Electromagnetic Brakes will also be set whenever the scooter is OFF, but the motor levers are in the engaged (vertical) position. Parking brake: There is an automatic parking brake function included in the electromagnetic brake. The scooter will stop when the motor is engaged and the power switch is off or when the power switch is on and the wigwag is in the neutral HW007 Scooter Owner’s Handbook (HW007_IFU 08/15) Page 11 position. If the scooter is in the free wheel mode (motor is disengaged), you can use the manual parking brake function by moving the engaging/disengaging lever back into the engaged position by an attendant. Thermal Protection: Your scooter controller is equipped with a safety system called thermal rollback. A built-in circuit monitors the temperature of the controller and motor. In case of excessive heat of the controller and motor, the controller will cut-off the power to allow the electrical components to cool down. Although your scooter will resume its normal speed when the temperature returns to a safe level, we recommend to wait for 5 minutes before restarting to allow the components to cool down. In some circumstances the scooter may slow down, regardless of desired driving speed, prior to this happening. This is normal. However repeated occurrences should be reported to your dealer. Main Circuit Breaker: The main circuit breaker reset button is located on the top of the battery box. The main circuit breaker monitors the electric current drawn from the battery. It is a safety feature built in your scooter for your extra safety. When the batteries and motor are heavily strained (e.g., from excessive loads), the main circuit breaker will trip to prevent damage to the motor and the electronics. If the circuit breaker trips, turn off the scooter and wait for approximately one minute and then depress the button to reset it. Then turn on the scooter, and continue normal operation. If the main circuit breaker continues to trip repeatedly, this indicates a fault so contact your authorized dealer. BATTERY AND CHARGING INSTRUCTION We recommend that you use deep-cycle batteries that are sealed and maintenance free for your scooter. Both sealed lead-acid (SLA) and gel cell are deep-cycle batteries and are similar in performance. Deep-cycle batteries are specifically designed to provide power, drain down, and then accept a relatively quick recharge. Lead-acid batteries should be charged as often as possible. Specification of the battery that we recommend for the HW007 scooter is Type: Deep –cycle sealed lead-acid or gel cell Size: 22AH Voltage: 12V each HW007 Scooter Owner’s Handbook (HW007_IFU 08/15) Page 12 Amp Hours: 12 amp hours Depending on the use, terrain and driving conditions, the batteries will provide a range of 20 km of travel. However, even if the scooter is not in use, we recommend that the batteries are charged periodically. Note: Do not use any automotive batteries. They are not designed to handle a long, deep discharge and also are unsafe for use in the scooter. The useful life of a battery is quite often a reflection of the care it receives. 2 AMP CHARGER The battery charger takes the standard wall outlet voltage (alternating current) and converts it into VDC (direct current).The batteries use direct current to run your scooter. When the batteries are fully charged, the amperage from the charger is almost at zero. This is how the charger maintains a charge but does not overcharge the battery. Note 1: The batteries cannot be charged if they were discharged to nearly zero voltage. CHARGING INSTRUCTIONS To recharge the batteries, follow the steps below: Place your scooter close to a standard electrical wall outlet. Remove your key to turn the power OFF Charger Port Slide the charger port door open. Plug the XLR connector of the charger to the charger port. Plug the other end of power cord into a standard wall outlet. When charging is completed, the charger LED shows green. Disconnect the charger power cord from the wall outlet when the batteries are fully charged. Recharge the battery only when the scooter is switched off. When the battery indicator shows low power, recharge the battery. Note: Always charge your batteries in well ventilated areas. The charger is intended for indoor use only. Protect from moisture. For maximum performance, it is recommended that you replace both batteries at the same time if the batteries are weak. If the vehicle will not be used for a long period of time, arrange to have the batteries recharged at least once every month to avoid deterioration of the batteries. According to the battery type and condition of the batteries, they usually can be fully charged 10 hours. This will be indicated when the status light in the battery charger side panel turns green. Charging the battery longer than necessary will not harm the battery. We recommend that you charge the batteries for 10 hours after daily use. HW007 Scooter Owner’s Handbook (HW007_IFU 08/15) Page 13 SCOOTER MAINTENANCE AND REPAIR Make sure to keep the controller clean while protecting it from rain or water. Never hose off your scooter or place it in direct contact with water. Keep wheels free from lint, hair, sand and carpet fibres. Visually inspect the tire tread. If less than 1mm (1/32”), please have your tires replaced by your local dealer. All upholstery can be washed with warm water and mild soap. Occasionally check the seat and back for sagging, cuts and tears. Replace if necessary. Do not store your scooter in damp or humid conditions as this will lead to mildew and rapid deterioration of the upholstery parts. All moving mechanism will benefit from simple lubrication and inspection. Lubricate using petroleum jelly or light oil. Do not use too much oil, otherwise small drips could stain and damage carpets and furnishings etc. Periodically check that all fasteners (nuts, bolts, etc) are tight and secure. Inspect the state of the battery terminals every six months. Make sure that they are not corroded and the connections are tight. Periodically apply a thin film of petroleum jelly on the surface of terminals to guard against corrosion. Your scooter is designed for minimal maintenance. However, like any motorized vehicle it requires routine maintenance. To keep your scooter for years of trouble-free operation, we recommend you follow the following maintenance checks as scheduled. HW007 Scooter Owner’s Handbook (HW007_IFU 08/15) Page 15 Maintenance Job Daily Weekly Monthly Semi-Annual Electrical System Battery meter – Inspect the battery meter to determine if batteries are needed to be recharged Controller / Display panel – Make sure they are not frayed or have any exposed wiring Check all plug & wiring connections for firm condition Have the batteries been fully charged before the daily operation Are all holder and screws firmly fixed and safe? Are all electric lighting system (if applicable) in working order Tyres & Wheels Front & Rear wheels must be able to spin smoothly without any interference Rear & Front wheels must spin without wobbling Visually inspect the tire tread. If less than 1mm (1/32”), please have your tires replaced by your local dealer. Others Motor brushes. We recommend that your authorized dealer inspect the brushes every sixmonth if your scooter or power wheelchair is not operating smoothly. If the inspection determines excessive motor bushes worn out, they must be replaced otherwise motor damage will result. HW007 Scooter Owner’s Handbook (HW007_IFU 08/15) Page 16 TROUBLESHOOTING AND FAULT REPAIR S-DRIVE controller: Your scooter is fitted with a S-Drive controller, which continuously monitors the operating conditions of your scooter. Error Number Reference Fault Impact Scooter on Notes 1 Low Voltage Error flashing The battery requires charging or there is a bad connection to the battery. 2 Motor Connection Scooter will not drive There is a bad connection to the motor. Check all connections between the motor and controller. 3 Short Circuit Scooter will not drive The motor has experienced a short circuit to a battery connection. Check all motor and battery connections. 4 Not Used Not Applicable Not Applicable 5 Not Used Not Applicable Not Applicable 6 Inhibit Scooter will not drive Inhibit circuit has become active not permitting drive. Likely to be caused by a charger being connected or a fault within the controller or wiring. 7 Throttle Fault Scooter will not drive A throttle fault has been indicated. Ensure the throttle is in neutral before switching the scooter on. Throttle may require calibration. 8 Controller Fault Scooter will not drive A controller fault has been indicated. Make sure all connections are secure. Also cycle keyswitch as this fault can be initiated by a break in the circuit during keyswitch initiation. 9 Brake Fault Scooter will not drive There is a fault within the electromagnetic brake circuit, Check all brake and motor connections. Make sure controller connections are secure and that the scooter is not in freewheel mode. 10 Excessive Voltage Scooter will not drive An excessive voltage has been applied to the controller. This is very often caused by a poor battery connection. Check all connections from the batteries to the controller. Note: If you experience any technical problems, it is recommended that you check with your local dealer before attempting to troubleshoot on your own. The following symptoms could indicate a serious problem with your scooter. Contact your local dealer if any of the following arises: 1. 2. 3. 4. 5. 6. 7. 8. 9. 10. Motor noise Frayed harnesses Cracked or broken connectors Uneven wear on any of tires Jerky motion Pulling to one side Bent or broken wheel assemblies Does not power up Powers up, but does not move Involuntary slowing of the scooter WARRANTY There is a comprehensive twelve-month warranty from the date on which your new scooter is delivered. The warranty covers the scooter for repairs or replacement during this period. For more detail, please see the Warranty Conditions below. Warranty Conditions: HW007 Scooter Owner’s Handbook (HW007_IFU 08/15) Page 17 1. Any work or replacement part installation must be carried out by an authorized Drive Medical dealer / service agent. 2. To apply the warranty should your scooter require attention please contact the designated service agent listed above. 3. Should any part of the scooter require repair or full or part replacement, as a result of a manufacturing or material defect within twelve months of receiving the scooter, replacement parts will be supplied free of charge. Note: This guarantee is not transferable 4. Any repaired or replaced parts will be covered by this warranty for the balance of the warranty period on the scooter. 5. Consumable items supplied will not generally be covered during the normal warranty period unless such items require repair or replacement clearly as a direct result of a manufacturing or material defect. Such items include (among others): motor brushes, tyres, arm pads, seat cushion, fuses, bulbs, tiller cover, rear shroud, front shroud. 6. The above warranty conditions apply to brand new scooter purchased at the full retail price. If you are unsure whether your scooter is covered, check with the service agent. 7. Under normal circumstances, no responsibility will be accepted where the scooter has failed as a direct result of: a) The scooter or part not having been maintained in accordance with the manufacturer’s recommendations. b) Failure to use the manufacturer’s specified parts c) The scooter or part having been damaged due to neglect, accident or improper use d) The scooter or part having been altered from the manufacturer’s specifications or repairs having been attempted before the service agent is notified In the event of your scooter requiring attention, contact the stockist from where you bought the scooter and give all relevant details so they can act quickly. The manufacturer reserves the right to alter without notice any weights, measurements or other technical data shown in this manual. All figures, measurements and capacities shown in this manual are approximate and do not constitute specifications. This does not affect your statutory rights. HW007 Scooter Owner’s Handbook (HW007_IFU 08/15) Page 18 Appendix A: Service Record YEAR 1 2 3 4 5 YEAR Service Dates Service Dates Controller Upholstery On/off switch Seat Control Lever Back Braking Armrests Recharge point Electrics Batteries Connections condition Levels Lights Connections Test run Discharge test Forwards Wheels and Tyres Reverse Wear Emergency stop Pressure Left turn Bearings Right turn Wheel nuts Slope test Motors Over obstacles Wiring List Items repaired 1 2 3 4 5 Noise Connections Brake Brushes Chassis Condition Steering HW007 Scooter Owner’s Handbook (HW007_IFU 08/15) Page 19 The Team at Drive Medical develops its products to give our customers the freedom to live independently. This encompasses their daily home life and provides them with the opportunity to enjoy an outing with family and friends. Our goal is to develop a range that will provide individuals with a chance to enjoy every day life. Dealer Stamp Drive Medical Limited Ainleys Industrial Estate, Elland West Yorkshire, HX5 9JP Tel: +44 (0) 1422 314 488 Fax: +44 (0) 1422 314 489 Email: [email protected] www.drivemedical.co.uk