1
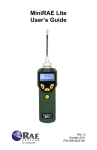
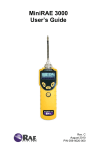
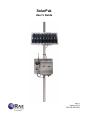
SolarPak
User’s Guide
Rev. A
January 2012
P/N F06-4001-000
© Copyright 2012 RAE Systems, Inc.
SolarPak User’s Guide
Contents
1 Warnings .......................................................................................................................................... 3
1.1 SolarPak Marking ................................................................................................................. 3
1.2 Operation Area and Conditions ............................................................................................. 4
1.3 Instruction For Safe Use ....................................................................................................... 4
1.4 Use In Hazardous Areas ........................................................................................................ 4
1.5 Specifications ........................................................................................................................ 4
2 Overview .......................................................................................................................................... 5
3 SolarPak Mounting Assembly Installation .................................................................................... 6
4 Installation ....................................................................................................................................... 6
4.1 Solar Panel Mounting Preparation ........................................................................................ 6
5 Mounting The Completed Assembly .............................................................................................. 7
5.1 Wall mounting....................................................................................................................... 7
5.2 Pole Mounting ...................................................................................................................... 8
5.3 Solar Panel Tilt Angle Adjustment ...................................................................................... 10
5.3.1 Solar Panel Orientation .......................................................................................... 11
5.3.2 Solar Panel Tilt ....................................................................................................... 12
5.3.3 Maximizing Total Yearly Energy Production ......................................................... 13
5.3.4 Maximizing Energy Production In The Winter ...................................................... 14
5.3.5 Maximizing Energy Production In The Summer.................................................... 14
5.3.6 System Run Time ................................................................................................... 14
5.3.7 PowerPak Run Time Without A Solar Charger ...................................................... 14
5.3.8 Expected Daily Consumption ................................................................................. 15
5.3.9 Expected Daily Production..................................................................................... 15
5.3.10 U.S. Peak Sun Hours By Location ......................................................................... 16
5.3.11 International Peak Sun Hours By Location ............................................................ 17
5.3.12 Calculating Expected Run Time ............................................................................. 19
6 Electrical Connections With FTB1000 PowerPak ...................................................................... 20
7 Starting & Testing The System ..................................................................................................... 21
8 Disconnecting The SolarPak System ........................................................................................... 21
9 Troubleshooting ............................................................................................................................. 22
10 Replacement Parts......................................................................................................................... 22
10.1 LED Displays ...................................................................................................................... 22
10.2 LED Status Indicator........................................................................................................... 23
10.3 LEDs And Troubleshooting ................................................................................................ 23
11 RAE Systems Contacts.................................................................................................................. 24
1
SolarPak User’s Guide
Proper Product Disposal At End Of Life
The WEEE symbol (crossed-out wheeled bin) indicates separate collection of waste
electrical and electronic equipment in EU countries.
At the end of its life, this product must undergo separate collection and recycling
from general or household waste. Please use the return and collection system
available in your country for disposal of this product.
2
SolarPak User’s Guide
1 Warnings
Warning:
This instrument has not been tested in an explosive gas/air atmosphere having an oxygen
concentration greater than 21%. Substitution of components may impair suitability for intrinsic
safety.
1.1 SolarPak Marking
The RAE SolarPak is certified according to the IECEx scheme, ATEX and CSA for US and
Canada as protected by intrinsic safety.
The product is marked with the following information:
RAE SYSTEMS
3775 N. 1st. St., San Jose
CA 95134, USA
RAE SolarPak
Type FTS-20.
Serial No/barcode: XXX-XXXX
IECEx DNV 11.0007
Ex ia IIC T4 Ga
0575
II 1G Ex ia IIC T4 Ga
DNV 11 ATEX 98773
11.2440615
Exia Class I,Div 1,
Groups A,B,C,D T4
Intrinsically safe entity parameters:
Power output, Pin1
CTL, Pin 2
Io: 3.23A
Io: 23mA
Lo: 3.2uH
Lo: 66mH
Co: 3uF
Co: 3uF
Uo: 9.96V
Uo: 9.56V
Po: 8.03W
Po: 12mW
-40º C < Tamb < +60º C
WARNING: Read User’s Manual for Intrinsic Safety Precautions
WARNING: EXPLOSION HAZARD - SUBSTITUTION OF COMPONENTS MAY IMPAIR
INTRINSIC SAFETY.
WARNING: TO PREVENT THE IGNITION OF EXPLOSIVE ATMOSPHERE, DISCONNECT
POWER BEFORE SERVICING.
3
SolarPak User’s Guide
1.2 Operation Area and Conditions
Hazardous Areas classified by Zones
RAE SolarPak is intended to be used in hazardous areas classified for zone 0, zone 1 or zone 2, within
the temperature range of -40º C to +60º C, where gases of explosion groups IIA, IIB or IIC and T4
may be present.
Hazardous Areas classified by Divisions
RAE SolarPak is intended to be used in hazardous areas classified for Class I Div. 1 or 2, within the
temperature range of -40º C to +60º C, where gases of explosion groups A, B, C or D and temperature
class T4 may be present.
1.3 Instruction For Safe Use
The RAE SolarPak can be applied as charger for intrinsically safe equipment in hazardous areas,
providing that connected equipment complies with the intrinsically safe input entity parameters.
The RAE SolarPak can be connected and disconnected inside the hazardous area.
The connected intrinsically equipment must have fitting intrinsically safe entity parameters
1.4 Use In Hazardous Areas
Equipment which is intended for use in explosive atmospheres and which has been assessed and
certified according to international regulations may be used only under specified conditions. The
components may not be modified in any way.
The appropriate regulations for service and repair must be properly observed during such activities.
1.5 Specifications
Length: 650mm (25.6″)
Width: 335mm (13.2″)
Thickness: 40mm (1.6″)
Weight (panel only): 4.6 kg (10.14 lbs)
Weight (panel + adjustable pole mount): 7.6 kg (16.75 lbs)
Cable length: 5m/16′
Maximum Voltage (full sun): 9.96V
Maximum Current (full sun): 700mA
Certification:
IECEx DNV 11.0007
Ex ia IIC T4 Ga
0575
II 1G Ex ia IIC T4 Ga
DNV 11 ATEX 98773
Intrinsically safe entity parameters:
Power output, Pin1
CTL, Pin 2
Io: 3.23A
Io: 23mA
Lo: 3.2uH
Lo: 66mH
Co: 3uF
Co: 3uF
Uo: 9.96V
Uo: 9.56V
Po: 8.03W
Po: 12mW
-40º C < Tamb < +60º C
4
11.2440615
Exia Class I,Div 1,
Groups A,B,C,D T4
SolarPak User’s Guide
2 Overview
The SolarPak has been designed for easy assembly and installation, and most portions of the
assembly are done before the SolarPak is shipped. The complete assembled system is shown
below, along with a RAE Systems FTB-1000 PowerPak and MeshGuard monitor. Pole and wall
mounting instructions are included in this guide.
SolarPak
MeshGuard
PowerPak
5
SolarPak User’s Guide
3 SolarPak Mounting Assembly Installation
The SolarPak operates most effectively when it is installed and adjusted for maximum sun
exposure for the greatest amount of time per day. This requires checking the angle relative to the
sun and the orientation relative to its geographic location (for true north or true south exposure).
A computer, a magnetic compass, and a mechanical (drawing) compass will help you during
installation.
4 Installation
The SolarPak’s solar panel is set inside a metal frame. On the back of the frame is the junction
box with a cable that attaches to a RAE Systems FTB-1000 PowerPak. Attached to the frame is
an adjustable mounting system that attaches to a bracket for wall mounting or pole mounting.
4.1 Solar Panel Mounting Preparation
1. Remove the solar panel and place it face-down on a soft surface (cloth, carpeting, etc.).
2. Remove the pole-mounting assembly.
3. Loosen the screws holding the two arms to the brackets on the back of the solar panel, as
well as the two extra screws.
4. Remove the screw, washer, and nut at the end of each bracket, as well as the two extra
screws, and raise the two arms.
5. Line up the holes of the pole-mounting assembly with the holes at the ends of the two
arms and insert the hex screws. Slip washers and nuts over the ends of those four screws.
6. Tighten all six screws with your fingers. Do not tighten them too much, since you will
perform adjustments when the SolarPak is attached to a wall or pole.
Slide the assembly and arms to make sure the arms move freely. Then follow the instructions in
the next section, Mounting The Completed Assembly.
1
2
3
4
5
6
6
SolarPak User’s Guide
5 Mounting The Completed Assembly
The completed SolarPak assembly may be placed on top of any stable platform, wall-mounted, or
pole-mounted. All parts required for wall-mounting or pole-mounting are included.
5.1 Wall mounting
1.
2.
3.
4.
Find the best location on a strong wall that can support the weight of the SolarPak.
Mark and drill holes in the wall to accommodate screws to hold the mounting plate.
If necessary, install anchors (if the SolarPak is to be fastened to a masonry or brick wall).
Fasten the wall/pole mounting plate to the wall with four screws through the round holes at
the left and right edges of the mounting plate (see below).
Insert four M10 screws through the outer four holes to fasten the wall/pole mounting plate.
Drilling chart for the wall/pole mounting plate.
7
SolarPak User’s Guide
5.2 Pole Mounting
The pole-mountable bracket is designed for small-diameter poles (2" to 3.5"/50 mm to 89 mm).
1. Place one pole-mount bracket against the pole and one wall/pole-mount plate on the other
side of the pole.
Note: The height of the bracket and mounting plate should be set so that the SolarPak
assembly is at the desired height when the heads of the top four M6 screws on the backside of
the enclosure are inserted into the corresponding keyholes on the mounting plate.
2. Slide a spring washer and steel washer onto each of the M8*8 bolts. Tightly fasten the bracket
to the mounting plate with four M8*80 bolts.
3. Adjust the height of the bracket and mount plate to align with the bottom four M6 screws on
the back of the enclosure.
4. Support the weight of the SolarPak assembly and insert the top set of four M6 screws on its
backside through the corresponding holes on the top wall/pole-mounting plate.
5. Do the same for the bottom set of four M6 screws.
Note: Ensure the M6 screws are firmly inserted in each hanging notch before letting the wall/pole
mounting plate fully bear the weight of the SolarPak assembly.
Pole Mounting Bracket
M8 bolts
8
SolarPak User’s Guide
Here is a side view of how the pole-mounting bracket is attached to a pole:
Align the bracket’s two
parts with the pole.
Tighten the two screws
until the unit is snug
After the SolarPak is at its
correct height and its
north/south alignment is set,
fully tighten the screws with
the hex wrench.
The SolarPak’s angle
relative to the sun can
now be set.
Initially tighten the screws so that the parts are snug but moveable. This will make it easier to adjust
the SolarPak’s north/south alignment and the solar panel’s angle.
9
SolarPak User’s Guide
5.3 Solar Panel Tilt Angle Adjustment
1. Loosen the top screws on the two steel support bars (shown below) of the SolarPak
mounting assembly.
2. Slide the top of the bars into the desired position and retighten the top screws.
If desired, the solar panel's tilt angle can be adjusted each season to get the best angle for that
season and optimize output from the solar panel. During the spring and autumn equinoxes, the
best angle is equal to the latitude.
Winter: The best tilt angle is the latitude plus 15 degrees in the Northern Hemisphere (minus 15
degrees in the Southern Hemisphere).
Summer: The best tilt angle is the latitude minus 15 degrees in the Northern Hemisphere (plus 15
degrees in the Southern Hemisphere).
If it is preferable to leave the panel in a fixed position throughout the year, select the best winter
angle to even out seasonal performance.
Important! In order to optimize your SolarPak’s efficiency, refer to Solar Panel Orientation, page
11, for instructions on calculating the correct angles for your location.
If mounting on a pole, set the directional orientation first, by turning the panel side to side. Then
lock the screws.
Note: If the SolarPak is not mounted on a pole, try to face it as close to true south as possible.
10
SolarPak User’s Guide
Set the panel’s orientation relative to the sun by following instructions in the next section.
Whether it is mounted on a pole or on a wall, the procedure is the same. Make sure the screws on
both sides are loose enough to allow setting the angle, but tight enough so that the solar panel
does not simply drop to a vertical orientation. Once the panel’s angle is set, then tighten up the
three screws on each side.
5.3.1 Solar Panel Orientation
To maximize the charging capability of the SolarPak, it is important to adjust the orientation of
the solar panel based on your location.
For locations in the Northern Hemisphere, solar panels should be oriented to face true south. In
the Southern Hemisphere, solar panels should be oriented to face true north. If you are using a
magnetic compass to determine direction at the solar panel’s installation site, you need to take
into account magnetic declination. A magnetic compass points to magnetic north, rather than
true north. The difference between magnetic and true north is the magnetic declination, and it
varies by location.
For example: San Jose, California, has a magnetic declination of 17° east. When using a
magnetic compass, you would find magnetic north and then rotate counterclockwise by 17
degrees to find true north. (A western declination value would rotate true north clockwise from
magnetic north.)
11
SolarPak User’s Guide
An example of worldwide magnetic declination values is shown below. For more accurate
magnetic declination values, we recommend that you perform an internet search for “magnetic
declination” followed by the city and country that you are in.
5.3.2 Solar Panel Tilt
The sun’s path over a particular location varies throughout the year. In the summer months, the
sun is higher in the sky, while in the winter it is lower. Solar panels produce the most energy
when the sun’s rays are perpendicular (at a 90° orientation) to the panel. For this reason, it is
important to tilt the solar panels to the appropriate angle to maximize the energy produced.
Ideally, the face of the solar panel would be pointed directly at the sun, at a 90° orientation:
Sun
Solar panel
12
SolarPak User’s Guide
The closer to a 90° orientation between the panel and the sun, the higher the efficiency.
Low
Efficiency
Maximum
Efficiency
5.3.3 Maximizing Total Yearly Energy Production
The SolarPak’s tilt angle should be set to the latitude of the location in order to maximize yearly
energy production.
For example: San Jose, California, is at 37° latitude and -121° longitude. To maximize the yearly
energy production, the SolarPak panel should be tilted to 37° from horizontal.
However, it is often preferable to design the system to operate in worst-case conditions. For solar
panels, these are often in the winter months, due to shorter days, increased cloudiness, and the
sun’s lower position in the sky.
13
SolarPak User’s Guide
5.3.4 Maximizing Energy Production In The Winter
To maximize energy production in the winter, the best tilt angle is the latitude plus 15° in the
Northern Hemisphere (or, minus 15° in the Southern Hemisphere).
For example: San Jose, California, is at 37° latitude and -121° longitude. To maximize the winter
production, the SolarPak panel should be tilted to 52° (37 + 15) from horizontal.
5.3.5 Maximizing Energy Production In The Summer
The best tilt angle for summer is the latitude minus 15° in the Northern Hemisphere (or, plus 15°
in the Southern Hemisphere).
Also, note that the tilt angle of the SolarPak is easy to adjust. You can easily change the tilt angle
several times per year to maximize energy production at all times.
5.3.6 System Run Time
Several factors such as daylight hours, ambient temperature, and alarm conditions affect the
overall run time of a SolarPak system.
To calculate the expected run time of your SolarPak system, you will need the following
information:
1. Expected PowerPak run time without solar charger
2. Expected daily consumption (% of PowerPak consumption per day)
3. Expected daily production (% of PowerPak charge per day)
5.3.7 PowerPak Run Time Without A Solar Charger
Several factors affect the run time of the PowerPak, most notably transmission mode, ambient
temperature, and alarm conditions. Use the table below as a baseline for determining expected
run time of the PowerPak without solar.
Product
MeshGuard EC
MeshGuard LEL
Router
EchoView
Mode
Battery
Run time
at 55° C
(131° F)
STD
RTR
STD
RTR
RTR
RTR
PowerPak
PowerPak
PowerPak
PowerPak
PowerPak
PowerPak
5 months
30 days
15 days
13 days
30 days
30 days
14
Run
Run
Run
time at
time at time at
-20° C
20° C
0° C
(68° F)
(32° F)
(-4° F)
15 months 13 months 5 months
45 days
40 days
30 days
21 days
19 days
15 days
20 days
18 days
13 days
45 days
45 days
40 days
40 days
30 days
30 days
Run
time at
-40° C
(-40° F)
3 months
10 days
10 days
7 days
10 days
10 days
SolarPak User’s Guide
5.3.8 Expected Daily Consumption
The previous chart has been converted to the percentage of battery consumed per day:
Product
Mode
Battery
MeshGuard
EC
MeshGuard
LEL
Router
EchoView
STD
RTR
STD
RTR
RTR
RTR
PowerPak
PowerPak
PowerPak
PowerPak
PowerPak
PowerPak
% battery
per day at
55° C
(131° F)
0.7%
3.3%
6.7%
7.7%
3.3%
3.3%
% battery % battery % battery % battery
per day at per day at per day at per day at
-20° C
-40° C
20° C
0° C
(68° F)
(32° F)
(-4° F)
(-40° F)
0.2%
2.2%
4.8%
5.0%
2.2%
2.2%
0.3%
2.5%
5.3%
5.6%
2.5%
2.5%
0.7%
3.3%
6.7%
7.7%
3.3%
3.3%
0.9%
10.0%
10.0%
14.3%
10.0%
10.0%
5.3.9 Expected Daily Production
The amount of radiant solar energy falling on a surface is commonly measured in watts per
square meter (W/m2). This quantity varies according to location, season, time of day, and weather
conditions. The radiant energy from the sun at its peak (around noon on a clear day) falling on an
adjacent surface is about 1000W/m2. Naturally, it is not as powerful when it’s lower in the sky,
and in fact the amount of radiant energy changes throughout the day.
Insolation, commonly referred to as “peak sun hour,” is a unit of measurement that normalizes the
amount of solar energy reaching the earth at different locations and at different times of the year.
Peak sun hours vary based on geographic location and weather.
For example, Los Angeles, California, gets approximately 15 hours of daylight in June. This is
equivalent to 7.3 peak sun hours, based upon the latitude and weather conditions for Los Angeles.
In contrast, Anchorage, Alaska, gets approximately 20 hours of daylight in June. However, based
on the latitude and weather, it is only equivalent to 5.6 peak sun hours.
For critical applications, where 24/7/365 operation is required, run time calculations should be
based on the lowest monthly peak sun hour value.
15
SolarPak User’s Guide
5.3.10 U.S. Peak Sun Hours By Location
The following table provides 30-year monthly averages of peak sun hours for various locations in
the United States. Major locations outside the United States are in the tables on the pages
following this one.
State
City
Latitude
Longitude
Jan
Feb
Mar
Apr
May
Jun
Jul
Aug
Sep
Oct
Nov
Dec
AL
AK
AR
AZ
CA
CA
CO
CT
DE
FL
GA
HI
lA
ID
IN
lL
KS
KY
LA
MA
MD
ME
Ml
MO
MN
MS
MT
MT
NC
NO
NE
NH
NJ
NM
NV
NY
OH
OK
OR
PA
PA
Rl
SC
SD
TN
TX
TX
UT
VA
VT
WA
WI
WV
Birmingham
Anchorage
Little Rock
Phoenix
Los Angeles
San Francisco
Denver
Hartford
Dover
Miami
Atlanta
Honolulu
Dubuque
Boise
Indianapolis
Chicago
Kansas City
Louisville
New Orleans
Boston
Annapolis
Portland
Detroit
St. Louis
Minneapolis
Jackson
Billings
Great Falls
Charlotte
Fargo
Omaha
Manchester
Trenton
Albuquerque
Las Vegas
New York
Columbus
Tulsa
Portland
Philadelphia
Pittsburgh
Providence
Columbia
Sioux Falls
Nashville
San Antonio
Houston
Salt Lake City
Washington
Montpelier
Seattle
Milwaukee
Charleston
33’ 34" N
61’ 10" N
32’ 25" N
33’ 26" N
34'N
38’ 31" N
39’ 45" N
41’ 44" N
39’ 8" N
25’ 48" N
33’ 39" N
21’ 20" N
42’ 24" N
43’ 34" N
39’ 44" N
41’ 53" N
39’ 12" N
38’ 11" N
29’ 37" N
42’ 22" N
38’ 35" N
45’ 36" N
42’ 25" N
38’ 45" N
44’ 53" N
42’ 16" N
45’ 48" N
43’ 33" N
35'13"N
46’ 54" N
41’ 18" N
42’ 56" N
40'13"N
35’ 3" N
36’ 18"N
41‘ N
39’ 16" N
36’ 12" N
45’ 32" N
39’ 53" N
40’ 27" N
41’ 44" N
38’ 58" N
45’ 27" N
36’ 7" N
29’ 32" N
29’ 59" N
40’ 46" N
38’ 51" N
44’ 16" N
47’ 32" N
42’ 57" N
38’ 22" N
86’ 45” W
150’ 1” W
94'44” W
112’ 1” W
118' W
121’ 30” W
104’ 52” W
72’ 39” W
75’ 28” W
80’ 16” W
84'26” W
157’ 55” W
90’ 42” W
116’ 13” W
86’ 17" W
87’ 38” W
94’ 36” W
85’ 44” W
90'5” W
71’ 2” W
76’ 21” W
122’ 36” W
83’ 1” W
90’ 23” W
93’ 13” W
84’ 28” W
108’ 32” W
96'42” W
80'56” W
96'48” W
95’ 54” W
71‘ 26” W
74’ 46” W
106’ 37” W
115’ 16” W
74' W
85’ 54” W
95’ 54” W
122’ 40” W
75’ 15” W
79’ 57" W
71‘ 26” W
92’ 22” W
98’ 25” W
86’ 41” W
98’ 28” W
95’ 22” W
111’ 52” W
77’ 2" W
72’ 35” W
122’ 18" W
87’ 54" W
81‘ 36” W
2.29
0.21
2.36
3.25
3.09
2.35
2.25
1.7
1.85
3.72
2.31
4.38
1.64
1.73
1.67
1.5
2.06
1.71
2.64
1.66
1.96
1.38
1.43
2.02
1.6
1.47
1.55
1.3
2.22
1.44
1.92
1.66
1.71
2.92
3.02
1.67
1.64
2.33
1.38
1.85
1.59
1.7
2.14
1.72
1.94
2.57
2.47
2.23
1.95
1.58
1.14
1.43
1.75
3.31
0.76
3.39
4.41
4.25
3.33
3.2
2.43
2.62
4.61
3.37
5.15
2.58
2.72
2.59
2.45
2.89
2.65
3.73
2.5
2.8
2.33
2.33
2.82
2.61
2.41
2.57
2.36
3.17
2.39
2.76
2.5
2.39
3.97
4.13
2.37
2.57
3.22
2.33
2.62
2.4
2.46
2.91
2.71
2.9
3.7
3.5
3.15
2.8
2.54
2.04
2.41
2.64
4.04
1.68
4.01
5.17
5.09
4.42
4.32
3.48
3.6
5.42
4.08
5.99
3.34
3.77
3.28
3.2
3.62
3.32
4.67
3.51
3.71
3.49
3.19
3.52
3.3
3.22
3.52
3.41
3.95
3.36
3.45
3.51
3.43
4.92
5.05
3.41
3.26
3.9
3.49
3.6
3.26
3.53
3.62
3.31
3.54
4.43
4.4
4.09
3.66
3.5
3.23
3.29
3.34
5.14
3.12
5.32
6.76
6.58
5.95
5.61
4.07
4.33
6.4
5.2
6.69
4.57
5.22
4.67
4.48
4.92
4.73
5.8
4.13
4.55
4.57
4.34
4.97
4.55
4.33
4.82
4.84
4.98
4.79
4.74
4.13
4.04
6.3
6.57
3.93
4.63
5.25
4.57
4.33
4.07
4.2
5.03
4.65
4.76
5.54
5.59
5.57
4.46
4.05
4.26
4.48
4.26
5.92
3.98
5.71
7.42
7.29
6.84
6.11
5.14
5.44
6.61
6.02
7.05
5.54
5.9
5.46
5.56
5.58
5.38
6.6
5.11
5.54
5.46
5.44
5.56
5.44
5.46
5.63
5.56
5.8
5.62
5.6
5.11
5.26
6.68
7.25
5.11
5.4
5.58
5.46
5.44
5.05
5.17
5.56
5.61
5.57
5.94
6.03
6.26
5.42
5
5.19
5.6
5.2
5.98
4.58
6.19
7.7
7.62
7.39
6.71
5.58
5.91
6.29
6.01
7.48
6.06
6.57
6.11
6.07
6.17
6.08
6.15
5.47
6.03
6.09
5.98
6.21
5.86
5.93
6.45
6.18
6.01
5.82
6.14
5.47
5.67
6.94
7.69
5.48
608
6.32
6.09
5.91
5.53
5.67
6.22
6.1
5.9
6.62
6.45
6.98
5.88
5.24
5.75
6.09
5.67
5.81
4.25
6.15
6.99
7.45
7.55
6.5
5.38
5.64
6.26
5.81
7.37
5.81
7.17
5.79
5.68
6.21
5.79
6.09
5.44
5.77
6.64
5.64
6.05
5.77
5.57
6.39
6.44
5.76
5.94
6.11
5.44
5.39
6.66
7.37
5.26
5.73
6.4
6.64
5.64
5.27
5.48
6.13
6.04
5.86
6.49
6.36
6.86
5.63
5.37
6.27
5.74
5.49
5.7
3.16
5.85
6.11
6.72
6.51
5.86
5.04
5.3
6.08
5.59
7.07
5.26
6.12
5.37
5.27
5.59
5.35
5.7
5.05
5.34
5.78
4.99
5.63
5.12
4.99
5.75
5.53
5.27
5.14
5.46
5.05
5.14
5.8
6.42
5.01
5.29
5.8
5.78
5.3
4.94
5.08
5.64
5.42
5.62
6.28
6.07
5.98
5.22
4.92
5.46
5.21
5.19
4.8
1.98
5.25
6.02
6.11
5.75
5.47
4.13
4.38
5.47
4.76
6.51
4.33
5.28
4.76
4.51
4.9
4.8
5.13
4.12
4.48
4.8
4.25
4.91
4.12
4.3
4.67
4.4
4.58
4.01
4.74
4.12
4.18
5.68
6.08
4.05
4.74
5.08
4.8
4.38
4.05
4.21
4.95
4.47
4.63
5.7
5.46
5.39
4.38
3.79
4.43
4.34
4.26
3.93
0.98
4.17
4.44
4.42
3.92
4.01
2.91
3.23
4.84
3.95
5.46
3.03
3.29
3.33
3.07
3.49
3.42
4.48
2.84
3.4
2.79
2.73
3.55
2.9
2.78
3.19
2.9
3.75
2.83
3.34
2.84
3
4.18
4.26
2.85
3.29
3.8
2.79
3.23
2.88
2.97
3.57
3.2
3.53
4.67
4.61
3.68
3.36
2.46
2.5
2.9
3.19
2.96
0.37
2.95
3.52
3.43
2.65
2.59
1.81
2.21
3.96
2.98
4.41
1.72
1.74
1.97
1.69
2.2
2.1
3.49
1.74
2.37
1.41
1.52
2.21
1.62
1.55
1.77
1.53
2.76
1.59
2
1.74
1.98
3.16
3.18
1.82
1.96
2.62
1.41
2.21
1.86
1.8
2.25
1.78
2.45
3.43
3.3
2.29
2.34
1.52
1.21
1.6
2.15
2.25
0.12
2.25
2.75
2.72
2.06
1.98
1.42
1.66
3.46
2.33
4.01
1.35
1.46
1.46
1.26
1.75
1.56
2.68
1.4
1.81
1.1
1.14
1.73
1.34
1.17
1.3
1.11
2.21
1.31
1.57
1.4
1.48
2.5
2.6
1.4
1.45
2.06
1.1
1.66
1.41
1.43
1.82
1.43
1.82
2.62
2.44
1.97
1.79
1.28
0.9
1.2
1.62
Avg
Avg
Summer Winter
Insolation Insolation
5.56
3.13
3.51
0.69
5.75
3.19
6.83
3.92
6.96
3.83
6.67
3.11
6.04
3.06
4.89
2.29
5.17
2.53
6.19
4.34
5.57
3.17
7.03
4.90
5.26
2.28
6.04
2.45
5.36
2.38
5.26
2.20
5.56
2.67
5.36
2.46
5.91
3.62
4.89
2.28
5.29
2.68
5.56
2.08
5.11
2.06
5.56
2.64
5.14
2.23
5.10
2.10
5.62
2.32
5.49
2.10
5.40
3.01
5.22
2.15
5.47
2.51
4.89
2.28
4.95
2.33
6.34
3.61
6.90
3.71
4.81
2.25
5.31
2.36
5.74
2.99
5.56
2.08
5.17
2.53
4.82
2.23
4.97
2.32
5.59
2.72
5.38
2.36
5.39
2.70
6.10
3.57
5.99
3.45
6.17
2.90
5.17
2.65
4.73
2.15
5.23
1.84
5.24
2.14
5.01
2.45
Note: The SolarPak charges 1.5% of the battery per peak sun hour.
For example, the average winter insolation value for Pittsburgh, Pennsylvania, is 2.23. This
means that SolarPak will charge 2.23 x 1.5%, or 3.35% per day. Calculations assume optimum tilt
and orientation, as described in section 5.3.3 of this guide.
16
SolarPak User’s Guide
5.3.11 International Peak Sun Hours By Location
The following table provides 30-year monthly averages of peak sun hours for various locations
regions around the world, outside of the United States. For other locations outside the United
States, a web search for “peak sun hours” or “insolation levels” followed by the name of the city
will give the best results. One potential website with this information is http://www.gaisma.com.
Country
City
Latitude
Longitude
Jan Feb Mar Apr May Jun Jul
Albania
Albania
Andorra
Andorra
Australia
Australia
Australia
Australia
Austria
Austria
Belarus
Belarus
Belgium
Belgium
Bosnia and Herzegovina
Brazil
Brazil
Brazil
Brazil
Brazil
Bulgaria
Canada
China
China
China
China
Croatia
Czech Republic
Denmark
Denmark
Estonia
Egypt
Egypt
Faroe Islands
Finland
Finland
France
France
France
Germany
Germany
Germany
Gibraltar
Greece
Greece
Guernsey
Hungary
Iceland
Ireland
Ireland
Isle of Man
Italy
Italy
Jersey
Kazakhstan
Kazakhstan
Kazakhstan
Latvia
Liechtenstein
Lithuania
Luxembourg
Tirana
Durrës
Andorra la Vella
Escaldes-Engordany
Sydney
Melbourne
Brisbane
Perth
Vienna
Graz
Minsk
Homel'
Brussels
Antwerp
Sarajevo
São Paulo
Rio de Janeiro
Salvador
Fortaleza
Belo Horizonte
Sofia
Calgary
Shanghai
Beijing
Chongqing
Xian
Zagreb
Prague
Copenhagen
Århus
Tallinn
Cairo
Alexandria
Tórshavn
Helsinki
Espoo
Paris
Marseille
Lyon
Berlin
Hamburg
Munich
Gibraltar
Athens
Thessaloníki
Saint Peter Port
Budapest
Reykjavík
Dublin
Cork
Douglas
Rome
Milan
Helier
Almaty
Shymkent
Qaragandy
Riga
Schaan
Vilnius
Luxemburg
41°19'48"N
41°19'48"N
42°30'36"N
42°30'00"N
33°52'12"S
37°48'36"S
27°27'36"S
31°57'36"S
48°13'12"N
47°04'48"N
53°54'36"N
52°25'48"N
50°49'48"N
51°13'12"N
43°51'00"N
23°31'48"S
22°54'36"S
12°58'12"S
3°46'48"S
19°55'12"S
42°41'24"N
51°03'00"N
31°13'48"N
39°55'48"N
29°34'12"N
34°16'12"N
45°48'00"N
50°04'48"N
55°40'12"N
56°09'00"N
59°26'24"N
30°03'36"N
31°13'12"N
62°01'48"N
60°10'12"N
60°12'36"N
48°51'36"N
43°18'36"N
45°45'36"N
52°31'12"N
53°33'00"N
48°08'24"N
36°08'24"N
37°58'48"N
40°38'24"N
49°28'12"N
47°30'36"N
64°08'24"N
53°19'48"N
51°54'00"N
54°09'00"N
41°53'24"N
45°28'48"N
49°11'24"N
43°19'12"N
42°19'12"N
49°52'48"N
56°58'12"N
47°10'12"N
54°42'00"N
49°37'12"N
19°49'12"E
19°27'00"E
1°30'36"E
1°31'48"E
151°12'36"E
144°57'36"E
153°01'12"E
115°50'24"E
16°22'12"E
15°25'12"E
27°33'00"E
30°59'24"E
4°19'48"E
4°25'12"E
18°22'48"E
46°37'48"W
43°12'00"W
38°30'00"W
38°35'24"W
43°56'24"W
23°18'36"E
114°03'36"W
121°28'12"E
116°24'00"E
106°34'48"E
108°54'00"E
15°58'12"E
14°25'48"E
12°34'48"E
10°13'12"E
24°44'24"E
31°15'00"E
29°57'00"E
6°48'00"W
24°56'24"E
24°39'36"E
2°20'24"E
5°22'12"E
4°49'48"E
13°22'48"E
10°00'00"E
11°34'48"E
5°21'00"W
23°43'48"E
22°56'24"E
2°33'00"W
19°04'48"E
21°55'12"W
6°15'00"W
8°28'12"W
4°28'48"W
12°30'00"E
9°11'24"E
2°06'36"W
76°55'12"E
69°35'24"E
73°09'36"E
24°07'48"E
9°30'36"E
25°16'12"E
6°07'12"E
1.82
1.84
1.35
1.6
5.82
6.15
6.64
7.5
1.07
1.28
0.75
0.93
0.74
0.74
1.41
5.26
5.31
6.27
5.77
5.49
1.59
0.99
2.61
2.51
1.83
2.66
1.27
0.87
0.49
0.5
0.32
2.99
2.76
0.16
0.28
0.28
0.85
1.65
1.15
0.62
0.5
1.1
2.33
1.83
1.8
0.9
1.07
0.11
0.63
0.67
0.53
1.61
1.48
0.99
1.59
1.61
1.12
0.53
1.29
0.67
0.79
2.45
2.62
2.2
2.56
5.06
5.65
5.79
6.59
1.9
2.11
1.52
1.65
1.37
1.37
2.16
5.06
5.4
6.26
5.58
5.71
2.27
1.79
3.08
3.34
2.16
3.2
2.2
1.61
1.16
1.17
1.04
3.71
3.68
0.66
0.99
0.99
1.53
2.63
1.98
1.21
1.14
1.93
3.25
2.56
2.46
1.7
1.86
0.53
1.31
1.13
1.03
2.49
2.43
1.77
2.41
2.22
1.92
1.15
2.11
1.32
1.51
17
3.58
3.92
3.46
3.73
4.34
4.34
5.27
5.25
2.84
3.05
2.6
2.75
2.46
2.46
3.12
4.78
4.87
5.77
4.98
5.3
3.25
3
3.54
4.29
2.87
3.68
3.19
2.53
2.34
2.43
2.3
4.9
5.04
1.67
2.23
2.23
2.63
4.05
3.29
2.28
2.3
2.9
4.49
3.68
3.45
2.94
2.81
1.31
2.46
2.06
1.95
3.68
3.68
2.83
3.4
3.43
3.38
2.39
3.12
2.48
2.48
4.35
5.2
4.22
4.37
3.38
3.07
4.18
3.86
4.14
3.95
3.68
3.8
3.72
3.72
3.94
4.34
4.25
5.1
4.74
4.9
4.25
4.51
4.46
5.42
3.65
4.79
4.21
3.83
3.85
3.97
3.99
6.26
6.43
3.12
3.83
3.83
3.76
4.96
4.16
3.65
3.68
4.16
5.48
5.36
4.32
4.55
3.99
2.77
3.91
3.37
3.06
4.57
4.28
4.23
4.56
4.78
4.79
3.95
4.03
3.85
3.69
5.66
6.63
5.22
5.05
2.62
2.12
3.4
2.86
5.16
4.71
4.7
4.97
4.77
4.77
4.97
3.53
3.45
4.58
5.18
4.35
5.43
5.25
5.05
6.09
4.12
5.41
5.32
4.8
5.19
5.34
5.5
7.02
7.4
4.49
5.14
5.14
4.83
6
5
4.79
4.83
5.13
6.24
6.78
5.35
5.85
4.95
4.11
5.12
4.34
4.23
5.77
5.05
5.43
5.36
6.18
5.85
5.33
4.9
5.11
4.61
6.64
7.59
5.74
5.68
2.38
1.66
3.23
2.43
5.26
4.7
4.75
5.08
4.89
4.89
5.55
3.4
3.42
4.21
5.29
4.22
6.11
5.58
4.64
6
4.05
5.38
5.57
4.81
5.43
5.55
5.77
7.73
8.04
4.75
5.37
5.37
5.09
6.81
5.56
4.77
4.8
5.15
7.3
7.91
6.27
6.23
5.19
4.71
5.22
4.49
4.36
6.41
5.79
5.84
5.99
7
6.47
5.56
5
5.24
4.84
6.87
7.69
6.05
6.01
2.54
1.81
3.47
2.53
5.3
4.84
4.71
5.03
4.85
4.85
5.84
3.6
3.43
4.5
5.73
4.38
6.27
5.85
5.15
5.29
4.73
5.26
5.74
4.92
5.31
5.48
5.52
7.52
7.89
4.23
5.17
5.17
5.13
6.77
5.84
4.81
4.9
5.26
7.52
7.83
6.46
6.05
5.28
4.16
5.02
4.37
4.28
6.73
5.98
5.69
5.91
6.95
6.05
5.36
5.11
5.14
4.85
Aug Sep Oct Nov Dec Avg
Avg
Summer Winter
Insolation Insolation
6.03 4.35 2.9 1.87 1.51
5.65
2.36
6.69 4.95 3.17 2.01 1.56
6.46
2.52
5.29 4.09 2.51 1.49 1.16
5.10
2.03
5.23 4.18 2.76 1.83 1.42
5.09
2.32
3.33 4.32 5.25 5.71 6.12
3.10
5.38
2.52 3.4 4.6 5.63 6.07
2.43
5.41
4.29 5.47 5.97 6.56 6.8
4.01
6.17
3.26 4.41 5.88 6.94 7.6
3.23
6.63
4.81 3.3 1.96 1.12 0.85
4.66
1.62
4.38 3.21 2.06 1.33 1.04
4.30
1.81
4.11 2.62 1.44 0.78 0.53
4.10
1.27
4.4 2.87 1.7 0.91 0.69
4.36
1.44
4.24 2.84 1.67 0.86 0.55
4.22
1.28
4.24 2.84 1.67 0.86 0.55
4.22
1.28
5.21 3.69 2.35 1.42 1.16
4.87
1.94
4.34 4.49 5.03 5.46 5.33
3.95
5.15
4.02 4.02 4.55 4.93 4.99
3.77
5.01
4.84 5.42 6.03 5.95 6.11
4.78
6.07
6.4 6.66 6.76 6.49 6.22
5.67
5.97
5.01 5.34 5.46 5.22 5.11
4.70
5.38
5.58 4.05 2.55 1.58 1.29
5.28
2.09
4.85 3.4 2.16 1.21 0.82
4.91
1.66
4.82 4.09 3.47 2.91 2.56
4.70
3.03
4.85 4.34 3.43 2.61 2.21
5.33
3.07
4.62 3.34 2.36 1.99 1.64
4.09
2.14
4.88 3.77 3.04 2.59 2.41
4.92
2.93
5.14 3.63 2.22 1.36 1.05
4.94
1.88
4.45 2.92 1.7 0.88 0.68
4.29
1.38
4.41 2.86 1.47 0.75 0.39
4.51
1.10
4.49 2.94 1.56 0.74 0.4
4.63
1.13
4.39 2.71 1.29 0.51 0.21
4.65
0.95
6.91 5.79 4.41 3.34 2.84
6.87
3.70
7.15 6.01 4.57 3.28 2.64
7.15
3.66
3.56 2.2 1.02 0.29 0.07
3.73
0.65
3.98 2.47 1.12 0.46 0.16
4.33
0.87
3.98 2.47 1.12 0.46 0.16
4.33
0.87
4.47 3.13 1.88 1.04 0.65
4.40
1.43
5.79 4.42 2.73 1.84 1.38
5.79
2.38
5.03 3.66 2.18 1.3 0.94
4.88
1.81
4.14 2.74 1.51 0.73 0.48
4.15
1.14
4.16 2.72 1.46 0.68 0.39
4.18
1.08
4.69 3.25 1.94 1.12 0.86
4.61
1.64
6.75 5.26 3.6 2.51 2
6.43
3.03
6.98 5.35 3.32 2.06 1.57
6.70
2.50
5.67 4.29 2.79 1.81 1.48
5.39
2.30
5.15 3.86 2.16 1.17 0.7
5.28
1.60
4.77 3.23 1.95 1.12 0.86
4.57
1.61
3.27 2.17 0.97 0.25 0.03
3.53
0.53
4.28 3.09 1.72 0.79 0.47
4.44
1.23
3.71 2.66 1.47 0.79 0.5
3.82
1.10
3.45 2.41 1.22 0.59 0.41
3.63
0.96
5.94 4.33 2.75 1.7 1.36
5.63
2.27
5.2 3.83 2.37 1.56 1.21
5.02
2.12
4.89 3.46 1.92 1.09 0.79
4.92
1.57
5.57 4.52 3.04 1.94 1.35
5.32
2.29
6.19 4.85 3.2 1.99 1.36
5.99
2.30
5.3 3.82 2.26 1.3 0.93
5.38
1.82
4.39 2.75 1.4 0.68 0.35
4.56
1.08
4.48 3.33 2.23 1.36 1.03
4.48
1.86
4.38 2.77 1.5 0.8 0.51
4.42
1.21
4.28 2.88 1.7 0.9 0.61
4.19
1.33
SolarPak User’s Guide
Macedonia
Malta
Moldova
Monaco
Montenegro
Netherlands
Norway
Oman
Oman
Poland
Poland
Portugal
Qatar
Qatar
Romania
Russia
Russia
San Marino
Saudi Arabia
Saudi Arabia
Serbia
Slovakia
Slovenia
Spain
Spain
Svalbard and Jan Mayen
Sweden
Sweden
Switzerland
Ukraine
United Arab Emirates
United Arab Emirates
United Kingdom
United Kingdom
Vatican City
Skopje
Birkirkara
Chişinău
Monte Carlo
Podgorica
Amsterdam
Oslo
as-Sīb
Bawšar
Warsaw
Cracow
Lisbon
Doha
ar-Rayyān
Bucharest
Moscow
Saint Petersburg
Serravalle
Riyadh
Jiddah
Belgrade
Bratislava
Ljubljana
Madrid
Barcelona
Longyearbyen
Stockholm
Göteborg
Zurich
Kharkiv
Dubai
Sharjah
London
Birmingham
Vatican City
42°00'00"N
35°54'00"N
47°01'48"N
43°45'00"N
42°28'12"N
52°22'12"N
59°54'36"N
23°40'12"N
23°31'48"N
52°15'36"N
50°03'36"N
38°43'12"N
25°18'00"N
25°19'12"N
44°26'24"N
55°45'00"N
59°55'48"N
43°57'00"N
24°39'00"N
21°30'00"N
44°49'48"N
48°09'36"N
46°03'36"N
40°25'12"N
41°24'00"N
78°12'36"N
59°19'48"N
57°43'12"N
47°22'48"N
49°58'48"N
25°16'12"N
25°22'12"N
51°31'12"N
52°28'48"N
41°54'00"N
21°28'12"E
14°28'12"E
28°49'48"E
7°25'12"E
19°16'48"E
4°53'24"E
10°45'00"E
58°11'24"E
58°23'24"E
21°01'12"E
19°57'36"E
9°08'24"W
51°30'36"E
51°22'12"E
26°06'00"E
37°37'12"E
30°19'12"E
12°29'24"E
46°46'12"E
39°10'12"E
20°30'00"E
17°07'48"E
14°30'36"E
3°42'36"W
2°10'12"E
15°36'36"E
18°04'12"E
12°00'36"E
8°32'24"E
36°13'12"E
55°19'48"E
55°24'36"E
0°06'00"W
1°54'36"W
12°27'36"E
1.66
2.59
1.17
1.46
1.6
0.68
0.28
4.37
4.37
0.87
0.93
1.91
4.04
3.26
1.5
0.61
0.29
1.49
3.5
4.37
1.31
1.07
1.39
1.79
1.87
0
0.34
0.38
1.24
1.12
3.9
3.9
0.64
0.67
1.61
2.35
3.61
1.93
2.32
2.26
1.41
0.94
5.22
5.22
1.54
1.63
2.74
4.95
4.23
2.19
1.33
0.96
2.49
4.58
5.24
2.15
1.9
2.33
2.75
2.9
0.01
1.03
0.98
2.05
1.98
4.79
4.79
1.25
1.23
2.49
18
3.34
4.9
2.94
3.38
3.33
2.55
2.2
5.92
5.92
2.55
2.65
4.05
5.48
4.95
3.22
2.57
2.14
3.91
5.41
6.14
3.27
2.84
3.36
4.06
4.14
0.48
2.33
2.12
3.16
2.97
5.31
5.31
2.33
2.23
3.68
4.14
6.26
4.07
3.86
4.08
4.07
3.57
7.15
7.15
3.72
3.78
5.09
6.6
5.9
4.29
3.91
3.79
4.86
6.12
7.08
4.36
4.14
4.16
4.88
5.06
1.6
4.03
3.57
4.18
3.77
6.36
6.36
3.54
3.39
4.57
5.18
7.35
5.43
4.69
5.22
5.36
5.09
7.93
7.93
4.97
4.92
5.82
7.59
7.02
5.57
5.13
5.29
6.05
7.06
7.35
5.46
5.16
5.02
5.68
5.78
3.68
5.45
5.04
5.06
5.03
7.27
7.27
4.59
4.39
5.77
6.06
7.99
5.72
5.65
6.16
5.53
5.31
7.91
7.91
4.77
4.89
6.58
8.01
7.44
6.05
5.42
5.68
6.6
7.65
7.51
5.95
5.26
5.21
6.75
6.44
4.5
5.7
5.23
5.37
5.44
7.4
7.4
4.86
4.64
6.41
6.3
8.11
5.74
5.97
6.49
5.44
5.14
7.19
7.19
4.83
4.93
6.59
7.53
7.23
6.14
5.31
5.49
6.63
7.5
7.48
6.03
5.3
5.37
6.89
6.6
4.46
5.46
5.21
5.45
5.5
6.94
6.94
4.83
4.66
6.73
5.55
7.27
5.12
5.13
5.7
4.59
3.99
6.93
6.93
4.39
4.49
6.02
7.31
6.71
5.49
4.16
4.27
5.72
7.12
7.19
5.41
4.81
4.83
5.97
5.69
2.87
4.37
4.16
4.74
4.63
6.7
6.7
4.13
3.99
5.94
4.04
5.63
3.55
3.99
4.08
2.95
2.54
6.73
6.73
2.8
2.94
4.65
6.77
5.96
3.95
2.63
2.55
4.11
6.48
6.61
3.8
3.3
3.53
4.63
4.43
1.09
2.82
2.73
3.45
3.16
6.21
6.21
2.81
2.76
4.33
2.66
4.14
2.25
2.51
2.66
1.64
1.24
6
6
1.62
1.74
3.14
5.75
4.78
2.53
1.49
1.21
2.59
5.37
5.87
2.49
1.96
2.15
2.98
3.01
0.13
1.32
1.29
2.14
1.93
5.39
5.39
1.66
1.59
2.75
1.68
2.83
1.22
1.68
1.65
0.78
0.47
4.88
4.88
0.92
0.94
2.06
4.62
3.69
1.56
0.74
0.47
1.57
3.97
4.61
1.46
1.12
1.44
1.96
1.99
0
0.54
0.58
1.31
1.13
4.32
4.32
0.82
0.82
1.7
1.35
2.23
0.92
1.22
1.36
0.49
0.17
4.19
4.19
0.67
0.71
1.62
3.79
3.05
1.18
0.43
0.16
1.24
3.25
4.07
1.1
0.85
1.14
1.51
1.6
0
0.2
0.26
0.98
0.84
3.67
3.67
0.49
0.5
1.36
5.21
7.10
4.94
4.88
5.29
4.66
4.27
7.31
7.31
4.25
4.33
5.79
7.30
6.71
5.25
4.43
4.51
5.66
6.99
7.20
5.17
4.66
4.69
5.80
5.67
3.03
4.64
4.32
4.71
4.59
6.81
6.81
4.13
3.97
5.63
2.17
3.38
1.74
2.10
2.14
1.26
0.88
5.10
5.10
1.36
1.43
2.59
4.77
3.99
2.03
1.20
0.87
2.22
4.35
5.05
1.96
1.62
1.97
2.51
2.59
0.10
0.96
0.94
1.81
1.66
4.56
4.56
1.20
1.17
2.27
SolarPak User’s Guide
5.3.12 Calculating Expected Run Time
If your daily charge percentage is larger than your daily consumption percentage, the SolarPak
system will run indefinitely, since it is producing more energy than you are consuming.
If your daily charge percentage is less than your daily consumption percentage, use the following
formula to determine the worst-case scenario for the expected run time of your system.
Minimum Number Of Days
Of Battery Run Time
With SolarPak
=
100%
C% - G%
Where:
C% = PowerPak % consumed per day
G% = PowerPak % generated per day
For example: In Pittsburgh, Pennsylvania, the PowerPak percentage consumed per day is 4.8%
(from the expected daily consumption table on page 14). The average winter PowerPak
percentage generated per day is 3.35%. This is calculated by using lowest monthly peak sun
hours from the chart on page 13 (Pittsburgh’s average winter insolation level is 2.23 peak sun
hours) times the 1.5 % SolarPak charge per peak sun hour. 2.23 x 1.5% = 3.35%.
The minimum number of days of battery run time with SolarPak would be:
100%
4.8% - 3.35%
Or 69 days.
It is important to note that 69 days of run time is an runtime based on the average winter
insolation level. Individual months may vary based on seasonal weather and temperature. More
specific run time values can be calculated using the same formula and by replacing the average
winter insolation value with a monthly value.
Note: The above calculations are based on historical 30-year averages. Actual values vary from
year to year. The power capacity value displayed on the PowerPak's LCD may vary with weather,
temperature, and time of day.
19
SolarPak User’s Guide
6 Electrical Connections With FTB1000 PowerPak
The cable from the SolarPak is very short, so a 5m (16 ') extension cable is included. Once all
connections are made, any extra cable should be attached to the pole (or, in the case of a wall
mounting, rolled neatly) and held with cable ties.
1. Press the end of the SolarPak’s cable and the end of the extension cable together and twist
until the connection is tight.
2. Connect the other end of the cable to the input on the bottom of the FTB1000 PowerPak
3. Connect the MeshGuard’s cable to the PowerPak.
MeshGuard
PowerPak
Rear of SolarPak
Make sure the cable connections are tight, in order to ensure proper contact and to keep
contaminants and moisture out.
WARNING!
Do not modify the extension cable or increase its length beyond 5m (16 ').
20
SolarPak User’s Guide
Remove the cap from the connector on the bottom of the PowerPak, align the connectors, and
then twist the cable’s connector until the connection is snug.
Bottom view of
FTB1000 PowerPak
The connector has an index
point that assures it can
only be attached to the
cable’s connector one way.
Once all connections are made, check them before starting and testing the system.
7 Starting & Testing The System
When all connections are made, the system is automatically on. Follow the start-up and
calibration procedures outlined in the MeshGuard User’s Guide, which comes with the
MeshGuard monitor (also available online at www.raesystems.com).
•
•
When the SolarPak is placed outdoors in sunlight, the charge controller’s Info LED should
flash green (on and off in alternation), indicating that it is receiving power from the solar
panel and is charging the batteries in the PowerPak.
If the red Battery LED glows, then the battery is depleted and needs charging or replacement.
8 Disconnecting The SolarPak System
To disable the solar power system for servicing or relocation, disconnect the battery and solar
panel connections. When the system is ready to be used again, reconnect them.
21
SolarPak User’s Guide
9 Troubleshooting
Problem
Battery does not charge
or maintain a charge.
Possible Reasons & Solutions
Reasons:
Solar panel set incorrectly.
Defective/old batteries in PowerPak.
Incorrect or loose cable connections.
Solutions:
MeshGuard is not
receiving power.
Reasons:
Solutions:
Charge controller Info
LED or Battery LEDs do
not glow
Reasons:
Solutions:
Check solar panel alignment.
Charge or replace battery.
Check cable connections.
Loose/damaged wire in cable to MeshGuard.
Incorrect wiring polarity
Damaged/defective charge controller.
Tighten all wire connections or replace cord to
MeshGuard.
Check wiring polarity.
Replace charge controller.
Incorrect or loose wiring.
Battery is dead.
Charge controller damaged/defective.
Check that all wiring is correct.
Check wiring polarity.
Replace charge controller.
10 Replacement Parts
There are no user-serviceable parts in the SolarPak. If the unit is damaged or does not work,
contact your RAE Systems distributor of RAE Systems customer support. Only the mounting
hardware can be serviced.
10.1 LED Displays
The RAE PowerPak has a single LED and an LCD that indicates charge, and in the case of errors any
messages.
3-color LED
LCD
22
SolarPak User’s Guide
10.2 LED Status Indicator
The LED on the RAE PowerPak glows red, orange, or green, depending on different status alerts it is
conveying.
Color
Green
(blinking)
Green
(Steady)
Red
Orange
Indication
SolarPak supplying charge
Related LCD Message
Percentage of battery charge is shown
Battery (or batteries) fully
charged.
Battery (or batteries) charging
via AC Adapter.
Indicates an error. Check the
LCD for more information.
LCD says “FULL”
LCD says “CHRG” (charging)
LCD shows error code beginning with the
letters “Er” followed by two digits
indicating the type of error. Consult the
PowerPak User’s Guide for an explanation
of error codes.
10.3 LEDs And Troubleshooting
The green solar power LED on the left side of the charge controller should illuminate as soon as
the charge controller receives power from the solar panel. When the controller starts to limit the
charging current, this LED flashes. If this LED does not glow, it is likely an indication that the
charge controller is not receiving current from the solar panel. Use a voltmeter to check the
output from the solar panel.
The multi-color battery power LED on the right side of the charge controller can display 10
different colors (from red through yellow to green). The color indicates the battery voltage.
Before the load is switched off, the LED blinks quickly. After the load is removed or switched
off, the LED flashes slowly.
23
SolarPak User’s Guide
11 RAE Systems Contacts
RAE Systems by Honeywell
World Headquarters
3775 N. First St.
San Jose, CA 95134-1708 USA
Phone: +1 408.952.8200
Fax: +1 408.952.8480
E-mail: [email protected]
Web Site: www.raesystems.com
RAE Systems Technical Support
Monday through Friday, 7:00AM to 5:00PM Pacific Time
Phone: +1.408.952.8461
Email: [email protected]
Life-critical after-hours support is available
+1.408.952.8200 select option 9
RAE Systems Europe ApS
Kirstinehøj 23 A
DK-2770 Kastrup
Denmark
Phone: +45 86 52 51 55
Fax: +45 86 52 51 77
[email protected]
[email protected]
[email protected]
Web: www.raesystems.eu
RAE Systems UK Ltd
D5 Culham Innovation Centre
Culham Science Centre
Abingdon, Oxon OX14 3DB
United Kingdom
Phone: +44 1865408368
Fax: +44 1235531119
Mobile: +44 7841362693
Email: [email protected]
RAE Systems France
336, rue de la fée des eaux
69390 Vernaison
France
Phone: +33 4 78 46 16 65
Fax: +33 4 78 46 25 98
Email: [email protected]
Web: www.raesystems.fr
24
SolarPak User’s Guide
RAE BeNeLux BV
Hoofdweg 34C
2908 LC Capelle a/d IJssel
The Netherlands
Phone: +31 10 4426149
Fax: +31 10 4426148
Email: [email protected]
Web: www.rae.nl
RAE Systems Spain, s.l.
Av. Remolar, 31
08820 El Prat de Llobregat
Spain
Phone: +34 933 788 352
Fax: +34 933 788 353
Mobile: +34 687 491 106
Email: [email protected]
Web: www.raespain.com
RAE Systems Middle East
LOB 7, Ground Floor, Office 19,
Jebel Ali Free Zone
Dubai, United Arab Emirates
Phone: +971.4.887.5562
Email: [email protected]
RAE Systems (Hong Kong) Ltd.
Room 8, 6/F, Hong Leong Plaza
33 Lok Yip Road
Fanling, N.T, Hong Kong
Phone: +852.2669.0828
Fax: +852.2669.0803
Email: [email protected]
RAE Systems Japan
403 Plaza Ochanomizu Bldg. 2-1
Surugadai Kanda Chiyoda-Ku
Tokyo, Japan
Phone: 81-3-5283-3268
Fax: 81-3-5283-3275
Email: [email protected]
RAE Systems Korea
#1010, DaeMyungAnsVill First,
Sang-Dong 412-2, Wonmi-Gu, Bucheon,
Kyungki-Do, Korea
Phone: 82-32-328-7123
Fax: 82-32-328-7127
Email: [email protected]
25
RAE Systems by Honeywell
World Headquarters
3775 N. First St.
San Jose, CA 95134-1708 USA
Phone: 408.952.8200
Fax: 408.952.8480
E-mail: [email protected]
Web Site: www.raesystems.com
Rev. A
January 2012
P/N F06-4001-000