1
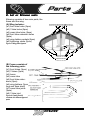
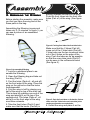
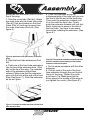
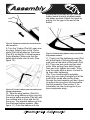
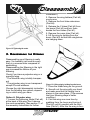
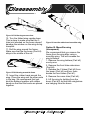
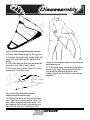
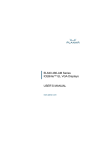
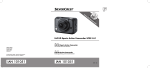
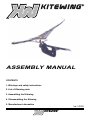
ASSEMBLY MANUAL
CONTENTS
1. Warnings and safety instructions
2. List of Kitewing parts
3. Assembling the Kitewing
4. Disassembling the Kitewing
5. Manufacturer information
Ver 1/2002
2
I M P O RT A N T
By assembling and/or using this Skywings
product, you agree that you have read and
understood the entire user manual, including
all instructions and warnings contained in
that manual, prior to using the Skywings
product in any way. You additionally agree
that you will ensure any additional or
subsequent user of your Skywings product
will read and understand the entire Skywings
user manual, including all instructions and
warnings contained in that manual, prior to
allowing that person to use your Skywings
product.
Assumption of risk: Use of the Skywings
product and any of its components involve
certain inherent risks, dangers, and hazards,
which can result in serious personal injury
and death to both the user and to nonuser
third parties. In using the Skywings product,
you freely agree to assume and accept any
and all known and unknown risks of injury to
you and to third parties while using this
equipment. The risks inherent in this sport
can be greatly reduced by abiding by the
warning guidelines listed in the user manual
and by using common sense.
Release and waiver of claims: In consideration of the sale of the Skywings product to
you, you hereby agree to the fullest extent
permitted by law, as follows:
To waive any and all claims that you have or
may in the future have against Skywings and
all related parties resulting from use of the
Skywings product and any of it’s components.
W ARNING
components.
In the event of your death or incapacity all
provisions contained herein shall be effective
and binding upon your heirs, next of kin,
executors, administrators, assigns and
representatives. Skywings related parties have
not made and expressly deny any oral or
written representations other than what is set
forth herein and the Skywings user manual.
Safety instructions:
You must read the user manual carefully before
using the product. Kitewing riding is an adult
sport, underaged should practise it under adult
surveillance. Kitewing riding must be taken
seriously and we recommend that, at least in
the early stages of your use, you seek the
guidance of experienced riders.
Always use extreme caution when using this
product. Always remember to wear personal
protection, at least a helmet.
We also recommend the usage of knee and
elbow protection. Improper and/or negligent
use of this product may result in serious injury
or death to yourself and others.
Spend time to become familiar with your
Kitewing and remember that you are responsible for your own safety, and the safety of
others when using this product. As you learn
the sport, ride within your own skills and do not
exceed them.
This product is not intended for use as a flying
device and Skywings Ltd. does not recommend
flying or jumping with the product.
To release Skywings and all related parties
from any and all liability for any loss,
damage, injury or expense that your next of
kin may suffer, as a result of the use of the
Skywings product, due to any cause
whatsoever, including negligence or breach
of contract on the part of Skywings and all
related parties in the design or manufacture
of the Skywings product and any of its
3
2. L IST
OF
K ITEWING
PARTS
Kitewing consists of two main parts, the
frame and the wing.
(A) Wing includes:
(a1) front tube holes (2pcs)
(a2) Y-tube holes (2pcs)
(a3) cross tube holes (2pcs)
(a4) front tube extension holes
(2pcs)
(a5) wing batten pockets (5pcs)
(a6) tightening cords (2pcs)
a1 / front tube holes
a3 / cross tube holes
a2 / Y-tube holes
Figure 1. Wing (Part A) parts.
a6 / tightening cords
a5 / wing batten pockets
a4 / front tube extension holes
(B) Frame consists of
the following parts:
(b1) front tubes (2pcs)
(b2) Y-tubes (2pcs)
(b3) boom
(b4) cross tube
(b5) front tube extensions (2pcs)
(b6) wing battens (3pcs
long and 2pcs short)
(b7) cross tube joints
(2pcs)
(b8) Y-tube joint
Figure 2. Frame (Part B)
consists of 8 different types of
parts.
4
3. A S S E M B L I N G
THE
KITEWING
Before starting the assembly, make sure
you that you have the wing and all the
frame parts in the bag.
pointing towards the back of the wing.
Push the front tubes into the front tube
holes (Part a1) of the wing. (See figure
4).
Assembling the Kitewing is easy and
takes only 3-10 minutes. In figure 3. you
can see a picture of an assembled
Kitewing.
Figure 4. Pushing front tubes into front tube holes.
Make sure that the Y-tubes (Part b2)
come out of the Y-tube holes (Part a2).
Y-tube holes are the two innermost holes
out of the 4 holes on the edge of the
wing. Push the tubes as far as possible
so that the cross tube joints (Part b7)
can be seen in the outhermost holes
(See figure 5).
Figure 3. An assembled Kitewing
1. Look for a sheltered place to assemble the Kitewing.
2. Open the Kitewing bag and take out
the wing (Part A).
3. Find the holes (Parts a1, a2 and a3)
on the front edge of the wing. Place the
wing on the ground so that the holes
face downward.
4. Fold the wing in half by placing one
half of the wing on top of the other half.
This is done by grabbing one end of the
wing and placing it on the top of the
opposite end. The holes (Parts a1, a2
and a3) on the front edge of the wing
must face outwards.
5. Take the front tubes (Part b1) and
make sure that the boom (Part b3) is
Figure 5. Push the front tubes so far that the Y-tubes
come out of the Y-tube holes and cross tube joints
can be seen from the cross tube holes.
6. Unfold the wing and place it on the
5
ground so that the boom (Part b3) is on
top of the wing.
7. Take the cross tube (Part b4). Attach
the cross tube into the cross tube joints
(Part b7) that are situated on the front
tubes (Part b1) and can be seen from
the cross tube holes (Part a3). (See
figure 6.)
b. Push the extension along the
outhermost side of the hole until you can
feel that it hits the end of the front tube.
Then push the extension outward until
it’s in line with the front tube. Finally
push the extension forward until you feel
that it clicks into its place in the end of
the front tube. You have to use some
force when installing the extension. (See
figure 8.).
Figure 6. Attach the cross tube into the cross tube
joints.
8. Take the front tube extensions (Part
b5)
a. Push one of the front tube extensions
into the front tube extension hole (Part
a4) on the tip of the wing. The rounded
side of the extension should face
outward. Make sure that the extension
goes into the hole at the end of the front
tube (See figure 7.). Push the extension
as far as it goes.
Figure 7. Push the front tube extension into the front
tube extension hole.
6
Figure 8. First push the extension outward and then
push the extension forward until you feel that the
extension clicks into its place.
c. Do the same procedure with the other
extension.
d. Pull the cord at the end of the front
tube extension through the cord lock at
the tip of the wing. Tighten the cords
quite hard. (Tip: Make sure that the
boom stays in the middle of the wing as
you tighten the cords.) (See figure 9.)
pockets as far as they will go. Find the
rubber bands that are situated beside
the batten pockets. Attach the band by
pulling it to the gap in the end of the
batten.
Figure 9. Tighten the cords at the end of the front
tube extensions
9. Turn the Y-tubes (Part b2) open one
at a time. Attach them to the Y-tube
joints (Part b8) situated on the boom
(Part b3) so that the Y-tubes become
firmly attached. Make sure that the
safety knob clicks into it’s hole. (See
figure 10.)
Figure 10. Turn the Y-tubes open one at a time and
join them to the boom.
Figure 11. Push the wing battens one-by-one into the
wing’s batten pockets.
11. Finally, pull the tightening cords (Part
a6) at the back of the wing through the
cord locks at the back of the boom (Part
b3). There are two cords and two cord
locks. After pulling them both through
their own lock, tighten the cords. To be
sure the cords hold in place, it is best to
tie them after tightening.
(Tip: If you have bought a polyester
wing, you can make a simple knot at the
ends of the cords after pulling them
through the lock because you don’t have
to remove the wing from the frame after
the first assembly. See section 3. for
information on how to recognize if you
have a polyester wing.)
10. Take the wing battens (Part b6).
Push the wing battens one-by-one into
the wing’s batten pockets (Part a5) with
the rounded end in front and the tip
facing up. The shortest battens go into
the outermost batten pockets. (See
figure 11.) Push the battens into the
7
information.)
2. Remove the wing battens (Part b6)
one-by-one.
3. Remove the front tube extensions
(Part b5).
4. Release the Y-tubes (Part b2) from
the boom (Part b3) and turn them
beside the front tubes (Part b1).
5. Remove the cross tube (Part b4).
6. Lift the wing by holding from the
boom (Part b3) so that both winghalves
are hanging down.
Figure 12. Tightening the cords.
3. D IS A SSEMBLING
THE
K ITEWING
Disassembling your Kitewing is really
easy. You basically just have do everything in a reverse order compared to
assembling.
Disassembling the Kitewing in the right
way increases the lifetime of your
Kitewing.
Check if you have a polyester wing or a
monofilm wing
* The Monofilm wing is totally transparent
* The polyester wing is non-transparent
except Of small windows.
Choose the right disassembly instruction
from the following two options, depending on which wing you have.
Option A. Polyester wing
1. Loosen the tightening cords (Part a6)
at the back of the wing. Don’t remove
the cords completely. (See section 11 of
the assembly instructions for further
8
Figure 13. Lift the wing by holding from the boom.
7. Place the folded wing on the ground.
8. Smooth out the wing with your hand
and make sure that the folding line is
always in the same place. (This ensures
that your Kitewing stays in better
condition.)
9. Fold the wing one more time by
grabbing from the boom and turning it
(Part b3) until it’s parallel with the front
tube (Part b1). After this the wing is four-
fold.
Figure 14. Fold the wing one more time.
10. Turn the folded wing upside down.
This is done to make sure that the Ytube joint situated on the boom doesn’t
damage the window on the wing during
transport.
11. Roll the wing around the frame.
Make sure that the the boom (Part b3)
stays in the middle of the roll.
Figure 15. Roll the wing around the frame.
12. Insert the rubber band around the
wing. Place the wing and the other parts
in the bag. We recommend that you
bind the battens together with rubber
bands so that the front ends are placed
together.
Figure 16. Insert the rubber band around the wing.
Option B. Monofilm wing
(transparent)
We recommend that you remove the
frame from the wing after using a
monofilm wing. This will increase the
wing’s lifetime.
1. Remove the wing battens (Part b6)
one-by-one.
2. Remove the front tube extensions
(Part b5).
3. Release the Y-tubes (Part b2) from
the boom (Part b3) and turn them
beside the front tubes (Part b1).
4. Remove the cross tube (Part b4).
5. Lift the wing by holding from the
boom (Part b3) so that both winghalves
are hanging from the boom.
9
Figure 17. Lift the wing by holding from the boom.
6. Place the folded wing on the ground.
7. Loosen the tightening cords (Part a6)
from the cord locks at the back of the
boom.
8. Fold the wing so that the winghalves
are placed on top of each other.
9. Pull both front tubes (Part b1) simultaneously out of the wing.
Figure 18. Pull both front tubes (Part b1)
simultaneously out of the the wing.
10. Place the wing on the ground and
roll it tight from one tip to the other. Put
the rubber band around the wing. You
can tighten up the roll by pushing one
hand inside the roll. (See figure 19.)
10
Figure 19. You can tighten up the roll by pushing one
hand inside the roll.
11. Place the wing, frame and the other
parts in the bag. We recommend that
you bind the battens together with
rubber bands so that the front ends are
together.
M A N U FFAA C T U R E R
INFORMA
TION
AT
Address:
Oy Skywings Ab (Ltd.)
Olarinluoma 15, SF-02200 Espoo, Finland.
Tel. +358 9 2517 6110, fax +358 9 455 1717, GSM +358-500-452 956
Internet: www.kitewing.com
11