1
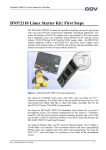
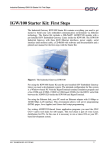
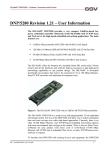
DNP/SK23-WCE
Windows CE Starter Kit
First Steps
SSV Embedded Systems
Heisterbergallee 72
D-30453 Hannover
Phone: +49 (0)511/40 000-0
Fax:
+49 (0)511/40 000-40
E-mail: [email protected]
FOR FURTHER INFORMATION REGARDING OUR PRODUCTS PLEASE VISIT US AT WWW.SSV-EMBEDDED.DE
Document Revision: 1.0
Date: 2008-01-24
DNP/SK23-WCE - First Steps
CONTENT
1
INTRODUCTION ...............................................................................................................3
1.1
Safety Guidelines...................................................................................................................3
1.2
Conventions ...........................................................................................................................3
1.3
Features and Technical Data..................................................................................................4
2
GETTING STARTED.........................................................................................................5
2.1
Serial Link between DNP/EVA9 and PC ..............................................................................5
2.2
Ethernet Link between DNP/EVA9 and PC..........................................................................6
2.3
Connecting Power Supply and Power-up the Starter Kit............................................................7
2.4
Using Serial Link with Terminal Program ............................................................................8
2.5
Power-up DNP/9200 with RCM enabled ..............................................................................9
2.6
Checking the IP Address of PC ...........................................................................................10
2.7
Checking the Ethernet-based TCP/IP Communication .......................................................11
2.8
Using a Telnet Connection ..................................................................................................12
2.9
Checking the Embedded Web Server ..................................................................................13
2.10 Checking the FTP Server.....................................................................................................14
3
U-BOOT COMMAND OVERVIEW ..................................................................................16
4
POCKET CMD 5.0 COMMAND OVERVIEW ..................................................................17
5
HELPFUL LITERATURE .................................................................................................18
CONTACT..............................................................................................................................18
DOCUMENT HISTORY .........................................................................................................18
2
Manual Revision 1.0
DNP/SK23-WCE - First Steps
1
INTRODUCTION
The DIL/NetPC DNP/9200 Starter Kit contains everything you need to get started with your
Atmel AT91RM9200 ARM9-based embedded networking application. The Starter Kit includes a DNP/9200 module with a preinstalled U-Boot boot loader and Windows CE, the
Evaluation Board DNP/EVA9, power supply, serial interface (null modem) cable, a
CD-ROM with software and documentation and a printed user manual for the first steps with
the Starter Kit.
For using the DNP/SK23 Windows CE Starter Kit you need a PC-based development system. The minimal configuration for this system is a Windows XP-based PC with a free COM
port (COM1, COM2 or USB-based COMx) for the RS232 serial link and a 10/100 Mbps
LAN interface with TCP/IP support for an Ethernet link to Windows CE.
The RS232 serial link allows the communication with the DNP/9200 U-Boot boot loader.
This software component supports the download of a new Windows CE image file to the
DNP/9200 Flash memory. The Ethernet link is necessary for Telnet-based user communication, FTP-based file transfers and HTTP-based web access to the Windows CE embedded
servers.
1.1
Safety Guidelines
Please read the following safety guidelines carefully! In case of property or personal
damage by not paying attention to this document and/or by incorrect handling, we do
not assume liability. In such cases any warranty claim expires.
ATTENTION: Observe precautions for handling – electrostatic sensitive device!
•
Discharge yourself before you work with the device, e.g. by touching a heater of
metal, to avoid damages.
•
Stay grounded while working with the device to avoid damage through electrostatic
discharge.
1.2
Conventions
Convention
bold
italic
monospace
Usage
Important terms
Filenames, user inputs and command lines
Pathnames, internet addresses and program code
Table 1: Conventions used in this Document
Manual Revision 1.0
3
DNP/SK23-WCE - First Steps
1.3
Features and Technical Data
The DIL/NetPC DNP/9200 comes with a preinstalled U-Boot boot loader and a Windows
CE operating system. The DNP/9200 Windows CE consists of two main components within
one image file: 1. the Windows CE kernel and 2. the root file system (Windows CE file system).
The DNP/9200 U-Boot boot loader allows the downloading of new Windows CE kernel versions and root file systems to the DNP/9200 RAM and Flash. This in-system programming
feature can be used by a simple serial and Ethernet link between the development system and
the DNP/9200.
4
•
DIL/NetPC DNP/9200 with Atmel AT91RM9200, 16 MByte Flash and 32 MByte
SDRAM
•
U-Boot boot loader and Windows CE preinstalled in Flash memory
•
Evaluation Board DNP/EVA9
•
Null modem cable
•
Ethernet LAN cross-over cable
•
110 VAC or 230 VAC to 5 VDC international power supply
•
CD-ROM with SDK, TFTP server and FTP client software
•
Printed hardware reference and user manuals
•
HTTP (web) server setup sample
•
FTP server setup sample
•
Telnet server setup sample (Windows CE Telnet service)
Manual Revision 1.0
DNP/SK23-WCE - First Steps
2
GETTING STARTED
2.1
Serial Link between DNP/EVA9 and PC
Setup the serial link between the Evaluation Board DNP/EVA9 and your PC. Use a null modem cable for this connection.
Figure 1: Serial link between Evaluation Board and PC
Connect one end of the null modem cable with an unused COM port of your PC. Make sure
that this PC COM port supports 115.200 bps.
Manual Revision 1.0
5
DNP/SK23-WCE - First Steps
2.2
Ethernet Link between DNP/EVA9 and PC
Setup the Ethernet LAN link between the Evaluation Board DNP/EVA9 and your PC. Use
an Ethernet cross-over cable or a switch-based infrastructure for the first LAN connection.
Figure 2: Ethernet link between Evaluation Board and PC
Please note: The DNP/9200 comes with the default IP address 192.168.0.126. Please
make sure that your PC can work with the IP address range 192.168.0.x.
Figure 3: Switch-based Ethernet link between Evaluation Board and PC
6
Manual Revision 1.0
DNP/SK23-WCE - First Steps
2.3
Connecting Power Supply and Power-up the Starter Kit
Connect a 5 VDC power supply with a 5.5 mm x 2.5 mm jack plug to the Evaluation Board
DNP/EVA9.
Figure 4: Power supply for the Evaluation Board
CAUTION: Providing the DNP/EVA9 with a voltage higher than the regular 5 VDC ±10%
could resolve in damaged board components!
Please pay attention to the polarity of the power connector: the + pole is in the center!
Figure 5: Polarity of the power connector
Please note: Make sure that all cable connections are OK. Then power-up the Starter
Kit.
Manual Revision 1.0
7
DNP/SK23-WCE - First Steps
2.4
Using Serial Link with Terminal Program
Run HyperTerminal on your Windows-PC or a similar simple terminal emulation program.
Figure 6: Direct connection setup with HyperTerminal
Setup a direct connection with the parameters of table 2. Make sure, that the PC COM port
supports 115.200 bps.
Figure 7: Parameter setup with HyperTerminal
Parameter
Speed
Data Bits
Parity
Stop Bits
Protocol
Value
115.200 bps
8
None
1
No (Xon/Xoff, RTS/CTS or similar)
Table 2: Setup parameters for the serial link
8
Manual Revision 1.0
DNP/SK23-WCE - First Steps
2.5
Power-up DNP/9200 with RCM enabled
After power-up the DIL/NetPC DNP/9200 starts an automatic boot process from the onboard Flash memory chip. This process consists of two steps:
1. The DNP/9200 runs the U-Boot boot loader program. This software shows a wait
message over the DNP/9200 COM1 serial interface if the RCM jumper is available (RCM enabled). Please see the DIL/NetPC DNP/9200 Hardware Reference Manual for details. It is possible to interrupt the boot process and switch
to the U-boot command line interface (U-Boot CLI). Just hit a key of your terminal emulation program.
2. Without interruption the U-Boot boot loader starts the Windows CE image after
the wait period from the DNP/9200 Flash memory.
Figure 8: Booting process after the U-Boot boot delay
Without the RCM jumper (RCM disabled) there is no wait time and absolutely no output
to the DNP/9200 serial interface COM1. The port is free for application usage.
Please note: The U-Boot command line interface (CLI) allows you to change the
wait time of the first step. Please see the U-Boot environment variable boot delay
for details.
Manual Revision 1.0
9
DNP/SK23-WCE - First Steps
2.6
Checking the IP Address of PC
Make sure that your PC is using the right IP address for the Ethernet-based TCP/IP communication with the DIL/NetPC. Use 192.168.0.1 or 192.168.0.254 for your PC
and 192.168.0.126 for the DNP/5370.
Figure 9: Windows-PC IP address check with ipconfig
Talk to your network administrator if you have problems with the IP address understanding.
10
Manual Revision 1.0
DNP/SK23-WCE - First Steps
2.7
Checking the Ethernet-based TCP/IP Communication
Check the Ethernet-based TCP/IP communication between the DNP/9200 and the PC
with a simple ping command.
Figure 10: Windows-PC TCP/IP communication check with ping
First check the cable connections and then the IP addresses if your ping does not work.
Then check the TCP/IP setup of your PC.
Manual Revision 1.0
11
DNP/SK23-WCE - First Steps
2.8
Using a Telnet Connection
Run a Telnet client program on your PC with the IP address of the DIL/NetPC DNP/9200.
You can use a Telnet session with the Windows CE Telnet service for entering commands
on the Windows CE command line interface (CLI).
Figure 11: Run the Windows telnet client program
Please use the CLI also for the user access to the Windows CE file system. This CLI offers
commands for directory change, file copy, file delete and more.
Figure 12: Using Pocket CMD commands within a Telnet client window
12
Manual Revision 1.0
DNP/SK23-WCE - First Steps
2.9
Checking the Embedded Web Server
The DIL/NetPC DNP/9200 default Windows CE configuration comes with a preinstalled
embedded web server (also called HTTP server). The object storage space (HTML
pages, pictures, CGI programs, Java Applets …) for this web server is located within the
Windows CE file system.
Figure 13: The files within the directory \www
Run your PC web browser and access the HTML file index.html. Use the following
URL within the browser address field:
http://192.168.0.126/index.html
Figure 14: Check the embedded web server with the Internet Explorer
Manual Revision 1.0
13
DNP/SK23-WCE - First Steps
2.10
Checking the FTP Server
First install the FileZilla FTP client on your PC. The installation file for this FTP client is
a part of the DNP/9200 Windows CE Starter Kit CD-ROM.
Figure 15: The user interface of the FileZilla FTP client
Then run FileZilla and select the menu item Edit => Settings. Set on the Connection
window the default password for anonymous login to your e-mail address and click on
OK.
Figure 16: First time configuration for the FileZilla FTP client
14
Manual Revision 1.0
DNP/SK23-WCE - First Steps
Enter the IP address 192.168.0.126 within the FileZilla address field and click on the
Quickconnect button. Do not enter a user name and password. These items are supplied
by FileZilla for anonymous FTP sessions.
Figure 17: FTP-based file transfers between Remote Site and Local Site window
After a successful connection to the FTP server FileZilla offers a Remote Site window
with the DNP/9200 file system. It is now possible to transfer files between the Local Site
window and the Remote Site window. Just use drag-n-drop for these FTP-based file
transfers.
Figure 18: The new files within the DNP/9200 Windows CE file system
Manual Revision 1.0
15
DNP/SK23-WCE - First Steps
3
U-BOOT COMMAND OVERVIEW
The user interface to U-Boot consists of a command line interpreter (CLI), much like a
simple shell prompt. When connected via a serial line you can interactively enter commands and see the results. The following table shows the available U-Boot commands for
the DIL/NetPC DNP/9200.
Command
autoscr
base
bdinfo
bootm
bootp
bootd
cmp
cp
crc32
echo
erase
flinfo
go
help
iminfo
loadb
loadc
loadg
loads
loop
md
mm
mtest
mw
nm
printenv
protect
rarpboot
reset
run
saveenv
setenv
sleep
tftpboot
version
?
Function
run script from memory
print or set address offset
print Board Info structure
boot application image from memory
boot image via network using BootP/TFTP protocol
boot default, i.e., run 'bootcmd'
memory compare
memory copy
checksum calculation
echo args to console
erase FLASH memory
print FLASH memory information
start application at address 'addr'
print online help
print header information for application image
load binary file over serial line (kermit mode)
load binary file over serial line (ymodem-c mode)
load binary file over serial line (ymodem-g mode)
load S-Record file over serial line
infinite loop on address range
memory display
memory modify (auto-incrementing)
simple RAM test
memory write (fill)
memory modify (constant address)
print environment variables
enable or disable FLASH write protection
boot image via network using RARP/TFTP protocol
perform RESET of the CPU
run commands in an environment variable
save environment variables to persistent storage
set environment variables
delay execution for some time
boot image via network using TFTP protocol and env variables ipaddr
and serverip
print monitor version
alias for 'help'
Table 3: U-Boot command overview
16
Manual Revision 1.0
DNP/SK23-WCE - First Steps
4
POCKET CMD 5.0 COMMAND OVERVIEW
The Windows CE Telnet service offers a command line interpreter (CLI) called
Pocket CMD v 5.0. This user interface allows you to communicate with the DNP/9200
Windows CE shell. The following table shows the available commands.
Command
ATTRIB
CALL
CD
CHDIR
CLS
COPY
DATE
DEL
DIR
ECHO
ERASE
EXIT
HELP
GOTO
IF
MD
MKDIR
MOVE
PATH
PAUSE
PROMPT
PWD
RD
REM
REN
RENAME
RMDIR
SET
SHIFT
START
TIME
TITLE
TYPE
Function
Set/display file attributes
Call batch script
Change directory
Same as CD
Clear the screen
Copy files
Display/set system date
Delete a file
Print contents of a directory
Echo output on the screen or change echoing parameters
Same as DEL
Exit command interpreter
Print help for command interpreter or individual commands
Transfer control to a label in batch processing
Conditionally execute a command
Create a directory
Same as MD
Move/rename files
Alias for SET PATH
Suspend execution of a batch file
Reconfigure system prompt
Print current working directory
Remove directory
Record comments in batch file
Change file name
Same as REN
Same as RD
Set or list environment variables
Shift arguments of a batch file
Start detached process
Display/change system time
Set the window title for a CMD.EXE session
Output contents of a file or files to the screen
Table 4: Windows CE Pocket CMD v 5.0 command overview
Manual Revision 1.0
17
DNP/SK23-WCE - First Steps
5
HELPFUL LITERATURE
• Atmel AT91RM9200 data sheet summary
• Atmel AT91RM9200 user guide
• ARM ARM926EJ-S technical reference manual
• ARM ARM9EJ-S technical reference manual
• DIL/NetPC DNP/9200 hardware reference manual (SSV Starter Kit item)
• Evaluation Board DNP/EVA9 hardware reference manual (SSV Starter Kit item)
CONTACT
SSV Embedded Systems
Heisterbergallee 72
D-30453 Hannover
Phone: +49 (0)511/40 000-0
Fax:
+49 (0)511/40 000-40
E-mail: [email protected]
Internet: www.ssv-embedded.de
Support: www.ssv-comm.de/forum
For actual information about the DNP/SK23-WCE visit us at www.dilnetpc.com.
DOCUMENT HISTORY
Revision
1.0
Date
2008-01-24
Remarks
first version
Name
WBU
The content of this document can change any time without announcement. There is taken over no guarantee
for the accuracy of the statements. The user assumes the entire risk as to the accuracy and the use of this
document. Information in this document is provided ‘as is’ without warranty of any kind. Some names within
this document can be trademarks of their respective holders.
© 2008 SSV EMBEDDED SYSTEMS. All rights reserved.
18
Manual Revision 1.0