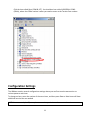
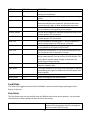
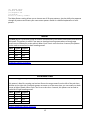
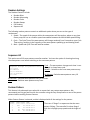
1
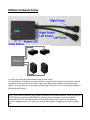
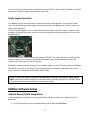
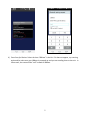
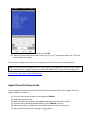
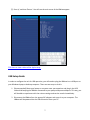
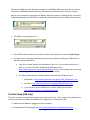
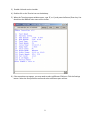
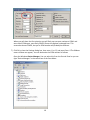
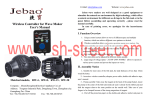
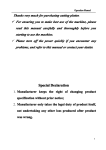
JBWave Controller Software Version 3.4 / 19-SEP-2015 User’s Manual JBWave Hardware Setup .......................................................................................................................... 2 Single Supply Operation ....................................................................................................................... 3 JBWave Software Setup ............................................................................................................................ 3 Android Phone/Tablet Setup Guide ..................................................................................................... 3 Apple iPhone/iPad Setup Guide ........................................................................................................... 6 USB Setup Guide ................................................................................................................................... 7 Termite Setup (USB only)...................................................................................................................... 8 Configuration Settings ............................................................................................................................ 11 Feed Mode .......................................................................................................................................... 12 Easy Setup ........................................................................................................................................... 12 Test Speed........................................................................................................................................... 13 Max Speeds ......................................................................................................................................... 14 Min Speeds ......................................................................................................................................... 14 Wave Patterns .................................................................................................................................... 14 Random Settings ................................................................................................................................. 17 Sequence All ....................................................................................................................................... 17 Custom Pattern ................................................................................................................................... 17 Cycle Time ........................................................................................................................................... 18 Feed Time ........................................................................................................................................... 18 Feed Speed ......................................................................................................................................... 18 Ramp Time .......................................................................................................................................... 18 Self Clean ............................................................................................................................................ 19 Night Mode ......................................................................................................................................... 19 # of Pumps .......................................................................................................................................... 19 Factory Reset ...................................................................................................................................... 19 Understanding Patterns.......................................................................................................................... 20 Tips, Tricks, Fixes..................................................................................................................................... 21 Warranty ................................................................................................................................................. 24 JBWave Hardware Setup 1) Unplug your Jebao AC power adapters from the wall outlet. 2) If you have two AC adapters and two controllers, plug the two AC adapters into the two jacks and connect the two pumps to the two cables. Plug in your Jebao power adapters back into the wall outlet. The pumps will start up and begin an alternating wave action every 5 seconds, with speeds of 60% (Max) and 0% (Min). NOTE: If you have two different pump models with different size power adapters, make sure that the LEFT/RIGHT pumps match the LEFT/RIGHT ac adapter jacks. For example, if you have a WP10 connected to the LEFT cable and a RW4 connected to the RIGHT cable, make sure the WP10 AC adapter is plugged into the LEFT power jack and the RW8 adapter is plugged into the RIGHT power jack. 2 3) If you only have 1 Jebao pump, connect the pump to the LEFT cable and the AC adapter to the LEFT power jack. The RIGHT power jack and cable is not used. Single Supply Operation The JBWave is preset from the factory to operate with two power adapters. If you have the twins controller with the single power supply, you need to open up the JBWave case and set a jumper for single supply operation. The box snap fits together with no screws. Disconnect all cables and power. Hold the bottom of the enclosure and grab the top with your other hand while slightly squeezing and pull up. The top cover should snap off. You will see a jumper on the circuit board marked “OFF/ON”. The jumper will be in the OFF position. Slide the jumper up and remove it. Now slide the jumper back in at the ON position, where the jumper is over the center pin and the right pin. Reconnect the pump cables and plug the twins power supply into the LEFT power jack on the JBWave (The RIGHT power jack is not used). The pumps will start up and begin an alternating wave action every 5 seconds, with speeds of 60% (Max) and 0% (Min). WARNING: DO NOT ATTEMPT TO USE ONE OF THE SINGLE JEBAO AC ADAPTERS TO POWER BOTH PUMPS. Doing so will cause the adapter to overheat and fail, possibly causing a fire. The ON position of the jumper should only be used with the twins power supply. JBWave Software Setup Android Phone/Tablet Setup Guide If you purchased the Android version you will need an Android smartphone or tablet with built-in Bluetooth. 1) Go to the Google Play Store and download/install an app called BlueTerm. 3 2) Run the app. A Blue screen will appear. If your phone has a button with three vertical dots, tap the button to bring up the app settings menu. If this button doesn’t exist on your phone, then press and hold down the Recent Apps button. 3) When the app menu pops up, tap on “connect device”. 4 4) Press Scan for Devices. Select the item “JBWave” in the list. If it does not appear, try scanning again and/or make sure your JBWave is powered up and you are standing close to the unit. In some cases, the name will be “null” instead of JBWave. 5 5) When prompted for a PIN or Password, enter 1234. 6) When you return to the main blue screen, Type a ‘q’ or ‘Q’ and tap the Return key. The main menu should now appear. If the text is too large or too small, you can change the font size from the app settings menu. NOTE: If you previously connected and can’t connect again, the JBWave may already be connected to this or another device. Unplug the power jacks from the JBWave for a few seconds and plug back in. Click here to view a video of the android setup. Apple iPhone/iPad Setup Guide If you purchased the Apple version (mode BT4-xxx) you will need an iPhone 4S or higher, iPad 3 or higher, iPad Air, or iPad mini. (1) (2) (3) (4) (5) (6) Go to the App Store and search for an app called JBWave. Install and launch the app. When the app screen appears, press Scan at the upper right side of the screen. A list will pop up showing available devices. Tap on JBWave in the list. When the list closes, you will see “Connected” at the top center of the screen. Tap anywhere on the screen to bring up the keyboard. 6 (7) Press ‘q’ and then ‘Return’. You will see the main menu of the JBWave appear. Click here to view a video of the Apple setup. USB Setup Guide In order to configure the unit for USB operation, you will need to plug the JBWave into a USB port on your Windows laptop or desktop computer. There are two ways to do this: 1. (Recommended) Move your laptop or computer near your aquarium and plug in the USB cable while keeping the JBWave connected to your pumps and power adapters. This way, you will be able to experiment with the various settings and see the results immediately. 2. Disconnect the JBWave from the pumps/AC adapters and move it to your computer. The JBWave will be powered via the USB connection from your PC. 7 Connect the JBWave to your Windows computer via USB Cable. Make sure you have an internet connection as Windows will automatically download and install the drivers from the internet. Wait for your computer to recognize the JBWave. With the exception of Windows XP, all versions of Windows already have USB Drivers installed and will be detected by the JBWave automatically. The JBWave is now ready to use. If the USB Drivers have been successfully installed, skip ahead to the section Termite Setup. If you get an error message indicating that there was a problem installing the USB drivers or you are running Windows XP: Look for the model number on the bottom of the unit. If your model number has a “340” in it, such as “BT2-340” download the USB drivers here: http://www.joejaworski.com/jebao/usb340.exe. Then run the program (do not change any settings/selections) and just click the INSTALL button. For older models without a model number, download the USB drivers here: i. Windows 8.1: http://www.joejaworski.com/jebao/v208_Windows8_1.exe ii. All Others: http://www.joejaworski.com/jebao/v208_Windows.exe iii. If you still can’t get the USB drivers to install, follow this document http://www.joejaworski.com/jebao/usbfix.pdf Termite Setup (USB only) Termite is an easy to use Windows program that works similar to a “chat” program that allows you to communicate with the JBWave and perform all configurations. Follow these steps: 1) Make sure the JBWave is plugged into your computer. 2) Download the Termite program at http://www.joejaworski.com/jebao/termite.zip 8 3) Double-click and run the installer. 4) Double click on the Termite icon on the desktop. 5) When the Termite program window opens, type ‘Q’ or ‘q’ and press the Return/Enter key. You should see the JBWave main menu on the screen. 6) If the menu does not appear, you may need to select a different COM port. Click the Settings button. Select the Port pull down menu and select a different port number. 9 When you pull down the Port selection you will likely see two port numbers a COM1 and some other COMx port, most likely COM3. Choose the highest numbered item. This screenshot shows COM13, but you’re COM number will probably be different. 7) Click OK to close the Settings dialog box, then enter ‘q’ or ‘Q’ and press Enter. If The JBWave menu still does not appear, You can determine the COM number as follows: Open the Windows Device Manager. You can select this from the Control Panel or you can type “Device Manager” in the search box of the Start Menu. 10 Click the item called Ports (COM & LPT) . You should an item called USB-SERIAL CH340 (COMx), where the COMx number is what you need to enter as the Termite Port number. Configuration Settings The JBWave contains several configuration settings where you can fine tune the wave action to various patterns and times. To change an item, enter the number of the menu item, and then press Return. Most items will have additional entries that are needed. NOTE: You can enter ‘q’ or ‘Q’ at any time to cancel any selection and return to the main menu. 11 SETTING Feed Mode DEFAULT Easy Setup… n/a Test Speed… n/a Wave Pattern Alternating Set MAX Speeds 60%/60% Set MIN Speeds 0%/0% Feed Time 15 min Feed Speed 0% Cycle Time 00:00:05.0 secs Ramp Time 1 secs Self Clean No Night Mode OFF # of Pumps Factory Reset 2 n/a OFF DESCRIPTION Turns Feed Mode on or off. Performs the same function as pushing the Feed button. Provides several popular setups to get you up and running quickly. Manually changes pump speeds in order to find the best Maximum and Minimum speeds for your particular setup. You can test Left, Right, or Both pumps at the same time. There are 10 different wave patterns to choose from. You can also sequence through every wave pattern. You can set the highest or maximum speeds you want to use for each pump in 1% increments. You can set the lowest or minimum speeds you want to use for each pump in 1% increments. Sets the number of minutes (from 1 – 99) to slow down or stop the pumps when the FEED button is pressed. Sets the speed of the pumps during feeding. You can set this to any speed from 0% (pumps off) to 100%. Determines the frequency or rate that the wave pattern will run. Can be set from .1 seconds to 12 hours. Determines how long it takes for a pump to change speeds during a wave pattern. Can be set from 0 to 30 seconds. This setting allows smooth speed changes and prevents the pumps from shaking or jerking. If set to ‘YES’, runs a quick pattern every 30 minutes that keeps the impeller clean. Turn Night Mode on or off, which runs the pumps at reduced speeds during the night. An additional menu will appear with several options. Sets the number pumps connected. Resets all settings to the default values. Feed Mode This menu item toggles the state of the Feed Mode. It does the same thing as pushing the Feed button on the unit. Easy Setup The Easy Setup menu lets you quickly setup the JBWave with various preset patterns. You also enter the maximum or fastest speed you want to use for the pumps. Gentle Flow This wave pattern does a back and forth wave motion of the two pumps. Ideal for creating nonlaminar flow for SPS/LPS corals. 12 Alternate Pulse ‘Else’ Mode Pulses the left/right pumps with flow pauses. Simulates the Jebao controller “Else” mode, but adds full control of maximum speed. Creates a standing wave by sending quick pulses to both pumps. Creates a front-to-back wave. Creates a standing wave by sending quick pulses to each pump on opposite phases. Creates a sideto-side wave. Pulses alternately with a short pause. Standing Wave-1 Standing Wave-2 Pulse & Pause Test Speed The first thing you need to do is determine the top speed you want to run your pumps. Running pumps too fast can damage soft corals and/or create a “gravel storm” in your tank. The Test Speed item allows you to individually adjust and change the pump speed to determine the best speed settings for your tank. You can independently test the left, right, or both pumps at the same time. Select the “Test Speed” item in the main menu. Now enter either an L (Left), R (Right), or B (Both). You can repeatedly enter different speed values from 0 to 100%, finding the best speeds for your pumps. The chosen pump will change speed as soon as you hit the Return key. To exit, type ‘Q’ or ‘q’ followed by the Return key. Enter L (Left), R (Right), or B (Both) L Enter Pump Speed (0-100) or 'q' to quit 50 Enter Pump Speed (0-100) or 'q' to quit Steps to determine the MAX speeds of each pump: 1. Go to the Test Speed menu. Both pumps will completely turn off. Select ‘L’ for Left. 2. Start by entering a value of 50%. The Left pump will start up and run at 50% speed. 3. Continue to raise (or lower) the speed until you reach a point where you don’t want the left pump to run any faster. The value you have chosen is your MAX speed setting. 4. Repeat the above steps for the Right pump. Even though your pumps may be equally spaced in your aquarium, you may find that either the left or right may need a little more (or less) speed to balance out the flow. NOTE: If the LEFT pump is selected but the RIGHT pump is responding, reverse the two pump cables connected to the JBWave. 5. It’s a good idea to try the BOTH setting as well to check your speeds when both pumps are running at the same time. 13 6. Once you’ve determined the best L/R speeds, enter the percentage values into the MAX Speeds menu item. Max Speeds This menu item sets the maximum speed for your pumps. Use the Test Speed function to determine your maximum speeds. You MUST set the Max Speed setting to a value that is higher than the Min Speed setting. You can set different maximum speeds for each pump. This is handy if you’re running two different models (i.e., a RW8 and a WP-25) so you can reduce speed on the larger pump and match their flow. This is also useful when one pump requires a bit more (or less) flow than the other. Min Speeds This option sets the minimum speed that your pumps will run with any selected pattern. The speed can be set from 0% to 100% representing 0 Volts to 24 Volts DC applied to your pumps. You MUST set the Min Speed to a value that is lower than the Max Speed setting. The minimum speed setting is the speed of a pump when the wave pattern calls for it. For example, if using the alternating pattern, the min speed setting sets the speed of the pump that is “turned off” during the cycle. By setting minimum speed to something other than 0%, you can have the “turned off” pump run at a slower, gentler speed. You can set different minimum speeds for each pump. Most users set both pumps to the same minimum speeds. The default minimum speed is 0%. If you want a slow, gentle current you can set the minimum speed higher. The Jebao pumps tend to stutter and stall when minimum speeds are set from 1% to 30%. We recommend either a setting of 0% or a setting of 30% or higher. Wave Patterns (1) (2) (3) (4) (5) (6) (7) (8) Blast Alternating Pulse Sweep Ramp Random Blast Random Alt Random Pulse 14 (9) Random Sweep (10)Full Random (11)Sequence All (12)Custom… Select an item by number The Wave Pattern setting allows you to choose one of 10 wave patterns, plus the ability the sequence through all patterns and create your own custom pattern. Below is a detailed explanation of each pattern. BLAST The Blast pattern cycles both pumps on and off simultaneously from MIN to MAX speed, then MAX to MIN speed. This pattern is useful if you want to simulate incoming waves where a strong surge current occurs followed by a calm period. When Cycle Time is set to less than 1 second, this pattern can be used to create front to back standing waves. PASS L Speed R Speed 1 MAX MAX 2 MIN MIN 3 MAX MAX 4 MIN MIN View BLAST Pattern animation. ALTERNATING The Alternating pattern cycles each pump individually from MIN to MAX then MAX to MIN speed. This pattern is ideal for creating non-laminar flow as the surge comes from the left of the tank then switches to the right side. Since both pumps are never on at the same time, you can usually run both pumps at higher speeds. When Cycle Time is set to less than 1 second, this pattern can be used to create left to right standing waves. PASS L Speed R Speed 1 MAX MIN 2 MIN MAX 3 MAX MIN 4 MIN MAX View ALTERNATING Pattern animation. 15 PULSE The Pulse pattern pushes water from the left pump, pauses, and then pushes water from the right pump. With a short Cycle Time setting, you can create short bursts of water current alternating from each pump. If you want both pumps to pulse simultaneously, use the Blast wave pattern with short Cycle/Ramp times. Since both pumps are never on at the same time, you can usually run the pumps at higher speeds. PASS L Speed R Speed 1 MAX MIN 2 MIN MIN 3 MIN MAX 4 MIN MIN View PULSE Pattern animation. SWEEP The Sweep pattern cycles the pumps so that the flow starts from the left, adds the right, then pauses. This pattern simulates waves that “sweep” from left to right across your tank. The left pump turns on first, followed by the right pump while the left keeps running. Then the left turns off followed by the right, ending in a calm period. PASS L Speed R Speed 1 MAX MIN 2 MAX MAX 3 MIN MAX 4 MIN MIN View SWEEP Pattern animation. RAMP The Ramp pattern cycles the pumps so that the flow starts from the left, switches to the right, then both pumps turn on at maximum followed by a calm period. This pattern is good for creating lots of turbulence. The pumps start out like the Alternating pattern, then both go to max speed followed by a calm period. PASS L Speed R Speed 1 MAX MIN 2 MIN MAX 3 MAX MAX 4 MIN MIN View RAMP Pattern animation. 16 Random Settings The Random Patterns include: Random Blast Random Alternating Random Pulse Random Sweep Full Random Sequence All The following random patterns contain an additional option where you can set the type of randomness: 1. Speed – The speed of the pumps within the wave pattern will be random, where at any given time a pump will run at a random speed somewhere between the MIN to MAX speed setting. 2. Cycle – The Cycle Time of the wave pattern will change randomly from 0 seconds to your Cycle Time setting, resulting in the frequency of the wave pattern speeding up and slowing down. 3. Both – Speed and Cycle Time will both be random. Sequence All This option runs all 10 wave patterns one after another. You have the option of choosing how long the wave pattern runs before switching to the next wave pattern. Cycle – The wave pattern changes each time it runs through its 4 step wave cycle. Minute – Switches to the next wave pattern every minute. 10 Minutes – Switches wave patterns every 10 minutes. 30 Minutes – Switches wave patterns every 30 minutes. Hour – Switches wave patterns every hour. Sequence through all patterns every: (1) Cycle (2) Minute (3) 10 minutes (4) 30 minutes (5) Hour Custom Pattern This feature is for advanced users who wish to create their own custom wave patterns. We recommend you first get familiar with the controller using the Easy Setup feature or one of the preset patterns before tackling Custom Patterns. When Custom Pattern is selected, a table is displayed with all the settings for the pattern. STAGE ===== 1 2 3 4 LEFT RIGHT TIME ==== ===== ========== 80% 0% 00:00:05.0 0% 0% 00:00:01.0 0% 80% 00:00:05.0 0% 0% 00:00:01.0 There are 4 “Stages” or sequences that the wave pattern follows. The controller first does Stage 1 with the Left/Right pump speeds and the length of 17 Time specified. It then moves on to Stage 2, 3, and 4. After that it repeats and starts Stage 1 again. In the example shown, the following will take place: 1) Left pump runs at 80% speed, right pump is 0% (off), lasting for 5 seconds. 2) Left and Right pumps are both off for 1 second. 3) Left Pump is 0% (Off), right pump is running at 80% for 5 seconds. 4) Both pumps are off for 1 second. TIP: You can preload this pattern by choosing Easy Setup and selecting the “Pulse & Pause” item. When Custom Pattern is selected, the MIN Speed, MAX Speed, and Cycle Time settings in the main menu are not used. The Main Menu will display “n/a” for these adjustments when Custom Pattern is selected. Cycle Time The Cycle Time defines how long it takes for a segment of a wave pattern to run. In other words, it defines how long the pumps go into “hold” between patterns. For example, if you set the Cycle Time to 15 seconds it will take 1 minute (4 x 15 seconds) to run through the entire 4 cycles of a wave pattern. You can set the Cycle Time from .1 seconds to 12 hours. See the chart in the Understanding Patterns section for more information. Setting Cycle Time to less than one second can be used to create single and double standing waves. For best effect, set Ramp Time to zero when Cycle Time is set to a few seconds or less. Feed Time When the FEED button is pressed, the pumps will slow down or stop to accommodate feeding. The Feed Time setting allows you to set the duration of how long the pumps stay in Feed Mode. You can set the feed time from 1 to 99 minutes. If the JBWave is in Feed Mode, the LED indicator will flash. To cancel Feed Mode prematurely, press the FEED button again. Feed Speed The Feed Speed setting lets you set the speed of the pumps when the FEED button has been pressed. The default is 0% (completely off). Some people like to have their pumps run at a slow speed during feeding to help keep food in circulation. In this case, set the speed to something other than 0%. Ramp Time The Ramp Time defines how long it takes for a pump to speed up or slow down to its new setting in a running wave pattern. It allows the pump to smoothly accelerate or decelerate to the new pump speed. This prevents abrupt speed changes which can cause the pump to make noise, shake, jitter, or 18 stir up the gravel. It can also be used to enhance any wave pattern by slowly increasing water current over a longer period of time. You can set the Ramp Time from 0 to 30 seconds. Self Clean The Self Clean mode is used to clean the pump impellers and prolong the time between pump cleanings. When Self Clean is activated the pumps go through a series of abrupt changes from full off to 100% speed. The entire cycle lasts for about 10 seconds. You can choose how frequently you want to run the Self Clean from every 30 minutes, to every 4, 8, or 24 hours. Night Mode The JBWave can slow the pumps down during the night to reduce flow. When you select Night Mode in the main menu, several options can be set. Night Mode - Specifies the way Night Mode works: Pattern – The wave pattern continues to run but maximum speed is reduced. Steady – The Steady setting runs both pumps continuously at a steady, reduced speed. OFF – Night Flow is turned off. The Night Speed and Night Times settings are ignored and not shown. Night Times - Sets start/end hour when Night Mode should start and end. Night Speed - Sets the speed of the pumps at night. If Night Mode is set to Pattern, your wave pattern continues to run but the MAX speed is replaced by this speed setting. If Night Mode is set to Steady, the pumps run continuously at this speed setting. Set Clock - Use to set the time of day. If you’re not using Night Mode, you do not have to set the clock. The clock has a rechargeable battery backup and will continue to maintain the correct time for several days without power. # of Pumps Sets the number of pumps that are connected. Set this to ‘1’ if you’re using the controller with a single pump. Set to ‘2’ for dual pump control. Note that for single pump, the patterns that are designed for dual pumps (Sweep and Ramp) will not function. Factory Reset Resets all the configuration settings to their default values as listed in the Configuration settings table. 19 Understanding Patterns No matter what wave pattern you choose, there are four items that affect the wave pattern: 1. MIN Speed – The slowest speed of the pumps. 2. MAX Speed – The fastest speed of the pumps. 3. Cycle Time – How fast the pumps change direction within the pattern. 4. Ramp Time – Optional setting to slowly increase/decrease the pump speed when changing direction. Referring to the chart above, here is an example of all four settings: MIN Speed MAX Speed Cycle Time Ramp Time 25% 85% 7.0 Seconds 3 Seconds As you can see in the Y-axis of the chart, the minimum speed of the pump is set to 25%. The Maximum Speed is set to 85%. The Ramp Time is set for 3 seconds so it takes that amount of time for the pump to change speeds or climb slowly from minimum to maximum speed (and visa-versa). Once at maximum speed, the Cycle Time determines how long to “hold” the wave pattern. In this case it is set to 7 seconds. After the Cycle Time passes, the next segment of the wave pattern starts and the pump speed changes, going from max speed to min speed. The cycle then repeats. 20 Tips, Tricks, Fixes Pump Size – For maximum wave making effects, you should use Jebao pump models that are not too oversized for your tank. For example, running pumps on 30% min and 50% max will have a lot less wavemaking effects compared to running at 30% min and 90% max. Minimum Speed –We have read that starting and stopping a pump frequently presents extra wear and tear on the impeller and volute. If this is a concern, then a minimum speed of 30% is a safe value to use with the Jebao pumps. Note that both pumps never really turn off when a minimum speed is used. For an alternating pattern, the pump that is supposed to be off will run at the MIN speed setting. This may actually be an advantage since you’re getting more circulation and curious fish won’t swim into the pump because there is always positive flow. Night Mode – Setting a minimum speed for Night Mode can get tricky. For example, a 20% minimum speed may run fine for a while but after 7-8 hours the pumps may stall. Likewise, your min speed setting may work fine for now, but a month from now they may stall as the pumps accumulate debris. We have a Night Mode feature because people want it- and most other wavemakers have it too. Surface current or beach waves are gentler at night because winds are generally calmer. However, subsurface currents in the real reef are virtually the same whether it be day or night. If anything, you would want more current at night, because dissolved oxygen drops and CO2 levels rise. But the feature is there if you want to use it. Food in Motion – To keep food particles in circulation during feeding, set the feed speed greater than 0%. Ramp Time Setting – If you’re running a wave pattern at medium to slow speed (Cycle Time set to 5 – 30 seconds), setting Ramp Time from 1 – 5 seconds will enhance the pattern by adding smooth up/down acceleration when the pumps change speed. However, if your Cycle Time setting is less than 2 seconds, you probably want to set Ramp Time to zero. This is because Ramp Time adds to the total cycle time. For example, if your Cycle Time is set to 0.5 seconds and Ramp Time is set to 1 second, you will wind up with a total cycle time of 1.5 seconds. Just set Ramp Time to zero if you’re running fast changing wave patterns. Self Clean – If your pumps are way oversized for your tank, using Self Clean may produce a brief “gravel storm” as the pumps quickly surge to 100% speed. Likewise, if your pumps are undersized and you have the max speeds of your pumps set close to 100%, Self Clean will not be very effective. Front To Back Standing Wave – To create a standing wave that moves from the back to the front of the tank, here is a good starting point: Pattern: Blast Cycle Time: 0.3 seconds Ramp Time: 0 seconds Min Speed: 0 % 21 Side to Side Standing Wave – To create a standing wave that moves from side to side, here is a good starting point: Pattern: Alternating Cycle Time: 0.4 seconds Ramp Time: 0 seconds Min Speed: 0 % Waving LPS and Softies – To create an attractive and functional back and forth non-laminar flow pattern, here is a good starting point: Pattern: Alternating Cycle Time: 5.0 seconds Ramp Time: 2 seconds Min Speed: 30 % Change the pattern to Pulse to add a calm period between the flow changes. Beach Wave – To create a “beach” wave where flow starts gentle and then ramps up to strong currents, here is good starting point: Pattern: Sweep Cycle Time: 3.0 seconds Ramp Time: 3 seconds SPS Non-Laminar – If you have SPS corals and want to create a true non-laminar, back and forth wave current, here is good starting point: Pattern: Pulse Cycle Time: 10 seconds Ramp Time: 0 seconds Duplicating Jebao “W1” Setting (with speed control) - The JBWave has a bunch of wave patterns that give you a lot more control over the stock Jebao controller. But sometimes you need a starting point when transitioning from the Jebao controller. To duplicate the "W1" pattern (with added speed control), use this configuration: MAX SPEED: xxx% (set to fastest speed you want to run the pumps) MIN SPEED: 0% RAMP TIME: 0 secs PATTERN: Alternating CYCLE TIME: 00:00:00.8 (0.8 seconds) From here you can tweak the settings and find the best flow for your tank. Bluetooth Connection Problems – If you can’t get the display to show up on your Bluetooth device, make sure you are paired/connected. On the back side of the JBWave there is a small hole with a LED visible through it. If the LED is flashing, the JBWave is not connected to your device. If the LED is steady on, you are already connected. If you’re switching Bluetooth devices or trying to connect 22 again, you may need to remove power for 5 seconds. This will return the red LED to its flashing state and be ready to connect. Android Keyboard Problems – If you have the main menu displayed but the keyboard does not seem to work, you might be running an app called “Swiftkey” which interferes with BlueTerm. Disable Swiftkey to fix the problem. No Menu Access – on the USB version- sometimes USB gets confused, especially if you unplugged/plugged in the USB cable while the serial or configuration program was running. If you can no longer access the main menu despite having the correct Serial Port, close Termite and unplug the USB cable. Wait a few seconds then plug the USB cable back then run the Termite program. Extreme Cycle Times – Avoid setting the Cycle Time below 0.5 seconds. The pump motors won’t be able to keep up at that speed and they will appear to be running steady. Menu Pause – When entering numbers during configuration, the pumps temporarily stop running the wave pattern. When you’re finished with the configuration and go back to the main menu, the pumps will resume operation with the new configuration settings. If you do not complete a configuration setting (you’re not at the main menu) the JBWave will wait 5 minutes then return to the main menu automatically, resuming your wave pattern. n/a Displayed on Some Adjustments – When using “Custom Pattern” the MIN and MAX Speed settings as well as the Cycle Time setting will show n/a, as those values are not used. To bring back those settings, choose a Wave Pattern other than “Custom”. 23 Warranty The JBWave is warranted to be free of defects in material and workmanship for a period of one year from the date of original purchase. For warranty repair, send email to [email protected] to receive a return authorization. When returning the unit, you must include proof of purchase and a written explanation of the trouble. During the warranty period, we will, at our option, either repair or replace the product free of charge. The warranty is not transferable. This warranty does not cover damage due to improper installation or use, negligence, damage caused by water, fire, lightning, or other acts of nature, and unauthorized product modification or repair, or failure to follow instructions supplied with the product, or to incidental or consequential damages beyond the JBWave product itself. Implied warranties are limited in duration to the life of this limited warranty. Some US states do not allow limitations on how long an implied warranty lasts, or the exclusion or limitation of incidental or consequential damages, so the above limitations may not apply to you. This warranty gives you specific legal rights. You may have other rights, which vary from state to state. NOTE: The warranty DOES NOT cover freshwater or saltwater damage. If your unit has partially or fully failed, unplug the unit and remove the top cover. If there are rust spots or white spots of dried saltwater anywhere on the electronic circuit board we cannot repair it. 24