1
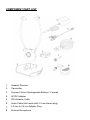
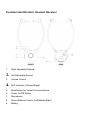
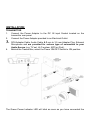
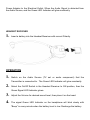
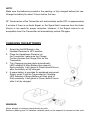
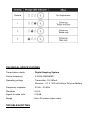
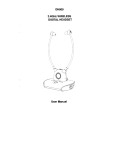
DH900
2.4GHz WIRELESS
DIGITAL HEADSET
User Manual
INTRODUCTION
This 2.4GHz DIGITAL WIRELESS CHIN HEADSET uses latest digital wireless
technology, and enables to improve the hearing aid capability that may required
by the elderly people to enjoy crystal sound stereo music and TV sound anywhere
inside your home. Simply connect the transmitter to a desired audio source: DVD
player, CD player, TV set, Hi-Fi system, or iPod. Without complicated wiring and
installation, the system enables you to enjoy thrilling, lifelike sound in minutes.
FEATURES
1.
2.4GHz Digital Hopping System Technology
2.
Docking Charge Mechanism
3.
RF Transmission Auto Off (when without audio signal)
4.
Music Muting for Verbal Communications
5.
Speed Charging Mechanism
6.
Spare Battery Charging Design
7.
Microphone Adapter for sound pick up from audio source.
8.
Adjustment of Sound Balance
9.
Adjustment of Treble/Tone Clarity
COMPONENT PART LIST
1.
Headset Receiver
2.
Transmitter
3.
Polymer Lithium Rechargeable Battery x 2 pieces
4.
AC/DC Adapter
5.
RCA Adapter Cable
6.
Audio Cable (both ends with 3.5 mm stereo plug)
7.
6.3 mm to 3.5 mm Adapter Plug
8.
External Microphone
Function Identification: Headset Receiver
1.
Right Adjustable Earbud
2.
Left Adjustable Earbud
3.
Volume Control
4.
LED Indicator of Power/Signal
5.
Mute Button for Verbal Communications
6.
Power On/Off Switch
7.
Microphone
8.
Sound Balance Control (Left/Middle/Right)
9.
Battery
Function Identification: Transmitter
1.
Charging Cradle
2.
LED Indicator of Tone Clarity
3.
Tone Clarity Button
4.
LED Indicator of Power/Signal
5.
LED Charging Indicator for Main Battery (attached to Headset Receiver)
6.
LED Charging Indicator for Spare Battery
7.
Spare Charging Slot
8.
DC In
9.
Power ON/OFF
10.
Mono/Stereo Switch
11.
3.5mm Audio In Socket
INSTALLATION
TRANSMITTER
1.
Connect the Power Adapter to the DC IN input Socket located on the
transmitter rear panel.
2.
Connect the Power Adapter provided to an Electrical Outlet.
3.
4.
RCA Adapter Cable, Audio Cable, 6.3 mm to 3.5 mm Adapter Plug, External
Microphone and are provided for various type of connection to your
Audio Source (e.g. TV set, Hi-Fi system, MP3 or iPod).
Behind the Transmittter, select the Power ON/OFF Switch to ON position.
The Green Power Indicator LED will blink as soon as you have connected the
Power Adapter to the Electrical Outlet, When the Audio Signal is detected from
the Audio Source, and the Green LED Indicator will glow constantly.
HEADSET RECEIVER
1.
Insert a battery into the Headset Receiver with correct Polarity.
OPERATION
1.
Switch on the Audio Source (TV set or audio component) that the
Transmitter is connected to. The Green LED Indicator will glow constantly.
2.
Select the On/Off Switch in the Headset Receiver to ON position, then the
Green Signal LED Indicator glows.
3.
Adjust the Volume for desired sound level, then place it on the head.
4.
The signal Green LED Indicator on the headphone will blink slowly with
“Beep“ in every minute when the battery level is low. Recharge the battery.
NOTE:
Make sure the batteries provided in the packing, is fully charged before first use.
Charge the battery for about 3 hours before first use.
RF Transmission of the Transmitter will automatically switch OFF in approximately
5 minutes if there is no Audio Signal, or the Signal that it receives from the Audio
Source is too weak for proper reception. However, if the Signal returns to an
acceptable level, the Transmitter will automatically switch ON again.
CHARGING THE BATTERIES
1. Select the On/Off Switch in the
Headset Receiver to OFF position.
2. Place the Headphone Receiver on
the Transmitter, make sure the Charge
Contact touches the Charge Pins on the
Transmitter.
3. The Charging process starts automatically.
LED Indicator of Main Battery then glows in
Red constantly. It will glows in Green about 2 hours
after the battery is fully charged.
4. A spare battery is provided for sustained enjoyment.
Simply insert it into the Transmitter for Charging.
LED Indicator of Spare Battery will then glow in
Red constantly. It will glows in Green about 2 hours
after it is fully charged.
WARNING:
Never attempt to recharge conventional dry cells.
Batteries (battery pack or batteries installed) shall not be exposed to excessive heat such
as sunshine, fire or the like
Never use another type of battery or non-rechargeable batteries to replace the
rechargeable batteries supplied.
When the headphones are not in use, move the switch to the OFF position to avoid
damaging the batteries.
The batteries must always be fully charged before first use. An initial 3 hours charge is
required to guarantee an acceptable service life for the rechargeable batteries. Always
ensure that the Headphone Receiver is switched to OFF position while the batteries are
charging.
Excessive sound pressure from earphones and headphones can cause hearing loss.
IMPORTANT:
This unit should be operated with rechargeable batteries only. When replacing the batteries
or when disposing of the unit, always comply with applicable laws relating to the disposal
of batteries. Please place them in a proper disposal container to ensure that they are
eliminated safely and in an environmentally friendly way.
TONE CLARITY
When necessary, Tone Clarity to Headset Receiver can be adjusted on the
Transmitter, from orange LED of 1, 2 and 3. Simply press the Tone Clarity Button
to select and match to your level of hearing aid capability.
The Tone Speech Intelligibility can be enhanced individually on the transmitter
with the following settings.
TECHNICAL SPECIFICATIONS
Transmission mode
: Digital Hopping System
Carrier frequency
: 2.4GHz ISM BAND l
Operating voltage
: Transmitter : 5V 550mA
Receiver : 3.7 V, 350 mA Lithium Polymer Battery
Frequency response
: 30 Hz – 20 KHz
Distortion
: <0.5%
Signal-to-noise ratio
: >75 dB
Range
: Up to 25 meters (open area)
TROUBLESHOOTING
NO SOUND
-
-
Ensure that the mains adapter is pushed fully into the power outlet and
that its cable is properly connected to the DC IN connector on the
transmitter.
Ensure that the Headset Receiver Power ON/OFF switch is switched
to ON.
The charge level of Battery inside Headset Receiver may be too low.
Recharge the battery or replace them with fully charged batteries.
Ensure that the TV set, Hi-Fi system or audio component is switched
ON and set to a channel that broadcasts an audio signal.
Use the Volume Control on the Headset Receiver to increase the
sound level.
The connected audio/video equipment may not be in playback mode.
Start playback on by the equipment.
The Headset Receiver output level is set too low. Adjust the volume to
a suitable level.
DISTORTION
-
The charge level of Battery inside Headset Receiver may be too low.
Recharge the battery or replace them with fully charged batteries.
The Headset Receiver may be too far away from the Transmitter. Move
closer to it.
The Audio Signal input level is too low. Increase the volume from the
audio source.
In case the headset receiver cannot be linked with the transmitter. Please
follow the following procedure for Pairing:
1.
2.
3.
Turn OFF the power of the Transmitter.
Turn ON the Headset Receiver.
Press and Hold the MIC Button for about 5 seconds, the Green LED flash
quickly in the Headset Receiver, then turn ON the power of the Transmitter.
4.
The Headset Receiver and the Transmitter is then Paired automatically, and
the Green LED on Headset Receiver lights steadily.