1
Sync-One2
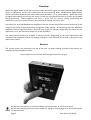
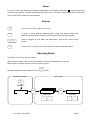
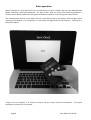
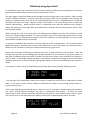
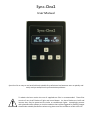
User Manual Sync-‐One2 is an easy to use hand held tool suitable for professional and amateur users to quickly and easily analyse audio/visual synchronisation problems. To obtain the best results the use of supplied test files is recommended. These files consist of very brief flashes of light and sound beeps. As these flashes are brief and intense they may be perceived as similar to stroboscopic lights. Accordingly persons with photosensitive epilepsy or similar condition that can be triggered by flashing images should take suitable precautions when using these test files and do so at their own risk. Overview Within the digital Audio Visual (AV) world the audio and video signals are often processed by different pieces of equipment, which when combined with the processing delay introduced by digital display devices can lead to problems with audio video synchronisation – or lip sync problems. Within the realm of digital video editing, errors can also occur if tracks are not aligned correctly or frames are dropped during processing. These problems can occur in areas such as a home cinema, professional AV installations such as a Lecture Theatre, post-‐production editing, and many more. Sync-‐One2 is a small handheld device designed to aid with correct setup of AV systems and to verify the output in the areas of post-‐production and general video editing. By measuring the time difference between a pulse of light and sound, it becomes easy to get the optimal configuration for almost any AV application, or to just check that things are as they should be. The measurement results are available in various formats, depending on the user requirement and combined with statistical analysis of readings help give a real indication as to what is going on in any audio-‐visual system. Sensors The system sensors are located at the top of the unit, so when holding Sync-‐One2 the sensors are naturally pointed toward the screen. The microphone is on the left, with the light sensor on the right. Do not cover the sensors, if covered readings may not be taken or will be inaccurate Do not insert anything into the sensor apertures, doing so may damage Sync-‐One2 and prevent correct operation Page 2 Sync-‐One2 User Guide Power Sync-‐One2 uses 2 AA batteries (including rechargeable), a low battery indication is shown when new batteries are required. Should the batteries get really low, a warning is displayed and Sync-‐One2 will switch itself off to avoid incorrect operation. Buttons On
Off
Menu
Is used to move between Measurement mode and Menu mode (with additional functionality available in some specific menus as given below) ↓
↑
OK
Press once to turn on, again to turn off. Used to navigate up and down the Main Menu, and to alter values within menus Used to enter a specific menu item and return back to the Main menu Operating Modes Sync-‐One2 runs in two distinct modes; Measurement mode, when the actual readings are taken and displayed in real time Menu mode, to display statistics and set various options Moving between the two modes is via the Menu
button. Measurement Mode
Menu Mode
On
Off
Calibrating
OK
Menu Item
Select Item
Alter Value
↑
↑
↑
Show Stats
↑
Menu
Readings
Sync-‐One2 User Guide Page 3 What do all the numbers mean? All measurements are taken and presented with reference to the light pulse, so if the audio is ahead of the light the readings are positive. Should the audio be behind the video then the readings are negative. times +ve
Sound
times -ve
Light
Sound
Readings are given in milliseconds (ms), and also frames (F) if a frame rate has been entered. For example in a home cinema environment, if the synchronisation error were detected as +100ms then introducing that delay within the AV Receiver/Pre-‐Amplifier would bring things back into sync. The results vary a lot, what’s going on? This is, surprisingly, normal. With all the digital processing that goes on in modern equipment it is rare to get a set of readings that all exactly match one another. That is why Sync-‐One2 calculates various statistics to help with the analysis, details on these are given later within the guide. What is all this Calibration business? Whenever Sync-‐One2 goes into Measurement mode it will calibrate itself. It is measuring the current ambient levels of light and background noise, and then automatically adjusting to be able to filter these out for more accurate readings and fewer false readings. Ideally, always have Sync-‐One2 in the measuring position (i.e. pointed at the light/sound sources) when turning on, or going back to the Measurement mode, to obtain optimal results. Page 4 Sync-‐One2 User Guide Measurement Mode Basics The display gives the latest detected reading in milliseconds, in this example the audio was detected as being 33ms ahead of the video as the reading is positive. If it were a negative number this would mean the audio lags behind the video. ms
+033
If a frame rate has been set, the reading is also given in frames. Using the same example, with a frame rate of 25 frames the audio is ahead by 00.84 frames. 25
ms
00.84 +033
F
The running average of the current measurement session can also be displayed in milliseconds or frames. This average is calculated on the current measuring session and is not stored. 25
ms
A
00.84 +033 +032
F
If the average has been set to show in frames rather than milliseconds, the ‘F’ next to the A shows this. 25
ms
A
00.84 +033 +0.80
F
F
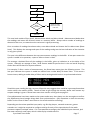
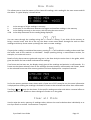
Two flags could also be shown, which indicate when a manual offset and/or speaker distance has been entered, more details on these settings are given in the Advanced Operation section below. The 60 most recent measurements are kept in memory and are available via the ‘Show Stats’ menu option. When the memory becomes full, the oldest readings are dropped so it always contains the most recent 60 readings. This memory is erased when Sync-‐One2 is turned off and can be cleared via the ‘Clear All Stats’ menu option. In stable systems it may be unclear if readings are being taken, to indicate a reading has been taken a heart symbol is flashed in the top left hand corner or bottom right hand corner of the display, for small or large font mode respectively. Sync-‐One2 User Guide Page 5 Basic operation When powered on, Sync-‐One2 will start up and display its serial number then go into Measurement Mode, following a brief self-‐calibration. For best results, hold the unit in the measuring position in relation to the display equipment during the calibration sequence, as this will give the best results. The measurement position is the when the unit is held fairly close to the display, with the light sensor pointing at the display, or if a projector is in use within the light beam of the projector. Typically as in the picture below: A basic use, for example, is to check or help to set-‐up a home cinema environment. The typical workflow to achieve this is as below: Page 6 Sync-‐One2 User Guide Play Test File
Take Measurements
Analyse Results
Delay Acceptable?
No
Adjust the Audio within the system under test
Yes
System OK
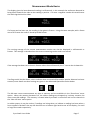
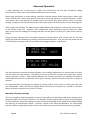
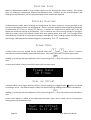
This uses both modes of Sync-‐One2, Measurement Mode and Menu Mode. Measurement Mode takes the readings and stores the 60 most recent in a memory buffer. Always take a number of readings to determine the error, to smooth out the variances in signal processing. Once a number of readings have been taken, enter Menu Mode and choose the first Menu Item {Show Stats}. This displays the average and span of the readings and gives the best indication of the situation in any given system. The span is the difference between the two most extreme readings in the buffer. A low span means the system is stable in its operation, a span of 10ms or lower is ideal. The average, calculated from all the readings in the buffer, gives an indication as to the delay of the system. Naturally an average of 0ms / 0.00 frames would be perfect but in the real world anything under 10ms will be hard for anyone to detect. For example, if after a series of measurements, the Show Stats menu gives the following screen. The low span indicates the system is stable but suffers from a video delay of about 32ms. If this were a home cinema, adding an audio delay of 32ms and re-‐testing should result in a synchronised solution. A +032 M01
S 0002 ms
+033
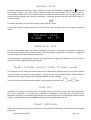
Should the span reading be high, say over 25ms this may suggest there could be inaccurate/anomalous results within the memory buffer. Details of how to go through the memory buffer and remove any suspect readings is given in Show Stats menu item section of the guide on page 11. If any adjustments have been made to the system under test, then always run the test again to confirm the adjustments have brought things back into synchronisation. (NB, remember to clear the memory buffer via the ‘Clear All Stats’ menu item or the results could be confusing). Depending on the various possible input paths, e.g. Blu-‐Ray players, network streamers, games consoles etc. it might be required to configure a delay for each of the input devices if the audio processor supports multiple values. If it is not possible to configure the individual input channels, pick the most commonly used input, which is able to play suitable test file. Sync-‐One2 User Guide Page 7 Advanced Operation A more advanced use of Sync-‐One2 is within the Professional AV and Post Production editing environments, where some of the additional features come into play. Within post production or video editing, workflow is based around whole video frames, rather than time in milliseconds. Within Sync-‐One2 you can set a frame rate between 1 and 99 frames/sec. Whilst some frame rates are fractional, for example 29.97, Sync-‐One2 uses whole frames, which is accurate enough. Simply pick the closest whole frame rate to the actual one of the system you are working with. With a frame rate selected, the Measurement Mode displays the readings in milliseconds and in frames, at the chosen frame rate. However, more importantly, when performing analysis within the ‘Show Stats’ menu item the readings for average and span are also given in frames, as is each of the memory buffers. Using the same readings taken in the Basic Operation example above, with a frame rate set the stats display will alternate between the reading in milliseconds and frames. So in this case the frame rate set is 25 frames/sec, the span is 00.1 frames with the average reading of +0.80 frames. A +032 M01
S 0002 ms
+033
A+0.80 M01
F
S 00.1 25 +0.84
The value below the memory position indicates if the readings displayed are in milliseconds or frames, and the frame the rate entered. The display will start to alternate a couple of seconds after a given memory position is shown. When moving between the memory positions, the readings are shown in milliseconds but will start to alternate once a given memory position has been shown for a couple of seconds. For post production work having the reading in frames make it much easier to correct the issue than just milliseconds. When the frame reading is below 10 frames the resolution is to 1/100th of a frame, above 10 frames resolution is to 1/10th of a frame. Manually offsetting readings There are situations where being able to enter a known offset can also help understand readings where equipment delays are known in advance. For example, should a display have a known processing delay of 45 milliseconds, when the readings are taken the best obtainable result would be the audio leading the video by 45 milliseconds (+45ms). However, should a user offset be applied of -‐45 milliseconds, then this offset is automatically taken into account within the measurements and statistics generated. Page 8 Sync-‐One2 User Guide The user offset is input in milliseconds (via the ‘User MS Offset’ Menu Item) however if a frame rate is also set the delay calculated in frames will be displayed too. Readings are tagged with a symbol to indicate he setting is active. Use in larger spaces Another example for Professional use is within large spaces, such as Lecture Theatres or Cinemas. Given sound travels much slower than light, in larger spaces setting the synchronisation delay at the screen could mean it is out for those in some areas of the space. The optimal would be to take readings when sitting in a central listening position. Depending on the ambient environment doing this may not result in accurate readings. Combine the problem of taking accurate readings with the problem that a central position is also unlikely to have a speaker close by, things get tricky to determine the optimal adjustments needed. To get around this problem, a speaker distance can be input which would result in the readings taken being adjusted for the time it would take the sound to travel the distance input (well, for sound travelling at 21oc at sea level). For example, in a lecture theatre the central seating position is 5m from the nearest speaker and it’s much easier to take measurements at the front of house close to one of the main speakers. When measurements are taken an adjustment would be required to cater for the time it takes the sound to travel the 5m to the central seating position (an adjustment of 15 milliseconds in this example). However, by setting a speaker distance of 5m the measurements taken and statistics calculated are automatically adjusted to take account of the time for sound to travel the 5m to the seating position. When a distance is input (via the ‘Speaker Dist’ Menu Item), all readings are tagged with a to indicate the setting is active. Other Adjustments The default setting is to have the Audio and Visual sensors running at their maximum sensitivity, which should be fine in most environments as the unit self calibrates to account for ambient conditions. However, should false readings continue to be taken, then a lower trigger levels is probably required. Five levels are available, independently set for the audio and visual sensor, follow the instructions on these items as shown on page 13. Sync-‐One2 User Guide Page 9 Menu Mode Menu mode gives access to the memory of stored readings and gives access to various options and settings; Gives access to the last 60 readings and various statistics Show Stats
Clear all Stats
Clears all the stored readings/statistics Display Size
Changes the measurement mode display size from normal to large * Display Average
Enables the running average during Measurement mode * Frame Rate
Sets a frame rate to be used for calculation and display * User ms Offset
Detection Test
Manually set a millisecond offset * Set a speaker distance, an allowance is made for the distance of the speaker in the readings * Used to check the detectors are picking up audio and video signals Audio Trig Lvl
Lets you adjust the sensitivity of the audio sensor * Video Trig Lvl
Lets you adjust the sensitivity of the video sensor * Auto Switchoff
Changes, or disables, the auto-‐off period * Reset Settings
Resets all settings to default Speaker Dist
Within some menu options user input will be required, such as choosing between two options or inputting values. Where user input is required, this is shown by displaying a flashing cursor near to the requested action. Options such as Yes/No, On/Off, or Large/Small, use the OK
↑
or ↓
keys to toggle the input and to select the input. If values are required to be input, use the ↑
and ↓
keys to increase/decrease the value, and OK
to confirm the value. For some menu items, holding the arrow key will step up or down in multiple units. * The state/value of these options is stored in flash memory, so are retained if Sync-‐One2 is switched off. Page 10 Sync-‐One2 User Guide Show Stats
This allows you to view the memory of the latest 60 readings, with reading 01 the most recent and 60 the oldest. A typical display is shown below: A +032 M01
S 0002 ms
+033
A S M +033 is the average of all the readings in memory is the span, or the difference between the largest and smallest readings in the memory is the reading currently on the screen, with 01 being the most recent is the delay measured for the reading being displayed ↑
↓
You can move through the readings using the and keys, if you think of the memory as being a vertical stack, with 01 at the top, the down arrow moves down through the stack to older readings and the up arrow moves up though the stack to newer readings. Menu
If a particular reading is considered inaccurate, pressing will enable the reading to be erased from the buffer and all the statistics re-‐calculated. People speaking during a measurement session, for example, can cause such errors. Details of why these stats are gathered are given in the Stats Analysis section later in the guide, which gives the details for how to best understand the readings. If no frame rate has been set, the display simply gives all the readings and statistics in milliseconds. If a frame rate has been selected, then all the readings alternate between milliseconds and frames, based on the selected frame rate after memory position has been displayed for a couple of seconds. A+0.80 M01
F
S 00.1 25 +0.84
So for the memory position shown above with a frame rate of 25 frames/sec set, the same information is displayed but showing the readings calculated in frames at the selected rate rather than milliseconds. Two flags ( and ) may also be shown, if the specific reading was taken with either a manual offset or speaker distance set. Details on these settings are further on in the guide. Clear all Stats
Used to wipe the entire memory of readings taken, without the need to delete them individually or to turn Sync-‐One2 on and off. Confirmation is required. Sync-‐One2 User Guide Page 11 Display Size
When in Measurement Mode a large number display can be activated for easier reading. This simply gives the reading in milliseconds without the additional data. However all the normal statistics and readings are still stored it’s just an alternate display mode should it be required. Display Average
In Measurement mode, whilst readings are being stored for future analysis a running average of the current measurement session can be displayed. There is a choice between the average being displayed in milliseconds (M/Sec) or frames (Frames). If frames are chosen but no frame rate is set, the display will show the average in milliseconds. This is handy to see if this running average is starting to head up or down, which can indicate a small delay error getting worse over time. The average can be calculated over hundreds of consecutive readings, although any ‘false’ readings will be included within the average. Millisecond and frame averages are indicated by A or AF respectively. Frame Rate
↑
↓
A video frame rate per second can be entered using the and keys, which is used to calculate the millisecond delay measured into frames. Any frame rate from 1 to 99 can be entered. Menu
Holding an arrow key will step up/down in 10’s and pressing the zero. In the screen below, a frame rate of 30 Frames/Sec has been input. key will quickly reset the value to Frame Rate
30 F/Sec
User ms Offset
A manual offset can be input, when an offset is set the readings are tagged with a symbol to indicate he setting is active. The offset entered is taken into account during readings and statistics calculations. Menu
Holding an arrow key will step up/down in 10’s and pressing the key will quickly reset the value to zero. In the screen below, an offset of 45 milliseconds has been input, with a frame rate of 25 frames/sec having previously already been set. User ms Offset
F
+45ms 1.12 @ 25
Page 12 Sync-‐One2 User Guide Speaker Dist
A speaker distance can be input, when a distance is input, all readings are tagged with a to indicate the setting is active. The time it takes sound to travel from the speaker to the “target” point is automatically calculated by Sync-‐One2 based on the distance value entered. This delay is taken into account during readings and statistics calculations. Distances between 0m and 20m can be input, in 0.5m increments. Menu
The delay can quickly be reset back to 0 by pressing the key. In the screen below, a speaker distance of 5m has been input, the distances are also given in feet and inches. Speaker Dist
5.00m
16’ 5”
Detection Test
If there is some doubt about the ability of readings being taken in any given environment, a detection test will simply display ‘Audio’ and/or ‘Video’ when the sound or light level is sufficient to trigger the sensors based on the last calibration performed. The flashing heart is to show the system is running looking for signals, the detection test will run for 1 minute or unless stopped early by pressing OK. Audio Trigger Level / Video Trigger Level
The sensitivity of the audio and video sensors can be adjusted, by default they are set to their highest setting to obtain the most accurate readings. If required, this can be reduced which has the effect of louder sound or brighter light being required to be able to take readings. There are five levels of adjustment available, move between them with the ↑
and ↓
keys. Auto Off
By default if no buttons are pushed for 15 minutes, the unit will switch itself off to save the battery. This can be adjusted in the range from disabling it completely to switching off after 60 minutes. Regardless of setting, if the battery gets too low Sync-‐One2 will give you a warning then switch itself off anyway. This helps prevent rechargeable batteries from being run down too low. Reset Settings
After confirming the action, Sync-‐One2 will be restored back to the factory defaults for all the settings & options. Sync-‐One2 User Guide Page 13 Effectively using Sync-‐One2 To be effective, there are some basic tips which when combined with an understanding of the statistics gathered will enable effective measuring of synchronisation errors. The light trigger is based on detecting the change from dark to light and is very sensitive. When testing involves projectors however, it may be required to put Sync-‐One2 into the projector beam (facing the projector, naturally) rather than rely on the reflected light from a screen. Audio detection is essentially looking for the start of a noise, it doesn’t matter is the audio is in or out of phase as this is taken into account automatically. Ideally perform tests in a darkened room with low ambient noise, doing so makes the distinction of the light flash and sound easier to detect and so measurements will be more accurate and reliable. When turning the unit on or going back into Measurement Mode Sync-‐One2 will calibrate to take account for ambient light and noise. It is best to hold the unit in the measuring position when turning on, or going back into measurement mode such that the calibration can be optimally set for the current measurement conditions and unit position. In any given installation there will be a variance between all the readings taken. This is because when digital processing is involved there will be slight differences in how the signals are processed, this is where the use of statistics is the most useful to determine any given error. Always take a number of readings to determine an error, to help smooth out the variances. Then the average and span of a set of readings give the best indication of the situation in any given system. A low span of readings means the system is stable in its operation, ideally a span of 10ms or 0.5 frames or lower is ideal. The average will give the delay in the system, naturally an average of 0ms / 0.00 frames would be perfect but in the real world anything under 10ms or 0.5 frames would be hard for anyone to detect. For example, if after a series of measurements, the Show Stats menu gives the following screen… A +046 M01
S 0002 ms
+047
…the low span of 2 milliseconds indicates the system is stable but suffers from a video delay of about 46ms. If this were a home cinema, adding an audio delay of 46ms and re-‐testing should result in a synchronised solution. If the same readings were obtained with a frame rate set, for example in a video editing environment, the screen would alternate between the stats in milliseconds and frames. So with the same measurements with a frame rate of 48 frames/second set there is a span of 00.1 frames, which is good. The average error is the audio leads the video by 2.19 frames so adjustments need to be made. A+2.19 M01
F
S 00.1 25 +2.23
Page 14 Sync-‐One2 User Guide When the low battery symbol comes on, it really does mean it’s time to change the batteries. The system will continue to operate until they get very low, then the unit will display a message and switch its self off. Troubleshooting Unit does not power on? Check the batteries are installed the right way round and that they are not discharged (i.e. flat). I don’t seem to be able to detect anything? Often just turning up the brightness or volume is enough to restore things to normal. Otherwise turn the unit on in the measurement position, so it calibrates to the measurement environment. Then go into the menus and select “Detection Test” and run the test sequence. This will indicate when audio and/or video triggers are detected. Should there still be no detection, check the trigger levels have not been lowered or simply reset the settings and try again. Specifications The specifications of Sync-‐One2 are below: • Operates on 2 x AA batteries, either normal or rechargeable batteries may be used. • Power consumption is low, so a standard set of AA batteries should last for around 50 hours of continuous use. Whilst off, Sync-‐One2 does draw a tiny amount of battery power (less than 0.1 micro amps), however if not being used for some time, it is always best to remove the batteries. • Dimensions (H x W x D) 144mm x 90mm x 30mm (5.6" x 3.5" x 1.2”) • 165g (5.8oz) excluding batteries • 16x2 OLED display for easy viewing and low power consumption • 2 x AA (LR6) batteries, rechargeable AA batteries are fine too • Reverse battery protection • Low battery indication and auto shutdown when batteries too low to sustain operation • Measurement of audio visual delay up to ±750 milliseconds • Internal minimum delay measurement accuracy of 0.05 milliseconds, display rounded to the nearest millisecond • Detection unaffected by phase of the audio signal • Best detection is with a clean audio signal between 1 KHz and 3 KHz • Self calibration adjusts for ambient noise and light (including fluorescent light flicker), with automatic microphone gain adjustment There are no elements within Sync-‐One2 which require internal end user adjustment. Sync-‐One2 User Guide Page 15 Standards compliance EN 55103-‐1:2009 Part 1 (EMC Emissions) EN 55103-‐2:2009 Part 2 (EMC Immunity) EN 55103-‐2:2009 (Magnetic Immunity) IEC 61000-‐4-‐2 (ESD) Sync-‐One2 is RoHS compliant and lead free For additional support or information please visit the website, or e-‐mail sync-‐[email protected] Sync-‐One2 is designed and manufactured in Cambridge, UK, by Harkwood Services Ltd. © Harkwood Services Ltd Page 16 Sync-‐One2 User Guide