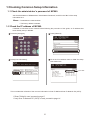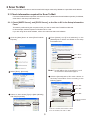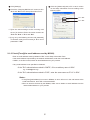
1
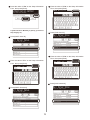
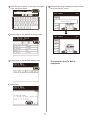
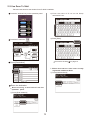
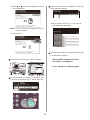
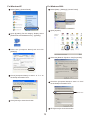
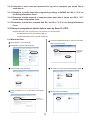
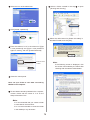
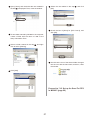
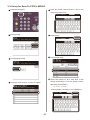
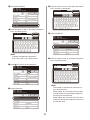
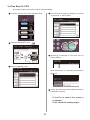
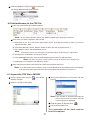
Before Setup
This guide describes the setup method to perform Scan To Mail, Scan To Network PC (CIFS) in MFP. Before
setting up Scan To mail, Scan To Network PC (CIFS), the MFP should be connected to the network so that printing is
available via the network from the computer.
If printing is not available via the network , functions described in this guide are not available. Read the user's
manual to connect your MFP via the network.
Set up the MFP with the following instruction.
• Connect MFP as a network printer. (Refer to the user's manual .)
6
• Check the information of setup items required for Scan To Mail and Scan To Network PC (CIFS)
and fill in the [Setup information form] on the next page.
6
• Set up the information filled in the [Setup information form] on the MFP and your computer in
accordance with the procedure.
Memo
In this guide, MC860 & CX2633 are collectively described MC860.
Contents
Setup Information Form....................................................................................................................................... 3
1 Checking Common Setup Information.............................................................................................................. 4
1-1 Check the administrator’s password of MC 860..................................................................................... 4
1-2 Check the IP address of MC860............................................................................................................ 4
2 Scan To Mail..................................................................................................................................................... 5
2-1 Check information required for Scan To Mail.......................................................................................... 5
2-2 Set up MC860 for Scan To Mail.............................................................................................................. 7
2-3 Use Scan To Mail.。............................................................................................................................. 12
3 Scan To Network PC (CIFS)........................................................................................................................... 14
3-1 Check the information required for Scan To CIFS................................................................................ 14
3-2 Set up a computer to which data is sent by Scan To CIFS................................................................... 16
3-3 Set up for Scan To CIFS in MC860...................................................................................................... 22
3-4 Use Scan To CIFS................................................................................................................................ 25
4 Block Registration for Email Address Book and Address Book..................................................................... 26
4-1 Read out onto CSV file......................................................................................................................... 26
4-2 Add an address to the CSV file............................................................................................................ 27
4-3 Import the CSV file to MC860.............................................................................................................. 27
5 Sending Received Faxes to the Server or as Emails without Printing (Auto Delivery)................................... 28
6 When Errors Occur......................................................................................................................................... 30
6-1 Error messages and Handling............................................................................................................. 30
6-2 How to set up [Target URL] when there is no DNS server................................................................... 31
6-3 How to set up when the user name is managed by the domain.......................................................... 32
Setup Information Form
Setup Information common in Scan To Mail/ Scan To CIFS
No.
Item
Description
Example
Customer's comment
G-1
Administrator
Password of MC860
Password to change the system setup aaaaaa
of MC860.
The default is "aaaaaa".
G-2
IP address of MC860
IP address assigned to MC860
192.168.0.2
Setup Information required for Scan To Mail
No.
Item
Description
Example
Customer's comment
(Up to 80 characters)
E-1
From
Email address when MC860 sends
an email.
mc860 @ test.co.jp
E-2
SMTP server
Address of a server used when
sending an email.
smtp.test.co.jp
E-3
POP3 server
Address of a server used
when receiving an email pop3.test.co.jp
E-4
SMTP port
Port number of SMTP server
587
E-5
POP3 port
Port number of POP3 server
110
E-6
Authentication
method
Authentication of the outgoing mail
server
SMTP
E-7
SMTP user ID
Account name of the outgoing mail
server
OKIMC860
E-8
SMTP password
Password of the outgoing mail server okimc860
E-9
POP user ID
Account name of the incoming mail
server
E-10 POP password
user
Password of the incoming mail server okimc860
(Up to 16 characters)
E-11 Name of Email
destination address
Name of the other party you want to
send by Scan To Mail from MC860
User
E-12 Email address
Email Address of the other party you
wan to send by Scan To Mail from
MC860
[email protected]
Setup Information required for Scan To CIFS
No.
Item
Description
Example
C-1
Computer name
of the destination
address
Name of a computer to which
scanned data is transferred.
PC1
C-2
User name
User name to log into a computer to
which scanned data is transferred.
mc860
C-3
Password
Password to log into a computer to
which scanned data is transferred.
mc860
C-4
Profile
Name to register settings in MC860.
Sales
C-5
Shared folder name
Folder name of a computer to which
scanned data is sent.
SalesDev
C-6
Scan File name
File name of scanned data
ScanData
Customer's comment
(Up to 32 characters)
(Up to 32 characters)
(Up to 16 characters)
(Up to 64 characters)
(Up to 64 characters)
1 Checking Common Setup Information
1-1 Check the administrator's password of MC860.
Ask the administrator of MC860 about "Administrator Password", and fill in the "G-1" of the setup
information form.
Memo • Passwords are case-sensitive.
• The factory default is aaaaaa.
1-2 Check the IP address of MC860.
If MC860 is connected to the network before following the procedure of this guide, an IP address has
been already set up in MC860.
Press the [Setup] key.
Press [Network].
Press [View Information].
Fill in the IPv4 address value on "G-2" the setup
information form.
Fill in "G-2".
This concludes the collection of the common information in Scan To Mail and Scan To Network PC (CIFS).
If Scan To Mail is used, proceed to page 5.
If only Scan To Network PC (CIFS) is used, proceed to page 14.
2 Scan To Mail
Scan To Mail provides a function to send an email with images scanned by MC860 to a specified email address.
2-1 Check information required for Scan To Mail.
If a network administrator specifies mail server account, password and email address (sender) for MC860,
enter them in the setup information form.
2-1-1 Check [SMTP Server], and [POP3 Server], or the like to fill in the Setup Information
Form.
This task is performed by the computer which you want to send Scan To Mail from MC 860.
In this example, Outlook Express on Windows XP is used.
If you are using other email software, refer to the manual of that email software.
Click the [Start] button to select [Email Outlook
Express].
Enter [Name] and [E-mail address] on the
[General] tab in "E-11" and "E-12" of the Setup
Information Form.
Fill in "E-11".
Fill in "E-12".
Note: The email address that is entered here is used
Select [Tools] - [Accounts].
to send email as described on page 12.
Click the [Servers] tab to fill in each column on
the Setup Information Form according to the
following graphic.
Fill in "E-2".
Fill in "E-3".
Fill in "E-9"
Select an item whose [Type] is [Mail (default)],
and click [Properties].
Enter the password
in "E-10".
If this box is checked, enter "SMTP" in "E-6".
If it is not checked, enter "POP" in "E-6".
Click [Settings].
Click the [Advanced] tab to fill in each column
on the Setup Information Form according to the
following figure.
Check the "Outgoing Mail Server" screen to fill in
"E-7" and "E-8" on the Setup Information Form.
Fill in "E-4".
Fill in "E-5".
• If [Use the same settings as the incoming mail
server] is checked, Enter the same contents as
"E-9" and "E-10" in "E-7" and "E-8".
• If [Log on by the following account and password]
is checked, enter [Account name] in "E-7" and a
password in "E-8".
2-1-2 Check [From](the email address used by MC860).
Enter an email address used by MC860 in "E-1" on the Setup Information Form.
If this email address is specified by the network administrator, enter the email address.
If ADSL, or the like is used, obtain an email address from your provider.
If any email address is not specified or obtained:
• If the "E-6" authentication method is "SMTP", fill in an arbitrary name in "E-1".
e.g.: [email protected]
• If the "E-6" authentication method is "POP", enter the same name as "E-12" in "E-1".
Notes:
• If the [From](mail address) is not set in MC860, an error will occur in the mail server at the
email transmission, and it will not be transmitted.
• When an email is received by the MC860, make sure to obtain an email address from the
network administrator or your provider.
2-2 Set up MC860 for Scan To Mail
Information obtained from Procedure 1 and 2-1 should be entered in MC860.
Make the settings of [From], [SMTP Server], [POP3 Server], [SMTP Port], [POP3 Port], [Authentication
Method], [POP User ID], [POP Password], and [Destination Name and Email Address].
2-2-1 Set [From] in MC860.
Press [Email Setup].
Press the [Setup] key.
Press [Admin Setup].
Press [From/ Reply To].
Enter the administrator password (Value in "G-1"
of the Setup information form) to press [Enter].
Enter by pressing keys on LCD.
Press [From].
Enter the value of "E-1" on the Setup Information
Form to press [Enter].
Press [Enter] after everything is entered.
Press [Scanner Setup].
Press [Close] on the [From/ Reply To] screen.
2-2-2 Set up items related to [Mail Server]
in MC860.
Press [Network Menu].
❿Press [Close] on the [Email Setup] screen.
Press [Mail Server Setup].
Press [Close] on the [Scanner Setup] screen.
Press [SMTP Server].
Check that the screen is [Admin Setup].
Enter the value of "E-2" on the Setup Information
Form to press [Enter].
[Mail Server] is now set up.
Press [POP3 Server].
Press [POP3 Port].
Use the numeric keypad to enter the value of
"E-5" on the Setup Information Form, then press
[Enter].
Enter the value of "E-3" on the Setup Information
Form, then press [Enter].
Press [SMTP Port].
Press [
].
Press [Authentication Method].
Use the numeric keypad to enter the value of
"E-4" on the Setup Information Form, then press
[Enter].
Press the value of "E-6" on the Setup Information
Form, then press [Enter].
Enter the value of "E-8" on the Setup Information
Form, then press [Enter].
If [Authentication Method] is [None], proceed to
Step 23 (page 11).
Press [POP User ID].
Press [SMTP User ID].
Enter the value of "E-9" on the Setup Information
Form, then press [Enter].
Enter the value of "E-7" on the Setup Information
Form, then press [Enter].
Press [POP Password].
Press [SMTP Password].
10
Enter the value of "E-10" on the Setup Information
Form, then press [Enter].
[Network Rebooting] is displayed, and the screen
will be the stand-by screen.
Press [Close] on the [Mail Server Setup] screen.
Press [Close] on the [Network Menu] screen.
The setup for Scan To Mail is
completed.
Press [Yes].
11
2-3 Use Scan To Mail.
Transmit a test email to see whether Scan To Mail is available.
Press the "Scanner" key on the operation panel.
2) Enter the value of "E-12" on the Setup
Information Form.
3) Press [Enter].
Press the E-mail icon.
Press [Destination].
•
Proceed to the step
When destinations have been already
registered in Address Book.
1) Press [Address Book].
Enter the destination.
•
When entering a destination from the
operation panel.
1) Press [Enter Address].
12
on page 13.
2) Press
or
to select the registered number
of the destination.
[Scanning document] is displayed on LCD, and
Scan To Email is started.
When transmission is completed,
[Completed] is displayed.
Note: You can enter the number with the
numeric keypad.
3) Press [Enter].
Check that the email is transmitted from MC860
to a destination computer.
If the email has been received,
the setup is completed.
Set a document to be sent on ADF or Flatbed.
abc
If not, check the settings again.
Check that [Mail Tx Ready] is displayed, and
press the <Color Start> Key or <Mono Start> key.
13
3 Scan To Network PC (CIFS)
Scan To Network PC is a function to send and save images scanned by MC860 in "Shared Folder" of a
computer connected to the network.
This section describes a method using CIFS protocol.
It is hereafter referred to us Scan To CIFS.
Setup Flow
• Enter information items required for Scan To CIFS in "Setup Information Form".
6
• Set up a computer so that MC860 can access to the computer to which data is sent by Scan To CIFS.
6
• Create "Shared Folder" in a computer set.
6
• Based on values described in "Setup Information Form", "Profile" is registered in MC860.
Note: Profile means a combination of settings including a user name, folder name of a saved place,
file name of data to be saved, scanned resolution, contrast, and hue adjustment.
A combination of frequently used settings can be registered as a profile, and by pecifying the
profile at usage, you do not have to enter each settings every time
3-1 Check information required for Scan To CIFS.
3-1-1 Check the name of a computer to which data is sent y Scan To CIFS, and then, fill
in "C-1" of the Setup Information Form.
Select [See the name of this computer] of
[Systems].
For Windows Vista
Select [Start] - [Control Panel].
Check the [Computer Name] to enter it in "C-1"
on the Setup Information Form.
Open [System and Maintenance]
Fill in "C-1".
Click [Cancel] to close the window.
14
For Windows XP
For Windows 2000
Select [Start] - [Control Panel].
Select [Start] - [Settings]- [Control Panel].
Open [System].
Open [System] (For the category display, select
[Performance and Maintenance] – [System]).
Select the [Computer Name] tab and click
[Change].
Select the [Network ID] tab to click [Properties].
Check [Computer Name] to enter it in "C-1" on
the Setup Information Form.
Check the [Computer Name] to enter it in "C-1"
on the Setup Information Form.
Fill in "C-1".
Click [Cancel] to close the window.
Click [Cancel] to close the window.
15
3-1-2 Determine a user name and password to log into a computer you would like to
send data to.
3-1-3 Determine a profile name when registering settings in MC860, and fill in "C-4" on
the Setup Information Form.
3-1-4 Determine a folder name of a computer where sent data is saved, and fill in "C-5"
on the Setup Information Form.
3-1-5 Determine a name for a scanned data file, and fill in "C-6" on the Setup Information
Form.
3-2 Set up a computer to which data is sent by Scan To CIFS.
Register MC 860 in the computer as a user, and set up a shared folder.
For Windows XP users, proceed to page 18.
For Windows 2000 users, proceed to page 20.
For Windows Vista
Check that [Standard User] is selected, and then,
click [Create Account].
Select [Start] – [Control Panel].
Click [Add or remove user accounts].
Confirm the
"Standard
User".
Click [Create a new account].
Click the icon of the user name entered in Step
Enter the value of “C-2” on the Setup Information
Form.
Click [Create a password].
Enter the
value of “C-2”.
16
Enter the value of “C-3” in [New password]
and [Confirmation for new password], and
click [Create password].
Select the user added in the step
[Add].
, and click
Enter the value
of “C-3”.
Close [Control Panel].
Select the added user and click [Share].
Next, set up a folder to save data scanned by
MC860 in the computer.
To save data scanned by MC 860 in the
computer, create a folder with the name of “C-5”
of the Setup Information Form.
Right click the folder created in the step , and
open [Properties].
Click [Done].
Click [Share] on the [Sharing] tab
Click [Advanced Sharing] on the [Sharing] tab.
17
Click [Permissions].
For Windows XP
Select [Start] – [Control Panel].
Click [User Accounts].
Check the box of [Allow] for [Full Control], and
click [OK].
Click [Create a new account].
Enter the value of “C-2” on the Setup Information
Form.
Close the properties of the folder.
Enter the
value of “C-2”
Proceed to “3-3 Set up items for Scan To
CIFS in MC860” (Page 22).
Select [Limited] in [Pick an account type] to click
[Create Account].
18
Select the icon of the added user.
Select a folder created in the step
[Sharing and Security].
to open
Click [Create a password].
Select the radio button for [Share this folder] in
Windows Firewall, and click [OK].
Enter the values of “C-3” in the columns of [Type
a new password] and [Type a new password
again to confirm], and click [Create Password].
Enter the value
of “C-3”.
Note:
If the following screen is displayed, click
the section surrounded by the frame after
checking with the network administrator.
Close the control panel.
Next, set up a folder to save data scanned by
MC860 in the computer.
To save data scanned by MC860 in the computer,
create a folder with the name of “C-5” on the
Setup Information Form.
Note:
It is recommended that you create a folder
to save data in the local drive.
It is not recommended to create the folder
in the desktop or my document.
19
For Windows 2000
Check [Share this folder] and click [Permissions].
Right click [My Computer] to select [Manage].
Select [System Tools] – [Local Users and
Groups], and then, select [Users]- [New User] on
the right window.
Check the box of [Allow] for [Full Control], and
click [OK].
Enter the value of “C-2” in the Setup Information
Form in [User name], and the value of “C-3” in
[Password] and [Confirm password].
Enter the value
of “C-2”.
Close the [Properties] of the folder.
Enter the value
of “C-3”.
Proceed to “3-3 Setup for Scan To CIFS
in MC860” (page 22).
Check the boxes of [User can not change
password] and [Password never expires]. Then,
click [Create].
20
Open [Users], and check that the user created in
the step is displayed. Then, close the window.
Select the user added in the step
[OK].
, and click
Check the box of [Allow] for [Full Control], and
click [OK].
To save data scanned by MC860 in the computer,
create a folder with the name of “C-5” of the
Setup Information Form.
Select a folder created in the step
click to select [Sharing].
, and right-
Check that the icon of the shared folder changes
into the icon with the hand mark, and then, close
the window.
Click [Add].
Proceed to “3-3 Set up for Scan To CIFS
in MC860” (page 22)
21
3-3 Set up for Scan To CIFS in MC860
Press the [Setup] key.
Enter the profile name entered in “C-4” in the
Setup Information Form.
Press [Profile].
Press [Enter].
❼ Press [Target URL].
Press [Register/ Edit].
❽ Enter the values of “C-1” and “C-5” in the
Setup Information Form as shown below,
and then, press [Enter].
Press the profile number you want to register.
\\ + “C-1” + \ + “C-5” In this example, it should be “ \\PC1\SalesDev ”.
22
❾ Press [User Name].
⓭Enter the value of “C-3” in the Setup Information
Form, and then, press [Enter].
❿Enter the value of “C-2” in the Setup Information
Form, and press [Enter].
⓮Press [File Name].
Note:
If domain management is performed,
enter "User name + @ + domain name".
⓯ Enter the value of “C-6” in the Setup Information
Form, and press [Enter].
⓫Press [ ] to move to the second page.
Note:
⓬Press [Password].
The number of characters for a file name is
up to 64 characters ).
When adding “#n” to the last of the file name,
a serial number is automatically assigned to
the last of the sent file name.
When adding “#d” to the last of the file name,
a date is automatically assigned to the last of
the sent file name.
23
⓰Set other values if needed.
⓲Press [Close] on the [Register/ Edit] screen.
⓳Press [Close] on the [Profile] screen.
Press [Close] on the [Setup] screen.
⓱After setting all values, press [Enter].
The setup for Scan To CIFS is
completed.
24
3-4 Use Scan To CIFS
Send a test email to see whether Scan To CIFS is available.
Press the “Scanner” key on the operation panel.
Check that [Scan Ready] is displayed, and press
<Color Start> or <Mono Start>.
Press the NetworkPC icon.
[Scanning] is displayed on LCD, and Scan To
CIFS is started.
Select a registered profile.
When transmission is completed, [Completed] is
displayed.
Confirm that a file scanned from MC860 is saved in
a destination computer.
If the file is saved, the setup is
completed.
If not, check the settings again.
25
4 Block Registration for Email Address Book and
Address Book
With the Configuration Tool, you can register an Email Address Book and Address Book (Speed dials)
created on your computer in block.
For the setup for Configuration Tool, refer to the user’s manual.
In this example, an Email address book is registered.
Registration Flow
• Register one email address in MC860.
6
• Write out an Email address book from MC860 onto a CSV file.
6
• Edit the CSV file on Microsoft-Excel to add the address.
6
• Read the edited CSV file into MC860.
4-1 Read out onto CSV file
Click [Email Address Manager].
Start Configuration Tool.
Select [Start] – [All Programs] (In Windows 2000,
[Programs]) – [Oki Data] – [Configuration Tool][Configuration Tool].
(If the address book is edited, click [Speed
Dial Manager].)
If MC 860 has been already registered in
Configuration Tool, proceed to the step .
Select [Register Device] on the [Tools] menu to
search for MC860.
Enter the value of “G-1” on the Setup Information
Form in “Administrator Password”, and click [OK].
❸Check the box of MC860, which the email address
book is registered in, and click [Register].
Click the [Create a New Email] icon.
Enter the value of “E-11” on the Setup Information
Form in “Name”, and the value of “E-12” in “Email
Address]. Click [OK].
Close the “Register Device” screen.
Select MC860 you want to se up from “Registered
Device List”, and click [User Setting].
Enter the value
of “E-11”.
Enter the value
of “E-12”.
26
Click the [Export to File] icon
to write out
the email address book as a CSV file.
4-2 Add addresses to the CSV file
Open the created CSV file in Microsoft-Excel.
Note: Do not change the item names, etc already entered when opening the CSV file.
Enter items you want to register in the CSV file.
A: Make sure to put “#” to the left the (RecordID) column, and add the number of items you want to
register, like #001, #002…
B: In the (EntryNumber) column, add the number of items you want to register, like 2, 3, …
C: In the (Name) column, add a destination name.
Note: The destination name is up to 16 characters in Email Address Book, and 24characters in Address Book.
D: Nothing has to be entered in the (Pinyin) column. E: In the (MailAddress) column, enter an email address (FAX number for Address Book).
Note: If the first 0 of a phone number is deleted, specify the character in the display format.
F: Nothing has to be entered in the (Member) column.
After everything is entered, save the file as a CSV format and quit the Excel.
Note: Up to 500 entries can be made in each of email address book and addess book in the MC860.
A file with more than 500 entries that cannot be imported as described in secton 4-3.
4-3 Import the CSV file to MC860.
Click the [Import from File] icon
address manager.
of the Email
Select email addresses to be imported, and click
[Import].
Select a CSV file to click [Open].
Note! If the number of characters exceeds the
limit, or the Excel is not closed, “File can
not be imported” is displayed.
Click the [Save To Device] icon.
Exit the Configuration Tool.
The registration of the email address
book is completed.
27
5 Sending Received Faxes to the Server or as Emails
without Printing (Auto Delivery)
By utilizing the function of Scan To Email or Scan To CIFS, you can save received faxes in a computer or
send as emails without printing.
If saved in the computer, the setup of Scan To CIFS is necessary. See Page 14.
If sent as an email, the setup of Scan To Email is necessary. See Page 5.
In this example, the following environment is used.
Device name: M860
IP address of the device:
192.168.0.2
MAC address: 00:80:87:84:9C:9B
Web browser: Microsoft Internet Explorer Ver.6.0
Start the web browser.
Click [Skip].
Enter “http://IP address of the device” in
[Address], and press the Enter key.
Click [Transmission Settings].
[Administrator’s login].
[Click
Enter “root” in [User name], and the value of “G-1”
of Setup Information Form in [Password], and
then, click [OK].
Click [New].
28
• When saving in a computer
Enter an arbitrary name in [Delivery Setting
Name], and set the [Delivery Setting] to [Enable],
checking “Received FAX”. Then, set [Print] to
[OFF].
1) Click [Edit].
Enter an
arbitrary name.
Check this box.
Set to “ON”.
2) Select a profile for a folder to be saved from
the profile list, and then, click [OK].
Set to “OFF”.
Note: You can select auto delivery destinations
by setting any specific conditions tfor
narrowing down destinations.
Set the [Delivery destination].
• When sending an email.
1) Click [Setup for Email destination address].
Click [Submit].
2) Enter a destination email address, and click
[Add to the list].
The settings are transmitted to
MC860, and MC860 is restarted.
3) Check that entered email address is displayed
in the address list, and click [OK].
The setup for the auto delivery
is completed.
29
6 When Errors Occur
6-1 Error messages and Handling
Error Messages
Check the DNS setting.
Press the <Stop> key.
Check the server setting and
press the <Stop> key.
Cases
Handling
In the setting of “Target URL” of
the profile, a computer name is
wrong.
Check the profile setting to correct the
computer name.
It is the value of “C-1” of the setup information
form.
There is no DNS server on the
network.
In the specification of “Target URL” of the
profile, specify not a computer name but an IP
address (See 6-2)
A user name is managed by
the domain.
Add the domain name to the user name.
See 6-3.
“Share the profile and printer”
service is not allowed in
Windows Firewall.
Select [Control Panel]- [Security Center][Windows Firewall], and check that “Share the
profile and printer” exists on the [Exception]
tab, and the box is checked.
Select “Share the profile and printer” and click
[Edit]. Check that “TCP445” exists, and the box
is checked.
TCP445 is not allowed in
Widows Firewall.
A user name is managed
by the domain
Add the domain name to the user name.
See 6-3.
Server Login Failed
Press the <Stop> key.
The password of the computer
or profile is wrong.
Check that the password specified in the
computer matches the password specified in
the profile.
The value of “C-3” in the setup information
form.
File writing Failed
Press the <Stop> key.
The user name of the computer
or profile is wrong.
Check that the user name specified in the
computer matches the user name specified in
the profile.
The value of “C-2” in the setup information
form.
Writing in the shared folder is
not allowed.
Check that setting of the shared folder.
Check the shared name.
Press the <Stop> key
The shared name of the folder is
wrong in the URL specification
of the file.
Check that the name of the shared folder
matches the profile setting.
The value of “C-5” of the setup information
sheet.
[Email Sent Completed] is
displayed, however, the email is
not sent.
The address of the email is
wrong.
Check the address and send it again.
The file size for the email
attachment may be limited by
the network administrator.
Send it in several batches.
Reduce the scanning resolution.
Send it as monochrome data.
30
6-2 How to set up [Target URL] when there is no DNS server
If there is no DNS server in the network, a computer can not be specified by the computer name.
In this case, the IP address of a computer is used for the setup.
Check the IP address of a computer.
Set up the profile in MC860.
Set up with the procedure of “3-3 Setup for
Scan To CIFS in MC860” (page 22).
1) Select [Start]- [ Control Panel]- [Network].
2) Double-click [Local Area Connection] to click
[Properties].
Step ❽ on page 22 is as follows.
3) Select [Internet Protocols (TCP/IP)] and click
[Properties].
4) Enter the value of the IP address in “C-1”.
Enter in
“C-1”.
In this case, the value to be entered in the
If the IP address is not displayed on the
window, proceed to 6).
5) Click [Cancel] to close the window.
Proceed to
6) Click [Cancel] to close the window.
7) Select [Start]- [All Programs]- [Accessories][Command Prompt].
8) Enter “ ipconfig ” to press the Enter key.
9) Enter the Value in IP address in “C-1”.
Enter in
“C-1”.
10) Enter “ exit ” to exist the command prompt.
31
\\ + 192.168.0.3 + \ + SalesDev
6-3 How to set up when the user name is managed by the domain
When [Check the DNS setting] or [Check the server setting] is displayed on the LCD of MC860, the
network may be managed by the domain.
Check with the administrator of the network, and if the network is managed by the domain, MC860 is set
up wit the following procedure.
In this example, Windows XP is used for the description.
4) Check the domain name.
Check the domain name.
1) Open [Start]- [Control Panel].
In the following figure, “domain.co.jp” is the
domain name.
2) Open [Systems](For the category display,
select [Performance and Maintenance] –
[System]).
Set up MC860.
Set up with the procedure of “3-3 Setup for
Scan To CIFS in MC860” (page 22).
In this case, the value to be entered in the step
❿ on page 23 is as follows
mc860 + @ + domain.co.jp
3) Select the [Computer Name] tab to click
[Change].
32
About Trademarks
OKI is a registered trademark of Oki Electric Industry Company, Ltd.
Microsoft, Windows, Windows Server and Windows Vista are registered trademarks or trademarks of Microsoft
Corporation in the United States and/or other countries.
Apple, Macintosh and Mac OS are registered trademarks or trademarks of Apple Inc. in the United States and/or
other countries.
About Copyright on This Manual
All rights belong to Oki Data Corporation. Reproduction, transcription, translation or other use without
permission is not allowed. Written consent of Oki Data Corporation must be required for them.
2009 Oki Data Corporation
33