1
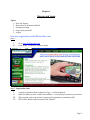
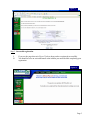
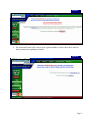
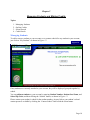
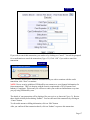
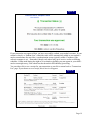
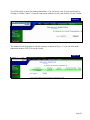
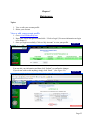
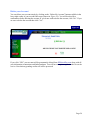
User’s Manual for EZSchoolPay Parents
Revision 7 – 09/20/2007
This manual is divided into three chapters:
1. Sign-up and Login
This chapter explains the sign-up procedure in detail. It also provides help for issues such as
logging in, activation of account and lost password recovery.
2. Making Credits
This chapter discusses the tasks related to making credits to your student’s accounts. It
explains linking and unlinking of students, crediting accounts and maintaining your billing
information.
3. Maintenance
This chapter provides help for editing your account information, deleting your account, and
other maintenance activities.
Note: Please contact your school if you have further questions regarding EZSchoolPay.com.
EZSchoolPay sales and website administration personnel cannot provide tech support. Sorry.
TABLE OF CONTENTS
Sign-up and Login............................................................................................................. 2
New user registration with EZSchoolPay.com ............................................................... 2
Do not have your activation E-mail? .............................................................................. 4
Existing User Login ........................................................................................................ 6
Forgot your password?.................................................................................................... 7
Logout ............................................................................................................................. 9
Managing Students and Making Credits...................................................................... 10
Managing Students ....................................................................................................... 10
Online Credits ............................................................................................................... 14
School Search ............................................................................................................... 20
Credit Search................................................................................................................. 21
Maintenance .................................................................................................................... 23
View or edit your account profile ................................................................................. 23
Delete your Account ..................................................................................................... 24
Chapter 1
Sign-up and Login
Topics:
1.
2.
3.
4.
5.
New user sign up
Do not have an Activation-Email?
Existing user login
Forgot your password?
Logout
New user registration with EZSchoolPay.com
Step 1:
I.
II.
Go to www.EZSchoolPay.com
Click on the “Click Here” button to begin.
Step 2: Registration form
I.
II.
III.
IV.
A simple registration form as shown in Figure 1 will be displayed.
Make sure that you enter a valid E-mail address -- it is necessary to activate your account.
The password needs to be at least 6 characters long (numbers or characters OK).
Fill in all the details in the form and Click “Submit.”
Page 2
Figure 1
Step 3: Successful registration
I.
II.
If you see the page shown in Figure 2 below, then you have registered successfully.
You should receive an activation email at the address you entered while completing your
registration.
Figure 2
Page 3
Step 4: Activation
You will need to activate your account in order to start using EZSchoolPay.com. The Activation
E-mail you receive will contain the detailed instructions to activate your account.
Do not have your activation E-mail?
If you have lost or deleted the activation E-mail without activating your account, or if you did not
receive it, you can simply resend the activation E-mail to your registered E-mail address with
EZSchoolPay.com (see “Resending the Activation E-mail” topic below).
If you never received an activation E-mail:
1. Please check that the E-mail address you registered with EZSchoolPay.com is a valid E-mail
address and you are able to receive Internet E-mail at this address.
2. If you are using any ‘Spam Blocker’ program, be sure that it allows you to receive incoming
E-mail from EZSchoolPay.com.
3. Some E-mail providers, such as Verizon.net, mistakenly mark EZSchoolPay.com email as
“spam”, and fail to deliver it to your inbox. If you suspect this, please check with your provider.
4. Resend the activation E-mail to yourself.
Resending the Activation E-mail:
1. Go to www.EZSchoolPay.com
2. Enter E-mail address and Password you registered with EZSchoolPay.com
3. Click on “Click to Login” button.
Figure 3
4. If your account is not activated, you will see the page shown in Figure 4.
To receive your activation E-mail, click on the link “Click here”
Page 4
Figure 4
5. The activation E-mail will be sent to your registered address. Please check the E-mail for
further instructions regarding activation.
Figure 5
Page 5
Existing User Login
You can log into EZSchoolPay.com if,
1. You have already registered with EZSchoolPay.com and,
2. You have activated your account successfully using the activation E-mail.
If you forgot your password, you can reset your password and EZSchoolPay.com will send you a
new password.
To login:
1. Go to www.EZSchoolPay.com
2. Enter your registered E-mail address and password.
3. Click on the button “Click to Login.”
Figure 6
If email and password you entered is valid and your account is activated then you will login
successfully into your account with EZSchoolPay.com.
You can use your account to add & remove students, make credits (Chapter 2) and maintain your
profile (Chapter 3).
Page 6
Forgot your password?
You can reset your password and EZSchoolPay.com will E-mail you a new password.
To reset your password:
1. Go to www.EZSchoolPay.com
2. Click on the link “Forgot Password?” shown in Figure 7.
Figure 7
3. You will be asked for your E-mail address. Please enter the E-mail address you registered
with EZSchoolPay.com and click on the “Submit” button.
Figure 8
Page 7
4. You will be asked the “Security Question” you selected while registering with
EZSchoolPay.com.
5. Please answer the question in the “Response” box and click “Submit.”
Figure 9
6. If your answer matches with the answer you registered with EZSchoolPay.com, your
password will be reset and an E-mail will be sent to you with the new password. You’ll
know this happened if you see the page shown in Figure 10.
Figure 10
Page 8
Logout
Make sure that you logout from your account after you are done using the account. This will avoid
any unauthorized access to your account.
To logout simply click the “Click to Logout” button as shown in Figure 11.
Figure 11
If you do not perform any activity while logged in, you will be automatically logged out from
EZSchoolPay after some time for security reasons. To continue working with EZSchoolPay simply
login again.
Page 9
Chapter 2
Managing Students and Making Credits
Topics:
1.
2.
3.
4.
Managing Students
On-line Credits
School Search
Credit Search
Managing Students
To add or remove students to your accounts, or to contact schools for any student in your account,
just click on “My Students” as shown in Figure 12.
Figure 12
If any students are currently attached to your account, they will be displayed, grouped together by
school.
You can add new students to your account by entering Student Number, Student Last Name, and
School Zip Code, and then clicking the “Submit” button, as shown in Figure 13.
Please contact your student’s school for the student number. An easy link to your student’s school
contact person is available by clicking the “Contact School” link beside the school name.
Page 10
To remove existing students from your account, just click on “Remove” beside the name of the
student you wish to remove.
Figure 13
If you do not know the zip code of your school, click on Pick School to select your school. You will
be asked to select your state to begin with. You can either click on the appropriate state in the map or
select your state from the drop-down list and press the “Go” button to continue (see Figure 14).
Figure 14
Page 11
Once the state is chosen, you will be asked to chose your school district.
Figure 15
KANSAS
After the district is selected, you will need to select your school.
Figure 16
KANSAS: Two Rivers Public Schools
Once you click “Submit” after selecting the school, the zip code will be filled in for the selected
school. To add the student to your account, simply click on “Submit” after you enter Student
Number and Student last name.
Page 12
You can view contact information for your student’s school or send an E-mail to a school by
clicking “Contact School” beside the school name.
A new window will appear with the contact information of the school. You can either call the school
at the number given or use the form to send an E-mail to the school.
Figure 17
To send an E-mail to the school, type in your name, telephone number, E-mail address, and a brief
message in appropriate text boxes. Conclude by clicking the “Submit” button shown in Figure 17.
Please make sure that your contact information is correct -- the school will use this to contact you.
Page 13
Online Credits
There are two types of schools: 1) “Student Sync” schools in which you add your student from an
existing database once and the student record is available each time you make a credit (by far the
most common) and 2) “Non Student Sync” schools in which you must add the student’s name and
information with each credit – note that these schools do not automatically add online credits
directly into the meal accounting system at the school; a school administrator must manually adjust
the balance caused by a new credit.
If you are not sure about which type of school your student belongs to, EZSchoolPay will prompt
you appropriately when needed. To make credits, click “Online Credits” in the left side menu
(Figure 18). If you have made any prior transactions, those will be displayed here.
Figure 18
To make a new transaction, just click on “Add Credit” shown in Figure 19.
All of the active students linked to your account will be displayed here (see
Figure 20). You can also add more students to this transaction simply by
entering their first name, last name, grade and student number.
After you click on “Add”, you will be prompted to select your State, District and
School respectively.
Figure 19
Depending on your school synchronization type, either the student will be linked to your account or
will be added to the transaction as an additional student. The linked student will appear under “My
Students” menu selection and will automatically be available for future transactions.
An Additional Student is only part of the current transaction (is part of a “Non Student Sync” school;
these credits are not automatically added to the school’s meal accounting system – instead a manual
adjustment to the balance by school personnel is necessary). This student will not automatically
appear for future transactions, but must be added again manually each time.
Page 14
Figure 20
You can remove an additional student simply by clicking on “Remove”.
If you do not wish to add any more students to this transaction, simply click on “Proceed to Online
Credits” to pay for existing students.
All of the students linked to your account will be displayed here (see Figure 21). You can make a
credit to some or all of them at the same time. If your child’s school has set up any “Special
Payments” you will see them listed here (for instance, Dance Class Registration, Back-To-School
Portraits, Locker Fee, etc). Leave blank any fee you don’t wish to pay as part of this transaction, or
which doesn’t pertain to the listed student(s).
If the schools have provided extra information about a payment (comments or special instructions),
the payment name will be marked with a “*” to indicate a footnote. The corresponding information
will be displayed at the bottom of the screen.
For all fees except “Meal Account”, a text box to enter “Notes/Comments” will be displayed. The
comment you enter here will be sent to your child’s school, along with the payment. This is useful,
for instance, if the school has requested additional information about your payment. (Note: no
comment can be entered for “Meal Account” credits, simply because these amounts are imported
directly and automatically into your school’s meal accounting program.)
To provide a credit, simply enter the desired amounts in the boxes beside each applicable payment
name. Then, click “Next” to continue.
To cancel the transaction instead, click “Cancel” to return to the Transactions List page.
Page 15
Figure 21
IMPORTANT: “Special Payments” (anything other than “Meal Account” credits) are displayed only
if your child’s school has set up any such payment with EZSchoolPay.com. Otherwise, you will just
see options to enter Meal Account credits for each student. Check with your school if you would like
the ability to pay for other school fees online.
After you enter the amount you wish to pay, you will be required to enter the credit card/debit card
information as shown in Figure 22. The page will also display the Credit amount, Processing fee and
the total charges you will pay. You can edit the credit amount by clicking on “Edit”.
Page 16
Figure 22
If you wish to cancel this transaction, you can do so by clicking on “Cancel”. You will be prompted
for a confirmation to cancel the transaction (Figure 23). Click “OK” if you wish to cancel the
transaction.
Figure 23
Once you have entered all the financial information and you wish to continue with the credit
transaction, click “Next” to continue.
NOTE: Due to security guidelines EZSchoolPay.com cannot save your financial information for
future transactions. This is in keeping with the security requirements of PCI (Payment Card
Industry) Compliance. This means you will have to enter your credit card information every time
you pay using EZSchoolPay.com.
The details of your transaction will be displayed for your review, as shown in Figure 24. Review
these details carefully before hitting “Submit”. You can still cancel the transaction by clicking on
“Cancel” button.
To edit credit amount or billing information, click on “Edit” button.
After you confirm all the transaction details, click on “Submit” to process this transaction.
Page 17
Figure 24
After transaction is processed, the results will be displayed.
Status of the transaction will either be Approved or Not Approved. Figure 25 illustrates the results of
an Approved transaction.
Please note:
1) Transaction Processing may take few seconds – be patient.
2) If your transaction is Not Approved, it may be that you have entered some information
incorrectly. If you are certain that you have entered all information correctly and the
transaction is Not Approved, you should contact your bank or card issuer.
Page 18
Figure 25
If your transaction was approved then you have successfully credited your student’s account. If your
student’s school is a “Student Sync” school the credit will be automatically added to your student’s
meal account balance the next time a synchronization occurs (typically within 15 minutes if the
cafeteria computer is on). Remember, though, each school may opt to receive credits on differing
schedules. Credits made during the night or on weekends or holidays may not appear in your child’s
meal account right away, if the school has shut down their EZSchoolPay processing.
You can either click to see a receipt for your transaction or can click to return back to “Transactions
List” page. If you choose to see a receipt, this is how it will appear:
Figure 26
Page 19
Click on “Print receipt” to print a paper copy of your receipt. Click on “Close Window” to close this
receipt.
If you click to return to the list of transactions, you will be taken to the “Transactions List” page,
which displays all your transactions (Figure 27).
Figure 27
To view the details of the transaction simply click on the transaction number (TRX #) link.
School Search
To search for a school’s contact information click on “School Search” from the top menu selection.
Figure 28
Page 20
You will be asked for School Zip code and School name. School name is optional. If you do not
enter a school name, you will see all the schools with the specified zip code. Click “Submit” to
complete the search.
All the schools in the specified zip code will be displayed. If you specified the name of the school,
then only schools matching that search will be shown.
Figure 29
Click on the school name to view its contact information. Note: You can also view a school’s contact
information using the link that appears above the names of students already linked to your account,
on the “List Students” screen.
Credit Search
To search for a past credit transaction, click on “Search Credit” (Figure 30).
Figure 30
Page 21
You will be asked to enter your transaction number. (You can always view all your transactions by
clicking on “Online Credits”). Enter the transaction number to locate, and click the “Search” button.
Figure 31
The transaction will be displayed with the summary as shown in Figure 32. You can click on the
transaction number (TRX #) to see the receipt.
Figure 32
Page 22
Chapter 3
Maintenance
Topics:
1. View or edit your account profile
2. Delete your account
View or edit your account profile
1. Go to www.EZSchoolPay.com
2. Enter your E-mail and password and click “ Click to Login” (For more information on login
refer chapter 1)
3. Once you login successfully, Click on “My Account” to view your profile.
Figure 33
You can edit your information and then click “Submit” to confirm the changes.
If you do not wish to edit anything, simply click “Back.” (See Figure 34).
Figure 34
Page 23
Delete your Account
You can delete your account simply by clicking on the “Delete My Account” button available in the
lower right corner of your account edit screen (shown in Figure 34). You will be asked for a
confirmation before deleting the account. If you do not wish to delete the account, click “No”. If you
are sure to delete the account then click “Yes”.
Figure 35
If you click “YES” your account will be permanently deleted from EZSchoolPay.com along with all
your information, transactions and linked students. You will have to register again in order to use the
service. Note that any pending credits will still be processed.
Page 24