1
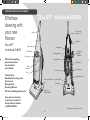
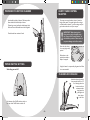
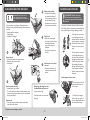
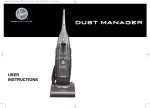
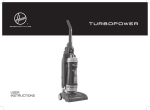
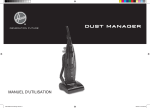
GENERATION FUTURE
DUST MANAGER
USER
INSTRUCTIONS
0565-5287.indd 1
28/11/2007 15:27:15
IMPORTANT SAFETY REMINDERS
User’s manual - This cleaner should only be used
for its intended purpose as described in these
instructions. Ensure that these are fully understood
before operating this appliance.
Only use attachments recommended or supplied by
Hoover.
When using cleaning tools ensure that the cleaner is
kept in the upright (parked) position. This will avoid
possible damage to the carpet or floor covering.
When cleaning stairs DO NOT position the cleaner
above you.
Safety with Children, Elderly or the Infirm: Do not
let children play with the appliance or its controls.
Please supervise the use of the appliance by older
children, the elderly and the infirm.
STATIC ELECTRICITY. Some carpets can cause a
small build up of static electricity.
Any static discharge is not hazardous to health.
DO NOT use your cleaner out of doors or on any
wet surface or for wet pick up.
Keep hands, feet, loose clothing and hair away from
rotating brushes.
DO NOT pick up hard or sharp objects, matches,
cigarette ends or other similar items.
DO NOT pick up flammable liquids such as cleaning
fluids, petrol etc. or their vapours.
Aerosol sprays may be flammable. DO NOT spray
near cleaner.
SUPPLY CORD. DO NOT run over the supply
cord when using your cleaner or remove the plug by
pulling on the supply cord.
FAULTS. DO NOT continue to use your cleaner if
it appears to be faulty. If the supply cord is damaged
stop using the cleaner IMMEDIATELY.
The supply cord must be replaced by an authorised
Hoover service engineer to avoid a safety hazard.
AFTER USE. Switch the cleaner off and remove the
plug from the electricity supply.
Always switch off and remove the plug before
cleaning the appliance or attempting any maintenance
task.
HOOVER SERVICE. To ensure the continued safe and
efficient operation of this appliance we recommend
that any servicing or repairs are only carried out by
an authorised Hoover service engineer
0565-5287.indd 2
This highly advanced machine makes cleaning
easier and more efficient.
You’ll find it kinder to your carpets - and to
you!
Please take the time to read this manual
carefully.
You’ll be ready to make the most of the special
features only the new Hoover Dust Manager
can offer!
WARNING!
ELECTRICITY CAN BE
EXTREMELY DANGEROUS
This appliance is double insulated and must
not be earthed.
The plug is fitted with a 13 amp fuse.
IMPORTANT: The wires in the mains lead
are coloured in accordance with the following
code:
Blue - NEUTRAL
Brown - LIVE
Genuine Hoover Spares and Consumables
Always replace parts with Genuine Hoover spares and consumables.
HOOVER SERVICE 08705 400 600
HOOVER SPARES 01204 556 111
Congratulations on the purchase of your new
Hoover Dust Manager.
DUST MANAGER
-- -28/11/2007 15:27:16
GETTING TO KNOW YOUR CLEANER*
DUST MANAGER
Effortless
cleaning with
your new
Hoover
DUST
MANAGER
Cord storage
swivel hook
Handle
Supply cord
Cleaner body
Dusting brush
On/Off switch
Grooming nozzle
Door release
When first unpacking
your cleaner please
check all items
are included:
Pet Hair &
Allergen
Remover*
Carrying handle
Flexible hose
Dust
Cassette
Hose retainer
Door
Cleaner Body
Handle with securing screw
Crevice tool
Dusting Brush
Grooming Nozzle
Pet Hair and Allergen Remover*
Hose supports
Exhaust filter cover
Cleaner lock release
Long Crevice Tool
Hose hook
Carpet Care
Control Selector
If any parts are missing
contact your retailer or
call the Hoover helpline
on 08705 400 600
* Features may vary according to model
-0565-5287.indd 3
28/11/2007 15:27:16
CARPET CARE CONTROL
SELECTOR
PREPARING TO USE YOUR CLEANER
Insert handle into body of cleaner. Slide into position.
Ensure handle is flush with body of cleaner.
Tighten large screw (pre-fitted to handle upper hole).
Insert small screw into handle lower hole and tighten.
The carpet care control selector raises or lowers the
height of the nozzle. The nozzle height will not change
until the handle is released. Try various settings until you
get the best results for each of your carpets.
1
!
Check that the dust container is fitted.
IMPORTANT: When cleaning hard
floors such as vinyl or linoleum, move
the “Carpet Care Control Selector” to
the Hard floor position. Failure to do so
may cause damage to the floor surface.
Ensure that the cleaner
is in an upright (parked)
position.
Slide selector to the
position best suited to
depth of carpet pile.
POWER SWITCH SETTING
Using this cleaner for carpets with pile greater than 30mm
is not recommended.
Switching on and off
CLEANER LOCK RELEASE
Unlock the cleaner by pressing
down on pedal with foot. For
floor cleaning under low
furniture and some
maintenance tasks
simply press the
pedal again and
lower cleaner
to the floor.
Push bottom of the On/Off switch to switch on.
Push top of the On/Off switch to switch off.
-0565-5287.indd 4
28/11/2007 15:27:17
CLEANING TOOLS*
!
EMPTYING THE DUST CASSETTE
IMPORTANT: DO NOT FILL ABOVE THE INDICATED MAX LEVEL MARK SHOWN
ON THE CASSETTE .
IMPORTANT: When using cleaning tools, the cleaner must
be kept in the upright (parked) position, particularly when
cleaning stairs. The carpet height selector should also be
set to tool mode:
Pet Hair & Allergen Remover*. (Certain
models only)
Ideal for removing pet hairs.
Do not touch the rotating brush.
*
The long crevice tool provides extra reach
and can be attached to both the dusting
brush and the grooming nozzle.
Press down on door
release pad and remove
door.
Remove the dust cassette
from the cleaner using the
handle grip on the front.
Rotate the BLUE filter pack
to the unlock position to
release from the dust
cassette.
ALWAYS attach hose retainer to
hook when using cleaning tools.
Unhook after use.
CLEANING THE STAIRS
Turn the dust container
and remove the BLUE
transparent shroud
including the RED vortex
finder.
It is dangerous to place the cleaner above you whilst
cleaning the stairs.
ALWAYS work with the cleaner below you. Ensure it is
positioned up against the bottom step.
!
DO NOT attach hose retainer when cleaning the stairs.
* Features vary according to model
0565-5287.indd 5
Empty the dust container of Repeat all steps in reverse
to refit the dust container
dirt and debris.
on the product. Make sure
that the RED and BLUE
components are refitted.
IMPORTANT: For optimum cleaning performance, always keep
your filters clean. Hoover recommends to wash Dust Manager
cassette filters after 5 container empties.
-- -28/11/2007 15:27:18
CLEANING THE FILTERS*
Washing pre-motor and exhaust filter:
Washing filter and foam:
The pre-motor filter should be washed every three
months.
Rotate the BLUE filter pack until the unlock
position to release it from the dust container.
The Carbon filter is normally maintenance free, this
component should not be washed. If a replacement is
required please contact our spares department.
Separate the GREY foam filter from the BLUE
filter pack using the tab provided.
The exhaust filter should be washed every month.
Press down on the latch to remove the exhaust cover
and filter.
Wash the GREY foam filter thoroughly.
Wash filters under hand warm water.
DO NOT USE HOT WATER OR DETERGENTS!
Gently tap to release excess dust. Wash the
filter with the BLUE housing from the inside.
DO NOT USE HOT WATER OR
DETERGENTS!
Remove excess water by shaking and leave to dry for
24 hours. Refit filters only when completely dry.
Remove excess water by shaking and leave
to dry for 24 hours. Refit filters only when
completely dry.
!
Do not use a brush as this will damage the
filter.
IMPORTANT: For optimum cleaning performance, always keep
your filters clean.
* Features vary according to model
-0565-5287.indd 6
28/11/2007 15:27:21
CHANGING BELT OR BRUSHES
1
2
IMPORTANT: Switch cleaner off and
remove plug from electricity supply
before checking the brushes or removing
hood.
If your cleaner is not picking up efficiently, the belt or
brushes (or both) may need replacing, but first make sure
you have:
• Emptied the dust container
• Cleaned filters
• Checked for blockages
B
1
3
4
A
Remove hood
• Prise off the carpet care control selector
• Remove hood screws A and B.
• Lift off hood
5
Refit brush assembly
•Hold the brush assembly
and stretch the belt until
brush mountings slot down
into the cleaner housing.
Rotate the brush to ensure
free movement of the belt.
Refit hood
•Refit hood, ensuring the
lugs along the front of hood
are located in the slots
along the front edge of
baseplate.
•Secure hood, using screws
A and B.
Refit carpet care control
selector
•Ensure the raised face (T)
is towards the front of the
cleaner.
CLEARING A BLOCKAGE
!
IMPORTANT: Switch the cleaner
off and remove the plug from the
electricity supply before dismantling
cleaner.
This cleaner is unlikely to become blocked, except by
over filling of the dust container or accidentally picking
up large solid objects. Clearing a blockage is simple.
If cleaning tools were in use,
check cleaning tool and extension tube first. Next check
hose handgrip; to remove grip
ribbed ring as shown, turn in
direction of arrow and ease
apart.
To check the hose, stretch it
to full length and switch on
the cleaner; the suction will
dislodge most obstructions.
If this is unsuccessful, switch
off and unplug the cleaner.
Remove the hose by turning
it anti-clockwise as shown.
Detach cassette and remove
blockage.
For blockages in cleaner base:
2
Remove brush assembly
• Inspect belt for signs of wear.
• To remove, pull brush cleaner assembly upwards out of
cleaner housing. Remove belt from motor spindle then
from brush assembly.
Replace belt
• Loop the new belt around the motor spindle then
around the brush channel.
* Features vary according to model
0565-5287.indd 7
Removing a blockage from the
Pet Hair & Allergen Remover*
(Certain models only)
Open clip and lift cover to remove
blockage.
1. Turn the cleaner over and
check that the brushes are
free to rotate.
2. Check for a blockage in
hose socket. Use a piece of
wire or a blunt flexible rod to
remove any obstructions.
-28/11/2007 15:27:22
Genuine HOOVER spares
Tel. 01204 556 111
Quality, Safety & Environment
Always replace parts with genuine Hoover spares. These are available from your local
Hoover dealer or direct from Hoover. When ordering parts always quote your model number.
As the owner of a new Hoover product we
would like to tell you more about the high
standards we have set on Quality, Safety
and the Environment.
Hoover service Tel. 08705 400 600
Quality
Should you require service at any time please call the HOOVER Service Office.
Hoover have a computerised nationwide service network with over 500
engineers who will respond quickly to your call and guarantee your repair for 12 months.
BSI ISO 9001
Hoovers factories have been independantly
assessed for quality.
Our products are made using a quality
system which meets the requirements of
ISO 9001.
Hoovercare
To maintain your HOOVER product in peak condition you may also wish to take out a
Hoovercare policy, for which an annual payment provides a comprehensive maintenance and
repair scheme. For further information telephone the HOOVER Service Office.
Although safety certification
of electrical applications is not
required by law in the UK, Hoover
believe that independant approval
is the best way of demonstrating
safety in design and manufacture.
The British Electrotechnical
approvals Board (BEAB),
the independant UK national
authority for the safety of domestic
electical appliances, ensure that
European Safety Standards
are met and are maintained
throughout the production life of
an appliance.
All appliances which pass these tests
are permitted to carry this BEAB
mark of safety:
GUARANTEE STATEMENT
BEAB
Appproved
The guarantee conditions for the appliance are as defined by our representative in the
country in which it is sold. Details regarding these conditions can be obtained from
the dealer from whom the appliance was purchased, the bill of sale or reciept must be
produced when making any claim under this guarantee.
Subject to change without notice.
CONSUMABLES
CYCLONIC CASSETTE FILTER KIT: HEPA PREMOTOR FILTER
AND FOAM
PRE MOTOR FILTER
AGITATOR
BELT
HOSE
MINI TURBO NOZZLE WITH INTEGRATED CREVICE TOOL
MINI TURBO NOZZLE
Safety
Environment - Weee Directive
This appliance is marked according to the European directive 2002/96/EC on
Waste Electrical and Electronic Equipment (WEEE).
CODE
U44 - 35600746
By ensuring this product is disposed of correctly, you will help prevent potential negative consequences for the environment and human health, which
could otherwise be caused by inappropriate waste handling of this product.
The symbol on the product indicates that this product may not be treated as household
waste. Instead it shall be handed over to the applicable collection point for the recycling
of electrical and electronic equipment.
Disposal must be carried out in accordance with local environmental regulations for
waste disposal.
For more detailed information about treatment, recovery and recycling of this product,
please contact your local city office, your household waste disposal service or the shop
where you purchased the product.
S77 - 03875160
Y14 - 04845056
V17 - 09161985
D1 - 04345084
J28 - 35600703
J20 - 09200356
Use only HOOVER spares
-0565-5287.indd 8
28/11/2007 15:27:22
User checklist
WARNING!
If your cleaner is not working properly run through the following checklist.
1 Is there a working electricity supply to the cleaner?
Check with another electrical product.
2. Is the dust container full or choked with fine dust?
To empty the dust container see the instructions on page 5.
3. Is the hose blocked?
To clear a blockage, see the instructions on page 7.
4. Is there a blockage in the cleaner base?
To clear a blockage, see the instructions on page 7.
5. Are the filters blocked?
To clear the filters, see the instructions on page 6.
6. Is the nozzle height set correctly?
To set the carpet care control selector, see the instructions on page 4.
7. Are the brushes rotating correctly?
To check the brushes, see the instructions on page 7.
8. Has the cleaner overheated? If so, it will take about 30 minutes to reset
itself.
If there is any doubt call the Hoover Service Office for advice. They may be
able to assist you over the telephone.
A thermal cut out switches off the cleaner to prevent overheating
if it is used when full or there is a blockage or dirty filters. If this
should happen switch off, unplug and correct the fault.
It will take about 30 minutes for the cut out to automatically
reset.
IMPORTANT: Do not run cleaner over the supply cord
as this could damage the supply cord insulation.
A service charge will be made if the cleaner is examined and found to be in
working order, has not been assembled in accordance with these instructions
or has been used incorrectly.
®
GENERATION FUTURE
Hoover Limited
Pentrebach
Merthyr Tydfil
Mid Glamorgan
CF48 4TU
© 2007
® Registered Trade Mark
* Features vary according to model
-0565-5287.indd 9
28/11/2007 15:27:22
GENERATION FUTURE
Printed in P.R.C
0565 5287
0565-5287.indd 10
28/11/2007 15:27:22