1
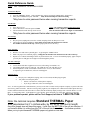
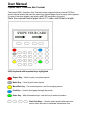
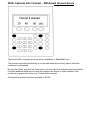
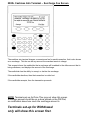
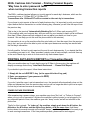
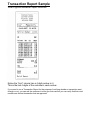
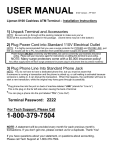
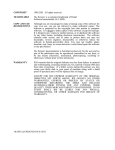
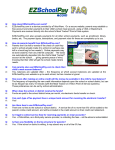
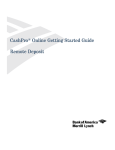
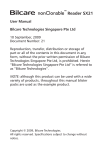
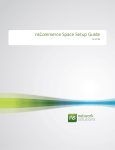
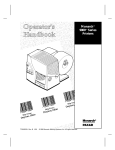
Printing Instructions: Print page 2 thru 5 in black and white Print page 6 in color Print pages 7 thru 21 in black & white *counting this page as page one, which is not for printing USER MANUAL 2085 Version PF1007 2085+ Cashless Atm Terminal – Installation Instructions 1) Unpack Terminal and Accessories NOTE: Be sure and go through all the packing material to make sure you’ve found all the accessories included in the package. (Some items may be in the bottom) 2) Plug Power Cord into Standard 110V Electrical Outlet NOTE: It is highly recommended that you use a surge protector for POWER and PHONE LINE, just like you would use for a PC, for protection from potential power surges and power spikes. Power Surges ARE NOT covered by any Warranties, but can be covered by your business insurance policy. Please call your insurance agent for instructions on adding this terminal to your policy. NOTE: Many surge protectors come with a $5,000 insurance policy! Any office supply store will have surge protectors for power plug-in and phone line (to protect modems) 3) Plug Phone Line Into Standard Phone Jack NOTE: You do not have to have a dedicated phone line, but you must be aware that if someone is running a transaction and the phone is picked up, or call waiting is activated because someone is calling in, it can disrupt the transaction. When this happens, the cardholder will have to start a new transaction, while the original may have gone through successfully. *Plug phone line into the port on back of machine labeled “LINE” (stands for “Line In”) This is the plug on the far left side when viewing the back of terminal *You can plug a phone into the port labeled “TEL” (“Line Out”) Terminal Password: 2222 For Tech Support, Please Call 1-800-379-7504 NOTE: A statement will be provided every month for each previous month’s transactions. If you don’t get one, please contact us for a duplicate. Thank You! If you have questions about your statement, or questions about accounting, Please call Tech Support at 1-800-379-7504. Important Things you should know that will help your customers should any of them have difficulties using your machine. 1) When the card is being swiped through the terminal, make sure the magnetic strip on the card is facing to the right (away from the buttons on the machine). 2) Make sure the card is swiped through the card reader with the card pressed all the way down. 3) Make sure the card is swiped through the card reader quickly. If the card isn’t swiped fast enough, the machine may not read the card and the transaction will not begin. 4) If a customer cannot get the machine to start a transaction after following the tips mentioned above, please inspect the magnetic strip on the card to see if it is scratched. If it is, the customer may need to replace the card. The card numbers cannot be manually entered into the machine, since the machine operates like an Atm. NOTICE: Do Not cash a Scrip Receipt unless it says “WITHDRAWAL”(or, Cash Advance) and “APPROVED” Do Not cash receipts that say “TRANSFER”, or “BALANCE INQUIRY”….these transactions are not paid by the processor because they are not withdrawals! *Please see Scrip Receipt examples on the very last page of this manual and educate ALL employees about which receipt to honor from customers! Also, Please see Transaction Reversal Section in this manual *Machine Must Stay On at All Times So it Can Auto-Batch Every Morning at 5:30 EST If Machine Doesn’t Auto-Batch, the Machine’s Memory Won’t be Cleared for Each New Business Day, which will Make Transaction Reports Inaccurate by Showing Previous Days. Quick Reference Guide NOTE: THE TERMINAL PASSWORD IS 2222 Transaction Report: Press the “REPORT” button (some terminals may require pressing the “MENU/ESC” button next) Enter password 2222, then press “ENTER” . . . Daily Transaction Report will start Printing *May have to enter password twice when running transaction reports Last Receipt: Press “Review” key Select “Menu/ESC” and enter password 2222 The last transaction will show up on the screen NOTE: you can always print a transaction report if you ever need a duplicate receipt. It will show the amounts and last few digits of card numbers. *May have to enter password twice when running transaction reports Not Printing: Recycle power (unplug unit, wait a few seconds, and plug it back in) then press “Feed” Check paper for proper installation. Paper must roll forward from the bottom of roll into the machine and not from the top. (Thermal paper prints on one side only.) Paper Jammed: Remove cover and remove jammed paper – try pressing the “FEED” button. Make sure paper roll is installed properly, rolling into the machine from the bottom of the roll not the top Replace cover with the front hinges all the way down in their slots – If cover not installed properly, paper will jam! (you may have to fold paper at an angle to feed it through the printer). “No Line” Message: Line is shared with other equipment or services (call waiting, fax machine, etc.). Call waiting might need to be removed. The ATM may not work with this service. Extension phone or credit card machine could be in use. If a 9 (or other number) is required to get an outside line, call us for Tech Support. Solutions to try: Recycle power and phone (unplug, wait several seconds, and then plug in again) Test phone line with spare phone o If there is no dial tone, call the phone company o If you do get a dial tone, call us for Tech Support Note: As with any phone line communications, you may not be able to connect with your phone company’s system at all times due to heavy phone line traffic. Just like receiving a busy signal on your telephone, the ATM will also find its phone line busy at times and the transactions will not be able to connect, thus the ATM may display messages like “Network Down” or “Line Busy”, or “Processing, Wait”. If this happens to your customer, please ask them to try again after waiting a few minutes. If your problems persist, please call for Tech Support, toll-free at 1-800-379-7504. Note: the terminal requires Standard THERMAL Paper Size requirement is 2 ¼ inches wide, by 60, 65 or 165 feet in length Any office supply store will have this paper - it rolls from the BOTTOM of the roll into machine. If you install it where it is rolling from the TOP of the roll into the machine....it will show up white when you try to print because THERMAL paper only prints on one side. Important Notice! Please INFORM ALL Employees In the rare event that a customer runs a transaction and the receipt doesn’t print for whatever reason… RUN A TRANSACTION REPORT! (See User Manual for directions on how to run Transaction Report) You can run a transaction report and verify whether their transaction went through or not, within just a few seconds…with little effort. When you run the transaction report, the transaction should be listed as the LAST transaction…check the time of the transaction and the 4 digit acct number to make sure the customer’s transaction just happened. (Running a report will help you verify!) Ask to see the customer’s CARD and verify that the 4 digit number in the account column of the transaction report matches the last 4 digits of their card number. If it does, and the time matches the current time of day…then make sure the transaction report shows “WD” (Withdrawal Debit), or “WC” (Withdrawal Credit) on the far left hand side of the transaction report. (MUST say WD, or WC…which means they made a Withdrawal) If these conditions exist, then the transaction went through OK according to the machine’s transaction memory, and it’s alright to go ahead an honor the transaction as being good. Circle the customer’s transaction on the transaction report and keep this in place of the original receipt that did not print (the terminal will not print a duplicate original receipt) If your business has customers sign the merchant copy of the receipt, then have the customer sign the transaction report. If the customer wants a copy of the transaction, simply run another transaction report, circle their transaction and give it to them for their records. If you cannot verify that their transaction went through using the steps above, then DO NOT honor the transaction because it probably did not go through. If the customer is still claiming that their transaction went through, have them to call their bank for a transaction reversal. The steps above explain how to read the machine’s memory to show the day’s list of transactions. If a customer’s transaction does not show up on a transaction report, you have no evidence that their transaction went through and should not honor the transaction. In case the customer asks…you cannot run a reversal on the cashless ATM terminal like you could if it were a credit card machine. If the transaction shows up on their bank statement later, then their bank has to reverse it because ATM machines simply do not have the ability to reverse transactions. The customer has the right under Federal Law to request their bank reverse ATM transactions in the event they did not get their money, or in this case…the merchant cannot verify a transaction. User Manual Lipman 2085+ Cashless Atm Terminal The Lipman 2085+ Cashless Atm Terminal comes equipped with an internal PIN Pad and an internal printer that uses the same type thermal paper found in many cash registers. It is one of the most reliable, and widely used POS terminals in the world. (Note: the required thermal paper size is 2 ¼ wide, and 85 feet in length) 2085+ keyboard with important keys highlighted Report Key – Used to print your preset reports Batch Key – Used to print batch reports Menu/Esc Key – For accessing menu, and for escaping screen Feed Key – Used to feed paper through the printer Enter Key – After information input, use this key to enter information Fast Cash Keys – Used to select preset dollar amounts, and to select accounts to withdraw transactions from 2085+ Cashless Atm Terminal - Main Screen This is what the Main Screen looks like when the terminal is ready to run a transaction. The arrows under “SWIPE YOUR CARD” will be running left to right. “SWIPE YOUR CARD” should be showing at all times, unless the machine is running a transaction, or performing some other function. If this is not showing on the screen when the machine needs to be ready for a cardholder to run a transaction, try pushing the yellow “MENU / ESC” button so the machine comes back to the main screen. If that doesn’t work, try un-plugging the machine for about 10 seconds, and then plugging it back in. This will reset the machine and should bring it back to the main screen. 2085+ Cashless Atm Terminal – Transaction Screen This is the Transaction Screen which lists the 3 types of transactions available on the terminal. Withdrawal: Withdrawals can be made from any type of card. All transactions require the use of a PIN (Personal Identification Number). If the cardholder does not have the correct PIN, or does not know their PIN, the machine cannot run a transaction for them. Transfer: Transfer transactions can be performed on this terminal. Transfers to and from any of the 3 types of accounts (Checking, Savings, Credit Card) can be made. (this option may not be available on your terminal) Balance Inquiries: Balance Inquiries can be made on Checking, Savings, and Credit Card accounts. (this option may not be available on your terminal) NOTICE: Only cash scrip receipts that say “WITHDRAWAL”, and “APPROVED” NOTE: Terminals set-up for Withdrawal only, or Drive Thru applications may provide withdrawal option only, and may not ask for card type. 2085+ Cashless Atm Terminal – Withdrawal Screen This is the main Withdrawal Screen, which lists the types of accounts cardholders can make withdrawals from. The cardholder must have the type of account they select with their financial institution and they must know the correct PIN associated with that account. Many cardholders have both Checking and Savings accounts associated with their bankcard, or Atm card, and may choose either account to withdraw funds from. Cardholders can withdraw funds from their Credit Card account if they know their PIN. This type of transaction will be a cash advance from the cardholder’s Credit Card account, and in most cases, will be subject to cash advance fees charged by their issuing bank where they have their Credit Card account. NOTE: Terminals set-up for Withdrawal only, or Drive Thru may not show this screen. 2085+ Cashless Atm Terminal – Withdrawal Amount Screen The Lipman 2085+ terminal can be set with a combination of “Fast Cash” keys. This provides merchants the flexibility to choose what dollar amounts they want to offer their customers for withdrawals. By using the “Other” key (the Fast Cash button on the far right) the cardholder has the capability to choose additional dollar amounts that the merchant has chosen to make available (if the machine is programmed to have up to 7 preset dollar amounts) All transaction amounts must be in multiples of $10.00 2085+ Cashless Atm Terminal – Surcharge Fee Screen The cashless atm terminal charges a convenience fee for each transaction, that is also known as a surcharge. This fee can be any amount the merchant wants to charge. This screen informs the cardholder that a surcharge will be added to the dollar amount that is being withdrawn, and displays the amount of the surcharge. The cardholder has the ability to accept, or decline the surcharge. If the cardholder declines, then the transaction is voided out. If the cardholder accepts, then the transaction proceeds. NOTE: Terminals set-up for Drive Thru may not show this screen. Surcharge amount should be on a decal placed on the PIN Pad, so cardholders know how much the surcharge amount is. Terminals set-up for Withdrawal only will show this screen first. 2085+ Cashless Atm Terminal – PIN Screen After the cardholder is notified that there is a surcharge for this transaction, the terminal asks the cardholder for their PIN (Personal Identification Number) At this point, the cardholder has accepted the surcharge. When the enter their PIN, this makes the machine dial up to the processor’s data center, which in turn connects to the cardholder’s issuing bank, so the processor can manage the cardholder’s request and get approval for the transaction. The 2085+ cashless terminal only performs PIN based transactions, which requires the cardholder to know the correct PIN for the card they’re using. If they do not know they’re PIN, or if they enter the wrong PIN, the transaction will be denied. NOTE: After the cardholder has entered their PIN, the “DIALING” screen appears to let the cardholder know the terminal is connecting with the processor. Upon connecting with the processor’s data center, the “PROCESSING” screen will be displayed to let the cardholder know that the transaction is being processed, which will be approved if the cardholder entered the correct PIN, and has sufficient funds to cover the transaction amount requested. NOTE: Terminals set-up for Drive Thru or Withdrawal only, will need the cardholder to enter their PIN Number, then press ENTER. (Drive Thru attendant may need to press ENTER on the machine itself to activate transaction, if customer doesn’t know to press ENTER after using external PIN Pad). 2085+ Cashless Atm Terminal – Inquiries and Transfers Balance Inquiry 1. Checking Account 2. Saving Account 3. Credit Card TOTAL $0.00 Enter Your PIN The 2085+ cashless terminal allows cardholders to make balance inquiries from Checking accounts, Savings accounts, and Credit Cards. The terminal also allows cardholders to transfer funds between accounts. *NOTE: Some banks don’t allow their customers to do Balance Inquiries NOTE: Terminals set-up for Withdrawal only, or Drive Thru may not show this screen. 2085+ Cashless Atm Terminal – Transaction Sample 2085+ Cashless Atm Terminal – Printing Terminal Reports *May have to enter password twice when running transaction reports The 2085+ cashless terminal allows you to print reports for each day’s business, which are the processing hours of 12:00am EST to 12:00am EST. *transactions after 12:00am EST will be counted on the next day’s transactions. If you chose to print reports at the end of each business day, it is important to print your terminal report before the first transaction is run the following day, otherwise you will lose the report from the previous day. This is due to the terminal “Automatically Batching Out” at 5:30am each morning, EST. (if this conflicts with your business day, and you need for your terminal to batch out at a different time than 5:30am, please call tech support so we can adjust your batch out time for your terminal. We can help you do this over the phone within a few minutes) If a transaction is run on the machine after this auto batch out, then the report from the previous day is lost, and you will not be able to print out that report because a new day has started with the first day’s transaction. If at all possible, it’s best to print reports at the end of each business day, if you decide that this is something you want to do. Many merchant’s simply save all scrip receipts, and total them up at the end of each day to write in on their end of day cash drawer report. PRINTING AUTO-BATCH REPORT (or Transaction Report) After your machine has run it’s auto batch report at 5:30am in the morning, the machine will display a message that will say “Auto Batch Performed . . . Please Print Report”. If you decide to print the report, follow these instructions: 1. Simply hit the red <REPORT> key (in the upper left side of key pad) 2. Enter your password (your password is 2222) 3. The report will print If you don’t print the report, and a transaction is run, the terminal will automatically close out the totals and transactions from the previous day and you will no longer be able to print out a report for that day’s business because a new day has started. POWER OUTAGE PROCEDURE After experiencing a power outage, your machine may show “No Line”, or “Failure to Connect”, when you try to run a transaction. Anytime the machine is without power (or not plugged in) for any extended period of time, the machine goes into “sleep” mode, and will not connect to the phone line. The fix for this is simple. To “wake-up” the machine, simply push down the #1 button, the #4 button, the #7 button, and the Alpha-Copy button, all at the same time. Hold these buttons down for several seconds until machine “beeps”, and the machine should be ready to go to work running transactions. If No-Line problem persists, please call for tech-support. Transaction Report Sample What a typical transaction report looks like. Notice the “Acct” column has a 4 digit number in it. This is the last 4 digits of the customer’s card number. If you need to run a Transaction Report for the purpose of verifying whether a transaction went through or not, you can ask the customer to show you their card so you can verify that their card number was the last transaction that we approved. Transaction Reversals – VERY IMPORTANT! What merchants need to know about possible reversals *also applies to situations where cardholder runs a transaction, hits enter, and then tries to cancel the transaction. The machine sends transaction immediately and can’t be reversed. There are no “Charge Backs” with PIN based transactions, such as those run on a Cashless Atm machine, however it is possible to have a “Reversal” in certain situations. Typical example of a Reversal on a Cashless Atm: A cardholder swipes their card and completes a transaction, and while waiting for the machine to receive approval for the transaction, the machine suddenly displays “No Line”, or may even simply go back to “Swipe Your Card”. This is caused by the phone line being disconnected during the transaction due to someone in the merchant’s location trying to use the same line, or possibly someone trying to call in (this would apply if the line has Call waiting, which is not recommended on the same line that a Cashless Atm is on.) When this happens, the machine never receives the approval for the transaction because the phone line was cut off. Therefore, the machine doesn’t know to print a receipt for the transaction. Normally the transaction went through, and charged the cardholder’s account. In most cases, the cardholder doesn’t know what happened so they run another transaction which they would get a receipt for and redeem it at the merchant’s register as usual. Here’s where the problem comes in: a few days later, the cardholder gets their bank statement and notices that their account has been charged twice for the same transaction. This is due to the fact that the machine didn’t print a receipt for the first transaction due to the phone line being disconnected (this is no fault of the machine, or processor). The cardholder may call and complain. If / when this happens, please tell the cardholder to dispute one of the charges with their bank (in other words, tell their bank that one of the charges needs to be reversed and to please run a reversal) When the cardholder’s bank disputes the charge, they will notify the processor of the reversal request. When this happens, someone will get in touch with the merchant to see if the merchant has the scrip receipt from that transaction (they will have the transaction number, so we will know if the merchant has the receipt from the transaction in question) If the merchant does not have the receipt from that transaction, then the processor will debit the merchant’s account for the amount of the transaction, so the cardholder can get their money back. This doesn’t cost the merchant anything, because they merchant got paid for a transaction that they never gave money out for, so it is “a wash” for the merchant. If the merchant does have the scrip receipt for the transaction in question, then the reversal request will be denied to the cardholder’s bank. This protects the merchant from cardholders trying to do reversals just to try and get their money back. It is very important that merchant keep all receipts with each day’s business for future reference in the event that a reversal request is made by a cardholder. It is also recommended that merchants have the cardholder sign each scrip receipt. Tracking Your Transactions Keeping track of money paid out, and surcharge profits Daily “Drawer” Money The cashless atm machine works like an Atm, but is considered to be a POS terminal by the banking industry. For this reason, the turn around time on the merchant’s money will be similar to a regular credit card machine. The processor sends the merchant’s daily transaction money to the Federal Reserve Bank at the end of 48 hours. The Federal Reserve sends the funds to the merchant’s bank within 24 hours. Most merchants will have their funds in their accounts on the 3rd business day (weekends and holidays not included). Some smaller banks manually post transaction to the merchant’s account, which may delay the time it takes for the funds to be applied to the merchant’s bank account. This would be an issue to take up with that bank, as we have no control over how fast they post deposits to the merchant’s account. The merchant’s bank will have the funds in their possession by the 3rd business day. The easiest way to keep track of how much money is being paid out (and compare it to the money being deposited to your account) is by keeping track on the total dollar amount being paid out. The daily batch report run from the machine may not be the actual amount deposited into your account because of daily cut-off times by different banks. Some transactions may be counted as happening the following day because they took place after the bank’s cut-off time. The cashless atm is just like a regular credit card terminal when it comes to keeping track of incoming funds. Please keep this in mind when reconciling your account. Merchants WILL get their money. Merchant funds are FDIC Insured Surcharge Profits are sent to your bank account by the 15th of the month for each previous month's transactions. Please account for any applicable monthly fees that may be deducted from your account the first week of each new month. NOTE: Transactions should show up in your bank account as coming from "POB DAS". This is the name of the Ach System sending money to your account. If your bank doesn’t show who the ACH Deposits are coming from, tell them to start showing this information on your statement because this is a banking industry regulation so you can know who is putting money into your account. Bank Statement Information How to identify activity in your Bank Account Deposits: “Drawer Money” – These are deposits that are made to your account for transactions that your terminal has approved as customers use your machine. They will show up on your bank statement in the following format (your bank may list this differently, but this is the information that should be contained in the entry: “ACH CR POB DAS (ACH Date) Daily (Transaction Date) (Your Terminal ID Number)” Your bank may add numbers after this. Example: ACH CR POB DAS 0613 Daily 0611 I260M000 0613 – the day funds were sent by the processor to the Federal Reserve, then to your Bank 0611 – the day transactions were run on machine “Monthly Residual Deposits” – These are surcharge profits that are deposited to your account by the 15th every month for the previous month’s transactions. They will show up on your bank statement in the following format (your bank may list this differently, but this is the information that should be contained in the entry: “ACH CR POB DAS” May also have the initials MSUR in the entry. Your bank may add numbers after this. Example: ACH CR POB DAS “Debits – Monthly Terminal Fees” (if applicable for your location) – These are debits for any applicable fees that you may be paying, such as the $5 monthly statement/batch fee. They are debited once-a-month for the previous month’s activity. “ACH POB DAS MTC (Your Terminal ID Number)” Example: ACH POB DAS MTC I260M000T00101 |example terminal ID number| *NOTE: transactions from the processor should be showing up in your bank account as coming from “POB DAS” 2085+ Cashless Atm Terminal – Paper Replacement Removing an empty paper roll: 1. Remove the paper compartment cover. 2. Remove the roll paper core and spindle it turns on. Discard the paper core, but save the plastic spindle to be used with the new paper roll. 3. Remove any paper left in the printing mechanism by pressing the <FEED> button. If needed, you may have to gently pull the last bit of paper out of the printer by pulling the paper upwards to exit the printer while pressing the <FEED> button at the same time. VERY IMPORTANT: NEVER pull the paper out of the printer backwards (the opposite direction that the paper comes out when it is printing) If you do, this may damage the printer, and void your machine warranty. Inserting New Paper Roll: 1. Unroll the new the new paper roll directly behind the printer. 2. Using scissors, cut the leading edge of the paper at an angle (perpendicular to the paper feeder) so the paper cleanly cut, and is not jagged. 3. Insert the leading edge of the paper underneath the printer’s small rubber roller, while pressing the <FEED> button. The printer should automatically catch the paper, and feed it up through the printer. You may need to press the <FEED> button in short increments while doing this, until the paper comes out the top. 4. Lift up the paper roll and tighten up any excessive paper slack. Make sure that the paper unrolls from the bottom of the roll into the printer (if it’s rolled from the top of the roll, the printer will not print receipts because thermal paper only prints on one side) 5. Slide the spindle through the middle of the paper roll and lower the paper roll and spindle down into the paper compartment until each end of the spindle is sitting into the spindles slots within the paper compartment, so that the spindle is secured. 6. Replace paper cover. Note: the terminal requires Standard THERMAL Paper Size requirement is 2 ¼ inches wide, by 65 or 165 feet in length Any office supply store will have this paper - it rolls from the BOTTOM of the roll into machine. If you install it where it is rolling from the TOP of the roll into the machine....it will show up white when you try to print because THERMAL paper only prints on one side. Thank You for your Business . . . It is very much appreciated! Scrip Receipts - Transaction Examples This is what a typical withdrawal receipt will look like. You must make sure that the receipt says “Withdrawal” on it before you accept it, and you must make sure the receipt says “APPPROVED”. Be sure and pay close attention to the dollar amount, and only honor the receipt for the amount shown. It is recommended that you have your customer sign the scrip receipt, just like you would if it were a credit card receipt. This will help protect merchants if a customer claims that they never got their money, and can help prevent a reversal. This is what a typical Transfer receipt will look like. A transfer is when a customer transfers money from one of their bank accounts, to another one of their bank accounts. A transfer DOES NOT mean that the customer has transferred money from their account to the merchant’s account, therefore you CANNOT honor this Scrip Receipt. VERY IMPORTANT: Some customers may try to get merchants to honor a transfer receipt because they know that they did not actually make a withdrawal. NOTE: Merchants will not be reimbursed if they honor a Scrip Receipt that is a transfer and not an approved withdrawal! This is what a typical Balance Inquiry receipt will look like. A balance inquiry is when a customer checks their account to see what their current account balance is. This type of Scrip Receipt is obviously not a withdrawal, and cannot be honored. NOTE: Merchants will not be reimbursed if they honor a Scrip Receipt that is a balance inquiry and not an approved withdrawal!