1
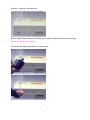
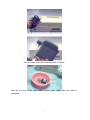
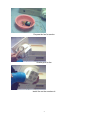
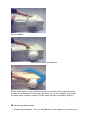
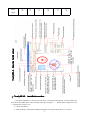
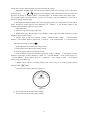
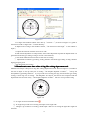
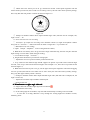
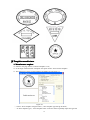
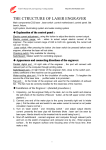
THE CTRUCTURE OF LASER ENGRAVER
Main components:CO2 laser , laser switch ,control motherboard ,control panel
,flat bench ,fixture ,
Light system ,illuminating system and water-cooling system
◆ Expla
nation of the control panel :
Explanation
Electric current adjustment : using this button to adjust the electric current output.
Electric current range: mA : refers to actual output electric currnet of the engraver
.The output current range of DC-K40III is 0-20 mA .(generally the current will not
over 15 mA)
Laser switch: After pressing the button ,the laser switch be pressed before each
engrave ,otherwise the laser will not shine.
Checking switch: Only available for checking .
Switchboard : Master switch for controlling engraver.
◆ Appearance and connecting directions of the engraver:
Parallel digital port : At right side of the engraver , the port will connect with
relevant port on the computer through printing cable .
Switchboard port : At right hinder of the engraver (5A) ,close to the switch port ,
safety coefficient of the machine can be guaranteed .
Water-cooling pipe port : It is for the circulation of cooling water . To lengthen the
service life of the laser tube , purified water is to promoted .
Fan port : At the hinder of the engraver and used for the installation of exhaust
fan . The fan must be correctly installed for the cleanness of the machine .
◆ Installation of the Engraver : (detailed procedures )
1. Unpacking , put the engraver flatly on the desk ,turn on the switch and observe
the self-check of the machine (‘Recover ’ button, at the left upper corner of the
platform ).
2. Connect one end of the water pipe to the pump (normally right end is intake
pipe ). Put the other end and switch to see water current is normal or not (water
circulation means normal ).
3. Turn on ‘laser switch ’ and ‘checking switch ’ and adjust output electric current
.presently the laser pipe will illuminate (Note : laser can’t be seen by bare eyes
.Hands should not be inserted into its avoid being burnt ).
4. Shut off switchboard , connect engraver and computer through relevant ports
and turn on the switch of engraver and computer one by one . Enter engrave
surface , fix the engrave surface onto focusing area of the focus lens .then
make a trial.
The switch must connect to secure ground wire!
Following I want to introduce how to install the fan and the water pump on the
1
machine , hoping it can help you :
1.Water pump and smoke pipe installation
Before Install Water pump and smoke pipe, make sure the water pump is running.
but do not switch on machine.
2.Connect the water pipe with the water pump
2
Then the other end of the water pipe flow out water
Now put the end of the water pipe in water ware, Make sure the water is
circulating
3
Prepare the fan for smoke
Smoke pipe for fan
Install fan on the smoke exit
4
Fan is installed
Install smoke pipe on smoke fan
Switch on fan while run the machine now you can switch on the machine and try
to make a small sample of the engraving. When you run the machine, make sure
the water pump is always running and the water on pipe is circulator y flowing !
◆ Operating instructions :
1. Engraving procedures: Turn on switchboard of the engraver and make sure
5
cooling water circulation is functional . After measuring the engraving object .
pinch it on the focus of the focus lens . Turn on computer , enter engrave
surface and make typesetting .
2. Notes and maintenance points :
a) The engraver should be put on flat surface without slant . Avoid collision
when move .
b) Check out cooling water , pararrel line and switch before getting in use .
Conduct without cooling water is strictly prohibited to proof against laser
destruction. Reflection mirror and focus lens should be examined frequently
with absorbent cotton wiping off the dirt. Damaged plating coat should be
replaced in time .
c) Deviated light road should be adjusted instantly during engraving process
(non-professionals are prohibited to touch it ).
d) Before engraving new material , first judge it whether suitable to the laser
engraver and get parameters through experiment . During engraving process
, any part of human body is prohibited putting into light road avoid being
burnt ).
Note : laser .reflection mirror and focus lens are exhaustible
material . Ventilation pipe should be connected outdoors .
◆ Common breakdown and the fixation :
A.
a)
b)
B.
a)
b)
c)
d)
a)
b)
c)
After typesetting and output .if the laser head don’t move , you should :
Be sure that the engraver is connecting to the computer .
Shut off the switch and check whether the parallel line is well connected .
If the laser don’t illuminate , you should :
Be sure that the laser switch has been pressed down .
Check whether the electric current button at the zero place . If so , adjust it to
appropriate place.
Observe the cooling water in normal process or not . If it stops to work , maybe
the laser has been damaged , and you should shut off the machine
immediately. In half an hour , check whether the cooling water unit return to
normal state , if so reopen the machine .
If the power of the laser decrease, then maybe it reaches its longevity and
should replace it in time. If the laser work normally and engraving parameter is
right . but engraving effects is not good . then you should :
Check whether engraving surface is on the focusing area of the focus lens .
Judge whether the engraver power is decreasing . If so , you should increase
output current or change the laser .
Check whether the light road is diverted: cover the entrance of the first ,
second and third reflector (the first generation machine has four reflectors) with
polyester film successively , press down laser switch and hand checking
switch . observe the location of light spot . If the spot diverts from the certer of
entrance . you should adjust the position and angle of laser or reflector slightly
to guarantee the light road pass through the focus lens . (The adjustment of
6
light road is not easy . please contact the maintenance section.)
d) If extra lines take place in engraving process; you should check the pararrel
digital line and replace it if necessary.
Please look up the Manual if you have any question; Please cintact us if you
couldn’t resolve the problems!
◆ Accessories and other articles:
Switch wire , computer parallel line (typewriter cable ), software . technical
manuel ,product qualification ( Posted on the machine ,then there is no
maintenance sheet ), a length of ventilating pipe , a ventilating fan and a water
pump . Any short of the above articles , please request to the engraver
manvfacturer or agent .
C a t a l o g u e of software
Short introduction of NewlySEAL
Ⅰ.. Setup NewlySEAL
Ⅱ.. The knowledge ready for make a seal
Ⅲ.. Make a seal
1. Make a department seal.
2. Make a contract seal.
3. Make a more-line-ring words department seal.
4. Make a right angle square seal.
5. Make a round line inside seal.
6. Other seal examples.
Ⅳ.. Make seal template
1. Male seal template.
2. Choose seal template.
3. Manage seal template.
Ⅴ.. Output seal
Ⅵ.. Seal engrave
7
Introduction of Newly-Sino®
NewlySEAL
This software is easy to operate even though the user not contacts the computer.
NewlySEAL Software combines modern computer technical with traditional seal craft. It’s sort
scientific, easy to operate, and conform to seal trade and technical demand
This software has a large of common seal template. That was composed. The user just fill in the
words and the output the seal, it has the function of seal template , so the user can make lots of same
form seals with deferent appellation.
The manage function of seal template can exchange the new seal templates between the users of
Newlysoft or between the users and Newlysoft company. Newlysoft website (www.0123.com.cn)
supply with marry seal template for user.
This is software adapt to different habits of different region. It can calculate line length, word
height, word wide, line space word speck automatic. User output BMP JPG GIF picture document etc.
It is easier exchange with other software. It is can compose lace and stripe code convict.
Computer demand
CPU main frequency: 100MH2 or above;
Memory:32MB or above;
The hard disk: 10-400MB;
CD drive;
USB port
Operate System: WINDOW2000/XP.
Recommendation: CPU: P Ⅲ ; Memory: 128MB; Operate System: WINDOW2000. The
cultivation is higher and the velocity is quicker.
Output function
According different edition the user can print,engrave and save as BMP, JPEG, and GIF picture
decampment.
Seal 1 1 various editions function discrimination
Carves the Prints
Carving
The forgeryEdition
stereotype the
printing
proof carves
version
version
the
stereotype
Function
ForgeryArtificial Artificia
Artificial
Automatic
proof grain
l
line and
code
Database
row of seal
The
engraving
machine
outputs
Forgeryproof
printing
version
Versatile
version
Automatic
Automatic
ⅹ
ⅹ
ⅹ
√
√
√
√
ⅹ
√
√
ⅹ
√
8
ⅹ
√
ⅹ
√
√
√
NewlySEAL Function Introduction:
Printer
output
Ⅰ.. NewlySEAL installation orders.
1. Put the NewlySEAL 11 disc into the CD-room, it will setup automatically. If the procedure not
movement, then fellow these orders: Double click “My computer” → Double click compact disc icon
→ Double click “Setup” icon;
2. Choose installment.
3. After installs the software the tabletop will appear “sets up the NewlySEAL 11” the icon
9
4. Put the NewlySEAL USB key insert a USB receptacle of your computer;
5. If your current operating system is WINDOWS2000/98/Me, then it can appear the dialog box of
“Discovered the new hardware”, the system can install the actuation automatically, does not need any
operation, until the dialog box vanishing;
Ⅱ.. Manufacture seal knowledge preparation (D epartment Seal example)
1. It can draw a rectangle outside the seal, the following chart (Figure 2-1) shows for the red
rectangle.
Figure 2-1
2. Each part of writing or the graph all can become the object. When the mouse places on the
object, it will appear a pink color frame around the correspond object, the following chart (Figure 2-2)
shows.
Figure 2-2
3. Noun explanation
Logo: The decorate graph mark in the seal.
Center line: The beautification line of the seal center.
Nearby character spatial: The distance from the outside boundary of the link words to the sides of
the outside rectangle (The red rectangle of Figure 2-1) in the round, ellipse seal. The distance from
outside boundary of the character to the frame in the square shape seal.
Between character spatial: The distance between every words in a same line.
Between lines spatial: The distance between every lines.
Link platoon: The writing arrangement for arc in round seal.
Included angle: It’s the included angle between the left and right side of the round words line and
the centre line of the seal.
Character height: The height of the character.
4. The basic contact surface software and every part names like chart 2-3.
10
Main menu
Main toolbar
Chart toolbar
Seal of toolbar
Work area
Ruler
Attribute area
Status bar
Figure 2-3
Ⅲ.. Manufacture a seal
1. To manufacture a department seal
⑴ Single-click the button
of the toolbar, then the work area will appear a department seal
automatic (Figure3-1). It has four objects, upper part of the category region is objects list, and lower part
is category of the objects.
Figure 3-1
⑵ To revise, increase, delete the objects according to the customer requests.
①Revises the up-round writing.
a. Selects the up-round writing: The mouse single-clicks the up-round writing, around the link
row of writing appears four control points, the mouse places in the writing to become
.
b. Changes the up-round writing: Change the “NewlySEAL Typesetting Software” into the words
what the user want in the writing frame of category area and enter.
c. Adjusting the included angle of round line: The mouse places about a link row of writing in
two side control points Becoming
or
, drag the mouse, loosens the mouse left key after
satisfaction. Or: Enter the degree (eg: enter 240) at the “included angle ” category region straightly.
11
Attention: Don’t cover the other objects.
d. The change character height: Use the mouse to pull the up and down side control point of the
round words till your satisfaction. Or: Enter the height (eg: enter 7) at “Height” of the category
column straightly.
② Revision the logo
a. Selects the logo: The mouse places in the logo to single-click the mouse, attempts about the
symbol about to appear four control points.
b. In the attribute column the object tabulates the Chinese Library logo reverse demonstration; In
the attribute column under the part logo this object related attribute as shown in Figure 3-2.
Figure 3-2
c. Replacement logo: Has the logo in logo attribute column right side which each kind of logo
tabulation single click must elect, in the seal logo can change automatically. (If tabulates graphic file
which appropriate logo user has not been possible to induct oneself manufactures, single click
“filename” after “browsing” button, found own graphic file then)
d. Adjustment logo size: When the mouse places about the logo in about control point to become
↔ or ↕ , With the mouse dragging, loosens the mouse left key after satisfaction, this time the logo is
carries on the reproduce by pantograph take the seal central point as the symmetrical points;
e. Adjustment logo color: The single click “front the scenery” the button, appears the color
dialog box single click to select the color, in single click definite button then
f. Increase Logo Grain line: In the single click attribute column the lower part minute “grain
line” the label, attempts the symbol the grain line attribute to adjust front as shown in Figure 3-3, in the
column inputs 20 in “grain line number”, the single click “arranges the grain line button”.
12
Figure 3-3
③ Revision horizontal type-setting writing: With revises the up round writing method to be same
④ Revises a lower ring row of writing: With revises the up round row of writing method to be
same, if the next row of writing is time a numeral, when adjustment typeface should choose the western
languages typeface;
⑤ About writing attribute in under high-quality label some explanations
Character height: The typeface
Character width: The typeface width
Character spatial: Between line of within writing distance
Line spatial: Between line and line distance
Overall width: The writing partial overall widths are the character width character empty for
always the wide
Overall height: The writing partial gross altitudes empty character immediately high for overall
height
Seal height: Seal whole highly
Seal width: Seal overall altitude
Line of computation:
a. The overall height line calculated spatially the character height, the width and height does not
limit: When adjustment writing part gross altitude immediately spacing, software automatic control
writing altitude, and is not limited highly in the alignment procedure Chinese character width.
b. The overall height line calculated spatially the character is high, the character extends the <=
character to be high: When adjustment writing part gross altitude and good spacing, software automatic
control writing altitude, also when adjustment maintains the single writing throughout highly the <=
character altitude
c. Overall height character height calculated line is spatial: When adjustment writing part gross
altitude and writing highly, software automatic control good spacing.
d. Character height line spatial calculates the overall height, does not change the seal altitude,
again does not change in the seal high situation to adjust the writing highly, the navigation bureau, the
software automatic control writing part.
e. Character-height line-spatial calculated the overall-height change seal is high, in may change
13
in the seal high situation to adjust the writing highly, the navigation bureau, software calculate the
writing partial gross altitudes; And acts according to this height control seal the altitude.
Character computation
a. The overall extends the character to calculate spatially the character is wide, does not limit
highly: Does not limit in writing part character width Yu Character-height when in situation, adjustment
overall width and writing spacing, software automatic control writing width
b. Always extends the character to calculate spatially the character is high, the character high <=
character is high: Is smaller than in the request writing width is equal to in the writing highly situation,
when adjustment overall width and writing spacing, software automatic control writing width;
c. Always extends the character width to calculate the character is spatial: When adjustment
writing overall width and writing width, software automatic control writing spacing
d. Character width this calculated spatially always extends, does not revise regulations the width:
Again does not change the seal in the width situation, when adjustment writing width and writing
spacing, software from adjustment writing partial overall widths;
⑥ Manufacture seal completely. (Figure 3-4)
Figure 3-4
⑶ Save the manufactured department seal: In the single click main menu “Document” the menu,
single click “Preservation”, then appear “SAVE AS”, inputs the filename in the document column,
the single click “Preservation” the button.
2. Manufactures one contract seal
Manufacture analysis: Contract seal of as shown in Figure 3-5, Includes the contract Seal object: upround writing “NewlySEAL Typesetting Software”, the logo, five line of horizontal type-setting
writing, the altogether seven objects, the contract seal with department seal of similar, might increase
four line of writing objects in a manufacture department seal of foundation to be possible .
Figure 3-5
⑴ Single click the button
of the seal toolbar.
⑵ Adjustment seal of each object position and attribute
① Adjusts a up round row of writing
a. Selects a up round row of writing: The mouse single-clicks a up round row of writing;
b. Change writing: In the writing frame “NewlySEAL Typesetting Software” in the attribute
14
column the writing to delete the input customer will need the writing.
c. Adjustment included angle: The mouse places about a link row of writing in two side control
points becomes
or
o’clock, with the mouse dragging, after satisfaction loosens the mouse left
key then; Or directly in attribute column “included angle” in attribute column direct input angle ,
(For example inputs 150) then, this time a link row of writing is the seal middle line for the axis of
symmetry change included angle;
d. The adjustment character high with a mouse dragging link row of writing about two side control
points, loosens the mouse left key after satisfaction, Or “Height” in the attribute column in the
attribute column the direct input (eg: input 7) then;
②Adjustment chart
a. Selects the logo: Mouse single click logo
b. Replacement logo: Has the logo in logo attribute column right side which each kind of logo
tabulation single click must elect
c. Motion logo: In the logo attribute column “Demonstration width”, “Demonstration
altitude” in the column inputs 6 respectively, “central Y” in the column inputs - 6.5 (or mouse turns
when logo drives logo to ideal position);
③Under adjustment horizontal type-setting writing
a. Under selects the horizontal type-setting writing;
b. Under change horizontal type-setting writing;
c. Under reduction, migration horizontal type-setting writing: “Height” in the column in under
horizontal type-setting writing attribute to output 3.5, “Overall altitude” in the column inputs 15,
“Overall altitude” in the column inputs 26, “Displaces” in the column to input - 13 (or adjusts
directly with mouse also may)
④ Deletes a lower ring row of writing: Single-clicks a lower ring row of writing, single-clicks in
the host toolbar
button.
⑤ This time seal model as shown in Figure 3-6.
Figure 3-6
⑶ The increase horizontal type-setting writing
① increases the horizontal type-setting writing;
15
Figure 3-7
a. In single click attribute column above line of “increase…”(As shown in Figure 3-7), pulls in
the menu in under to single-click “sets horizontally”
b. Replaces the writing in the attribute column, “the character will be high” in the column to
input 7;
c. Adjusts the character with the mouse to be wide
d. With mouse adjustment overall position, about when adjustment requests the displacement is 0
guarantee horizontal type-setting writing crosswise comes between;
e. The similar method increases other several lines of writing
② Adjustment horizontal type-setting writing attention horizontal type-setting writing character
high equal quite good
③Seal document preservation
3. Manufactures more than a line of ring-like writing department seal
seal..
Manufacture analysis: Many line of ring-like writing department seal as shown in Figure 3-8, includes in
the seal of object: A left up round row of writing “the People's Republic of China ”, “sets up the
NewlySEAL Typesetting Software” by a up round row of writing, the logo, the horizontal type-setting
writing, a lower ring row of writing,The altogether five objects, the contract seal compared with the
department seal have been many “the People's Republic of China ” this two row up round writing.
Figure 3-8
⑴ In single click seal of toolbar button
⑵ An original up round row of writing will adjust seal of right side
① Changes a up round row of writing, should input a link row of writing the right side single line
character
16
② Holds down ALT the key not to let go, when drives the left control point migration with the
mouse which up round sets, this is a link row of writing is not by the seal center axial symmetry change,
but is only then left side position variation as shown in Figure 3-9.
Figure 3-9
③ Perhaps in attribute column direct input included angle value (take this seal as example) 160,
angle of crab – 40
⑶ In increase two row row of writing
① Increases a up round row of writing in the attribute column: In single click attribute column
above line of “Increase…”Pulls in the menu in under to single-click “Up round to set”
② Manufacture two row writing
a. Inputs “People’s Republic” in the writing attribute column;
b. Holds down Ctrl the key not to let go, but in the single click Enter key, this time may line feed the
input writing not to be able to finish the input writing;
c. In second line of input “of China”;
d. Single-clicks the Enter key conclusion writing input
③ Adjustment two rows up round sets the position and the size
a. In up round sets the character high should suppose for specific up round sets the character high
one half, a line of up round sets the character high in this example is 3.5, but a line of up round sets the
character high is 7;
b. Holds down ALT the key not to let go, sets the right control point migration with mouse dragging
two row up round, this delivers a stock link row of seat is not by the seal center axial symmetry change,
but is only then right side the position variation;
④ Perhaps in attribute column direct input included angle value (take this seal as example) 80, the
angle of crab is 83;
⑷ Adjusts the seal other object attribute and the layout
⑸ Preserves the seal
4. Manufactures a right angle side seal
⑴ Single click seal of toolbar right angle side seal button .
⑵ Replacement seal writing
⑶ In the writing high-level attribute, may line feed automatically according to the seal width
⑷ In each line of writing different is may through the writing high-level attribute revision,
Following chart:
17
Figure 3-10
Figure 3-
Figure 3-12
Writing high-level attribute
The article block breaks the good
way
Each line of numbers of words
different when
Figure 3-10
The block breaks the line many
little
The block breaks the line many
little
The block breaks line of how
many
Each line of character width is
same
Each line of character width is
different
Each line of character width is
different
Figure 3Figure 3-12
Attention: After breaks the good way “how many” two character meanings to be few for first line of
character many second line of characters, If right side the writing vertical stroke row first lists as the
first line “many” two character meanings to be little many for the first line of character few second line
of character.
⑸ Add seal sideline
① Selects the entire seal:
② single-clicks the grain line attribute label:
③ Establishes the grain line attributes and the map sheet establishment grain line attribute method
is same.
⑹ Preserves the seal
5. In belt loop line seal
seal..
Figure 3-13
⑴ Manufacture a round seal
⑵ In repairs revises regulations the writing
⑶ Adjustment writing position
⑷ Increase loop line
① In the single click image toolbar (ellipse) finishes the job has the button
② Increases an in loop line in the seal, Drives an ellipse with the mouse, If needs to increase the
proper circle, needs to hold down the ALT key to drive the mouse again
③ In adjusts the loop line control point with the mouse to the appropriate size
⑹ Preserves the seal
6. Other seal demonst ration
ration..
18
Ⅳ..Template manufacture
1. Manufactures template
⑴ Selects in the page to have to take the template a seal;
⑵ In the single click menu bar “Template” the option choice “Saves for the template”
⑶ The appearance “Saves for the template” the dialog box like chart 4-1;
Figure 4-1
⑷ Choice “New template storage location”; “New template type storage location”;
⑸ In “New template type”, “New template name” in the text frame separately inputs the type and
19
the name which you get up;
⑹ The single click “Preservation” the button completes the new template the preservation
⑺ When later each time you will use the template which will establish, will take out directly from
the template storehouse then uses.
2. Apply template
⑴ In single click main menu column “Template” menu;
⑵ The single click “Takes the template …”Option;
⑶ The appearance “Takes the template” the
dialog
box
like
chart
4-2.
Figure 4-2
⑷ The single click needs the seal the template name;
⑸ The single click “Determines” button;
⑹ According to chooses the template to be able to produce a seal automatically in the work area.
3. Template manages
⑴ In single click main menu column “Template” menu
⑵ Single click “Template management” option
⑶ Appearance “Template management” dialog box like chart 4-3.
20
Figure 4-3
⑷ After this software may the template which has choose derives saves the plate, also may induct
the floppy disk in template to the template storehouse in;
⑸ After chooses single-clicks “Determines ” the button
Ⅴ.. Seal output
1 .Prints the seal; Selects in the seal → single click main menu “Document” the menu →
single click “the printing” the option → appearance “the printing” the dialog box → single click
“Printing”.
2. The seal outputs the engraving machine
⑴ Select seal
⑵ Single-click the “Document” in the main menu.
⑶ Single-click the “Carving”.
⑷ The “carving” the dialog box is display ed.
In dialog box left side in demonstration, pink color circle for carving seal;
a. The blue color dashed line makes the big carving scope for the engraving machine;
b. The pink color dashed line is the seal tangent;
c. Locates X, locates Y the coordinates for the seal tangent intersection;
d. This software general default value for the data which already adjusts, the user may carve
directly, if has the need customer to be possible to carry on the adjustment;
⑸ Single-clicks the “Carving” button.
Ⅵ.. Seal engrave
1. Single-clicks the
button. Then appear the fellow dialogue box:
21
2. Choose “prop…”, then appear the attribute of the engraving machine.
3. Engraving machine attribute
This kind of type engraving machine should connect with computer’s LPT Port This software is
unable to simulate the machine board. Its attribute dialog box is composed by “General” and “Device”.
1. The device
The establishment of “device” in the page must completely consistent with concrete hardware
establishment and installment. So the engraving machine factory sign matches the end-user of this
software and don’t revise the establishment of this page. The user can directly read next content jump
over this page.
The attribute page of “device” shows as following chart.
Help
Help: It’s showing the method of coordinates direction, topleft corner coordinate and engrave width. If
the methods not clear you may test according to the steps of explanation.
Coordinate direction
direction: The movement direction of main indicator, auxiliary indicator electrical
22
machinery. If the movement direction of the engrave machine not same with your hope when you move
in the dialog box, then you should choose different button here.
Topleft XY: The carve region of the engraving machine is topleft corner of the machine. Unit:
millimeter.
Carving width: The width and the high size of the carve region about the engraving machine . Unit:
millimeter.
Crosswise DPI: The resolution establishment of the transversal motion axis about the engraving
machine. Unit: Pulse/Inch.
Vertical DPI: The resolution establishment of longitudinal motion axis about the engraving machine .
Unit: Pulse/Inch.
Prompt: Here the establishment choice must same with the machine actual. Otherwise the
machine movement is not accurately. If has chosen these establishments after the machine design
standard, the machine proper motion has fine distinction with graph size of the software. Then you can
trim DPI value . If the movement distance more than graph size then depression DPI value; otherwise
increase DPI value.
Examples: If original DPI is 1016, draw a 100*100 square and carry on cutting. And the square
size is 102*102 actually, after the trimming in the new DPI= software the graph size/cutting graph
actual size =1016*100/102=996.
Locate mode
mode:
The locate mode (in engraving machine attribute dialog box factory attribute page) is assigns
carves the position the way. Sets up the Newly CARVING software to provide reaches more than 20
ways newly to carry on the carving localization, the user mainly acts according to the current engraving
machine the structure performance and the carving request and the use custom chooses the appropriate
locate mode.
Because in ordinary circumstances, locate mode and engraving machine structure related, namely
the different engraving machine uses the different locate mode, after and the user designated one
appropriate way very little changes, therefore the locate mode choice design places the engraving
machine attribute dialog box in the factory attribute page.
left-hand corner in engraving machine current position, left bottom in engraving machine
Top
Topleft-hand
current position, right under angle in engraving machine current position, top right corner in
engraving machine current position, central point in engraving mach
ine current position: Each time
machine
carves when the output all by an engraving machine laser current position took the carving object on left,
left under, right under, the top right corner or the central point position carries on the carving.
Prompt: Only then a part of model carving function uses these locate mode.
Chooses when these locate mode carves in the dialog box above the schematic drawing XY value
or insignificant or the expression current engraving machine laser head position. If the software can read
out the current engraving machine the position to express the engraving machine position, if the
software cannot read out the engraving machine position not to have the significance, rests on the
concrete engraving machine performance to decide. The value does not have when the significance in
the schematic drawing demonstration is also insignificant.
When chooses these locate mode, generally releases the good material after laser to single-click
“Carving” to start to output.
When chooses these locate mode, also may single-click in the dialog box the direction button to
move an engraving machine laser position, or also may remove “Single step” in the option regarding
certain engraving machines to select the condition then to hold down when the position which the
direction button moves continuously needs loosens the button. Thus also may single-click “Move frame”
23
to cause the engraving machine along the output object outside the package of rectangular frame
movement the test output object carving scope.
Typesetting position: Regards as the current typesetting page top left-hand corner is the engraving
machine carves the region the top left-hand corner, the output object arranges in the page when any
position, the carving output on the output in engraving machine any position. Chooses when this locate
mode carves in the dialog box the apex XY value to express the output object top left-hand corner carves
the region in the engraving machine the position.
Generally when a whole piece material overall design work also original design output chooses this
locate mode. After carves the region to put the material to single-click “Carving” to start directly to
output.
When chooses this locate mode, also may single-click “Measured frame” the button causes the
engraving machine along the output object outside the package of rectangular frame movement the test
output object carving scope.
Assigns the top left-hand corner, the left bottom, the right under angle, the top right corner, the
central point, above the central point, left side the central point, under the central point, right side
the central point position: Will output the object an outside package of rectangle for instance will be
“Field” the character standard, through will assign its 9 intersections the position to carry on the carving
localization the way. Chooses when this locate mode carves in the dialog box the apex XY value
expression the sizing coordinate figure. X towards right increases, Y downward increase.
on left (left
Assigns on left (left under, right under, on right) the angle to the engraving machine
machineon
under, right under, on right) the angle distance: Through assigns outside the output object package of
rectangular one of four angles to arrive the engraving machine to carve the region to correspond the
same direction the vertex position distance to carry on the carving localization the way. Chooses when
this locate mode the apex XY value expression corresponding distance value, the value is bigger leaves
the engraving machine angle to be farther, smaller nearer.
Chooses when above “Assign” the kind of locate mode, may directly revise the XY value either the
one-shot “Single step” the direction button revises the XY value or with the mouse left key in the
schematic drawing drives the output object to change the XY value, the one-shot “Measured top” either
“Move frame” the button test output object carving position or the scope.
This kind of locate mode also is generally in adjusts the carving position no longer to change, later
each time all when this position output uses.
2. General
To designs the general parameter in the engraving machine.
24
Link to
to…: The direction of engrave machine and computer connection.
Scan speed
speed: The movement speed of sweep the graph itself.
Cut speed
speed: The movement speed of cutting speed and draw frame when engraving.
Link gap
gap: The distance between the up sweep lines and under lines. It related with each pulse machine
movement. In ordinary the distance of sweep is 0.05 millimeter
Scan direction
direction: The way of sweep process.
Horizontal
Horizontal: The direction of each scan line is horizontal way.
Longitudinal
Longitudinal: The direction each sweep line is vertical way.
Unidirectional
Unidirectional: From graph this end sweep toward another end when it’s light. After return then
move to begin position of next line and continue to sweep.
Bidirectional: It will all light when back and forth sweep in the process to improve the efficiency.
Up down
down:: If it crosswise sweeps, establishment the order of the sweep lines. If it longitudinal
sweeps, establishes the first line to sweep direction.
Right left: If it longitudinal sweeps, establishes the first line to sweep direction. If it crosswise
sweeps, establishment the order of the sweep lines.
To XY after eng
eng:: Laser head pauses on the appoint position after the end of crave. X towards right
increases, Y downward increase takes the top left-hand corner as the zero point.
Scan delay
delay,, cut delay: The time-gap of the computer transport the instruction to the engraving
machine when sweep or crave. The value is smaller and the speed is quicker. But if you want to suspend
operation quickly please increase this value let the transport speed match with the machine execute
speed.
25