1
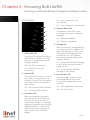
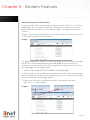
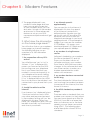
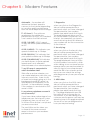
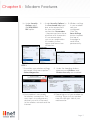
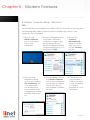
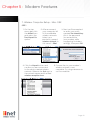
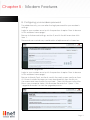
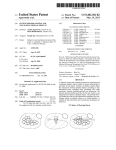
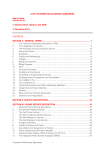
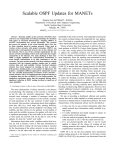
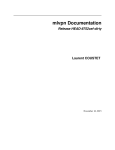
BoBTM – 4 port wireless VoIP router
Table of Contents
Chapter 1
Introduction....................................................................................... 4
Chapter 2
Product Overview............................................................................ 5
Chapter 3
Knowing BoB Lite.............................................................................. 8
Chapter 4
Connection and configuration...................................................... 9
Chapter 5
Modem features............................................................................. 12
1. How to browse to this modems
home page.............................................................................. 12
2. What does the information on the
home page mean?................................................................ 13
3. How do I log into my modem to
configure the various options................................................. 15
4. Wireless Modem Setup............................................................ 16
5. Wireless Computer Setup - Windows 7.................................. 18
6. Wireless Computer Setup - Windows XP............................... 19
7. Wireless Computer Setup....................................................... 20
8. Configuring your modems password.................................... 21
9. Firmware upgrade................................................................... 21
10. Set up a file server................................................................... 22
Chapter 1 : Introduction
This modem, developed by iiNet Labs, means you can connect your
computers in the home or office to the internet, it also has the ability for
you to connect your home phone to this modem and sign up for iiNet’s
netphone service, which allows you to make cheap phone calls through
your broadband connection.
Your modem has software onboard (just like a PC has software); simply
connect your computer/s in the home or office, either via wires or through
a wireless connection, to this modem and surf the internet, retrieve emails
and communicate with other computers on the world wide web (WWW).
This user manual will guide you through the process of connecting your
modem to the internet and will also help utilise advanced features, such
as:
• Remote management – this enables any computer to manage your
modems settings remotely, and means that if you wanted to make
changes to your modem from a remote location, such as a friend’s
house, you can log in into your modem at home by entering a unique
web address and security password.
• Access control & Parental control – manage which computers in your
home or office can access the internet and at what times of the day,
for example you may only
what the kids computer
to be able to access
the internet or surf social
media websites at certain
times of the day
• Set up wireless security – it
may be necessary to set
up a security system so
that only your computers
in the home can connect
to this modem and in
turn use your internet
connection, and
prevent your neighbour’s
computer from using your
internet connection over
a wireless connection!
Page 4
Chapter 2 : Product Overview
About BoB LiteTM 4 port integrated wireless modem
BoB LiteTM - 4 port
integrated wireless modem
Web-Based Advanced User
Interface
You can set up the modem
advanced functions easily through
your web browser, without having
to install additional software onto
the computer. There are no disks
to install or keep track of and, best
of all, you can make changes and
perform setup functions from any
computer on the network quickly
and easily.
Compatibility with both PC’s
and Mac® Computers
The modem supports a variety of
networking environments including
Mac OS® 8.x, 9.x & v10.x, Linux®,
Windows® 98SE, ME, NT, 2000, XP and
Vista and Windows 7. You will need
an Internet browser and a network
adapter that supports TCP/IP (the
standard language of the Internet).
Internet Access
This device supports Internet access
through an ADSL connection. Since
many ADSL providers use PPPoE or
PPPoA to establish communications
with end users, the modem includes
built-in clients for these protocols,
eliminating the need to install these
services on your computer.
Front-Panel LED Display
Light LED’s on the front of the
modem indicate which functions
are in operation. You’ll know ata-glance whether your modem
is connected to the Internet. This
feature eliminates the need for
advanced software and statusmonitoring procedures.
Built-in Dynamic Host
Configuration Protocol
(DHCP)
Built-In Dynamic Host Configuration
Protocol (DHCP) on-board makes
for the easiest possible connection
of a network. The DHCP server
will assign IP addresses to each
computer automatically so there
is no need for a complicated
networking setup.
DMZ Host Support
DMZ Host Support allows a
networked computer to be fully
exposed to the Internet. This
function is used when NAT and
firewall security prevent an Internet
application from functioning
correctly.
NAT IP Address Sharing
Your modem employs Network
Address Translation (NAT) to share
the single IP address assigned to you
by your Internet Service Provider
while saving the cost of adding
additional IP addresses to your
Internet service account.
Page 5
Chapter 2 : Product Overview
About BoB LiteTM 4 port integrated wireless modem
SPI Firewall
QoS
Your modem is equipped with
a firewall that will protect your
network from a wide array of
common hacker attacks including:
QoS (Quality of Service) limits the
traffic being sent from the modem
(upstream) when using VoIP at
the same time. If QoS is disabled,
the quality of the VoIP call can
suffer due to excessive traffic from
another source, such as a PC. When
QoS is enabled, it limits the upstream
traffic and sets it aside for VoIP,
increasing the call quality.
IP Spoofing, Land Attack, Ping of
Death (PoD), Denial of Service
(DoS), IP with zero length, Smurf
Attack, TCP Null Scan, SYN f lood,
UDP f looding, Tear Drop Attack,
ICMP defect, RIP defect, and
fragment f looding.
Universal Plug-and-Play
(UPnP) Compatibility
UPnP (Universal Plug-and-Play) is
a technology that offers seamless
operation of voice messaging,
video messaging, games, and
other applications that are UPnPcompliant.
USB/3g/Charge Ports
Your modem is equipped with two
USB ports. One on the side of the
modem for storage or for charging
USB devices such as mobile phones
or for plugging in a 3G device; the
second USB slot is situated in the
back of the modem for 3G USB
modems. The Storage port currently
supports FAT16/32 & NTFS USB Mass
Storage Devices. With a mass
storage device connected you can
easily share your files to anyone on
the network.
The ‘Charge’ port will supply a
maximum 5V 500mA. Connecting
a USB device which requires more
than 500mA may result in damage
to your equipment.
Virtual Server
If you have a fixed IP address, you
can set the modem to act as a
virtual host for network address
translation. Remote users access
various services at your site using
a constant IP address. Then,
depending on the requested
service (or port number), the
modem can route the request to
the appropriate server (at another
internal IP address).This secures
your network from direct attack
by hackers, and provides more f
lexible management by allowing
you to change internal IP addresses
without affecting outside access to
your network.
Support for VPN Pass-Through
If you connect to your office
network from home using a VPN
connection, your modem will allow
your VPN-equipped computer to
pass through the modem and to
your office network. This modem
supports 1 VPN session at any one
time
Page 6
Chapter 2 : Product Overview
About BoB LiteTM 4 port integrated wireless modem
This modem supports three of the
most commonly used VPN protocols
– PPTP, L2TP, and IPSec. The VPN
protocols supported by the modem
are brief ly described below.
Point-to-Point Tunneling Protocol –
Provides a secure tunnel for remote
client access to a PPTP security
gateway. PPTP includes provisions
for call origination and flow control
required by ISPs.
L2TP merges the best features
of PPTP and L2F – Like PPTP, L2TP
requires that the ISP’s modems
support the protocol.
IP Security – Provides IP networklayer encryption. IPSec can
support large encryption networks
(such as the Internet) by using
digital certificates for device
authentication.
Wired & Wireless LAN
The modem provides access for up
to 4 by 10/100 Mbps wired devices
and up to an additional 32 wireless
devices, making it easy to create a
network in small offices or homes.
802 11b, 802 11g & 802 11n wireless
standards are supported.
WEP, WPA and WPA 2
Encryption protocols
The modem features WPA2, which
is the second generation of the
WPA-based 802 11i standard. It
offers a higher level of wireless
security by combining advanced
network authentication and
stronger Advanced Encryption
Standard (AES) encryption methods.
It also supports the legacy security
standard called Wired Equivalent
Privacy (WEP) in order to allow you
to activate security with any legacy
devices you may have on your
network.
VLAN
VLAN (Virtual Local Area Network)
adds the ability to manage multiple
networks with the one modem. The
modem is designed to be placed
on a desktop. All of the cables exit
from the rear of the modem for
better organisation and utility. The
LED indicators are easily visible on
the front of the modem to provide
you with information about network
activity and status.
Computer Filter Rule
For added security, you can set
up a list of MAC addresses (unique
client identifiers) that are allowed
access to your network Every
computer has its own MAC address.
Simply enter these MAC addresses
into a list using the web-based user
interface and you can control
access to your network.
Page 7
Chapter 3 :Knowing BoB LiteTM
Knowing your BoB LiteTM 4 port integrated wireless modem
Front Panel
Off - Your computer is not
connected
On - Your computer is connected
1
2
3
4
The Wireless status LED shows
you when the router’s wireless is
enabled.
On - Wireless enabled
Off - Wireless is disabled
5
5. Storage/3G
6
When a USB mass storage device
is connected to this modem, this
light will illuminate to inform you
the attached storage device
is ready for use. This modem
also accepts a 3G wireless USB
modem service.
1. ADSL SYNC LED
The ADSL LED will light up yellow
indicating no ADSL sync. Once
line sync is established the LED
will light up blue.
4. Wireless Status LED
Off - No ADSL connection
On – Attached USB Mass Storage
or 3G Device connected and
ready for use
On - ADSL link is up and
connected
Off – No attached USB Mass
Storage or 3G Device
2. Internet LED
6. Phone Status LED
The Internet LED shows you when
the router is connected to the
Internet. If the LED is off or yellow
the router is NOT connected to
the Internet.
The phone light indicates that
your Netphone account has
successfully registered on the
network.
Off – Not connected to Internet
On – Connected to internet
On - VoIP registered successfully
Off - No VoIP activity
3. LAN Status LED
When a computer is properly
connected to the LAN port on
the rear of the router, the LED
shown here will light. A solid light
means a computer or a networkenabled device is connected.
When information is being sent
over the port, the LED blinks
rapidly.
Page 8
Chapter 4 :Connection & Configuration
Connect & Configure your BoB LiteTM
The following provides an easy step-by-step hardware installation guide.
All the modem settings have been organised for you. Simply follow all the
steps to successfully connect to the internet.
Before you begin, please check the following items have been included.
Quick Installation Guide
Wireless
Setup
Guide
Wireless
Setup
Guide
3
BoB LiteTM
Power Pack
Line Filter
Ethernet
Cable
Phone Cable
x2
User Manual
Quick Install
Guide
Wireless Setup
Guide
Get BoB LiteTM Ready
• Connect the power adaptor to the power port on the back of BoB LiteTM
and plug it into an electrical outlet.
• Connect one end of a white telephone cable to the grey ‘ADSL’ port on
the back of BoB LiteTM and then connect the other end to the ‘ADSL’ port
on the Line Filter.
• Connect the Line Filter to your telephone wall socket using the phone
cable attached to the ‘Line’ side of the filter.
• Switch BoB LiteTM on and wait a few minutes.
If you have an active iiNet DSL connection BoB LiteTM will automatically start
talking to iiNet’s servers. BoB LiteTM will retrieve your login details and other
settings during this time, so please leave BoB LiteTM connected and give him
some time to set himself up. If you are waiting for your iiNet DSL service to be
activated then BoB LiteTM will be unable to connect to the internet until your
application for DSL is complete.
Note: If you have Naked DSL, you do not need to use the Line Filter. Simply
connect your phone line directly into the ‘ADSL’ port on the back of BoB
LiteTM
Line Filter
Power Cable
Phone Cable
Page 9
Chapter 4 :Connection & Configuration
Connect & Configure your BoB LiteTM
Connecting to BoB LiteTM
How would you like to connect your computer to BoB LiteTM? You can
connect multiple computers and laptops using the methods below.
Wireless
All BoB LiteTM units are enabled for wireless connection by default. Please
refer to Wireless Setup Guide for instructions on setting up wireless and
ensuring the wireless connection is secure.
Using the supplied ethernet cable
• Plug the yellow Ethernet cable into one of the yellow ports on the back of
BoB LiteTM.
• Plug the other end into your computer or laptop’s Ethernet port.
Your computer will start talking to BoB LiteTM within a few moments.
How do you plan on making calls now that you have BoB LiteTM?
Line Filter
Phone Cable
Ethernet Cable
Power Cable
Just VoIP (Naked DSL Customers)
If you only plan to use VoIP, you’ll need to plug in your own handset into the
‘phone’ port.
Just Your Standard Phone Line (PSTN – Doesn’t Work With Naked)
If you just want to use your regular phone line to make phone calls:
• Plug the additional phone cable that came with BoB LiteTM into the ‘Phone’
port on your line filter.
• Plug the other end into the black ‘pstn failover’ port on BoB LiteTM.
Page 10
Chapter 4 :Connection & Configuration
Connect & Configure your BoB LiteTM
VoIP & Your Standard Phone Line
By default, calls will be made via VoIP if you have an active VoIP service
with iiNet. If for any reason your broadband service is down calls will
automatically be made using PSTN
If you have another phone which you would like to connect to BoB LiteTM
• Plug that phone into the green ‘phone 2’ port on BoB LiteTM using the
phone cable supplied with that phone.
Line Filter
Phone Cable
Power Cable
Ethernet Cable
Phone Cable
Congratulations!
You have successfully set up your BoB LiteTM. You are now ready to use the
internet and phone!
The following lights should now be lit in blue on the front of your modem/
router.
adsl sync internet
wired or wireless (depending on your preferred connection type)
phone
USB/Storage portable hard drive to expand your storage capacity
(depending if you have a storage device connected). USB hard drive
is not included.
Page 11
Chapter 5 : Modem Features
Administering BoB LiteTM Manually
To log into BoB LiteTM and change settings manually, type 10.1.1.1 into the
address bar of your web browser. Your computer must be connected to
BoB LiteTM either wirelessly or via ethernet cable. The default password is
“admin”.
Image 1 shows the home page of your modem and from here you can surf
to the various features of the modem...
Image 1
The page displayed in image 1 is the home page of your modems software;
just like you would navigate around a web page on the internet you
navigate your way around your iiNet modem by clicking on the links within
this web page in your web browser.
1. How to browse to this modems home page
In order to login to the modem and navigate around its various web pages
and configure the settings you first need to open up your web browser and
enter the modems home page address.
1. Open your computers web browser and in the address bar type
http://10.1.1.1 –see image 2
Image 2
Page 12
Chapter 5 : Modem Features
2. The page displayed is your
modems home page and from
here you can get a snap shot
of your modems setup, you can
also select to login to the modem
and access its more advanced
features or set up your ADSL
username and password and ‘get
online’!
2. What does the information
on the home page mean?
You will notice that on your modems
home page you have 8 headings,
the following will give you an
overview in to the information
displayed.
1. the connection with my ISP is
active?
You will either see ‘yes’ or ‘no’ in
this box. If ‘yes’ is displayed this
means you have an active ADSL
line running over your telephone
line in your home and that your
modem is connected correctly to
your telephone line and is talking
to the main computer at your ISP.
If ‘no’ is displayed either your ADSL
line is not active or the modem is not
connected to your phone line in your
home.
2. should I be able to surf the
internet?
If you have a ‘yes’ displayed in box
1 and you have the correct ADSL
user name and password entered
in the modems settings will ‘yes’ be
displayed in this box. When you
have ‘yes’ displayed in box 2 will you
be able to actually surf the internet
and check your emails.
3. my internet speed is
approximately
Your connection to the internet is
displayed in this box, the speed
of your internet connection is
determined by the plan you sign
up for with your ISP, as well as the
distance your house is from the
telephone exchange in your local
neighbourhood. In the example in
image 2 you can see the numbers
2112/384kbps – this means your
download speed is 2112kbps and
your upload speed is 384kbps.
4. my modem is using firmware
version
Software is loaded on your modem
(just like a standard PC) and this
shows you the latest version of
software running on your modem.
From time to time iiNet may make
changes to the software and send
you newer versions to make your
modem operate better under
various circumstances.
5. my modem has been connected
for this long
The time indicated in this box shows
you how long the modem has been
connected to the internet; the time
format is hh:mm:ss
6. the ADSL standard my modem is
using is
There are various standards that your
modem can connect to the internet.
You may have signed up to iiNet for
ADSL2 or if you are in an area that
does not have access to the faster
speeds you may have connected
using ADSL1. The following gives
a brief description of each of the
standards:
Page 13
Chapter 5 : Modem Features
Automatic – the modem will
determine the best speed to
connect to the internet depending
on your line quality and distance
from the local telephone exchange.
T1.413 issue 2 – The minimum
requirement for satisfactory
performance of ADSL, this standard
is not used on the iiNet network
G.992.1 (G.DMT) –ADSL1 speed,
usually the lowest speed offered by
an ISP
G.992.3 (ADSL2) –This indicates your
speed could be up to 12mbps
G.992.5(ADSL2+) This indicates that
your speed could be up to 22mbps
G.992.5_M(ADSL2+M) This indicates
you have access to faster upload
speeds and is only offered in
selected areas or on selected plans
7. my SIP sever is connected to
which Australian state?
iiNet offer a service whereby you
can make telephone calls over your
internet connection, there is a lot
of smart technology going on in the
background and a SIP server is a
special piece of equipment in our
network. In the example is image
2 the modme is connected to a SIP
server in NSW
8. my primary netphone account is
set up correctly?
If you have taken advantage of our
telephone over the internet system
(netphone) then you will see ‘yes’
in this box if the service is set up and
you are connected.
1. Diagnostics
when you click on the Diagnostics
tab you will be prompted for a
password, unless you have changed
the password for your modem,
please type admin and click Log in.
The page displayed allows you to
test your modems connection to the
internet, for example if you type in
www.iinet.net.au and click execute
your modem will test the connection
to the internet.
2. Security log
when you click on the Security log
tab you will be prompted for a
password, unless you have changed
the password for your modem,
please type admin and click Log in.
The page displayed shows a history
of your modems connectivity, often
when talking to our customer service
representative you may be asked to
save this log to your computer and
email the file to a customer service
rep so we can check the settings
and diagnose any issues you may be
having.
3. ADSL status
when you click on the ADSL status
tab you will be prompted for a
password, unless you have changed
the password for your modem,
please type admin and click Log
in. The page displayed shows the
line status of your connection to
the internet, if you are talking to a
customer service person you may be
asked to jump to this page and read
the results so we can diagnose the
issue you may be having.
The useful links section takes you
to three of the more common
areas to check on your modems
performance.
Page 14
Chapter 5 : Modem Features
3. How do I log into my modem to configure the various
options?
Please read chapter 2 paragraph 1 to explain how to launch your modems
home page.
To change any settings in your modem you need to first login to the
password protected pages. To do this you enter the password in the box
as shown in image 3 – unless you have already altered the modems default
password please type admin and click log in.
Image 3
Enter Admin and click log in
Page 15
Chapter 5 : Modem Features
4. Wireless Modem Setup
The following information provides an easy, step-by-step guide to setting
up your wireless network.
By now you’ve used the Quick Installation Guide to connect your modem
to a computer and the Internet. The next step is to set up your modem to
allow other devices to connect wirelessly.
Before starting Wireless Setup, please ensure:
• Your modem is switched on.
• The Ethernet cable is plugged in correctly into both your modem and
computer.
• You are able to browse to a website.
STEP 1
1. Click
on your
preferred
browser.
2. In your browser,
type in 10.1.1.1
into the URL bar
to browse to
your modem.
3. Once loaded you’ll see the
modem login page. Enter your
modem password into the
password field (default password
is “admin”) and press enter.
STEP 2
1. Click on menu
option 2 – Set up
my wireless.
2. On the Set up my wireless page follow the steps
below.
• Enable the Wireless function by ticking the enable
option. Already enabled by default.
• Enable the primary SSiD by ticking the Enable
primary SSiD option. Already enabled by default.
• Make a note of the name of the SSID. This will
identify your new wireless network to the devices
you attempt to connect to your network.
Page 16
Chapter 5 : Modem Features
3.• Under Security
Options select
the WPA/WPA2PSK option.
4. • Under Security Options, in
the Pre-shared key input
box, enter a password
for your new wireless
connection. Remember
– the password must be a
minimum of 8 characters.
It is recommended
you use a combination
of numbers, letters,
upper and lower case
characters.
5.Wireless settings
in your modem
are now
configured.
Click the
Save Settings
button towards
the top of
the page to
save these
permanently.
STEP 3
1.To confirm your wireless settings
are saved, click menu option 7 Status/diagnostics.
2. Under the heading wireless
please ensure Wireless: and
Wireless Security: are enabled.
3. Your modem is now ready
for wireless connections. The
next step is to configure any
devices you wish to connect
to the wireless network and the
internet.
4. Please log out of your modem by
clicking ‘log out of my modem’
near the top right side of your
web browser.
Page 17
Chapter 5 : Modem Features
5. Wireless Computer Setup - Windows 7
STEP 1
You should have now enabled the wireless (Wi-Fi) connection of your modem.
The following easy step-by-step instructions will help you connect your
computer to your modem.
1.Click on the
Wireless Network
icon in the system
tray of your
computer.
2. A
menu will appear with
the wireless networks
currently in range. Look
for the name of your
newly configured wireless
network and click on it. In
this case it’s iiNet.
4. Next you’ll be
required to enter
your newly created
Pre-shared key (this
is the password
you entered into
your modem while
configuring its wireless
settings), then press
ok.
5. Once loaded, click on
the Wireless Network
icon in your computers
system tray to confirm
the connection to
your modem’s wireless
network.
3. Ensure the
Connect
Automatically
option is ticked
and then click
on the Connect
button.
6. Connection to
your modem’s
wireless network
is now complete.
Try using a
browser to surf to
a website.
Page 18
Chapter 5 : Modem Features
6. Wireless Modem Setup
STEP 1
1. Click on the Start
Menu, open the
Connect To menu
item and select
Wireless Network
Connection.
2. O
nce the
Wireless Network
Connection window
appears, select the
wireless network you
previously named
(In this case it’s
iiNet). Next, click the
Connect button.
4. In a few moments, your
computer will have connected
to the wireless network. To
confirm a connection has been
made, look for the Connected
status.
3. N
ext you’ll be
required to enter your
newly created Preshared key (this is the
password you entered
into your modem while
configuring its wireless
settings), then press
Connect.
5. Connection to your modem’s
wireless network is now
complete. Try using a browser to
surf to a website.
Page 19
Chapter 5 : Modem Features
7. Wireless Computer Setup - Mac OSX
STEP 1
1. On the top
menu bar, click
the AirPort icon
and select the
Turn Airport On
option.
2. After a moment,
your computer will
list the available
wireless networks.
Select your
previously named
wireless network. In
this case it’s iiNet
4. Click the Airport button and
confirm you are connected
to the newly created wireless
network. Observe the tick next to
the network name and the filled
wireless reception icon.
3. Next you’ll be required
to enter your newly
created Pre-shared key
(this is the password
you entered into
your modem while
configuring its wireless
settings), then press OK.
5. Connection to your modem’s
wireless network is now
complete. Try using a browser to
surf to a website.
Page 20
Chapter 5 : Modem Features
8. Configuring your modems password
For added security you can alter the login password for your modem’s
settings.
Login to your modem as set out in the previous chapter ‘How to browse
to this modems home page’.
Browse to Advanced settings, section 5, and in the left menu bar click
item 1.
Passwords can contain any combination of alphanumeric characters.
9. Firmware upgrade
Login to your modem as set out in the previous chapter ‘How to browse
to this modems home page’.
Browse to Handy Tools, section 6, and in the main screen continue, item
A. If there is a later firmware you can download this from the link on
the screen and save the file to your hard . Then click Browse to find the
file on your computer. Select the firmware file and click ‘Open.’ Click
‘upgrade firmware’ to start the upgrade process.
Page 21
Chapter 5 : Modem Features
10. Set up a file server
A file server means you can attach a hard drive to the USB port of this
modem and share the content on this hard drive between computers in
your home or office that are also connected to this modem and on your
network. Only computers within your home or office can retrieve these files
sitting on the hard drive attached via USB to your modem.
Login to your modem as set out in the previous chapter ‘How to browse to
this modems
home page’.
Browse to configure my USB port, section 4. Click on item number 4 in the
left menu bar – setup my file server.
11. This modem has been pre-configured with the most common settings
for users of ADSL broadband; we have pre-configured the modem with
firewall settings that will give you a degree of protection (we always
recommend using PC based firewall software).
This guide has supplied you with the most common functions users need to
configure - if you need help configuring the more advanced sections and
you need to get in touch,you can call our 24 hour call centre on 13 22 58
or email us at [email protected].
Page 22
iiNet
iiNet Support
13 22 58
[email protected]
iiNet Business Support
13 24 49
[email protected]