1
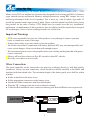
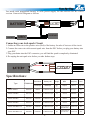
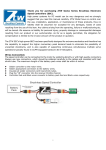
Thank you for purchasing ZTW Mantis Brushless Electronic Speed Controller (ESC). ZTW Mantis series ESC is a medium level product line designed for xed wing and Helis. It features super smooth start up and throttle linearity, multiple protection, strong BEC output, low cost and best performance at this level of product. This is not a toy., only for adult. Age under 14 should be operated under supervision of adult. Please read this manual carefully before using this product for the sake of safety. ZTW Model have no control over the use, installation, application, or maintenance of these products, thus no liability shall be assumed nor accepted for any damages, losses of costs resulting from the use of this item. Important Warnings ▲ZTW is not responsible for your use of this product, or any damage or injuries you may cause or sustain as a result of its usage. ▲Always place safety as priority when you use the product ▲An electric motor that is connection with battery pack and ESC may start unexpectedly and cause serious danger. Always treat them with enough respect. ▲We recommend you to remove the propeller when you working on the plane that with power source connected. ▲Observe all local laws when you y a RC aircraft or other RC vehicles ▲Never y over others or near crowds. Wires Connection: The speed controller can be connected to the motor by soldering directly or with high quality connectors. Always use new connectors, which should be soldered carefully to the cables and insulated with heat shrink tube. The maximum length of the battery pack wires shall be within 6 inches. ● Solder controller to the motor wires. ● Solder appropriate connectors to the battery wires. ● Insulate all solder connectors with heat shrink tubes. ● Plug the “JR” connector into the receiver throttle channel. ● Controller Red and Black wires connects to battery pack Red and Black wires respectively. BATTERY RECEIVER 1 You need extra appropriate battery to offer power supply for the receiver for HV OPTO version. Connection Diagram as follows BATTERY RECEIVER UBEC BATTERY Connecting your Anti-spark Circuit 1. Solder an extra wire to the positive wire (Red) of the battery for sake of best use of the circuit 2. Connect the extra wire with our anti-spark wire from the ESC before you plug your battery into your ESC 3. Plug your batter into the ESC connector, you will nd the spark is completely eliminated 4. Do unplug the anti-spark wire before you take further steps. Specications: Cont.\Burst Type Batterycell Weight BEC Size(mm) User PN#Model Current(A) NiXX\Lipo (g) Output W*L*H Program Mantis 6A BEC 2006101 6A\8A 5-10NC\2-3Lipo 6 5V/1A 14x21x7 Yes Mantis 12A BEC 2012101 12A\16A 5-12NC\2-4Lipo 10 5V/1A 22x23x8 Yes Mantis 25A BEC 2025101 25A\35A 5-12NC\2-4Lipo 19 5V/2A 29x28x9 Yes Mantis 35A BEC 2035101 35A\45A 5-12NC\2-4Lipo 31 5V/3A 29x38x10 Yes 31x57x12 Yes 31x57x12 Yes Mantis 45A SBEC 5A 2045201 45A\65A 5-18NC\2-6Lipo 47 5.0V,5.5V,6.0V adjustable/5A Mantis 65A SBEC 5A 2065201 65A\85A 5-18NC\2-6Lipo 50 5.0V,5.5V,6.0V adjustable/5A 2 Cont.\Burst Type Batterycell Weight BEC Output Current(A) NiXX\Lipo (g) Mantis 85A OPTO 2085301 85A\100A 5-18NC\2-6Lipo 47 Mantis 85A SBEC 5A 2085201 85A\100A 5-18NC\2-6Lipo 57 Mantis 125A SBEC 5A Size(mm) User PN#Model 2125211 125A\150A 5-18NC\2-6Lipo W*L*H Program 35x47x11 Yes 5.0V,5.5V,6.0V adjustable/5A 35x47x15 Yes 145 5.0V,5.5V,6.0V adjustable/5A 48x80x21 Yes 147 5.0V,5.5V,6.0V adjustable/5A Mantis 155A SBEC 5A 2155211 48x80x21 Yes Mantis 90A OPTO HV 2090411 90A\100A 18-38NC\6-12Lipo 128 48x80x21 Yes Mantis 120A OPTO HV 2120411 120A\150A 18-38NC\6-12Lipo 142 48x80x21 Yes Mantis 150A OPTO HV 2150401 150A\180A 18-38NC\6-12Lipo 142 48x80x21 Yes 155A\200A 5-18NC\2-6Lipo Features: ◆ ◆ ◆ ◆ ◆ ◆ Super smooth and accurate throttle linearity Safety thermal over-load protection Auto throttle shut down in signal lose situation Low Voltage Cut off Governor Mode Strong BEC Output Multiple Protection 1. Over-heat protection: When the temperature of ESC exceeds 110 deg C, the ESC will reduce the output power to allow it too cool. 2. Lost signal protection: The ESC will automatically cut power to the motor when it detects a lost of throttle signal for 2 seconds, then the motor will emit continuous beeping tone. Mounting your ESC 1. Choose a location that has good airow to offer best cooling to prevent overheating. DO NOT cover the side with the at heat shield with hook and loop tape or any other material as this will greatly lower its effectiveness. 2. Mount the ESC with a combination of hook and loop tape or 2-sided foam tape. THROTTLE CALIBRATION 1. Turn on your radio and keep the throttle stick at the to position (100%). 2. Connect the battery pack to the ESC. Wait for about 2 seconds, the motor will beep for twice, then put the throttle in the minimum position, the motor will also beep, which indicates that your ESC has got the signal range of the throttle from your transmitter. 3 Using the ESC 1. Turn on your radio and keep the throttle stick at the lowest position 2. Connect the battery pack to the ESC. 3. Motor emits two sets of audible tones in succession means the ESC is armed and ready to use. The rst set of tone counting the cells of the battery the second set of means the status of the brake setting. Entering the programming Mode 1. Turn on your radio and set the throttle stick to top positon (100%) 2. Plug the battery pack into your controller 3. Wait for 2 seconds, you will hear 4 groups of two sets of fast beeps, after this you will hear four single beeps to indicate you have successfully entered the programming mode Programmable Items 1. Brake a. Turn on your radio and set the throttle stick to top positon (100%) b. Plug the battery pack into your controller c. Wait for 2 seconds, you will hear 4 groups of two sets of fast beeps, after this you will hear four single beeps to indicate you have successfully entered the programming mode d. When you hear one short beep “Beep” means you are in the Brake menu, the default setup is OFF, please choose your desired value by pulling the throttle stick to the lowest position. e. The system will automatically enter into next setting item when you nish one . If you do not want to change other settings, unplug the power to exit. Note: Brake Off- Sets the propeller to freewheel when the throttle stick is at the minimum position. Soft Brake-Sets the propeller to the 30% of the brake when the throttle stick is at the minimum position (Recommended for folding props). Mid Brake-Sets the propeller to the 60% of the brake when the throttle stick is at the minimum position (Recommended for folding props). Hard Brake-Sets the propeller to the 100% of the brake when the throttle stick is at the minimum position (Recommended for folding props). 2. Battery Type : NiCad/NiMH/LiPo 1. Turn on your radio and set the throttle stick to top positon (100%) 2. Plug the battery pack into your controller 3. Wait for 2 seconds, you will hear 4 groups of two sets of fast beeps, after this you will hear four single beeps to indicate you have successfully entered the programming mode 4. When you hear two short beeps “Beep-Beep” means you are in the Battery Type menu, please choose your desired value by pulling the throttle stick to the lowest position. 5. The system will automatically enter into next setting item when you nish one . If you do not want to change other settings, unplug the power to exit. 4 3. Low Voltage Protection Threshold ( Cutoff Threshold ) a. Turn on your radio and set the throttle stick to top positon (100%) b. Plug the battery pack into your controller c. Wait for 2 seconds, you will hear 4 groups of two sets of fast beeps, after this you will hear four single beeps to indicate you have successfully entered the programming mode d. When you hear three short beeps “Beep-Beep-Beep” means you are in the Low Voltage Protection Threshold menu, please choose your desired value by pulling the throttle stick to the lowest position. e. The system will automatically enter into next setting item when you nish one . If you do not want to change other settings, unplug the power to exit. 1) For Li-xx packs- number of cells are automatically calculated and requires no user input apart from dening the battery type. This ESC provides 3 setting options for the low voltage protection threshold ; Low (2.8V)/ Medium (3.0V)/ High (3.2V). For example : the voltage cutoff options for an 11.1V/ 3 cell Li-Po pack would be 8.4V (Low)/ 9.0V(Med)/ 9.6V(High) 2) For Ni-xx packs-low / medium / high cutoff voltages are 50%/60%/65% of the initial voltage of the battery pack.. For example: A fully charged 6 cell NiMh pack's voltage is 1.44V x 6=8.64V,when “LOW” cutoff voltage is set, the cutoff voltage is: 8.64V x 50%=4.3V and when “Medium” of “High” is set, the cutoff voltage is now 8.64V X 65%=5.61V. 4. Factory Setup Defaults: a. Turn on your radio and set the throttle stick to top positon (100%) b. Plug the battery pack into your controller c. Wait for 2 seconds, you will hear 4 groups of two sets of fast beeps, after this you will hear four single beeps to indicate you have successfully entered the programming mode d. When you hear four short beeps “Beep-Beep-Beep-Beep” means you are in the Factory Setup Defaults menu, please choose your desired value by pulling the throttle stick to the lowest position. e. The system will automatically enter into next setting item when you nish one . If you do not want to change other settings, unplug the power to exit. Restore- Sets the ESC back to factory default settings; Brake Type: Brake Off Battery Type: LiPo with Automatic Cell detective Cut Off Voltage Threshold: 3.0V/60% Motor Timing: Auto SBEC Voltage Output 5.0V Governor Mode : RPM OFF Motor Rotation : Forward Start Up Strength: 30% Low Voltage Cut Off Type: Reduce Power 5 5. Timing Setup a. Turn on your radio and set the throttle stick to top positon (100%) b. Plug the battery pack into your controller c. Wait for 2 seconds, you will hear 4 groups of two sets of fast beeps, after this you will hear four single beeps to indicate you have successfully entered the programming mode d. When you hear one long beep “Beep-----” means you are in the Timing Setup menu, please choose your desired value by pulling the throttle stick to the lowest position. e. The system will automatically enter into next setting item when you nish one . If you do not want to change other settings, unplug the power to exit. Automatic (7-30 deg) – ESC automatically detect the best motor timing Low (7-22 deg) – Setting for most 2 pole motors. High(22-30 deg)-setting for motors with 6 or more poles. Note: For the beginner we recommend automatic timing to achieve best performance. For the multiple poles motor we recommend high timing to gain best efciency. 6. SBEC Voltage Output a. Turn on your radio and set the throttle stick to top positon (100%) b. Plug the battery pack into your controller c. Wait for 2 seconds, you will hear 4 groups of two sets of fast beeps, after this you will hear four single beeps to indicate you have successfully entered the programming mode d. When you hear one long beep and 1 short beep “Beep----Beep” means you are in the SBEC Voltage Output menu, please choose your desired value by pulling the throttle stick to the lowest position. e. The system will automatically enter into next setting item when you nish one . If you do not want to change other settings, unplug the power to exit. Option 1 : 5.0V Option 1 : 5.5V Option 1 : 6.0V Note: This feature is only valid for the ESCs with BEC 5A output (45A SBEC-155A SBEC). 7. Governor Mode (Heli) a. Turn on your radio and set the throttle stick to top positon (100%) b. Plug the battery pack into your controller c. Wait for 2 seconds, you will hear 4 groups of two sets of fast beeps, after this you will hear four single beeps to indicate you have successfully entered the programming mode d. When you hear one long beep and 2 short beeps “ Beep-----Beep-Beep” means you are in the Governor Mode menu, please choose your desired value by pulling the throttle stick to the lowest position. e. The system will automatically enter into next setting item when you nish one . If you do not want to change other settings, unplug the power to exit. 1) OFF 6 2) Soft Start : Soft Start 1: 8-second delay from start to full rpm; Soft Start 2: 18-second delay from start to full rpm; Note: If the throttle is cut off after starting less 3 Seconds, then the next start will be as normal start. If the throttle is cut off after starting more than 3 Seconds, the next start will be as soft start. Governor Mode 1 : There will be a 23-second delay from start to full rpm;If lower the throttle to the 80% position of the full throttle or lower than 80% position, the RPM would be denitely changed , the lost RPM will be detected and compensated automaticly by the ESC that makes sure to keep the RPM at the same speed. (Note: This function is only for Low KV motor) Governor Mode 2 : There will be a 23-second delay from start to full rpm;If lower the throttle to the 80% position of the full throttle or lower than 80% position, the RPM would be denitely changed , the lost RPM will be detected and compensated automaticly by the ESC that makes sure to keep the RPM at the same speed. (Note: This function is only for High KV motor) Note: 1: If the throttle is cut off after starting less 3 Seconds, then the next start will be as normal start. If the throttle is cut off after starting more than 3 Seconds, the next start will be as soft start. 2: Once the Governor Mode is enabled, the ESC's Brake and Low Voltage Cutoff Type settings will automatically be resetted to Brake Off and Reduce Power respectively, regardless of what settings they were previously set. 3: Lower 50,000 turns is considered as Low KV motor, 100,000-200,000 turns is considered as High KV motor. Formula : Pole's qty of motor x KV value x Voltage= Motor turns For example: we test a 8 pole motor 1040KV with 6S Lipo, its turns will be 8x1040KVx25v=208,000 turns, so you can choose Governor Mode 2. 8. Motor Rotation: Forward/ Reverse a. Turn on your radio and set the throttle stick to top positon (100%) b. Plug the battery pack into your controller c. Wait for 2 seconds, you will hear 4 groups of two sets of fast beeps, after this you will hear four single beeps to indicate you have successfully entered the programming mode d. When you hear one long beep and 3 short beeps “Beep-----Beep-Beep-Beep” means you are in the Motor Rotation menu, please choose your desired value by pulling the throttle stick to the lowest position. e. The system will automatically enter into next setting item when you nish one . If you do not want to change other settings, unplug the power to exit. There are two way to change the motor rotation: a) by swapping any two motor wires b) by programming with program box or radio. 9. Start Up Strength a. Turn on your radio and set the throttle stick to top positon (100%) b. Plug the battery pack into your controller c. Wait for 2 seconds, you will hear 4 groups of two sets of fast beeps, after this you will hear four single beeps to indicate you have successfully entered the programming mode 7 d. When you here 1 long beep and four short beeps “ Beep----- Beep- Beep- Beep- Beep” means you are in the Start Up Strength menu, please choose your desired value by pulling the throttle stick to the lowest position. e. The system will automatically enter into next setting item when you nish one . If you do not want to change other settings, unplug the power to exit. Low(10%-15%-20%) low start up current Mid (25%-30%-35%) start up current High(40%-45%-50%) high start up current 10. Low Voltage Cutoff Type a. Turn on your radio and set the throttle stick to top positon (100%) b. Plug the battery pack into your controller c. Wait for 2 seconds, you will hear 4 groups of two sets of fast beeps, after this you will hear four single beeps to indicate you have successfully entered the programming mode d. When you hear two long beep” Beep----- Beep-----” means you are in the Low Voltage Cutoff Type menu, please choose your desired value by pulling the throttle stick to the lowest position. e. The system will automatically enter into next setting item when you nish one . If you do not want to change other settings, unplug the power to exit. Reduce Power – Lower the power output Hard Cutoff – Immediately shut down the power once the voltage reaches the preset value THE TONES WILL BE HEARD IN SEQUENCE AS FOLLOWS: 1 BeepBrake Type (1 short tone) 2 Beep-BeepBattery Type (2 short tone) 3 Beep-Beep-BeepCut Off Voltage Threshold (3 short tone) 4 Beep-Beep-Beep-BeepRestore Factory Setup Defaults (4 short tone) 5 Beep----Motor Timing (1 long tone) 6 Beep-----BeepSBEC Voltage Output (1 long tone 1 short tone) 7 Beep-----Beep- BeepGovernor Mode (1 long tone 2 short tone) 8 Beep-----Beep- Beep- BeepMotor Rotation (1 long tone 3 short tone) 9 Beep-----Beep- Beep- Beep- BeepStart Up Strength(1 long tone 4 short tone) 10 Beep----- Beep----Low Voltage Cut Off Type (2 long tone) Note :One long tone “Beep-----”is equal to ve short tone “Beep-”. Programming Tone Reference Table Tone of value Prog.Item BrakeType BEEP- BEEPBEEP- BEEPBEEPBEEP- BEEPBEEPBEEPBEEP- Brake OFF Soft Brake Mid Brake Hard Brake 8 BEEP----- BEEP----BEEP----BEEP----BEEPBEEP----BEEPBEEPBEEPBEEPBEEPBEEPBEEPBEEPBEEP- BatteryType Cut Off Voltage Threshold Restore Factory Setup Defaults NiCd/NiMH 2.8V/50% Lipo LiFe 3.0V/60% 3.2V/65% Restore Motor Timing Auto 2° 8° SBEC Voltage Output 5.0V 5.5V 6.0V Governor Mode Motor Rotation No Protection RPM OFF 1st Soft Start 2nd Soft Start Forward 15° 22° Governor Mode 1 Governor Mode 2 25% 30% 30° Reverse Start Up Strength 10% 15% Low Voltage Cut Off Type Reduce Power Cut Off Power 20% 35% 40% 45% 50% Note: Highlighted value are default settings. Frequently Asked Questions Q: Motor does n't work, but there are audible tones signal the number of cells after powering up ESC Possible cause: The ESC throttle calibration has not set up. Possible Solution: Set up the ESC throttle calibration Q: Motor does n't work and no audible tone emitted after connecting the battery. Servos are not working either. Possible cause: 1. Poor/loose Connection between battery Pack and ESC. 2. No power 3. Poor soldered connections (dry joints) 4.Wrong battery cable polarity 5. ESC throttle cable connected to receiver in the reverse polarity Possible Solution: Check all the connections make sure you are doing it right. Q: Motor does not work but servos do Possible Cause: 1. Poor / loose connection between ESC and motor 2. Burnt motor coils 3. The battery pack voltage exceeds the acceptable range. 4. Throttle stick is not at the lowest position 5. The battery pack voltage exceeds the acceptable range. Q: Motor does not work but beeps like in the programming mode Possible Cause: Reversed throttle channel caused the ESC to enter the programming mode. 9