1
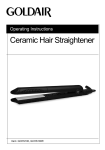
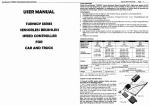
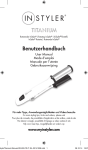
IMPORTANT!
For best results, go to
www.myinstyler.com
for Video Tips & Techniques
USER MANUAL
1¼ in. (32mm) InStyler® Wet 2 Dry Rotating Iron
1¼ in (32mm) InStyler® Wet 2 Dry Rotating Iron
IMPORTANT SAFETY INFORMATION
WARNINGS: TO REDUCE THE RISK OF SERIOUS
INJURY, READ ALL INSTRUCTIONS AND WARNINGS
COMPLETELY BEFORE USING THIS PRODUCT
InStyler Wet 2 Dry Rotating Iron has been carefully engineered
for both effectiveness and safety, however, basic safety precautions should always be followed when using any product,
especially when children are present.
• INSTYLER ROTATING IRON IS NOT INTENDED FOR USE BY
CHILDREN.
• KEEP AWAY FROM WATER.
• DANGER - As with most electrical appliances, electric parts are electrically live even when the switch is off. To reduce the risk of electric shock:
1. ALWAYS UNPLUG IT IMMEDIATELY AFTER USING.
2. DO NOT USE WHILE BATHING OR SHOWERING.
3. DO NOT place or store InStyler Rotating Iron where it can fall or be pulled into a tub, toilet or sink or any other water source.
4. DO NOT use InStyler Rotating Iron near water.
5. DO NOT place in or drop into water or other liquid.
6. If InStyler Rotating Iron falls into water, DO NOT REACH INTOTHE WATER! Unplug it immediately.
7. Unplug this appliance before cleaning it.
WARNING: TO REDUCE THE RISK OF BURNS, FIRES, ELECTRICAL SHOCK, DEATH, INJURY OR DAMAGE TO PROPERTY:
1. Counterfeit versions of the InStyler Rotating Iron do exist. To ensure you have purchased a genuine product, and to reducethe risk of burns, electrical shock and malfunctions, purchase from authorized dealers only.
2. Use InStyler Rotating Iron only for its intended use as
described in this manual. DO NOT use attachments not recommended by the manufacturer.
2
3. NEVER operate the InStyler Rotating Iron if it has a damaged
cord or plug, if it is not working properly, if it has been
dropped or damaged or if it has been dropped into water.
If the power supply cord or plug is damaged, the InStyler
Rotating Iron must be replaced by the manufacturer or an
authorized service agent in order to avoid a hazard.
4. Keep this product and the cord away from water and heated
surfaces. DO NOT wrap the cord around the InStyler Rotat
ing Iron until unit is completely cool.
5. This product has moving parts. Children and pets should be
kept away when product is in use.
6. The InStyler Rotating Iron should NEVER be left unattended
when plugged in.
7. NEVER use while sleeping.
8. NEVER drop or insert any object into any opening or hole on
The InStyler Rotating Iron.
9. DO NOT operate outdoors or where aerosol (spray) products
are being used or where oxygen is being administered.
10. DO NOT use an extension cord with the InStyler Rotating
Iron.
11. The InStyler barrel and unit bottom may be hot during use.
DO NOT allow eyes or skin to touch the heated surfaces.
12. DO NOT place InStyler on any unprotected surface while it
is operating or cooling down after use, except for the InStyler
carrier/mat, which has been provided.
13. DO NOT operate with a voltage converter.
14. This product is designed for hair styling. DO NOT use for
any other purpose.
15. This product is a personal care device and is NOT intended
for commercial use.
16. DO NOT use this product if any parts become damaged.
Inspect the InStyler product prior to beginning hair styling to
ensure allparts are secure in their place.
3
1¼ in (32mm) InStyler® Wet 2 Dry Rotating Iron
17. DO NOT subject this product to excessive force or shock that
may result in malfunction, shorter life span or distorted parts.
18. DO NOT tamper with this product’s components. Doing so
may cause unnecessary damage. This product contains no
user-serviceable parts.
19. DO NOT use liquid cleaners, aerosol cleaners, or any
cleaner containing alcohol, detergent, abrasive or corrosive
materials.
20. The InStyler Rotating Iron should be used only on clean
hair.
21. DO NOT use the InStyler Rotating Iron if you are 12 years
or younger.
22. An appliance should never be left unattended when it is
plugged in.
23. Close supervision is necessary when this appliance is used
by, on, or near children or individuals with certain disabilities or special needs.
24. Always store this appliance and cord in a moisture-free
area. Do not store it in temperatures exceeding 140°F
(60°C).
25. DO NOT plug or unplug this appliance when your hands
are wet.
26. Hold the appliance with the display and stem vents facing
away from your scalp.
IMPORTANT: The InStyler Rotating Iron should NEVER be used
with any type of synthetic hair extension. The InStyler can be
used on real human hair extensions ONLY, with the following
precautions. If your real human hair extensions are sewn in, you
can use your InStyler up to the scalp. If your real human hair
extensions are glued in, make sure you start with your InStyler
below the glue.
4
• SAVE THESE INSTRUCTIONS
• KEEP THIS MANUAL IN A SAFE PLACE FOR FUTURE
REFERENCE AND MAKE SURE ANYONE WHO USES THIS PRODUCT ALSO READS THIS MANUAL.
• READ ALL INSTRUCTIONS BEFORE USING YOUR INSTYLER
ROTATING IRON. NO ASSEMBLY REQUIRED.
The InStyler Rotating Iron is for household use only. The InStyler
Rotating Iron has a polarized plug (one blade is wider than the
other). As a safety feature, this plug will fit in a polarized outlet
only one way. If the plug does not fully fit in the outlet, reverse
the plug. If it still does not fit, contact a qualified electrician.
DO NOT attempt to defeat this safety measure.
Introduction and Getting Started
CONGRATULATIONS! You can now skip blow drying your hair
and still get that amazing blowout look that you could never get
with any other styling tool. The InStyler Wet 2 Dry dries hair by
whisking water out of the hair strands, and then as the water
travels up the rotating barrel, it is vented away safely and quickly.
It does this as you style resulting in significantly less styling time!
“Go Slowly!“
• The Wet 2 Dry InStyler is designed to help you save time blow drying
your hair, but it shouldn’t be used on completely wet hair. Towel dry
the hair thoroughly, and begin with hair that is as dry as possible.
• Glide the InStyler Wet 2 Dry SLOWLY down the hair once to dry and
once more to style.
• Listen for the crackle sound. That’s the sound of water evaporating off
the barrel, and it means that the InStyler Wet 2 Dry is working as it is
supposed to.
• Experiment with it and be creative. You will quickly see what this
innovative tool can do. The styling tips on the following pages will
help give you some ideas of what is possible. You will become more
efficient at styling your hair each time you use your InStyler.
5
For more tips, tricks and videos visit, www.myinstyler.com
1¼ in (32mm) InStyler® Wet 2 Dry Rotating Iron
Top 4 Things You Must Know
About Your InStyler Wet 2 Dry
#1 Towel Dry. Try to get your hair as dry as possible with a
towel before you begin.
#2 One to Dry and One to Style. Glide the InStyler SLOWLY
down your hair once to dry and once to style.
#3 Go Slowly! The InStyler works best if you glide it through your hair slowly. Repeated passes should be unnecessary
if you proceed slowly.
#4
Listen for the Crackle! If you hear a little crackling, that
means the moisture is evaporating properly from the
barrel and not in your hair.
Features
30 Second
Rapid Heat-up
1¼ in. (32mm) InStyler Wet 2 Dry Rotating Iron
1¼” Barrel
Offers Volume,
Curls and Flips
Heated Rotating Barrel
Straightens, Curls and Polishes Hair
410°F Ceramic Heat
Salon Quality Results
Air Intake Vents
Curved Smoothing
Plate
Automatically Aligns
to Smooth Hair and
Reduce Frizz, Without
Crushing or Creasing.
First Row of Bristles
Separates and Aligns Hair
Second Row of Bristles
Adds Volume and Reduces Frizz
Swivel Cord
Automatic Safety Shut-Off | Voltage: 120V/60Hz | Power: 50W
6
Multiple Heat Settings:
HIGH
3 Bars, 410 °F
Ideal for thick, coarse hair
MEDIUM
2 Bars, 315 °F
Ideal for thin-to-medium textured hair
LOW
1 Bar, 285 °F
Ideal for thin, fine hair
OFF
No Bar(s)
Towel Dry the hair thoroughly first. Hair can then be styled as normal on the
appropriate heat setting while still damp.
• The unit will start on “High.”
• Press the Power button again to reduce heat.
• The LED bars will flash while reaching heat; once the
temperature is reached, the LED bars will stay lit.
7
For more tips, tricks and videos visit, www.myinstyler.com
1¼ in (32mm) InStyler® Wet 2 Dry Rotating Iron
Safety First - Using your Thermal Guard
NOTE: It is recommended that you use your InStyler with the included
Thermal Guard Training Aid, to help prevent burns while you are getting
used to this unique new hot styling tool.
Attaching Your Thermal Guard Training Aid
1. Before attaching the Thermal Guard make sure the barrel of the unit is cool to
touch.
2. To attach, snap the Thermal Guard Training Aid onto the side of the unit
directly under the ring below the barrel.
3. Rotate the Thermal Guard Training Aid until tabs are seated in the indentations
on the body of the InStyler, and the Thermal Guard Training Aid is facing out.
4. Once it is snapped in place, you can use your InStyler as you normally
would.
Removing Your Thermal Guard Training Aid
5. Before removing Thermal Guard make sure the barrel of the unit is cool to
touch.
6. To remove the Thermal Guard Training Aid, firmly grab the Thermal Guard
Training Aid, making sure the barrel of the unit is cool, twist to unseat it and
pull to remove.
NOTE: It is important to keep your InStyler clean, as hair product build-up can
accumulate on the barrel and bristles. With the unit unplugged, wipe the outside
surface only with a lightly damp cloth. Bristles can be lightly scrubbed if necessary. Make sure the InStyler is completely dry before plugging into any power
source. Please see page 19 of this manual for more detailed instructions on
cleaning.
*Always allow the InStyler Wet 2 Dry to cool before storing.
8
The Basics - Preparation for all hair types.
• Before using your InStyler, you should always start with clean hair.
• You should also detangle first with a brush, and all sections should be
combed out for optimal results and shine.
• Sections of hair to be styled should be no wider than the length of the InStyler
barrel. We recommend starting with 1 to 3 inch sections at a time for whichever style you want to achieve.
• Style the under layers of your hair first. After under layers are completed,
style your top layers.
• You may use any salon quality styling product with your InStyler, however we
do not recommend the use of any oil-based products with your InStyler.
• For better hold, you can use your favorite light styling spray on each section of
hair before using your InStyler.
• Go Slowly! The most important lesson is to glide the InStyler slowly. Don’t
worry if you see “steam” coming off of your hair when using your InStyler. This
is not the result of any damage to the hair, it is simply excess moisture that is
evaporating.
Hair Types
The way you use your InStyler depends on what type of hair you have. You’ll get
the most out of your InStyler if you use the techniques best suited to your hair type.
The four main types of hair are:
1. Fine - Set the InStyler at Low to Medium heat setting. With fine hair, you
should only need 1 to 2 passes with the InStyler to achieve your desired
results.
2. Medium or Normal - Set your InStyler to the Medium to High heat setting.
You should only need 1 to 2 passes with the InStyler to achieve your desired
results.
3. Thick or Coarse - Set your InStyler at the highest heat setting and style as
desired. With coarse hair, 2 to 3 passes with the InStyler should be enough
to set your style.
4. Wet Hair (towel dry) - For wet hair, use the appropriate heat setting to dry
while styling.
Don’t rush! Remember to Take your time and move slowly through the hair.
NOTE: For color treated hair, we also recommend a lightweight shampoo and a
light leave-in conditioner.
•
•
•
9
Volumizing products can be used to hold the style.
To hold your style, end with a professional light finishing spray.
Although the InStyler uses less heat than other hair appliances,
we recommend using thermal protectant products before use.
For more tips, tricks and videos visit, www.myinstyler.com
1¼ in (32mm) InStyler® Wet 2 Dry Rotating Iron
Sectioning Hair
To achieve the style you want with your InStyler, it is important to know
how to properly section the hair.
• With longer hair, clip up the top layers of your hair, and then begin
sectioning and styling your under layers of hair first.
• For best results, do not use fingers to gather each section of hair. You
can gather a much “cleaner” section with a sectioning comb. • Start with 1 to 3 inch sections working around each side of the head
to the nape of the neck. Use small sections of hair.
• When styling hair, grip the InStyler firmly but not too tightly. Let hair
glide through it. Let the InStyler do the work.
• For straightening damp hair, glide the InStyler Wet 2 Dry once to dry
then once more to straighten.
Straightening
1.Section your hair using a sectioning comb.
2.Position the InStyler so the rotating barrel
side is next to your scalp as illustrated in
the picture.
3.Gently close the InStyler on your section
of hair starting at the roots, and let the
InStyler slowly glide straight down
through the ends of your hair.
4.Go slowly to allow the InStyler enough time
to be able to dry and style at the same time.
For straightening damp hair, glide the InStyler
Wet 2 Dry once to dry then once more to straighten.
TIP: To straighten at the root, simply
glide just the hot barrel over the root
area (see illustration). Do not close
the unit. Be cautious to avoid burning your scalp.
10
Flip Out
1.Gently close the InStyler onto the section
of hair with the barrel positioned over the
section of hair.
2.Slowly glide the InStyler down through the
hair section from the roots to the ends.
(see illustration)
3.Near the end of the hair section, rotate
your wrist so the InStyler brush turns out
away from your face. Allow the barrel to
rotate 3 to 5 seconds in place on your
ends before releasing the hair.
(see illustration)
Flip Under
1.Gently close the InStyler onto the section
of hair with the barrel positioned under the
hair section.
2.Slowly glide the InStyler down through the
hair section from the roots to the ends.
(see illustration)
3.Near the end of the hair section,
rotate your wrist so the InStyler brush
turns in towards your face. Allow the
barrel to rotate 3 to 5 seconds in
place on your ends before releasing
the hair. (see illustration)
11
For more tips, tricks and videos visit, www.myinstyler.com
1¼ in (32mm) InStyler® Wet 2 Dry Rotating Iron
Soft Curl
1.For the curling technique, you may find it easier to remove the Thermal
Guard Training Aid while keeping in mind to be cautious and avoid
burning your face or scalp.(See page 8 for Thermal Guard Training
Aid removal instructions.)
2.Being careful to not burn your fingers, wrap a section
of hair around the barrel of your InStyler from root to
ends, with the barrel side facing your scalp
(see illustration).
3.Gently close the InStyler onto the
section of hair. Rotate your wrist
slightly to ensure the ends
of your hair are included.
4.Let the InStyler rotate for 5 to 10
seconds on each section of hair, then
gently open the unit letting the hair
fall from the barrel.
5.For tighter, more defined curls, you
can let your InStyler rotate for a few
seconds longer. Let hair cool completely before running fingers through
to separate.
> TIP: When curling damp hair, let the barrel
rotate a few seconds longer on the section than you would with dry hair.
12
Volume Boost
To give your hair a boost of even more dramatic volume, you can try a
technique called, “On Base Styling”
1.To begin, wrap a section of hair around
the barrel down to the root.
2.Place the InStyler barrel directly
over the root, close the unit and
let the barrel rotate for a few seconds.
(see illustration)
3.Open the InStyler and let the hair
fall from the barrel. (see illustration)
DO NOT loosen newly styled sections
with fingers or comb until the hair is
completely cool to the touch. This
technique can be used anywhere
you want an extra volume boost.
13
For more tips, tricks and videos visit, www.myinstyler.com
1¼ in (32mm) InStyler® Wet 2 Dry Rotating Iron
InStyler Techniques - Advanced
To create extra body and volume using the InStyler:
• With the InStyler barrel facing towards the back of the head, close
the InStyler onto the section of hair, and slowly pull the InStyler in the
opposite direction that you want your hair to lay. In other words, at
the crown of your head, grab a section of hair with the InStyler and
slowly pull the unit forward towards your forehead.
• To boost the volume on the sides and back of the head, gather a
section of hair and push the InStyler upwards towards the crown of
your head. Gently pull the InStyler through the ends of the section of
hair. This technique gives extra body in the root area making hair look
fuller. This technique can be used anywhere you need extra body,
volume or height.
• For additional height in your bangs, wrap the bangs with the barrel
towards your scalp and let the InStyler rotate for a few seconds directly over the root. Open the unit and let your bangs gently fall from
the barrel.
14
Frequently Asked Questions
How do I use the InStyler as compared to my flat iron?
A. The technique is similar in that you put your hair into the InStyler, you close it onto your hair, and then slowly move down
the length of your hair. That is where the similarities end!! The
rotating, heated, polishing barrel and bristles will do most of
the work for you. Plus, you’ll find that you can do much, much
more with your InStyler than you could ever do with your flat
iron.
My hair is coming out frizzy when I use my InStyler. What am I
doing wrong?
A. Go Slowly. Towel dry the hair thoroughly first, then comb and
detangle your hair as much as possible. Position the InStyler
so that the barrel rotates with the direction of your hair. Also,
keep in mind to put as little tension as possible on the barrel.
This will help keep frizz to a minimum. If you’re still not getting the desired results, you may need to dry hair a bit more
before using the InStyler.
Does the InStyler work on natural African American hair?
A. Absolutely. You will get best results if your hair is combed
and detangled first. The InStyler is a great tool for African
American Hair because it will not leave crease marks like flat
irons, and the polishing barrel and bristles will leave the hair
looking shiny and beautiful. The InStyler is safe for any type of
hair when used properly.
Can I use styling products before or after I use my InStyler?
A. You can use any salon quality product with your InStyler,
although we do not recommend using any oil-based products
on your hair beforehand. A professional thermal protectant
spray can be applied to the hair before you style, as well
as any professional firm-up or styling spray to help hold the
style.
15
For more tips, tricks and videos visit, www.myinstyler.com
1¼ in (32mm) InStyler® Rotating Iron
Frequently Asked Questions
The InStyler doesn’t seem to be working on my ends. Am I doing
something wrong?
A. If you’re having trouble styling the ends, try holding the InStyler there a little bit longer. The ends of the hair are normally
the driest part of the hair, and can be a bit more difficult to
style. It helps to use a good conditioner, especially on the
ends to help infuse moisture. Also, if you have split ends, the
hair may come out looking frizzy.
I see smoke coming from my hair! Is it burning my hair?
A. No! The InStyler Wet 2 Dry is not burning your hair. This is
just a byproduct of evaporation.
Can I use my InStyler with real human hair extensions?
A. Yes. Make sure you start with your InStyler below where the
extension is attached to your natural hair. Do not pull the
InStyler through with any pressure, as you may pull out your
extensions if not careful. NEVER use your InStyler with any
synthetic hair extensions.
Can I use the InStyler Wet 2 Dry on already dry hair?
A. Of course! In fact, you may get even better results.
How does the InStyler Wet 2 Dry work? A. The InStyler Wet 2 Dry dries hair by whisking water out of
the hair strands, and then as the water travels up the rotating barrel, it is vented away safely and quickly. It does this
as you style resulting in significantly less styling time.
16
Product and Troubleshooting Questions
What is the InStyler?
A. The InStyler is a new hair styling tool that straightens, polishes
and styles hair by means of a rotating heated barrel and
brush bristles. This totally new design polishes the hair strands
individually, creating amazing results that are much better
than those they would have achieved using a flat iron, curling
iron, or hot tool. The new design delivers great results without
an extreme amount of heat or heavy styling products.
How is the InStyler different than my flat iron?
A. Simple: A flat iron compresses, mashes and then literally
bakes your hair between two extremely hot plates. The InStyler’s rotating polishing barrel gives your hair the heat it needs
to help style and straighten. Since the barrel is constantly
moving, it won’t “press and bake” like a traditional flat iron.
The InStyler also features a heated, floating plate between the
two rows of brushes. The plate automatically adjusts, allowing the hair to have more consistent contact with the barrel,
without having to grip the unit so tightly. The result is less frizz
and smoother, shinier hair with no creasing. The polishing
barrel allows the InStyler to actually use less heat than a flat
iron delivering better results including perfect flips, curls and
loads of luscious volume.
I need a lot of heat to straighten my hair. Will the InStyler get hot
enough?
A. We get asked this question a lot, and we’re very proud
to say you can add this one to the old “hair styling myths”
column! With the InStyler, you don’t need a lot of heat to
straighten and style your hair! The InStyler’s unique design
actually allows you to use less heat than you are used to,
while still getting better results than you would with a flat iron
or other hot tool. It’s a totally new way of thinking about heat
and your hair – you don’t need the extreme heat to get the
results you want. If you decide that you would like more heat,
the InStyler has three different temperature settings.
17
For more tips, tricks and videos visit, www.myinstyler.com
1¼ in (32mm) InStyler® Wet 2 Dry Rotating Iron
Can I use the InStyler to curl hair?
A. Absolutely! Simply by wrapping your hair around the rotating
heated polishing barrel, and closing the InStyler, you can
create great curls!
The heated polishing barrel rotates. Can my hair get tangled?
A. No. The surface of the rotating heated polishing barrel is
totally smooth, so your hair will not get tangled.
What is the diameter of the heated barrel?
A. Your InStyler’s heated barrel diameter is 1¼ inches or 32 mm.
What are the bristles made of?
A. The bristles are made of heat resistant nylon.
What is the power of the InStyler?
A. The InStyler is 120V, 60Hz and 50 Watts.
How do I turn the InStyler on?
A. Check to make sure your InStyler is plugged in. Press the
Power button. The LED bars should light and begin flashing.
Once the LED stops flashing the InStyler is ready to go. You
must close the handle to begin the rotation.
How do I get my InStyler to rotate?
A. You must close the handle to start the rotation. The rotation
will start automatically.
What if my InStyler does not heat?
A. Check to make sure your InStyler is plugged in. Press the
Power button. The LED bars should light and start flashing.
When the LED stops flashing the InStyler will be at the set
temperature and ready to use.
18
When I use my InStyler, why does the temperature LED start to
flash?
A. It is normal for the heat to fluctuate during use. As long as
the InStyler has been allowed to reach full heat (steady LED)
after powering on, you can continue to use your InStyler
while it is flashing.
Ho do I clean my InStyler?
A. When cleaning your InStyler, disconnect it from the power
source and make sure it has completely cooled. Wipe the
outside surface only with a soft damp cloth. Be sure to wring
out all excess water before applying it to the InStyler. Clean
more severe dirt by using a soft, damp cloth with a mild
soap. Bristles can be lightly scrubbed if necessary with a
damp cloth to remove any built up product and any residual
hair left in the bristles should be removed. The barrel can
be wiped down with a soft, damp cloth. Use a mild soap if
necessary. Make sure the InStyler is completely dry before
plugging into any power source.
19
For more tips, tricks and videos visit, www.myinstyler.com
Joinourcommunityforupdatedtips,
tricks,videos,andspecialproductoffers.
www.myinstyler.com
©2012TréMilano,LLC.AllRightsReserved.
InStyler®andInStyler®logoareregisteredtrademarksofTréMilano,LLC.
Illustrations by Renee Reeser Zelnick