1
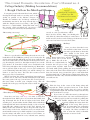
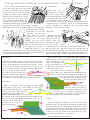
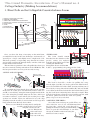
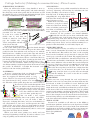
The Grand
Domestic Revolution
User’s Manual no. 2
Cottage Industry
(Making Accommodations)
Textiles have always been central to political-economic
developments throughout the world, and textile
production methods can be seen to represent the state
of labor, industry, and exchange as a whole. If we are
to experiment with the private sphere as revolutionary
microcosm, I recommend adopting domestic modes of
production and exchange that can manifest that
revolution physically, in action!
To this end, I initiate ‘cottage industry,’ and provide
means for producing textiles here, in the apartment.
Enclosed is the complete printed manual, covering use
of the small, simple looms I’ve left here, as well as the
much larger, more complex floor loom.
When attempting to record the many steps of the many
processes weaving entails I was continuously
confronted with the failure of text and image to
transmit the ‘tacit knowledge,’ embedded bodyknowledge which comes through direct experience and
close observation. To fill these gaps, a technical
solution: video tutorials on-line, and the opportunity
for live video chat via the provided eMac or through
your own skype account on your laptop. These techno-
logical fixes are available on my homepage,
actionweaver.com. Just press the ‘GDR weaving help’
button, or ask Yolande!
In these ways- I make the technique and apparatus of
hand weaving available to you, residents and visitors
to the Grand Domestic Revolution. Experiment!
Investigate production methodologies and labor
dynamics. Develop finished wares from the material
you produce, and negotiate how they will be used or
exchanged. This ‘GDR Merchandise’ could be used in
two exciting ways: enabling non-monetary exchanges
and thus extending the ‘domestic relations’ to the local
community; and if brought into a home and used, the
revolutionary labor action embedded in the cloth may
be celebrated in a private, domestic sphere. I hope the
blanket I’ve left for you transmits this intent in some
small way, if you sleep under it during your stay.
If you make something using the cotton or wool yarn
provided, you can sew on one of the provided ‘care
instruction’ tags, and sign it as your contribution!
Thank you,
Travis Joseph Meinolf, Casco, 2010
The Grand Domestic Revolution -User’s Manual no. 2
Cottage Industry (Making Accommodations)
Table of Contents
Introduction
Table of Contents
Mini Laser Loom
Floor Loom
Cover
here
1
3
ati
s tr
illu
warp
by
confused? helpful
video tips on
actionweaver.com,
my website
I am quite proud of the mini laser loom, which I
developed through study of weaving tools of the
world, in pursuit of my Master’s Degree in
Textiles. It combines the ‘backstrap’ method of
maintaining tension in the warp threads (fig. 1)
with the simplest tool for weaving, a flat piece
known as a ‘rigid heddle’. Using this loom and
the organic cotton provided you can weave a
coarse cloth perfect for many household needs.
Iri
sB
ens
on
The Grand Domestic Revolution -User’s Manual no. 2
Cottage Industry (Making Accommodations)
1. Rough Cloth on the Mini Laser Loom
upset?
s
on
fig. 1
exactly to your specifications. So, if
this is its last, chaotic, ‘fling’ you should probably allow it, rather than trying to control it too
much now. If you have extra strings peel them off, or measure out a few more if you are short some.
*Measuring your warp*
1
3
2
*Rolling*
Once you have threaded every
slot and hole of the loom, even out
the ends, spread them to about the
same width as the loom, and
loop
fig. 3
clamp them between a beam piece
with a hemp twine loop, and the
second, brace piece of the beam
(fig. 3). Make sure all of the
threads are caught firmly in
between the two pieces and
squeeze them together with
fig. 4
one hand while gently pulling the warp bundle from the
other side of the loom. Now roll the beam a couple times so
that the threads wrap around the pieces and hold them
together firmly (fig. 4). This design configuration allows the
materials to become a key structural element of the loom, as
you will soon be.
There is a peg board for measuring threads on one of the
bookshelves in the GDR flat, perhaps you’ve noticed it. To
get the 40 strands that will make up your warp, pull the end
out of one of the balls of yarn and tie it to the top-left-corner
peg. Leaving the yarn loose, but tight enough to stay on the
pegs, make a ‘Z’ from left to right, across and down to the
lower-left, and right to the far-right bottom peg. Remember
not to pull too tight on the pegs, you are just starting out
your relationship with this string, you will be asking a lot
from it, so just stay loose. You also don’t want to break
those pegs, they’re just dowels!
When you bring the string around that lower-right peg
you have one of your forty strands. Bringing it back along
the same path to the top, you measure the second. Just do
this forty times to make your complete warp, slide the *De-tangling*
bundle off of the pegs and clip the ends to make 40
Take the loop in the center of the hemp string and
strands.
suspend the whole operation from one of the hooks
installed in the flat’s walls. Once it is secure, pull the
warp bundle taught and work the tangles out, moving
fig. 2 the loom down as you go.
*Threading the loom*
If you come to a knot that won’t go through one
of the holes just measure out a new strand and replace
Now that you have your warp, it is time to thread it
it. Most people get the best results by pulling the
through the loom. Pull a piece of yarn from the bundle and
whole bundle taught with one hand and
slip it through the slot in the far right of the loom. Take
gently guiding the loom down the
another piece, maybe stiffen it with a little saliva and thrust
length of the warp. This process
it through the hole next to that first slot (fig. 2). Go across the
can be frustrating but remember
loom like this, taking each one of the forty threads and
that if the yarns were not inclined
filling all the slots and holes. Try to keep the ends even on
to tangle, the fibers wouldn’t be
the far side of the loom, and don’t worry too much if the
able to form the solid, yet flexible
main bundle seems to get a little tangled as you go. Rememfig. 5
structure
of woven cloth.
ber the strings and what you are about to ask of them, to
allow you to arrange them in a very ordered state, (mostly)
Cottage Industry (Making Accommodations): Mini Laser Loom
Once you have worked the loom most
of the way down the warp (not all the
way off or you will have to start all over
again!) get ready to roll the threads
around the front beam. Pull the
bundle so that all threads are evenly
taut, and place the larger beam
piece underneath them. Make sure
you don’t have any loose threads
fig. 6
hanging lower then the rest (slackers!)
and place the brace piece on top of them, clamping
them tight so that each strand is solidly secured, and then,
in one movement roll this
beam like you did the
other (fig. 7), so that the
yarns hold the beam
together and you can
strap it to your body.
Simply pass the cotton
strap behind your back and
fig. 7
hook it onto the beam, not
too tight, but close (fig. 8)
Adjust the strap to a comfortable part of your back, and pull against the warp, not
too hard, but so that the loom piece floats on the threads in
front of you without having to hold it.
*Weaving*
The loom is built, and you are almost ready to weave!
You can set it down on the floor, or on a stool and get some
“weft,” the material that you will weave into the “warp”
you have stretched before you. For these towels you can
use the same bio-cottons provided for warp. Wind some
3
2
1
onto one of the shuttles, crossing
the yarn over itself each time so it
keeps nice and tidy (fig. 10). This
fig. 10
also helps it to stay in order as
you wind it off of the shuttle, into the body of the cloth.
*The Loom*
Now that you are
strapped in, you have
become a main compofig. 8
nent of the loom! It is your
body pulling the warp taut
that allows the ‘tool’ to function
correctly. The warp threads also have structural functions,
as laid out above, so that this ‘loom’ is an inter-dependent
organic machine, user, material, and tool having equal
importance. So how does it work?
*Weaving*
shed
Keeping the warp
tight with your body,
pull up on the loom.
Notice that the
threads you put in
fig. 9
the the loom’s holes
(called heddles) are now yours to command, and as you
lift the loom, they will raise above the threads that are
through the slots, making a space known as the shed. You’ll
pass the shuttle through this space, back and forth many
times to make cloth, as will be explained in detail below.
The rest becomes very predictable and repetitive,
which for many can be quite therapeutic. Push the loom
down, creating the second
shed, and allowing you
shed
to pass the shuttle over all
fig. 13
of the ‘blue’ threads and under the
‘yellow’ ones (fig. 13,14).
As you lay in each weft piece,
beat it into place with the loom. Remember that
‘beat’ is a weaving term, but it doesn’t mean you
have to use a lot of force, you are really
just placing the thread gently next to
the last. You don’t want to put
*The Shed*
When you pull the loom up, lifting the ‘blue’
threads (fig.11), you create a shed. When you pass
the shuttle through this space, you bring the
shed
weft over all of the ‘yellow’ threads
and below all of the ‘blue’ ones.
fig. 11
Pull the shuttle through (fig. 12) and leave
the tail end of the weft, hanging from the shuttle, in the
shed. As you pass the shuttle through the shed you can
lower the loom, and pull it
towards you to ‘beat’ the
weft yarn into place.
fig. 12
too much strain on
the warp, or the loom. Also try
not to pull too tight on the weft,
fig. 14
you can even leave a small loop hanging out of
the edge until you achieve the right balance;
remember, a little loose is better than too tight.
*Cloth*
You are making cloth! When you can’t reach the loom
and shed easily, just unhook the backstrap and roll what
you have made onto the front beam, then hook back up
and continue to weave. Of course you can also set it down
and take a break. You did a lot! When you reach the end
of the warp you can decide how you want to use your
brand new cloth. Thank you, and peace.
Travis J. Meinolf, Action Weaver
The Grand Domestic Revolution -User’s Manual no. 2
Cottage Industry (Making Accommodations)
2. Fine Cloth on the Collapsible Counter-balance Loom
H
A) PEDALS (WITH CLIPS TO LAMS)
B) BEATER (WITH REED)
C) FRONT OR CLOTH BEAM (WITH GEAR)
D) BRACE BAR (UNLOCK TO COLLAPSE LOOM)
E) BACK BEAM
F) LAMS
G) HARNESSES
B
H) BALANCE BARS
(nails to
lock gear)
D
C
G
B
F
E
A
A
Once you have the hang of weaving on the mini-loom,
you might feel ready for the new challenges, and rewards, of
weaving on a larger and slightly more complicated scale.
The basic premise, of separating warp threads in sections,
and passing weft threads through sheds, remains, with just
bit mechanical intervention.
The machine in question is the collapsible floor loom you
may have noticed leaning somewhere in the GDR flat. The
first step towards its use is to get it out and set it up.
*THE LOOM*
The loom should remain
threaded for the duration of the
project, saving you nephytes
from the most tedious part of the
process,
sending the 600 threads
through the beater and the 600
heddles, ‘programming’ the pattern for the cloth.
*SET-UP AND STORAGE*
warp threads
pivot point
locking wing nut
2
A
3
1
To assemble the loom simply place it flat on the ground,
make sure all of the gears are unlocked (remove nails at C
and E, as seen below), swing the frame upright and lock the
brace bar using the provided wing nut. Go slow, and if you
encounter resistance, watch where the wooden pieces slide
against one another. Next you will need to use the clips
dangling from the treadles to attach them to the loops that
hang from the lams directly above them.
When you are finished weaving merely unclip the
treadles, undo the brace bar at the
wingnut and reverse the
process. Bind at the
center and lean it
against the wall,
3
2
nicely out of the way.
1
B
The loom is basically a frame for pulling the warp
threads tight, just like you had to pull on the mini-loom to
weave. It should be left with a little weaving sticking out of
the reed (A), or warp threads in bundles (B), and you should
secure them to the dowel attached to the front beam by locking the back beam and tieing htose threads on tight. Then
lock the front beam so that the warp is held in tension, with
the knots pulled towards the front bar giving
plenty of space to test your shed.
*OPENING THE SHED*
Sit at the loom and step on pedals. They are
color-coded for ease of use and demonstration.
See how they control the warp threads by
*
pulling the harnesses (G) apart and making a
shed * to pass the weft through, as you must
already be familiar with from using the
mini laser loom so much!
Cottage Industry (Making Accommodations): Floor Loom
*BEGINNING TO WEAVE*
First you will need to make a long bundle of 10 or so
yarns, step on one of the white pedals, and send it through
the shed. Step on the other pedal and use the beater to pull
the bundle into place. Send the thick bundle through again
to make a foundation for your thinner threads.
*ADVANCING*
As long as there is warp rolled around the back beam you
can keep advancing and weaving by unlocking the two
beams, unrolling a foot or more of warp
from the back, re-locking the back beam
and pulling the warp tight. Then
lock down the front beam and
sit back down to weave.
When there is no more warp
to advance, your piece is done!
Cut it off of the loom, leaving
some, to hold the pattern (as it
Find the yarn that seems appropriate for the warp on the was when you found it), and
loom and wind some onto a bobbin using the bobbin winder make something special for the house or for yourself or
provided. Use the clamp
whatever! As the producer you should definitely
to secure it to a table stick a
decide the outcome you are most comfortable with.
bobbin onto it, and turn the
I traded some cloth I made there to the screenhandle to wind on yarn! Then
printing shop next door and they made us these nice
pop the bobbin into your
‘care intstruction’ tag that you can sew on, so nobody will
shuttle and pull the tail end out
shrink you precious wools, and you will be marking it as a
of the slot in the side.
bobbin winder, bobbins, shuttle product of this household, of your hands. Sign it, too.
Sit back at the loom and step
*THE NEXT PIECE*
on one of the white pedals again. Pass the shuttle through
To start another weaving you will get to really make it
the shed, leaving a trail of thread! Step on the other white
from ‘scratch’. Remember measuring out your 40 threads
pedal, beat the weft with the reed, and repeat. As with the
for the mini-loom? This will be the same, at the warping
mini-loom leave a bubble of weft at the edge and watch it
board on the bookshelf, except instead of using the four
get pulled into the cloth. Don’t pull it too tight or you can
corner pegs, you will use all of them. Zig-zagging between,
hurt the threads and the loom. Weave a few inches this way,
up and down like you did before, but much longer. You can
practicing stepping on the pedals, opening up the shed, and
just measure out bundles of 60 though. Ten times, please!
passing the shuttle through. You are making plain weave!
You can use different colors to make nice vertical stripes in
If you feel any resistance while you step on the pedal
your piece. And once you have our 600 threads, instead of
check that nothing’s tangled up between the harnesses and
threading the whole loom you just have to tie each
the pedals. It should be a straight line between each
thread to the warp that is on the loom, coming from the
harness to the lam and its pedal below.
reed. Once they are all tied nice just pull on the old
*PATTERNS*
*
warp, from the back, to get the new one through
To weave a pattern into cloth, you alter the structure
reed and the heddles. It’s easier to do this in sections,
that you are forming with the threads. This is
working across the loom.
done by stepping on different pedals as you
*BEAMING*
weave. Notice if you step on the red pedal the
With your new warp through the reed and harnesses
two front harnesses drop, and the rear ones
(known as the castle by some) now you must roll it onto the
rise. Then the yellow pedal drops the two center harnesses.
back beam to make it available to weave. Roll the back
If you send a shot of weft through the shed
beam clock-wise until you meet resistance, probably a
now you will see that rather than passing
tangle in the reed, and slide the nail into the gear-lock. Come
over single threads, the weft is now going
to the front of the loom and detangle the warp by pulling
over pairs of warps, and as you pedal
against it and running your fingers through it. Then return
across the rainbow it shifts over by
to the back beam and roll again. Repeat as necessary, until
one each time, producing twill.
there is just enough yarn to tie onto the front rod and start a
You can make a nice, regular
fresh weaving! Always use a thick bundle of yarns as weft to
pattern by just repeating these four pedals, red-yellowstart, then wind some bobbins and get to work!
green-blue-red-yellow...&c, or you can make a kind of
*FINAL NOTE*
zig-zag by changing directions, and you can definitely try
I want to be available to all who stay at the GDR, to
out compositions of your own, and incorporate the white
provide more guidance and to hear your experiences. Until I
pedals again, too! A nice piece of cloth might be mostly
can visit Utrecht again, I’ve at least made some informative
plain weave, with bands of twill throughout, or vice-versa.
supplementary materials available on-line at my homepage,
You can also experiment with materials, there is a nice yarn
actionweaver.com, or call me! Thanks, and again, peace.
shop down near Lijn Straat, I think.
Travis Joseph Meinolf
When your shed starts getting very small, and your
Casco 2010
weaving is beginning to look big, it’s time to advance your
warp, by pulling out the nails that lock the beams.