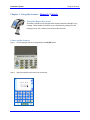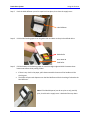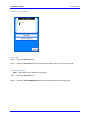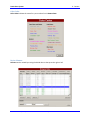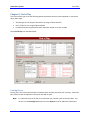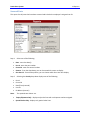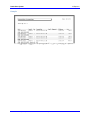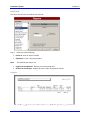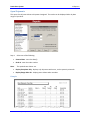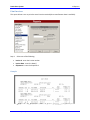
1
System User Manual
Version19
Table of Contents
Overview ....................................................................................................................................................... 8
Chapter 1: Using the Scanner – Monarch / Unitech .................................................................................... 9
Using the Monarch Scanner ...................................................................................................................... 9
Power up the Scanner ............................................................................................................................... 9
Scanner Screen Icons and Buttons.......................................................................................................... 10
Icons .................................................................................................................................................... 10
Buttons ................................................................................................................................................ 11
Scanner Menu ......................................................................................................................................... 12
Scanner Settings.................................................................................................................................. 12
Maintenance ....................................................................................................................................... 12
Return to Scanner ............................................................................................................................... 12
Loading the Scanner Labels..................................................................................................................... 13
Changing the Battery in your Scanner .................................................................................................... 16
Using the Unitech Scanner...................................................................................................................... 17
Power up the Scanner ............................................................................................................................. 17
Scanner Screen Icons and Buttons.......................................................................................................... 18
Icons .................................................................................................................................................... 18
Buttons ................................................................................................................................................ 19
Scanner Settings.................................................................................................................................. 19
Maintenance ....................................................................................................................................... 19
Return to Scanner ............................................................................................................................... 19
Charging your Scanner ............................................................................................................................ 20
Chapter 2: Server Settings.......................................................................................................................... 21
Store Settings .......................................................................................................................................... 21
Connection Settings ................................................................................................................................ 23
Manufacturers ........................................................................................................................................ 24
Labels ...................................................................................................................................................... 25
Equipment Settings ................................................................................................................................. 27
To Add or Edit Scanner........................................................................................................................ 28
User Settings ........................................................................................................................................... 29
To Add or Modify a User ..................................................................................................................... 30
Lookup Settings ....................................................................................................................................... 31
Pull Times ................................................................................................................................................ 32
Schedule .............................................................................................................................................. 32
Cleanup ............................................................................................................................................... 32
Advanced Settings................................................................................................................................... 33
Interact ................................................................................................................................................ 33
Grid Layout .......................................................................................................................................... 33
User Access ......................................................................................................................................... 34
Scanning .............................................................................................................................................. 34
Updates ............................................................................................................................................... 34
Chapter 3: ScanIt Parts ............................................................................................................................... 35
Open the Interact Program ..................................................................................................................... 35
Advanced Options ............................................................................................................................... 37
Parts Scanning Process............................................................................................................................ 38
Receive Parts ........................................................................................................................................... 38
Hot Keys – Receiving Parts .................................................................................................................. 39
Bin Changes ............................................................................................................................................. 41
Hot Keys – Bin Changes ....................................................................................................................... 42
Miscellaneous Menu ............................................................................................................................... 43
Other Items ......................................................................................................................................... 43
Hot Keys – Other Items ....................................................................................................................... 44
Create Part List .................................................................................................................................... 45
Hot Keys – Create Part List .................................................................................................................. 45
Part Inquiry ......................................................................................................................................... 46
Hot Keys – Part Inquiry ....................................................................................................................... 47
Add Lookup ......................................................................................................................................... 48
Hot Keys – Add Lookup ....................................................................................................................... 49
Perpetual Inventory ................................................................................................................................ 50
Hot Keys – Perpetual Inventory .......................................................................................................... 51
Chapter 4: PC Server Main Menu Features................................................................................................ 53
Status ...................................................................................................................................................... 53
Adjustments ............................................................................................................................................ 54
Manual Posting ....................................................................................................................................... 55
Open Orders ........................................................................................................................................ 55
Bin Changes ......................................................................................................................................... 57
Batch Bin Changes............................................................................................................................... 58
Chapter 5: Bin Printing ............................................................................................................................... 59
Printing Shelf Tags................................................................................................................................... 59
Printing Bin Labels................................................................................................................................... 63
Create a Part List ..................................................................................................................................... 66
Chapter 6: Browse...................................................................................................................................... 69
Sorting ................................................................................................................................................. 69
Move Columns .................................................................................................................................... 70
Printing ................................................................................................................................................ 70
Edit Record .......................................................................................................................................... 70
Search.................................................................................................................................................. 71
Color Codes ......................................................................................................................................... 72
Resize Columns ................................................................................................................................... 72
Open Orders............................................................................................................................................ 73
History ..................................................................................................................................................... 74
Inventory ................................................................................................................................................. 75
Part Number Changes (PNC) ................................................................................................................... 75
Other Items ............................................................................................................................................. 76
Invoices ................................................................................................................................................... 77
Order Status ............................................................................................................................................ 78
Scanned Parts.......................................................................................................................................... 79
Lookup..................................................................................................................................................... 79
Chapter 7: Client Settings........................................................................................................................... 80
Settings.................................................................................................................................................... 80
Interact Data Pulls ................................................................................................................................... 81
Interact Posting ....................................................................................................................................... 82
Lookup..................................................................................................................................................... 83
Chapter 8: End of Day ................................................................................................................................ 84
Posting Errors .......................................................................................................................................... 84
Over / Shorts ........................................................................................................................................... 85
Grouping Over / Shorts ....................................................................................................................... 85
Incomplete Shipments ........................................................................................................................ 85
Over / Shorts Section .......................................................................................................................... 85
Date ......................................................................................................................................................... 85
Chapter 9: Get Data – GM / Honda............................................................................................................ 86
GM Overview .......................................................................................................................................... 86
Dealers .................................................................................................................................................... 86
Add ...................................................................................................................................................... 86
Remove ............................................................................................................................................... 87
Log In ....................................................................................................................................................... 88
Change ................................................................................................................................................ 88
Downloads .............................................................................................................................................. 88
Custom Download............................................................................................................................... 88
Download ............................................................................................................................................ 89
Status ...................................................................................................................................................... 89
GM Data .................................................................................................................................................. 89
Honda Overview ..................................................................................................................................... 90
Dealers .................................................................................................................................................... 90
Remove ............................................................................................................................................... 92
Log In ....................................................................................................................................................... 94
Change ................................................................................................................................................ 94
Downloads .............................................................................................................................................. 94
Custom Download............................................................................................................................... 94
Download ............................................................................................................................................ 95
Status ...................................................................................................................................................... 95
Chapter 10: Monitor .................................................................................................................................. 96
Scanned Orders ....................................................................................................................................... 96
Other Items ............................................................................................................................................. 97
Scanned Inventory .................................................................................................................................. 98
Bin Changes ............................................................................................................................................. 98
Chapter 11: Reports ................................................................................................................................... 99
Over / Shorts ......................................................................................................................................... 100
Shipment Status .................................................................................................................................... 101
Posting Errors ........................................................................................................................................ 102
Posted History ....................................................................................................................................... 103
Scanned Parts........................................................................................................................................ 104
Lost Parts............................................................................................................................................... 106
Open Shipments.................................................................................................................................... 107
Special Orders ....................................................................................................................................... 108
Order Status Information ...................................................................................................................... 110
Invoice Reconciliation ........................................................................................................................... 112
Print Packing Slip ................................................................................................................................... 113
Core Exchange....................................................................................................................................... 114
Employee .............................................................................................................................................. 115
Part Number Change (PNC) Report....................................................................................................... 116
Bin Changes ........................................................................................................................................... 117
Part Information ................................................................................................................................... 118
Multiple Part Number Changes (PNC) .................................................................................................. 119
Print Invoices......................................................................................................................................... 120
Other Items ........................................................................................................................................... 121
Print Part List......................................................................................................................................... 122
Perpetual Inventory .............................................................................................................................. 123
Freight Cost ........................................................................................................................................... 125
Graph .................................................................................................................................................... 126
Received Part Status ............................................................................................................................. 128
Order Claims ......................................................................................................................................... 129
Multi-Pack ............................................................................................................................................. 129
Physical Inventory ................................................................................................................................. 130
Order Summary..................................................................................................................................... 132
Order Status History ............................................................................................................................. 133
Chapter 12: Frequently Asked Questions & Troubleshooting ................................................................. 134
General Information & Setup................................................................................................................ 134
Scanning ................................................................................................................................................ 136
Printing .................................................................................................................................................. 138
ScanIt Parts System
Overview
Overview
The ScanIt Parts System enables you to create and print barcode labels for your parts department while
simultaneously managing your parts inventory.
The ScanIt Parts System runs on a PC. The PC automatically downloads, from your DMS, all of your open
orders, special orders, and inventory for the current day.
Using a wireless handheld barcode scanner and built-in printer, you scan parts in your receiving area.
Any special order part will automatically print a label with your part number, control number, repair
order number, customer name, employee number, bin location and route number. Any stock part, the
information will be displayed on the scanner. These features reduce the overall time to check in the
order because there is no need to reference the packing slip for each part on that particular order.
Once your parts are scanned, your DMS is automatically updated.
Another feature the ScanIt Parts System has can be used to look up part numbers. For example, if you
scan an ACDelco part number, ScanIt Parts will automatically convert the ACDelco number to your
assigned GM number.
Additionally, the ScanIt Parts System produces bin location labels. This eliminates look up time for the
assigned bin location when receipting your parts.
Lastly, the ScanIt Parts System produces a series of reports helping you to determine the status of an
order. There are many, but a few are:
•
•
•
•
All over/short parts for the day by shipment number (discrepancies only).
All parts scanned, listed by user or by date.
All parts scanned but not posted and why. Such as part number changes, multi-packs, and part
numbers that are not on an open order.
Invoice reconciliation cross checks each part number for discrepancies in price and in quantity.
Confidential & Proprietary Information of IPS and ScanIt Parts © 2013
8
ScanIt Parts System
Using the Scanner
Chapter 1: Using the Scanner – Monarch / Unitech
Using the Monarch Scanner
The battery should be fully charged and the labels should be checked for any
damage. Labels should not have any tears, should not be peeling off of the
backing on their own, and there should be no discoloration.
Power up the Scanner
Step 1.
On the top right side of the keypad push the On/Off button.
Step 2.
When prompted, touch the screen to connect.
Confidential & Proprietary Information of IPS and ScanIt Parts © 2013
9
ScanIt Parts System
Using the Scanner
Step 3. The Main Menu will display.
Step 4.
Using the scanner keypad, select an option from the Main Menu by typing the menu number
followed by the Enter key.
Scanner Screen Icons and Buttons
Icons
On the right side of the screen are three icons:
The first icon is the Battery Meter.
• This displays how much battery life is left for the scanner before it requires recharging.
• If the battery is too low it displays red. Recharging is necessary.
Confidential & Proprietary Information of IPS and ScanIt Parts © 2013
10
ScanIt Parts System
Using the Scanner
The middle icon is the Volume icon.
• If the volume is turned off, the icon is displayed with a red X.
The bottom icon is the Wireless Signal Strength indicator.
• Depending on the signal strength, the icon displays up to four bars for full strength.
• If no signal is detected, the icon is displayed with a red X.
Buttons
• The Control button can be used to enter shortcuts.
• The Shift button
displays special characters for input:
•
•
Press once to display special characters.
Press a second time to go back to alpha characters.
• The Hot Key button
• The Escape button
• The More button
displays additional shortcuts.
returns the scanner to the previous menu screen.
displays additional scanner menus:
Confidential & Proprietary Information of IPS and ScanIt Parts © 2013
11
ScanIt Parts System
Using the Scanner
Scanner Menu
The Scanner Menu provides access to scanner settings and maintenance tools.
Scanner Settings
Scanner Settings displays the IP Address for the ScanIt Parts Main PC.
Maintenance
Maintenance takes you to the Windows screen. Wireless profile or IP configurations are done through
here.
Return to Scanner
Return to Scanner exits the Scanner Menu and returns to the Main Menu.
Confidential & Proprietary Information of IPS and ScanIt Parts © 2013
12
ScanIt Parts System
Using the Scanner
Loading the Scanner Labels
Note: Labels loaded incorrectly may cause printing problems, display issues, or drain batteries.
Step 1.
To open the supply cover on the scanner, push in the yellow latch buttons located on both
sides and lift up.
Step 2.
Using the spring-loaded supply holders inside of the unit, separate the supply holders to give
you enough space to fit the roll of labels securely inside.
Step 3.
The labels feed out of the bottom front of the unit.
Step 4.
Peel and discard the first four inches or so of labels from the backing paper.
Confidential & Proprietary Information of IPS and ScanIt Parts © 2013
13
ScanIt Parts System
Step 5.
Using the Scanner
On the front of the scanner is a black plastic deflector that clips to the unit. Gently push down
on the deflector (fig 1) and pull it down and away from the scanner (fig 2).
Figure 1
Figure 2
Step 6.
Take the end of the labels and feed them under the applicator roller, over the peel bar and
under the label deflector.
Important:
Labels must be fed over the silver bar!
Applicator Roller
Peel Bar
Confidential & Proprietary Information of IPS and ScanIt Parts © 2013
14
ScanIt Parts System
Step 7.
Using the Scanner
Push the label deflector up until it snaps back into place, then close the supply cover.
Label Deflector
Step 8.
Pull the label backing paper over the guide roller and down to the pinch and feed rollers.
Guide Roller
Pinch Roller &
Feed Roller
Step 9.
Fold the bottom of the backing paper to create a straight edge and hold it between these
bottom two rollers while printing a label.
•
•
If there is any slack in the paper, pull it down toward the bottom of the handle until the
slack is gone.
The labels will print and dispense over the label deflector while the backing is fed under the
label deflector.
Note: If the labels dispense, but do not print or only partially
print, check that the supply cover is latched all the way down.
Confidential & Proprietary Information of IPS and ScanIt Parts © 2013
15
ScanIt Parts System
Using the Scanner
Changing the Battery in your Scanner
Step 1.
Press the button on the battery compartment door (at the bottom of the scanner’s handle)
and slide it open (the door stays attached).
Step 2.
Insert a new battery into the compartment.
Step 3.
Slide the compartment door shut. You have to press the battery in slightly so the door fits
over it. When the door shuts, you should hear it click into place.
Note: Wait 15 seconds after removing the charged battery before inserting the dead battery in the
charger.
Step 4.
To recharge the battery, insert the battery into the charger with the ribbed end sticking out.
Push the battery in all the way.
Note: Charging time is approximately three hours.
Confidential & Proprietary Information of IPS and ScanIt Parts © 2013
16
ScanIt Parts System
Using the Scanner
Using the Unitech Scanner
Power up the Scanner
Step 1.
On the lower left corner of the keypad push the red power button.
Step 2.
When prompted, touch the screen to connect.
Confidential & Proprietary Information of IPS and ScanIt Parts © 2013
17
ScanIt Parts System
Using the Scanner
Step 3.
The Main Menu will display.
Step 4.
Using the scanner keypad, select an option from the Main Menu by typing the menu number
followed by the Enter key.
Scanner Screen Icons and Buttons
Icons
On the right side of the screen is the Volume icon.
• If the volume is turned off, the icon is displayed with a red X.
Confidential & Proprietary Information of IPS and ScanIt Parts © 2013
18
ScanIt Parts System
Using the Scanner
Buttons
• The Control button can be used to enter control characters.
• The Shift button
displays special characters for input
•
•
Press once to display special characters.
Press a second time to go back to alpha characters.
• The Hot Key button
• The Escape button
• The More button
displays additional hot key functions.
returns the scanner to the previous menu screen.
displays additional scanner menus:
Scanner Settings
Scanner Settings displays the IP Address for the ScanIt Parts Server.
Maintenance
Maintenance is used to troubleshoot scanner issues.
Return to Scanner
Return to Scanner exits the Scanner Menu and returns to the previous menu.
Confidential & Proprietary Information of IPS and ScanIt Parts © 2013
19
ScanIt Parts System
Using the Scanner
Charging your Scanner
Step 1.
Power the scanner off.
Step 2.
Set the base of the scanner unit into the charging cradle.
Step 3.
The light on the top of the scanner will turn red when the scanner is charging.
Step 4.
The light on the top of the scanner will turn green when the unit is fully charged. This will take
approximately four hours.
Confidential & Proprietary Information of IPS and ScanIt Parts © 2013
20
ScanIt Parts System
2 - Server Settings
Chapter 2: Server Settings
Server Settings allow a user to enter and edit scanner information, IP addresses, user log ons, and many
other administrative functions.
Store Settings
Enter your dealership information. The information stored here is used for report purposes.
Step 1.
Select Settings from the Main Menu.
Confidential & Proprietary Information of IPS and ScanIt Parts © 2013
21
ScanIt Parts System
Step 2.
The Server Settings screen displays the Store tab by default.
Step 3.
Enter your dealership information:
•
•
•
•
•
•
•
•
Step 4.
2 - Server Settings
Dealer Name
Address
City
State
Zip Code
Phone #
Fax #
E-Mail
Select Close when completed.
Confidential & Proprietary Information of IPS and ScanIt Parts © 2013
22
ScanIt Parts System
2 - Server Settings
Connection Settings
This screen allows you to edit your DSP settings for ScanIt Parts.
Step 1.
Select Settings from the Main Menu.
Step 2.
Select the Connections tab.
Note: Login information will display what was entered upon initial setup.
EDIT: To edit your DSP connection settings.
Step 1. Select the Edit button.
Step 2.
Enter the IP address / Host address of your DSP
Step 3.
Port # defaults to the standard 23.
•
•
Update - saves all changes
Close - does not save any changes and the previous screen will appear
Confidential & Proprietary Information of IPS and ScanIt Parts © 2013
23
ScanIt Parts System
2 - Server Settings
Manufacturers
Note:
Manufacturer settings displays the manufacturer parts you carry and are on order.
Step 1.
Select Settings from the Main Menu.
Step 2.
Select the Manufacturers tab.
Step 3.
Checking and unchecking:
•
•
Step 4.
Checking the manufacturer boxes adds parts the store carries.
Unchecking the manufacturer boxes removes parts the store carries.
Close - saves any changes you have made
Confidential & Proprietary Information of IPS and ScanIt Parts © 2013
24
ScanIt Parts System
2 - Server Settings
Labels
This screen allows you to modify the scanner labels.
Step 1.
Select Settings from the Main Menu.
Step 2.
Select the Labels tab.
Step 3.
From the Section drop-down, select which label, when printed from the scanner, you would
like to change or modify:
•
•
•
•
•
•
•
Receive
Bin Changes
Perpetual
Other Items
Part Inquiry
Create Part List
Add Lookup
Confidential & Proprietary Information of IPS and ScanIt Parts © 2013
25
ScanIt Parts System
Step 4.
2 - Server Settings
Select Print Mode Label/Label Name and choose from the following options:
•
•
•
•
•
Set selected as Print Mode label - label will print when scanner print mode is set to ON
New - creates a new blank label
Copy - copies the selected label
Paste - creates a new label based on the last copied label
Edit - opens the selected label to change or modify
•
adds a drop-down menu. Select data such as: part #, control #, etc.
•
adds a text box to type any comments or notes.
•
adds a barcode when printed from the scanner.
•
inserts an image from file, ie: company logo.
•
moves between a horizontal and a vertical label.
•
deletes any highlighted data.
•
You can change/modify the
font, size, style and justification.
Note: 6037 scanners can only print left justified labels.
• Save - saves your changes
• Cancel - resets back to the original label
To adjust the size of the box: select an item, then click on the double-headed arrow and drag.
Confidential & Proprietary Information of IPS and ScanIt Parts © 2013
26
ScanIt Parts System
2 - Server Settings
Equipment Settings
This screen allows you to add, edit or remove scanner information.
Step 1.
Select Settings from the Main Menu.
Step 2.
Select the Equipment tab.
•
New - adds new equipment
•
Remove - deletes scanners from the list
Confidential & Proprietary Information of IPS and ScanIt Parts © 2013
27
ScanIt Parts System
2 - Server Settings
To Add or Edit Scanner
Step 1.
Step 2.
Description - drop-down - 6037 and 6039 scanners are the "MONARCH GUN"
IP Address - IP address assigned
Step 3.
Printer
•
•
•
Step 4.
Default: MONARCH - built-in printer on scanner
NO PRINTER - will not print
A printer installed to the ScanIt Parts PC.
Emulation
•
•
IPSVT.Net - 6039 or touch screen scanners
IPSVT - 6037 or all other scanners
Step 5.
Notes – any information may be added, such as date of setup, serial number of scanner, etc.
Step 6.
Update - saves changes
Cancel - does not save any changes and the previous screen will reopen
Confidential & Proprietary Information of IPS and ScanIt Parts © 2013
28
ScanIt Parts System
2 - Server Settings
User Settings
This screen allows you to add, edit and remove users.
Step 1.
Select Settings from the Main Menu.
Step 2.
Select the Users tab.
•
New - adds a new user
•
Remove - deletes a user
Confidential & Proprietary Information of IPS and ScanIt Parts © 2013
29
ScanIt Parts System
2 - Server Settings
To Add or Modify a User
Enter the following User Information:
Step 1.
Name - employee's name
Step 2.
User ID - can use random numbers, letters or the employee IDs number
Step 3.
Password - assigned individually to each user
Step 4.
This user can use scanner guns - user must log in on the scanner.
Step 5.
Program Access - allows the user to have access to one or all of the programs listed.
•
Select All - user’s account will have access to all of the programs.
Step 6.
Selecting Store Name and checking the Access box - user’s account will have access only to the
store selected.
Step 7.
Add - saves changes
Close - does not save any changes and the previous screen will reopen
Confidential & Proprietary Information of IPS and ScanIt Parts © 2013
30
ScanIt Parts System
2 - Server Settings
Lookup Settings
This feature is used to cross reference a particular UPC barcode to what is stored as a part number in
your inventory.
Example: If you store a part number in your DSP as ANTI-FREEZE, it will have a UPC barcode on it such as
1234567890. Set up your lookup table to say anytime you scan 1234567890 it really means ANTIFREEZE. This allows any user to pick up the scanner, scan the UPC barcode and ScanIt Parts will convert
it to the stored part number.
Step 1.
Step 2.
Select Settings from the Main Menu.
Select the Lookup tab.
•
•
•
New - adds a new part number or UPC
Edit - makes changes to the selected UPC #
Remove - deletes the selected UPC entry
Enter or change the following information:
• Make
• UPC #
• Part #
• Update - saves changes
• Close - does not save any changes and the previous screen will reopen
Confidential & Proprietary Information of IPS and ScanIt Parts © 2013
31
ScanIt Parts System
2 - Server Settings
Pull Times
This screen allows you to change scheduled pull times and adjust how long old records and reconciled
invoices are saved.
Step 1.
Select Settings from the Main Menu.
Step 2.
Select the Pull Times tab.
Note: All options are defaulted during installation; prior to making any changes, make a note
of the original settings.
Schedule
•
•
•
•
Wake Up - schedule 1 hour prior to the Pull Open Orders time scheduled
Sleep - nothing happens
Pull Open Orders - begins pulling open orders
Pull Lookup - pulls ACDelco and/or Motorcraft information
Note: Wake Up and Pull Open Orders should be scheduled 1 hour apart and not at the same time.
Cleanup
•
•
Keeps old records
Deletes reconciled invoices
Confidential & Proprietary Information of IPS and ScanIt Parts © 2013
32
ScanIt Parts System
2 - Server Settings
Advanced Settings
Advanced Settings allows you to change settings for Open Orders, User Access, Interact, and Scanning.
Step 1.
Select Settings from the Main Menu.
Step 2.
Select the Advanced tab.
Note: All options are set during installation; prior to making any changes, make a note of the
original settings.
Interact
•
•
•
•
•
•
Automatically Pull Inventory - pulls all your inventory
Post Bin Changes - posts bin changes real-time
Post Order Statuses - posts Answerback Data (if available from manufacturer)
Post Open Orders - posts parts real-time
Post Other Items - posts other items real-time
Primary PDC - your primary distribution center number
Grid Layout
• Reset All Grids - resets all grids within the Browse Data table back to default settings
Confidential & Proprietary Information of IPS and ScanIt Parts © 2013
33
ScanIt Parts System
2 - Server Settings
User Access
•
Scanner Gun Login - requires users to login on scanner
•
Application Login - requires users to login on PC
Scanning
•
Display “Wrong Bin” Error Message - the scanner displays a message when the part
scanned in perpetual inventory mode is in the wrong bin location
•
Perpetual Single Mode - scans only a quantity of 1
•
Automatically Print Special Order Label - special order labels always print when scanned
•
Post Receive Qty Greater Than Order Qty - allows scanning and posting of quantities
greater than those ordered
•
Remain in Hotkey Menu after Selection - keeps HotKey Menu on 6039 scanners open after
the final selection is pressed
Updates
•
Check for Updates – this feature will notify you when there is an update available. The
ScanIt Parts software can then be upgraded to the most current version.
Step 1.
Select Server Settings.
Step 2.
Select the Advanced tab.
Step 3.
Go to the Updates section.
Step 4.
Select Check Now.
Step 5.
Close the Settings screen.
Step 6.
Re-open the ScanIt Parts Main Menu - if a newer version is available, a screen will appear
prompting you to download a current version. If no screen appears, you have the latest
version available.
Confidential & Proprietary Information of IPS and ScanIt Parts © 2013
34
ScanIt Parts System
3 - ScanIt Parts
Chapter 3: ScanIt Parts
Open the Interact Program
The Interact program must be running on the ScanIt Parts PC in order for ScanIt Parts to operate
properly and keep your DMS up-to-date.
•
•
Interact automatically posts every scanned part into your DMS.
The ScanIt Parts software will import and export the following data from your DMS:
•
•
Step 1.
All orders (Purchase Orders, Stock Orders, and Daily Orders)
Inventory
To open the Interact program on the ScanIt Parts PC, double-click the ScanIt Parts icon on your
desktop. The Main Menu displays.
Step 2. Select the Interact icon and the dialog box shown below will be displayed.
Confidential & Proprietary Information of IPS and ScanIt Parts © 2013
35
ScanIt Parts System
3 - ScanIt Parts
Step 3.
ScanIt Parts is now ready to begin receiving scanned parts. If the ScanIt Parts PC is shut down
or restarted for any reason, repeat this process to launch the Interact program again.
Step 4.
Shipment status for GM and Honda dealers should be retrieved from the manufacturer on a
daily basis.
Step 5.
Interact should NOT be turned off at night. The ScanIt Parts program will pull open orders and
inventory on a nightly basis.
As parts are scanned they are automatically entered into your DMS. Interact’s status is shown below:
•
ON: If the Interact feature is turned on in the middle of scanning or when you have finished
scanning the parts, the program will attempt to post all previously scanned parts.
•
OFF: If the Interact feature is turned off while trying to scan parts, nothing will post against
your inventory.
All interactions between ScanIt Parts and your DMS go through Interact. Some of the features of
Interact are:
•
•
•
Reading inventory
Posting of scanned parts
Retrieval of open orders
Interact also runs the following daily maintenance:
•
•
Moves open orders, that have been received, to history
Deletes history after 18 months
Confidential & Proprietary Information of IPS and ScanIt Parts © 2013
36
ScanIt Parts System
3 - ScanIt Parts
Advanced Options
By default, Interact pulls open orders and inventory automatically. You can perform the following
functions manually by selecting Advanced:
Button
Function
Pull Open Orders
Pulls all of your open orders from your DMS. If your nightly pull did not happen
automatically, select this.
Invoice Reconcile
Select this option to run invoice reconciliation. This is required to print the
invoice reports.
Pull Inventory
Pulls inventory information for physical scanning.
Pull Lookup
Pulls the latest ACDelco or Ford MotorCraft part numbers.
Re-Post
Attempts to repost all parts that failed to post within a specific date range. The
Re-post button will default to the same day.
Confidential & Proprietary Information of IPS and ScanIt Parts © 2013
37
ScanIt Parts System
3 - ScanIt Parts
Parts Scanning Process
Receive Parts
This process is used to receive (receipt) parts into your inventory. Using your DMS, Interact imports
parts scanned, or entered, into your inventory.
Step 1.
At the Main Menu select 1 (Receive).
Step 2.
At the Part # prompt, scan the part’s barcode using the wireless handheld scanner.
Note: When typing part numbers manually into the scanner, dashes, spaces, # signs, and special
characters are not used.
Step 3.
If the scanner beam does not work after you scan a part number, look at the display, it is
waiting for one of the following inputs:
•
•
•
Step 4.
Control #
Quantity
Shipment #
The scanner prints a label automatically if the part is a Special Order.
Confidential & Proprietary Information of IPS and ScanIt Parts © 2013
38
ScanIt Parts System
3 - ScanIt Parts
Hot Keys – Receiving Parts
Print Label
Step 1. Select the Hot Key button.
Step 2.
Select the Print Label button and choose the label to print for the last part scanned.
Turn Print Mode ON
Note: Automatically prints labels during scanning
Step 1.
Select the Hot Key button.
Step 2.
Select the Turn Print Mode ON button to print labels during the scanning process.
Turn Single Mode ON
Note: Enter multiple quantities during scanning
Step 1.
Select the Hot Key button.
Step 2.
Select the Turn Single Mode OFF button to stop the scanner from entering a quantity of one
for each part.
Confidential & Proprietary Information of IPS and ScanIt Parts © 2013
39
ScanIt Parts System
3 - ScanIt Parts
Enter a Default Shipper Number
Step 1. Select the Hot Key button.
Step 2.
Select the New Default Ship # button to enter a shipper number.
Note: Shipment # remains in the scanner until it is deleted or changed.
Step 3.
Select a New Ship # and press ENTERto assignthe shipper number you just entered to the next
part number.
Note: New Default Ship # will OVERWRITE any shipment information automatically pulled from
the manufacturer.
Step 4.
To change a shipper number, repeat steps 2 and 3.
Change Bin Location
Step 1. Select the Hot Key button.
Step 2.
Select the Bin Change button.
Step 3.
Enter the new bin location and press ENTER.
Confidential & Proprietary Information of IPS and ScanIt Parts © 2013
40
ScanIt Parts System
3 - ScanIt Parts
Bin Changes
The scanner can be used to make bin changes.
Step 1.
From the Main Menu, select 2 (Bin Changes).
Step 2.
At the Part # prompt screen, scan or enter the part number.
Note: When typing part numbers manually in the scanner, dashes, spaces, # signs, and special
characters are not used.
Step 3.
If typing in the number, always remember to press ENTER to accept your entry. The next
screen prompts you to enter the new bin location.
Step 4.
Enter the new bin location. A label prints automatically.
Note: If a label does not automatically print, select the Hot Key button, then Turn Print Mode ON.
Step 5.
The scanner is now ready to assign a bin location to the next part number.
Confidential & Proprietary Information of IPS and ScanIt Parts © 2013
41
ScanIt Parts System
3 - ScanIt Parts
Hot Keys – Bin Changes
Print Label
Step 1. Select the Hot Key button.
Step 2.
Select the Print Label button and choose a label to printfor the last part scanned.
Turn Print Mode ON
Note: Automatically prints labels during scanning
Step 1.
Select the Hot Key button.
Step 2.
Select the Turn Print Mode ON button to print labels during the scanning process.
Confidential & Proprietary Information of IPS and ScanIt Parts © 2013
42
ScanIt Parts System
3 - ScanIt Parts
Miscellaneous Menu
The Miscellaneous Menu on the scanner has four features: Other Items, Create Part List, Part Inquiry,
and Add Lookup.
Other Items
The Other Items option allows scanning of items into inventory that are not on order. This feature can
be used to scan OEM or Aftermarket parts.
Step 1.
From the Main Menu select 3 (Misc. Menu).
Step 2.
From the Miscellaneous Menu select 1 (Other Items).
Step 3.
At the Batch # prompt, enter the batch # associated with the parts you will be scanning, press
ENTER.
Note: Reusing a batch # deletes the part numbers in the existing batch file. Maximum number of
characters or digits for a batch # is 8.
Step 4.
Enter the Vendor #, press ENTER.
Step 5.
Enter the Order Type, press ENTER.
Step 6.
At the Part # prompt, scan or type the part number for the first Other Item.
Note: When typing part numbers manually in the scanner, dashes, spaces, # signs, and special
characters are not used.
Confidential & Proprietary Information of IPS and ScanIt Parts © 2013
43
ScanIt Parts System
3 - ScanIt Parts
Hot Keys – Other Items
Change Batch #
Step 1. Select the Hot Key button.
Step 2. Select the Change Batch # button and enter the new batch #.
Change Vendor
Step 1. Select the Hot Key button.
Step 2. Select the Change Vendorbutton and enter the new vendor code.
Print Label
Step 1. Select the Hot Key button.
Step 2. Select the Print Label button and choose which label to print for the last part scanned.
Set Bin Location
Step 1. Select the Hot Key button.
Step 2. Select the Set Bin button and enter the new bin location.
Turn Print Mode ON
Note: Automatically prints labels during scanning
Step 1.
Step 2.
Select the Hot Key button.
Select the Turn Print Mode ON button to print labels during the scanning process.
Confidential & Proprietary Information of IPS and ScanIt Parts © 2013
44
ScanIt Parts System
3 - ScanIt Parts
Create Part List
Use this feature to scan parts and create a part list. A list can be produced using the Print Part List
Report.
Step 1.
From the Miscellaneous Menu select 2 (Create Part List).
Step 2.
At the Batch # prompt, enter the batch # associated with your part list then press ENTER and
then scan or manually enter your part numbers.
Note: Maximum number of characters or digits for a batch # is 8. The batch # can include either
alpha and/or numeric characters.
Hot Keys – Create Part List
Print Label
Step 1. Select the Hot Key button.
Step 2.
Select the Print Label button and choose which label to print for the last part scanned.
Change Batch #
Step 1. Select the Hot Key button.
Step 2.
Select the Change Batch # button, the scanner will prompt for a new batch #.
Turn Print Mode ON
Note: Automatically prints labels during scanning
Step 1.
Select the Hot Key button.
Step 2.
Select the Turn Print Mode ON button to print labels during the scanning process.
Confidential & Proprietary Information of IPS and ScanIt Parts © 2013
45
ScanIt Parts System
3 - ScanIt Parts
Part Inquiry
This feature is used to retrieve part number information about any part number in your inventory by
scanning the barcode or typing in the part #.
Step 1.
From the Miscellaneous Menu select 3 (Part Inquiry).
Step 2.
Scan or enter the part number.
Step 3.
The screen displays the part number information associated with the part number entered.
Note: When typing part numbers manually in the scanner, dashes, spaces, # signs, and special
characters are not used.
Confidential & Proprietary Information of IPS and ScanIt Parts © 2013
46
ScanIt Parts System
3 - ScanIt Parts
Hot Keys – Part Inquiry
Print Label
Step 1. Select the Hot Key button.
Step 2.
Select the Print Label button and choose which label to print for the last part scanned.
Turn Print Mode ON
Note: Automatically prints labels during scanning
Step 1.
Select the Hot Key button.
Step 2.
Select the Turn Print Mode ON button to print labels during the scanning process.
Confidential & Proprietary Information of IPS and ScanIt Parts © 2013
47
ScanIt Parts System
3 - ScanIt Parts
Add Lookup
Add Lookup is used to cross reference the UPC barcode with what the dealership stores as a part
number.
Example:If you store the part number in your DMS as ANTI-FREEZE, it will have a UPC barcode on it such
as 1234567890. Set up your lookup table to say anytime you scan 1234567890 it really means ANTIFREEZE. This will allow any user to pick up the scanner; scan the UPC barcode and ScanIt Parts will
convert it to what is stored as the part number.
Step 1.
From the Miscellaneous Menu select 4 (Add Lookup).
Step 2.
Enter Make Code.
Step 3.
Scan or type the UPC when prompted.
Note: When typing part numbers manually in the scanner, dashes, spaces, # signs, and special
characters are not used.
Step 4.
Enter the Part # exactly the same way it is listed in your inventory.
Confidential & Proprietary Information of IPS and ScanIt Parts © 2013
48
ScanIt Parts System
3 - ScanIt Parts
Hot Keys – Add Lookup
Change Current Make
Step 1. Select the Hot Key button.
Step 2.
Select the Change Current Make button and enter the new make code.
Confidential & Proprietary Information of IPS and ScanIt Parts © 2013
49
ScanIt Parts System
3 - ScanIt Parts
Perpetual Inventory
Perpetual Inventory allows you to maintain and count inventory by bin location.
Step 1.
From the Main Menu select 4 (Perpetual Inventory).
Step 2.
Enter a bin location.
Note: Bin selection can be exact or partial.
Example: T100-1 or T100. In the second selection any part that is in the T100 area will be noted as the
correct bin. If you select T100-A then any part you scan that is not exactly in T100-A will be reported as
the wrong bin.
Step 3.
Begin scanning or entering part numbers.
•
•
The default quantity is 1.
If the part is in the wrong bin, the scanner will alert the operator with a message on the
screen.
Note: When typing part numbers manually in the scanner, dashes, spaces, # signs, and special
characters are not used.
Confidential & Proprietary Information of IPS and ScanIt Parts © 2013
50
ScanIt Parts System
3 - ScanIt Parts
Hot Keys – Perpetual Inventory
Print Label
Step 1. Select the Hot Key button.
Step 2.
Select the Print Label button and choose which label to print.
Change Bin Location
Step 1. Select the Hot Key button.
Step 2.
Select the Change Bin Location button and enter the next bin location.
Turn Print Mode ON
Note: Automatically prints labels during scanning
Step 1.
Select the Hot Key button.
Step 2.
Select the Turn Print Mode ON button to print labels during the scanning process.
Enter Quantity
Note: The quantity entered REPLACES the total quantity scanned.
Step 1.
Select the Hot Key button.
Step 2.
Select the Enter Quantity button and enter the correct quantity.
Confidential & Proprietary Information of IPS and ScanIt Parts © 2013
51
ScanIt Parts System
3 - ScanIt Parts
Set New Bin Location
Step 1. Select the Hot Key button.
Step 2.
Select Set New Bin Location.
Step 3.
The scanner will display your current bin location as the new bin location.
Step 4.
Enter Y (Yes) to accept or N (No).
Note: See Bin Changes for more detailed information.
Confidential & Proprietary Information of IPS and ScanIt Parts © 2013
52
ScanIt Parts System
PC Server Main Menu Features
Chapter 4: PC Server Main Menu Features
The Main Menu provides navigation to all of the features within the ScanIt Parts System.
Status
The Status feature will tell you when the software has pulled Open Orders, Inventory, and Lookup.
Step 1.
•
•
•
•
Select the Status button at the bottom of the Main Menu. This feature will display the
following information:
The date and time Open Orders were pulled.
The date and time Inventory was pulled.
The date and time Lookup was pulled.
Software status for Receiving, Interact and GetData.
Confidential & Proprietary Information of IPS and ScanIt Parts © 2013
53
ScanIt Parts System
PC Server Main Menu Features
Adjustments
The Adjust feature allows the user to change the scanned quantity for a specific part number.
Step 1.
Select Adjust from the Main Menu.
Step 2.
Enter the Part #.
Note: If the part number is not found, the message “Part # XXXXXXXX was not found” is
displayed.
Step 3.
Step 4.
The program searches for the part number that was scanned and returns the results to the list
box. Select the part number that needs to be adjusted and change the quantity.
Select the Adjust button and the part number quantity automatically changes to the New
Scanned Quantity.
Note: This will automatically update the quantity in your DMS.
Confidential & Proprietary Information of IPS and ScanIt Parts © 2013
54
ScanIt Parts System
PC Server Main Menu Features
Manual Posting
The Manual Posting feature is used to post parts manually or fix scanning errors. This feature also
allows for posting of parts directly into your DMS.
Open Orders
Step 1. Select Manual from the Main Menu.
Step 2.
The Manual Posting screen displays the Open Orders tab by default.
Step 3.
Enter the Part #.
Note: If the part number is not found, the message “Part # XXXXXXXX was not found” is
displayed.
Confidential & Proprietary Information of IPS and ScanIt Parts © 2013
55
ScanIt Parts System
PC Server Main Menu Features
Step 4.
The Control # field will fill automatically, or select the correct control # from the drop-down
menu.
Step 5.
The Shipping # field will fill automatically, or select the correct shipper # from the drop-down
menu.
Step 6.
The Make field will fill automatically.
Step 7.
Enter the quantity to post.
Step 8.
Select Post to post the part number.
Step 9.
Select Clear to delete all of the information entered.
Step 10. Select Close.
Confidential & Proprietary Information of IPS and ScanIt Parts © 2013
56
ScanIt Parts System
PC Server Main Menu Features
Bin Changes
This screen allows you to manually post bin changes.
Step 1.
Select Manual from the Main Menu.
Step 2.
Select the Bin Changes tab.
Step 3.
Enter the Part #.
Note: If the part number is not found, the message “Part # XXXXXXXX was not found” is
displayed.
Step 4.
Enter the Make or Old Bin number.
Note: If the bin number entered is not found, the message “Bin not found” is displayed.
Step 5.
Enter the New Bin number.
Note: If the bin number entered is not found, the message “Bin not found” is displayed.
Step 6.
Select Post to post the bin change.
Step 7.
Select Clear to delete all of the information entered.
Step 8.
Select Close.
Confidential & Proprietary Information of IPS and ScanIt Parts © 2013
57
ScanIt Parts System
PC Server Main Menu Features
Batch Bin Changes
This screen allows you to post a batch of bin number changes.
Step 1.
Select Manual from the Main Menu.
Step 2.
Select the Batch Bin Change tab.
Step 3.
Enter the bin number you are changing in the Old Bin field.
Note: If the bin number entered is not found, the message “Bin not found” is displayed.
Step 4.
Enter the new bin number in the New Bin field.
Note: If the bin number entered is not found, the message “Bin not found” is displayed.
Step 5.
Select Post to post the bin change.
Step 6.
Select Clear to delete all of the information entered.
Step 7.
Select Close.
Confidential & Proprietary Information of IPS and ScanIt Parts © 2013
58
ScanIt Parts System
Bin Printing
Chapter 5: Bin Printing
The Bin Printing menu allows you to print Shelf Tags, Bin Labels, or Create a Part List for shelf tags.
Printing Shelf Tags
You can select data for your shelf tags by part #, bin location, or group code.
Step 1.
Select Bin Printing from the Main Menu.
Step 2.
Select Print Shelf Tags.
Step 3.
Select Next.
Confidential & Proprietary Information of IPS and ScanIt Parts © 2013
59
ScanIt Parts System
Step 4.
Bin Printing
Select a label style.
Note: You can preview the label styles by selecting one. The label is displayed to the right and
describes the information printed on that label style.
Step 5.
Once you choose a style, select Next.
Step 6.
In the Selection Criteria screen, you can choose to print between specific part numbers, bin
locations or group codes.
Note: The values entered result in the list being restricted to those values, as well as all numbers
in between.
Confidential & Proprietary Information of IPS and ScanIt Parts © 2013
60
ScanIt Parts System
Bin Printing
Example: If you specify the value Between Part #’s 15766462 and 22137122 the part number displayed
will match those two values and any part numbers that fall in between.
Step 7.
Select Next.
Step 8.
In the Selections Options screen, choose one of the following:
•
•
•
Step 9.
Normal Selecting – All parts within the selection criteria.
Changed Bin Locations – All parts that have had bin locations changed since your last
inventory pull and are within the selection criteria.
Changed Parts – All parts that have been changed since your last inventory pull and are
within the selection criteria.
If you only want to display part numbers that have a quantity on hand, select the checkbox for
Select parts with quantities greater than zero.
Step 10. Choose which order to display the parts in using the Sort By drop-down field. The choices are:
•
•
•
•
Bin Location
Bin, Group, Part #
Group Code
Part #
Step 11. Select Next.
Confidential & Proprietary Information of IPS and ScanIt Parts © 2013
61
ScanIt Parts System
Bin Printing
Step 12. The Summary screen displays all selected criteria.
Note: If you see any options that are not correct, or you would like to change, select the Back
button until you reach that option, change it, then select the Next button until you
return to the Summary screen.
Step 13. When all of the options are correct, select Browse and Print.
Step 14. The Bin Printing – Browse screen lists the parts that you have selected to print.
Step 15. Confirm that your selections are correct.
Step 16. If no, select Close to return to the Summary screen.
Step 17. If you do not want to print a specific part, select the part and select the Don’t Print button to
remove the part from the list.
Step 18. When you are done reviewing and correcting the list, select the Print button. The Print dialog
box will display.
Confidential & Proprietary Information of IPS and ScanIt Parts © 2013
62
ScanIt Parts System
Bin Printing
Printing Bin Labels
Select data for your bin labels by all bin changes or select bin locations.
Step 1.
Step 2.
Select Bin Printing from the Main Menu.
Select Print Bin Labels.
Step 3.
Select Next.
Step 4.
Select a label style.
Note: You can preview the label styles by selecting one. The label is displayed to the right and
describes the information printed on that label style.
Step 5.
Once you choose a style, select Next.
Confidential & Proprietary Information of IPS and ScanIt Parts © 2013
63
ScanIt Parts System
Step 6.
Bin Printing
In the Selection Criteria screen, select All Bin Locations or Between Bin Locations.
Note: If you choose All Bin Locations, all bins will display. If you choose Between Bin Locations all
bin locations between, and including, the given values will display.
Step 7.
Select Next.
Step 8.
The Summary screen displays all selected criteria.
Confidential & Proprietary Information of IPS and ScanIt Parts © 2013
64
ScanIt Parts System
Bin Printing
Note: If you see any options that are not correct, or you would like to change, select the Back
button until you reach that option, change it, then select the Next button until you
return to the Summary screen.
Step 9. If all of the options are correct, select Browse and Print.
Step 10. The Bin Printing – Browse screen lists the bins that you have selected to print.
Step 11. Confirm that your selections are correct.
Step 12. If no, select Close to return to the Summary screen.
Step 13. If you do not want to print a specific bin, select the bin location and select the Don’t Print
button to remove the bin location from the list.
Step 14. When you are done reviewing and correcting the list, select the Print button. The Print dialog
box will display.
Confidential & Proprietary Information of IPS and ScanIt Parts © 2013
65
ScanIt Parts System
Bin Printing
Create a Part List
Create a list of part numbers to print on shelf tags.
Step 1.
Select Bin Printing from the Main Menu.
Step 2.
Select Create a Part List.
Step 3.
Select Next.
Step 4.
Select a label style.
Note: You can preview the label styles by selecting one. The label is displayed to the right and
describes the information printed on that label style.
Confidential & Proprietary Information of IPS and ScanIt Parts © 2013
66
ScanIt Parts System
Step 5.
Bin Printing
Once you choose a style, select Next.
Note: By using this feature, the parts list is created manually.
Step 6.
Enter a Part #.
Step 7.
Add that part number by selecting the Add to List button.
Step 8.
Continue to add part numbers until all of your desired parts are in the list.
Note: A calculated total of part numbers is displayed. There is also an option to create a part list
using Import by Batch #. This imports part numbers to the list based on a batch # created on
the scanner.
Step 9.
Select Remove Selected to delete a single part, or select Clear List to start the list over.
Step 10. When you have completed the list, select Next.
Confidential & Proprietary Information of IPS and ScanIt Parts © 2013
67
ScanIt Parts System
Bin Printing
Step 11. The Summary screen displays your label choice.
Note: If you see any options that are not correct, or you would like to change, select the Back
button until you reach that option, change it, then select the Next button until you
return to the Summary screen.
Step 12. If all of the options are correct, select Browse and Print.
Step 13. The Bin Printing – Browse screen lists the parts that you have entered to print.
Step 14. Review the list to verify that your entries are correct.
Step 15. If no, select Close to return to the Summary screen.
Step 16. If you do not want to print a specific part, select the part and select the Don’t Print button to
remove the part number from the list.
Step 17. When you are done reviewing and correcting the list, select the Print button. The Print dialog
box will display.
Confidential & Proprietary Information of IPS and ScanIt Parts © 2013
68
ScanIt Parts System
6 - Browse
Chapter 6: Browse
The Browse feature allows you to view a status for your parts on order, shipment numbers and order or
control numbers.
Note: Any change to the Browse screen will be saved upon exiting.
Sorting
You can sort by any column that is titled in bold.
•
•
Click on the column header once to sort the criteria in the column – descending.
Click on the header twice to sort in reverse order – ascending.
Confidential & Proprietary Information of IPS and ScanIt Parts © 2013
69
ScanIt Parts System
6 - Browse
Move Columns
You can rearrange columns by selecting the column header and dragging it to a desired position.
Printing
You have the option to either Print Screen or Export.
•
•
Print Screen - will print the screen as displayed.
Export - sends the information to an Excel spreadsheet.
Edit Record
The Edit Record feature allows you to add notes to a part number, such as, if the part is damaged or
mispicked. These notes will also display in your Posting Errors, Received Part Status and Order Claims
reports.
Note: Any information entered is stored for the same length of time as your history.
Confidential & Proprietary Information of IPS and ScanIt Parts © 2013
70
ScanIt Parts System
6 - Browse
Search
You can Search by specific fields in the Browse Data screen.
Step 1.
The search field has a drop-down menu at the lower left of the Browse Data screen.
Step 2.
Select the Search button.
Note: Searches access only the column titles that are bolded in Browse Data.
Example
Information Fields
• Advise Date
• Bin Location
• Claim #
• Control #
• Cost
• Customer Name
• Customer PO
• Date Added
• Description
• Employee
• Exchange
• Freight
• Group
• Invoice #
• Line #
• Make
• Old Part #
• Order Date
• Order #
•
•
•
•
•
•
•
•
•
•
•
•
•
•
•
•
•
•
•
Order Status
Order Type
Part #
Posted Date
Posted Qty
Qty Ordered
Qty Scanned
Qty Shipped
Route #
Scanned Date
Srvc. Writer
Ship Via
Shipment Date
Shipper #
SPAC Case #
Status
Supplier Inv #
Tracking #
Trans. Code
Confidential & Proprietary Information of IPS and ScanIt Parts © 2013
71
ScanIt Parts System
6 - Browse
Color Codes
Color Codes indicate the status for a part number line in Browse Data.
Resize Columns
Columns can be resized by moving the divider bars at the top to the right or left.
Confidential & Proprietary Information of IPS and ScanIt Parts © 2013
72
ScanIt Parts System
6 - Browse
Open Orders
The Open Orders tab displays all part numbers on order. When part numbers are fully scanned and
posted, Interact will move them from Open Orders to History.
Note: Bold column headers indicate fields you can search and sort by.
Confidential & Proprietary Information of IPS and ScanIt Parts © 2013
73
ScanIt Parts System
6 - Browse
History
The History tab shows orders that have been scanned, posted, and closed.
Example
Information Fields
• Advise Date
• Bin Location
• Claim #
• Control #
• Cost
• Customer Name
• Customer PO
• Date Added
• Description
• Employee
• Exchange
• Freight
• Group
• Invoice #
• Line #
• Make
• Old Part #
• Order Date
• Order #
•
•
•
•
•
•
•
•
•
•
•
•
•
•
•
•
•
•
Order Status
Order Type
Part #
Posted Qty
Qty Ordered
Qty Scanned
Qty Shipped
Route #
Scanned Date
Srvc. Writer
Ship Via
Shipment Date
Shipper #
SPAC Case #
Status
Supplier Inv #
Tracking #
Trans. Code
Note: Bold column headers indicate fields you can search and sort by.
Confidential & Proprietary Information of IPS and ScanIt Parts © 2013
74
ScanIt Parts System
6 - Browse
Inventory
The Inventory tab displays all current inventory. Information includes part number changes, group
number, and assigned bin location.
Note: Bold column headers indicate fields you can search and sort by.
Part Number Changes (PNC)
The PNC tab displays part number changes including the date of the part number change and the old
part number.
Note: Bold column headers indicate fields you can search and sort by.
Confidential & Proprietary Information of IPS and ScanIt Parts © 2013
75
ScanIt Parts System
6 - Browse
Other Items
The Other Items tab displays part numbers that were scanned using the Other Items feature on the
scanner. This feature allows a dealer to scan OEM or Aftermarket parts directly into the system. These
items may or may not be on an open order.
This tab also displays parts scanned using Create Part List mode on the scanner. These lines are shown
as a different color than Other Items to allow for easy differentiation.
Note: Bold column headers indicate fields you can search and sort by.
Confidential & Proprietary Information of IPS and ScanIt Parts © 2013
76
ScanIt Parts System
6 - Browse
Invoices
The Invoices tab allows you to view all of your data on an invoice (when available from the
manufacturer).
Example
Information Fields
• Claim #
• Cost
• Customer Order Date
• Customer Order #
• Discount Amount
• Gross Amount
• Handling Charge
• Invoice Date
• Invoice #
• Line #
• Multi Pack
• Net Amount
• Order Type
•
•
•
•
•
•
•
•
•
•
•
•
Part Desc
Part #
PNC
Percent Discount
Qty
Qty Received
Ship Date
Shipper #
Shipping Charge
SPO Order #
SPO Order Date
Unit Price
Note: Bold column headers indicate fields you can search and sort by.
Confidential & Proprietary Information of IPS and ScanIt Parts © 2013
77
ScanIt Parts System
6 - Browse
Order Status
The Order Status tab allows you to view the status of your orders (when available from the
manufacturer).
Example
Information Fields
• Control #
• Cost
• Date Added
• Dealer Code
• Line #
• Old Part #
• Order #
• Order Date
• Order Qty
•
•
•
•
•
•
•
•
Part #
PDC
Posted Date
Processed
Shipment #
Status
Status Type
Type
Note: Bold column headers indicate fields you can search and sort by.
Confidential & Proprietary Information of IPS and ScanIt Parts © 2013
78
ScanIt Parts System
6 - Browse
Scanned Parts
The Scanned Parts tab displays all scanned parts.
Note: Bold column headers indicate fields you can search and sort by.
Lookup
The Lookup tab displays part numbers that you have entered as an alternate UPC. You can add these
part numbers either through the ScanIt Parts Main Menu or through the Add Lookup function on the
scanner.
Note: Bold column headers indicate fields you can search and sort by.
Confidential & Proprietary Information of IPS and ScanIt Parts © 2013
79
ScanIt Parts System
Client Settings
Chapter 7: Client Settings
For a Client PC you can obtain more detailed information on the installation process by visiting our “How
To” page at http://www.scanitparts.com/install-client-machine.aspx
Settings
This feature allows you to set the data path to your ScanIt Parts information and reset the browse table
grids back to the default settings.
Note: These settings are accessed through a Client or secondary PC, not the main ScanIt Parts
system (server).
Step 1.
Select Settings from the Main Menu.
Step 2.
The Client Settings screen displays the Settings tab by default.
Step 3.
You must manually type in the new data path.
Step 4.
Reset the grids on the Browse tables by selecting Reset All Grids.
Note: This restores the default settings for the Browse tables for that client PC but does not affect
any of the other PCs.
Confidential & Proprietary Information of IPS and ScanIt Parts © 2013
80
ScanIt Parts System
Client Settings
Interact Data Pulls
This feature allows a user to pull Open Orders and Inventory.
Step 1.
Select Settings from the Main Menu.
Step 2.
Select the Interact Data Pulls tab.
Step 3.
Choose which Pull option you want to execute:
•
•
Pull Open Orders
Pull Inventory
Note: These options function exactly like the Main PC (server).
Confidential & Proprietary Information of IPS and ScanIt Parts © 2013
81
ScanIt Parts System
Client Settings
Interact Posting
This feature allows a user to attempt a Re-Post of scanned data.
Step 1.
Select Settings from the Main Menu.
Step 2.
Select the Interact Posting tab.
Step 3.
Select which of the following to re-post:
•
•
Open Orders
Order Status
Step 4.
Enter the date(s).
Step 5.
Select Re-Post.
Note: These options function exactly like the Main PC (server).
Confidential & Proprietary Information of IPS and ScanIt Parts © 2013
82
ScanIt Parts System
Client Settings
Lookup
This feature is used to cross reference the UPC barcode with what the dealership stores as a part
number.
Example:If you store a part number in your DMS as ANTI-FREEZE, it will have a UPC barcode on it such as
1234567890. Set up your lookup table to say anytime you scan 1234567890 it really means ANTIFREEZE. This allows any user to pick up the scanner, scan the UPC barcode and ScanIt Parts will convert
it to what is stored as the part number.
Step 1.
Step 2.
Select Settings from the Main Menu.
Select the Lookup tab.
Step 3.
Step 4.
Step 5.
Select New to add a new part number or UPC.
Select a UPC number from the list and select Edit to make changes.
Remove to delete.
Step 6.
Enter or change the following information:
•
•
•
Step 7.
Make
UPC #
Part #
To save changes, select Update.
Note: These options function exactly like the Main PC (server).
Confidential & Proprietary Information of IPS and ScanIt Parts © 2013
83
ScanIt Parts System
End of Day
Chapter 8: End of Day
This screen allows you to see the following potential problems that may have happened on a particular
day or date range:
•
•
•
All posting errors for the parts scanned in the range of dates selected
Over / Shorts for the range of dates selected
Incomplete shipments grouped by either shipment number or control number
Select End of Day from the Main Menu.
Posting Errors
Posting errors are parts that have been scanned but have not been posted to your inventory. Select the
part number to see an explanation of why the part did not post.
Note: It is important that you fix the errors otherwise your inventory will not be up to date. You
can also run the Posting Errors report from the Reports menu for additional information.
Confidential & Proprietary Information of IPS and ScanIt Parts © 2013
84
ScanIt Parts System
End of Day
Over / Shorts
Over and Shorts are order lines that have parts scanned but the scanned quantity does not match the
shipped quantity as reported by the manufacturer.
Grouping Over / Shorts
You can view Over / Shorts in two ways:
•
•
Shipment # - Is the default selection where manufacturer data is applicable
Control # - If shipment # is not available.
Incomplete Shipments
A shipment is considered incomplete if there are any parts that have not been scanned and at least one
part has been scanned on the shipment.
Select a shipment number to display any discrepancies for that shipment number in the Over / Shorts
section of the End of Day screen.
You can run the Shipment Status report from the Reports menu for more detailed shipment status
information.
If the shipment number is red instead of black, this indicates that a portion of the shipment was not
scanned.
Over / Shorts Section
In the Over/Shorts section, the following is true:
•
•
If the line is red, the line item is a shortage.
If the line is blue, the line item is an overage.
Double-click the line item for more information.
Select the Print button for a print out of your Over / Shorts or you can view the Over / Shorts report
from the Reports menu.
Order lines are typically over or short due to an incorrect quantity scanned or entered. Entries can be
corrected using the Adjust program from the Main Menu.
Date
You can run End of Day for a specific range of days instead of the default date of today.
To view a range of days, enter the To and From dates and select the Update button to refresh with the
new date range.
Confidential & Proprietary Information of IPS and ScanIt Parts © 2013
85
ScanIt Parts System
9 - Get Data
Chapter 9: Get Data – GM / Honda
GM Overview
The Get Data function allows you to monitor and download data from Parts Workbench to your ScanIt
Parts System. From here, your data is downloaded from GM, if available, and a date of the last
successful data pull will be displayed. Also, your login information is stored here and will allow you to
make any changes. Get Data has four sections: Dealers, Log In, Downloads and Status.
Note: If either your username or password is incorrect, no data will be pulled.
Dealers
The Dealers section allows you to manage your data pulls. If you should have more than one account
through Parts Workbench, Get Data will pull every account every day.
Add
The Add option allows you to enter a new or additional Parts Workbench account number(s).
Step 1.
Select Get Data from the Main Menu.
Confidential & Proprietary Information of IPS and ScanIt Parts © 2013
86
ScanIt Parts System
Step 2.
In the Dealers section, select Add.
Step 3.
Enter your Dealer #, User Name, and Password.
9 - Get Data
Note: You must use the same User Name and Password you use as your login for Parts
Workbench.
Step 4.
To save changes, select Add.
Remove
Remove deletes Parts Workbench account numbers.
Step 1.
Step 2.
Select a Dealer # and then select Remove.
A confirmation screen will appear. Select Yes to remove or No to cancel.
Confidential & Proprietary Information of IPS and ScanIt Parts © 2013
87
ScanIt Parts System
9 - Get Data
Log In
The User Name and Password must match a Parts Workbench login.
Change
This section allows you to change any of your GM information such as Dealer #, User Name, or
Password.
Step 1.
Step 2.
Select a Dealer # from the list if there is more than one listed.
Select Change under the Log In section.
Step 3.
Make any changes and select Update.
Downloads
Last Download displays the date and time of the last successful data pull.
Custom Download
The Custom download option allows you to specify a date range to pull your Parts Workbench data.
Step 1.
Select the Custom button to pull any of your GM data within the last 30 days.
Step 2.
Specify a date range.
Note: Date ranges must be within the past 30 days and cannot exceed seven days.
Step 3.
Download will send your request and close the form.
Confidential & Proprietary Information of IPS and ScanIt Parts © 2013
88
ScanIt Parts System
9 - Get Data
Download
Download automatically pulls ALL data from GM for the past 7 days. Wait time for a download may be
approximately 5 minutes per Dealer #.
Step 1.
Select the Download button.
Step 2.
Yes will send your request and close the form.
Status
The Status field displays the progress for a selected Dealer #, the 5 status steps are:
•
•
•
•
•
Starting - the pull has started and will display the Parts Workbench Dealer #
Downloading - the GM Data is downloading and is in progress
Download complete - the GM Data has finished pulling
Done - the download is complete
Username/Password is incorrect - GM is not accepting the current login information as
entered. You can verify a User Name and password entered through the Parts Workbench
website.
Note: If the date and time displayed are not current, the ScanIt Parts System did not communicate
with Parts Workbench. Possible reasons are:
•
•
•
User Name or Password may be incorrect.
Your Internet was down.
Pull times may be earlier than the data was available from GM.
GM Data
Once your GM Data has been downloaded, you can access it through either the Browse table or
Reports.
Browse - Downloaded GM data can be found in the following: Open Orders, PNC (Part Number
Change), Invoices, and Order Status.
Reports - Downloaded GM data can be found in the following: Over/Shorts, Shipment Status, Print
Packing Slip, Order Status Information, and Invoice Reconciliation.
Confidential & Proprietary Information of IPS and ScanIt Parts © 2013
89
ScanIt Parts System
9 - Get Data
Honda Overview
The Get Data function allows you to monitor and download data from Honda iN to your ScanIt Parts
System. From here, current data is downloaded from Honda, if available, and a date of the last
successful data pull will be displayed. Also, your login information is stored here, but no changes to a
password should be necessary once the account was initially set up. Get Data has four sections: Dealers,
Log In, Downloads and Status.
Dealers
The Dealers section will display your Honda dealer #.
Note: To begin receiving your Honda data there are two steps:
•
•
FIRST PHASE - Set up your Honda account information in ScanIt Parts
SECOND PHASE - Activate Honda iN to begin the download process of shipment and
invoice data.
Confidential & Proprietary Information of IPS and ScanIt Parts © 2013
90
ScanIt Parts System
9 - Get Data
FIRST PHASE
Step 1.
Select Get Data from the Main Menu.
Step 2.
In the Dealers section, select Add.
Confidential & Proprietary Information of IPS and ScanIt Parts © 2013
91
ScanIt Parts System
Step 3.
9 - Get Data
Enter your Dealer # and Password.
Note: You must use the same password you use as your login for Honda iN.
Step 4.
To save changes, select Add.
Remove
Remove deletes your Honda dealer number.
Step 1.
Select Dealer # and then select Remove.
Step 2.
A confirmation screen will appear. Select Yes to remove or No to cancel.
Confidential & Proprietary Information of IPS and ScanIt Parts © 2013
92
ScanIt Parts System
9 - Get Data
SECOND PHASE
Note: A Honda iN System Administrator will need to activate your dealer #:
Step 1.
Log in to http://www.in.honda.com
Step 2.
Enter your Dealer Number
Step 3.
Select iN Plus Realtime tab from the left navigation bar.
Step 4.
Select the Parts tab.
Step 5.
Select the Parts Invoice section at the bottom of the screen.
Step 6.
Select Yes to Activate Parts Invoice. The drop-down should show IPS.
Step 7.
Select Submit.
Note: It may take 24-48 hours to begin receiving Honda data.
Confidential & Proprietary Information of IPS and ScanIt Parts © 2013
93
ScanIt Parts System
9 - Get Data
Log In
The Dealer # and Password must match Honda iN's login.
Change
Select this tab only if your password for Honda iN has changed.
Note: If the password on Honda iN has changed, please contact ScanIt Parts technical support.
Downloads
Last Download displays the date and time of the last successful data pull.
Custom Download
The Custom download option is only needed if your Honda data has not pulled.
Note: Your Honda data should be pulling from Honda iN on a daily basis.
If your Honda data has not pulled daily, you can force a custom pull.
Step 1. Select the Custom button.
Step 2.
Enter the day needed.
Note: The date range cannot exceed seven days. Once your Honda data has been pulled and
received, you cannot retrieve your data a second time.
Step 3.
Download will send your request and close the form.
Confidential & Proprietary Information of IPS and ScanIt Parts © 2013
94
ScanIt Parts System
9 - Get Data
Download
Download automatically pulls ALL Honda data which has not previously been received.
Note: Once your Honda data has been pulled and received, you cannot retrieve your data
a second time.
If your Honda data is not pulling daily, you can force a pull.
Step 1.
Select the Download button.
Step 2.
Selecting Yes will send your request and close the form.
Status
The Status field displays the progress for the selected Dealer #:
•
•
•
•
•
Starting - indicates the pull has started and will display the Honda Dealer #
Downloading Honda - the Honda data is downloading and the pull is in progress
Download complete - the Honda data for the date displayed is finished
Done - the download is complete
Invalid Dealernumber/Password - indicates one part of the login is invalid
Note: A Honda iN administrator can verify if the password has been changed. If the password
has been changed, please contact ScanIt Parts technical support.
If the date and time displayed are not current, ScanIt Parts did not communicate with Honda iN.
Possible reasons are:
•
•
•
Dealer # or Password may be incorrect.
Your internet is down.
Pull times are earlier than the data was available from Honda.
Confidential & Proprietary Information of IPS and ScanIt Parts © 2013
95
ScanIt Parts System
Monitor
Chapter 10: Monitor
This feature allows any ScanIt Parts PC to view the parts being scanned in real time.
Scanned Orders
When parts are scanned in Receive mode, ScanIt Parts automatically puts the date and time into the list.
The total scanned count is displayed in the bottom left-hand corner.
Note: Multiple scanners can be logged in and scanning simultaneously.
Step 1:
Select Monitor from the Main Menu.
Step 2:
The Monitor Scanned Parts screen displays the Scanned Orders tab by default.
Confidential & Proprietary Information of IPS and ScanIt Parts © 2013
96
ScanIt Parts System
Step 3:
Monitor
To see scanning statistics, select the Stats button and a dialog box will appear with the
scanning information for today.
Note: The program will show the total number of parts scanned and will refresh every 30 seconds.
Other Items
This screen shows parts scanned using the Other Items and Create Part List modes.
Step 1:
Select Monitor from the Main Menu.
Step 2:
Select the Other Items tab.
Confidential & Proprietary Information of IPS and ScanIt Parts © 2013
97
ScanIt Parts System
Monitor
Scanned Inventory
This screen shows parts scanned using Perpetual Inventory mode.
Step 1.
Select Monitor from the Main Menu.
Step 2.
Select the Scanned Inventory tab.
Bin Changes
This feature shows scanned bin changes in real time.
Step 1.
Select Monitor from the Main Menu.
Step 2.
Select the Bin Changes tab.
Confidential & Proprietary Information of IPS and ScanIt Parts © 2013
98
ScanIt Parts System
11-Reports
Chapter 11: Reports
The Reports feature allows you to view, print and export a wide variety of reports from the ScanIt Parts
system.
Select Reports from the ScanIt Parts Main Menu to view a particular report. Any of the reports can be
printed directly from the report menu, exported to disk, or viewed at your PC by selecting one of the
buttons listed below:
•
Preview - Displays the report onscreen
•
Print - Sends the report to your default printer
•
Export - the report data is compiled in the form of a spreadsheet
•
Close - returns to the Main Menu
Confidential & Proprietary Information of IPS and ScanIt Parts © 2013
99
ScanIt Parts System
11-Reports
Over / Shorts
This report compares quantity shipped to quantity scanned. If the two quantities do not match, the
report will show the part # as an overage or a shortage.
Important: This report should be run on a daily basis.
Step 1.
•
Select from one of the following:
Date - enter the scanned date(s)
Note: You must select a Group By choice.
•
•
Shipment # - enter the shipment number
Control # - enter the control number
Note:
•
Last 30 days - displays only the parts scanned on the control number entered within the
last 30 days.
Display All Parts - displays all scanned parts
Example
Confidential & Proprietary Information of IPS and ScanIt Parts © 2013
100
ScanIt Parts System
11-Reports
Shipment Status
This report lists all shipments, complete or incomplete, during a given period.
Step 1.
Enter the Scanned Date(s).
Step 2.
From the Group By drop-down, select one of the following:
•
•
Shipment #
Control #
Example
Confidential & Proprietary Information of IPS and ScanIt Parts © 2013
101
ScanIt Parts System
11-Reports
Posting Errors
This report displays any parts that did not post into your DMS.
Step 1.
•
•
•
•
Select one of the following:
Control # - enter the control number
Part # - enter the part number
Shipment # - enter the shipment number
Scanned Date – enter the date(s)
Note:
•
•
The optional two choices are:
Display Details - displays the reason why the part did not post.
Display GM Status - displays the status of the part numbers according to GM (when available),
listing which parts are for special orders and which parts are for stock.
Example
Confidential & Proprietary Information of IPS and ScanIt Parts © 2013
102
ScanIt Parts System
11-Reports
Posted History
This report displays the parts posted into your DMS. Parts can be sorted by shipment #, part #, or
control #.
Step 1.
•
•
•
•
Select one of the following:
Posted Date - enter the date(s)
Part # - enter the part number
Shipment # - enter the shipment number
Control # - enter the control number
Note:
•
•
The optional two choices are:
Group Posts - consolidates similar posts.
Display Errors - displays posting errors.
Example
Confidential & Proprietary Information of IPS and ScanIt Parts © 2013
103
ScanIt Parts System
11-Reports
Scanned Parts
This report lists all parts that have been scanned and includes the employee’s assigned user ID.
Step 1.
•
•
•
•
•
Step 2.
•
•
•
•
•
Note:
•
•
Select one of the following:
Date - enter the date(s)
Part # - enter the part number
Control # - enter the control number
Scanner - from the drop-down, you can choose which scanner to display
Gun User ID - from the drop-down, you can choose which Gun User ID to display
Selecting the Sort By drop-down displays one of the following:
Part #
Control #
Date/Time (scanned)
User ID
IP Address (scanner)
The optional two choices are:
Empty Shipments Only - displays only order lines with no shipment number assigned.
Special Orders Only - displays only special order lines.
Confidential & Proprietary Information of IPS and ScanIt Parts © 2013
104
ScanIt Parts System
11-Reports
Example
Confidential & Proprietary Information of IPS and ScanIt Parts © 2013
105
ScanIt Parts System
11-Reports
Lost Parts
This report lists all parts invoiced but not scanned.
Step 1.
•
•
Select one of the following:
Invoice # - enter an invoice number
Shipment # - enter a shipment number
Note:
•
•
The optional two choices are:
Suppress Processed Parts - displays only unprocessed parts
All Parts for last 30 days - displays all parts in order by shipment number
Example
Confidential & Proprietary Information of IPS and ScanIt Parts © 2013
106
ScanIt Parts System
11-Reports
Open Shipments
This report lists all parts without a shipment # assigned. The results can be displayed either by date
range or by order #.
Step 1.
•
•
Select one of the following:
Scanned Date - enter the date(s)
Order # - enter the order number
Note:
•
•
The optional two choices are:
Display Exceptions Only - displays only shipments with errors, such as quantity mismatch.
Display Empty Order #’s - displays parts without order numbers.
Example
Confidential & Proprietary Information of IPS and ScanIt Parts © 2013
107
ScanIt Parts System
11-Reports
Special Orders
This report lists all special orders and their current status.
Step 1. Select one of the following:
•
•
•
Date - enter the date(s)
Invoice # - enter the invoice number
Control # - enter the control number
Note: When the control # prompt is selected, the Last 60 Days filter is enabled. This option
searches only the past 60 days for Special Orders.
•
And Date - enter a control number and a date range
Example – By Date
Confidential & Proprietary Information of IPS and ScanIt Parts © 2013
108
ScanIt Parts System
Note:
•
11-Reports
The optional two choices are:
All Open Special Orders - displays all open special orders.
Note: The Sort By option will automatically be enabled.
•
Finished Invoices Only - displays only special orders for finished invoices within a given date range.
Example – All Open Special Orders
Confidential & Proprietary Information of IPS and ScanIt Parts © 2013
109
ScanIt Parts System
11-Reports
Order Status Information
This report lists out all parts and their shipping status. You can view all statuses, backorders, cancelled
or referred parts.
Step 1.
Select one of the following:
•
Order Date - enter the date(s)
•
Part # - enter the part number
•
Control # - enter the control number
Note:
The optional four choices are:
•
Display Error Details - displays posting error descriptions, such as "Can't post cancelled special
orders" and "Part # has no empty order types".
•
Just Posting Failures - displays all posting errors.
•
Display Status Info - displays the manufacturer order status (when available).
•
Display Shipped Parts - displays shipped parts.
Confidential & Proprietary Information of IPS and ScanIt Parts © 2013
110
ScanIt Parts System
Step 2.
11-Reports
The Order Status drop-down gives you the following options:
•
All
•
Billed/Shipped
•
Reviewed
•
Discontinued
•
Backorders
•
Referred
Example
Confidential & Proprietary Information of IPS and ScanIt Parts © 2013
111
ScanIt Parts System
11-Reports
Invoice Reconciliation
This report compares the manufacturer’s invoice to scanned history, listing all parts with exceptions.
Both quantity exceptions and cost exceptions will be displayed based on invoice information.
Step 1.
•
•
•
•
Select one of the following:
Invoice # - enter the invoice number
Part # - enter the part number
Invoice Date - enter the date(s)
Shipment # - enter the shipment number
Step 2.
•
•
•
•
•
•
The report can show all exceptions or specific exceptions by using the Choose One drop-down
filter:
All Exceptions
Quantity Exceptions
Cost Exceptions
Display All Parts
Invoice Status
Unfinished Invoices
Example
Confidential & Proprietary Information of IPS and ScanIt Parts © 2013
112
ScanIt Parts System
11-Reports
Print Packing Slip
This report assists in printing out packing slips for shipments.
Step 1.
•
Select one of the following:
Date - enter the Shipment Date(s)
Note:
•
If necessary, enter the PDC code.
Shipment # - enter the shipment number
Example
Confidential & Proprietary Information of IPS and ScanIt Parts © 2013
113
ScanIt Parts System
11-Reports
Core Exchange
This report lists core exchanges and totals for a given period.
Step 1.
•
•
•
Select one of the following:
Invoice Date - enter the date(s)
Shipment # - enter the shipment number
Part # - enter the part number
Step 2.
•
•
•
Select the Core Exchanges to display:
All Core Exchanges
Outstanding Core Exchanges
Core Exchanges - (Scanned and Invoiced)
Example
Confidential & Proprietary Information of IPS and ScanIt Parts © 2013
114
ScanIt Parts System
11-Reports
Employee
This report shows the status of all orders by their assigned employee code.
Step 1. Select one of the following:
• Employee Code - enter an employee code
• Scanned Date - view all orders for all employees within a given date range
• Employee and Date - enter the employee code and date(s) to display all orders for a specific
employee within a given date range.
Step 2. From the Sort By drop-down filter, select one of the following:
• Part #
• Scanned Date
• Repair Order #
Note:
•
•
The optional two choices are:
Display GM Status - displays only the GM order status of each part.
New page on Employee Code - displays each employee code on a new page.
Example
Confidential & Proprietary Information of IPS and ScanIt Parts © 2013
115
ScanIt Parts System
11-Reports
Part Number Change (PNC) Report
This report displays part number changes for a given part number or date range by listing the new part
number, the old part number and the date/time of the change.
Step 1.
•
•
Select one of the following report options:
Date Added - enter the date(s)
Part # - enter the part number
Example
Confidential & Proprietary Information of IPS and ScanIt Parts © 2013
116
ScanIt Parts System
11-Reports
Bin Changes
This report lists information for all bin changes.
Step 1.
•
•
Select one of the following:
Scanned Date - enter the date(s)
Part # - enter a part number
Note:
•
Another search option is:
Display Posting Errors Only - displays only bin posting errors for the given date range or part
number.
Example
Confidential & Proprietary Information of IPS and ScanIt Parts © 2013
117
ScanIt Parts System
11-Reports
Part Information
This report prints out information about parts in a specified bin location(s).
Step 1.
•
•
Select one of the following:
Bin Location - enter the bin location(s)
Part # - enter the part number
Example
Confidential & Proprietary Information of IPS and ScanIt Parts © 2013
118
ScanIt Parts System
11-Reports
Multiple Part Number Changes (PNC)
This report lists all parts on order that were split into multiple part numbers.
Step 1.
•
•
Select one of the following:
Date Added - enter the date(s)
Part # - enter the part number
Example
Confidential & Proprietary Information of IPS and ScanIt Parts © 2013
119
ScanIt Parts System
11-Reports
Print Invoices
This report allows a user to print the actual invoice received (when manufacturer data is available).
Step 1.
•
•
•
Select one of the following:
Invoice # - enter the invoice number
Invoice Date - enter the date(s)
Shipment # - enter the shipment #
Example
Confidential & Proprietary Information of IPS and ScanIt Parts © 2013
120
ScanIt Parts System
11-Reports
Other Items
This report displays the “OTHER” parts received, such as tires or aftermarket items.
Note: When scanning Other Items, a batch number must be entered. Batch numbers allow for
tracking of the parts.
Step 1.
•
•
Select one of the following:
Date – enter the scanned date(s)
Batch # - enter the batch number
Example
Confidential & Proprietary Information of IPS and ScanIt Parts © 2013
121
ScanIt Parts System
11-Reports
Print Part List
This report prints out a list of parts that were scanned in Create Part List mode on the scanner.
Step 1.
•
•
•
Select one of the following:
Scanned Date - enter the date(s)
Part # - enter the part number
Batch # - enter the batch number
Note:
•
Another search option is:
Combine duplicate Part #’s - displays each part number only once.
Example
Confidential & Proprietary Information of IPS and ScanIt Parts © 2013
122
ScanIt Parts System
11-Reports
Perpetual Inventory
This report lists out parts scanned in Perpetual Inventory mode on the scanner.
Step 1.
•
•
•
Select one of the following from the drop-down menu:
Display All Parts
Display Quantity Exceptions Only
Display Parts In Wrong Bin Locations Only
Example – Exceptions Only
Confidential & Proprietary Information of IPS and ScanIt Parts © 2013
123
ScanIt Parts System
Step 2.
•
•
•
11-Reports
Select one of the following:
Scanned Date - enter the date(s)
Part # - enter the part number
Bin Location - can be a partial bin number
Note: Exact Bin - displays a specific bin number.
Note:
•
•
The optional two choices are:
Condensed Report - displays the report without any page breaks for each bin location.
Clear Scanned button - clears all scanned parts based on bin location or scanned date(s).
Confidential & Proprietary Information of IPS and ScanIt Parts © 2013
124
ScanIt Parts System
11-Reports
Freight Cost
** This feature is available for GM dealers only **
This report displays all freight costs by shipment date, shipment #, part # or control #.
Note: Freight costs are received directly from GM and may not always be included with your daily
shipment data. Any freight costs without shipment information are not displayed.
Step 1.
•
•
•
•
Note:
•
Select one of the following:
Shipment Date - enter the date(s)
Shipment # - enter the shipment number
Part # - enter the part number
Control # - enter the control number
Another search option is:
Hide parts that have no Freight Cost - displays only part numbers that have a freight cost.
Confidential & Proprietary Information of IPS and ScanIt Parts © 2013
125
ScanIt Parts System
11-Reports
Graph
This report graphs the parts scanned by different employees or scanners. The information can be
displayed as a bar graph or pie chart.
Step 1.
•
•
•
Step 2.
•
•
•
Step 3.
•
•
Note:
Enter the Scanned Date(s).
Show Legend - displays a description next to the graph.
Show Percentages - displays percentages/values.
3D - displays the graph in 3 dimensions.
Select your Graph Choice from the drop-down menu:
Average Scans
Percent Scanned
Total Scanned
Graph From allows you to choose a User ID or IP Address:
User ID - displays the employee ID who scanned the parts
IP Address - displays the scanner which was used to scan the parts
Graph button - displays information in graph form.
Once the graph is displayed:
•
•
•
Back - returns to the previous screen.
Zoom - displays the graph as a larger image.
Copy to Clipboard - copies the graph for printing or to use in other reports.
Confidential & Proprietary Information of IPS and ScanIt Parts © 2013
126
ScanIt Parts System
11-Reports
Examples
Confidential & Proprietary Information of IPS and ScanIt Parts © 2013
127
ScanIt Parts System
11-Reports
Received Part Status
This report displays only the information entered manually into the Status column in Browse Data using
the Edit Record feature.
Step 1.
•
•
•
Select one of the following:
Date - enter the order date(s)
Shipment # - enter the shipment number
Control # - enter the control number
Confidential & Proprietary Information of IPS and ScanIt Parts © 2013
128
ScanIt Parts System
11-Reports
Order Claims
This report displays information only if you manually enter data into the Claim # column in Browse Data
using the Edit Record feature.
Step 1.
•
•
•
Select one of the following:
Claim # - enter the claim number
Order Date - enter the date(s)
Shipment Date - enter the date(s)
Multi-Pack
This report lists all scanned parts that have a multi-pack quantity for a given date range.
Enter the Scanned Date(s).
Confidential & Proprietary Information of IPS and ScanIt Parts © 2013
129
ScanIt Parts System
11-Reports
Physical Inventory
This report keeps track of the actual inventory on-hand.
Enter the Scanned Date(s) and select one of the following reports to run:
Step 1.
Parts scanned but not invoiced
Example
Confidential & Proprietary Information of IPS and ScanIt Parts © 2013
130
ScanIt Parts System
Step 2.
11-Reports
Selecting the Summary filter will display the Parts scanned but not invoiced Report in a
condensed format.
Example
Step 3.
Parts Invoiced but not scanned
Example
Confidential & Proprietary Information of IPS and ScanIt Parts © 2013
131
ScanIt Parts System
11-Reports
Order Summary
This report displays all order lines with a cost for a given order date.
Step 1.
Enter the Order Date(s).
Note:
Another search option is:
•
Display Special Orders Only - displays only the special orders.
Example
Confidential & Proprietary Information of IPS and ScanIt Parts © 2013
132
ScanIt Parts System
11-Reports
Order Status History
** This feature is available for GM dealers only **
This report displays part numbers that have multiple order statuses. If the manufacturer backorders the
part and later cancels the part, this report displays an order status history of backorder and cancelled for
that part number.
Step 1.
•
Date - enter the ordered date(s)
•
Part # - enter the part number
•
Control # - enter the control number
Note:
•
Select one of the following:
Another search option is:
Display Status Description - displays a status for each part number, such as "written to ship direct"
and "referred to source".
Confidential & Proprietary Information of IPS and ScanIt Parts © 2013
133
ScanIt Parts System
12 - FAQ & Troubleshooting
Chapter 12: Frequently Asked Questions & Troubleshooting
General Information & Setup
Q: Where can I purchase labels for the scanners?
A: Labels are purchased directly through ScanIt.
•
•
On the web: http://www.scanitparts.com/order.aspx
Call (810) 695-9332, press 3 – Supplies
Q: How does this system interface with our DMS?
A: The ScanIt Parts System uses the dealership’s standard Ethernet network. All communication is
done on the existing dealership network.
Q: What information is scanned into my DMS?
A: Parts scanned at the receiving dock are automatically receipted into your DMS under a control #.
The information receipted is generally part #, order #, and control #, bin information and quantity.
Q: What information needs to be keyed manually?
A: None, unless the barcode will not scan. If for some reason the barcode will not scan, you can always
manually type the part # using the scanner’s keypad.
Q: What do I do if an error occurs on the ScanIt Parts program?
A: Restart the ScanIt Parts computer and see if the error happens again. If the error occurs again,
please contact us at (810) 695-9332 and press 1 for technical support.
Q: What hardware is involved in an installation?
A: There are three components:
•
•
•
PC Server - can be running Windows 2000 Professional, Windows 2003 Professional, Windows
XP Professional, Windows Vista or Windows 7
Access Point with antenna- uses wireless frequency of 802.11 B/G/N
Scanner- wireless card communicates via radio frequency
Q: Are there any firewalls incorporated into the ScanIt Parts System when there are multiple access
points?
A: The access point installed at the dealership connects to the main ScanIt Parts PC using standard
Ethernet cabling and uses the TCP/IP protocol. Because this is a standard network connection,
security techniques, including a firewall, can be used to protect the transfer within and outside a
dealership; however, the ScanIt Parts System does not automatically use any.
Confidential & Proprietary Information of IPS and ScanIt Parts © 2013
134
ScanIt Parts System
12 - FAQ & Troubleshooting
Q: Will the ScanIt Parts System handle an inventory consisting of 100,000 part numbers?
A: Yes. The System was designed from the start to handle very large inventories.
Q: My warehouse is 100,000 square feet and has many girders and support posts. Will the system
have trouble transmitting and receiving in this environment?
A: No. However, for a 100,000 square foot warehouse, you may need to purchase multiple antennas
to get complete wireless coverage.
Q: How far from the access point can the scanner operate?
A: The scanner will communicate approximately 500 ft. from an access point (this is radius coverage).
If multiple access points are added, the access points will automatically overlap coverage without
any special setup.
Q: How many scanners are supported by the ScanIt Parts System?
A: The total number of scanners the ScanIt Parts System will support is 254.
Q: If I have more than one scanner, can I “overload” the system by having multiple scanners
scanning?
A: No. You will never be able to “overload” the system because of multiple scanners.
Q: How can I improve the speed and stability of the ScanIt Parts system?
A: The ScanIt Parts System is PC based, things that will improve the system are increased memory
(RAM) and increased storage space.
Q: Can specific dealer personnel access the ScanIt Parts System data from outside of the dealership?
A: Yes. The ScanIt Parts System runs on a standard PC configuration. You can run the software at the
main parts department or a location elsewhere. Again, the ScanIt Parts software communicates
through a basic internet or LAN connection.
Confidential & Proprietary Information of IPS and ScanIt Parts © 2013
135
ScanIt Parts System
12 - FAQ & Troubleshooting
Scanning
Q: My part # uses spaces and/or dashes. If I have to type in the part #, do I type the part number
with dashes or spaces?
A: No. Dashes, spaces, # signs or any special characters are not typed into the scanner. Type the part
number and press Enter;the system will automatically find the part # if it is on order.
Q: What happens if someone tries to scan the same part more than once?
A: If the part is only on one open order, the ScanIt Parts System will notify the user that the part
number is fully scanned. If the part is on multiple open orders, the ScanIt Parts program will prompt
the user for a control number.
Q: I’m in the middle of scanning and my scanner goes black
A: Try putting in a freshly charged battery. If this does not solve the problem, call us at (810) 695-9332
and press 1 for technical support.
Q: The parts I scan are not posting into my DMS
A: If a part does not post into your DMS, check the following:
•
•
•
•
Is Interact on?
Is the part number on order in your DMS?
Is the quantity you have different from the one in your DMS?
Is the control number wrong?
Q: I turn the scanner on and the screen says “ScanIt Parts Touch Screen to Connect”
A: This is normal. When you see the message, touch the screen and the scanner will connect to the
server. After you have made your connection, you will be prompted with a menu.
Q: Scanner will not detect a wireless connection
A: The scanner is either too far from the access point or the access pointmay have lost power. Check
the access point to see if there are lights on the unit.
Q: When the scanner sits idle for a few minutes and I go back to using it, it is disconnected.
A: The network card on your computer probably has power-save mode enabled. Go to the settings of
the network card and uncheck the box where it says, “Allow Windows to turn this device off to save
power”. If the problem persists, please contact us at (810) 695-9332 and press 1 for technical
support.
Confidential & Proprietary Information of IPS and ScanIt Parts © 2013
136
ScanIt Parts System
12 - FAQ & Troubleshooting
Q: An error saying ‘This gun is not in the equipment list…’
A: In the ScanIt Parts System, go to the Main Menu, then Settings, then the Equipment tab. The
scanner's information needs to be added to the equipment list. Select Add and enter the settings
for that scanner; you will then need to reboot your ScanIt Parts PC. If the scanner is already in the
equipment list, check all of the properties of that scanner to see if they match the scanner you are
holding by selecting Edit.
Q: The scanner is displaying a red battery level.
A: The battery may not be fully charged. When charging the battery, it needs to be inserted fully into
the charger (it should snap into place). If the battery reads as fully charged in less than an hour,
please contact us at (810) 695-9332 and press 1 for technical support.
Q: Scanner message says “Nightly orders pull did not run. Some parts may not scan. Please contact
your system administrator”.
A: If Interact is turned off, nightly orders did not pull. On the main ScanIt Parts PC go to the Interact
screen, select Advanced and Pull Open Orders. If you are not able to access the main ScanIt Parts
PC, you can pull open orders through a client computer. From the Main Menu, go to Settings, then
Interact Data Pulls, and selectPull Open Orders. Interact and the computer need to be “on” at all
times.
Confidential & Proprietary Information of IPS and ScanIt Parts © 2013
137
ScanIt Parts System
12 - FAQ & Troubleshooting
Printing
Q: The scanner keeps printing a blank label
A: Turn the scanner off and replace/reload the labels.
Q: No label comes out of the scanner.
A: Try a freshly charged battery.
Q: 706 Error
A: Exchange the battery in the scanner with a fully charged battery.
Q: 756 Error
A: Check to be sure the labels are loaded correctly and the scanner lid or cover is closed all the way.
Q: Scanner prints part of a label
A: Check to be sure the labels are loaded correctly and the scanner lid or cover is closed all the way.
Q: Scanner keeps printing out multiple blank labels
A: Check to make sure labels are loaded correctly; labels should be fed over the silver bar.
Q: The bin labels I am printing do not scan, no information shows
A: If your part numbers are not exactly like they are in inventory, they will not scan properly. This
includes special characters like dashes.
Q: The bin labels I am typing into the scanner do not print
A: If you are typing a part number into the scanner you must include special characters, like dashes.
For example, if you have a part number FOCZ-6379-AMS, but you type in FOCZ 6379 AMS, no
information will show because the part number is wrong, it has to include the dashes.
Confidential & Proprietary Information of IPS and ScanIt Parts © 2013
138