1
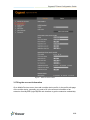
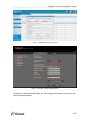
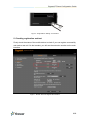
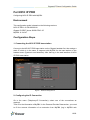
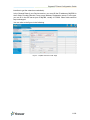
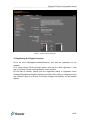
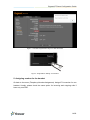
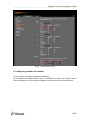
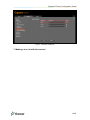
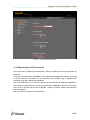
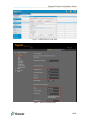
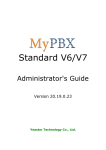
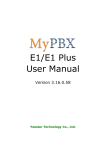
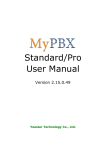
Gigaset IP Phone Configuration Guide Version 1.0 Date: November 9, 2015 Yeastar Information Technology Co. Ltd. Gigaset IP Phone Configuration Guide Contents INTRODUCTION.....................................................................................................................................3 FOR N720 DECT IP MULTICELL SYSTEM.......................................................................................4 Environment.........................................................................................................................................4 Common Scenario.............................................................................................................................. 4 Configuration Steps............................................................................................................................ 5 1. Connecting the N720 IP PRO base station............................................................................5 2. Configuring VoIP Providers.......................................................................................................5 3. Filling the account information................................................................................................. 6 4. Registering the Gigaset handsets........................................................................................... 8 5. Checking registration and test..................................................................................................9 FOR N510 IP PRO............................................................................................................................... 10 Environment.......................................................................................................................................10 Configuration Steps..........................................................................................................................10 1. Connecting the N510 IP PRO base station......................................................................... 10 2. Configuring the IP Connection............................................................................................... 10 3. Configuring Codecs for the IP connection........................................................................... 12 4. Registering the Gigaset handset........................................................................................... 13 5. Assigning number for the handset.........................................................................................14 6. Configuring mailbox for handset............................................................................................15 7. Making a test call with the handset....................................................................................... 16 FOR MAXWELL 10.............................................................................................................................. 17 Environment.......................................................................................................................................17 Configuration Steps..........................................................................................................................17 1. Connecting the Maxwell 10.................................................................................................... 17 2. Configuring the call control..................................................................................................... 17 3. Configuring the VoIP Connection.......................................................................................... 18 4. Configuring the Codecs...........................................................................................................20 5. Configuring the mailbox for Maxwell 10............................................................................... 21 6. Making a test call from Maxwell 10....................................................................................... 22 2/22 Gigaset IP Phone Configuration Guide Introduction This guide shows you how to manually configure the Gigaset IP Phones with MyPBX. It has been tested with the latest firmware version supported by MyPBX firmware version X.19.0.47. Including Models: N720 DECT IP Multicell System N510 IP PRO Maxwell 10 3/22 Gigaset IP Phone Configuration Guide For N720 DECT IP Multicell System Configuring N720 DECT IP Multicell System with MyPBX. Environment This configuration guide is based on the following versions: N720 DM PRO DECT Manger: 70.095.00.000.00 N720 IP PRO base station: 71.095.00.000.00 Gigaset IP DECT phone S650H PRO: 25 MyPBX: X.19.0.47 Common Scenario Basically, the N720 DM PRO is used for managing the base station and the Gigaset handsets. The N720 IP PRO base station provides the wireless connection for the Gigaset handsets. Gigaset handsets register to MyPBX via the DECT manager and base. Here is the common application scenario for N720 DECT IP Multicell System with MyPBX: Figure - Common Scenario 4/22 Gigaset IP Phone Configuration Guide Configuration Steps 1. Connecting the N720 IP PRO base station Login the web interface of N720 DECT Manger, and register the N720 IP PRO base station by following its user manual. Then you could configure the base station, like assigning a static IP or other else. Figure - Base Stations Status 2. Configuring VoIP Providers Go to the VoIP Providers menu and configure the VoIP provider. Select one VoIP provider and filling in the information of MyPBX. Usually you can keep the default settings except for the 4 fields: Domain, Proxy server address, Registration server, Registration server port. In the first 3 fields you can fill the IP address of MyPBX like the following figure shows. For the port, you can fill in the SIP server port of MyPBX, usually it is 5060. For other fields, you need to modify or fill as required. 5/22 Gigaset IP Phone Configuration Guide Figure - VoIP Provider Profile 3. Filling the account information Go to Mobile Devices menu, then add a mobile device profile. In the profile edit page of the mobile device, generally you need to fill in the account information of an extension from MyPBX (login MyPBX web interface to get the extension credentials). 6/22 Gigaset IP Phone Configuration Guide Figure - MyPBX Extension Edit Page Figure - Personal Provider Data Section In addition, in the advanced settings, you can configure the codecs. Usually you can keep the default settings. 7/22 Gigaset IP Phone Configuration Guide Figure - Settings for Codecs 4. Registering the Gigaset handsets After filling the information, click the “Start registration”. Then it will jump to another page showing the handset registration information. On the handset, please open the registration dialog or registration menu (Settings>Registration>Register Handset) and fill the PIN code which displays on the web interface within the limited time it remains. Note: for the operation of handset, the precondition is that this handset should connect the one of the base stations which the DECT manager registers. For more details, you can refer to the handset’s user manual. Figure - Handset Registration Page on Web Interface 8/22 Gigaset IP Phone Configuration Guide Figure - Registration Dialog on Handset 5. Checking registration and test Finally check the status of the mobile device to check if you can register successfully and make a test call. On the handset, you will see the extension number on the main interface. Figure - Mobile Devices Registration Status 9/22 Gigaset IP Phone Configuration Guide For N510 IP PRO Configuring N510 IP PRO with MyPBX. Environment This configuration guide is based on the following versions: N510 IP PRO: 42.199.00.000.00 Gigaset IP DECT phone S650H PRO: 25 MyPBX: X.19.0.47 Configuration Steps 1. Connecting the N510 IP PRO base station Connect to the N510 IP PRO base station on the Gigaset handset first, then assign a static IP which is in the same IP segment with MyPBX for the base station on the handset menu (System>Local Networks). After that log in the web interface of N510 IP PRO base station. Figure - Address Assignment 2. Configuring the IP Connection Go to the menu (Telephony>IP Connection), select one of the connections as required. Then fill in the information of MyPBX. In the Personal Provider Data section, you need to fill the account information of an extension from MyPBX (log in MyPBX web 10/22 Gigaset IP Phone Configuration Guide interface to get the extension credentials). In the General Data of your Service section, you need fill the IP address of MyPBX in the 3 fields: Provider Domain, Proxy server address, Registration server. For the port, you can fill in the SIP server port of MyPBX, usually it is 5060. Other fields could be kept unchanged. You can refer to the figure in the following. Figure - MyPBX Extension Edit Page 11/22 Gigaset IP Phone Configuration Guide Figure - IP Connection Profile 3. Configuring Codecs for the IP connection Go to the menu (Telephony>Audio), you can keep the default settings. 12/22 Gigaset IP Phone Configuration Guide Figure - Audio Codecs Settings 4. Registering the Gigaset handset Go to the menu (Management>Miscellaneous), and start the registration for the handset. Fill a 4 digit system PIN for the base station, then click the “Start registration”. It will pop up a prompt “Please start registration via the handset”. On the side of handset, please open the registration dialog or registration menu (Settings>Registration>Register Handset) and fill the PIN code you configured on the web interface. Wait for a second, it will show “Register successfully” on the handset display. 13/22 Gigaset IP Phone Configuration Guide Figure - Handset Registration Page on Web Interface Figure - Registration Dialog on Handset 5. Assigning number for the handset Go back to the menu (Telephony>Number Assignment). Assign IP Connection for one handset. Usually, please check the same option for incoming and outgoing calls if have only one PBX. 14/22 Gigaset IP Phone Configuration Guide Figure - Number Assignment 6. Configuring mailbox for handset Go to the menu (Telephony>Network mailboxes). Fill the default voicemail feature code *2 of MyPBX and check the “Active” option. Once configured, you can press the “Mailbox” button to enter the voicemail menu. 15/22 Gigaset IP Phone Configuration Guide Figure - Network Mailboxes 7. Making a test call with the handset 16/22 Gigaset IP Phone Configuration Guide For Maxwell 10 Configuring N510 IP PRO with MyPBX. Environment This configuration guide is based on the following versions: Maxwell 10: 1.30 MyPBX: X.19.0.47 Configuration Steps 1. Connecting the Maxwell 10 Configure the network settings and enable its Web UI on the Maxwell 10 display. Please assign a static IP which is in the IP segment with MyPBX for Maxwell 10 on its Settings menu. Meanwhile, enable the Web UI option. 2. Configuring the call control Log in the Web UI of Maxwell 10 and configure the phone systems. Go to the menu (Network and Connections>Phone Systems), select the phone system as “Asterisk”. For call control, please check the following settings: Calls via Call Manager: No Incoming Calls without Call Manager: No Outgoing Calls via function key: Execute call via handset. Note: these settings are suitable for the handset on Maxwell 10. If you want to use the Gigaset DECT handset to make and receive calls, please refer to its user guide to configure the call control. 17/22 Gigaset IP Phone Configuration Guide Figure - Phone Systems Settings 3. Configuring the VoIP Connection Go to the menu (Telephony>Connections), select and edit one of the connections as required. Then fill in the information of MyPBX. In the Personal Provider Data section, you need to fill the account information of an extension from MyPBX (log in MyPBX web interface to get the extension credentials). In the General Data of your Service section, you need fill the IP address of MyPBX in the 3 fields: Provider Domain, Proxy server address, Registration server. For the port, you can fill in the SIP server port of MyPBX, usually it is 5060. Other fields could be kept unchanged. You can refer to the figure in the following. 18/22 Gigaset IP Phone Configuration Guide Figure - MyPBX Extension Edit Page Figure - VoIP Connection Profile 19/22 Gigaset IP Phone Configuration Guide 4. Configuring the Codecs Go to the menu (Telephony>Audio&Video), and select the codecs needed. For audio codecs, you can keep the default settings. Figure - Audio Codecs Settings For video codecs, it’s recommended to use the H.264. On MyPBX, please go to the menu (PBX>Advanced Settings>SIP Settings>Codecs), and select the H.264 as the only video codec. 20/22 Gigaset IP Phone Configuration Guide Figure - Video Codecs Settings Figure - Codecs Settings on MyPBX 5. Configuring the mailbox for Maxwell 10 Go to the menu (Telephony>Voicemail Services), then fill the default voicemail feature code *2 of MyPBX and check the “Active” option. Once configured, you can touch the VOICEMAIL on the phone’s main interface to enter the mailbox. 21/22 Gigaset IP Phone Configuration Guide Figure - Voicemail Services Settings 6. Making a test call from Maxwell 10. Dial a number on the dialing application, then pick up the handset to dial out. To receive calls, just pick up the handset when it rings. [The End] 22/22