1
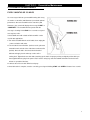
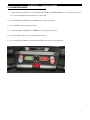
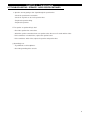
LS10.0T Service Manual
1
TABLE OF CONTENTS
CHAPTER 1: SERIAL NUMBER LOCATION……………………………………………..………….3
CHAPTER 2: PREVENTATIVE MAINTENANCE
2.1
Preventative Maintenance……………………………………………………………….…………………4
2.2
Tension and Centering the Running Belt…………………………………………………….…………...6
CHAPTER 3: ENGINEERING MODE
3.1
Engineering Mode…………………………………….………………………………………….….……..7
3.2
Engineering Mode Overview…………………………………………….…………………………..…….8
2
CHAPTER 1: Serial Number Location
1
1-1 Serial Number Location
3
CHAPTER 2: Preventative Maintenance
2.1 PREVENTATIVE MAINTENANCE
Preventative maintenance is the key to smoothly operating equipment, as well as keeping the user’s liability to a minimum.
Equipment needs to be inspected at regular intervals.
Defective components must be replaced immediately. Improperly
working equipment must be kept out of use until it is repaired.
Ensure that any person(s) making adjustments or
performing maintenance or repair of any kind is qualified to do so.
AFTER EACH USE (DAILY)
Clean and inspect, following these steps:
•
Turn off the treadmill with the ON / OFF switch, then unplug the power cord at the wall outlet.
•
Wipe down the running belt, deck, motor cover, and console casing with a damp cloth. Never use solvents, as they can
cause damage to the treadmill.
•
Inspect the power cord.
If the power cord is damaged, contact Customer Technical Support.
•
Make sure the power cord is not underneath the treadmill or in any other area where it can become pinched or cut.
•
Check the tension and alignment of the running belt.
Make sure that the treadmill belt will not damage any other
components on the treadmill by being misaligned.
•
If any labels are damaged or illegible, contact Customer Technical Support for replacements.
EVERY WEEK (WEEKLY)
Clean underneath the treadmill following these steps:
•
Turn off the treadmill with the ON / OFF switch, then unplug the power cord at the wall outlet.
•
Fold the treadmill into the upright position, making sure that the lock latch is secured.
•
Move the treadmill to a remote location.
•
Wipe or vacuum any dust particles or other objects that may have accumulated underneath the treadmill.
•
Return the treadmill to its previous position.
EVERY MONTH - IMPORTANT!
•
Turn off the treadmill with the ON / OFF switch, then unplug the power cord at the wall outlet.
•
Inspect all assembly bolts of the machine for proper tightness.
•
Remove the motor cover. Wait until ALL display screens turn off.
•
Clean the motor and lower board area to eliminate any lint or dust particles that may have accumulated.
Failure to do
so may result in premature failure of key electrical components.
•
Vacuum and wipe down the belt with a damp cloth. Vacuum any black / white particles that may accumulate around
the unit. These particles may accumulate from normal treadmill use.
4
CHAPTER 2: Preventative Maintenance
2.1 PREVENTATIVE MAINTENANCE
EVERY 6 MONTHS OR 150 MILES
It is necessary to lubricate your treadmill running deck every
six months or 150 miles (240 kilometers) to maintain optimal
performance. Once the treadmill reaches 150 miles (240
kilometers), the console will display the message “LUBE” or
“LUBE BELT”. The treadmill will not operate while the
message is showing. Hold ‘STOP’ for 5 seconds to suspend
message for 5 miles.
Your treadmill came with a bottle of lubricant which can be
used for two applications.
● Turn off the treadmill with the on/off switch, then unplug the
power cord at the wall outlet.
● Loosen both the rear roller bolts. (for best results, place two
removable marks on both sides of the frame and note roller
position). Once the belt is loosened, take the bottle of
lubricant and apply it to the entire top surface of the
running deck. Tighten both rear roller bolts (matching up the marks for proper position) to original position. After you
have applied lubricant, plug in the power cord, insert the safety key, start the treadmill and walk on the belt for two
minutes to spread the lubricant.
● Lubricate the air shocks with Teflon based spray.
● Once lubrication is complete, reset the console by pressing and holding ‘STOP’ and ‘SPEED +’ buttons for 5 seconds.
5
CHAPTER 2: Preventative Maintenance
2.2 TENSIONING & CENTERING THE RUNNING BELT
If you can feel a slipping sensation when running on the treadmill, the running belt must be tightened. In most cases, the
belt has stretched from use, causing the belt to slip. This is a normal and common adjustment. To eliminate this slipping,
turn the treadmill off and tension both the rear roller bolts using the supplied Allen wrench, turning them ¼ turn to the right
as shown. Turn the treadmill on and check for slipping. Repeat if necessary, but never turn the roller bolts more than ¼
turn at a time. Belt is properly tensioned when the slipping sensation is gone.
The running belt has been properly adjusted at the factory before it was shipped. At times the belt can move off-center
during shipment. Before operating the treadmill, make sure the belt is centered and remains centered to maintain smooth
operation.
If the running belt is too far to the right side: With the treadmill
running at 1 mph, turn the left adjustment bolt counter-clockwise
¼ turn at a time (using the supplied Allen wrench). Check the belt
alignment. Allow belt to run a full cycle to gauge if more
adjustment is needed. Repeat if necessary, until the belt remains
centered during use.
If the running belt is too far to the left side: With the treadmill
running at 1 mph, turn the right adjustment bolt counter-clockwise
¼ turn at a time (using the supplied Allen wrench). Check the belt
alignment. Allow belt to run a full cycle to gauge if more
adjustment is needed. Repeat if necessary, until the belt remains
centered during use.
6
CHAPTER 3: Engineering Mode
3.1 ENGINEERING MODE
1) To enter Engineering Mode, press & hold the INCLINE UP “▲” and SPEED DOWN “-
-” keys at the same time for
3-5 seconds until Engineering Menu appears on the display.
2)
Use the INCLINE and SPEED UP and DOWN keys to select a parameter.
3)
Press ENTER to enter a parameter setting.
4)
Use the INCLINE and SPEED UP and DOWN keys to change the parameter.
5)
Press the START key to save the change to the parameter.
6)
Press and hold the STOP key to exit Engineering Mode and return to normal operation.
7
CHAPTER 3: Engineering Mode
3.2 ENGINEERING MODE OVERVIEW
MODE
ENG 0
FUNCTION
Display Test
DESCRIPTION
Start Key – LCD/LED on
Stop Key – LCD/LED off
Any Other Key - Will show on the display window.
Hold the STOP key for 3 seconds to return to the Engineering Menu.
ENG 1
Hardware Test
Motor & Incline Motor Test.
ENG 2
Auto Calibration
Auto calibrates the speed only.
ENG 3
Switch Function
Use the INCLINE or SPEED UP and DOWN keys to switch DEMO
MODE off or on(Demo on=1 & Demo off=0 on DISTANCE window).
Use the START key to select unit (1=KM & 0=Mile on TIME window).
ENG 4
Information
Accumulated Time and Distance
Press and hold the START key for 5 seconds to clear all data.
Remarks: Unit of Time is Hour.
Unit of Distance is KM or Mile based on your set.
SECOND LEVEL
Software Version
ENG 8
To Get to ENG 8 - Enter into ENG 3, the press and hold the SPEED UP
and INCLINE DOWN key at the same time for 3-5 seconds.
Press ENTER at P0 - Software version.
Press ENTER at P1 - Select speed up rate (normal or quick).
Press ENTER at P3 - Hold the START key to clear all data.
※ “START” key to save the change.
※ Demo off-- console will display Figure A after remove the safety key; Demo on--60 seconds later after remove the
safety key, the console will enter into DEMO ON MODE. The LED and LCD will display in turns (Figure B).
FIGURE A
FIGURE B
8
CHAPTER 4: Troubleshooting
4.7 TROUBLESHOOTING - SPEAKER / AUDIO ISSUES-CONTINUED
e. Speakers are not getting a clear signal through the speaker wires.
- Check the speaker wire connections.
- Check for any kinks or cuts in the speaker wires.
- Replace the speaker wiring.
- Replace the speakers.
f. The speaker or speaker wiring is bad.
- Check the speaker wire connections.
- Switch the speaker connections from one speaker to the other to see if sound switches sides.
- If the sound does not switch sides, replace the speaker board.
- If the sound does switch sides, replace the speaker and speaker wires.
g. Grounding issue.
- Try a different set of headphones.
- Check the grounding of the console.
19