1
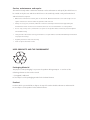
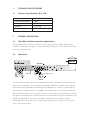
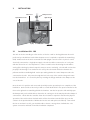
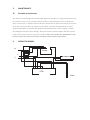
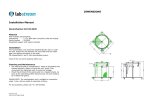
ON 100 Odour Neutraliser
TECHNICAL & OPERATION MANUAL
CK Direct
2010
All rights reserved.
No part of this publication may be copied or published by means of printing, photocopying, microfilm or
otherwise without prior written consent of the manufacturer. This restriction also applies to the corresponding
drawings and diagrams.
The information given in this document has been collected for the general convenience of our clients. It has
been based on general data pertaining to construction material properties and working methods known to us
at the time of issue of the document and is therefore subject at any time to change or amendment and the
right to change or amend is hereby expressly reserved. The instructions in this publication only serve as a
guideline for installation, use, maintenance and repair of the product mentioned on the cover page of this
document.
This publication is to be used for the standard model of the product of the type given on the cover page. Thus
the manufacturer cannot be held responsible for any damage resulting from the application of this publication
to the version actually delivered to you.
This publication has been written with great care. However, the manufacturer cannot be held responsible,
either for any errors occurring in this publication for their consequences.
TAKE YOUR TIME TO CAREFULLY READ AND UNDERSTAND THE MANUAL BEFORE USING THE PRODUCT.
ALWAYS KEEP THE MANUAL WITH THE PRODUCT.
1 PREFACE
Using this manual
This manual is intended to be used as a work of reference for professional, well trained and
authorised users to be able to safely install, use, maintain and repair the product mentioned on the
cover of this document. Please note that it is strongly recommended that training is given
CK Direct
by Purified
AirLtd
Ltd prior to operatives attempting to carry out maintenance or repair
work on this product.
Service and technical support
For information about specific adjustments, maintenance or repair jobs which are not dealt with in
this manual, please contact the supplier of the product.
2 SAFETY INSTRUCTIONS AND WARNINGS
General
The manufacturer does not accept any liability for damage to the product or personal injury caused
by non-observance of the safety instructions in this manual, or by negligence during installation,
use, maintenance and repair of the product mentioned on the cover of this document or
corresponding accessories.
Specific working conditions or used accessories may require additional safety instructions.
Immediately contact your supplier if you detect a potential danger when using the product.
The user of the product is always fully responsible for observing the local safety instructions and
regulations. Observe all applicable safety instructions and regulations.
User manual
•
Everyone working on or with the product must be familiar with the contents of this manual and
must strictly observe the instructions therein. The management should instruct the personnel in
accordance with the manual and observe all instructions and directions given.
•
Never change the order of the steps to perform
•
Always keep the manual with the product.
Users
•
The use of this product is exclusively reserved to authorised, trained and qualified users.
Temporary personnel and trainees can only use the product under supervision and responsibility
of skilled engineers.
Intended use
The product has been designed exclusively for use in commercial kitchens. The product has been
built in accordance with state-of the-art standards and recognised safety regulations. Only use the
product in technically perfect condition with its intended use and the instructions laid down in the
user manual.
Safety features
•
All safety features must be correctly mounted and can only be removed for maintenance and
repair jobs by skilled and authorised service engineers
•
The product must not be used if the safety features are only partly present or defective.
•
The safety features should be regularly checked for their proper functioning, and if required, be
immediately repaired.
Modifications
A modification of the product is not allowed.
Technical specifications
The specifications given in this manual must not be altered.
Modifications
Modification of (parts of) the product is not allowed.
Use general
•
Inspect the product and check it for damage. Verify the functioning of the safety features.
•
Check the working environment. Do not allow unauthorised persons to enter the working
environment.
•
Use common sense. Stay alert and pay attention to your work. Do not use the product when
you are tired or under the influence of drugs, alcohol or medicine.
•
Make sure the room is always sufficiently ventilated, particularly in smaller confined areas.
•
Never install the product in front of entrances and exits which must be used by emergency
services.
•
Keep the operating controls free from dirt and grease.
•
The product is not explosion-proof rated. It can cause sparks and should therefore not be used
in areas with an explosion risk.
Use of O.N. 100 for commercial kitchen extraction
•
The product is suitable for the filtration of extracted fumes from commercial kitchens.
•
The product shall always be used in combination with the pre- and post-filters that are suitable
for the particular kitchen involved.
Service, maintenance and repairs
This manual clearly makes a distinction between service maintenance and repair jobs which have to
.
be carried out by the user and those which have to be exclusively carried out by well trained and
authorised service engineers.
•
Observe the maintenance intervals given in this manual. Overdue maintenance can lead to high costs for
repairs and revisions and can render the guarantee null and void.
•
Always use tools, parts, materials, lubricants and service techniques that have been approved by the
manufacturer. Never use worn tools and ensure that tools are not left behind in or on the product.
•
Do not carry out any service, maintenance or repairs on the product before it has been protected against
unintended starting.
•
Safety features removed for servicing, maintenance or repair shall be re-installed immediately and checked
for proper functioning.
•
Regularly clean the inside of the housing.
•
Clean or replace the filters in time.
USED PRODUCTS AND THE ENVIRONMENT
Packaging Material
The purpose of the packaging is to protect the product during transport. It consists of the
following substances that can be reused:
- (corrugated) cardboard
Do not dispose of the packaging material in the industrial waste
Product
Products which you would like to dispose of may still contain valuable substances and materials.
Do not dispose of the product in the industrial waste.
1
TECHNICAL SPECIFICATIONS
1.1
Technical specifications O.N. 100
Power consumption
Max capacity
Weight
Power Supply
O.N. 100
40W
4.2m3/s
12.25 kg
220/240 V 50 Hz 1ph
2
GENERAL DESCRIPTION
2.1
O.N.100 in kitchen extraction applications
The O.N.100 can remove odours from kitchen extract systems. The O.N. 100 is designed to be
installed in the extraction ducting of a commercial kitchen downstream of the extraction hood and
upstream of the extract fan.
2.2
Operation
POSITIVELY
L CHARGED GREASE
NEGATIVEL
A
LY CHARGED ELIMINODOR
T
TION
PARTICULATE
A
CONTROL UNIT
COOKING
CANOPY
GREASE
FILTER
L
FAN
AIRFLOW
DAMPER CONTROL
VENTURI
SPIGOT
AMBIENT AIR
O.N.100
The airstream must first be cleaned of the majority of particular contaminants leaving the gaseous
phase of the contamination to be treated by the ON 100. Ambient air is drawn into the unit and
mixed with the specially blended neatralising chemical (Eliminodor). A vapour is formed which is
then ionised to a negative potential of 15,000 V. The ionised vapor passes along a nonconductive
tube and is discharged into the centre of the duct via a venturi spigot, the metal ducting is earthed
through the same high tension circuit which makes the contaminant at an opposite potential to the
negatively charged vapor. The electrostatic difference between the contaminants and the
neatralising vapour causes the two to combine electrically after which a chemical reaction takes
place to treat the malodour..
3
INSTALLATION
Damper Control
Fan Control
Quick Release Locks
High Voltage
Top Up
3.1
Level Indicator
O.N.100
Installation O.N. 100
The unit can be free standing on a flat surface or fixed to a wall or ducting (wherever the unit is
positioned you should bare in mind that frequent access is required to replenish the neutralising
fluid). Make sure that the unit is mounted level and upright. Once the unit is in place it can be
electrically connected to a single-phase supply. The unit should be connected so as it only runs
with the extract fan. It is also important to connect a earth lead to the ducting the unit will be
serving (if the ducting is painted scrape this away to ensure continuity). The unit will not function
properly if the ducting is not earthed as this conveys the electrostatic difference between the
pollutant and the neutralizing fluid. Before proceeding further the control damper needs to be
connected to the unit. This passes through the hole in the top of the outside casing and screws
into the internal box. It is secured in place by screwing the flange attached to the damper to the
case of the unit.
Once the unit is in position and connected electrically test the operation prior to completion of the
installation. On the inside of the unit you will see a small knob which is the speed controller for the
fan used to agitate the neutralising fluid in the chamber. Turn the fan speed to full and fully open
the damper and you should be able to detect the air coming out of the PVC pipe that the damper is
connected to. Check that the controller alters the air volume as required. Now that the physical
operation of the unit has been checked switch off the fan and unscrew the filler cap, pour the
contents of the provided bottle of Eliminodor into the unit and replace the fillercap. Now switch
the fan on and turn it to full, you should be able to detect a strong odour of Eliminodor. The
system can now be switched off and the installation completed.
The spigot must be installed at least one metre prior to the fan unit and if possible in a straight
piece of ducting away from bends and other obstructions which will interrupt uniform airflow. The
spigot has an outside diameter of 50 mm therefore you must drill a hole in the ducting to
accommodate the spigot, this is normally done with a tank cutting drill bit. The spigot tip should
be as close to the centre of the ducting as possible, if necessary the spigot can be cut if it is too
long. The angled face of the spigot must face away from the airflow in order to establish a venturi
effect, under no circumstances should the spigot be positioned otherwise as this can cause blow
back and prevent the system from working at all. Once the spigot is in place it should be secured
using self tapping screws through the flange. You will note that the flange is a tight push fit, when
the final position is settled you may wish to fix the spigot to the flange to prevent any movement,
this can be done using good quality PVC glue. The spigot can now be connected to the unit via the
hose provided. Before pushing the hose onto the two connections place the jubilee clips over the
hose. Once the hose is in place tighten two clips over the bottom connection and one over the
spigot connection. Be sure not to over tighten the clips, as this will crack the pipe.
3.2
Commissioning O.N. 100
Now that the system is fully installed turn the fan to maximum and open the damper fully.
Neutralising fluid should now be strongly detected at the exhaust point. To balance the system
correctly wait until the kitchen is busy, neutralising fluid can still be detected then gradually
decrease the output of the unit by tuning the knob anti-clockwise. When both odour and the
neutralising fluid can be faintly detected, the unit is set correctly. Cooking odour may be detected at
the discharge point but if you stand back a meter or so from the end of the duct you will note that
the majority of the cooking odour has been neutralised.
If after twenty minutes operation more than a trace of chemical can be seen in the spigot or the
tube leaving the unit then the velocity is too high. Unless dealing with an extraordinarily odorous
system the chemical is designed to evaporate into the system in very small quantities. To reduce the
evaporation of the chemical close the damper gradually until the optimum setting is found. It may
take some time to find this setting and it is recommended that this exercise be carried out over a
period of a few hours to ensure that the settings are correct.
4
DIMENSIONS
4.1
Dimensions O.N.100
ServiceSpace
Space
Service
Air Flow
flow
Air
ON-100
O
N-100
600
Plan
Plan
200
Note:
Note:IfIfaccess
accessequipment
equipmentisisnecessary
necessary
service
servicerequirements
requirementsmay
mayvary.
vary.
Ductwork
Ductwork
Ductwork
Ductwork
ON-100
O
N-100
505
Air Flow
flow
Air
ON-100
O
N-100
Side E
levation
Side
Elevation
levation
Front E
Elevation
405
5
MAINTENANCE
5.1
Periodic maintenance
The amount of neutralising fluid consumed will depend on the type of cooking odour present and
the volume of extract air, an average situation should use approximately one litre of fluid every
three to four weeks. To refill the unit turn the unit off with the fan speed control knob on the front
of the unit, remove the filler cap and pour in the liquid. The level of liquid required to ensure
optimum performance is between the minimum and maximum lines on the site glass. Caution Over filling the unit may lead to damage. Once the unit has been filled replace the filler cap and
return the fan speed control to its previous position. ONLY USE PURIFIED AIR “ELIMINODOR” AND
NEVER ALLOW THE SYSTEM TO RUN DRY FOR MORE THAN TWENTY FOUR HOURS.
6
WIRING DIAGRAM
N
Ioniser
#
Fan
L
PCB
Neon
CK Direct
CK Direct (Peterborough) Ltd
Unit 9, Botolph Bridge Trading Estate,
Purified
Limited, Lyon House,
Oundle
Road,Air Peterborough
PE2 9QP
Lyon
Road,
Romford,
Essex
RM1
2BG
Tel: 0808 1780001
Fax: 01733England
569433
Tel:
01708
755414
Fax:
01708 www.ckdirect.co.uk
721488
e-mail: [email protected] web:
E-mail: enq@purifiedair.co.uk
www.purifiedair.co.uk