1
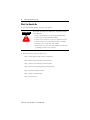
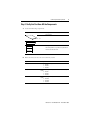
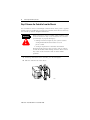
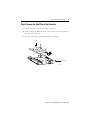
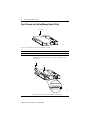
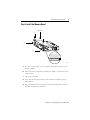
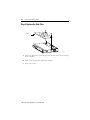
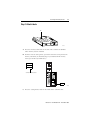
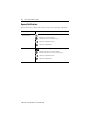
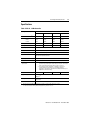
Installation Instructions
ControlLogix™ Memory Board
Catalog Number: 1756-M1, -M2, -M3, -M13, -M14, -M16
Before You Begin
Use this document as a guide to install your ControlLogix memory board. The
memory board privides additional memory for your ControlLogix controller. You
can install only one memory board per controller.
Additional Manuals
This product has the following manuals:
• Logix5000 Controllers Common Procedures Programming Manual,
publication 1756-PM001
• ControlLogix System User Manual, publication 1756-UM001
If you want to:
• view or download a manual, visit either of these locations:
– www.ab.com/manuals
– www.theautomationbookstore.com
• purchase a printed manual, use one of these options:
– contact your local distributor or Rockwell Automation representative
– visit www.theautomationbookstore.com and place an order
– call 800.963.9548 (USA/Canada) or 001.320.725.1574 (outside
USA/Canada)
Tools that You Need
• #2 phillips screwdriver
• grounding wriststrap
Publication 1756-IN033B-EN-P - November 2000
2
ControlLogix™ Memory Board
Important User Information
Because of the variety of uses for the products described in this publication, those
responsible for the application and use of this control equipment must satisfy
themselves that all necessary steps have been taken to assure that each application
and use meets all performance and safety requirements, including any applicable
laws, regulations, codes and standards.
The illustrations, charts, sample programs and layout examples shown in this guide
are intended solely for purposes of example. Since there are many variables and
requirements associated with any particular installation, Allen-Bradley does not
assume responsibility or liability (to include intellectual property liability) for actual
use based upon the examples shown in this publication.
Allen-Bradley publication SGI-1.1, Safety Guidelines for the Application, Installation
and Maintenance of Solid-State Control (available from your local Allen-Bradley
office), describes some important differences between solid-state equipment and
electromechanical devices that should be taken into consideration when applying
products such as those described in this publication.
Reproduction of the contents of this copyrighted publication, in whole or part,
without written permission of Rockwell Automation, is prohibited.
Throughout this manual we use notes to make you aware of safety considerations:
ATTENTION
Identifies information about practices or circumstances that can
lead to personal injury or death, property damage or economic
loss
!
Attention statements help you to:
• identify a hazard
• avoid a hazard
• recognize the consequences
IMPORTANT
Identifies information that is critical for successful application
and understanding of the product.
Allen-Bradley and ControlLogix are trademarks of Rockwell Automation.
Publication 1756-IN033B-EN-P - November 2000
ControlLogix™ Memory Board
3
European Communities (EC) Directive Compliance
If this product has the CE mark it is approved for installation within the European
Union and EEA regions. It has been designed and tested to meet the following
directives.
EMC Directive
This product is tested to meet the Council Directive 89/336/EC Electromagnetic
Compatibility (EMC) by applying the following standards, in whole or in part,
documented in a technical construction file:
• EN 50081-2 EMC — Generic Emission Standard, Part 2 — Industrial
Environment
• EN 50082-2 EMC — Generic Immunity Standard, Part 2 — Industrial
Environment
This product is intended for use in an industrial environment.
Low Voltage Directive
This product is tested to meet Council Directive 73/23/EEC Low Voltage, by
applying the safety requirements of EN 61131-2 Programmable Controllers, Part 2 Equipment Requirements and Tests. For specific information required by EN
61131-2, see the appropriate sections in this publication, as well as the
Allen-Bradley publication Industrial Automation Wiring and Grounding
Guidelines, publicaton 1770-4.1.
Open style devices must be provided with environmental and safety protection by
proper mounting in enclosures designed for specific application conditions. See
NEMA Standards publication 250 and IEC publication 529, as applicable, for
explanations of the degrees of protection provided by different types of enclosure.
Publication 1756-IN033B-EN-P - November 2000
4
ControlLogix™ Memory Board
What You Need to Do
To guard against ESD damage, take these precautions:
ATTENTION
!
Electrostatic discharge can damage the components. Follow
these guidelines:
•
•
•
•
•
•
touch a grounded object to discharge potential static
wear an approved grounding wriststrap
do not touch connectors or pins on component boards
do not touch circuit components inside the controller
if available, use a static-safe work station
when not in use, store each component in the anti-static
packaging in which it was shipped
To install the memory board, do these steps:
• Step 1: Verify that You Have All the Components
• Step 2: Remove the Controller from the Chassis
• Step 3: Remove the Side Plate of the Controller
• Step 4: Remove the Existing Memory Board (If Any)
• Step 5: Install the Memory Board
• Step 6: Replace the Side Plate
• Step 7: Attach Labels
Publication 1756-IN033B-EN-P - November 2000
ControlLogix™ Memory Board
5
Step 1: Verify that You Have All the Components
A. Locate the following components:
Component:
Description:
memory board
40042
memory board label
catalog number labels
1756-L1
1756-L1M1
The catalog numbers on your labels may be different
from the ones that are shown.
1756-L1M2
B. Make sure that you have the correct memory board:
If you have this controller:
Then you can:
1756-L1
add one of these memory boards:
• 1756-M1
• 1756-M2
• 1756-M3
1756-L1Mx
replace the existing memory board with one of these memory
boards:
• 1756-M1
• 1756-M2
• 1756-M3
1756-L55Mx
replace the existing memory board with one of these memory
boards:
• 1756-M13
• 1756-M14
• 1756-M16
Publication 1756-IN033B-EN-P - November 2000
6
ControlLogix™ Memory Board
Step 2: Remove the Controller from the Chassis
You can install or remove a ControlLogix controller while chassis power is applied
and the system is operating. If you remove the controller, all the devices owned by
the controller go to their configured faulted state.
WARNING
!
When you insert or remove a module while backplane power
is on, an electrical arc may occur. An electrical arc can cause
personal injury or property damage by:
• sending an erroneous signal to your system’s actuators
causing unintended machine motion or loss of
process control
• causing an explosion in a hazardous environment
Repeated electrical arcing causes excessive wear to contacts
on both the module and its mating connector. Worn contacts
may create electrical resistance that can affect module
operation.
A. On the top and bottom of the controller, press the locking tabs.
B. Slide the controller out of the chassis.
20880
Publication 1756-IN033B-EN-P - November 2000
ControlLogix™ Memory Board
7
Step 3: Remove the Side Plate of the Controller
A. Lay the controller on its side with the label facing up.
B. While wearing a grounding wriststrap, remove the two screws that attach the
side plate to the controller.
C. Rotate the side plate up and unhook it from the controller.
side plate
front of controller
40017
Publication 1756-IN033B-EN-P - November 2000
8
ControlLogix™ Memory Board
Step 4: Remove the Existing Memory Board (If Any)
memory board
42527
Does the controller already have a memory board?
If:
Then:
No
Go to Step 5: Install the Memory Board
Yes
Remove the existing memory board:
1. Pull the plastic back edge of the controller out slightly to clear the tabs on the
memory board.
tab
tab
42526
2. Gently separate and remove the memory board from the controller.
Publication 1756-IN033B-EN-P - November 2000
ControlLogix™ Memory Board
9
Step 5: Install the Memory Board
memory board
tab
tab
slot
slot
40018
A. Place the memory board over the connector and slide the memory board
into the controller.
B. Pull the plastic back edge of the controller out slightly to clear the tabs of the
memory board.
C. Line up the connectors.
D. Place your hands on the boards over the connectors and gently squeeze
them together.
E. Make sure that the tabs on the memory board extend through the slots on
the plastic housing of the controller.
Publication 1756-IN033B-EN-P - November 2000
10
ControlLogix™ Memory Board
Step 6: Replace the Side Plate
side plate
40019
A. Line up the hinge tabs on the side plate with the slots in the plastic housing
of the controller.
B. Gently press the side plate against the controller.
C. Replace the screws.
Publication 1756-IN033B-EN-P - November 2000
ControlLogix™ Memory Board
11
Step 7: Attach Labels
A.
40019
A. Place the memory board label on the side of the controller. It identifies
which memory board is installed.
B. From the sheet of catalog labels, peel off the label that corresponds to the
memory board that you installed. (E.g., If you installed an M2 memory
board, peel off the 1756-L1M2 label.)
1756-L1
1756-L1M1
1756-L1M2
identifies the memory board
1756-LxMx
41025
C. Place the catalog number label on the inside of the controller door.
Publication 1756-IN033B-EN-P - November 2000
12
ControlLogix™ Memory Board
Agency Certifications
When marked, the controller and memory board have the following certifications:
This component:
Has these certifications (when the product is marked):
1756-L1 controller
1756-L55 controller
Listed Industrial Control Equipment
Certified Process Control Equipment
Certified Class I, Division 2, Group A, B, C, D
Marked for all applicable directives
Marked for all applicable acts
N223
1756-Mx memory board
UL Recognized Component Industrial Control Equipment
Certified component Process Control Equipment
Certified component Class I, Division 2, Group A, B, C, D
Marked for all applicable directives
Marked for all applicable acts
N223
Publication 1756-IN033B-EN-P - November 2000
ControlLogix™ Memory Board
13
Specifications
Table A 1756-L1, -L1Mx Controller
Description:
user available memory
Value:
(1)
peak backplane current
+5V dc
+24V dc
1756-L1
1756-L1M1
1756-L1M2
1756-L1M3
64K bytes
512K bytes
1M bytes
2M bytes
0.65A
0.02A
0.95A
0.02A
1.05A
0.02A
1.20A
0.02A
average power dissipation
3.3W
4.6W
4.8W
5.4W
average thermal dissipation
11.3 BTU/hr
15.6 BTU/hr
16.4 BTU/hr
18.4 BTU/hr
operating temperature
0° to 60° C (32 to 140° F)
storage temperature
-40° to 85° C (-40 to 185° F)
relative humidity
5% to 95% noncondensing
vibration
10 to 500 Hz
2.0 G maximum peak acceleration
operating shock
30G peak for 11ms
storage shock
50G peak for 11ms
additional environmental
requirements
• This product must be mounted within a suitable enclosure to prevent
personal injury resulting from accessibility to live parts. The interior
of this enclosure must be accessible only by use of a tool.
• This industrial control equipment is intended to operate in a
Pollution Degree 2 environment, in overvoltage category II
applications, (as defined in IEC publication 664A) at altitudes up to
2000 meters without derating.
weight
10.0 oz.
programming cable
1756-CP3 or 1747-CP3 serial cable
category 3(2)
battery
1756-BA1 (PROMARK Electronics 94194801)
0.59g lithium
documentation set
1756-DPALEN
(1)
(2)
12.5 oz.
12.5 oz.
12.7 oz.
Amount of memory available after RSLogix 5000 software is connected and a null project is loaded
See Industrial Automation Wiring and Grounding Guidelines, publicaton 1770-4.1.
Publication 1756-IN033B-EN-P - November 2000
14
ControlLogix™ Memory Board
Table B 1756-L55Mxx Controller
Description:
Value:
1756-L55M13
1756-L55M14
1756-L55M16
user available memory(1)
1.5M bytes
3.5M bytes
7.5M bytes
peak backplane current
+5V dc
+24V dc
1.23A
0.014A
1.25A
0.014A
1.48A
0.014A
average power dissipation
5.6W
5.7W
6.3W
average thermal dissipation
19.1 BTU/hr
19.4 BTU/hr
21.5 BTU/hr
operating temperature
0° to 60° C (32 to 140° F)
storage temperature
-40° to 85° C (-40 to 185° F)
relative humidity
5% to 95% noncondensing
vibration
10 to 500 Hz
2.0 G maximum peak acceleration
operating shock
30G peak for 11ms
storage shock
50G peak for 11ms
additional environmental
requirements
• This product must be mounted within a suitable enclosure to prevent
personal injury resulting from accessibility to live parts. The interior
of this enclosure must be accessible only by use of a tool.
• This industrial control equipment is intended to operate in a
Pollution Degree 2 environment, in overvoltage category II
applications, (as defined in IEC publication 664A) at altitudes up to
2000 meters without derating.
weight
12.5 oz.
programming cable
1756-CP3 or 1747-CP3 serial cable
category 3(2)
battery
1756-BA1 (PROMARK Electronics 94194801)
0.59g lithium
documentation set
1756-DPALEN
(1)
(2)
12.8 oz.
13.4 oz.
Amount of memory available after RSLogix 5000 software is connected and a null project is loaded
See Industrial Automation Wiring and Grounding Guidelines, publicaton 1770-4.1.
Publication 1756-IN033B-EN-P - November 2000
ControlLogix™ Memory Board
15
Hazardous Location information
The following information applies when operating this equipment in
hazardous locations:
Products marked “CL I, DIV 2, GP A, B, C, D” are suitable for use in Class I Division
2 Groups A, B, C, D, Hazardous Locations and nonhazardous locations only. Each
product is supplied with markings on the rating nameplate indicating the hazardous
location temperature code. When combining products within a system, the most
adverse temperature code (lowest “T” number) may be used to help determine the
overall temperature code of the system. Combinations of equipment in your system
are subject to investigation by the local Authority Having Jurisdiction at the time
of installation.
WARNING
!
EXPLOSION HAZARD
• Do not disconnect equipment unless power has been
removed or the area is known to be nonhazardous.
• Do not disconnect connections to this equipment unless
power has been removed or the area is known to be
nonhazardous. Secure any external connections that mate
to this equipment by using screws, sliding latches, threaded
connectors, or other means provided with this product.
• Substitution of components may impair suitability for Class
I, Division 2.
• If this product contains batteries, they must only be
changed in an area known to be nonhazardous.
Publication 1756-IN033B-EN-P - November 2000
Informations sur l’utilisation de cet équipement en environnements
dangereux :
Les produits marqués « CL I, DIV 2, GP A, B, C, D » ne conviennent qu’à une
utilisation en environnements de Classe I Division 2 Groupes A, B, C, D dangereux
et non dangereux. Chaque produit est livré avec des marquages sur sa plaque
d’identification qui indiquent le code de température pour les environnements
dangereux. Lorsque plusieurs produits sont combinés dans un système, le code de
température le plus défavorable (code de température le plus faible) peut être
utilisé pour déterminer le code de température global du système. Les
combinaisons d’équipements dans le système sont sujettes à inspection par les
autorités locales qualifiées au moment de l’installation.
AVERTISSEMENT
!
RISQUE D’EXPLOSION
• Couper le courant ou s’assurer que l’environnement est
classé non dangereux avant de débrancher l’équipement.
• Couper le courant ou s’assurer que l’environnement est
classé non dangereux avant de débrancher les connecteurs.
Fixer tous les connecteurs externes reliés à cet équipement
à l’aide de vis, loquets coulissants, connecteurs filetés ou
autres moyens fournis avec ce produit.
• La substitution de composants peut rendre cet équipement
inadapté à une utilisation en environnement de Classe 1,
Division 2.
• S’assurer que l’environnement est classé non dangereux
avant de changer les piles.
Publication 1756-IN033B-EN-P - November 2000
Supersedes Publication 1756-5.33 - June 1998
PN 957400-63
© 2000 Rockwell International Corporation. Printed in the U.S.A.