1
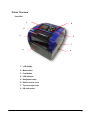
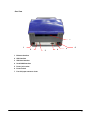
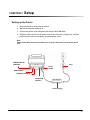
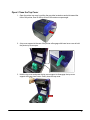
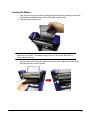
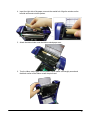
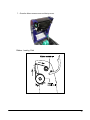
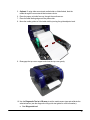
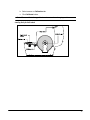
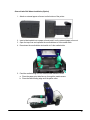
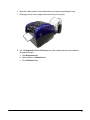
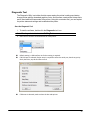
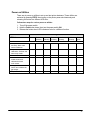
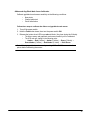
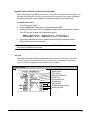
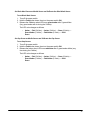
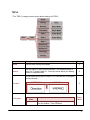
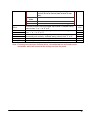
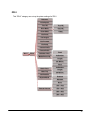
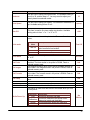
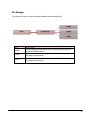
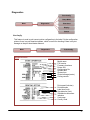
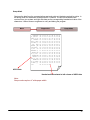
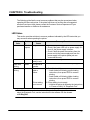
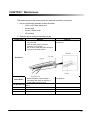
BBP12 Thermal Transfer Printer User Guide Contents CHAPTER 1 Introduction ........................................................................................................................................ 5 Product Introduction ................................................................................................................................................ 5 Compliance ............................................................................................................................................................ 5 CHAPTER 2 Operations Overview .......................................................................................................................... 6 Unpacking and Inspection ...................................................................................................................................... 6 Printer Overview ..................................................................................................................................................... 7 CHAPTER 3 Setup ................................................................................................................................................. 10 Setting Up the Printer ........................................................................................................................................... 10 Open / Close the Top Cover.................................................................................................................................. 11 Loading the Ribbon ............................................................................................................................................... 12 Loading the Media ................................................................................................................................................ 15 Diagnostic Tool ..................................................................................................................................................... 20 Install SD Memory Card ........................................................................................................................................ 21 CHAPTER 4 LED and Button Functions............................................................................................................... 26 LED Indicator ........................................................................................................................................................ 26 Regular Button Function ....................................................................................................................................... 26 Power on Utilities .................................................................................................................................................. 27 CHAPTER 5 LCD Menu Function ......................................................................................................................... 35 Enter the Menu ..................................................................................................................................................... 35 Main Menu Overview ........................................................................................................................................... 36 TSPL2 .................................................................................................................................................................. 37 ZPL2 ..................................................................................................................................................................... 39 Sensor .................................................................................................................................................................. 42 Interface ............................................................................................................................................................... 43 File Manager ........................................................................................................................................................ 46 Diagnostics ........................................................................................................................................................... 47 Advanced ............................................................................................................................................................. 51 Service ................................................................................................................................................................. 52 CHAPTER 6 Troubleshooting ............................................................................................................................... 53 LED Status ............................................................................................................................................................ 53 Print Quality .......................................................................................................................................................... 54 CHAPTER 7 Maintenance ..................................................................................................................................... 55 BPP12 User Manual iii Copyright This manual is copyrighted with all rights reserved. No portion of this manual may be copied or reproduced by any means without the prior consent of Brady Worldwide, Inc. While every precaution has been taken in preparation of this document, Brady assumes no liability to any party for any loss or damage caused by errors or omissions or by statements resulting from negligence, accident, or any other cause. Brady further assumes no liability arising out of the application or use of any product or system described, herein; nor any liability for incidental or consequential damages arising from the use of this document. Brady disclaims all warranties of merchantability or fitness for a particular purpose. Brady reserves the right to make changes without further notice to any product or system herein to improve reliability, function, or design. Reproduction of this material, in part or whole, is strictly prohibited without the written permission of Brady Worldwide, Inc.. For more information, contact: Brady Worldwide, Inc. Signmark® Division, 2221 W. Camden Road, Milwaukee, WI 53209. Disclaimer Every effort has been made to make this guide as accurate and complete as possible. Brady Worldwide, Inc. is not responsible for inaccuracies and omissions occurring during the use of this guide. This manual is proprietary to Brady Worldwide, Inc. and may be revised from time to time without notice. Brady Worldwide, Inc. disclaims any understanding to provide you with revisions, if any. All brand or product names referenced in this manual are trademarks or registered trademarks of their respective companies or organizations. © 2015 Brady Worldwide, Inc. All rights reserved. www.bradycorp.com Edition 05/15 Identification Solutions Division PO Box 2131 Milwaukee, WI 53201 U.S.A. Phone: 1-800-537-8791 Fax: 1-800-292-2289 BPP12 User Manual iii Revision History Date iv Content BPP12 User Manual CHAPTER 1 Introduction Product Introduction Thank you for purchasing the BRADY BBP12 series bar code printer. Although the printer is small, it delivers reliable, superior performance. This printer provides both thermal transfer and direct thermal printing at user-selectable speeds of 2.0, 3.0 or 4.0 ips. It accepts roll feed, die-cut, and fan-fold labels for both thermal transfer and direct thermal printing. All common bar codes formats are available. Fonts and bar codes can be printed in 4 directions, 8 different alphanumeric bitmap fonts and built-in true type font capability. You will enjoy high throughput for printing labels with this printer. Compliance FCC Class B, CE Class B, C-Tick Class B, UL, cUL, TÜ V/safety, CCC, EAC, NOM Note: Continuous printing will cause printer motor overheat. Printer will stop printing automatically about 10~15 minutes until motor is cooled down. Do not turn off power when printer pauses or the data transfered to printer buffer will be lost. Note: The maximum printing ratio per dot line is 15% for this printer. To print the full web black line, the maximum black line height is limited to 40 dots, which is 3.3 mm for 300 dpi resolution printer. BPP12 User Manual 5 CHAPTER 2 Operations Overview Unpacking and Inspection This printer has been specially packaged to withstand damage during shipping. Please carefully inspect the packaging and printer upon receiving the bar code printer. Retain the packaging materials in case you need to reship the printer. Unpacking the Printer The following items are included in the carton: • (1) Printer unit • (1) Product CD, including drivers • (1) Quick installation guide • (1) Power cord • (1) Auto switching power supply • (1) USB interface cable • (1) Adapter (for narrow continuous sleeves) If any parts are missing, please contact customer service. BPP12 User Manual 6 Printer Overview Front View 1 4 2 3 5 7 6 8 1. LCD display 2. Menu button 3. Feed button 4. LED indicator 5. Navigation button 6. Ribbon access cover 7. Top cover open lever 8. SD card socket BPP12 User Manual 7 Interior View 1 7 8 2 9 3 10 11 4 12 5 13 6 1. 2. 3. 4. 5. 6. 7. 8. 9. 10. 11. 12. 13. Ribbon rewind hub Ribbon rewind gear Gap sensor (receiver) Media holder Media holder lock switch Gap sensor (transmitter) Printhead Ribbon supply hub Top cover support Media guide adjustment knob Media guide Black mark sensor Platen roller BPP12 User Manual 8 Rear View 7 1 2 3 4 5 6 1. Ethernet interface 2. USB interface 3. USB host interface 4. Serial/COM interface 5. Power jack socket 6. Power switch 7. Fan-fold paper entrance chute BPP12 User Manual 9 CHAPTER 3 Setup Setting up the Printer 1. Place the printer on a flat, secure surface. 2. Make sure the power switch is off. 3. Connect the printer to the computer with the provided USB cable. 4. Plug the power cord into the AC power cord socket at the rear of the printer, and then plug the power cord into a properly grounded power outlet. Note: Please switch OFF printer power switch prior to plug in the power cord to printer power jack. Ethernet RJ-45 interface Plug Power Switch USB interface USB host interface Serial/COM Interface Power Supply BPP12 User Manual 10 Open / Close the Top Cover 1. Open the printer top cover by pulling the grey tabs located on each side toward the front of the printer, then lift the top cover to the maximum open angle. 2. A top cover support at the rear of the printer will engage with lower inner cover to hold the printer top cover open. 3. Hold the top cover and press the top cover support to disengage the top cover support with lower inner cover. Gently close the top cover. BPP12 User Manual 11 Loading the Ribbon 1. Open the top cover on the printer by pulling the green open levers located on each side of the printer and lifting the top cover to the maximum open angle. 2. Open the ribbon access cover. Note: In normal print mode, the ribbon access cover can be opened while opening the top cover. The ribbon access cover can be closed while the top cover is open or closed. 3. Insert the right side of the ribbon right onto the supply hub. Align the notches on the left side and mount onto the spokes. BPP12 User Manual 12 4. Insert the right side of the paper core onto the rewind hub. Align the notches on the left side and mount onto the spokes. 5. Attach the ribbon leader onto the ribbon rewind paper core. 6. Turn the ribbon rewind gear until the plastic ribbon leader is thoroughly wound and the black section of the ribbon covers the print head. BPP12 User Manual 13 7. Close the ribbon access cover and the top cover. Ribbon Loading Path BPP12 User Manual 14 Loading the Media Loading Media 1. Open the printer top cover by pulling the grey tabs, located on each side, toward the front of the printer, then lift the top cover to the maximum open angle. 2. Separate and hold open the media holders. 3. Place the roll between the holders and close them onto the core. 4. Set the media holder lock switch to Lock (down) to hold the label roll firmly. BPP12 User Manual 15 5. Optional: If using either an external media holder or folded labels, feed the media through the rear external label entrance chute. 6. Place the paper, print side face up, through the media sensor. 7. Place the label leading edge onto the platen roller. 8. Move the media guides to fit the label width by turning the guide adjuster knob. 9. Disengage the top cover support and close the top cover gently. 10. Use the Diagnostic Tool or LCD menu to set the media sensor type and calibrate the selected sensor (see the diagnostic utility quick start guide for more information): a. Start Diagnostic tool. BPP12 User Manual 16 b. Select sensor on Calibration tab. c. Click Calibrate button. Note: Please calibrate the gap/black mark sensor when changing media. Loading Path for Roll Labels BPP12 User Manual 17 External Label Roll Mount Installation (Option) 1. Attach an external paper roll mount on the bottom of the printer. 2. Insert a label spindle into a paper roll and install it on the external paper roll mount. 3. Open the top cover and separate the media holders to fit the media width. 4. Press down the media holder lock switch to fix the media holder. 5. Feed the media through the rear external label entrance chute: a. Place the paper, print side face up, through the media sensor. b. Place the label leading edge onto the platen roller. BPP12 User Manual 18 6. Move the media guides to fit the label width by turning the guide adjuster knob. 7. Disengage the top cover support and close the top cover gently. 8. Use the Diagnostic Tool or LCD menu to set the media sensor type and calibrate the selected sensor. a. Start Diagnostic tool. b. Select sensor on Calibration tab. c. Click Calibrate button. BPP12 User Manual 19 Diagnostic Tool The Diagnostic Utility is a toolbox that lets users explore the printer's settings and status; change printer settings; download graphics, fonts, and firmware; create printer bitmap fonts; and to send additional commands to the printer. Using this convenient tool, you can explore the printer status and settings and troubleshoot the printer. Start the Diagnostic Tool 1. To start the software, double click the Diagnostic tool icon. Note: The diagnostic tool is located at D:\DiagTool. 2. Select the PC interface connected with bar code printer. Default setting is USB interface. No further setting is required. If RS-232 port is selected, further setup is required to select the serial port, baud rate, parity check, data bits, stop bit and flow control. If Ethernet is selected, need to select the bar code printer. BPP12 User Manual 20 3. There are 7 features included in the Diagnostic utility. BPP12 User Manual 21 Calibration: This feature uses to calibrate the media sensor. Network Configuration: This feature uses to setup the IP address, subnet mask, gateway for the on board Ethernet System Settings: This feature uses to setup the RTC, Initialize the printer, reboot printer, print a test page or print printer configuration. Advanced configuration: This feature uses to explore/configure the printer settings. The common setting tab includes the settings that commonly used for TSPL/EPL2/ZPL/DPL printer languages. BPP12 User Manual 22 File Manager: File manager feature is to help users to generate the file header, download the file into printer, explore what files are downloaded in printer memory and delete all files in the memory. Bitmap Font Manager: Bitmap font manager is used to convert the selected TTF font into printer format bitmap font. Both fixed pitch and variable pitch bitmap font are supported. BPP12 User Manual 23 Command Tool: The additional features that are not yet supported in the Diagnostic Utility can be achieved by sending out printer commands to printer from the Command Tool. Specify the editor and enter the commands in the editor. Please be reminded to hit the PC keyboard Enter key at the end of each command line. Click the “Send” button to send out the commands in the specified editor to printer. You can also send a command file by clicking “Send File” button. BPP12 User Manual 24 Install SD Memory Card 1. Open the SD memory card cover. 2. Insert the SD card until it is fully seated. Close the memory card cover. BPP12 User Manual 25 CHAPTER 4 LED and Button Functions This printer has six buttons and one three-color LED indicator. By the button when the LED indicates a different color, the printer can be set to feed labels, pause the printing job, select and calibrate the media sensor, print a printer self-test report, reset the printer to defaults (initialization). See the following button operation descriptions for functions. LED Indicator LED Color Green/ Solid Green/ Flash Amber Red / Solid Red / Flash Description Illuminates when power is on and the device is ready to use. Illuminates when the system is downloading data from PC to memory or the printer is paused. Illuminates when the system is clearing data from printer. Illuminates when the printer head is open, or a cutter error. Illuminates when there is a printing error, such as head open, paper empty, paper jam, ribbon empty, or memory error etc. Regular Button Function Feed button Feed one label when the printer on ready mode Pause/Resume the printing process Press the button to enter/select cursor located item from a menu Menu button Enter the menu Exit from a menu or cancel a setting and return to the previous menu Navigation button Scroll the menu list BPP12 User Manual 26 Power on Utilities There are six power-on utilities to set up and test printer hardware. These utilities are activated by pressing FEED, then turning on the printer power simultaneously and releasing the button at a different LED color. Follow these steps for various power-on utilities: 1. Turn off the power switch. 2. Hold the Feed button down, then turn the power switch ON. 3. Release the button when LED indicates a color for a different function. Power on Utilities LED Color LED color changes as follows: Amber Red (5 blinks) Amber (5 blinks) Green Green/Amber (5 blinks) (5 blinks) Red/Amber (5 blinks) Solid green Functions 1. Ribbon Sensor Calibration and Gap / black mark sensor calibration 2. Gap / black mark sensor calibration, Self-test and enter dump mode 3. Printer initialization 4. Set black mark sensor as media sensor and calibrate the black mark sensor 5. Set gap sensor as media sensor and calibrate the gap sensor 6. Skip AUTO.BAS BPP12 User Manual Release Release Release Release Release Release 27 Ribbon and Gap/Black Mark Sensor Calibration Calibrate gap/black mark sensor sensitivity at the following conditions: • New printer • Change label stock • Printer initialization Follow these steps to calibrate the ribbon and gap/black mark sensor: 1. Turn off the power switch. 2. Hold the Feed button down, then turn the power switch ON. 3. Release the button when LED turns red and blinks. (Any time during the 5 blinks). • The ribbon sensor and gap/black mark sensor sensitivity will be calibrated. • The LED color will change in the following order: - Amber → Red (5 blinks) → Amber (5 blinks) → Green (5 blinks) → Green/Amber (5 blinks) → Red/Amber (5 blinks) → Solid Green Note: Select gap or black mark sensor by sending GAP or BLINE command to the printer before calibrating the sensor. BPP12 User Manual 28 Gap/Black Mark Calibration, Self-test and Dump Mode While calibrating the gap/black mark sensor, the printer will measure the label length, print the internal configuration (self-test) on a label and then enter the dump mode. Calibrating the gap or black mark sensor depends on the sensor setting in the last print job. To calibrate the sensor: 1. Turn off the power switch. 2. Hold the Feed button down, then turn the power switch ON. 3. Release the button when LED turns amber and blinks (any time during the 5 blinks). The LED color will change in the following sequence: • Amber → Red (5 blinks) → Amber (5 blinks) → Green (5 blinks) → Green/Amber (5 blinks) → Red/Amber (5 blinks) → Solid Green 4. The printer calibrates the sensor, measures the label length and prints internal settings then enters the dump mode. Note: Select gap or black mark sensor by sending GAP or BLINE command to the printer before calibrating the sensor. Self-Test The printer will print the printer configuration after a gap/black mark sensor calibration. The self-test printout can be used to check if there is any dot damage on the heater element, printer configurations and available memory space. Self-test printout Model name F/W version Firmware checksum Printer S/N Configuration file System date System time Printed mileage (meter) Cutting counter BPP12 User Manual 29 Print speed (inch/sec) Print darkness Label size (inch) Gap distance (inch) Gap/black mark sensor intension Code page Country code ZPL setting information Print darkness Print speed (inch/sec) Label size Control prefix Format prefix Delimiter prefix Printer power up motion Printer head close motion Note: ® ZPL is emulating for Zebra language. RS232 serial port configuration Numbers of download files Total & available memory space Print head check pattern BPP12 User Manual 30 Dump Mode The printer enters dump mode after printing the printer configuration. In the dump mode, all characters are printed in 2 columns as shown. The ASCII characters are received from your system and right side data shows the corresponding hexadecimal value of the characters. It allows users or engineers to verify and debug the program. ASCII Data Hex decimal data related to left column of ASCII data Notes: • 1. Dump mode requires 4” wide paper width. • 2. Turn off / on the power to resume printer for normal printing. • 3. Press FEED button to go back to the previous menu. BPP12 User Manual 31 Printer Initialization Printer initialization is used to clear DRAM and restore printer settings to defaults. The only exception is ribbon sensitivity, which will not be restored to default. To activate Printer initialization: 1. Turn off the power switch. 2. Hold the Feed button down, then turn the power switch ON. 3. Release the button when the LED turns green after 5 amber blinks. (Any time during the 5 blinks). The LED color changes as follows: • Amber → Red (5 blinks) → Amber (5 blinks) → Green (5 blinks) → Green/Amber (5 blinks) → Red/Amber (5 blinks) → Solid Green BPP12 User Manual 32 Set Black Mark Sensor as Media Sensor and Calibrate the Black Mark Sensor To set Black Mark Sensor: 1. Turn off the power switch. 2. Hold the Feed button down, then turn the power switch ON. 3. Release the ONbutton when LED turns green/amber after 5 green blinks. (Any green/amber will do during the 5 blinks). The LED color changes as follows: • Amber → Red (5 blinks) → Amber (5 blinks) → Green (5 blinks) → Green/Amber (5 blinks) → Red/Amber (5 blinks) → Solid Green Set Gap Sensor as Media Sensor and Calibrate the Gap Sensor To set Gap Sensor: 1. Turn off the power switch. 2. Hold the Feed button down, then turn the power switch ON. 3. Release the button when LED turns red/amber after 5 green/amber blinks (any time during the 5 blinks). The LED color changes as follows: • Amber → Red (5 blinks) → Amber (5 blinks) → Green (5 blinks) → Green/Amber (5 blinks) → Red/Amber (5 blinks) → Solid Green BPP12 User Manual 33 Skip AUTO.BAS TSPL2 programming language lets users download an auto execution file to flash memory. The printer will run the AUTO.BAS program immediately when printer power is turned on. The AUTO.BAS program can be interrupted without using the power-on utility to run the program. To skip an AUTO.BAS program: 1. Turn off printer power. 2. Press the FEED button and then turn on power. 3. Release the FEED button when LED turns solid green. The LED color changes as follows: • Amber → Red (5 blinks) → Amber (5 blinks) → Green (5 blinks) → Green/Amber (5 blinks) → Red/Amber (5 blinks) → Solid Green 4. Printer will be interrupted to run the AUTO.BAS program. BPP12 User Manual 34 CHAPTER 5 LCD Menu Function Enter the Menu Press the “Menu” button to enter the main menu. Use the navigation button to scroll the item on main menu. The selected item will turn red. Press the “Feed” button to enter the setting list. BPP12 User Manual 35 Main Menu Overview There are 8 categories for the main menu. You can easy to set the settings of printer without connecting the computer. Please refer to following sections for more details. Menu TSPL ZPL2 Sensor Interface File Manager Diagnostics Advanced Service Speed Darkness Auto Calibration Serial Comm. DEAM Print Config. Display Brightness Initialization Density Print Speed Manual Setup Ethernet FLASH Dump Mode Date & Time Printer Information Direction Tear Off Threshold Detect Bluetooth (option) CARD Print haed Language Print Mode Print Mode Maximum Length Wi-Fi (option) Offset Print Width Advanced Shift X List Fonts Shift Y List Images Reference X List Formats Reference Y List Setup Code Page Control Prefix Country Format Prefix Contact us Display Sensor Delimiter Char Media Power Up Head Close Label Top Left Position Reprint Mode Format Convert BPP12 User Manual 36 TSPL2 This “TSPL2” category can set up the printer settings for TSPL2. Speed Menu TSPL Density None Direction Batch Mode Print mode Peeler Mode Offset Cutter Mode Shift X Cutter Batch Shift Y Reference X Reference Y Code Page Country Item Description Default Speed Use this item to setup print speed. 5 Density Use this option to setup printing darkness. The available setting is from 0 to 15, and the step is 1. You may need to adjust your density based on selected media. 8 The direction setting value is either 1 or 0. Use this item to setup the printout direction. DIRECTION 0 DIRECTION 1 FEED Direction 0 This item is used to set the print mode. There are 5 modes as below, Print mode BPP12 User Manual Printer Mode None Description Batch Mode Next label top of form is aligned to the print head burn line location. (Tear Off Mode) 37 Batch Mode Once image is printed completely, label gap/black mark will be fed to the tear plate location for tear away. Enable the label peel off mode. Peeler Mode Cutter Mode Enable the label cutter mode. Cutter Batch Cut the label once at the end of the printing job. Offset This item is used to fine tune media stop location. Available setting value is from “+” to “-” or “0” to “9”. +000 Shift X Shift Y Reference X Reference Y Code page Country This item is used to fine tune print position. Available setting value is from “+” to “-” or “0” to “9”. This item is used to set the origin of printer coordinate system horizontally and vertically. Available setting value is from “0” to “9”. Use this item to set the code page of international character set. Use this option to set the country code. +000 +000 000 000 850 001 Note: If printing from enclosed software/driver, the software/driver will send out the commands, which will overwrite the settings set from the panel. BPP12 User Manual 38 ZPL2 This “ZPL2” category can set up the printer settings for ZPL2. Darkness Print Speed Tear Off Tear Off Print Mode Peel Off Print Width Cutter List Fonts List Images List Formats List Setup Control Prefix Format Prefix Feed Menu ZPL2 Delimiter Char Calibration Media Power Up Length No Motion Feed Calibration Head Close Label Top Length No Motion Left Position Enabled Reprint Mode Disabled None 150 -> 300 Format Convert 150 -> 600 200 -> 600 300 -> 600 BPP12 User Manual 39 Item Description Default Darkness Use this item to setup printing darkness. The available setting is from 0 to 30, and the step is 1. You may need to adjust your density based on selected media. 16 Print Speed Use this item to setup print speed. The increase or decrease is 1 ips. Available setting is from 2 to 6. 4 (300dpi) Tear Off This item is used to fine tune media stop location. Available setting value is from “+” to “-” or “0” to “9”. +000 This item is used to set the print mode. There are 3 modes as below, Print mode Printer Mode Tear Off Peeler Off Cutter Print Width List Fonts List Images List Formats List Setup Control Prefix Format Prefix Delimiter Char Description Tear Off Next label top of form is aligned to the print head burn line location. Enable the label peel off mode. Enable the label cutter mode This item is used to set print width. The available value is from “0” to “9”. This feature is used to print current printer available fonts list to the label. The fonts stored in the printer’s DRAM, Flash or optional memory card. This feature is used to print current printer available images list to the label. The images stored in the printer’s DRAM, Flash or optional memory card. This feature is used to print current printer available formats list to the label. The formats stored in the printer’s DRAM, Flash or optional memory card. This feature is used to print current printer configuration to the label. This feature is used to set control prefix character. This feature is used to set format prefix character. This feature is used to set delimiter character. 812 dot N/A N/A N/A N/A N/A N/A N/A This option is used to set the action of the media when you turn on the printer. Selections Media Power Up Feed Calibration Length No Motion BPP12 User Manual Description Printer will advance one label Printer will calibration the sensor levels, determine length and feed label Printer determine length and feed label Printer will not move media No Motion 40 This option is used to set the action of the media when you close the print head. Selections Head Close Label Top Left Position Reprint Mode Format Convert Description Printer will advance one label Printer will calibration the sensor levels, Calibration determine length and feed label Length Printer determine length and feed label No Motion Printer will not move media This option is used to adjust print position vertically on the label. The range is -120 to +120 dots. This option is used to adjust print position horizontally on the label. The range is -9999 to +9999 dots. When reprint mode is enabled, you can reprint the last label printer by pressing “UP” button on printer’s control panel. Selects the bitmap scaling factor. The first number is the original dots per inch (dpi) value; the second, the dpi to which you would like to scale. Feed No Motion 0 +0000 Disabled None Note: If printing from enclosed software/driver, the software/driver will send out the commands, which will overwrite the settings set from the panel. BPP12 User Manual 41 Sensor This option is used to calibrate the selected sensor. We recommend calibrate the sensor before printing when changing the media. Gap Auto Calibration Black Mark Continuous Gap Manual Setup Menu Sensor Black Mark Continuous Threshold Detect Maximum Length Auto Fixed Advanced Item Auto Calibration Description Printer will feed 2 to 3 gap labels to calibrate the sensor sensitivity automatically. Default N/A Manual Setup In case “Auto calibration” cannot apply to the media, please use “Manual setup” function to calibrate the sensor sensitivity. N/A Threshold Detect This option is used to set sensor sensitivity in fixed or auto. Auto Maximum Length This option is used to set the maximum length for label calibration. Advanced This function can set the minimum paper length and maximum gap/bline length for auto-calibrate the sensor sensitivity. BPP12 User Manual 253mm OFF 42 Interface This option is used to set the printer interface settings. Serial Ethernet Menu Interface Bluetooth Wi-Fi Serial Comm. This option is used to set the printer RS-232 settings. 1200 bps 2400 bps 4800 bps Baud Rate 9600 bps 19200 bps 38400 bps 57600 bps 115200 bps Menu Interface None Serial Parity Odd Even Data Bits Stop Bit(s) 7 8 1 2 Item Description Baud Rate This item is used to set the RS-232 baud rate. 9600 Parity This item is used to set the RS-232 parity. None Data Bits This item is used to set the RS-232 Data Bits. 8 Stop Bit(s) This item is used to set the RS-232 Stop Bits. 1 BPP12 User Manual Default 43 Ethernet Use this menu to configure internal Ethernet configuration check the printer’s Ethernet module status, and reset the Ethernet module. Status Menu Interface Ethernet DHCP Configure Static IP Item Description Status Use this menu to check the Ethernet IP address and MAC setting status. N/A DHCP This item is used to ON or OFF the DHCP (Dynamic Host Configuration Protocol) network protocol. N/A Static IP Use this menu to set the printer’s IP address, subnet mask and gateway. ON BPP12 User Manual Default 44 Bluetooth (Option) This option is used to set the printer bluetooth settings. Bluetooth Name Menu Interface Bluetooth Bluetooth PIN code Item Bluetooth Name Bluetooth Code Description Default This item is used to set the local name for Bluetooth. BT-SPP PIN This item is used to set the local PIN code for Bluetooth. 0000 Wi-Fi (Option) Operating Mode Menu Interface Wi-Fi Scan AP DHCP Item Description This item is used to set the operating mode of wireless local area networks to connect devices to the networks. Operating Note: Infrastructure mode requires the use of an access point for this communication to take place. Ad hoc mode involves connecting a computer directly to another computer. Scan AP This item is used to scan the access point devise N/A DHCP This item is used to ON or OFF the DHCP (Dynamic Host Configuration Protocol) network protocol. ON BPP12 User Manual Default Infrastructure 45 File Manager This feature is used to check the printer available memory and file list. DRAM Menu File Manager FLASH CARD Item DRAM Description Use this menu to show, delete and run (.BAS) the files saved in the printer DRAM memory. FLASH Use this menu to show, delete and run (.BAS) the files saved in the printer Flash memory. CARD Use this menu to show, delete and run (.BAS) the files saved in the printer Card memory. BPP12 User Manual 46 Diagnostics Print Config. Dump Mode Menu Diagnostics Print Head Display Sensor Print Config. This feature is used to print current printer configuration to the label. On the configuration printout, there is a print head test pattern, which is useful for checking if there is any dot damage on the print head heater element. Menu Diagnostics Print Config. Self-test printout Model name F/W version Firmware checksum Printer S/N Configuration file System date System time Printed mileage (meter) Cutting counter Print speed (inch/sec) Print darkness Label size (inch) Gap distance (inch) Gap/black mark sensor intension Code page Country code BPP12 User Manual 47 ZPL setting information Print darkness Print speed (inch/sec) Label size Control prefix Format prefix Delimiter prefix Printer power up motion Printer head close motion Note: ® ZPL is emulating for Zebra language. RS232 serial port configuration Numbers of download files Total & available memory space Print head check pattern Note: Checking dot damage requires 4” wide paper width. BPP12 User Manual 48 Dump Mode Captures the data from the communications port and prints out the data received by printer. In the dump mode, all characters will be printed in 2 columns. The left side characters are received from your system and right side data are the corresponding hexadecimal value of the characters. It allows users or engineers to verify and debug the program. Menu Diagnostics DOWNLOA D „TEST2. DAT“,5,CL S DOWNLO AD F,“TES T4.DAT“,5 ,CLS DOW NLOAD „TE ST2.DAT”, 5,CLS DO WNLOAD F, „TEST4.DA T”,5,CLS DOWNLOAD “TEST2.D AT”,5,CLS DOWNLOA D F,“TEST 4.DAT“,5, CLS 0D 44 44 53 41 54 2C 4E 53 35 57 22 54 0A 20 41 0D 44 34 43 0A 20 41 0D 44 34 43 4C 54 2C 4E 54 22 44 22 54 0A 20 2E 4C 44 22 54 0A 20 2E 4C 4F 32 43 4C 45 2C 4F 54 22 44 46 44 53 4F 54 22 44 46 44 53 41 2E 4C 4F 53 35 57 45 2C 4F 2C 41 0D 57 45 2C 4F 2C 41 0D 44 44 53 41 54 2C 4E 53 35 57 22 54 0A Dump Mode 4E 53 35 57 22 54 0A 20 41 0D 44 34 43 4C 54 2C 4E 54 22 4C 54 2C 4E 54 22 44 22 54 0A 20 2E 4C 4F 32 43 4C 45 2C 4F 32 43 4C 45 2C 4F 54 22 44 46 44 53 41 2E 4C 4F 53 35 4I 2E 4C 4F 53 35 57 45 2C 4F 2C 41 0D 44 44 53 4I 54 2C ASCII Data Hexdecimal data related to left column of ASCII data Note: Dump mode requires 4” wide paper width. BPP12 User Manual 49 Print Head This feature is used to check print head’s temperature, resistance and bad dots. Menu Diagnostics Print Head Display This feature is used to check LCD’s color state. Menu BPP12 User Manual Diagnostics Display 50 Advanced This feature is used to set the printer LCD settings. Display Brightness Menu Advanced Date & Time Language Item Display Brightness Description Date & Time (Option) This item is used to setup the date and time on display. (RTC) Language This item is used to setup the language on display. BPP12 User Manual This item is used to setup the brightness for display. 51 Service This feature is used to restore printer settings to defaults and checking information for printer. Initialization Menu Service Printer Information Contact Us Item Description Initialization This feature is used to restore printer settings to defaults. Printer Information This feature is used to check the printer’s serial number, printed mileage (m), printed labels (pcs.) and cutting counter. Contact Us This feature is used to check the contact information for tech support service. BPP12 User Manual 52 CHAPTER 6 Troubleshooting The following guide lists the most common problems that may be encountered when operating this bar code printer. If the printer still does not function after all suggested solutions have been tried, please contact the Customer Service Department of your purchased reseller or distributor for assistance. LED Status This section provides solutions to common problems indicated by the LED status that you may encounter when operating the printer. LED Status / Printe Color r OFF NoStatus respons e Possible Cause No power Solid Green ON Green with blinking Red with blinking Pause The printer is ready to use The printer is paused Out of label or ribbon. Error Printer setting is not correct Recovery Procedure • Turn on the power switch. • Check if the green LED is lit on power supply. If it is not lit, the power supply is broken. • Check if both the power connections from the power cord to the power supply and from the power supply to the printer power jack are connected securely. • No action necessary. • Press the FEED button to resume printing. 1. Out of label or ribbon: • Load a label roll following media loading instructions, then press FEED to resume printing. • Load a label roll following ribbon loading instructions, then press FEED to resume printing. 2. Printer setting is not correct: • Initialize the printer by following the instructions in “Power on Utility” or “Diagnostic Tool.” Note: Printer status can be viewed in the Diagnostic Tool. For more information about the Diagnostic Tool, see the instructions in the software CD disc located at D:\DiagTool. BPP12 User Manual 53 Print Quality Problem Not Printing No print on the label Possible Cause Check if interface cable is properly connected to the interface connector. The serial port cable pin configuration is not a pin-to-pin connection. The serial port setting is not consistent between host and printer. The port specified in the Windows driver is not correct. The Ethernet IP, subnet mask, gateway is not configured properly. Re-connect cable to interface. Label or ribbon loaded not correctly. Follow the instructions in loading the media or loading the ribbon. Load new ribbon. Out of Ribbon. Continuous feeding labels Paper Jam Poor Print Quality Replace the cable with pin to pin connection. Reset the serial port setting. Select the correct printer port in the driver. Configure the IP, subnet mask and gateway. The printer setting may be wrong. Perform the initialization and gap/black mark calibration. Gap/black mark sensor sensitivity is not set properly (sensor sensitivity is not enough). Label size is not set properly. Calibrate the gap/black mark sensor. Labels are stuck inside the printer mechanism near the sensor area. Top cover is not closed properly. Set label size exactly as installed paper in the labeling software or program. Remove the stuck label. Close the top cover completely and make sure the right- and left- side levers are latched properly. Supply is loaded incorrectly. Reload the supply. Ribbon and media are incompatible. Change the ribbon or label combination. Dust and/or adhesives are accumulated on the print head. Check if dust or adhesives are accumulated on the print head. Clean the print head. Adjust the print density and print speed. Print density is not set properly. Print head test pattern is incorrect. BPP12 User Manual Recovery Procedure Head element may be damaged. Run printer self-test and check the print head test pattern to see if there are missing dots in the pattern. 54 CHAPTER 7 Maintenance This session presents the cleaning tools and methods to maintain your printer. 1. Use one of following materials to clean the printer: • Cotton swab (Head cleaner pen) • Lint-free cloth • Vacuum / Blower brush • 100% ethanol 2. Clean the printer using the following process: Printer Part Method Interval 1. Always turn off the printer before cleaning Clean the print head when changing a the print head. new label roll 2. Allow the print head to cool for a minimum of one minute. 3. Use a cotton swab and 100% ethanol to clean the print head surface. Print Head 1. Turn the power off. 2. Rotate the platen roller and wipe it Platen Roller thoroughly with 100% ethanol and a cotton swab, or lint-free cloth. Use the lint-free cloth with 100% ethanol to Tear Bar/Peel Bar wipe it. Compressed air or vacuum Sensor Wipe it with water-dampened cloth Exterior Interior Brush or vacuum BPP12 User Manual Clean the platen roller when changing a new label roll As needed Monthly As needed As needed 55 Notes: • Do not touch the printer head. If you touch it, use ethanol to clean it. • Use 100% Acetone or Ethenol. DO NOT use medical alcohol, which may damage the printer head. • To maintain printer performance and extend printer life, clean the print head and supply sensors whenever you change a new ribbon. • Continuous printing will cause the printer motor to overheat. Printer will stop printing automatically about 10~15 minutes until motor is cooled down. Data transfered to printer buffer will be lost if power to the printer is turned off when the printer pauses. BPP12 User Manual 56 BPP12 User Manual 57 Copyright 2015 Brady Worldwide, Inc. All Rights Reserved BRADY WORLDWIDE, INC. 2221 W. Camden Road, Milwaukee, WI 53209