1
User Manual
for the
Configuration of the NetLink Adapter
via the
S7B Driver
for
iFIX/FIX32
Release date: 10.06.2005
Editor: J. Stähler, InCoSol-Industrial Communications Solutions
Configuration of the NetLink adapters
S7B driver for iFIX/FIX32
Page 2
Table of contents
1.
Introduction . . . . . . . . . . . . . . . . . . . . . . . . . . . . . . . . . . . . . . . . . . . . . . . . . . . . . . 4
1.1
Purpose of this document . . . . . . . . . . . . . . . . . . . . . . . . . . . . . . . . . . . . . . . . . . . . . . . . . . 4
1.2
Target groups . . . . . . . . . . . . . . . . . . . . . . . . . . . . . . . . . . . . . . . . . . . . . . . . . . . . . . . . . . . 4
1.3
Definitions and acronyms . . . . . . . . . . . . . . . . . . . . . . . . . . . . . . . . . . . . . . . . . . . . . . . . . . 4
1.3.1
1.4
2.
3.
Acronyms . . . . . . . . . . . . . . . . . . . . . . . . . . . . . . . . . . . . . . . . . . . . . . . . . . . . . . . . 4
Typographical conventions . . . . . . . . . . . . . . . . . . . . . . . . . . . . . . . . . . . . . . . . . . . . . . . . . 4
The NetLink Adapter . . . . . . . . . . . . . . . . . . . . . . . . . . . . . . . . . . . . . . . . . . . . . . . 5
2.1
Hardware . . . . . . . . . . . . . . . . . . . . . . . . . . . . . . . . . . . . . . . . . . . . . . . . . . . . . . . . . . . . . . 5
2.2
Configuration – general information . . . . . . . . . . . . . . . . . . . . . . . . . . . . . . . . . . . . . . . . . . 5
2.3
MPI or Profibus . . . . . . . . . . . . . . . . . . . . . . . . . . . . . . . . . . . . . . . . . . . . . . . . . . . . . . . . . 5
2.3.1
MPI bus parameters . . . . . . . . . . . . . . . . . . . . . . . . . . . . . . . . . . . . . . . . . . . . . . . . 6
2.3.2
Profibus parameters . . . . . . . . . . . . . . . . . . . . . . . . . . . . . . . . . . . . . . . . . . . . . . . . 7
2.3.3
Determination of Profibus parameters . . . . . . . . . . . . . . . . . . . . . . . . . . . . . . . . . . 7
The S7B Driver . . . . . . . . . . . . . . . . . . . . . . . . . . . . . . . . . . . . . . . . . . . . . . . . . . 11
3.1
Configuration of the NetLink adapter with the help of the S7B driver's power tool . . . . . . . 11
3.1.1
3.2
3.1.1.1
Start the S7B Power Tool . . . . . . . . . . . . . . . . . . . . . . . . . . . . . . . . . . . 12
3.1.1.2
Determination of accessible NetLink adapters . . . . . . . . . . . . . . . . . . . . 13
3.1.1.3
Set a temporary IP address . . . . . . . . . . . . . . . . . . . . . . . . . . . . . . . . . . 14
Permanent storage of the IP address and bus parameters . . . . . . . . . . . . . . . . . . . . . . . . 16
3.2.1
3.2.2
3.3
Setting an IP address when Netlink is in factory state . . . . . . . . . . . . . . . . . . . . . . 11
TCP/IP parameters of the first property page MPI/PB NetLink(1) . . . . . . . . . . . . 17
3.2.1.1
Up/Download IP Addr . . . . . . . . . . . . . . . . . . . . . . . . . . . . . . . . . . . . . . 17
3.2.1.2
Permanent IP Addr . . . . . . . . . . . . . . . . . . . . . . . . . . . . . . . . . . . . . . . . 17
3.2.1.3
Subnet Mask . . . . . . . . . . . . . . . . . . . . . . . . . . . . . . . . . . . . . . . . . . . . . 17
3.2.1.4
Default Gateway . . . . . . . . . . . . . . . . . . . . . . . . . . . . . . . . . . . . . . . . . . 18
TCP/IP parameters on the second property page MPI/PB NetLink(2) . . . . . . . . . . 18
3.2.2.1
MPI bus parameters . . . . . . . . . . . . . . . . . . . . . . . . . . . . . . . . . . . . . . . 18
2.2.2.2
Profibus parameters . . . . . . . . . . . . . . . . . . . . . . . . . . . . . . . . . . . . . . . 18
Read back the TCP/IP and bus parameters from NetLink . . . . . . . . . . . . . . . . . . . . . . . . . 20
Configuration of the NetLink adapters
S7B driver for iFIX/FIX32
Page 3
List of Tables
Table 2-1:
Standard MPI bus parameters . . . . . . . . . . . . . . . . . . . . . . . . . . . . . . . . . . . . . . . . . . . . . . 6
Table 2-2:
Profibus parameters . . . . . . . . . . . . . . . . . . . . . . . . . . . . . . . . . . . . . . . . . . . . . . . . . . . . 10
List of Pictures
Picture 2-1:
Dialog „HW Config - SIMATIC“ in Simatic Manager . . . . . . . . . . . . . . . . . . . . . . . . . . . . . 7
Picture 2-2:
Dialog „Properties - DP“ in S7 hardware configuration . . . . . . . . . . . . . . . . . . . . . . . . . . . 8
Picture 2-3:
Property Page „Parameters“ of dialog „Properties - PROFIBUS Interface DP“ in S7
hardware configuration . . . . . . . . . . . . . . . . . . . . . . . . . . . . . . . . . . . . . . . . . . . . . . . . . . . 8
Picture 2-4:
Property page „General“ of dialog „Properties - PROFIBUS“ in S7 hardware configuration
..................................................................... 9
Picture 2-5:
Property page „Network Settings“ of dialog „Properties - PROFIBUS“ in S7 hardware
configuration . . . . . . . . . . . . . . . . . . . . . . . . . . . . . . . . . . . . . . . . . . . . . . . . . . . . . . . . . . . 9
Picture 2-6:
Property page „Bus Parameters“ of dialog „PROFIBUS(1)“ in S7 hardware configuration
. . . . . . . . . . . . . . . . . . . . . . . . . . . . . . . . . . . . . . . . . . . . . . . . . . . . . . . . . . . . . . . . . . . . 10
Picture 3-1:
Power Tool with selected Channel „NetLinkMPI“ and property page „Prim. MPI/PB
NetLink(1)“ in foreground . . . . . . . . . . . . . . . . . . . . . . . . . . . . . . . . . . . . . . . . . . . . . . . . . 12
Picture 3-2:
Dialog „Scan for NetLinks“ to set the temporary IP address . . . . . . . . . . . . . . . . . . . . . . . 13
Picture 3-3:
List of the found NetLink adapters and allocation to configured adapters . . . . . . . . . . . . . 13
Picture 3-4:
Dialog „Set NetLink‘s IP Address“ to enter the IP address . . . . . . . . . . . . . . . . . . . . . . . . 14
Picture 3-5:
Message box which indicates that the IP address was set successfully . . . . . . . . . . . . . . 14
Picture 3-6:
Error message box, if the temporary IP address could not be set . . . . . . . . . . . . . . . . . . 15
Picture 3-7:
Message box at the end of the dialog „Scan for NetLinks“ . . . . . . . . . . . . . . . . . . . . . . . 15
Picture 3-8:
Relation between the selected bus type and its corresponding parameter set . . . . . . . . . 16
Picture 3-9:
Relation between the Step7 hardware config. bus parameters and the S7B configuration bus
parameters. . . . . . . . . . . . . . . . . . . . . . . . . . . . . . . . . . . . . . . . . . . . . . . . . . . . . . . . . . . . 19
Configuration of the NetLink adapters
S7B driver for iFIX/FIX32
1.
Introduction
1.1
Purpose of this document
Page 4
This document describes the procedures of the configuration of a NetLink adapter from the
company Hilscher via the S7B driver for iFIX/FIX32. Due to the specific features and functionality
of the NetLink adapter, the ability to configure the NetLink adapter on pure intuition is limited. This
detailed documentation is designed to assist the user where necessary.
1.2
Target groups
This documentation addresses iFIX/FIX32 application engineers, who wish to integrate the S7B
driver with the NetLink adapter in their system.
1.3
Definitions and acronyms
1.3.1
Acronyms
UDP
TCP/IP
MPI
CP
HSA
1.4
User Datagram Protocol
Transmission Control Protocol /Internet Protocol
Multi Point Interface
Communication Processor
Highest Station Address
Typographical conventions
Files, directories, host- and domain names, as well as menu entries and options will be italicized.
Blue font will be used for the titles of dialog windows.
Red font will be used for the lettering on button controls.
Green font will be used for the field names of the input- and display fields as well as for names of
property pages.
Configuration of the NetLink adapters
S7B driver for iFIX/FIX32
2.
The NetLink Adapter
2.1
Hardware
Page 5
The NetLink adapter is a gateway between the ethernet port of the iFIX system and the MPI bus or
Profibus of the S7 PLC. Via auto-detection the ethernet interface identifies if it is connected to a 10
or 100 MBit ethernet network.
The complete hardware of the NetLink adapter is fit in a standard Profibus D-Sub housing, thus the
NetLink adapter can be plugged directly in to the MPI or Profibus port of the S7 or any other gadget
that is compatible with an MPI bus.
The supply voltage is provided by the MPI-/Profibus connection. For this, the MPI-/Profibus
connector of the S7 must provide a voltage of 24 volt on pin 7 of the 9-Pin D-Pub-plug.
If there is no supply of 24 volt on the Profibus plug of the CP, as it is the case with the Profibus CP
343-5, the NetLink adapter can be separately supplied with power. In this case the junction box for
MPI and Profibus made by Helmholz can be recommended (Helmholz code No. 700-751-MPV20).
2.2
Configuration – general information
The configuration of the NetLink as MPI bus or Profibus connection is done by the S7B driver
software. As factory defaults the NetLink adapter is always configured for an MPI bus connection.
On the ethernet site it does not have any TCP/IP addresses, but only a unique MAC address. The
initial download of the basic configuration parameters (setup of the TCP/IP address) is done via
ethernet with the help of the User Datagram Protocol (UDP). The UDP does not need a TCP/IP
address in order to address the communication partners, but only the MAC address. Because of the
factory defaults the NetLink adapter does not have a TCP/IP address yet (or the address is 0.0.0.0)
and therefore the S7B software cannot access the NetLink adapter via TCP/IP. Hence, the software
uses the UDP once to assign a unique TCP/IP address for the NetLink adapter. The TCP/IP
address transfered to the NetLink adapter via UDP is only temporarily valid as it is only stored in
the internal RAM of the adapter. If the NetLink adapter is switched off after it has received a
temporary TCP/IP address via UDP, this address will be lost once the adapter is switched on again.
The reason for this, is that the RAM loses all its information when the power supply is switched off.
The TCP/IP address is only stored permanently once the S7B driver has downloaded the so-called
DBM-file (database file) into the adapter. This file contains in addition to the TCP/IP address all
other MPI/Profibus parameters such as MPI/Profibus baud rate, highest station address or the
station address of the NetLink adapter. The DBM-file is saved in the adapter’s flash memory and is
kept even after a power-off of the NetLink adapter.
Once the NetLink adapter can be accessed via a TCP/IP address, a new TCP/IP address can be
assigned via the TCP/IP protocol.
Attention: As the UDP cannot address a NetLink adapter across a router, the NetLink adapter must
be in the same ethernet network (sub-network) as the PC that it used for the initial set-up of the
TCP/IP address via the UDP.
2.3
MPI or Profibus
The NetLink adapter can be used as an MPI bus station, but also in a Profibus DP or FMS network.
Within existing Profibus networks neither the configuration of the master nor configuration of the
slaves has to be adapted. In a Profibus DP net it is not necessary to configure the NetLink adapter
as an additional slave. Only an unused Profibus station address must be available. This address
must be less or equal the highest Profibus station address (HSA) configured in this Profibus net.
While the Profibus parameters are fixed at the MPI bus (see table 1), they can vary at the Profibus
net, depending on the type of protocol (DP or FMS) and the number of stations on the bus. The
NetLink adapter must know these Profibus parameters in order to be correctly accepted by the bus
when it will be connected. The S7B Power Tool configuration program is used to record all these
Profibus parameters and to download the parameter set to the NetLink adapter.
Configuration of the NetLink adapters
S7B driver for iFIX/FIX32
2.3.1
Page 6
MPI bus parameters
In MPI networks the bus parameters are fixed according to the following table. Even though it‘s
possible to change the MPI bus parameters. they should not be changed in the S7B driver’s
configuration dialog.
Parameter
Highest station address (HSA)
Baud Rate
Value
31
187500
Slot Time
415
Station Delay Min.
60
Station Delay Max.
400
Setup Time
1
Quiet Time
1
Gap Actualization Factor
Retries
2
Target Rotation Time
Table 2-1:
20
Standard MPI bus parameters
10000
Configuration of the NetLink adapters
S7B driver for iFIX/FIX32
2.3.2
Page 7
Profibus parameters
If the NetLink adapter is to be used in a Profibus network, the Netlink adapter must be configured
with the current bus parameters of the Profibus which is described later in chapter 3.2.2.2.
At first the following chapter initialy describes how the current profibus parameters can be obtained
with the help of the Step7 software, so that they are available in the S7B Power Tool for the
parameterization of the NetLink driver channel.
2.3.3
Determination of Profibus parameters
In Profibus networks the determination of the current profibus parameters is done via the Step7
software. How to obtain this information with the Step7-software is described thereafter step by step
and with the help of several screen shots.
1. Open the hardware configuration in the Step7 project. The dialog „HW Config“ occurs.
Picture 2-1:
Dialog „HW Config - SIMATIC“ in Simatic Manager
Configuration of the NetLink adapters
S7B driver for iFIX/FIX32
Page 8
2. Select the slot with the Profibus module (our example X2/DP). In the context menu (right
mouse button) choose Object Properties.... . The dialog "Properties - DP“ comes up.
Picture 2-2:
Dialog „Properties - DP“ in S7 hardware configuration
3. In the dialog „Properties -DP“ click the button „Properties...“. The dialog „Properites PROFIBUS Interface DP“ with property page „Parameters“ comes up:
Picture 2-3:
Property Page „Parameters“ of dialog „Properties - PROFIBUS Interface DP“ in S7
hardware configuration
Configuration of the NetLink adapters
S7B driver for iFIX/FIX32
Page 9
4. On property page „Parameters“ of the window „Properties - PROFIBUS interface DP“ click on
the button „Properties...“.As shown below, the dialog „Properties - PROFIBUS“ with property
page „General“ pops up:
Picture 2-4:
Property page „General“ of dialog „Properties - PROFIBUS“ in S7 hardware
configuration
5. In the window „Properies - PROFIBUS“ click on property page „Network Settings“. The dialog
changes to the property page „Network Settings“ as shown below:
Picture 2-5:
Property page „Network Settings“ of dialog „Properties - PROFIBUS“ in S7 hardware
configuration
Configuration of the NetLink adapters
S7B driver for iFIX/FIX32
Page 10
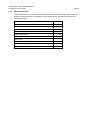
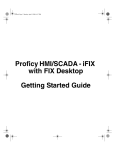
6. On the property page „Network Settings“ two Profibus parameters are already listed. These
parameters are the Highest PROFIBUS Address (HSA) and the Transmission Rate (Baud
Rate)of the Profibus net. Please write down these two parameters.
7. Click on button „Bus Parameters...“ in order to show all other profibus parameters.
Picture 2-6:
Property page „Bus Parameters“ of dialog „PROFIBUS(1)“ in S7 hardware
configuration
8. The parameters on the property page „Bus Parameters“ of the dialog „PROFIBUS(1)“, are
listed in the following table. These parameters are needed later for the configuration of the bus
parameters in the S7B configuration dialog. In the second column of the table below, there is a
list of the respective field names for the corresponding values in the S7B configuration dialog:
Parameter STEP 7
Parameter S7B Configuration
T slot_Init
Slot Time
Max. Tsdr
Station Delay Max
Min. Tsdr
Station Delay Min
Tset
Setup Time
Tqui
Quiet Time
Gap-Factor
Gap Actualization Factor
Retry
Retries
Ttr
Table 2-2:
Value
Target Rotation Time
Profibus parameters
Please make a printout of this page and note down the bus parameters.
Configuration of the NetLink adapters
S7B driver for iFIX/FIX32
Page 11
3.
The S7B Driver
3.1
Configuration of the NetLink adapter with the help of the S7B driver’s power tool
With the installation of the driver S7B all software modules (driver) necessary for the the NetLink
adapter are installed. It is not necessary to install the driver software that is delivered together with
the adapter from Hilscher or other suppliers. The initial configuration of a "nameless" NetLink
adapter is also done by the power tool of the driver S7B (as factory defaults the NetLink adapter
does not have an IP address or the IP address is 0.0.0.0).
All steps necessary to configure the NetLink adapter are described in detail thereafter and are
illustrated with the help of screen shots.
If the NetLink adapter does not have an IP address or in case you do not know the address, start
with point 3.1.1 in order to configure a new IP address. If you want to change the IP address of an
already configured NetLink adapter and if this adapter is accessible at this address, continue with
point 3.2.
3.1.1
Setting an IP address when Netlink is in factory state
As factory defaults the NetLink adapter does not have a valid IP address (or the address is 0.0.0.0)
and is therefore not accessible via the IP protocol. In order to initially assign a valid IP address to
the NetLink adapter, the adapter is contacted via the UDP (User Datagram Protocol) and gets a
valid IP address. The UDP does not address a network partner via the IP address, but via the MAC
address. This MAC address is used on the lowest ethernet telegram level to address a partner. As
factory defaults, each NetLink adapter has a valid and unique MAC address and can be contacted
via this address. As the MAC address does not work across routers, the NetLink adapter is only
accessible in the local network segment. Hence, connect the NetLink adapter to a port in your local
network segment if you have to contact it via UDP.
.
In order to reduce the risk that a NetLink adapter already with an IP address getting another IP
address via UDP by mistake, the NetLink adapter is equipped with a lock. Because of this lock the
setting of a new IP address via UDP is only possible within the first three minutes after the
power-up of the adapter. Hence, if a new IP address is to be set via UDP, it is necessary to
disconnect the NetLink adapter from the power supply, then power it up again and set the new IP
address via UDP within three minutes. However, this three minute limit is not valid if the NetLink
adapter does not have an IP address yet (or the address is 0.0.0.0 - factory defaults).
An IP address set via UDP is not permanently stored in the NetLink adapter’s flash memory, but
only in its unbuffered RAM and therefore lost after switching off the adapter. To store the IP
address permanently in the NetLink adapter’s flash memory, a configuration download must be
done. With this download the configuration file that contains the permanent IP address, other
TCP/IP parameters and the MPI/Profibus parameters is saved permanently in the NetLink adapter’s
flash memory.
To configure an "empty" NetLink adapter, follow each step as described thereafter.
Configuration of the NetLink adapters
S7B driver for iFIX/FIX32
Page 12
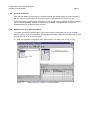
3.1.1.1 Start the S7B Power Tool
Open the power tool S7B starting from the program group iFIX or from the iFIX system
configuration and open the configuration file called DEFAULT.S7B, if it is not done automatically.
When installing the S7B driver this default configuration file is copied into the iFIX root directory.
The default configuration file contains the three channels "NetLinkMPI", "MPISer" and "NetLinkPB".
To use the NetLink adapter on an MPI bus of a S7-SPS, select the channel NetLinkMPI,. to use the
NetLink adapter on a Profibus, select the channel NetLinkPB. These channels are already
configured with the necessary parameters for the respective bus.
In the right half of the Power Tool window the property pages „Prim. MPI/PB NetLink(1)“ and „Prim.
MPI/PB NetLink(2)“, pop up and the first property page is visible in the foreground.
Picture 3-1: Power Tool with selected Channel „NetLinkMPI“ and property page „Prim. MPI/PB NetLink(1)“ in
foreground
Configuration of the NetLink adapters
S7B driver for iFIX/FIX32
Page 13
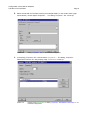
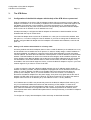
3.1.1.2 Determination of accessible NetLink adapters
In order to set a temporary IP address for the NetLink adapter, click on the button „Scan for..“. A
new dialog named "Scan for NetLinks" pops up.
Picture 3-2: Dialog „Scan for NetLinks“ to set the temporary IP address
In the list to the left „Configured NetLinks“ you can see the existing NetLink channels of the
current configuration and their permanent IP addresses. The permanent IP address is the IP
address stored in the configuration, which does not mean that it is actually configured in a NetLink
adapter.
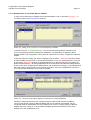
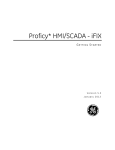
At first, the right list is empty, but will be completed once the button „Start Scan“ has been clicked
and the software has found one or several NetLink adapter`s in its own network segment. The click
on the button „Start Scan“ sends a so-called broadcast call on the ethernet with the message "all
NetLinks please answer". All NetLink adapters that have received this broadcast message send an
answer to the driver S7B giving their MAC address, the IP address (if existing), a type identifier and
the serial number. With the help of the received information, the driver completes the right list to
show which NetLink adapters are currently accessible.
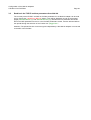
Picture 3-3: List of the found NetLink adapters and allocation to configured adapters
The above image shows that for the configured channel "NetLink PB" with the IP address
192.72.214.20 (brown square) a NetLink adapter with this IP address is accessible. For the
configured channel "NetLinkMPI" with the IP address 192.72.214.11 (white square) no NetLink
adapter was found. However, a second NetLink adapter was found that does not have an IP
address yet or the IP address 0.0.0.0.
Configuration of the NetLink adapters
S7B driver for iFIX/FIX32
Page 14
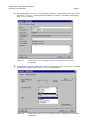
3.1.1.3 Set a temporary IP address
In order to assign a valid IP address to the NetLink adapter (without an IP address), select the
NetLink adapter on the right list (NetLinks accessible by UDP) and then click on the button "Set IP".
The following dialog window „Set NetLink‘s IP Address“ with an input field for the new IP address as
well as Set button and Exit button comes up:
Picture 3-4: Dialog „Set NetLink‘s IP Address“ to enter the IP address
As the NetLink adapter's current IP address is still undefined (or is 0.0.0.0), the entry field
"Temporary IP Address" is empty.
Enter an IP address and click on the Set button. The software transfers the entered IP address to
the NetLink adapter and awaits its response. If the NetLink adapter cannot accept the IP address, it
returns an error code to the software and a window with an error message pops up. In this case, the
adapter should be disconnected shortly from power and another attempt to set the IP address
should be made..
Once the NetLink adapter has accepted the new IP address, the following hint comes up that must
be confirmed by clicking the OK button.
Picture 3-5: Message box which indicates that the IP address was set successfully
Now the NetLink adapter has a temporary IP address which will be lost if the adapter is
disconnected from power.
Once the NetLink adapter has a valid IP address, this address can only be changed within the first
three minutes after the power on (following the above procedure). So, if it is desired to change the
set IP address again, the new address must be entered in the entry field "Temporary IP address".
Before the Set button is clicked, the adapter should be discoected shortly from power and
re-started. After the re-start, the NetLink adapter accepts the request to change the IP address only
for three minutes.
An attempt to change the IP address later than three minutes after the re-start, will result in the
Configuration of the NetLink adapters
S7B driver for iFIX/FIX32
Page 15
NetLink adapter sending an error response and the following message will come up:
Picture 3-6: Error message box, if the temporary IP address could not be set.
If the temporary IP address was set successfully, click the "Exit" button to leave the dialog „Set
NetLink‘s IP address“. In the list to the right, "NetLinks accessible by UDP", the previously selected
NetLink adapter in the column "Temp. IP Addr." now contains the previously assigned IP address.
Should this also correspond with an IP address of a configured NetLink adapter (left side), the
corresponding colored square, in the first column in the right list, will be displayed.
To transfer the NetLink adapter or the IP address of the NetLink adapter in the channel
configuration of the chosen driver channel, highlight the selected NetLink adapter by clicking the
corresponding line in the right list ("NetLinks accessible by UDP"). Then click the button "Select &
Exit".
The following message box will then ask if the IP address should be applied to the driver channel.
Picture 3-7: Message box at the end of the dialog „Scan for NetLinks“
If answered with "Yes", the given IP address will be assigned to the driver channel dialog as a
temporary IP address and put in the field "„Up/Download IP-Address". This means that the NetLink
adapter is now accessible through the IP address and that the parameters can be downloaded. Only
when the parameters have been downloaded, will the IP address be permanently stored.
The following passage describes how the IP address can be permanently stored and how other
network parameters and bus parameters of the NetLink adapter can be changed or read back.
Configuration of the NetLink adapters
S7B driver for iFIX/FIX32
3.2
Page 16
Permanent storage of the IP address and bus parameters
Should the permanent IP address of the NetLink adapter (via which it is accessible) for whatever
reason need to be changed or if the NetLink adapter was assigned only a temporary IP address and
this should be stored permanently, it is necessary to perform a so called "Download" of the NetLink
parameters. The NetLink parameter set contains, next to the IP address, the subnet mask, the
default gateway address on the first property page [Prim. MPI/PB NetLink (1)] and all adjustable
Profibus parameters or MPI bus parameters on the second property page [Prim. MPI/PB NetLink
(2)].It should be noted, that all changes to the parameters made via the Power Tool will only
become active in the NetLink adapter after the parameters have been transferred to it, per
download.
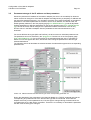
For the two different bus types (MPI and Profibus), the driver stores an individual parameter set.
The parameter set can be selected by the "plugged into" Combo box on the first property page
[Prim. MPI/PB NetLink (1)]. Due to the storage of the separate parameter sets, it is possible to
switch from one bus type to the other, without the risk of losing the parameters of the bus type
selected beforehand.
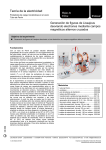
The following picture will elucidate the relation between the selected bus type and its corresponding
parameter set.
Picture 3-8: Relation between the selected bus type and its corresponding parameter set
During the download of the parameters in the NetLink adapter, the TCP/IP parameter set and the
corresponding bus parameter set of the selected bus type will be transferred. As the NetLink
adapter stores only one bus parameter set, if the bus type is changed during the download of the
new parameter set, the last will be overwritten. Therefore it is necessary to download the parameter
set each time the bus type is changed.
Configuration of the NetLink adapters
S7B driver for iFIX/FIX32
3.2.1
Page 17
TCP/IP parameters of the first property page MPI/PB NetLink(1)
The TCP/IP parameter set contains the following parameters:
3.2.1.1 Up/Download IP Addr:
During uploading or downloading the S7B Power Tool tries to connect to the NetLink adapter via
the Up/Download IP address. Therefore, this must be the current valid TCP/IP address of the
NetLink adapter. After starting the Power Tool and reading the S7B configuration file, this field is
empty for the time being. As long as this field is empty, the buttons "Download to NetLink" and
"Upload to NetLink" are disabled. Only when this field contains a valid IP,address will the buttons
be enabled to upload or download the parameter sets. To be able to download the parameter sets,
it is necessary to ensure that the IP address corresponds with the IP address of the NetLink
adapter, under which it can be reached ( see point 1 below).
The Up/Download IP address field can be filled in three ways:
1.
Manual entry of the TCP/IP address
If the IP address of the NetLink -adapter is known and the IP address is accessible, a manual
entry of the IP address in the field "Up/Download.IPAddr." can be applied. To find out whether
the IP address is actually accessible, test it with the command "PING" from the DOScommand window.
2.
Automatic transfer from the dialog "Scan for NetLinks"
The new temporary IP address will automatically be inserted in the Up/Download IP address
field if the NetLink adapter has received a new temporary IP address per UDP, via the dialog
"Scan for NetLinks" and the dialog is then closed with the button "Select & Exit".
3.
Transfer from the field „Permanent IP Addr.“
To change the NetLink´s bus parameters only (i.e. the MPI´s own station address), transfer the
stored IP address from the "Permanent IP Addr." field, in the "Up/Downl. IP Addr." field by
clicking the left transfer button .
3.2.1.2 Permanent IP Addr.
The permanent IP address assigned to this field will be transferred to the NetLink adapter and
permanently stored, during the downloading of the parameters (click the button "Download to
NetLink"). It is not obligatory that the permanent IP address must correspond with the temporary
address. To change the present IP address, to which the NetLink adapter can currently be
connected, type in the new IP address in the "Permanent IP Addr." field. Then type in the current IP
address in the "Up/Downl. IP Addr." field. The parameter data are written in the NetLink adapter,
through a click on the "Download to NetLink" button. After a successful download the NetLink
adapter will be automatically reset and be accessible through the new IP address.
Attention! The given IP address in this field, is the address through which the S7B-driver
establishes a data connection with the NetLink adapter in online mode (run).
The IP address in the "Up/Downl. IP Addr." field can be transferred to the "Permanent IP Addr."
field by clicking the right transfer button .
3.2.1.3 Subnet Mask
The subnet mask determines, in a TCP/IP segment, the address range of the IP addresses, via
which each host will be addressed. In a class C network, only the last 8 Bits (4th octet) of the IP
address are available to address the host. From these 8 Bits however, one or more can be used to
address a sub-network.
The NetLink adapter must be made recognizable to the subnet mask of the net segment to which it
is physically attached. If the NetLink adapter is used in the same net segment as the system
running the S7B driver, the settings of the NetLink subnet mask can be transferred from this
Configuration of the NetLink adapters
S7B driver for iFIX/FIX32
Page 18
system.
3.2.1.4 Default Gateway
If the NetLink adapter is not used in the same net segment as the system on which the S7B driver
runs, meaning, for example, it can only be reached via one or more routers, then the IP address of
the primary router must be made recognizable to the NetLink adapter to which it is directly
attached.
3.2.2
TCP/IP parameters on the second property page MPI/PB NetLink(2)
On the second property page of the NetLink channel configuration, the bus parameters for the MPI
bus or the Profibus will be configured.
3.2.2.1 MPI bus parameters
If the NetLink adapter is used in an MPI bus, in most cases the default parameters can be used.
The most important MPI bus parameters are the NetLink adapter‘ s own station address and the
highest station address.
The NetLink adapter must be assigned with its own station address in an MPI net. This may not be
used by another MPI station and must be less than or equal to the highest station address. In
standard MPI networks, the highest station address is set at 31. If the MPI network uses addresses
higher than 31, then the highest station address setting of the NetLink adapter must be set
accordingly.
All other parameters should not be altered, as variations from the default values may hinder the bus
communication or could be at the least disturbed by the NetLink adapter.
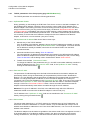
2.2.2.2 Profibus parameters
If the NetLink adapter is used on a Profibus, it must be configured with the current bus parameters.
There is a detailed description of how to locate the bus parameters of the S7 Profibus in chapter
2.3.2.. Chart 1 on page 6 shows the relation between the parameters of the S7 side and the fields in
the S7B configuration dialog on the second property page „MPI/PB NetLink(2)“.
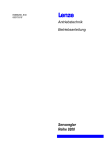
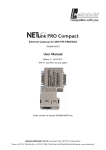
The following picture demonstrates how the parameters from the Step7 configuration relate to the
fields in the S7B configuration. The corresponding parameters of the Step7 configuration and the
S7B configuration are marked by circles of the same color.
The bus parameters must be disclosed to the NetLink adapter per download. It is not sufficient just
to collect the bus parameters. After the parameters have been gathered in the property page
"MPI/PB NetLink (2)", it is then neccessary to switch to the first property page "MPI/PB NetLink (1)"
and by clicking the "Download to NetLink" button, the downloading of the bus parameters on to the
NetLink adapter can be started.
Configuration of the NetLink adapters
S7B driver for iFIX/FIX32
Picture 3-9:
Relation between the Step7 hardware config. bus parameters and the S7B
configuration bus parameters.
Page 19
Configuration of the NetLink adapters
S7B driver for iFIX/FIX32
3.3
Page 20
Read back the TCP/IP and bus parameters from NetLink
The currently stored TCP/IP- and MPI or Profibus parameters in the NetLink adapter can be read
out by clicking the "Upload from NetLink" button. They will be displayed on both of the property
pages ("MPI/PB NetLink (1)" and "MPI/PB NetLink (2)"). Whether the bus parameter should be
filled in the MPI parameters record or in the Profibus parameters record, must be selected before
the upload through the selection of the Combo box "plugged into ".
Attention! The upload function cannot recognise independently if the NetLink adapter is connected
to the MPI or the Profibus.