1
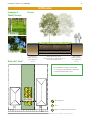
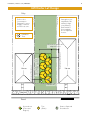
Volunteer
Professional
Volunteer + Professional
Infilltrator
Image Source: Dmitry Marochko, “Birch Grove.” 31 May 2009 via Flickr, CC BY-NC-SA 2.0
Field Guide | DFC-lots.com | Infilltrator
2
HELLO
What is the lot design likely to cost?
The estimated cost of the Infilltrator is over $5,500 and
based on utilizing volunteer and professional labor.
The Field Guide recommends hiring a professional for
earthworks, lot preparation, and installation of the
basement fill. The cost assumes that residents or
volunteers have access to basic safety gear and garden
tools.
MY NAME IS
Infilltrator
How much upkeep will this lot design
require?
The Infilltrator provides a unique
‘fill’ amenity within the footprint
of a recently demolished house — a
luscious green rain garden that can
manage stormwater from the roofs
of up to two neighboring houses.
This lot design incorporates the
City of Detroit’s alternative fill
practices as the drainage base for
a new type of drainage system.
The alternative fill consists of
concrete foundations, walls, etc.
excavated from recently demolished
house and crushed in place. The
Infilltrator takes advantage of the
porous space existing between the
large aggregate by creating a rain
garden. This lot design has a sun
and shade planting option.
For more information refer to DFC-lots.com
Cost
$50 - 1,000
Two planting option are provided and both will require
a medium level of maintenance to thrive. Refer to
maintenance list on page 9 for each planting option
maintenance requirements.
Will the installation of this lot design
require a professional?
The installation of this lot design will require professional
assistance for the first few steps. The Field Guide
identifies volunteer opportunities if you, with the help
and support of friends, family or neighbors, would like
to construct the planting portion of this lot design.
Please refer to the Step-By-Step section for guidance on
professional and volunteer recommended steps. If you
do not have the required support or feel unable to tackle
the volunteer aspect of this lot design, a professional can
construct the entire project.
How long will it take to install this
lot design?
This lot design requires a professional for the completion
of several steps. The projected installation time listed
below is for volunteer opportunities listed in step-by-step
section only. While people tackle projects differently, the
Field Guide estimates installation time of the lot design
to be one to two full weekends with volunteer group
organized by a knowledgeable lot leader. The Field Guide
recommends the help of at least five to eight healthy
adults or youth to complete this lot design. The Field
Guide assumes that the lot is ‘construction ready,’ and all
equipment and materials required for the lot design have
been acquired and are ready to use.
$1,000 - 2,500
$2,500 - 5,500
$5,500 +
People
Volunteer
Professional
Volunteer + Professional
Experience
Beginner
Intermediate
Advanced
Low
Medium
High
Good
Better
Best
Upkeep
Stormwater
Location
Residential Lots in Full Sun to Shade
Field Guide | DFC-lots.com | Infilltrator
3
Infilltrator
Examples of
Shade Plantings
Section
1 - Birch Grove
2 - Forget Me Not
Where Do I Grow?
Grass Area
10’-0” Minimum
from Adjacent
House
Depression with Trees
and Groundcover, Match limits of
Demolished Basement
Grass Area
10’-0” Minimum
from Adjacent
House
The Infilltrator is best constructed
on a single lot and ideal for lots with
recently demolished houses.
Section
Groundcover
Tree
Section
Grass or Optional Groundcover
Image Source: 1) Dmitry Marochko, “Birch Grove.” 31 May 2009 via Flickr CC BY-NC-SA 2.0; 2) Kostolany244, “Forget-me-not.” 19 April 2009 via Flickr CC By-NC 2.0.
Field Guide | DFC-lots.com | Infilltrator
4
Before You Start
‘Construction Ready’
This lot design assumes that
you have prepared the lot to a
‘construction ready’ state.
‘Construction Ready’ refers to a
lot that is clean and clear of trash,
hazardous objects, unwanted trees,
brush and vegetation, fences, and
other unwanted structures.
It may be necessary to remove grass
in preparation for your lot design.
Refer to the Remove Your Grass box
located on the right hand side of
this page for more information.
Is there an available water source
near your lot? Consider how and
where you will access water during
and after construction to ensure
that your plants can establish.
If your lot is not ready for
construction, refer to the Clean +
Green lot design.
You can find the lot design at
DFC-lots.com.
Call Before You Dig
Locate underground utilities before beginning your
lot design. MISS DIG provides a free service to
Michigan residents by locating and marking utilities
on requested properties. Call (800) 482-7171 or 811
at least three days before you plan to start digging
on your lot.
Test Your Soil
Harmful pollutants have made their way into
many urban soils. To proceed with awareness,
consider having your soil tested before
construction. Two great options are available:
Soil testing is free to members of Keep Growing
Detroit’s Garden Resource Program. Call
(313) 757 – 2635 for more information or visit
detroitagriculture.net.
If you are not yet a member, you can work directly
with Michigan State University’s (MSU) Extension
Program. They have a Home Lawn and Garden
Soil Test Mailer for $25. For more information call
(888) 678 – 3464 or visit msusoiltest.com.
If you are concerned about the presence of lead or
other contaminants in your soil, call the Michigan
Department of Health and Human Services at
(866) 691 – 5323 or (800) 424 – LEAD.
Remove Your Grass
Need to remove grass in areas where you are
constructing your lot design?
There are many ways to remove unwanted grass.
The first is to remove the grass and its root system
by digging up the grass. Another option is to cover
your lot with cardboard or a plastic tarp to smother
your grass in darkness. It will take several weeks,
but after being covered, the dead grass will be
easier to remove.
Till Safely
Before you till, inspect your lot for signs of buried
concrete or rubble that was not removed during
the cleanup stage. Large debris can ruin tiller
blades.
When tilling, wear appropriate safety gear, such as
covered boots with socks, long pants, safety glasses,
dust mask, and ear protection. Make sure you
understand the safe operating procedures of your
tiller. Refer to the user’s manual.
Field Guide | DFC-lots.com | Infilltrator
5
What You Need: Shopping List
Shopping List
Materials
MaterialsList
List
The shopping list provides a breakdown
of potential materials, tools, and
resources required to construct this lot
design.
Materials
·· Geofabric, amount to be determined by
basement size
This shopping list is designed for
a single lot (30 by 100 feet).
·· City of Detroit Approved Alternative Fill,
1 foot depth, amount to be determined by
basement size
·· Organic Drainage Soil, amount to be
determined by basement size
·· Mulch or Wood Chips, Three inch depth of
mulch required, amount to be determined by
basement size
Tools + Resources
·· Downspout Disconnect: Standpipe cap,
downspout elbow, downspout connection
pipe, rubber cap, and hose clamp
Suggested Tools
·· Safety Gear: Gloves, heavy work boots, tall
socks, pants, long sleeve shirts, dust masks,
protective eye wear, ear plugs, and hard hats
(if using heavy machinery)
·· Garden Tools: Spades, shovels, rakes, trash
bags, and wheelbarrows
·· Hacksaw and Screwdriver
·· Truck, for hauling imported soil, geofabric
and City of Detroit Approved Alternative Fill
·· Ball Cart, for moving heavy trees
Potential Water Sources
·· Garden Hose with potential extension hose
Planting Option 1: Shade
·· Northern Maidenhair Fern, 750 plugs
·· Lady Fern, 750 plugs
·· Jack Frost Bugloss, 750 plugs
·· Variegated Bugloss, 750 plugs
·· Birch Trees, 6 pots or balled and burlapped
Planting Option 2: Sun
·· Septic Field Wildflower Mix, 1 pound of seed
·· Germination Blanket, 1 roll (8 by 112.5 feet)
·· Sprinkler
·· Rain Barrel in addition to other water
source
·· Downspout Disconnect (shown in lot
design)
Field Guide Resources
Resources are available on the Field Guide’s web
site.
·· Clean + Green
·· Tree Planting Detail
·· Perennials + Grasses Planting Detail
·· Bulb Planting Detail
Remaining Lot (Optional)
Groundcover
·· Low-Maintenance Fescue Mix, 11 to 13
pounds of seed
·· Germination Blanket, 3 roll (8 by 112.5 feet)
Field Guide | DFC-lots.com | Infilltrator
6
Infilltrator Step-By-Step
Let’s Start
Want to create the Infilltrator? The
Field Guide recommends hiring a
professional for some tasks. Here are
a few guiding principles to help you
understand the tasks involved in the
lot design and the steps appropriate
for volunteers.
Check off tasks as you go along.
Lot Design Steps
Professional Recommended:
Prepare Your Lot
Infill Basement
Volunteer Opportunities:
Planting Option 1 (Shade):
Plant Trees
Planting Option 1 (Shade):
Plant Perennials
Planting Option 2 (Sun):
Sow Meadow
Disconnect Your Downspout
Maintain Your Lot Design
Sow Remaining Lot
This lot design provides two
planting options depending on
whether your lot is in sun or
shade.
Prepare Your Lot
The Infilltrator is one of the more complex
lot designs within the Field Guide. It is
recommended that you hire a professional
for these steps: Prepare Your Lot and Infill
Basement.
If you decide to construct this lot design
without the recommended assistance of a
professional, the Field Guide has provided
guiding principles below to help assist you
with the installation of the lot design.
·· The Field Guide recommends creating this
design on a lot where a house has recently
been demolished and a basement hole is
present and unfilled.
·· The basement footprint is to be utilized as the
size, shape, and dimensions of the Infilltrator
lot design. The Infilltrator can be created
without an existing or open basement but will
require soil excavation.
·· The Infilltrator should be (minimum) ten feet
from any adjacent houses, five feet from
adjacent property lines and at least five feet
from the sidewalk.
·· You do not need to kill grass in an open
basement as earth sculpting and imported
planting soil will suppress existing weeds.
·· Soil should be prepared for seeding by
scarifying, raking, or tilling the soil four to
six inches deep to loosen any compaction,
allowing for easier seed germination and
better water infiltration.
·· The Infilltrator can function as a rain garden
or as a unique garden without the collection
of stormwater. If the Infilltrator is to function
as a rain garden, there should be (minimum)
of one square foot for every ten square feet
of stormwater area directed into your rain
garden. The Infilltrator size shown on
the included plan (640 square feet) can
easily handle stormwater for two standard
single family house sizes in Detroit. This
rain garden is also large enough to collect
stormwater from some commercial
properties.
Field Guide | DFC-lots.com | Infilltrator
7
Infill toInfilltrator
InfiltrationStep-By-Step
Garden Set-By Step
Infill Basement
The following are a few guiding principles for
importing and backfilling an open basement
hole. The Field Guide recommends hiring
a professional to complete the earthworks
portion of this lot design.
·· Demolished basement depths can vary, and
no two sites are the same.
·· Calculate the length, height, and depth of
basement to determine the amount of fill
required.
·· Place geofabric on bottom and sides
of basement and fill one foot depth (or
required depth for basement) with City of
Detroit approved alternative fill (crushed
foundation) on top of geofabric.
·· City of Detroit approved alternative fill must
be at least three feet below grade. Crushed
foundation should not be larger than eight
inches.
·· Once geofabric is in place, wrap geofabric
around top of alternative fill (like a burrito).
·· Fill remainder of the hole with imported
organic drainage soil or until it is filled six
inches below adjacent grade for drainage or
rain garden.
Planting Option 1 (Shade):
Plant Trees
The Field Guide recommends planting 1.5
inch diameter trees; however, smaller or
larger trees can be planted if preferred.
Trees can be purchased in pots or balled and
burlapped. If you decide to plant larger trees,
speak with a professional or an educational
group as older trees can be more difficult to
establish.
Plant trees as soon as possible after
purchasing. If you cannot plant them the same
day, do not leave unplanted trees in direct
sunlight. Keep them in shade and well watered
until you can plant them. (Trees dry out fast!)
Identify the location where you wish to plant
the trees. Dig a hole three times the width of
the root ball and equal to the depth.
Pots should be removed before placing the tree
in the planting hole. Balled and burlapped
root balls should remain wrapped until placed
in hole. Unwrap the top 1/3 of the root ball and
peel back the burlap once planted. Remove any
twine, nails, or stakes. The root flare should be
level with the ground when you place the tree
in the hole.
Water the root ball, then backfill the hole with
the soil previously removed from planting. Add
water to the tree every six inches as you backfill
the hole. Compact the soil lightly after each
watering until the hole is filled with soil and
level with the adjacent ground.
The Field Guide recommends adding three
foot diameter by three inch depth of wood
chips or mulch around trees. Keep wood chips
or mulch a few inches away from tree trunks.
For more guidance on tree planting refer to
the Tree Planting Detail.
Field Guide | DFC-lots.com | Infilltrator
8
Infill toInfilltrator
InfiltrationStep-By-Step
Garden Set-By Step
Planting Option 1 (Shade):
Plant Perennials
Partly sunny to shade plantings are
recommended for this Infilltrator shade option.
Place plants in desired location, then remove
plastic pots, loosen roots, and plant.
The Field Guide recommends adding three
inches of wood chips or mulch to the
Infilltrator area. The amount of wood chips or
mulch should be determined by the basement
size. Adding wood chips or mulch will help
suppress weeds.
For more guidance on planting perennials
refer to the Perennials + Grasses Planting
Detail.
Planting Option 2 (Sun):
Sow Basement Meadow
Seeding should take place in either spring (midMay to mid-June) or fall (mid October to end of
November). Nativescape’s Septic Field seed mix
is a good option for the Infilltrator; similar mixes
are available from other suppliers. No cover
crop is required for the seed mix.
Although the seed mix is not being used over a
septic field, the Septic Field Seed Mix is ideal for
the basement meadow due to its great drainage
capabilities.
Nativescape suggests one pound of Septic Field
Seed Mix per 1,000 square feet. The Field Guide
recommends one pound of Septic Field Seed
Mix for the Infilltrator area (16 by 40 feet).
Once seeds have been mixed, spread seed
across the Infilltrator area. You can do this by
hand or with a hand-cranked whirlwind seeder.
You will need to do this several times to get even
coverage.
Gently water seedlings daily until they are four
to six inches in height.
Placing a thin layer of straw or a germination
blanket over seeded areas will help ensure your
seed establishes by keeping seeds from blowing
away and protecting them from birds. One 8
by 112.5 foot single net germination blanket
will cover the meadow area. Germination
blankets or straw can be purchased at most
nurseries and garden stores, including Detroit
Farm and Garden.
Disconnect Your Downspout
One of the easiest ways to collect stormwater
is by disconnecting your downspout and
directing it into your rain garden.
Before you start, remember that disconnected
downspouts should extend at least six feet
from any house foundation and five feet from
adjacent property or public sidewalk. Avoid
disconnecting downspouts where they might
discharge water across walkways, patios, or
driveways or where they might be a tripping
hazard. Do not disconnect directly over a septic
system.
Follow these steps to help you redirect your
roof water into your rain garden.
·· Measure the existing downspout, and mark
it approximately nine inches above sewer
connection or standpipe.
·· Cut with a hacksaw and remove cut piece.
·· Plug or cap the sewer standpipe with a rubber
cap secured by a hose clamp. Use screwdriver
to tighten and secure cap.
·· Attach elbow joint over the downspout.
·· Add downspout extension to elbow joint.
Extension should be length needed to carry
water away from house and towards rain
garden.
·· Secure pieces with sheet metal screws at each
joint.
Field Guide | DFC-lots.com | Infilltrator
Infill toInfilltrator
InfiltrationStep-By-Step
Garden Set-By Step
·· Use plastic or concrete splashblocks, rocks,
flagstone, or boulders at the end of the
downspout to control erosion of soil and plants
in the rain garden from stormwater.
For more information, refer to DWSD’s How to
Disconnect a Downspout document.
Maintain Your Lot Design
Plants require care and maintenance to thrive.
Both planting options (shade or sun) will require
weeding and watering.
Planting Option 1 (Shade): Trees must be
watered especially in the first year. Water
weekly or as needed. The Field Guide
recommends connecting with an arborist
or taking a workshop on tree health and
maintenance. The Greening of Detroit offers
a great Citizen Forester program to interested
residents.
Perennial plants will require watering and
weeding until it becomes established.
Planting Option 2 (Sun): The meadow will
require mowing in the first year. Cut your
meadow back to four to six inches whenever it
reaches above ten inches in height.
After the first year, it is recommended to
continue weeding and to mow your meadow in
late fall or early spring to keep the meadow at
its best. It will take about three years for the
meadow to fully establish.
Meadows are a work in progress. If you feel
your meadow needs more color, it is okay to
add additional plants, plugs, or seed mixes. Be
creative and make it your own!
9
Field Guide | DFC-lots.com | Infilltrator
10
Infill toInfilltrator
InfiltrationStep-By-Step
Garden Set-By Step
Sow Remaining Lot
If you are seeking a lower maintenance alternative
to a traditional lawn, the Field Guide recommends
a fescue seed mix. If you follow the Infilltrator
lot design you will need approximately 11 to 13
pounds of fescue seed mix for the remaining lot
(2,360 square feet) and three 8 by 112.5 foot rolls
of single net germination blankets.
This family of floppy grasses is drought-resistant
and requires one cutting (in August or September)
per year. Fescue can be established in full sun to
shade and should be seeded in spring (mid-March
to mid-May) or fall (August to September).
Soil should be prepared for seeding by scarifying,
raking, or tilling the soil four to six inches deep to
loosen any compaction, allowing for easier seed
germination and better water infiltration. Apply
seed mix to a damp lot.
Sow seed across the remaining lot by using a seed
spreader or by hand. A seed rate of five pounds
per 1,000 square feet is recommended. Gently
water seedlings daily until they are four to six
inches in height. Placing a thin layer of straw or
a germination blanket over seeded areas will help
ensure that your seed establishes by keeping seeds
from blowing away and protecting them from birds.
Germination blankets or straw can be purchased at
most nurseries and garden stores.
Visit the Resources page on the
Field Guide’s web site (DFC-lots.
com) to discover other vendors
and places to buy plants.
Once established, grass will not require
supplemental watering except during unusually dry
periods. Eco-Turf Low Maintenance Fescue Mix is
one recommended seed mix and can be purchased
through the Michigan Wildflower Farm.
Average Height of Plants
20’
15’
10’
Other Field Guide lot designs can be used as
groundcovers. Check out the web site for
additional options and ideas.
Next Level: If you would like to bring additional
color to your grass you can always plant bluebells,
crocuses and/or daffodils to create a decorative
show in spring. Bulbs should be planted in the fall.
5’
2.5’
Small Trees, Perennials, and Bulbs
For more guidance on bulb planting refer to the
Bulb Planting Detail.
Field Guide | DFC-lots.com | Infilltrator
11
Infilltrator Lot Design
Alley
Property Line
Property Line
Refer to the
Construction
Package for more
details - located
at DFC-lots.com.
Strengthen your
neighborhood’s
identity! Align
your planting
beds with the
front setback
line of adjacent
houses.
Individual
Trees
Property Line
Property Line
Downspout Disconnect
Match garden to limits
of demolished basement
House
Downspout Disconnect
10’ between garden and
adjacent house
House
2
1
Setback Line
Sidewalk
10’ between garden and
Road house
adjacent
Groundcover
(Ferns and
Bugloss)
nspout Disconnect
n to limits
basement
t
1
0’
2
Tree
(Birch)
3
4’
8’
16’
Grass or Optional
Groundcover
Field Guide | DFC-lots.com | Infilltrator
12
Planting Option 1: Part Sun to Shade
House
Lady Fern
Northern Maidenhair
Fern1
Adiantum pedatum
18” Height x 24” Width
Deciduous Fern
Quantity: 750 plugs
2
Athyrium filix-femina
18” Height x 24” Width
Deciduous Fern
Quantity: 750 plugs
1
Jack Frost Bugloss3
Brunnera macrophylla
‘Jack Frost’
18”Height x 18” Width
Blooms May - June
Quantity: 750 plugs
Variegated Bugloss4
Brunnera macrophylla
18”Height x 18” Width
Blooms May - June
Quantity: 750 plugs
Key
Sidewalk
1
Road
2
Paper Birch5
Betula papyrifera+
50’ Height x 30’ Width
Quantity: 6 plots or B & B
2
Northern Maidenhair Ferns,
Lady Fern, Jack Frost Bugloss &
Variegated Bugloss
(Space approximately five per
square feet and mix evenly.)
Paper Birch
(Trees should be spaced
approximately 10 to 15 feet apart.)
Plant Sizes
Pots: 1.5 inch diameter trees
are available at commercial
landscape supply stores in pots
or balled and burlapped (B & B).
Plugs: Plants can be purchased
in plug form or in pots. Plant one
plug per square foot.
Image Source: 1) Zen Sutherland, “Northern Maidenhair Fern.” 04 June 2005 via Flickr, CC BY-NC-SA 2.0; 2) Brewbooks, “Athyrium distentifolium americanum.” 09 September 2012 via
Flickr, CC BY-SA 2.0; 3) A. Barra, “Brunnera Macrophylla, ‘Jack Frost.’” May 2008 via Wikimedia, Creative Commons Attribution-Share Alike 4.0 International 3.0 Unported, 2.5, 2.0, 1.0
Generic; 4) Vauban, “Brunnera macrophylla.” 11 April 2006 via Wikimedia, Public Domain; 5) Erin Malone, “Nct_43.” 06 October 2012 via Flickr, CC BY-NC- SA 2.0.
Field Guide | DFC-lots.com | Infilltrator
13
Planting Option 2: Full Sun to Part Sun
Septic Field Wildflower
Mix
One pound of Septic Field Seed Mix is
recommended for the Infilltrator lot
design.
You can buy these seeds premixed at
Nativescape.
Temporary Grasses (75% of Mix)
Seed Oats, Avena sattiva
Annual Rye, Lolium multiflorum
Native Grasses (20% of Mix)
Sideoats Grama, Bouteloua curtipendula
Junegrass, Koeleria macrantha
Little Bluestem, Schizachyrium scoparium
Sand Dropseed, Sporobolus cryptandrus
Prairie Dropseed, Sporobolus heterolepis
Native Wildflowers (5% of Mix)
Butterfly Weed, Asclepias tuberosa
Wormwood, Artemisia campestris
Lanceleaf Coreopsis, Coreopsis lanceolata
Bee Balm, Monarda fistulosa
Dotted Mint, Monarda punctata
Roundhead Bushclover, Lespedeza capitata
Rough Blazing Star, Liatris aspera
Wild Lupine, Lupinus perennis
Meadow
White Beard Tongue, Penstemon digitalis
Black-Eye Susan, Rudbeckia hirta
Plant Sizes
Stiff Goldenrod, Solidago rigida
Showy Goldenrod, Solidago speciosa
Hoary Vervain, Verbena stricta
Image Source: George Lezenby, “The Meadow.” 30 July 2014 via Flickr, CC BY-NC-SA 2.0
Seeds: All plants can be
purchased in seed form.
Field Guide | DFC-lots.com | Infilltrator
14
Did You Know?
Professionals Can Help!
The Field Guide to Working With
Lots provides a Construction
Package for each lot design. The
Construction Package includes
information and details required
for a professional to construct
this design. On the Field Guide
web site, use the Construction
Package link located near the
top of this lot design page
to download and print. Your
selected professional will then be
able to provide a cost estimate
and schedule based on the
condition of your lot and the
design you select.
Want to Hire Locally?
DFC-lots.com has a growing list
of Detroit-based professionals
and suppliers of landscape
materials and services.
Still unsure of where to start?
Call (313) 294-LOTS or email
fieldguide@detroitfuturecity.
com for assistance.
Helpful Facts
·· Birch trees can grow to 40 to 50 feet in
height.
·· Birch trees were used by Native
Americans to make birch bark canoes.
·· Lanceleaf Coreposis is a Michigan
native wildflower.
·· Although they look like normal plants,
ferns reproduce using spores!
·· Septic Wildflower Mix can be used as
an alternative seed mix for other lot
designs. (Remember that the quantity
of seed you will need changes with the
size of the area you are planting!)
Planting Tips
·· Inspect trees before purchasing to
make sure they are healthy and wellformed. This will help you select trees
that are likely to survive.
·· Do not plant trees under overhead
wires.
·· Water trees during planting and as
needed.
·· If mulching around trees, do not place
too close (less than three inches) from
tree trunk. This will help keep the tree
free of disease.
·· Birch trees have very shallow root
systems, making them sensitive to
heating of soil. Ferns and bugloss
planting should help with this;
however, be sure to monitor birch trees
and water if it is a hot summer.
·· Birch trees grow well in full or partial
sunshine.
Field Guide | DFC-lots.com | Infilltrator
15
Draw Your Lot
Field Guide | DFC-lots.com | Infilltrator
16
Visit DFC-lots.com
#DFClots
Image Source: Brewbooks, “Athyrium distentifolium americanum.” 09 September 2012 via Flickr, CC BY- SA 2.0