1
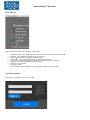
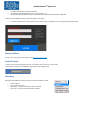
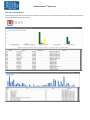
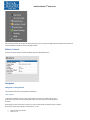
ONETOUCHPM 2.0TM Help Center
System Requirements
Use of the Chrome browser is highly recommended. Once inside Chrome you will be required to install the
Google Earth Web Plug-in for the tool to work properly. Since use of the services involves hardware, software,
and Internet access, your ability to use the services may be affected by the performance of these factors. High
speed internet access is strongly recommended.
Downloads
•
•
Chrome: https://www.google.com/intl/en/chrome/browser
Google Earth Web Plug-in: http://www.google.com/earth/explore/products/plugin.html
To download and install these items you may need to have administrator rights for your computer.
OverView
Link to Site: https://firstenergy.onetouchpm.com/
A login screen will be displayed to access the secured site.
ONETOUCHPM 2.0TM Help Center
Clicking the login button with display sign in box.
Access to the OneTouchPM 2.0™ content is controlled by these sets of controls shown below:
ONETOUCHPM 2.0TM Help Center
View Options
Other items that can be added to the view frame if needed include:
•
•
•
•
•
•
•
•
•
Navigation Controls – (On by Default) this allows the user to zoom and pan and use the Street View Ability
Status Bar – (On by Default) lower Right hand corner of the screen.
Imagery Date Coordinates and status bar for features loading
Overview Map – (Off by Default) displays larger overview map of viewing area
Scale Legend – (Off by Default) displays a scale bar in the lower left hand corner of the screen
3d Terrain – (On by Default) New terrain provided by Google
Atmosphere– (Off by Default)
Sun– (Off by Default)
Historical Imagery – (Off by Default) user can view old aerial photography based on timeline
Login Information
Upon clicking the Login Button you will see a Login Box.
ONETOUCHPM 2.0TM Help Center
•
•
•
You will be asked to enter an Email and Password
For example, Email: [email protected], Temp Password: *******
The Email and password will be sent to each specific user and should not be shared within the organization.
Another box will be displayed if this is your first time logging into the system.
•
You will be required to enter a unique password with a minimum length of 6 characters and 1 non-alpha numeric special character.
Password Reset
In order to have your password reset, please contact [email protected]
Switch Projects
To switch projects, select the Change Projects link. It is located in the top right corner of your browser.
The change project option is only available for large programs, with multiple projects.
Searching
Searching is accomplished by entering a key word in one of five dropdown choices:
•
•
•
•
Select a category
Type the search by criteria
Click “Search” – will fly to the location of the item searched
Click “Clear” – to remove (all) pushpin search location(s)
ONETOUCHPM 2.0TM Help Center
The address feature will look for a specific physical address, once the user selects “Search” or hits Enter the application will fly to that location.
Address - physical address
Struc Number - search by Structure Number
Substation - search by Substation Name
Access Roads - search by for Access Roads using Line List ID
Real Estate - search based on Line List Number, County PIN or Owner Name
ONETOUCHPM 2.0TM Help Center
Reports & Documents
Analytics allow the user to further work with the data, and enhance searching results. The reports button allows users to view Reports and Documents,
see examples below associated with the project.
ONETOUCHPM 2.0TM Help Center
Table of Contents & Data Layer
Data Layers
The data is categorized into groups by discipline. Users can navigate to a specific data layer category and find it on the map.
The layers will expand or collapse based on the user selection.
NOTE: If a heading displays in a blue color and the accordion is collapsed, then one or more data layers are currently turned ON
for that section.The sample figure displays that a data layer is ON for Abbe-Johnson,
and Bellevue-Greenfield
ONETOUCHPM 2.0TM Help Center
Data Layers will maintain the last layer that was checked upon exit. For example if the Maps layer was selected and the window is
closed. It will still be checked the next time the page is loaded.
Balloon Content
Once the user selects a feature a balloon will display noting the data attributes of the
Navigation
Navigation in Google Earth
This Information was taken from Google Earth User Manual
Using a Mouse
To get started navigating with your mouse, simply position the cursor in the middle of the 3D viewer
(image of the earth), click one of the buttons (right or left), move the mouse and note what happens in
the viewer.
Depending upon which mouse button you press, the cursor changes shape to indicate a change in behavior.
By moving the mouse while pressing one of the buttons, you can:
•
•
Drag the view in any direction
Zoom in or out
ONETOUCHPM 2.0TM Help Center
•
•
Tilt the view (requires middle button or scroll wheel)
Rotate the view (requires middle button or scroll wheel)
The following list describes all the actions you can accomplish using the mouse:
•
•
•
•
Move the view in any direction (north, south, east, or west) - To move the view, position the
mouse cursor on the viewer and press the LEFT/main mouse button. Notice that the cursor
icon changes from an open hand to a closed hand. Pull the viewer as if the hand cursor is like
a hand on an actual globe, and you want to drag a new part of the earth into view. You can
drag in any direction to reveal new parts of the globe, and you can even drag in circular motions.
Drift continuously across the earth - If you want to drift continuously in any direction, hold
the left/main mouse button down. Then, briefly move the mouse and release the button, as if
you are "throwing" the scene. Click once in the 3D viewer to stop motion.
Zoom in - There are a number of ways to zoom in with the mouse. You can double-click
anywhere in the 3D viewer to zoom in to that point. Single-click to stop, or double-click to zoom in more.
If your mouse has a scroll wheel, use it to zoom in by scrolling towards you. Use the ALT
(alt/option on the Mac) key in combination with the scroll wheel to zoom in by smaller increments.
More Settings
You can also position the mouse cursor on the screen and press the RIGHT mouse button. Once the
cursor changes to a double arrow move the mouse forward or push away from you, releasing the button
when you reach the desired elevation. If you want to zoom continuously out, hold the right button down
and briefly push the mouse forward and release the button, as if you are "throwing" the scene. Click
once in the viewer to stop motion.
•
•
•
•
•
•
•
Tilt the view - If your mouse has a either middle button or a depressible scroll wheel, you can
tilt the view by depressing the button and moving the mouse forward or backward. If your
mouse has a scroll wheel, you can tilt the view by pressing the SHIFT key and scrolling
DOWN to tilt the earth to "top down" view, or scrolling UP to tilt the earth for horizon view.
Rotate the view - If your mouse has either a middle button or a depressible scroll wheel, you
rotate the view to the left by clicking on the middle button and moving the mouse to the left.
To rotate the view right, click on the middle button and move the mouse to the right. You can
also use the key in combination with the scroll wheel to rotate the view. Press and scroll UP
to rotate clockwise, to rotate counter-clockwise. See Tilting and Viewing Hilly Terrain for
more information.
Mouse Wheel - See above. To change these settings, click Tools > Options > Navigation >
Navigation Mode > Mouse Wheel Settings. Move the slider to set how fast or slow your
viewpoint of the earth zooms in or out. Check Invert Mouse Wheel Zoom Direction to reverse
the direction of zooming when you use the mouse wheel.
Rotate the view (requires middle button or scroll wheel)
Pan and Zoom navigation - This mode is on by default when you start Google Earth. You can
return to this mode from other modes by doing one of the following:
When this mode is activated, the cursor changes to a hand symbol.
(Windows and Linux)
Google Earth > Preferences > Navigation > Navigation Mode > Pan and Zoom. If you use a
joystick or other non-mouse controller, you can also change how perspective moves in the 3D
viewer under Non-mouse controller settings. Note that these options are not available (greyed
out) until you connect a non-mouse controller to your computer and check Enable Controller.
Choose User-Based to move your particular vantage point or Earth Based to move the globe.
Check Reverse Controls to reverse the actions of the joystick.
ONETOUCHPM 2.0TM Help Center
Street View
This Section Taken from Google Earth User Manual
Use Pegman
1.
2.
Click Pegman
o
Areas with Street View imagery available will be highlighted in blue.
o
You can also see indoor imagery highlighted on the map as orange dots.
Unclick to drop him on the highlighted areas of the map and your screen will zoom down to street level.
Navigate in Street View
•
•
•
•
To move down the road, hover over your desired location. Your cursor becomes an arrow
that shows which direction you will travel, and an “X” on the ground marks where you will
go. Click once to travel to the “X.”
To look around, click and drag your mouse. You can also use the arrows to the left and right of the compass icon.
To zoom in or out, you can also use the + and - buttons below the compass.
To orient your Street View North, click the compass icon in the top right