1
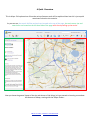
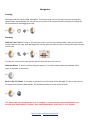
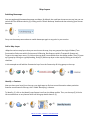
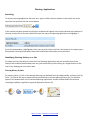
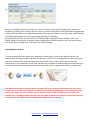
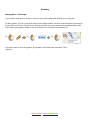
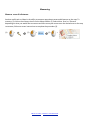
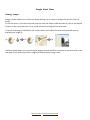
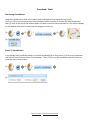
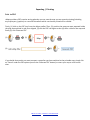
User Guide
Welcome to the rMaps User Guide. You can either choose a topic below or simply read through the
document to understand how to best use this site and its features.
A Quick Overview
The rMaps navBar
Navigation
(Panning & Zooming)
Address Searching
Map Layers
(Switching Basemaps, Adding & Identifying)
Planning Applications
(Searching & Identifying)
Drawing
(Adding Graphics)
Measuring
(Distances and Areas)
Google Street View
(Viewing Images)
Coordinate Tools
(Retrieving & Searching)
Exporting / Printing
(Map to PDF)
Other Features
(Clearing Graphics / Deactivating Tools, About & Contact Details)
Back To Start / Back to Tool Selection
A Quick Overview
This is rMaps. Full explanations of how the various features work will be explained later but this is just a quick
overview of what the site contains.
As you can see, the search facilities and tools are located at the top of the page, the main menu, tips and
news items are located on the left hand side of the page with the map taking up the centre.
Now you know the general layout of the site and where to find things, let’s get started on learning more about
the features of rMaps, starting with the rMaps navbar…
Back To Start / Back to Tool Selection
The rMaps navBar
This is the navBar. It contains a selection of tools to help you navigate around the map, add map layers, draw
graphics, measure distances & areas plus a lot more.
The following tools are available from the navBar (from left to right):
About | Help | Contact Us | Print to PDF | Zoom In | Zoom Out | Pan | Zoom To Full Extent | Map
Layers | Identify Map Feature | Identify Planning | Measure | Draw | Coordinate Tools | Google
Street View | Clear and Deactivate Map
If you just need to quickly brush up on how to use one of the tools above then feel free to click on the
relevant link, otherwise please read on to find out what these tools do and how they work.
Back To Start / Back to Tool Selection
Navigation
Panning:
Moving around the map is simple with rMaps. To move the map, you can (1) select the pan icon from the
rMaps navBar, but by default you can just use your mouse cursor to pan around the map by (2) clicking the
left mouse button and dragging the map.
(1)
+
(2)
Zooming:
With the Zoom Tools: To zoom in, (1) select the zoom in icon from the rMaps navBar, then (2) click the left
mouse button on the map, hold and drag a box over the area you want to zoom to and this will zoom the map
to that area.
(1)
+
(2)
+
To zoom out, carry out the same process but this time use the zoom out icon.
With the Mouse: To zoom in and out using the mouse, (1) scroll the mouse wheel up and down (up to
zoom in and down to zoom out).
(1)
Back to the Full Extent: If you need to get back to the full extent of the Borough, (1) click on the zoom to
full extent icon from the rMaps navBar, this will take you back to a view of Runnymede.
(1)
+
Our Advice: We have found the best way to navigate is to pan with your mouse and zoom in and
out with your mouse wheel. It reduces time switching between tools and it is a lot simpler.
Back To Start / Back to Tool Selection
Address Searching
To find a property in the Borough, start typing in any part of the address you wish to search for in the address
search box. Results will then automatically appear in the drop down menu after entering at least 5 characters;
you can then click on the correct result to zoom to that property.
Our Advice: Less is best. We recommend entering either the number / name of the property and /
or the street or just the postcode to return address matches, for example:‘13 high street’
‘garfield road’
‘KT15 1TL’
‘the cottage’
You do not need to enter a full address consisting of number / name, street, town and postcode (if
the address is complex it may not even be returned), results appear pretty quickly and it just saves
time typing a complete address out…
…and there is no need to include any capital letters or commas!
Back To Start / Back to Tool Selection
Map Layers
Switching Basemaps:
You can toggle easily between basemaps on rMaps. By default, the road layer shows on start up, but you can
switch this to a different view by (1) clicking on the ‘Switch Basemap’ button and then selecting your chosen
basemap.
(1)
+
Carry out the same process above to switch basemaps again at any point in your session.
Add a Map Layer:
rMaps has various map layers that you can view on the map; they are grouped into logical folders (Tree
Preservation Orders are within Environment & Planning, Bus Stops are within Transport & Streets etc).
To get to the map layer menu, (1) click on the map layer icon available from the rMaps navBar. Then (2) open
up a group by clicking on a group heading, finally (3) add a map layer to the map by clicking on the layer’s
checkbox.
In this example we will add the Cemeteries layer from the Community & Living group to the map.
(1)
+
(2)
+
(3)
+
Identify a Feature:
Now you have your layer(s) on the map, you might want to find out more information about particular
features now shown on the map; this is called ‘identifying’ a feature.
To identify, (1) click on the identify map feature icon from the rMaps navBar. Then, on the map (2) click the
left mouse button on any feature which will bring up details about it (3).
(1)
+
(2)
+
(3)
Back To Start / Back to Tool Selection
Planning Applications
Searching:
To locate a planning application and zoom to it, type in its RU reference number in the search box at the
top of the site and then click the search button.
If the number has been entered correctly then its details will appear in the results window at the bottom of
the map, simply click on the entry which will zoom the map to the planning application and highlight it.
Once the site boundary is highlighted in blue, you can then click on the link in the popup on the map to go to
Runnymede’s Planning Portal where documents and further information can be retrieved.
Identifying Planning History on a Site:
On rMaps you have the ability to retrieve a list of planning applications that are located at a particular
location and view brief details about each one; you can do this by either clicking at a single location on the
map, or by drawing your own search area.
Planning History By Point
For a basic search, (1) click on the identify planning icon available from the rMaps navBar, and then click ‘By
Point’. (2) Click on the map at a point where you would like to retrieve planning history for, this will then
open an info window with a list of retrieved planning applications and the relevant details for each one
including the address, application type and application decision (3).
(1)
+
+
(2)
+
Back To Start / Back to Tool Selection
(3)
Above is an example of what is returned. You can see that there is the option of viewing the application’s
boundary (by clicking show / hide in the first column), as well as the option of clicking the planning application
number which will take you straight to Runnymede’s Planning Portal where you can get more in depth details
including associated documents for the planning application (if available).
We also provide a facility to print the full list of returned planning applications by clicking on the ‘Print
Details’ option, and an option to ascend / descend applications by decision date so you can view the latest
ones at the top by clicking on the ‘Decision Date’ column heading.
Planning History By Area
For a more advanced search where you can specify a search area, (1) click on the identify planning icon
available from the rMaps navBar, and then click ‘By Area’. (2) Click at a starting position on the map to draw
your area, and then keep single clicking around your chosen site to create a search area on the map,
following on screen instructions as you go to complete the procedure by double clicking at the last point you
draw. Once finished, the planning history will be returned as shown in stage 3 above for your chosen area.
(1)
+
+
(2)
+
Our Advice: Searching for planning history by point will only return any applications that exist at the
location you click. This is normally ok for conventional residential dwellings or small commercial units,
but for any large sites such as schools, farms, industrial sites etc which might have applications for
specific areas / buildings within the larger site, we would recommend searching for planning history by
area to take in the whole extent, ensuring that no applications are missed.
Back To Start / Back to Tool Selection
Drawing
Add graphics to the map:
If you need to mark areas or locations onto the map, the drawing tools will help you in doing this.
To add a graphic, (1) click on the draw icon from the rMaps navBar. You then have the option of choosing to
draw a point, area or line. (2) Select one of these and then move your mouse over the desired area on the
map to draw your graphic, follow on screen instructions to complete the procedure (3).
(1)
+
(2)
+
(3)
+
If you then want to clear the graphics, just go back to the draw menu and select ‘Clear
Graphics’.
Back To Start / Back to Tool Selection
Measuring
Measure areas & distances:
Another useful tool on rMaps is the ability to measure approximate areas and distances on the map. To
measure, (1) click on the measure icon from the rMaps navBar. (2) Select either ‘Area’ or ‘Distance’
depending on what you would like to measure and then move your mouse over the desired area on the map
to measure, follow on screen instructions to complete the procedure (3).
(1)
+
(2)
+
(3)
+
Back To Start / Back to Tool Selection
Google Street View
Viewing Images:
Google’s Street View service is built into rMaps allowing you to access its images with just the click of a
button.
To use this service, (1) click on the street view icon from the rMaps navBar and then (2) click on the desired
location on the map (make sure it is on a road otherwise an image will not be shown).
If a street view image is available for the location where you clicked, the street view pane will open up
displaying the image (3).
(1)
+
(2)
+
(3)
Unlike on Google Maps, you cannot drag the pegman around to different locations so you must click on the
map again if you want to get further images for different places along a road.
Back To Start / Back to Tool Selection
Coordinate Tools
Retrieving Coordinates:
rMaps has capabilities to allow you to search for British National Grid coordinates very easily.
Firstly (1) click on the coordinate icon from the rMaps navBar and then (2) choose ‘Get Map Coordinates’.
Next, (3) click on the map at the location where you want to retrieve the coordinates for, this will then display
an info window with the X/Y coordinates for the given location (4).
(1)
+
(2)
+
(3)
+
(4)
Zoom To Coordinates:
If you already have coordinate details of a location and would like to zoom there, (1) click on the coordinate
icon but this time (2) choose ‘Zoom To Coordinates’. Then, (3) fill in the X/Y coordinates and click ‘Zoom’ to
move the map to that location.
(1)
+
(2)
+
(4)
Back To Start / Back to Tool Selection
Exporting / Printing
Print to PDF:
rMaps provides a PDF creation service whereby you can save the map you are currently viewing (including
any map layers / graphics) to a new PDF document which can then be printed off or emailed.
Firstly, (1) click on the PDF icon from the rMaps navBar. Then, (2) position the map you want exported inside
the map area outlined in red. Once aligned, (3) click the PDF icon again to then (4) enter a title for the map and
finally (5) click ‘Generate PDF’.
(1)
(4)
+
(2)
+
(3)
+
(5)
+
If you decide that you do not want to export a map after you have switched to the printable area, simply click
on ‘Cancel’ under the PDF options (next to the ‘Generate PDF’ button) to return your map to a full screen
view.
Back To Start / Back to Tool Selection
Other Features
Clearing The Map / Deactivating Tools:
If you have drawn graphics onto the map or have searched for an address which leaves the property
identifier symbol on the screen, you may want to get rid of these from the map. There is a quick way of
doing this, (1) click on the clear map icon from the rMaps navBar. This will remove any graphics shown on
the screen and it will also deactivate any tool that you have been using so you regain your normal default
panning option.
(1)
+
About:
A brief history of the Runnymede Interactive Mapping Service and how the site was developed is
available by (1) clicking on the about icon from the rMaps navBar.
(1)
+
Help:
Need some help in using rMaps? We have a comprehensive user guide showing you how to do everything (it
is the one you are looking at right now!).
Contact Us:
If you find you are having difficulty using the site, find something incorrect or have any feedback for the
GIS Team, then please (1) click on the contact us icon from the rMaps navBar where you will be able to
contact us via email.
(1)
+
Back To Start / Back to Tool Selection