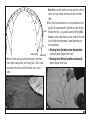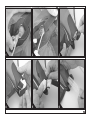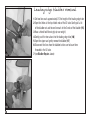
1
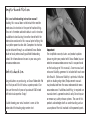
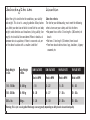
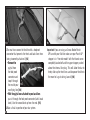
Notes
_________________________________________________
_________________________________________________
_________________________________________________
_________________________________________________
_________________________________________________
_________________________________________________
_________________________________________________
_________________________________________________
_________________________________________________
_________________________________________________
_________________________________________________
Take a lesson!
Before you launch any kite, it is imperative to
take certified kiteboarding lessons.
For Information on lessons in your area go to
www.oceanrodeo.com.
Table of contents
Important Notice________________________________4
Kite care and maintenance______________________20
Introduction_ ___________________________________4
Strut bladder removal___________________________20
Caution_________________________________________5
Repairing the bladder___________________________22
Selecting Kite size_______________________________6
Strut bladder replacement______________________22
Location________________________________________6
Leading edge bladder removal___________________24
Assembly of kite_________________________________7
Leading edge bladder replacement_______________24
Punch-UP Kite bar______________________________10
Warranty______________________________________26
Attaching flying lines to your OR flat kite__________12
Launching Your Flat Kite_ _______________________15
Important Notice
This is not a kiteboarding instruction manual!
Reading this manual does not eliminate the need for
professional instruction in the sport of traction kiting.
The user is therefore advised to obtain such instruction
in addition to familiarizing himself or herself with the
information contained in this manual prior to flying this
or any other power traction kite. Competent instruction
may be obtained through an authorized Ocean Rodeo
dealer or local professionally qualified kiteboarding
school. For information on lessons in your area go to
www.oceanrodeo.com.
Introduction
Congratulations on purchasing an Ocean Rodeo kite. We
trust that you will find it to be a superior product. Our
kites are the result of years of passionate R&D mixed
with technical expertise. Enjoy!
A label showing your serial number is sewn at the
underside of the leading edge center strut.
4
Important
For simplified warranty claims and product updates
please register your product with Ocean Rodeo (via our
website www.oceanrodeo.com or mail in coupon found
on the back page of this manual). A user manual and
release of liability agreement is included with each new
kite. Read it. (Release of liability is printed at inflation
point on leading edge tube.) Replacement manuals
may be obtained from the ocean rodeo website: www.
oceanrodeo.com. If additional outfitting is required use
manufacturer’s approved materials only. Do not impair
or remove any safety release systems. The user of this
product acknowledges both an understanding and an
assumption of the risk involved in kite powered sports.
Caution Safety Warning Kite powered sports can be very dangerous and physically
demanding. The user of this product should understand that participating in kite powered sports may involve serious
injury or death and agrees to observe the following safety precautions:
• Get instruction specific to the type of kite power craft.
• Obtain first aid training and carry first aid and
safety/rescue devices.
• Consult your physician prior to beginning kite
powered sports training.
• Always wear a nationally approved personal floatation
device when using a kite on water.
• Always wear a helmet.
• Dress appropriately for weather conditions; cold water
and/or cold weather can result in hypothermia.
• Check your equipment prior to each use for signs of
wear or failure.
• Never kite alone.
• Do not kite in overpowered, gusty wind conditions.
• Do not kite in offshore wind conditions.
• Before launching from an unfamiliar site be aware
of any dangers (rocks, reefs, currents, changeable
weather, etc).
• Scout unfamiliar sites before launching.
• Never launch from an area with any obstacles closer
than 2 line lengths downwind (people, rocks, etc).
• Do not kite near power lines!
• Do not ask a non-kiter to assist in the launching or
landing of a kite.
• Always use the kite with a functioning safety system.
• Always prevent kites from inadvertently launching on
land by weighting with sand, gravel, etc.
• Always announce when you are going to launch your
kite so people can be prepared to move in the event
of a gust or a problem.
• Disable an unattended kite by: removing the lines;
placing the kite leading edge down, facing the wind;
and weighting with sand, gravel, etc.
• Do not exceed your kiting ability. Be honest with
yourself.
• You must not use alcohol or mind altering drugs prior
to using this product.
5
Selecting kite size�
Location:
Select the right size kite for the conditions, your ability
and weight. This chart is a rough guideline. Many factors
can affect your decision of which size of kite to use: body
weight; wind direction and steadiness; kiting ability; line
length, etc should all be considered. When in doubt ask
someone who is capable or, if there is no one to ask, err
on the side of caution with a smaller sized kite!
Body Weight
in Lbs
Body Weight
in Kilos
Safe site criteria
The site for your kiteboarding must meet the following
criteria to ensure your safety and that of others:
•No power lines within 3 line lengths (100 meters) of
beach
•No trees 1 line length (30 meters) from beach
•Free from beach obstructions: logs, boulders, slippery
seaweed, etc
16M FLAT KITE
12M FLAT KITE
9M FLAT KITE
7M FLAT KITE
Wind in MPH
Wind in MPH
Wind in MPH
Wind in MPH
110 - 150 lbs
50 - 68 kg
9 - 18
12 - 22
15 - 25
18 - 30
150 - 200 lbs
68 - 90 kg
10 - 20
14 - 27
17 - 30+
20 - 30+
200 + lbs
90 kg +
11 - 24
16 - 30
22 - 30+
25 - 30+
Warning: This is just a basic guide. Wind range can vary greatly depending on abilty, board size and wind quality.
6
Ideal site conditions
•Side shore wind
•Smooth, steady moderate strength wind (8-15 knots)
•Wide sandy beach
•Shallow water close to shore
•Large area of beach downwind free from obstructions
•A clear bottom free of rocks, corals, excessive
seaweeds, etc
Organize a kitesurfing area
•A take off area
•A water entry area
•A landing area
punctures.
•������������������������������������������������������
Always use the largest nozzle size possible. The back
draft valve can be damaged if the nozzle is inserted
too far.
•When pumping up a kite for its first time, make
sure the inner bladder is filling up all corners of the
strut. If not, see strut bladder replacement section.
2. Select an area free of obstruction, the same or larger
than the span of your kite. Avoid areas with sharp
objects (thorns, sharp stick, etc).
3. Starting on one wing tip weigh tip with sand and
unroll kite downwind. Inflate ribs starting from upwind
end and work your way downwind. [1]
Assembly of kite
1. Inflation: Before you inflate your kite make sure
you have a suitable “anchor” to weigh down your kite
(sand, fine gravel, weight bag, etc).
Important
•������������������������������������������������
Before inserting pump nipple into bladder, make
several pumps to clear nipple of any debris (sand,
stones, etc) Debris in the bladder can cause small
1
7
Inflate the ribs until they assume their shape and are
firm.
Note
•���������������������������������������������������������
The valves have a back draft flap, it is not required to
pinch the valves to retain air pressure.
•�����������������������������������������������������
Make sure plug is secure in valve and held snug with
Velcro closure. �[2]
3a
3b
4. While holding the leading edge remove weight from
wingtip. Work your way to the center of the leading edge
tube. Clip pump onto pump leash��[3a] [3b]
Note
•�������������������������������������������������
Ocean Rodeo kites come with a dual valve system:
one to inflate and one to deflate. �[4]
2
•�����������������������������������������������������
Under inflation of your struts and leading edge tube
will adversely effect the performance of your kite.
Pump until tubes are firm!
4
8
5. Holding kite at center of leading edge rotate so that
kite sits leading edge down and into the wind. Use a
weight (sand, fine gravel, no sharp objects) to weigh
down the leading edge of the kite. �[7]�
Helpful Tip
•��������������������������������������������������
We recommend using a bag that contains sand, fine
gravel, etc for weighting the kite. This reduces your
kite’s exposure to abrasion.
5
•��������������������������������������������������
Insert pump into valve labeled inflate and ensure
exhaust valve is closed. [�5]
•���������������������������������������������������
Inflate leading edge until kite assumes full arced
shape. �[5]
6a
6b
7
•�������������������������������������������������������
When deflating kite use pokers. Gently push into strut
valves to release air. [�6a] [6b]
•Do not store kite with deflate pokers inserted in
valves. This can damage the back draft valve.
9
Punch-UP Kite bar.
Ocean Rodeo “Flat” kites should be used with the
Punch UP kite bar. We recommend you read and
become familiar with the contents of the Punch UP
bar manual in addition to this manual.
Line Lengths And Tuning
All lines must be of equal length when measured from
bar to end of lines with the center line un-cleated and
fully extended. With all lines equal the kite will perform
well and look like the kite pictured.
Note Wingtips are parallel.
The increased de-power of the flat kite design can only
be realized when used with a bar that offers excessive
sheeting control as offered by the
Punch UP Bar.
For up-to-date information on this bar
please visit: www.OceanRodeo.com/
PunchUpBar.html
If the rear lines are shorter than the front lines the
kite will be prone to stalling! It would look like the kite
pictured.
Note Wingtips angle inwards towards rear of kite.
Wingtips Parallel
Wingtips Angled inwards
10
Line length can affect turning and power of kite.
Optimum line lengths are 15m to 35m. Shorter lines
increase kite turn response but reduce the power
window of the kite. Conversely, longer lines decrease
turn response but increase the power window of the
kite.
Note The bridles and longer leader lines on flat style
kites will make your total line length longer. E.g.,
Combined 3m bridle and leader line length plus 24 m
lines = 27m
Line Managment
Kite line management is a very personal thing. Stored
incorrectly they can cause hours of frustration in
tangles. Attached to the kite incorrectly they can create
a dangerous situation for you and others. Develop a line
storage strategy that works for you and do it the same
way every time!
Here’s what works for us:
•Don’t be a kook! Have your kite pumped up and
your drysuit on (if required) before laying out your
lines! Be considerate of others and recognize that
tangles and confusion can result from lines left unattended!
•�����������������������������������������������������
Place the loose end of your lines near the center of
the leading edge tube
•���������������������������������
Unwind your lines walking upwind
•����������������������������������������������������
Identify lines at bar end and work your way down to
the kite separating the lines
•��������������������������������������������������
Before attaching any lines to the kite physically
separate the left front and rear, right front and rear.
•��������������������������������������������������������
Lift your kite over the separated lines, leaving enough
line length behind the kite so you do not have to drag
the bar to make contact with the pigtails on the kite.
[8]
•�������������������������������������������������
When storing lines re-wind in a figure 8 pattern
around the bar ends to avoid twisting the line set.
8
11
Helpful Tips
•�����������������������������������������������������
Stand between the front lines and separate the front
and back lines between your fingers
•��������������������������������������������������������
Carefully work your way towards kite. If your lines are
severely twisted, work in short segments starting near
the loose end working away from the bar.
•�������������������������������������������������������
Unwinding lines directly into the wind stops the lines
from twisting together.
•�����������������������������������������������������
Always remove seaweed from lines as it dries and can
cause tangles.
•Be sure there are no knots in your flying lines as
they create a weak point!
Attaching flying lines to
your OR flat kite.
1.Before you attach your lines have your kite pumped
up leading edge down and weighted with sand or
gravel.
2.Your flat kite has two front line attachments and
two back line attachments supported by line bridles,
locate these line attachment points
12
9
•�����������������������������������������������������
Front line attachment pigtails are located about 1/4
of the way up from the wing tip on the leading edge
tube �[9]��
•������������������������������������������������
Rear line attachment lark’s head connectors are
located at the very tip of the leading edge tube �[10]
10
Note Make sure the bridles are free and clear with no
twists and any pulleys are free and clear of debris.
[11]
C
D
4.Your front line attachment has multiple knots on the
pigtail. We recommend the 3rd knot up from the end,
E
PULLEY
towards the kite, as a good all around setting. �[12]�
F
However, micro adjustments can be made on the front
lines to offer more de-power / power depending on
G
wind conditions
I
H
•�������������������������������������������������
Attaching to the 2nd knot up from the end offers
FRONT ATTACH
maximum power (longer front lines)
REAR ATTACH
3.With the front and back attachment points free from
•�����������������������������������������������
Attaching to the 4th knot up offers maximum detheir Velcro storage tabs pull the pigtails / lark’s head
power (shorter front lines)
connectors forward so that the bridles are in clear
view.
A
11
B
12
13
13
15
5.The rear lines connect to the kite with a foolproof
connector that prevents the front and back lines from
being incorrectly attached. ��[13]
•�����������
Remove the
pigtail from
the fool proof
connector and
loop it through
the end of your 14
rear flying line �[14]
•�������������������������������������������������
With the pigtail now attached to your back lines
pass it through the fool proof connector (lark’s head
knot.) Use the second knot up from the end. �[15]
6.Make a final inspection of your bar system.
Important If you are using an Ocean Rodeo Punch
UP bar with your flat kite make sure your Punch UP
stopper is in “free ride mode” with the thumb screw
complelely backed off and the upper stopper pushed
above the internal line plug. This will allow the bar to
freely slide up the front lines and de-power the kite in
the event of a gust during launch. �[16]
14
Launching Your Flat Kite
Assisted Launch
Never let a person unfamiliar with handling a power
kite launch your kite! The ideal launching assistant is
another kiter!
Find a wide open area with steady wind and easy
access to the water. Make sure there are no power lines,
trees, logs, boulders, cars, people or other obstructions
down wind or within your wind window before launching
your kite.
In preparing to launch the kite the lines should be 90
degrees to the wind direction with the leading edge
17
18
facing the wind. The trim line on the bar should be set
to reduce the power during launching. (Sheeted in) �[17]
Give your launching partner slack in the lines to allow
easy positioning of the kite at the edge of the wind
window. Once he is in position take a few steps back to
put some tension on the lines.
At this time do a visual check to ensure your bridles
and lines are tangle free and attached to your kite
correctly. Ensure your bar is in “free ride mode”
giving you the ability to achieve maximum de-power!
[18] [19]
19
15
20
If all is clear signal to your partner to let go and
SLOWLY raise your kite. Get into the water as quickly as
possible.��[20]�
Tip If you are on the beach never position your kite
where you would not want to go. If a gust hits you want
to be pulled in the direction of the water.
Water Re-Launch
If the kite lands leading edge down in the water you
must bring the kite to the edge of the window. To
achieve this first determine which direction you want
your kite to re-launch.
•����������������������������������������������������
If you want the kite to go to your left pull on the
right side of the bar and grab the right outside
16
leader line and pull it towards you.
Note You may have to pull a couple of meters of
leader line to make the kite roll up on its wing tip.
•�����������������������������������������������������
Once the kite is on its wingtip continue to hold the
leader line as the kite moves to the edge of the
window.
•����������������������������������������������������
When the kite is ready to launch slowly release the
outside leader line, place both hands back on the
bar and fly the kite to neutral. You are now ready to
go!
1
3
2
4
Note If you decide to launch the kite to the right carry
out this procedure on the left side of the bar.
opposite outside line to complete the rotation. This is
not an easy technique and requires practice. To make
this technique work you must be aggressive with your
leader lines.
Note When pulling leader lines avoid line tangles on
your body and equipment!
If the kite lands leading edge towards you pull in as
much outside line as you can until the kite starts to
turn around. Once the kite starts to rotate pull the
TOPVIEW
1
2
3
4
5
17
Landing Your Ocean Rodeo
Flat Kite
Never let a person unfamiliar with power kites land
your kite! A kite grabbed by the trailing edge while
landing can send the kite back through the power
zone!!
Assisted Landing
It is always best to have a fellow kiteboarder help with
landing your kite. Be prepared before your landing.
Ready yourself with your release systems in the event of
your partner losing their grip on the kite and sending it
back into the sky.
Fly the kite to the edge of the window and have your
partner catch the kite by grabbing onto the leading
edge. As soon as possible unhook from the chicken
loop.
Self Landing
If you have no helper available you can land your kite
18
by use of a front line re-ride leash. Ease your kite into
the water at the edge of the window, unhook and let the
bar go. The kite will de-power and swing down wind on
the front line leash, so make sure there are no people or
obstructions at least 2 line lengths down wind of you.
Note Do not use rear line re-ride systems on Ocean
Rodeo flat kites as the kite can spin with force before
setting down
KITE CARE AND MAINTENANCE
Kite care and maintenance
Proper care and maintenance will provide you with
many years of enjoyment from your Ocean Rodeo kite.
Important things to remember include:
•Keep your kite out of the sun when not in use
•Deflate the leading edge and roll the kite when left on
the beach to eliminate flutter damage
•Dry the kite after using, as failure to do so can cause
mildew and color bleeding
•Rinse the kite with fresh water after extended salt
water use
•Check on the inside of the leading edge tube (where
the body material sews on) for rocks, etc
•Inspect the kite regularly for small tears, loose
stitching and general wear, and have repaired as
soon as possible
•Beware of heat in vehicles if storing your kite with
struts inflated
20
Strut bladder removal
1Lay the kite out in a clean, non-windy area
2Recruit a friend or get a couple of weights (sandbags,
heavy books, etc)
3Attach a line that is approximately 1.5 times as long
as the strut to the valves [1]
(use a larks head)
4Push the valve inside the strut [2]
5AOpen the velcro at end of tube [3]
BUndo velcro on white container [4]
CUntuck bladder and container from
the webbing loop on end of tube [5]
6Have a friend hold the valve end of the strut or use a
weight around the area
7Pull out the bladder and remove the line from the
valve (leave it threaded in the strut housing) �[6]
1
2
3
4
5
6
21
Repairing the bladder
1Inflate the bladder
2Cover the bladder with soapy water using a sponge or
cloth
3Look for any bubbles of air escaping the bladder
4Once the leak has been located mark it with a pen
5Rinse the bladder with clean water and dry with a
towel
6Lightly sand the area with the sandpaper provided in
the repair kit
7Apply the peel and stick patch — press firmly
8Place the bladder in a plastic bag containing talc
powder and shake it until the bladder
is completely covered. This will help to slide bladder
back into kite.
Strut bladder
replacement
1Lay the bladder out flat with the valve side up
2Re-attach the line protruding from the trailing edge
22
of the strut to the valve [7]
3Gently feed the front of the bladder and the valve into
the strut [8]
4Have a friend hold the trailing edge of the strut (or
use a weight) while you pull the bladder back into the
strut with the line through the valve opening
5Make sure the valve is seated properly in the opening
and disconnect the line [9]
6ASlide the white bladder end container over end
of bladder until there is about 3/4 of an inch of
bladder extending past the end of the container
[10].
BFeed the container and bladder back through
webbing loop on the tube end [11].
CFold container over to re-attach the Velcro [12].
DTuck bladder and container back into tube [13].
EClose end cover making sure that the material flap
and Velcro are correctly seated [14].
7Partially inflate the bladder and check to make sure it
is not twisted
8Deflate the bladder and “spank” the front end by the
valve to seat the bladder into
the front of the strut
7
8
9
10
11
12
23
Leading edge bladder removal
1Get two lines each approximately 2/3 the length of the leading edge tube
2Open the Velcro at the tip of both ends of the LE tube. Gently pull a bit
of the bladder out and tie one line each to the 2 ends of the bladder [15]
3Have a friend hold the wingtip (or use weight)
4Gently push the two valves into the leading edge tube [16]
5Open the zipper and gently remove the bladder [17]
6Disconnect the lines from the bladder but be sure to leave them
threaded in the LE tube.
13
14
24
7(see Bladder Repairs above)
15
16
17
Leading edge bladder replacement
1���������������������������������
Lay the bladder out valve side up
2�����������������������������������������������������
Have a friend hold the middle of the leading edge by
the valve openings (or use weight)
3����������������������������������������������������
Re-attach the line ends to the ends of the repaired
bladder
4�������������������������������������������������������
Use the lines to gently pull the bladder back into the
leading edge tube making sure there are no twists in
the bladder and that the valves line up with the valve
hole openings
5������������������������������������������������������
Close the LE tube ends by closing the Velcro opening.
Be sure no bladder material is caught in the folded
back LE Tube material
25
Warranty
All standard Ocean Rodeo products are covered by a
One Year Warranty offered to the original purchaser on
workmanship, with a One Year Warranty on materials.
Warranty is limited to the repair or replacement of
Ocean Rodeo product at our option. The warranty
does not cover damage caused by normal wear and
tear, fading, misuse or negligence, but not limited
to punctures, sun exposure, seam failure due to over
inflation, damage in the sun, damage caused by use in
waves or shore break and damage caused by anything
other than defects in material and workmanship.
This warranty is invalid if unauthorized repairs have
been carried out. Repairs or alterations not covered by
warranty will be billed to the customer. Factory seconds
and clear out products sold at a discount carry no
warranty.
26
Warranty Registration No.
Name
Age
Sex
Address
City
State/Province
Country
Postal Code/Zip
Email
Store Name
Date of Purchase
What is your product primarily used for?
Male
Female
Kiteboarding
Surfing
Snowboarding
Wakeboarding
Landboarding
Paddlesports
Dealer
Internet
Friend
Television
Trade Show
Magazine Ad/Article
What is your other favorite sport?
Skiing
Hangliding
Windsurfing
Snowboarding
Climbing
Mountain Biking
Why did you purchase from Ocean Rodeo?
Quality
Availability
Fit
Price
Design/Style
Reputation
How did you hear about Ocean Rodeo?
Please write any other comments or questions you may have
Other
Surfing
Wakeboarding
27